처음 이머시브 스프린트를 시작할 때는 TIL을 매일매일 쓰자...! 라고 다짐했지만 5주가 지난 지금을 보면 매주 1개? 2개 쓰고 있다. 변명을 하면 바쁘다 ㅠㅠ 매일 하루 쓰는 것을 우습게 생각했던 내 자신이 우습다. 그래도
블로깅 끊기지 않게 계속 합시다~
Introduction
- 클라이언트와 서버 코드를 모두 짜본 나에게 이제 두려울 것은 없다 라고 생각했었다. 리액트를 만나기
전까지... - 이번 스프린트의 주 목적은 React 라는 component 기반 라이브러리를 사용해 YouTube API를 받아와 영상을 플레이 시키는 프로그램을 짜는 것이다.
- 이 전 포스팅인 리액트의 12가지 main concept를 정리한 내용들을 실제로 코드를 짜서 구현해 보았다.
Process
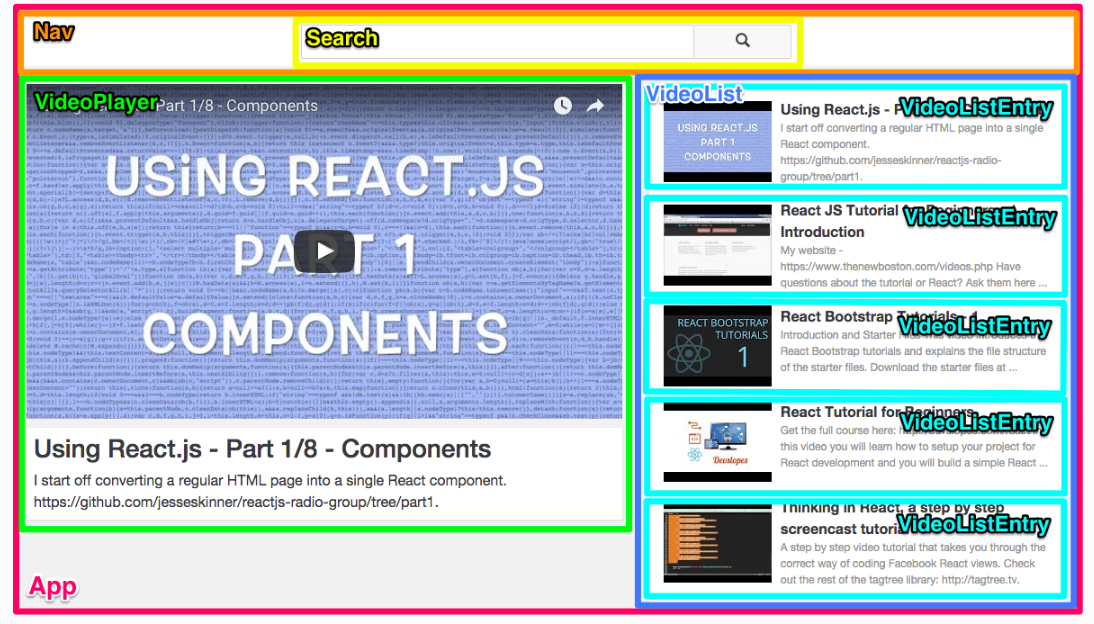
- 먼저, git repo를 클론 받아 코드를 열어보니 이미 어느 정도 css 디자인이 완성돼 있었고 필요한 component 항목들도 만들어져 있었다. 현재 이 리뷰를 작성할 시점에서는 이미 +알파 부분까지 완성했음으로 리뷰는 작성한 모든 코드들을 대상으로 할 것이다.
- 실제로 페어할 때는 다이어그램부터 시작하지 않았지만 리뷰를 정리하는 시점에서는 다이어그램으로 시작하는게 내가 편할 것 같다.
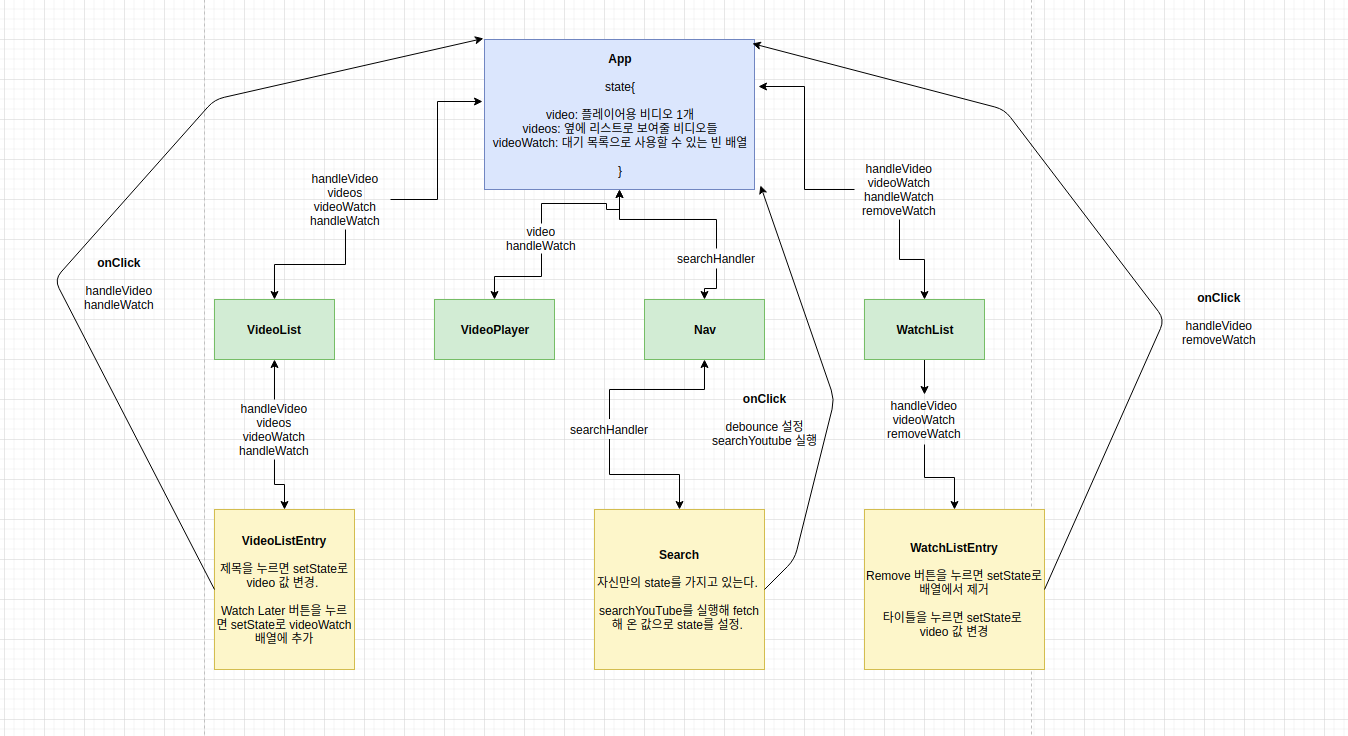
위 다이어그램은 이번 스프린트의 흐름을 정리해 놓은 그림이다. App이라는 source of truth에서 state안에 있는 내용과 또 안에 작성되어 있는 setState가 가능한 함수들을 이제 필요한 component들에게 내려준다. 자신만의 state를 설정해주어야 하는 component들은 class 로 짜고, 아닌 것들은 functional로 짠다. 사실 이 순서만 잘 기억하고 어떤 함수가 필요해 state를 바꾸어줘야 하는지, 무엇을 props로 내려줘야 하는지 잘 정리만 하면 그렇게 막 어렵진 않다. 하지만 처음은 막막했다. 지금은 다 했으니까 ㅋㅋㅋㅋㅋ

Components
자 이제 본격적으로 시작하기 전, npm 을 설치해 주고, 또 React Developer Tools 크롬 확장기능을 설치한다.
일단 sprint 순서는 =>
1. VideoList 와 VideoListEntry
2. VideoPlayer
3. Nav 와 Search (Use YouTube API Key)
4. 실시간 검색과 debounce 구현
5. WatchList 와 WatchListEntry
6. Use Local Storage
기억해야 할건 각 component들을 만들면서 끊임없이 App.js 에 내용을 추가해주고 확인해줘야 한다. 아래 component들에 필요한 내용은 App에서 만들어서 내려줘야 하기 때문이다!
VideoList
먼저 이 컴포넌트들은 처음 딱 페이지가 렌더 됐을 때 옆에 나오는 동영상 목록을 보여주는 component들이다. VideoListEntry 가 영상 하나, 타이틀과 description을 담당하고 VideoList는 그것을 다 묶어서 정리한다.
import React from "react";
import VideoListEntry from "./VideoListEntry";

// 실제 API를 쓰게 되면 이 fakeData는 더이상 import 하지 않아야 합니다.

const VideoList = props => (
  <div className="video-list media">
    {props.videos.map(data => (
      <VideoListEntry
        handleVideo={props.handleVideo}
        key={data.id.videoId}
        video={data}
        handleWatch={props.handleWatch}
      />
    ))}
  </div>
);

export default VideoList;
-
먼저 App.js 에서 첫단계로 내려오는 VideoList.js를 보면 일단 props를 받아와 VideoListEntry에 필요한 부분들을 넘겨주는 것을 볼 수 있다. 여기서 사용되는 videos는 App.js에서 내려다주는, state안에 있는 videos 이다.
-
videos는 5개의 객체를 가진 하나의 배열로 VideoList에서는 map을 통해 각 객체를 VideoListEntry안으로 넣어줘서 각 영상마다 VideoListEntry 컴포넌트를 실행시킬 수 있도록 한다.
-
handleVideo는 App.js에서 만든 영상 타이틀을 클릭하면 App.js의 state에 있는 video를 변경시켜주어 videoPlayer가 사용할 state의 video 값을 변경시켜 주는 함수이다.
-
handleWatch는 버튼을 클릭시, state의 videoWatch 배열에 이 데이터를 추가시켜주는 함수이다.
-
Video라는 넘겨주는 항목은 배열의 data를 넘겨주기 위해 만든 것이다. Key는 무슨 요소에 변화가 있었는지 더 쉽게 알기 위해 넣어주는 값이다. 전체적인 함수와는 무관하다.
-
요약하자면, VideoList는 배열 속 5 개 객체에 각각 VideoListEntry를 실행시켜 각 영상에 필요한 부분들을
조립한다.
VideoListEntry
import React from "react";

const VideoListEntry = (props) => {

  const { video, handleVideo, handleWatch} = props;
  const snippet = video.snippet;
  return (
    <div className="video-list-entry">
      <div className="media-left media-middle">
        <img
          className="media-object"
          src={snippet.thumbnails.high.url}
          alt=""
        />
      </div>
      <div className="media-body">
        <div onClick={() => handleVideo(video)} className="video-list-entry-title">
          {snippet.title}
        </div>
        <div className="video-list-entry-detail">{snippet.description}</div>
        <button onClick={() =>handleWatch(video)} className="watchButton">Watch Later</button>
      </div>
    </div>
  );
};

export default VideoListEntry;- VideoListEntry는 App.js에서 내려오는 props를 또 VideoList를 통해 받아 video, HandleVideo와 handleWatch를 받는다. video는 영상 하나의 정보를 담은 데이터, handleVideo는 클릭 시 플레이가 되게 하는 함수, handleWatch는 버튼 클릭시 App.js에 있는 state의 videoWatch 배열에 현재 Data를 추가해준다.
이미지 디스플레이가 필요한 부분은 snippet.thumbnails.high.url로 첨부해주고 함수 부분은 onClick을 화살표 함수로 실행해준다.
Nav and Search
import React from 'react';
import Search from './Search';

const Nav = ({ searchHandler }) => (
  <nav className="navbar">
    <div className="col-md-6 col-md-offset-3">
      <Search searchHandler={searchHandler}/>
    </div>
  </nav>
);

export default Nav;
- Nav 부분은 생각보다 간단하다. App.js의 searchHandler 함수를 받아와 자신 보다 아래 있는 Search에 넘겨주기만 하면 된다. 통로? 처럼 생각하면 된다. searchHandler는 실행 시 인자로 들어오는 item을 App.js의 state에 있는 videos 값으로 바꾸어준다.
import React from "react";
import searchYouTube from "../searchYouTube";

class Search extends React.Component {
  constructor(props) {
    super(props)
    this.state = {
      value: '',
      count: 0 //검색 남용 방지
    }
    this.handleClick = this.handleClick.bind(this);
  }

  componentDidMount() {
    setInterval(
      () => this.setState({count: 0}),
      5000
    );
  }

  handleClick() {
    const { value, count } = this.state;

    if (count > 3) {
      alert('적당히 하세요');
      return ;
    }

    if (value.length === 0) {
      alert('입력을 해야지');
      return ;
    }

    const { searchHandler } = this.props;

    this.setState({count: count + 1});
    searchYouTube({query: value}, searchHandler);
  }

  handleChange(e) {
    const value = e.target.value;
    const { searchHandler } = this.props;
    if (value.length > 3){
    this.setState({value});
    searchYouTube({query: value}, searchHandler)
    }
  }

  render() {
    return (
      <div className="search-bar form-inline">
        <input className="form-control" type="text" onChange={(e) => this.handleChange(e)}/>
        <button className="btn hidden-sm-down" onClick={this.handleClick}>
          <span className="glyphicon glyphicon-search"></span>
        </button>
      </div>
    );
  }
}

export default Search;
- Search 컴포넌트는 자신만의 local state를 가져야 해서 class로 함수를 만들어준다. 그렇다고 App.js에서 내려오는 props를 아예 안쓰는 것은 아니고, 아까 넘겨준 searchHandler를 사용해준다.
실시간 검색, Debounce
- Search 안에 있는 handleClick함수는 서치 버튼을 눌렀을 때 사용자가 너무 빨리 검색 버튼을 남발하지 않도록 제한해주고 또 입력값이 있을 경우 검색을 할 수 있게 해주는 함수이다. onClick때 실행된다.
- handleChange함수는 실시간 검색을 구현하기 위해, 검색 값이 3자가 넘었을 때 부터 검색을 실행해준다. onChange일때 실행된다.
- App.js 에서 props로 내려받는 searchHandler는 들어오는 인자로 this.state.videos의 값을 바꾸어주는 함수이다. 그렇다면 이 함수를 어떻게 사용할까? searchYouTube을 통해서이다.
import YOUTUBE_API_KEY from "../config/youtube";

const searchYouTube = ({ query, max = 5, key = YOUTUBE_API_KEY }, callback) => {
  return fetch(`https://www.googleapis.com/youtube/v3/search?part=snippet&q=
  ${query}&maxResults=${max}&key=${key}&type=video`)
  .then(response => response.json())
  .then(json => callback(json.items))

};- searchYouTube은 유툽 API 키를 통해 영상 정보를 받아오는 함수로 fetch를 통해 정보를 가져온다. query안의 들어가는 값이 검색어인데 이 함수를 실행하면 마지막에는 그 정보들을 반환한다. searchYouTube의 마지막 인자로는 callback함수를 실행가능하다.
이 부분을 이용한다!
this.setState({value});
    searchYouTube({query: value}, searchHandler)
}- search안의 이 함수는 검색어를 search안의 state안에 있는 value의 값을 value로 바꾸어 주고, query 값을 그 value(검색어)로 넣어 실행 시킨후, fetch 받아 온 값을 searchHandler의 인자로 넣어서 실행시킨다.
- searchHandler가 실행되며 유툽에서 받아온 정보는 App.js 의 state안에 있는 videos의 새로운 값이 된다.
WatchList 와 WatchListEntry
- WatchList와 WatchListEntry는 정말 VideoList와 VideoListEntry와 유사하다. 진짜 똑같다..
import React from "react";
import WatchListEntry from "./WatchListEntry";

// 실제 API를 쓰게 되면 이 fakeData는 더이상 import 하지 않아야 합니다.

const WatchList = props => (
  <div className="watch-list watchmedia">
    {props.videoWatch.map(data => (
      <WatchListEntry
        handleVideo={props.handleVideo}
        key={data.id.videoId}
        video={data}
        removeWatch={props.removeWatch}
      />
    ))}
  </div>
);

export default WatchList;- map을 통해서 들어오는 데이터 마다 WatchListEntry를 실행시켜준다. 여기서 사용하는 videoWatch는 App.js이 state에 있는, Watch Later 버튼을 누를 때마다 추가해준 그 배열을 사용한다.
import React from "react";

const WatchListEntry = ({video, handleVideo, removeWatch}) => {
  const snippet = video.snippet;

  return (
    <div className="watch-list-entry">
      <div className="media-left media-middle">
        <img
          className="media-object"
          src={snippet.thumbnails.high.url}
          alt=""
        />
      </div>
      <div className="media-body">
        <div onClick={() => handleVideo(video)} className="video-list-entry-title">
          {snippet.title}
        </div>
        <div className="video-list-entry-detail">{snippet.description}</div>
        <button onClick={() => removeWatch(video)} className="watchButton">Remove</button>
      </div>
    </div>
  );
};

export default WatchListEntry;
- WatchList는 App.js의 Props에서 video(배열의 각 객체), handleVideo(클릭시 영상 재생을 위한 setState)그리고 removeWatch(클릭 시 videoWatch 배열에서 해당 객체 제거)를 내려 받는다.
- 비디오 리스트엔트리 컴포넌트랑 진짜 똑같다. WatchLater 부분이 removeWatch로 바뀐점 말고는...
App.js 와 Local Storage
- 이제 마지막으로 진실의 원천인 App.js 와 그 속에서 사용한 local storage를 본다.
import React from "react";
import Nav from "./Nav";
import VideoPlayer from "./VideoPlayer";
import VideoList from "./VideoList";
import WatchList from "./WatchList";

import searchYouTube from "../searchYouTube";

class App extends React.Component {
  constructor(props) {
    super(props);
    this.handleVideo = this.handleVideo.bind(this);
    this.searchHandler = this.searchHandler.bind(this);
    this.handleWatch = this.handleWatch.bind(this);
    this.removeWatch = this.removeWatch.bind(this);
    this.saveData = this.saveData.bind(this);
    this.state = {
      video: "",
      videos: {},
      videoWatch: []
    };
  }

  componentDidMount(){
    searchYouTube({query: "izone"}, this.setInitial.bind(this))

    if (JSON.parse(localStorage.getItem("list") !== null)) {
    this.setState({
      videoWatch: JSON.parse(localStorage.getItem("list"))
    })
    }
  }

  saveData(){
    if (this.state.videoWatch.length === 0){
      localStorage.clear()
      return;
    }
    else{
    localStorage.setItem('list', JSON.stringify(this.state.videoWatch))
    }
  }

  setInitial(item){
    this.setState({
      video: item[0],
      videos: item
    })
  }

  handleVideo(item) {
    this.setState({
      video: item
    });
  }

  searchHandler(items) {
    this.setState({
      videos: items
    })
  }

  handleWatch(items) {
    if (this.state.videoWatch.includes(items)){
      return;
    }
    else{
    this.setState({
      videoWatch: this.state.videoWatch.concat(items)
    }, () => this.saveData())
  }
  }

  removeWatch(item) {
    this.setState({
      videoWatch: this.state.videoWatch.filter(element => element !== item)
    }, () => this.saveData())
  }

  render() {
    if (this.state.video.length === 0){
      return (<h1>loading</h1>)
    }
    return (
      <div>
        <Nav searchHandler={this.searchHandler}/>
        <div className="col-md-7">
          <VideoPlayer
          video={this.state.video}
          handleWatch={this.handleWatch}
          />
        </div>
        <div className="col-md-5">
          <VideoList
            handleVideo={this.handleVideo}
            videos={this.state.videos}
            videoWatch={this.state.videoWatch}
            handleWatch={this.handleWatch}

          />
        </div>
        <div className="watchlist-title">Watch List</div>
        <div className="watchlist">
          <WatchList
          handleVideo={this.handleVideo}
          videoWatch={this.state.videoWatch}
          removeWatch={this.removeWatch}
          />
        </div>

      </div>
    );
  }
}
export default App;- App.js에서는 처음 constructor 로 필요한 state의 부분 (video, videos, videoWatch)를 만들어준다.
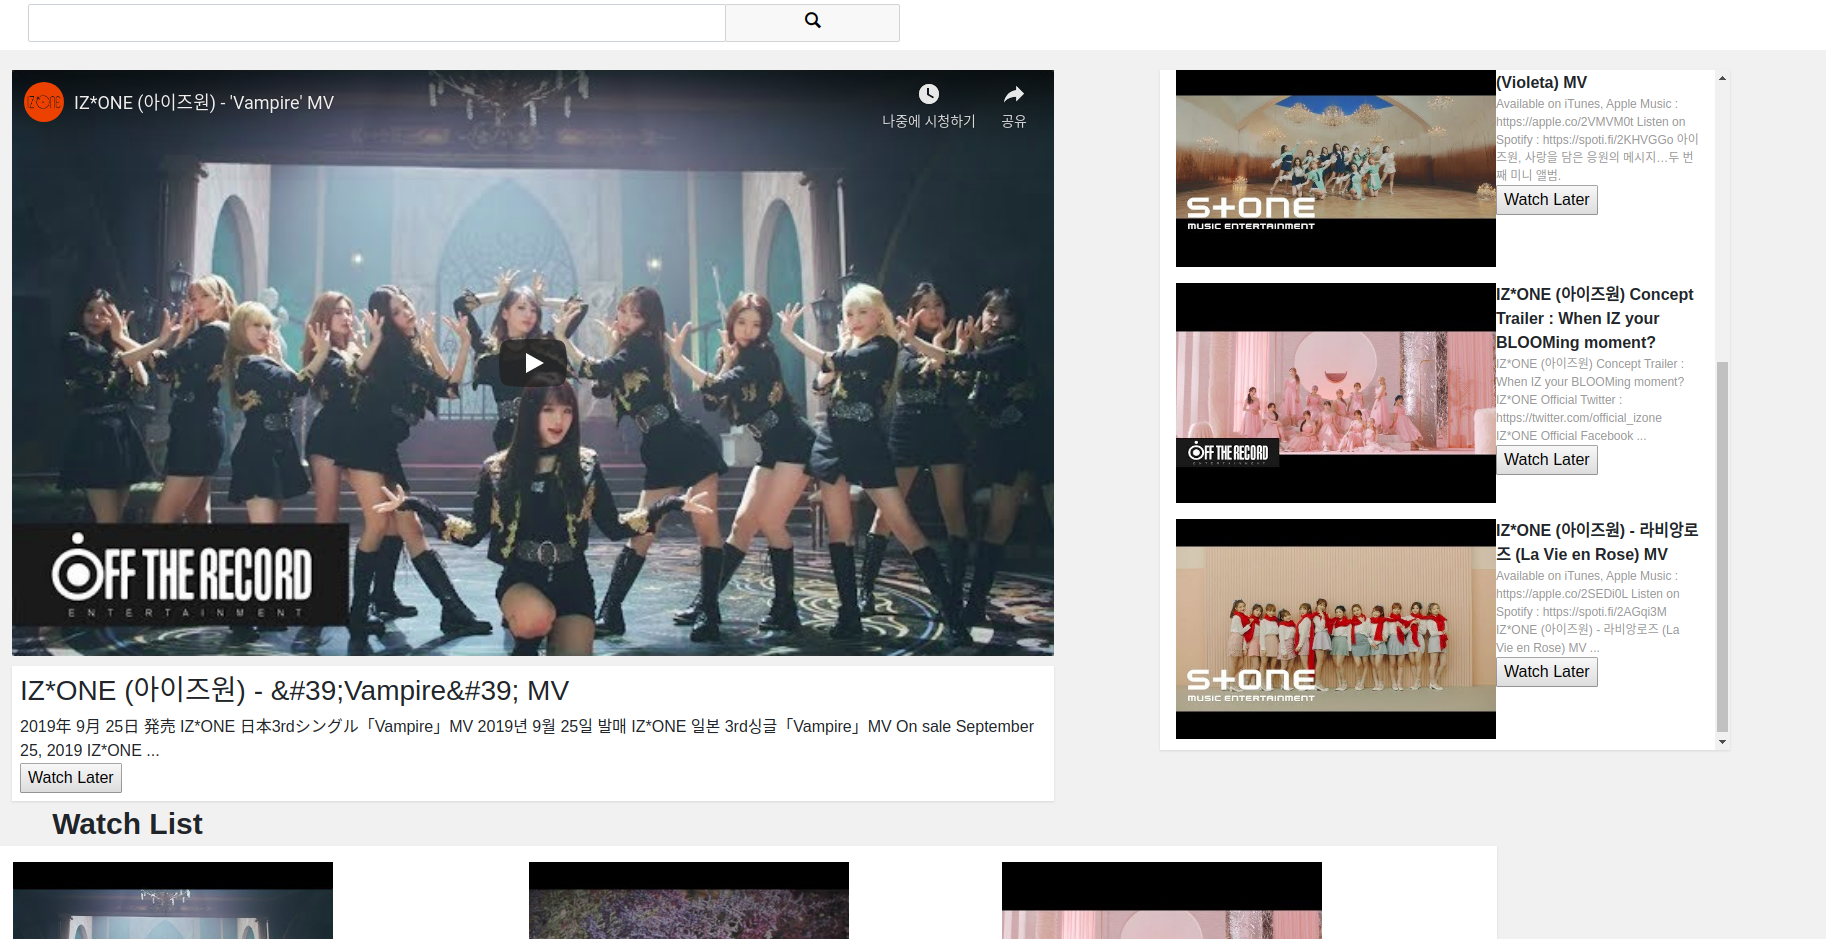
- ComponentdidMount()는 처음 페이지가 렌더될 때 실행되는 함수인데 나는 아이즈원을 검색어로 한 유투브
검색값으로 설정해주어 처음 페이지를 관련 영상으로 채웠다.
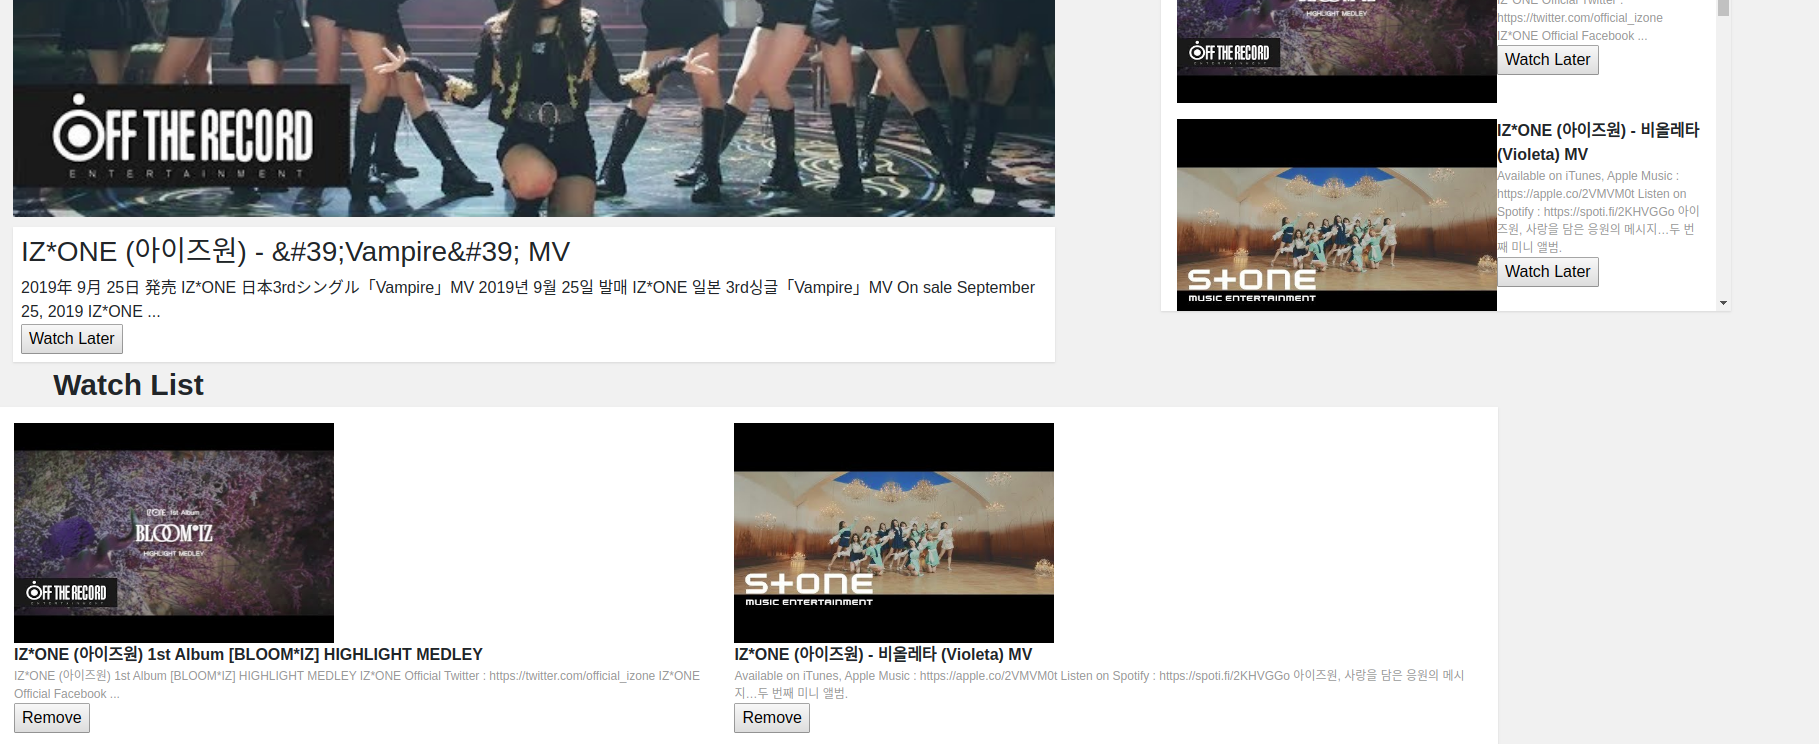
- 여기서 localStorage를 사용하는데 localStorage의 목적은 WatchList안의 내용을 껐다가 키더라도 정보를 가져오는 것이다. 그러면 저장 목록의 영상들은 페이지를 다시 시작해도 남아있다. localStorage.setItem 은 내용을 저장, .getItem은 그 내용을 불러오고, .clear는 로컬 스토리지안의 정보를 삭제한다. ComponentDidMount()안의 두번째 파트는, getItem으로 내용을 불러왔을 때 내용이 있다면 그 내용을 App.js의 state에 있는 videoWatch의 값으로 넣어주어서 Watch List에 로컬 정보를 넣어준다.
- saveData()함수는 App.js의 state 있는 videoWatch의 값을 보고 안에 내용이 있으면 로컬 스토리지에 저장을, 없다면 그냥 원래있던 내용도 리셋해야하니 클리어를 해준다.
- App.js의 render() 부분은 지금까지 있는 모든 부분을 종합해 페이지에 보여준다.
여러가지 종합 후 나오는 결과 값은 =>
Conclusion
- 이번에 리액트라는 기술을 사용해보며 FrontEnd 개발자들이 흔히 사용하는 라이브러리를 나도 사용해 보았다. 확실히 익숙해진다면 편할 것 같다. 일단 props를 계속 내려주니 그 정보만 넙죽 받아서 적용하면 돼 좋았다.
- 스프린트 전체난이도는 할만했다. 페어분도 적극적으로 잘하셨고 또 css와 기본 틀이 다 짜져있어서 안의 내용을 채우면 됐다.
- 하지만 이걸 아예 처음부터 한다면..막막할 것 같다.
- 아이즈원은 언제 컴백하려나....