지금까지 배운 스프린트 리뷰나 블로깅 정리할 때 제목을 TIL로 했는데 사실 TIL은 Today I learned 의 약자로 난 주마다 지금 정리하기 때문에 그렇게 잘 맞지는 않다. TIL을 This Week I learned로 바꿔야 겠다 ㅋㅋㅋㅋ TWIL? TIL? Either works for me!
Introduction
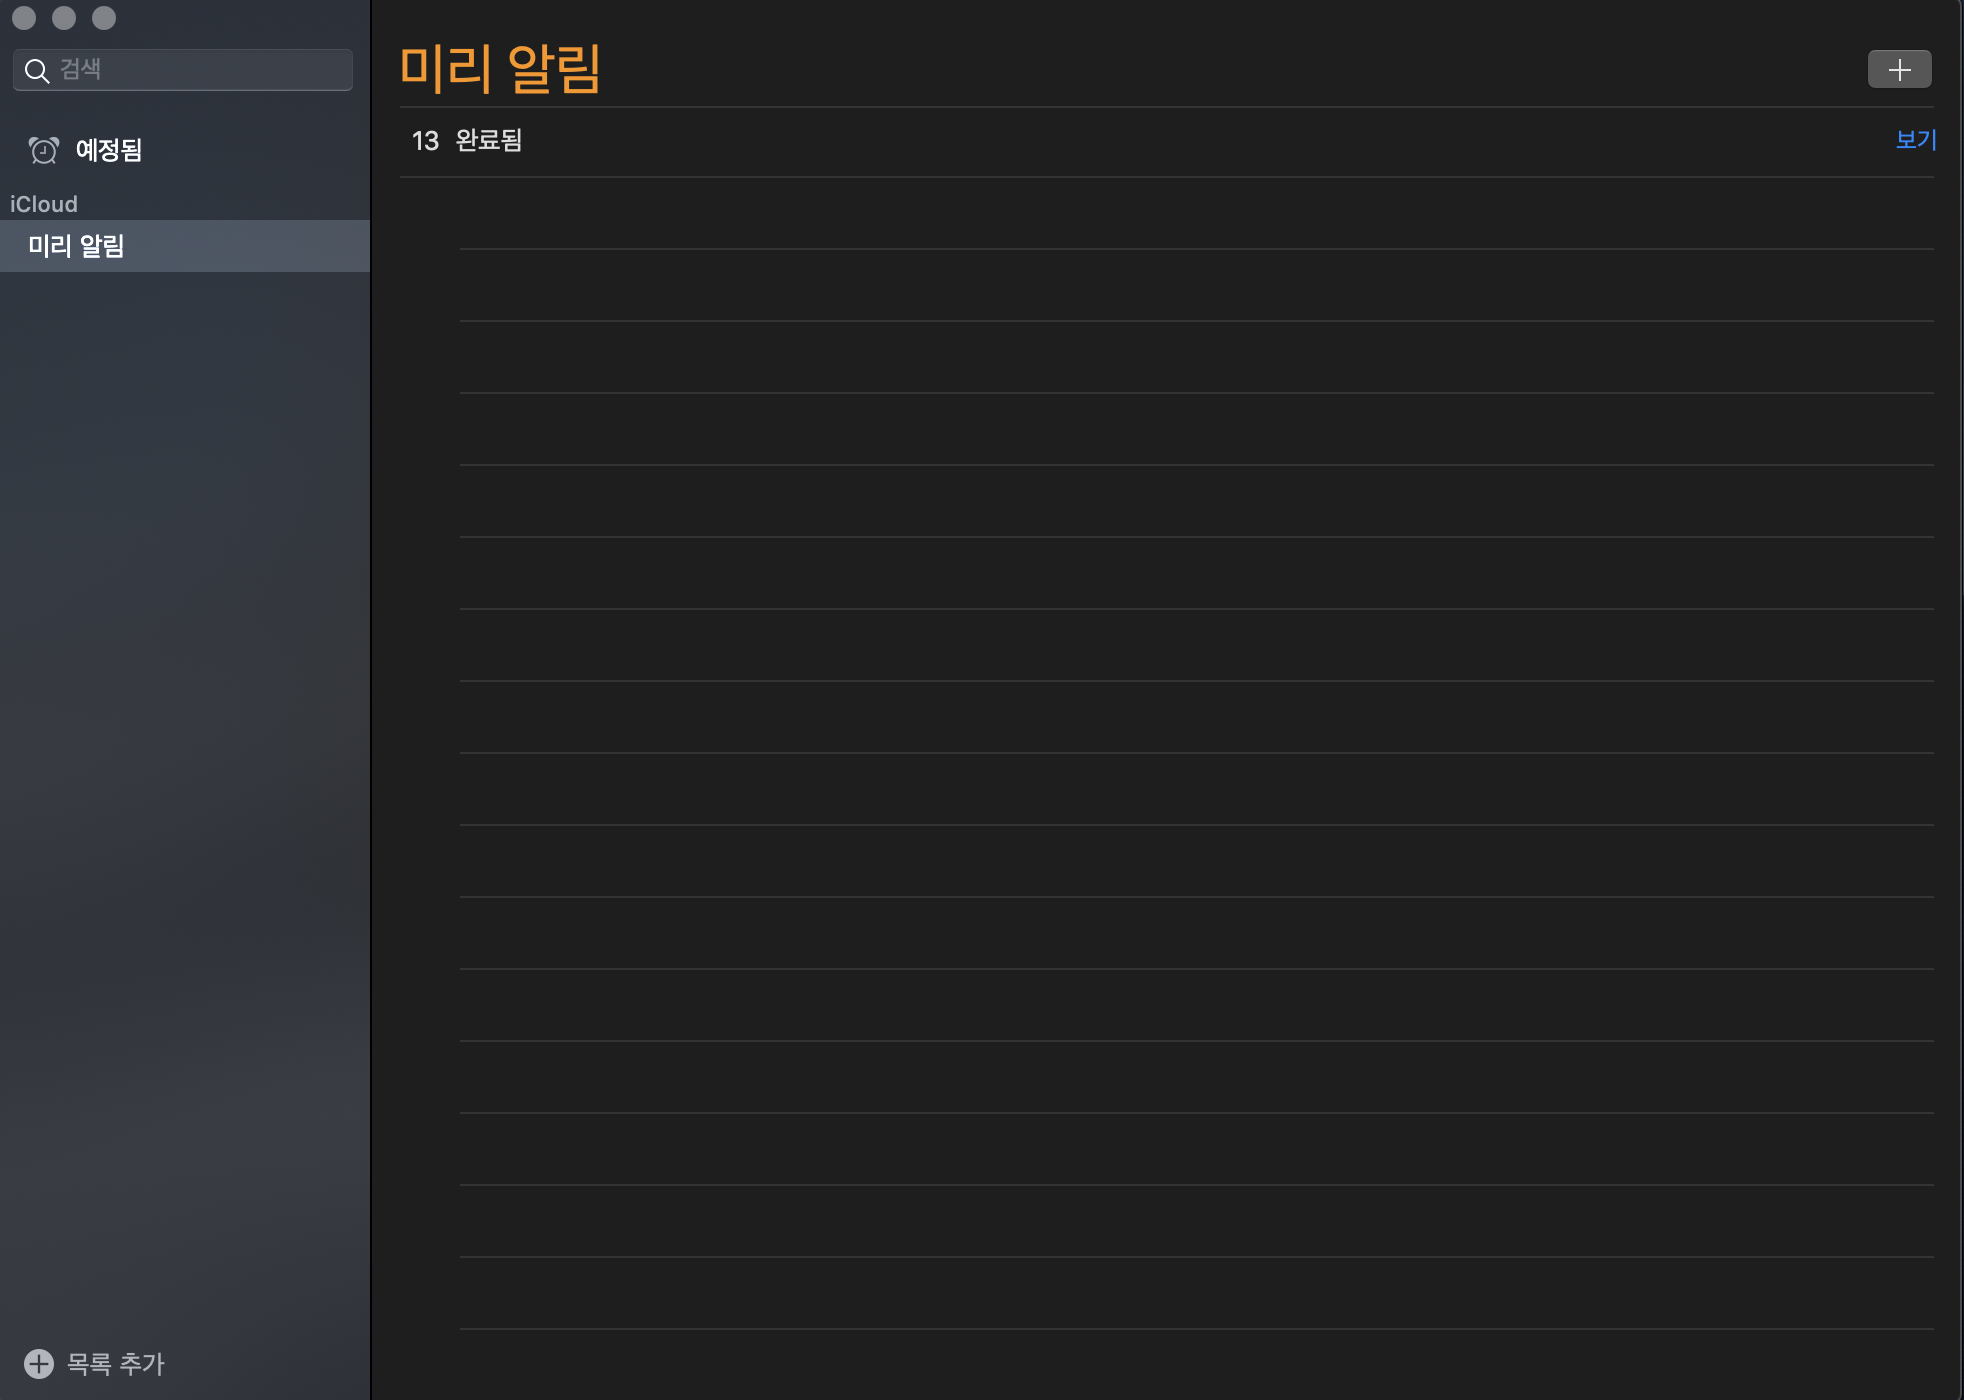
- 저번 시간에 눈물의 첫 리액트 스프린트로 유투브 영상 플레이어를 구현하고 다음으로 해야한 스프린트는 ToDoList라는 어플을 구현해 보는 것이었다. 난 맥북을 가지고 있는게 아니여서 정확히 그 어플이 무엇인지는 몰랐지만, 다행히 이미지가 있어 조금 이해가 됐다.

- 처음으로 백그라운드 없이 혼자 만들어야 했기 때문에, 코드를 짜기 전 정리하는 것이 매우 중요했다. State 와 event 관리, 그리고 Data Control 은 매우 중요하다고 생각해 그것부터 하기로 마음 먹었다.
구현해아 하는 내용은 다음과 같았다.
1. 화면 구성
2. 알림 추가 기능
3. 알림의 완료 여부 표시
4. 알림 그룹(카테고리) 추가
5. 검색 기능 구현
Planning
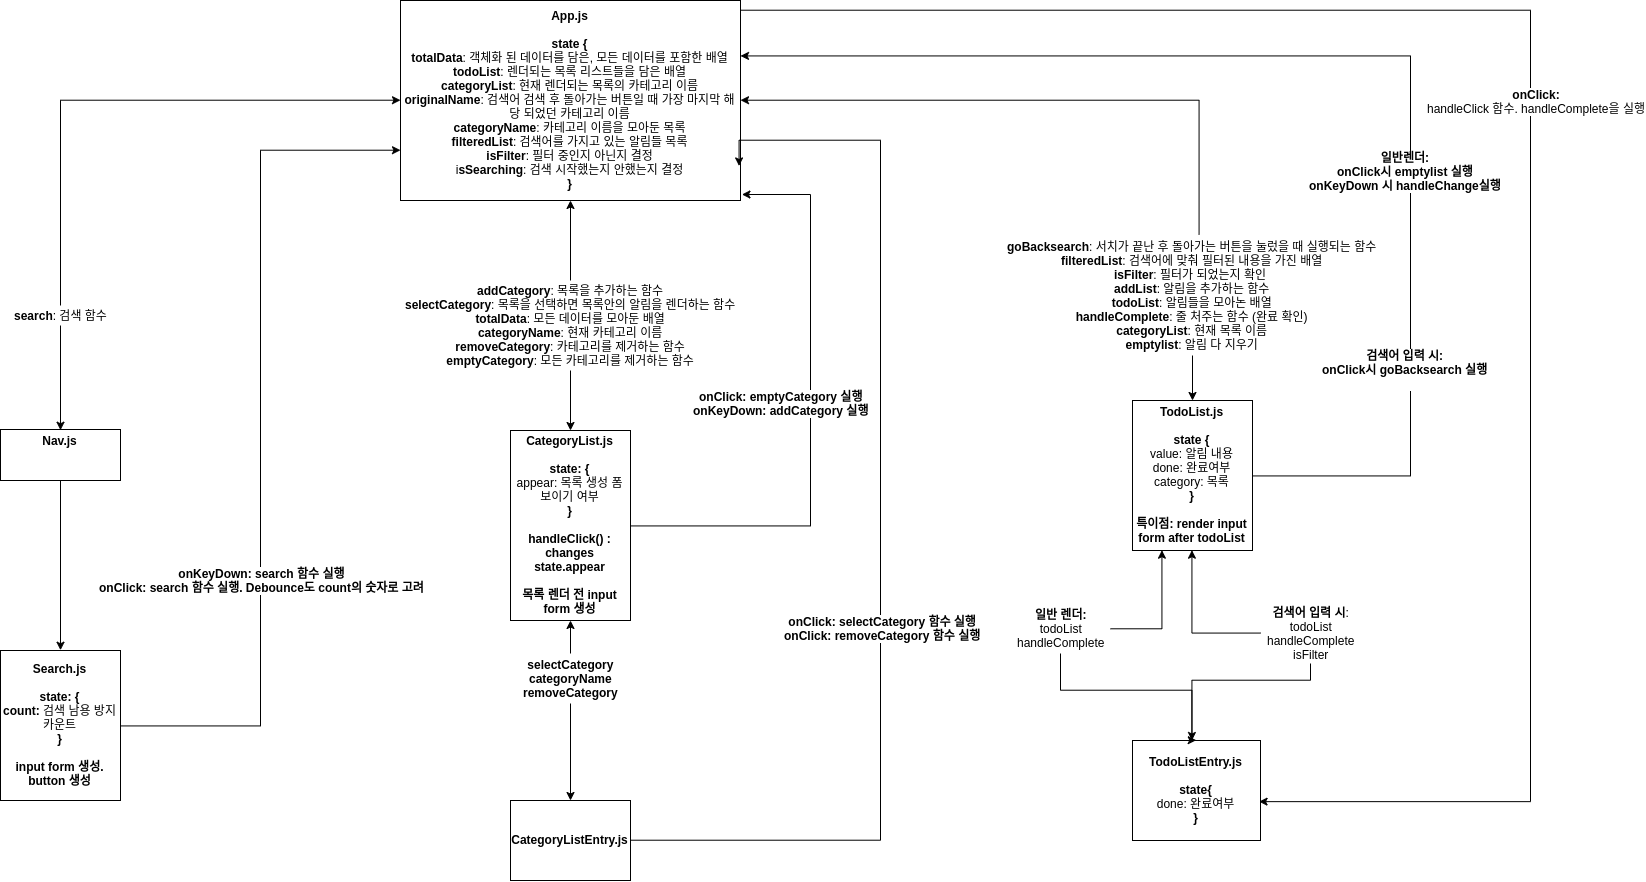
먼저, 무슨 컴포넌트들을, 어떤 state에 넣어서 관리할지를 정리하는게 좋다.

사실 처음에 이 다이어그램을 짤 때, 내용이 이렇게 많지도, detailed하지도 않았다. 하지만 어느정도 짜고 진행을 하면서 내용이 많이 추가되었는데 지금은 스프린트를 모두 마치고 리뷰하는 단계이기 때문에 모든 내용을 지니고 있다. 이 모든 것, state와 event들을 코딩 시작하기 전에 모두 계획한다는 것이 아직 상상이 되지 않는다. 하지만 경험이 쌓이면 가능할 것이라 믿는다.

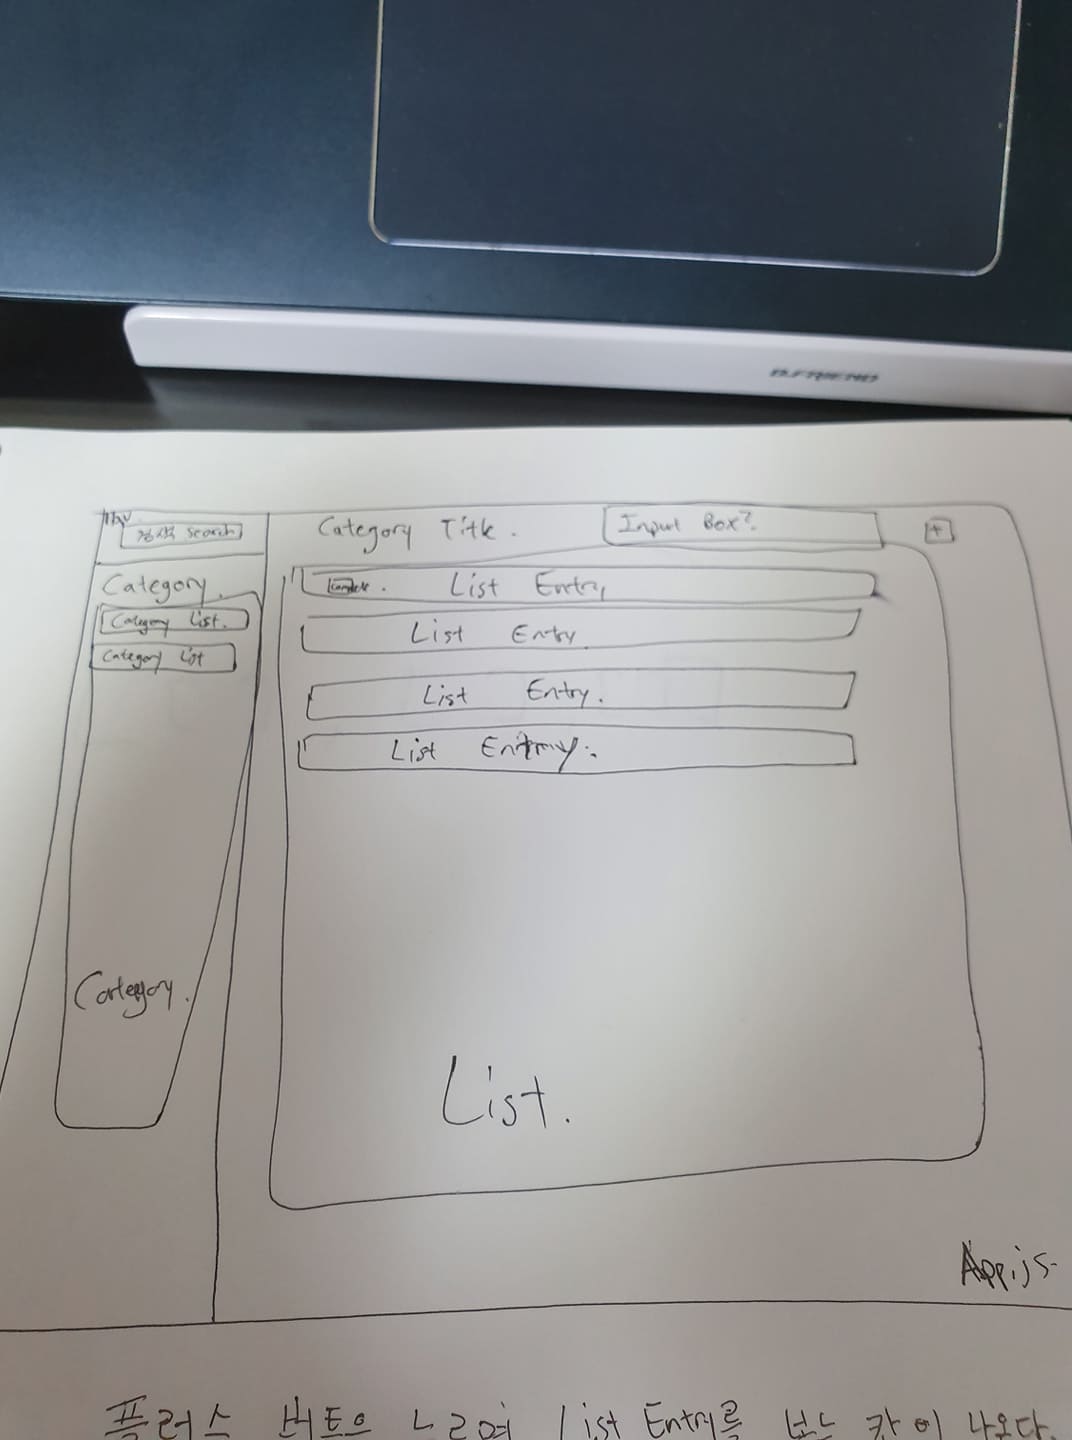
위 사진은, 어떤 구조로 컴포넌트들을 묶고 배치할지 간략하게 정리한 그림이다. 이렇게라도 대충 구조를 잡으니 많은 도움이 됐다. CSS에 많은 시간을 들이진 않았지만 그래도 이렇게 그룹을 잡아야 좋다.
Actual Coding
- 일단 코딩을 한 순서는 App.js를 짠 후, 그 아래 컴포넌트들을 하나하나 짰다.
App.js
import React from "react";
import Nav from "./Nav";
import TodoList from "./TodoList";
import CategoryList from "./CategoryList";

class App extends React.Component {
  constructor(props) {
    super(props);
    this.addList = this.addList.bind(this);
    this.handleComplete = this.handleComplete.bind(this);
    this.addCategory = this.addCategory.bind(this);
    this.selectCategory = this.selectCategory.bind(this);
    this.removeCategory = this.removeCategory.bind(this);
    this.emptylist = this.emptylist.bind(this);
    this.emptyCategory = this.emptyCategory.bind(this);
    this.search = this.search.bind(this);
    this.goBacksearch = this.goBacksearch.bind(this);
    this.state = {
      totalData: [],
      todoList: [],
      categoryList: "미리알림",
      originalName: "",
      categoryName: [],
      filteredList: [],
      isFilter: false,
      isSearching: false
    };
  }
 //서치가 끝난 후 돌아가는 버튼을 눌렀을 때 실행되는 함수
  goBacksearch() {
    this.setState({
      isFilter: false,
      categoryList: this.state.originalName,
      isSearching: false
    });
  }
//검색용 함수. 검색어를 입력하고 버튼을 누르면 실행.
  search(item) {
    if (this.state.isSearching) {
      return;
    }
    const result = [];
    const replaced = this.state.totalData
      .concat(this.state.todoList)
      .map(element => JSON.parse(element));
    for (let element of replaced) {
      if (element.value.includes(item)) {
        result.push(JSON.stringify(element));
      }
    }
    this.setState({
      filteredList: result,
      originalName: this.state.categoryList,
      categoryList: `${item}을 찾은 결과입니다`,
      isFilter: !this.state.isFilter,
      isSearching: !this.state.isSearching
    });
  }

  //카테고리 초기화 용
  emptyCategory() {
    if (this.state.isSearching) {
      return;
    }
    this.setState(
      {
        categoryName: [],
        categoryList: "목록을 넣어주쇼~"
      },
      () => this.emptylist()
    );
  }

  //해야 할 알림 목록들 초기화 용 함수
  emptylist() {
    if (this.state.isSearching) {
      return;
    }
    this.setState({
      todoList: []
    });
  }

  //카테고리 제거용 버튼을 누르면 실행되는 함수
  removeCategory(item) {
    if (this.state.isSearching) {
      return;
    }
    var result = [];
    const replaced = this.state.totalData.map(element => JSON.parse(element));
    for (let element of replaced) {
      if (element.category !== item) {
        result.push(JSON.stringify(element));
      }
    }
    this.setState({
      totalData: this.state.totalData.concat(this.state.todoList)
    });
    this.setState(
      {
        totalData: result,
        categoryName: this.state.categoryName.filter(data => data !== item)
      },
      () => {
        if (this.state.categoryName.length === 0) {
          this.setState({
            categoryList: "뭐 좀 하세요~~",
            todoList: [],
            totalData: []
          });
        }
        if (this.state.categoryList !== item){
          return;
        }
        else {
          const next = this.state.categoryName[this.state.categoryName.length - 1]
          const newResult = this.state.totalData.map(element => JSON.parse(element)).filter(data => data.category === next).map(element => JSON.stringify(element))
          this.setState({
            categoryList: next,
            todoList: newResult
          })
        }
      }
    );
  }

  //카테고리를 선택하면 실행되는 함수
  selectCategory(item) {
    if (this.state.isSearching) {
      return;
    }
    if (item === this.state.categoryList) {
      return;
    }
    var result = [];
    var newresult = [];
    const replaced = this.state.totalData.map(element => JSON.parse(element));
    for (let element of replaced) {
      if (element.category === item) {
        result.push(JSON.stringify(element));
      } else {
        newresult.push(JSON.stringify(element));
      }
    }
    this.setState({
      totalData: newresult.concat(this.state.todoList),
      categoryList: item,
      todoList: result
    });
  }

  //카테고리를 추가하는 함수
  addCategory(item) {
    if (this.state.isSearching) {
      return;
    }
    if (!this.state.categoryName.includes(item)) {
      this.setState({
        totalData: this.state.totalData.concat(this.state.todoList),
        categoryName: this.state.categoryName.concat([item]),
        todoList: [],
        categoryList: item
      });
    } else {
      window.alert("같은 이름의 카테고리는 만들 수 없습니다!");
    }
    return;
  }

  //목록을 추가하는 함수
  addList(item) {
    if (this.state.isSearching) {
      return;
    }
    this.setState({
      todoList: this.state.todoList.concat([item])
    });
  }

  // 누르면 완료 됐는지 안됐는지 보여주는 줄처주기 용.
  handleComplete(e) {
    const replaced = this.state.todoList.map(element => JSON.parse(element));
    for (let element of replaced) {
      if (element.value === e) {
        element.done = !element.done;
      }
    }
    this.setState({
      todoList: replaced.map(element => JSON.stringify(element))
    });
  }

  render() {
    return (
      <div className="start">
        내일 일을 미루지말자
        <div className="main">
          <Nav search={this.search} />
          <div className="col-md-7">
            카테고리
            <CategoryList
              addCategory={this.addCategory}
              selectCategory={this.selectCategory}
              totalData={this.state.totalData}
              categoryName={this.state.categoryName}
              removeCategory={this.removeCategory}
              emptyCategory={this.emptyCategory}
            />
          </div>
          <div className="col-md-5">
            {this.state.categoryList}
            <TodoList
              goBacksearch={this.goBacksearch}
              filteredList={this.state.filteredList}
              isFilter={this.state.isFilter}
              addList={this.addList}
              todoList={this.state.todoList}
              handleComplete={this.handleComplete}
              categoryList={this.state.categoryList}
              emptylist={this.emptylist}
            />
          </div>
        </div>
      </div>
    );
  }
}

// *
// ?
// !

export default App;
- App.js 는 정말 모든 걸 모아둔 가장 상위의 truth 집합소이다. 거의 모든 state와 함수가 여기 있다. 데이터 관리가 가장 고민되는 부분이었는데 일단 배열이 다루기가 쉬워 배열 안의 객체의 방식으로 데이터를 모아두었고 각 component마다 state안의 데이터를 따로 관리해주며 길이가 길더라도 조금 더 깔끔하게 각자 데이터를 사용할 수 있었다고 생각한다.
- 어려웠던 부분은 버그가 계속 발견됐다는 점인데, 그건 일일히 세부적으로 고쳐주면서 버그를 고쳐갔다.
TodoList && TodoListEntry
import React from "react";
import TodoListEntry from "./TodoListEntry";

class TodoList extends React.Component {
  constructor(props) {
    super(props);
    this.state = {
      value: "",
      done: false,
      category: ""
    };
    this.handleChange = this.handleChange.bind(this);
  }

 //엔터를 누르느냐, Escape를 누르느냐에 따라 실행되는 내용이 다르다.
 //엔터는 추가, escape은 아무것도 안한다.
  handleKeyPress(e) {
    if (e.key === "Escape") {
      document.querySelector(".newtoDolist").value = null;
      return;
    }
    if (e.key === "Enter") {
      //엔터일때
      const value = document.querySelector(".newtoDolist").value;
      if (value.length === 0) {
        window.alert("내용을 입력하세요");
        return;
      }
      this.setState({
        category: this.props.categoryList
      });
      this.handleChange();
      document.querySelector(".newtoDolist").value = null;
    }
  }

  //새로 작성된 알림을 전체 목록에 추가.
  handleChange() {
    const value = document.querySelector(".newtoDolist").value;
    this.setState(
      {value},
      () => this.props.addList(JSON.stringify(this.state))
    );
  }

  render() {
    if (!this.props.todoList) {
      return <div>내용을 입력해주세요!</div>;
    }
    //검색어를 입력해서 해당 내용을 담은 함수만 렌더시키기.
    if (this.props.isFilter !== false){
      return (
        <div className="toDo-list-whole">
          <div className="toDo-list media">
            <button onClick={()=> this.props.goBacksearch()}className="isComplete"> 돌아가기 </button>
            <div>
              {
                this.props.filteredList.filter(function(e) {
                  return JSON.parse(e).done === false;
                }).length
              }
              개의 알림 남음
            </div>
            {this.props.filteredList.map(data => (
              <TodoListEntry
                key={this.props.filteredList.indexOf(data)}
                todoList={data}
                handleComplete={this.props.handleComplete}
                isFilter={this.props.isFilter}
              />
            ))}
          </div>
        </div>
      )
    }
    //일반 렌더용
    return (
      <div className="toDo-list-whole">
        <div className="toDo-list media">
          <button onClick={()=> this.props.emptylist()}className="isComplete"> 사라져라 </button>
          <div className="numberofalarm">
            {
              this.props.todoList.filter(function(e) {
                return JSON.parse(e).done === false;
              }).length
            }
            개의 알림 남음
          </div>
          {this.props.todoList.map(data => (
            <TodoListEntry
              key={this.props.todoList.indexOf(data)}
              todoList={data}
              handleComplete={this.props.handleComplete}
            />
          ))}
        </div>
        <input
          placeholder="알림을 입력하세요"
          onKeyDown={e => this.handleKeyPress(e)}
          className="newtoDolist"
          type="text"
        />
      </div>
    );
  }
}

export default TodoList;
- TodoList 같은 경우는 서치를 실행 했을 경우와 안했을 경우 등으로 나누어주었다. 이 Component안에 local state를 설정해 App.js에 있는 totalData라는 모든 데이터를 모아둔 배열에 넘겨줌으로 input form에 작성된 내용을 가장 상위 데이터에 포함시켜 그 바뀐 데이터를 바탕으로 다시 뿌려줄 수 있게 했다. onKeyDown과 onClick도 적절하게 사용했다.
import React from "react";


class TodoListEntry extends React.Component {
  constructor(props) {
    super(props)
    this.state = {
      done: false
    }
    this.handleClick = this.handleClick.bind(this);
  }

  // 누르면 완료 됐는지 안됐는지 보여주는 줄처주기 용.
  handleClick(e) {
    this.props.handleComplete(e.target.innerHTML)
  }

  render(){
    const data = JSON.parse(this.props.todoList)
    const style = {
      textDecoration: data.done ? "line-through" : "none"
    }
    if (data === undefined){
      return (<div>Write Something~~~</div>)
    }
    return(
      <div className="toDo-list-entry">
      <div className="list-body">
        <div style={style} onClick={e => this.handleClick(e)} className="toDo-list-entry-detail">{data.value}</div>
      </div>
    </div>
    )
  }

}

export default TodoListEntry;
- TodoListEntry는 TodoList안에서 하나씩 렌더시켜주는 것인데 local state를 하나 만들어서 완료 여부를 보여줄 수 있는, 줄 치는 부분을 추가해 주었다.
CategoryList && CategoryListEntry
import React from "react";
import CategoryListEntry from "./CategoryListEntry";

// 실제 API를 쓰게 되면 이 fakeData는 더이상 import 하지 않아야 합니다.

class CategoryList extends React.Component {
  constructor(props) {
    super(props);
    this.state = {
      appear: false
    };
  }

  handleKeyPress(e) {
    const value = document.querySelector(".newCategory").value;
    if (e.key === "Escape") {
      document.querySelector(".newCategory").value = null;
      return;
    }
    if (e.key === "Enter") {
      //엔터일때
      if (value.length === 0) {
        window.alert("내용을 입력하세요");
        return;
      }
      this.props.addCategory(value);
      document.querySelector(".newCategory").value = null;
    }
  }

  handleClick() {
    this.setState({
      appear: !this.state.appear
    });
  }

  render() {
    if (this.state.appear === true) {
      return (
        <div className="watch-list-entry">
          <input
            placeholder="새로운 카테고리"
            className="newCategory"
            type="text"
            onKeyDown={e => this.handleKeyPress(e)}
          />
          <button className="categoryButton" onClick={() => this.handleClick()}>이제그만</button>
          <button className="categoryButton" onClick={() => this.props.emptyCategory()}>초기화</button>
          {this.props.categoryName.map(data => (
            <CategoryListEntry
              key={this.props.categoryName.indexOf(data)}
              categoryName={data}
              selectCategory={this.props.selectCategory}
              removeCategory={this.props.removeCategory}
            />
          ))}
        </div>
      );
    }
    return (
      <div className="watch-list-entry">
        <button className="categoryButton"  onClick={() => this.handleClick()}>생성</button>
        <button className="categoryButton"  onClick={() => this.props.emptyCategory()}>초기화</button>
        {this.props.categoryName.map(data => (
          <CategoryListEntry
            key={this.props.categoryName.indexOf(data)}
            categoryName={data}
            selectCategory={this.props.selectCategory}
            removeCategory={this.props.removeCategory}
          />
        ))}
      </div>
    );
  }
}
export default CategoryList;
- TodoList와 매우 유사하다. input form 에서 받은 내용을 app.js에 있는 state에 보내준다. App.js에서 사실 모든걸 해결하니, 위로 보내주는게 주 작업이다.
import React from "react";

const CategoryListEntry = ({categoryName, selectCategory, removeCategory}) => {


  return (
    <div className="category-list-entry">
      <div className="category-list-body">
        <div onClick={e => selectCategory(e.target.innerHTML)} className="category-list-entry-detail">{categoryName}
        </div>
        <span>
          <button className="removeButton" onClick={() => removeCategory(categoryName)}>x</button>
          </span>
      </div>
    </div>
  );
};

export default CategoryListEntry;
- 카테고리 리스트는 버튼을 누르면 removeCategory를 실행해 app.js 의 state에 있는 정보를 수정한다. setState의 힘이다!
Nav && Search
import React from 'react';
import Search from './Search';

const Nav = ({ search }) => (
  <nav className="navbar">
    <div className="col-md-6 col-md-offset-3">
      <Search search={search}/>
    </div>
  </nav>
);

export default Nav;
- 오히려 Nav는 그냥 search를 담아주는 역할만 한다. 지금 생각해보면...음 버튼도 search에 있다면 Nav가 없어도 될것 같은 느낌이든다....하하하
import React from "react";

class Search extends React.Component {
  constructor(props) {
    super(props);
    this.state = {
      count: 0 //검색 남용 방지
    };
    this.handleClick = this.handleClick.bind(this);
    this.handleKeyPress = this.handleKeyPress.bind(this);
  }

  //디바운스? 관리용 함수
  componentDidMount() {
    setInterval(() => this.setState({ count: 0 }), 5000);
  }

  //엔터 쳤을 때 검색하게하기
  handleKeyPress(e) {
    const { count } = this.state;
    const text = document.querySelector(".form-control").value;
    if (count > 3) {
      alert("적당히 하세요");
      return;
    }
    if (e.key === "Enter") {
      if (text.length === 0) {
        alert("내용을 입력하세요");
        return;
      }
      this.props.search(text);
      this.setState({ count: count + 1 });
      document.querySelector(".form-control").value = null;
    }
    if (e.key === "Escape") {
      document.querySelector(".form-control").value = null;
      return;
    }
  }
  //클릭 버튼 누르면 검색
  handleClick() {
    const { count } = this.state;
    const text = document.querySelector(".form-control").value;
    if (count > 3) {
      alert("적당히 하세요");
      return;
    }

    if (text.length === 0) {
      alert("입력을 해야지");
      return;
    }

    this.props.search(text);
    this.setState({ count: count + 1 });
    document.querySelector(".form-control").value = null;
  }

  render() {
    return (
      <div className="search-bar form-inline">
        <input
          onKeyDown={e => this.handleKeyPress(e)}
          className="form-control"
          type="text"
          placeholder="검색어를 입력하세요"
        />
        <button className="btn hidden-sm-down" onClick={this.handleClick}>
          <span className="glyphicon glyphicon-search"></span>
        </button>
      </div>
    );
  }
}

export default Search;- 서치 함수안에는 디바운스 구현을 위해 몇 초 안에 몇번 이상 검색을 하면 못하게 제한을 두었다. 그 외에는 검색어를 App.js에 넘겨주는 역할을 한다.
Conclusion
-
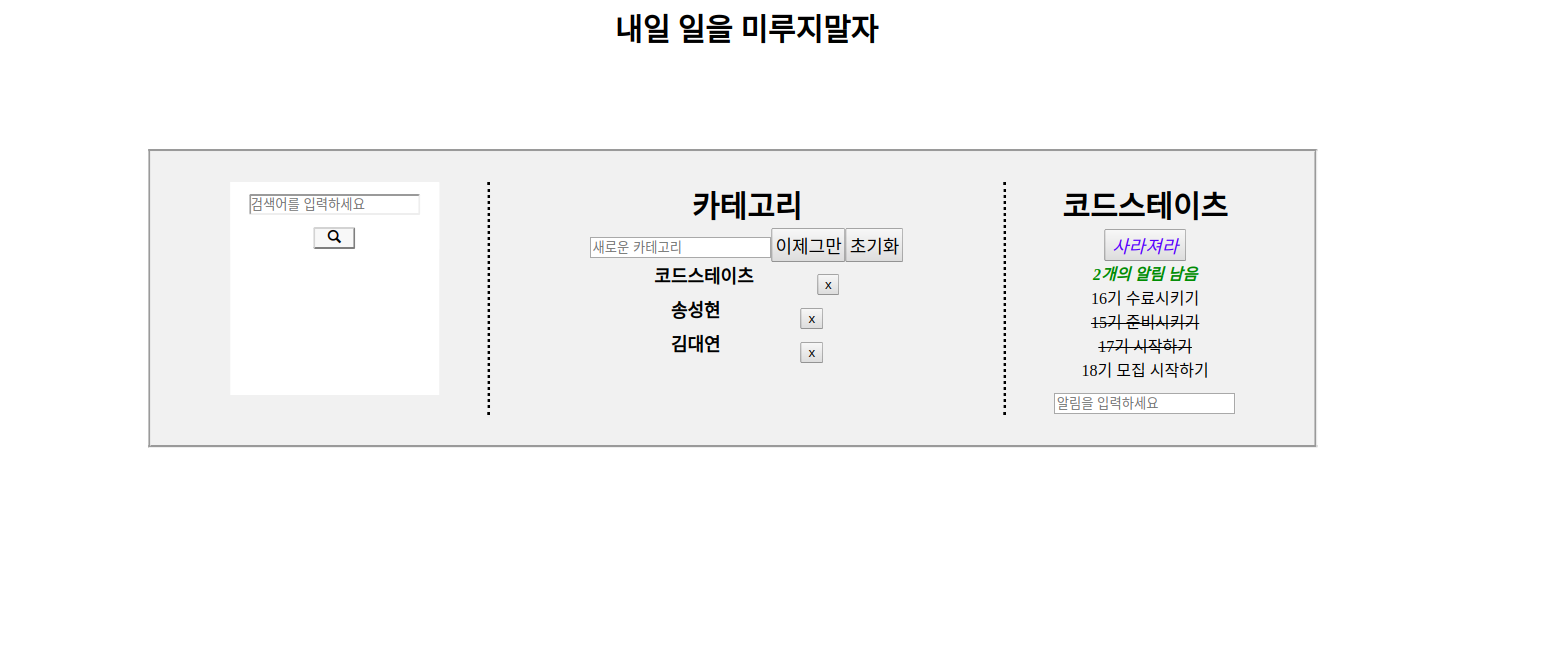
사실 코드안에 커멘트가 있기도 하고 내 다이어 그램을 보면 보이듯이 App.js만 잘 짠다면 수월하다. 위에서 다 뿌려주는 구조임으로 데이터 관리만 잘 한다면 좋다. 근데 state관리가 확실이 내용이 많아지고 길어질 수록 힘들긴하다. 그래서 redux를 사용한다고 들었는데 그걸 배우고 사용해서 refactoring할 생각도 있다.
-
배운점
- 음...페이스북에서 미는 리액트를 사용해 처음부터 만들고 버그를 거의 다 없애 내가 원하는 기능을 구현했다는 점은 매우 고무적이다. 확실히 편하고 가능성도 무궁무진하다. 근데 그만큼 기획자, 즉 시작하기 전 정리하고 플랜하는게 중요하다는 것을 느꼈다.- 데이터를 어떻게 관리할지, 어떻게 위에서 내려오게 할 것인지가 매우 중요한 것 같다.
- 하면됀다. CSS도 시간을 충분히 들이면 될 것 같다. 근데 다른 할 것도 많아서 아직은 기본기를 더 쌓아야
한다. - 시간이 많이 든다. 근데 플랜만 잘하면...끝난다...그냥
-
고생했다~~

