Stanford cs193p 수업을 듣다가 길을 헤맨 부분이 있었는데 이를 기록하려 한다.
class로 만든 ViewModel을 어디에서 initialize하느냐의 문제였는데,
강의에서는 SceneDelegate.swift에서 하라고 말했다.
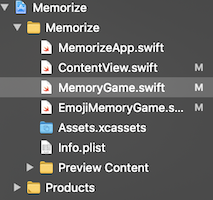
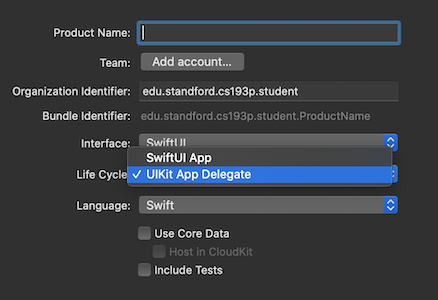
그런데 프로젝트 안에 SceneDelegate.swift 파일이 없었다.

원인을 찾아보니까 처음 프로젝트를 생성할 때 Life Cycle을 UIKit App Delegate로 설정했어야하는데 SwiftUI App으로 설정해서 생긴 문제였다.
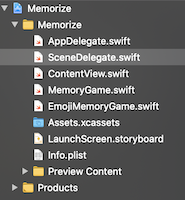
UIKit App Delegate로 만든 프로젝트에는 SceneDelegate.swift 파일이 존재한다. (처음부터 강의를 주의깊게 들었으면 안 생겼을 문제)
UIKit AppDelegate
In iOS 13 and later, use UISceneDelegate objects to respond to life-cycle events in a scene-based app.
Apple Developer Documentation에서 UIKit life cycle 글을 보면 다음과 같은 문장이 적혀있다.
iOS 13으로 업데이트하면서 하나의 어플을 여러개 창(Scene)으로 띄울 수 있는 기능이 생겼는데 이 기능을 만들면서 UI Life Cycle이 SceneDelegate로 빠져나갔다.
그래서 UI Life Cycle은 SceneDelegate가 주관하고, Scene 관리 및 App 전체 Life Cycle은 AppDelegate가 주관하게 되었다.
AppDelegate
import UIKit

@main
class AppDelegate: UIResponder, UIApplicationDelegate {
    func application(_ application: UIApplication, didFinishLaunchingWithOptions launchOptions: [UIApplication.LaunchOptionsKey: Any]?) -> Bool {
        // Override point for customization after application launch.
        return true
    }

    // MARK: UISceneSession Lifecycle

    func application(_ application: UIApplication, configurationForConnecting connectingSceneSession: UISceneSession, options: UIScene.ConnectionOptions) -> UISceneConfiguration {
        // Called when a new scene session is being created.
        return UISceneConfiguration(name: "Default Configuration", sessionRole: connectingSceneSession.role)
    }

    func application(_ application: UIApplication, didDiscardSceneSessions sceneSessions: Set<UISceneSession>) {
        // Called when the user discards a scene session.
    }
}
SceneDelegate
import UIKit
import SwiftUI

class SceneDelegate: UIResponder, UIWindowSceneDelegate {

    var window: UIWindow?

    func scene(_ scene: UIScene, willConnectTo session: UISceneSession, options connectionOptions: UIScene.ConnectionOptions) {
        // Create the SwiftUI view that provides the window contents.
        let contentView = ContentView()

        // Use a UIHostingController as window root view controller.
        if let windowScene = scene as? UIWindowScene {
            let window = UIWindow(windowScene: windowScene)
            window.rootViewController = UIHostingController(rootView: contentView)
            self.window = window
            window.makeKeyAndVisible()
        }
    }

    func sceneDidDisconnect(_ scene: UIScene) {
        // Called as the scene is being released by the system.
    }

    func sceneDidBecomeActive(_ scene: UIScene) {
        // Called when the scene has moved from an inactive state to an active state.
    }

    func sceneWillResignActive(_ scene: UIScene) {
        // Called when the scene will move from an active state to an inactive state.
    }

    func sceneWillEnterForeground(_ scene: UIScene) {
        // Called as the scene transitions from the background to the foreground.
    }

    func sceneDidEnterBackground(_ scene: UIScene) {
        // Called as the scene transitions from the foreground to the background.
    }
}
SwiftUI App Life Cycle
import SwiftUI

@main
struct MemorizeApp: App {

    var body: some Scene {
        WindowGroup {
            ContentView()
        }
    }
}
UIKit AppDelegate에서는 AppDelegate와 SceneDelegate를 class로 정의하고 SceneDelegate 안에 ContentView를 만들었다. 반면 SwiftUI App에서는 App이라는 type의 struct를 정의하고 그것의 body가 SceneDelegate 역할을 수행하고 있다. SceneDelegate에서 active, foreground, background 등의 함수는 body안의 WindowGroup에서 이벤트를 통해 구현할 수 있다.
UIKit AppDelegate -> SwiftUI
class SceneDelegate: UIResponder, UIWindowSceneDelegate {

    var window: UIWindow?

    func scene(_ scene: UIScene, willConnectTo session: UISceneSession, options connectionOptions: UIScene.ConnectionOptions) {
        // Create the SwiftUI view that provides the window contents.
        let game = EmojiMemoryGame()
        let contentView = ContentView(viewModel: game)
        ...
        }
    }
강의에서는 SceneDelegate.swift에서 viewModel을 initialize하라고 했다. ViewModel인 EmojiMemoryGame을 변수로 선언하고 View인 ContentView의 argument로 넘기라는 의미이다.
그렇다면 Life Cycle이 UIKit AppDelegate가 아니라 SwiftUI App일 때는 어떻게 해야할까?
import SwiftUI

@main
struct MemorizeApp: App {

    var body: some Scene {
        WindowGroup {
            let game = EmojiMemoryGame()
            ContentView(viewModel: game)
        }
    }
}
어렵지 않다. AppDelegate의 역할을 struct MemorizeApp: App가 하고있고 SceneDelegate의 역할을 var body: some Scene가 하고있고 ContentView가 어떤 WindowGroup 안에 불리고 있으니 그 안에서 ViewModel을 선언하고 ContentView의 arugment로 넘겨주면 된다.