3강에서 배우는 항목은 다음과 같다.
- View가 Model의 변화를 실시간으로 적용하게끔(reactive) 만들고
- Reactive UI를 만들 때 사용한 protocol과 protocol이 무엇인지 알고
- View가 공간을 어떻게 배치하는지 알아본다.
Mutating Function
struct MemoryGame<CardContent> {
    var cards: Array<Card>

    func choose(card: Card) {
    //	print("card chosen!")
        card.isFaceUp = !card.isFaceUp
    }
}
Reactive UI를 만들기 위해 우선 Model을 바꾸는 함수를 만든다. 이전에 만들었던 choose 함수를 이제 본 역할에 맞게 구현한다.
뒷면의 카드를 클릭하면 앞면으로 바뀌고 앞면의 카드를 클릭했을 때 다시 뒷면으로 뒤집히는 역할을 하기 때문에 그와 관련된 변수인 isFaceUp을 choose 함수에서 변경한다.
이 때 card.isFaceUp = !card.isFaceUp 이라고 쓰면 error가 발생한다.
Cannot assign to property: 'card' is a 'let' constant
Swift에서는 function argument가 let constant가 기본이라 내용을 바꿀 수 없다.
게다가 argument인 card를 앞서 struct로 구현했는데 struct는 value type이라 부를 때마다 복사된다.
즉, function argument로 들어가는 card와 array에 들어있는 card는 다른 variable이다.
우리는 array에 들어있는 card의 isFaceUp 값을 바꾸고 싶다.
따라서 array를 돌며 사용자가 클릭한 card를 찾고 여기서 찾은 card의 isFaceUp 값을 바꾸는 방식으로 구현하려 한다.
struct MemoryGame<CardContent> {
    var cards: Array<Card>

    func choose(card: Card) {
        let chosenIndex: Int = self.index(of: card)
		self.cards[chosenIndex].isFaceUp = !self.cards[chosenIndex].isFaceUp
    }

func index(of card: Card) -> Int {
    for index in 0..<self.cards.count {
        if self.cards[index].id == card.id {
            return index
        }
    }
        return 0 // TODO: bogus
}
choose 함수가 MemoryGame struct 안에 정의되고 card를 찾는데 사용되는 array 또한 MemoryGame struct 안에 정의되어있어 결국 choose 함수는 자기가 포함된 struct를 수정하는 함수이다.
self 라는 키워드를 사용하면 struct 자체를 지정할 수 있다.
Cannot assign to property: 'self' is immutable
그러나 struct 내 function은 struct 내 property를 수정할 수 없다. 이를 가능하게 하려면 choose 함수가 self를 수정할 수 있음을 명시하면 된다.
mutating 키워드를 func 앞에 적어주면 된다.
struct MemoryGame<CardContent> {
    var cards: Array<Card>

     mutating func choose(card: Card) {
        let chosenIndex: Int = self.index(of: card)
        self.cards[chosenIndex].isFaceUp = !self.cards[chosenIndex].isFaceUp
    }
}
Reacting UI
Model을 변화시키는 함수를 만든 다음에는 View가 변경사항을 redraw하게끔 한다. (이를 reacting UI라고 생각하면 된다.)
MVVM 설명을 다시 떠올려보자.
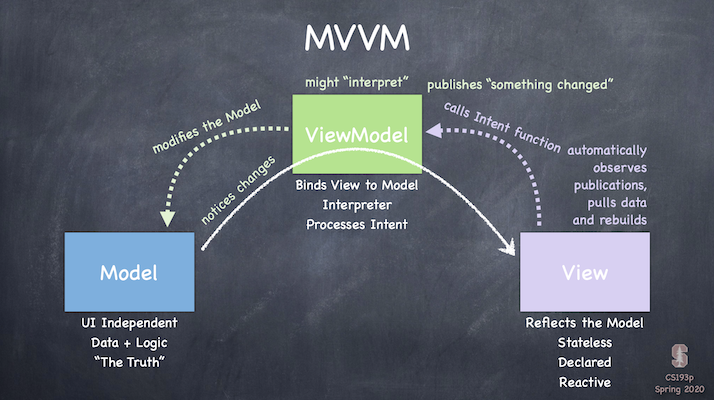
ViewModel은 Model의 변경사항을 publish하고 View는 ViewModel이 공표한 사항을 끌어와서 화면을 새로 만든다.
따라서
1. ViewModel이 변경사항을 publish하고
2. View가 publications을 observe하는
기능을 구현하면 된다.
여기서 ObservableObject라는 type과 @published, @ObservedObject 라는 키워드가 등장한다.
Property Wrapper
ObservableObject는 protocol의 일종인데 강의에서는 protocol 설명을 뒤에서 한다. 단지 ObservableObject는 class에서만 사용할 수 있고 주로 class로 구현하는 ViewModel의 type을 이것으로 지정한다고만 언급한다.
ObservableObject는 단어 그대로 (변경사항을) 관찰할 수 있는 object이다. ObservableObject는 objectWillChange.send()를 사용하여 변경사항이 있음을 알린다. 그러나 변수가 많아지고 변경사항이 늘어나면 send()를 호출하여 관리하기가 힘들어진다. 따라서 변경사항을 공표하고 싶은 변수 앞에 @published라는 property wrapper를 사용한다.
ViewModel이 publish한 변경사항을 View가 감지하고 화면을 새로 그릴 때 사용되는 property wrapper는 @ObservedObject 이다. View 안에서 감시 대상인 ViewModel을 감싸면 된다.
SwiftUI는 @Published로 감싼 변수 값이 변경될 때 view를 refresh 한다.
(Property Wrapper는 다른 글에서 자세히 정리할 예정이다)
/// EmojiMemoryGame.swift
import SwiftUI

// EmojiMemoryGame: ViewModel
class EmojiMemoryGame: ObservableObject {
	// Publish Model's mutation
	@Published private var model: MemoryGame<String> = EmojiMemoryGame.createMemoryGame()
    ...
}

// EmojiMemoryGameView.swift
// EmojiMemoryGameView: View
struct EmojiMemoryGameView: View {
	// Observe ViewModel's publications
	@ObservedObject var viewModel: EmojiMemoryGame
Protocol
Protocol은 struct나 class와 비슷하지만 implementation 없이 requirement만 존재하는 type이다.
A protocol defines a blueprint of methods, properties, and other requirements that suit a particular task or piece of functionality.
예시를 보자.
protocol Moveable {
	func move(by: Int)
	var hasMoved: Bool { get }
	var distanceFromStart: Int { get set }
}
Protocol은 다음과 같이 정의할 수 있다. var와 function은 있지만 이들이 무엇인지는 아직 정하지 않았다.
struct PortableThing: Movable {
	// must implement move(by:), hasMoved and distanceFromStart
}
struct나 class가 protocol을 가져다 쓰려면 protocol 안에 있는 var와 func을 모두 구현해야 쓸 수 있다. Struct나 class가 protocol을 가져다 쓰는 것을 adopted by class(or struct) 라고 표현하고 이들이 protocol requirement를 모두 만족시키면 conform to the protocol 라고 표현한다.
protocol 또한 다른 protocol을 가져다 쓸 수 있다. (Protocol Inheritance) 그리고 하나의 variable이 여러 개의 protocol을 adopt할 수 있다.
그리고 이런 것도 된다.
protocol Movable { ... }
struct PortableThing: Movable { ... }
class Car: Movable, Impoundable, Leasable { ... }

var m: Movable
var car: Car = new Car (...)
var portableThing: PortableThing = PortableThing()

m = car // legal
m = portableThing // legal
struct PortableThing와 class Car 모두 protocol Movable 을 구현했기 때문에 var type으로 assign할 수 있다. (그러나 portable = car 는 성립하지 않는다)
Extension
Extensions add new functionality to an existing class, structure, enumeration, or protocol type.
Extension은 이미 존재하는 class, struct, protocol 등에 새로운 기능을 추가할 수 있다. 강의에서 protocol을 설명할 때 extension을 언급했지만 class와 struct 역시 extension이 가능하다.
특히 protocol extension은 default implementation으로 사용할 수 있다.
protocol Moveable {
	func move(by: Int)
	var hasMoved: Bool { get }
	var distanceFromStart: Int { get set }
}

extension Movable {
	var hasMoved: Bool { return distanceFromStart > 0 }
}

struct ChessPiece: Movable {
	// Only need to implement move(by:) and distanceFromStart here
	// Would be allowed to implement hasMoved here
}
여러 variable이 같은 protocol을 사용할 때 동일한 기능을 하더라도 각 variable마다 모든 요구사항을 구현해야한다.
그러나 extension을 통해 default implementation을 하면 코드 중복을 피할 수 있다.
Extension을 사용하여 기존 struct나 class가 새로운 protocol을 conform하게끔 할 수도 있다.
struct Boat { ... }
extension Boat {
	func sailAroundTheWorld() { ... }
}
extension Boat: Movable { ... }
Generics and Protocols
protocol과 generics를 결합하여 아래처럼 사용할 수 있다.
protocol Greatness {
	func isGreaterThan (other: Self) -> Bool
}

extension Array where Element: Greatness {
	var greatest: Element {
		// for loop through all the Elements
		// which (inside this extension) we know each implements the Greatness protocol
		// and figure out which one is greatest by calling isGreaterThan(other:) on them
	return the greatest by calling isGreaterThan on each Element
    }
}
Layout
Container View (HStack, VStack, ZStack ...)은 내부 View에게 공간을 제공한다. 내부 View의 content에 따라 필요한 size가 달라지는데 이를 자동으로 계산하여 적절한 size를 return하는 container view가 GeometryReader이다.
GeometryReader
실제 View에서 보여주고자 하는 내용을 GemetryReader로 감싸서 사용한다.
var body: some View {
	GeometryReader { geometry in
    		self.body(for: geometry.size)
        }
}

func body(for: CGSize) -> some View {
	// Real Contents
}
Geometry의 parameter인 geometry는 GeometryProxy이다. GeometryProxy는 container에게 부여된 size와 coordinate space를 알려준다. 즉, GeometryProxy의 size를 불러와서 크기를 지정하면 화면 크기가 변화하는 상황 속에서도 적절하게 대처할 수 있다.
struct GeometryProxy {
    var size: CGSize
    func frame(in: CoordinateSpace) -> CGRect
    var safeAreaInsets: EdgeInsets
}
CGSize는 크기를, CGRect는 크기와 위치를 알려주는 struct이다. 이를 활용하여 할당된 크기에 따라 알맞은 폰트 크기를 자동으로 설정하게 만들 수 있다.
struct CardView: View {
    var card: MemoryGame<String>.Card

    var body: some View {
        GeometryReader { geometry in
            self.body(for: geometry.size)
       }
    }

    func body(for size: CGSize) -> some View {
        ZStack {
            if card.isFaceUp {
                RoundedRectangle(cornerRadius: cornerRadius).fill(Color.white)
                RoundedRectangle(cornerRadius: cornerRadius).stroke(lineWidth: edgeLineWidth)
                Text(card.content)
            } else {
                RoundedRectangle(cornerRadius: cornerRadius).fill()
            }
        }
        .font(Font.system(size: fontSize(for: size)))
    }

    // MARK: - Drawing Constants
    let cornerRadius: CGFloat = 10
    let edgeLineWidth: CGFloat = 3
    func fontSize(for size: CGSize) -> CGFloat {
        min(size.width, size.height) * 0.75
    }
}
맨 아래 fontSize라는 함수는 CGSize를 CGFloat으로 변경한다. 이 함수의 return value가 이미지 크기를 결정하는 폰트 크기이다. Font.system(size: ) 는 폰트를 설정하는 구문인데 argument 중 하나인 size가 CGFloat이다.
참고
Youtube video: Stanford CS193p iPhone Application Development Spring 2020
[SwiftUI] Published, ObservableObject
The Swift Programming Language swift 5.4 - Protocols
The Swift Programming Language swift 5.4 - Extensions