오늘은 Promise를 세세하게 살펴보며 직접 구현해보려고 한다.
JS의 Promise
자바스크립트 비동기 처리에 사용되는 객체
3가지 상태(states)
- Pending(대기) : 비동기 처리 로직이 아직 완료되지 않은 상태
- Fulfiled(이행) : 비동기 처리가 완료되어 프로미스가 결과 값을 반환해준 상태
- Rejected(실패) : 비동기 처리가 실패하거나 오류가 발생한 상태
상태 전환과 메소드
Promise를 호출 하면 Pending 상태가 된다.
new Promise()콜백 함수로 resolve, reject 인자를 받아 resolve를 실행하면 Fulfiled 상태로 전환한다.
const func = () => {
    return new Promise((resolve, reject) => {
        resolve('promise resolve')
    }
}
1. then 메소드
Fulfiled 상태에서 then 메소드를 통해 결과를 확인할 수 있다.
func()
  .then(res => console.log(res))  //'promise resolve'
2. catch 메소드
콜백 함수의 reject 인자를 실행하면 rejected 상태로 전환한다. catch 메소드를 통해 실패 결과를 확인할 수 있다.
const func = () => {
    return new Promise((resolve, reject) => {
        reject(new Error('promise reject'));
    });
};

func()
  .then()
  .catch(err => console.log(err)); //Error: promise reject
3. finally 메소드
성공, 실패와 상관없이 Promise가 처리된 후 콜백 함수가 실행된다.
func()
  .then()
  .catch(err => console.log(err))
  .finally(() => console.log('promise finish'))
4. all, race 메소드
이외에도 all과 race 메소드가 존재한다.
Promise 직접 구현하기
기본 구조를 살펴보면 Promise 객체의 생성자는 콜백 함수를 매개변수로 전달 받는다. 해당 콜백함수를 resolve, reject 두 가지 인자를 갖는다.
Promise의 생성자가 실행될 때 pending 상태를 갖도록 한다.
resolve(),reject()가 실행되면 상태를 전환하고 각각의 데이터를 갖도록 한다.
class Promise {
    constructor(callback) {
        this.state = 'pending';
        const resolve = value => {
            this.state = 'fulfiled';
            this.resolve = value;
        };
        const reject = error => {
            this.state = 'rejected';
            this.reject = error;
        };

        callback(resolve, reject);
    }
}
resolve, reject 데이터를 확인할 수 있도록 then, catch 메소드를 구현한다.
class Promise() {
    ... //중략

    then(callback) {
        callback(this.resolve)
    }
    catch(callback) {
        callback(this.reject)
    }
}
then 메소드를 통해 resolve된 데이터가 정상적으로 출력됨을 확인할 수 있다.
const prom = () =>
    new Promise((resolve, reject) => {
        resolve('promise resolve1');
    });

prom()
  .then(res => console.log(res)); //'promise resolve1'
콜백 함수의 비동기 실행
기존의 Promise는 콜백 함수가 비동기로 실행된다. 하지만 직접 구현한 Promise는 아직까지 동기적으로 실행되고 있다. 즉, 비동기로 전환하기 위해선 콜백 함수를 태스크 큐에 넣어줘야 한다.
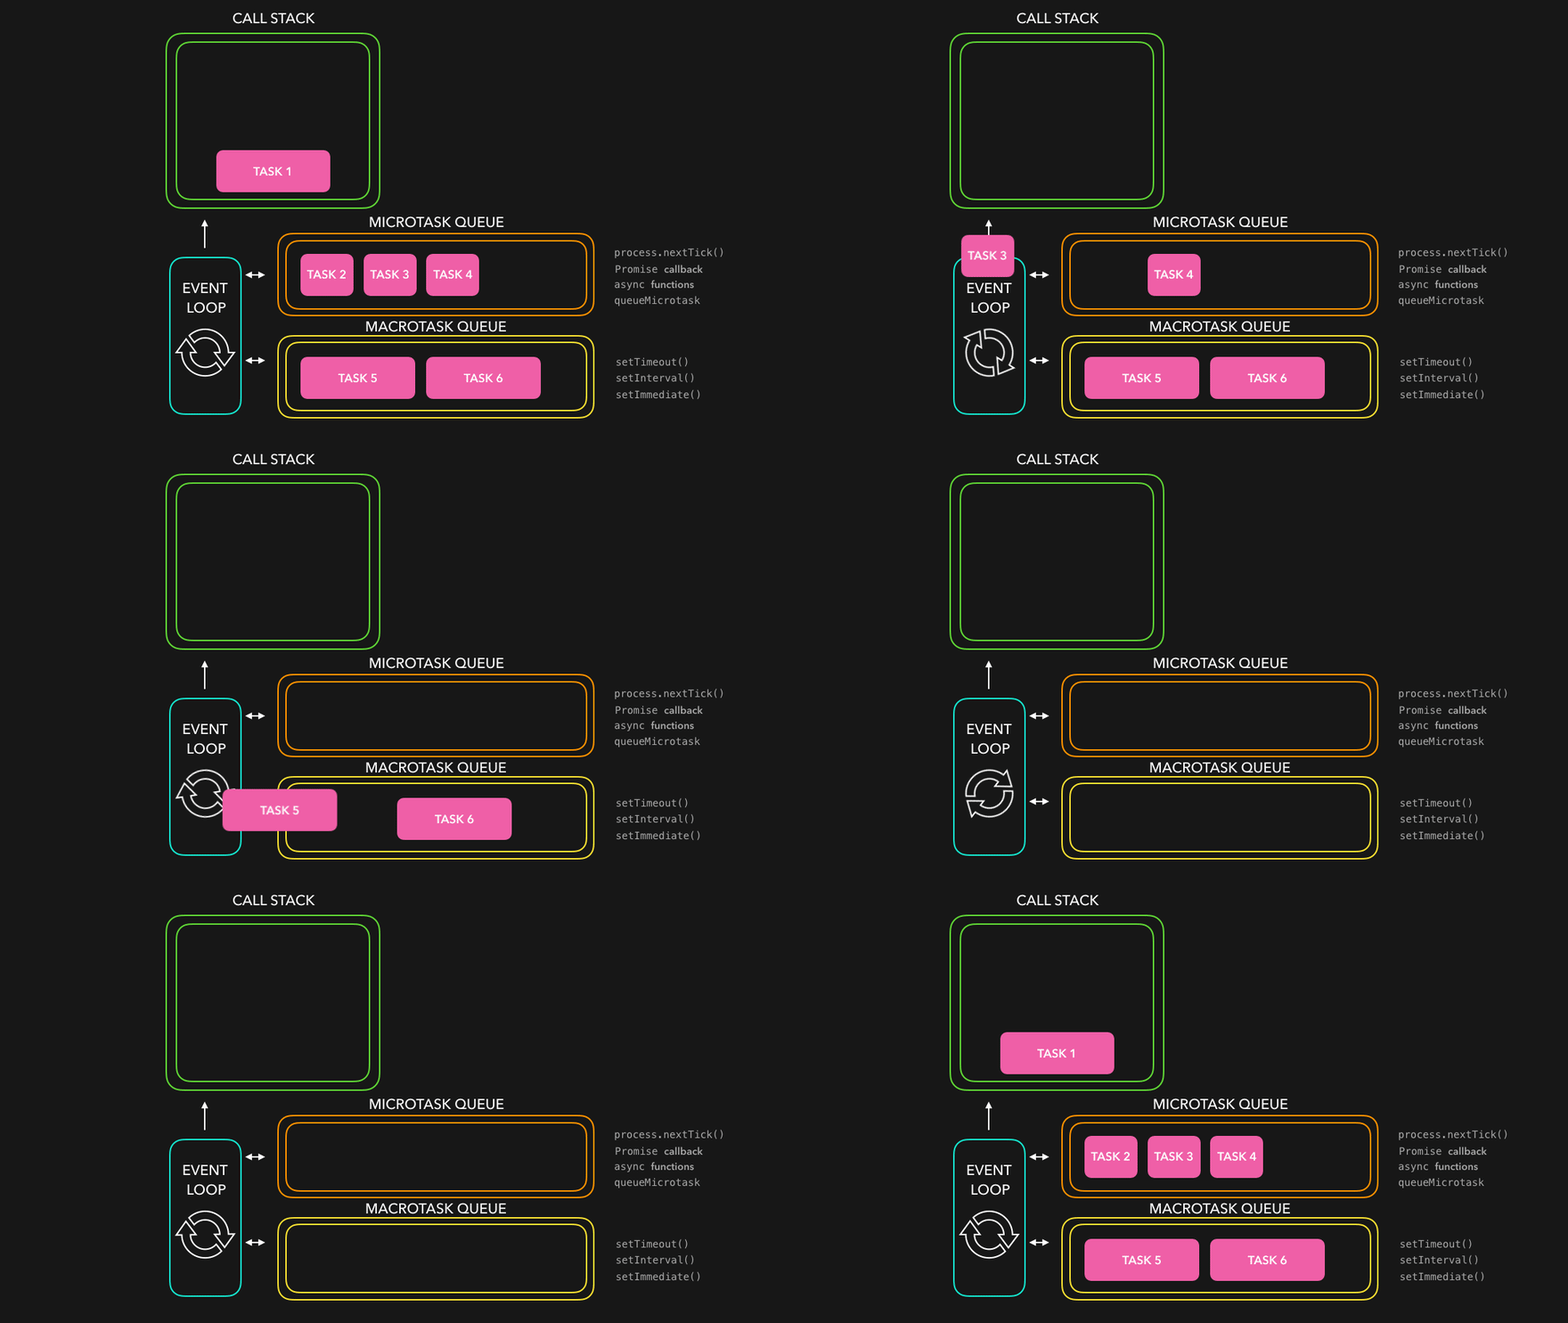
JS에는 (Macro)task Queue와 Microtask Queue 가 존재한다.

이벤트 루프는 (Macro)task Queue를 처리하기 전에 Microtask Queue를 먼저 처리한다.
(Macro)task Queue- setTimeout()
- setInterval()
- setImmediate()
Microtask Queue- process.nextTick()
- Promise
- async
- queueMicrotask
우리가 사용하고 구현 중이던 Promise는 Microtask Queue에 담기고 처리된다는 것을 알 수 있었다.
또한 process.nextTick()는 Promise보다 우선순위가 높다고 한다.
실행 환경에서 process.nextTick()이 모두 처리된 후 Promise가 처리되니 예상한 실행 순서와 달라진다. (직접 실험해보면 차이를 알 수 있다.)
기존의 Promise와 섞어서 실행하더라도 실행 순서를 예상할 수 있도록 queueMicrotask()를 사용하여 비동기 실행을 구현할 것이다.
class Promise {
    constructor(callback) {
        this.state = 'pending';
        const resolve = value => {
            this.state = 'fulfiled';
            this.resolve = value;
        };
        const reject = error => {
            this.state = 'rejected';
            this.reject = error;
        };
        queueMicrotask(() => callback(resolve, reject));
    }

    then(callback) {
        callback(this.resolve)
    }
    catch(callback) {
        callback(this.reject)
    }
}
체이닝
Promise는 체이닝이 가능하다. 여러 개의 then 메소드를 체이닝 할 수도 있고 catch, finally 메소드를 체이닝하여 사용할 수 있다.
const prom = () =>
    new Promise((resolve, reject) => {
        resolve('promise resolve1');
    });

prom()
  .then(res => {
      console.log(res);
      return 'promise resolve2';
  })
  .then(res => {
      console.log(res);
      return 'promise resolve3';
  })
  .catch(err => console.log(err))
// 'promise resolve1'
// 'promise resolve2'queueMicrotask()로 인해 비동기 실행이 되면서 발생하는 문제를 같이 처리하자. 콜백 함수가 실행 되기전에 then과 같은 메소드들이 먼저 실행된다.
즉, resolve()가 실행 되기 전이기 때문에 pending 상태에서 then과 같은 메소드들이 먼저 실행된다.
메소드들의 콜백을 처리해주기 위해 다음과 같이 큐를 생성하여 처리해준다.
fulfilledCallbackQueue = [];
rejectedCallback = null;
then 메소드는 위와 같은 체이닝을 통해서 여러개의 콜백 함수를 받을 수 있다. 하지만 catch 메소드는 reject 되었을 때 첫 번째 콜백만 실행되기 때문에 큐를 사용하지 않았다.
class Promise {
    fulfilledCallbackQueue = [];
    rejectedCallback = null;

    constructor(callback) {
        this.state = 'pending';
        const resolve = value => {
            if (this.state === 'pending') {
                this.state = 'fulfiled';
                this.resolve = value;

                this.fulfilledCallbackQueue.forEach(callback => {
                    this.resolve = callback(this.resolve);
                });
            }
        };
        const reject = error => {
            if (this.state === 'pending') {
                this.state = 'rejected';
		this.reject = error;

		if (this.rejectedCallback) this.rejectedCallback(this.reject);
	    }
        };
        queueMicrotask(() => callback(resolve, reject));
    }
    then(callback) {
        if (this.state === 'pending') this.fulfilledCallbackQueue.push(callback);
        if (this.state === 'fulfiled') callback(this.resolve);
	return this;
    }
    catch(callback) {
	if (!this.rejectedCallback) this.rejectedCallback = callback;
	return this;
    }
}
then 메소드는 pending 상태와 fulfiled상태를 구분함으로서 setTimeout()과 같은 비동기 처리 내에서 then 메소드를 사용하더라도 정상적으로 결과를 가져올 수 있도록 구현하였다.
각 메소드들의 반환값으로 this(Promise 객체 자기 자신)을 반환해주어 메소드 체이닝을 하더라도 정상적으로 다음 메소드를 실행할 수 있도록 한다.
finally 메소드 구현
then과 같이 finallyCallbackQueue = [];를 추가해주고 fulfiled, rejected 상태 모두에서 실행될 수 있도록 한다.
class Promise {
    fulfilledCallbackQueue = [];
    rejectedCallback = null;
    finallyCallbackQueue = [];

    constructor(callback) {
        this.state = 'pending';
        const resolve = value => {
            if (this.state === 'pending') {
                this.state = 'fulfiled';
                this.resolve = value;

                this.fulfilledCallbackQueue.forEach(callback => {
                    this.resolve = callback(this.resolve);
                });
            }
        };
        const reject = error => {
            if (this.state === 'pending') {
                this.state = 'rejected';
		this.reject = error;

		if (this.rejectedCallback) this.rejectedCallback(this.reject);
	    }
        };
        queueMicrotask(() => {
            callback(resolve, reject);
            if (this.finallyCallbackQueue.length) {
	        this.finallyCallbackQueue.forEach(callback => callback());
	    }
	});
    }
    then(callback) {
        if (this.state === 'pending') this.fulfilledCallbackQueue.push(callback);
        if (this.state === 'fulfiled') callback(this.resolve);
	return this;
    }
    catch(callback) {
	if (!this.rejectedCallback) this.rejectedCallback = callback;
	return this;
    }
    finally(callback) {
        if (this.state === 'pending') this.finallyCallbackQueue.push(callback);
        else callback();
	return this;
    }
}
JS Promise VS 나작프
JS의 Promise와 같이 사용하더라도 실행 순서에 문제가 발생하지 않았다!
const myLittlePromise = () => {
    return new MyLittlePromise((resolve, reject) => {
        resolve('MyLittlePromise');
    });
};
const promise = () => {
    return new Promise((resolve, reject) => {
        resolve('Promise');
    });
};

myLittlePromise().then(res => console.log(res, '0'));
promise().then(res => console.log(res, '1'));
myLittlePromise().then(res => console.log(res, '2'));
promise().then(res => console.log(res, '3'));

/*
실행결과
-----
MyLittlePromise 0
Promise 1
MyLittlePromise 2
Promise 3
*/
번외
- process.nextTick()
/*
실행결과
-----
MyLittlePromise 0
MyLittlePromise 2
Promise 1
Promise 3
*/- setTimeout(), setImmediate()
/*
실행결과
-----
Promise 1
Promise 3
MyLittlePromise 0
MyLittlePromise 2

*/