
👨🔧 스프링 컨테이너 생성
먼저 스프링 컨테이너가 생성되는 과정을 한번 알아보자.
// 스프링 컨테이너 생성, 구성 설정 정보(AppConfig.class) 지정
ApplicationContext applicationContext = new AnnotationConfigApplicationContext(AppConfig.class);
여기서 ApplicationContext는 스프링 컨테이너라는 인터페이스다. 그럼 스프링 컨테이너도 구현체가 여러 개 있나...? ApplicationContext 인터페이스를 구현한 것 중 하나가 바로 AnnotationConfigApplicationContext인 것이다. 지금 상태는 그냥 AnnotationConfigApplicationContext라는 이름의 스프링 컨테이너 박스 하나만 만들어 놓은 상태라고 생각하면 된다. 더 정확히는 스프링 컨테이너를 부를 때 BeanFactory, ApplicationContext로 구분해서 얘기한다.
// AppConfig.java
package hello.core;

import hello.core.discount.DiscountPolicy;
import hello.core.discount.FixDiscountPolicy;
import hello.core.member.MemberRepository;
import hello.core.member.MemberService;
import hello.core.member.MemberServiceImpl;
import hello.core.member.MemoryMemberRepository;
import hello.core.order.OrderService;
import hello.core.order.OrderServiceImpl;

@Configuration
public class AppConfig {

	@Bean
	public MemberService memberService() {
		return new MemberServiceImpl(memberRepository());
	}

	@Bean
	public OrderService orderService() {
		return new OrderServiceImpl(
			memberRepository(),
			discountPolicy());
	}

	@Bean
	public MemberRepository memberRepository() {
		return new MemoryMemberRepository();
	}

	@Bean
	public DiscountPolicy discountPolicy() {
		return new RateDiscountPolicy();
	}
}
현재 AppConfig를 보면 애노테이션 기반의 자바 설정 클래스로 ApplicationContext, 즉 스프링 컨테이너를 만들려고 하는 것이다. 스프링 컨테이너는 XML을 기반으로 만들 수 있고, 애노테이션 기반의 자바 설정 클래스로 만들 수 있다.
그림을 보면서 더 알아보자.
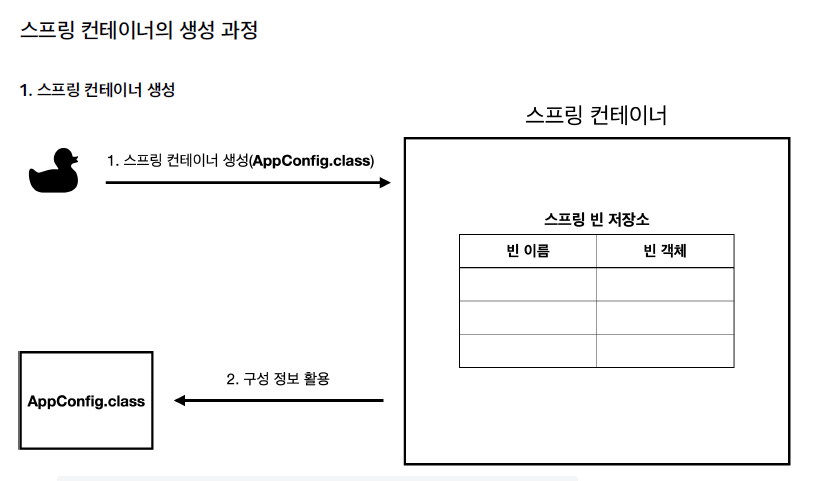
먼저 스프링 컨테이너를 생성하면서 AppConfig라는 구성 설정 정보를 지정한다. 스프링 컨테이너 안을 잘 보면 스프링 빈 저장소(Spring Bean Repository)가 존재한다. 보다시피 스프링 컨테이너(주로 ApplicationContext) 내부에서 관리되는, 생성된 빈(Bean) 객체들을 Key-Value(빈 이름 - 빈 객체) 쌍으로 저장하는 맵 구조다.
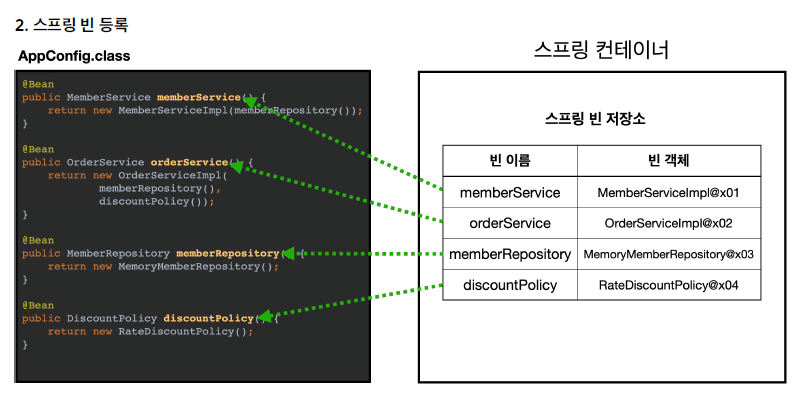
이후에 스프링 컨테이너가 AppConfig.class 정보를 보고 "아, 얘네들은 내가 객체 생성을 해 줘야겠다." 라고 인지를 하고 AppConfig.class를 참고해서 스프링 빈 저장소에 스프링 빈을 등록한다. AppConfig.class의 @Bean 애노테이션 붙은 것들을 아래와 같이 전부 호출한다.
그 다음 스프링은 스프링 빈 의존관계를 설정할 준비를 한다. 아까 위에 4개의 객체를 생성했으니 이제 의존 관계를 넣어주는 것이다.
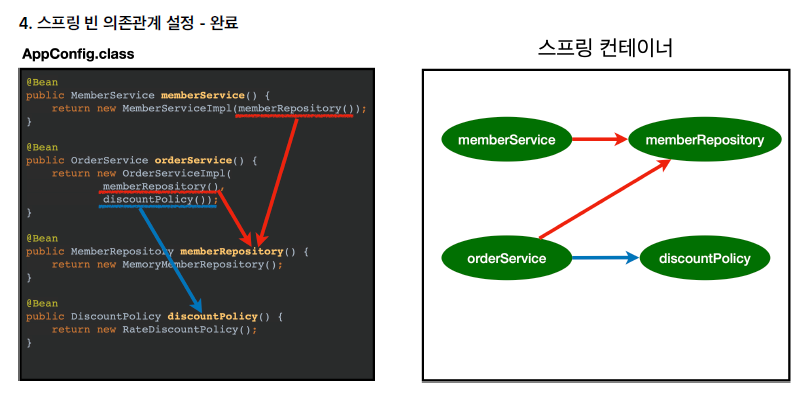
이처럼 스프링은 빈을 생성하고, 의존관계를 주입하는 단계가 나눠져 있다. 근데 자바 코드로 스프링 빈을 등록하면 생성자를 호출하면서 의존관계 주입도 한번에 처리된다. 자세한 내용은 의존관계 자동 주입 부분에서 다시 살펴보자. 아무튼, 지금까지 내용을 정리하자면 스프링 컨테이너를 생성하고, 설정 정보를 참고해서 스프링 빈도 등록하고 의존관계도 설정한다는 것이다.
이제 컨테이너에 등록한 빈들이 제대로 등록이 됐는지 확인해보자.
package hello.core.beanfind;

import hello.core.AppConfig;
import org.junit.jupiter.api.DisplayName;
import org.junit.jupiter.api.Test;
import org.springframework.beans.factory.config.BeanDefinition;
import org.springframework.context.annotation.AnnotationConfigApplicationContext;

class ApplicationContextInfoTest {

    AnnotationConfigApplicationContext ac = new AnnotationConfigApplicationContext(AppConfig.class);

    @Test
    @DisplayName("모든 빈 출력하기")
    void findAllBean() {

        String[] beanDefinitionNames = ac.getBeanDefinitionNames();

        for (String beanDefinitionName : beanDefinitionNames) {
            Object bean = ac.getBean(beanDefinitionName);
            System.out.println("name = " + beanDefinitionName + " object = " + bean);
        }
    }

    @Test
    @DisplayName("애플리케이션 빈 출력하기")
    void findApplicationBean() {

        String[] beanDefinitionNames = ac.getBeanDefinitionNames();

        for (String beanDefinitionName : beanDefinitionNames) {
            Object bean = ac.getBean(beanDefinitionName);
            BeanDefinition beanDefinition = ac.getBeanDefinition(beanDefinitionName);

            if (beanDefinition.getRole() == BeanDefinition.ROLE_APPLICATION) {
                System.out.println("name = " + beanDefinitionName + " object = " + bean);
            }
        }
    }
}-
모든 빈 출력하기
- 실행하면 스프링에 등록된 모든 빈 정보를 출력할 수 있다.
ac.getBeanDefinitionNames(): 스프링에 등록된 모든 빈 이름을 조회한다.ac.getBean(): 빈 이름으로 빈 객체(인스턴스)를 조회한다.
-
애플리케이션 빈 출력하기
- 스프링이 내부에서 사용하는 빈은 제외하고, 내가 등록한 빈만 출력한다.
- 스프링이 내부에서 사용하는 빈은
getRole()로 구분할 수 있다.ROLE_APPLICATION: 일반적으로 사용자가 정의한 빈ROLE_INFRASTRUCTURE: 스프링이 내부에서 사용하는 빈
하지만, 이는 전부 조회하는 것이므로 실무에 쓰일 일이 딱히 없다. 스프링 빈을 조회하는 가장 기본적인 동작부터 어떻게 하는지 하나씩 살펴보자.
🔍 스프링 빈 조회 - 기본
빈을 조회하는 가장 간단한 방법은 ac.getBean(빈 이름, 타입)이라는 메서드를 쓰면 된다. 그리고 빈 이름을 생략하고 타입만 줘도 된다. 조회할 스프링 빈이 없다면 NoSuchBeanDefinitionException 예외가 발생한다.
코드로 한번 살펴보자.
// ApplicationContextBasicFindTest.java
package hello.core.beanfind;

import hello.core.AppConfig;
import hello.core.member.MemberService;
import hello.core.member.MemberServiceImpl;
import org.junit.jupiter.api.Assertions;
import org.junit.jupiter.api.DisplayName;
import org.junit.jupiter.api.Test;
import org.springframework.beans.factory.NoSuchBeanDefinitionException;
import org.springframework.context.annotation.AnnotationConfigApplicationContext;
import static org.assertj.core.api.AssertionsForClassTypes.assertThat;
import static org.junit.jupiter.api.Assertions.assertThrows;

public class ApplicationContextBasicFindTest {

    AnnotationConfigApplicationContext ac = new AnnotationConfigApplicationContext(AppConfig.class);

    @Test
    @DisplayName("빈 이름으로 조회")
    void findBeanByName() {
        MemberService memberService = ac.getBean("memberService", MemberService.class);
        assertThat(memberService).isInstanceOf(MemberServiceImpl.class);
    }

    @Test
    @DisplayName("이름없이 타입으로만 조회")
    void findBeanByType() {
        // 빈 이름을 빼도 된다
        MemberService memberService = ac.getBean(MemberService.class);
        assertThat(memberService).isInstanceOf(MemberServiceImpl.class);
    }

    @Test
    @DisplayName("구체 타입으로 조회")
    void findBeanByName2() {
        MemberService memberService = ac.getBean("memberService", MemberServiceImpl.class);
        assertThat(memberService).isInstanceOf(MemberServiceImpl.class);
    }

    @Test
    @DisplayName("빈 이름으로 조회가 안됨")
    void findBeanByNameX() {
        // MemberService memberService = ac.getBean("xxxx", MemberService.class);
        assertThrows(NoSuchBeanDefinitionException.class,
                () -> ac.getBean("xxxx", MemberService.class));
    }
}
그리고 스프링 빈으로 조회할 때 동일한 타입이 둘 이상이면 오류가 발생하는데, 이때는 빈 이름을 지정해주면 된다. 그냥 테스트 코드를 한번 보자.
// ApplicationContextSameBeanFindTest.java
package hello.core.beanfind;

import hello.core.AppConfig;
import hello.core.discount.DiscountPolicy;
import hello.core.member.MemberRepository;
import hello.core.member.MemoryMemberRepository;
import org.junit.jupiter.api.DisplayName;
import org.junit.jupiter.api.Test;
import org.springframework.beans.factory.NoUniqueBeanDefinitionException;
import org.springframework.context.annotation.AnnotationConfigApplicationContext;
import org.springframework.context.annotation.Bean;
import org.springframework.context.annotation.Configuration;
import java.util.Map;
import static org.assertj.core.api.AssertionsForClassTypes.assertThat;
import static org.junit.jupiter.api.Assertions.assertThrows;

public class ApplicationContextSameBeanFindTest {

    AnnotationConfigApplicationContext ac = new AnnotationConfigApplicationContext(SameBeanConfig.class);

    @Test
    @DisplayName("타입으로 조회 시 같은 타입이 둘 이상 있으면, 중복 오류가 발생한다.")
    void findBeanByTypeDuplicate() {
        assertThrows(NoUniqueBeanDefinitionException.class,
                () -> ac.getBean(MemberRepository.class));
    }

    @Test
    @DisplayName("타입으로 조회 시 같은 타입이 둘 이상 있으면, 빈 이름을 지정하면 된다.")
    void findBeanByName() {
        MemberRepository memberRepository = ac.getBean("memberRepository1", MemberRepository.class);
        assertThat(memberRepository).isInstanceOf(MemberRepository.class);
    }

    @Test
    @DisplayName("특정 타입을 모두 조회하기")
    void findAllBeanByType() {
        Map<String, MemberRepository> beansOfType = ac.getBeansOfType(MemberRepository.class);
        for (String key : beansOfType.keySet()) {
            System.out.println("key = " + key + " value = " + beansOfType.get(key));
        }
        System.out.println("beansOfType = " + beansOfType);
        assertThat(beansOfType.size()).isEqualTo(2);
    }

    @Configuration
    static class SameBeanConfig {

        @Bean
        public MemberRepository memberRepository1() {
            return new MemoryMemberRepository();
        }

        @Bean
        public MemberRepository memberRepository2() {
            return new MemoryMemberRepository();
        }
    }
}
그리고 상속관계, 부모와 자식 간의 관계일 때 어떻게 조회되는지 살펴보도록 하자.
👨👩👦 스프링 빈 조회 - 상속 관계 (중요)
예를 들어, 어떤 부모 타입으로 조회했는데 자식이 여러 개 있다고 해보자. 그럼 그 자식 빈들이 다 딸려 나온다. 그래서 모든 자바 객체의 최고 부모인 Object 타입으로 조회해보면, 모든 스프링 빈을 조회한다. 아래 그림을 보고 이해해보자.
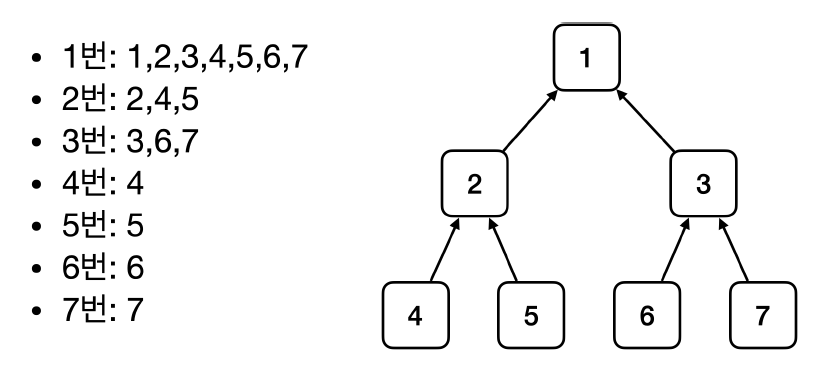
이런 부모 자식과의 관계가 있을 때, 만약 1번 타입으로 조회를 한다면 1, 2, 3, 4, 5, 6, 7이 다 나온다. 2번으로 조회하면 2, 4, 5가 나오고, 3번으로 조회하면 3, 6, 7이 나오는 식이다. 테스트 코드를 짜보자.
// ApplicationContextExtendsFindTest.java
package hello.core.beanfind;

import hello.core.discount.DiscountPolicy;
import hello.core.discount.FixDiscountPolicy;
import hello.core.discount.RateDiscountPolicy;
import org.junit.jupiter.api.DisplayName;
import org.junit.jupiter.api.Test;
import org.springframework.beans.factory.NoUniqueBeanDefinitionException;
import org.springframework.context.annotation.AnnotationConfigApplicationContext;
import org.springframework.context.annotation.Bean;
import org.springframework.context.annotation.Configuration;
import java.util.Map;
import static org.assertj.core.api.AssertionsForClassTypes.assertThat;
import static org.junit.jupiter.api.Assertions.assertThrows;

public class ApplicationContextExtendsFindTest {

    AnnotationConfigApplicationContext ac = new AnnotationConfigApplicationContext(TestConfig.class);

    @Test
    @DisplayName("부모 타입으로 조회 시, 자식이 둘 이상 있으면, 중복 오류가 발생한다.")
    void findBeanByParentTypeDuplicate() {
        DiscountPolicy bean = ac.getBean(DiscountPolicy.class);
        assertThrows(NoUniqueBeanDefinitionException.class,
                () -> ac.getBean(DiscountPolicy.class)
        );
    }

    @Test
    @DisplayName("부모 타입으로 조회 시, 자식이 둘 이상 있으면, 빈 이름을 지정하면 된다.")
    void findBeanByParentTypeBeanName() {
        DiscountPolicy rateDiscountPolicy = ac.getBean("rateDiscountPolicy", DiscountPolicy.class);
        assertThat(rateDiscountPolicy).isInstanceOf(RateDiscountPolicy.class);
    }

    @Test
    @DisplayName("특정 하위 타입으로 조회")
    void findBeanBySubType() {
        RateDiscountPolicy bean = ac.getBean(RateDiscountPolicy.class);
        assertThat(bean).isInstanceOf(RateDiscountPolicy.class);
    }

    @Test
    @DisplayName("부모 타입으로 모두 조회하기.")
    void findAllBeanByParentType() {
        Map<String, DiscountPolicy> beansOfType = ac.getBeansOfType(DiscountPolicy.class);
        assertThat(beansOfType.size()).isEqualTo(2);
        for (String key : beansOfType.keySet()) {
            System.out.println("key = " + key + " value = " + beansOfType.get(key));
        }
    }

    @Test
    @DisplayName("부모 타입으로 모두 조회하기 - Object")
    void findAllBeanByObjectType() {
        Map<String, Object> beansOfType = ac.getBeansOfType(Object.class);
        for (String key : beansOfType.keySet()) {
            System.out.println("key = " + key + " value = " + beansOfType.get(key));
        }
    }

    @Configuration
    static class TestConfig {
        @Bean
        public DiscountPolicy rateDiscountPolicy() {
            return new RateDiscountPolicy();
        }

        @Bean
        public DiscountPolicy fixDiscountPolicy() {
            return new FixDiscountPolicy();
        }
    }
}
이제 BeanFactory와 ApplicationContext에 대해 알아보자. 아래 계층구조 그림을 보자.
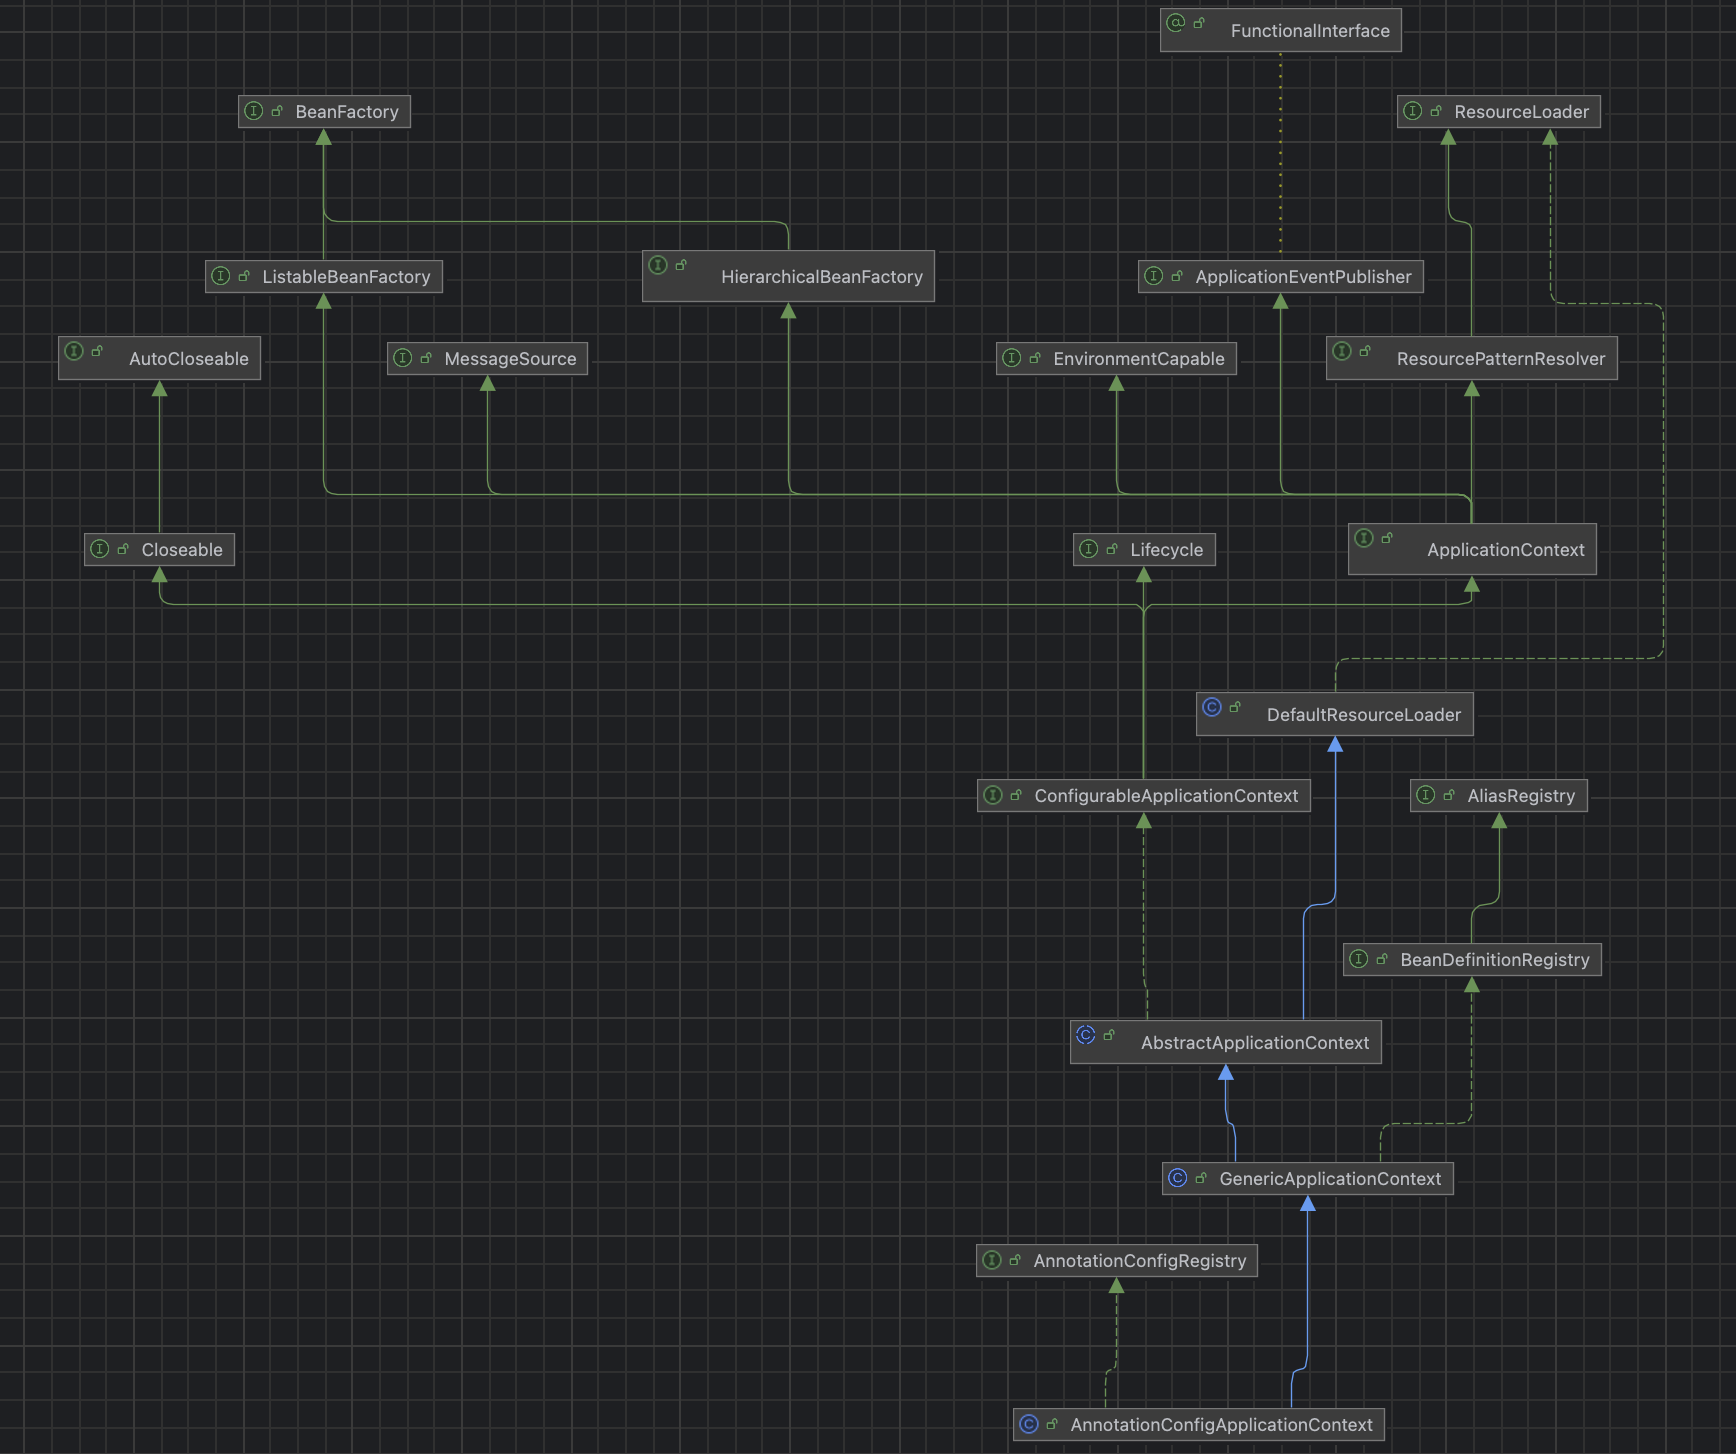
최상위에 BeanFactory라는 인터페이스가 있고 ApplicationContext가 BeanFactory를 상속받고 있다. 그러니까 여기서 ApplicationContext라는 것은 BeanFactory에 부가기능을 더한 것이라는 것을 짐작할 수 있다. 그리고 ApplicationContext 밑에 AnnotationConfigApplicationContext와 같은 구현 객체가 있다.
정리하자면, BeanFactory는 스프링 컨테이너의 최상위 인터페이스이자 스프링 빈을 관리하고 조회하는 역할을 담당한다. getBean() 메서드를 통해 빈 정보를 가져왔던 것과 같이 지금까지 사용했던 대부분의 기능은 BeanFactory가 제공하는 기능이다. BeanFactory의 내부 코드를 살펴보면 아래와 같다.
public interface BeanFactory {
    String FACTORY_BEAN_PREFIX = "&";
    char FACTORY_BEAN_PREFIX_CHAR = '&';

    Object getBean(String name) throws BeansException;

    <T> T getBean(String name, Class<T> requiredType) throws BeansException;

    Object getBean(String name, @Nullable Object... args) throws BeansException;

    <T> T getBean(Class<T> requiredType) throws BeansException;

    <T> T getBean(Class<T> requiredType, @Nullable Object... args) throws BeansException;

    <T> ObjectProvider<T> getBeanProvider(Class<T> requiredType);

    <T> ObjectProvider<T> getBeanProvider(ResolvableType requiredType);

    <T> ObjectProvider<T> getBeanProvider(ParameterizedTypeReference<T> requiredType);

    boolean containsBean(String name);

    boolean isSingleton(String name) throws NoSuchBeanDefinitionException;

    boolean isPrototype(String name) throws NoSuchBeanDefinitionException;

    boolean isTypeMatch(String name, ResolvableType typeToMatch) throws NoSuchBeanDefinitionException;

    boolean isTypeMatch(String name, Class<?> typeToMatch) throws NoSuchBeanDefinitionException;

    @Nullable Class<?> getType(String name) throws NoSuchBeanDefinitionException;

    @Nullable Class<?> getType(String name, boolean allowFactoryBeanInit) throws NoSuchBeanDefinitionException;

    String[] getAliases(String name);
}
그 다음으로 ApplicationContext는 BeanFactory 기능을 모두 상속받아서 제공한다. 근데 빈을 관리하고 검색하는 기능을 BeanFactory가 제공해주는데, 그렇다면 둘의 차이가 뭐지? 애플리케이션을 개발할 때는 빈을 관리하고 조회하는 기능은 물론이고, 다른 수많은 부가기능이 필요하다.
그럼 어떤 부가기능을 제공해주냐면,
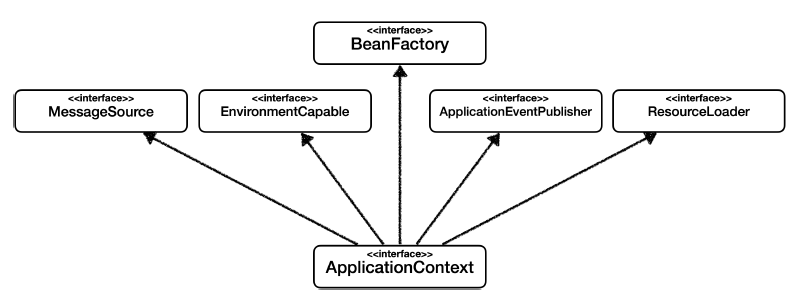
package org.springframework.context;

import org.jspecify.annotations.Nullable;
import org.springframework.beans.factory.HierarchicalBeanFactory;
import org.springframework.beans.factory.ListableBeanFactory;
import org.springframework.beans.factory.config.AutowireCapableBeanFactory;
import org.springframework.core.env.EnvironmentCapable;
import org.springframework.core.io.support.ResourcePatternResolver;

public interface ApplicationContext extends EnvironmentCapable, ListableBeanFactory, HierarchicalBeanFactory, MessageSource, ApplicationEventPublisher, ResourcePatternResolver {
    String getId();

    String getApplicationName();

    String getDisplayName();

    long getStartupDate();

    @Nullable ApplicationContext getParent();

    AutowireCapableBeanFactory getAutowireCapableBeanFactory() throws IllegalStateException;
}ApplicationContext는 보다시피 여러가지 인터페이스들을 받고 있다. 그 중 몇가지만 살펴보자면,
-
MessageSource: 예를 들어, 한국에서 들어오면 한국어로, 영어권에서 들어오면 영어로 출력하는 웹사이트를 본 적이 있을 것이다. 이런 것을 국제화 기능이라고 한다. -
EnvironmentCapable: 개발할 때는 크게 3가지 환경이 있다. 로컬 개발 환경, 테스트 서버, 운영 환경이다. 각 환경별로 어떤 데이터베이스에 연결해야 할지, 이런 환경 변수와 관련된 정보를 처리해주는 기능을 제공한다. -
ApplicationEventPublisher: 애플리케이션 내에 어떤 이벤트를 발행하고 구독하는 모델을 편리하게 지원해주는 기능이다. -
ResourceLoader: 파일이나 클래스 패스나 외부 URL 같은 곳에서 파일 같은 걸 읽어 들여 내부에서 사용할 때, 추상화해서 편리하게 쓸 수 있는 기능을 제공한다.
이러한 부가기능들은 보통 일반적인 애플리케이션 만들 때는 필요한 공통 기능들이다. 이것에 더해서 ApplicationContext라는 것이 BeanFactory의 기능에 더해서 부가기능을 제공해준다.
🔠 다양한 설정 형식 지원 - 자바 코드, XML
스프링 컨테이너는 다양한 형식의 설정 정보를 받아들일 수 있게 정말 유연하게 설계되어 있다. 아래 그림을 보자.
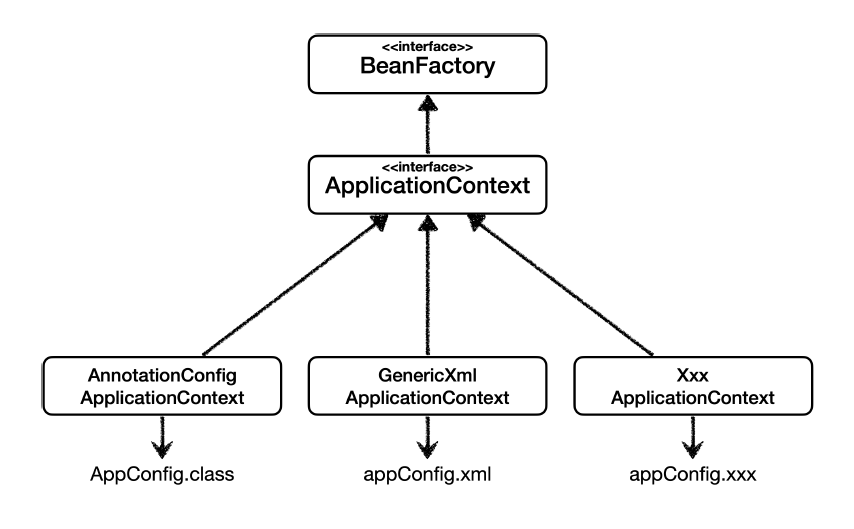
ApplicationContext를 구현한 것 중에 GenericXml도 있다. GenericXml은 자바 코드가 아니라 XML이라는 문서를 설정 정보로 사용하는 것이다. 그리고 내가 임의로 구현해서 또 만들 수도 있다.
애노테이션 기반 자바 코드 설정을 사용할 것이라면 지금까지 했던 과정을 수행하면 된다.
new AnnotationConfigApplicationContext(AppConfig.class)AnnotationConfigApplicationContext클래스를 사용하면서 자바 코드로 된 설정 정보를 넘기면 된다.
XML도 똑같다. 하지만, 최근에는 스프링 부트를 많이 사용하면서 XML 기반의 설정은 잘 사용하지 않는다. 아직 많은 레거시 프로젝트들이 XML로 되어 있고, 또 XML을 사용하면 컴파일 없이 빈 설정 정보를 변경할 수 있는 장점도 있으므로 한번쯤 배워두는 것도 괜찮다.
사용 방법은 GenericXmlApplicationContext를 사용하면서 XML 설정 파일을 넘기면 된다. 코드를 살펴보자.
// XmlAppContext.java
package hello.core.xml;

import hello.core.member.MemberService;
import org.junit.jupiter.api.Test;
import org.springframework.context.ApplicationContext;
import org.springframework.context.support.GenericXmlApplicationContext;
import static org.assertj.core.api.Assertions.assertThat;

public class XmlAppContext {

    @Test
    void xmlAppContext() {
        ApplicationContext ac = new GenericXmlApplicationContext("appConfig.xml");
        MemberService memberService = ac.getBean("memberService", MemberService.class);
        assertThat(memberService).isInstanceOf(MemberService.class);
    }
}
// appConfig.xml
<?xml version="1.0" encoding="UTF-8"?>
<beans xmlns="http://www.springframework.org/schema/beans"
xmlns:xsi="http://www.w3.org/2001/XMLSchema-instance"
xsi:schemaLocation="http://www.springframework.org/schema/beans http://www.springframework.org/schema/beans/spring-beans.xsd">
<bean id="memberService" class="hello.core.member.MemberServiceImpl">
<constructor-arg name="memberRepository" ref="memberRepository"/>
</bean>
<bean id="memberRepository" class="hello.core.member.MemoryMemberRepository"></bean>
<bean id="orderService" class="hello.core.order.OrderServiceImpl">
<constructor-arg name="memberRepository" ref="memberRepository"/>
<constructor-arg name="discountPolicy" ref="discountPolicy"/>
</bean>
<bean id="discountPolicy" class="hello.core.discount.RateDiscountPolicy"></bean>
</beans>XML 기반의 appConfig.xml 스프링 설정 정보와 자바 코드로 된 AppConfig.java 설정 정보를 비교해보면 거의 비슷하다는 것을 알 수 있다.
📰 스프링 빈 설정 메타 정보 - BeanDefinition
스프링은 어떻게 이런 다양한 설정 형식을 지원하는 걸까? 그 중심에는 BeanDefinition이라는 추상화가 있다.
쉽게 말해, 이것도 역할과 구현을 개념적으로 나눈 것이다.
- XML을 읽어서
BeanDefinition을 만들면 된다. - 자바 코드를 읽어서
BeanDefinition을 만들면 된다. - 스프링 컨테이너는 자바 코드인지, XML인지 몰라도 된다. 오직
BeanDefinition만 알면 된다는 것이다.
이 BeanDefinition을 빈 설정 메타정보라고 한다. @Bean, XML에서 <bean>을 하면 이 빈 하나당 각각 메타 정보가 생성된다고 이해하면 된다. 스프링 컨테이너는 이 메타정보를 기반으로 스프링 빈을 생성한다.
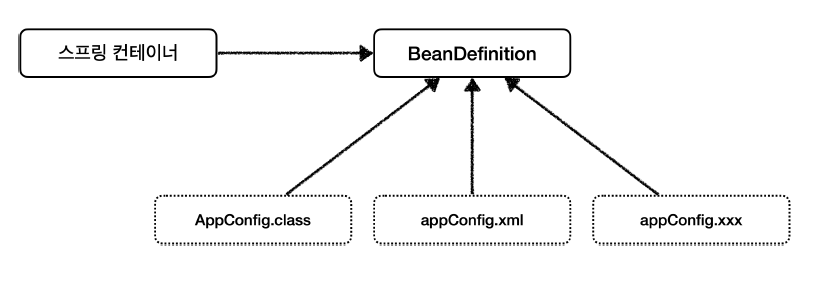
이 설계 자체도 추상화에만 의존하도록 잘 설계되었다는 것이다. BeanDefinition 자체가 인터페이스다. 코드 레벨로 조금만 더 깊이 들어가보자.
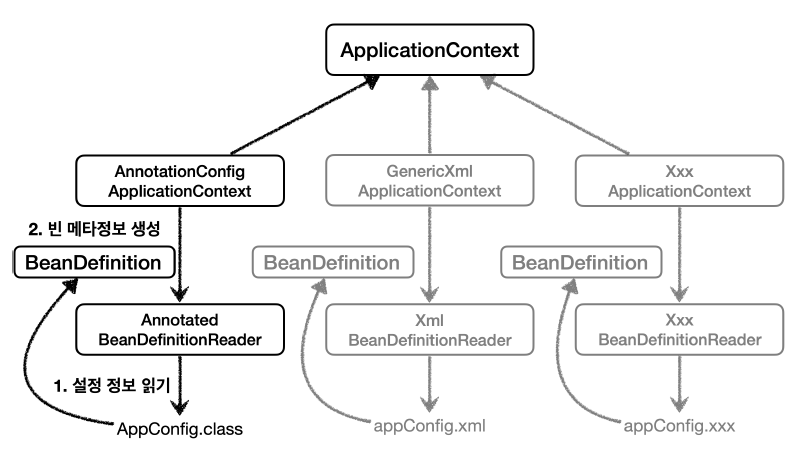
-
AnnotationConfigApplicationContext는AnnotatedBeanDefinitionReader를 사용해서AppConfig.class를 읽고BeanDefinition을 생성한다. -
GenericXmlApplicationContext는XmlBeanDefinitionReader를 사용해서appConfig.xml설정 정보를 읽고BeanDefinition을 생성한다. -
새로운 형식의 설정 정보가 추가되면,
XxxBeanDefinitionReader를 만들어서BeanDefinition을 생성하면 된다.
BeanDefinition 정보
package org.springframework.beans.factory.config;

import org.jspecify.annotations.Nullable;
import org.springframework.beans.BeanMetadataElement;
import org.springframework.beans.MutablePropertyValues;
import org.springframework.core.AttributeAccessor;
import org.springframework.core.ResolvableType;

public interface BeanDefinition extends AttributeAccessor, BeanMetadataElement {
    String SCOPE_SINGLETON = "singleton";
    String SCOPE_PROTOTYPE = "prototype";
    int ROLE_APPLICATION = 0;
    int ROLE_SUPPORT = 1;
    int ROLE_INFRASTRUCTURE = 2;

    void setParentName(@Nullable String parentName);

    @Nullable String getParentName();

    void setBeanClassName(@Nullable String beanClassName);

    @Nullable String getBeanClassName();

    void setScope(@Nullable String scope);

    @Nullable String getScope();

    void setLazyInit(boolean lazyInit);

    boolean isLazyInit();

    void setDependsOn(@Nullable String... dependsOn);

    String @Nullable [] getDependsOn();

    void setAutowireCandidate(boolean autowireCandidate);

    boolean isAutowireCandidate();

    void setPrimary(boolean primary);

    boolean isPrimary();

    void setFallback(boolean fallback);

    boolean isFallback();

    void setFactoryBeanName(@Nullable String factoryBeanName);

    @Nullable String getFactoryBeanName();

    void setFactoryMethodName(@Nullable String factoryMethodName);

    @Nullable String getFactoryMethodName();

    ConstructorArgumentValues getConstructorArgumentValues();

    default boolean hasConstructorArgumentValues() {
        return !this.getConstructorArgumentValues().isEmpty();
    }

    MutablePropertyValues getPropertyValues();

    default boolean hasPropertyValues() {
        return !this.getPropertyValues().isEmpty();
    }

    void setInitMethodName(@Nullable String initMethodName);

    @Nullable String getInitMethodName();

    void setDestroyMethodName(@Nullable String destroyMethodName);

    @Nullable String getDestroyMethodName();

    void setRole(int role);

    int getRole();

    void setDescription(@Nullable String description);

    @Nullable String getDescription();

    ResolvableType getResolvableType();

    boolean isSingleton();

    boolean isPrototype();

    boolean isAbstract();

    @Nullable String getResourceDescription();

    @Nullable BeanDefinition getOriginatingBeanDefinition();
}-
BeanClassName: 생성할 빈의 클래스 이름(자바 설정 처럼 팩토리 역할의 빈을 사용하면 없음) -
factoryBeanName: 팩토리 역할의 빈을 사용할 경우 이름, 예)appConfig -
factoryMethodName: 빈을 생성할 팩토리 메서드 지정, 예)memberService -
Scope: 싱글톤(기본값) -
lazyInit: 스프링 컨테이너를 생성할 때 빈을 생성하는 것이 아니라, 실제 빈을 사용할 때까지 최대한 생성을 지연 처리 하는지 여부 -
InitMethodName: 빈을 생성하고, 의존관계를 적용한 뒤에 호출되는 초기화 메서드 명 -
DestroyMethodName: 빈의 생명주기가 끝나서 제거하기 직전에 호출되는 메서드 명 -
Constructor arguments,Properties: 의존관계 주입에서 사용한다. (자바 설정 처럼 팩토리 역할의 빈을 사용하면 없음)
테스트 코드를 직접 짜보자.
// BeanDefinitionTest.java
package hello.core.beanDefinition;

import hello.core.AppConfig;
import org.junit.jupiter.api.DisplayName;
import org.junit.jupiter.api.Test;
import org.springframework.beans.factory.config.BeanDefinition;
import org.springframework.context.annotation.AnnotationConfigApplicationContext;

public class BeanDefinitionTest {

    AnnotationConfigApplicationContext ac = new AnnotationConfigApplicationContext(AppConfig .class);

    @Test
    @DisplayName("빈 설정 메타정보 확인")
    void findApplicationBean() {
        String[] beanDefinitionNames = ac.getBeanDefinitionNames();

        for (String beanDefinitionName : beanDefinitionNames) {
            BeanDefinition beanDefinition = ac.getBeanDefinition(beanDefinitionName);

            if (beanDefinition.getRole() == BeanDefinition.ROLE_APPLICATION) {
                System.out.println("beanDefinitionName = " + beanDefinitionName + " beanDefinition = " + beanDefinition);
            }
        }
    }
}
정리하면,
-
BeanDefinition을 직접 생성해서 스프링 컨테이너에 등록할 수도 있다. 하지만 실무에서BeanDefinition을 직접 정의하거나 사용할 일은 거의 없다. -
BeanDefinition에 대해서는 너무 깊이 있게 이해하기 보다는, 스프링이 다양한 형태의 설정 정보를BeanDefinition으로 추상화해서 사용한다는 정도만 이해하면 된다. -
가끔 스프링 코드나 스프링 관련 오픈 소스의 코드를 볼 때,
BeanDefinition이라는 것이 보일 때가 있다. 이때 이러한 메커니즘을 떠올리면 된다.
아무튼, 스프링은 BeanDefinition이라는 걸로 스프링 빈의 설정 메타 정보를 추상화 한다는 것만 기억하자. 추가적으로, 스프링 빈을 만들 때는 2가지 방법이 있는데, 하나는 직접적으로 스프링 빈을 등록하는 방법과 다른 하나는 FactoryBean이라는 것을 통해 등록하는 방법이 있고, 일반적으로 자바 config을 쓰는 것은 FactoryBean을 통해 등록하는 방식이라고 이해하면 되겠다.