✒️ Functional Test Code를 작성해보자.
1. 내가 어떤 기능을 구현할 것인지를 설계한다.
- 초기 렌더링 시 빨강색 배경을 가진 버튼을 생성한다.
- 이후 버튼을 클릭할 시, 배경 색상을 파랑색으로 변경한다.
- 이후 다시 버튼을 클릭할 시, 원래 색상이었던 빨강색으로 배경을 변경한다.
2. 렌더링할 컴포넌트인 App.js 에 테스트에 필요한 최소한의 코드를 작성한다.
// App.js
import { useState } from 'react';
import './App.css';

function App() {
    return <div></div>;
}

export default App;
3. 테스트를 진행할 요소를 불러와 테스트 코드를 작성한다.
toHaveStylematcher 는 요소가 특정 CSS 스타일을 가졌는지 체크한다.toHaveTextContentmather 는 요소의 innerText가 인자와 일치하는지 체크한다.fireEvent객체는 가상 DOM의 이벤트를 Trigger 하는 역할을 한다.
import { fireEvent, render, screen } from '@testing-library/react';
import App from './App';
test('버튼의 초기 색상이 올바르며, 클릭시 색상이 변경됨.', () => {
render(<App />);
const buttonElm = screen.getByRole('button', { name: 'Change to blue' });
// 버튼 클릭 전 요소의 배경 색상이 빨강색과 일치하는지를 체크.
expect(buttonElm).toHaveStyle({ backgroundColor: 'red' });
// 가상 DOM (여기서는 buttonElm) 에 Click Event를 Trigger 시킨다.
fireEvent.click(buttonElm);
// 버튼 클릭 이후 요소의 배경 색상과 innerText가 예상과 일치하는지 체크
expect(buttonElm).toHaveStyle({ backgroundColor: 'blue' });
expect(buttonElm).toHaveTextContent('Change to red');
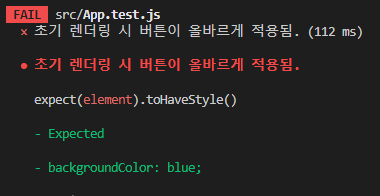
});4. 테스트를 1차적으로 실행하여 실패가 되었는지 (red) 확인한다.
5. 테스트를 통과시키기 위해 React 코드를 App.js에 작성.
import { useState } from 'react';
import './App.css';
function App() {
const [buttonColor, setButtonColor] = useState('red');
const newButtonColor = buttonColor === 'red' ? 'blue' : 'red';
return (
<div>
<button style={{ backgroundColor: buttonColor }} onClick={() => setButtonColor(newButtonColor)}>
Change to {newButtonColor}
</button>
</div>
);
}
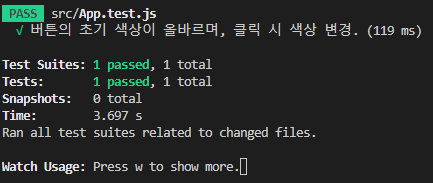
export default App;6. 테스트가 통과되었음을 확인 (green) 하고, 다음 개발에 착수
Reference

항상 왜 이걸 써야하는지가 궁금한 사람