http 서버를 통해서 Push 이벤트를 받을 수 있는 방법이 없을까 찾아보다 SSE(Server-Sent Event)에 대해서 알게되었다.
이미 표준으로 정의되서 사용된지는 꽤 오래된 예전(?) 기술이다.
SSE
Server-Sent Event(SSE)는 Web Server에서 HTTP를 통해서 Web Client에게 data를 push하는 기술이다.
동작
Web Page에서 커넥션을 요청하면 서버에서 종료하기 전까지는 연결이 계속 유지되고 해당 커넥션을 통해서 Push를 전달받는다.
연결
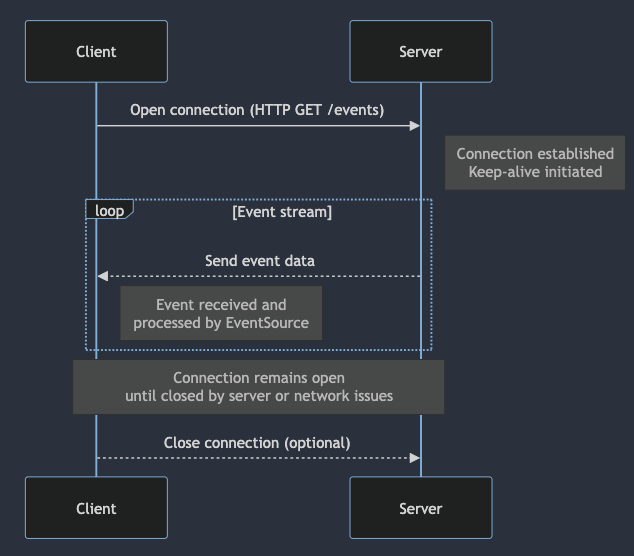
서버에서는 연결유지와 push stream를 위해서 header 설정이 필요하고
X-Accell-Buffering: no
Content-Type: text/event-stream
Cache-Control: no-cache
stream format
push stream의 다음과 같은 형태로 정의되고,
- 우선 UTF-8 encoding된 text이다.
\n\n으로 구분:으로 시작하는 경우는 comment이다.
stream의 필드는 다음과 같다.
data: 전달하는 데이터, 포멧이 정의된건 없다. text, json, 원하는 형태로 전달하면된다.id: EventSource에서 사용할 last event idevent: event 의 타입으로, 값이 존재하는 경우 해당 client에는 해당 event 이름을 linstening하는 lisetner에게 전달된다. 없으면onmessagehandler에게 전달된다.retry: reconnection timeout
text 형태로 전달하는 경우
: this is comment line

data: some text

data: another message
event에 이름을 지정해서 전달하는 경우
event: userconnect
data: {"username": "bobby", "time": "02:33:48"}
EventSource
Web Page에서는 EventSource 를 통해서 서버에서 전달되는 push message를 처리한다.
Hello SSE
간단하게 go lang을 이용해서 SSE HTTP server를 만들어 동작을 확인해보자.
매 초마다 현재 시간을 SSE event로 push해 보도록 하자
// MDN 코드를 조금 수정했다


<button>Close the connection</button>

<div id="sse-data">
</div>

<script>
    const button = document.querySelector('button');
    const evtSource = new EventSource('http://localhost:8080/sse-events');
    console.log('credentials', evtSource.withCredentials);
    console.log('readyState', evtSource.readyState);
    console.log('url', evtSource.url);


    const eventData = document.getElementById('sse-data');

    evtSource.onopen = function() {
        console.log("Connection to server opened.");
        eventData.innerHTML = 'Connection to server opened.';
    };

    evtSource.onmessage = function(e) {
        // const newElement = document.createElement("li");

        // newElement.textContent = "message: " + e.data;
        // eventList.appendChild(newElement);
        console.log('data', e.data);
        eventData.innerHTML = e.data;
    };

    evtSource.onerror = function() {
        console.log("EventSource failed.");
    };

    button.onclick = function() {
        console.log('Connection closed');
        evtSource.close();
    };
그 다음 서버 코드는 golang으로 작성되었고, 매초마다 현재 시간 문자열을 flush하고,
30초가 지나면 connection을 종료합니다.
func main() {
http.Handle("/", http.FileServer(http.Dir("./public")))
// '/events'는 event source
http.HandleFunc("/sse-events", sseEventsHandler)
http.ListenAndServe(":8080", nil)
}
func sseEventsHandler(w http.ResponseWriter, r *http.Request) {
// 가장 중요한 /sse-events handler 코드입니다
w.Header().Set("X-Accel-Buffering", "no")
w.Header().Set("Content-Type", "text/event-stream")
w.Header().Set("Cache-Control", "no-cache")
//w.Header().Set("Connection", "keep-alive")
// 30초간 1초마다 현재시간을 내보낸다.
for i := 0; i < 30; i++ {
now := time.Now()
nowStr := now.Format("2006-01-02 15:04:05")
data := fmt.Sprintf("data: %s\n", nowStr)
fmt.Fprintf(w, "%s\n\n", data)
time.Sleep(1 * time.Second)
w.(http.Flusher).Flush()
}
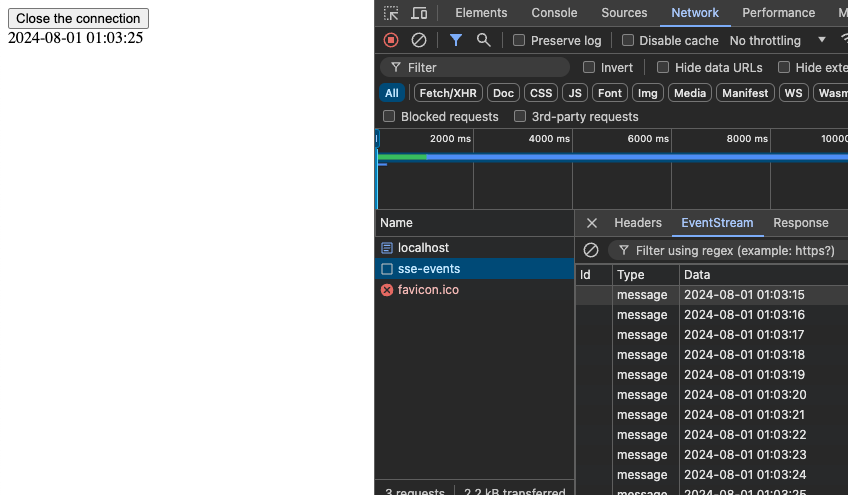
}최신 코드는 Github 레포를 참고하세요
Network - event stream을 선택 - 'EventStream' 을 선택하면 다음과 같이 stream의 내용을 확인할 수 있다.
참고
https://developer.mozilla.org/en-US/docs/Web/API/EventSource
