
Today I Learned
Spring MVC
1. Spring MVC
1) MVC Design Pattern
(1) MVC : Model-View-Controller
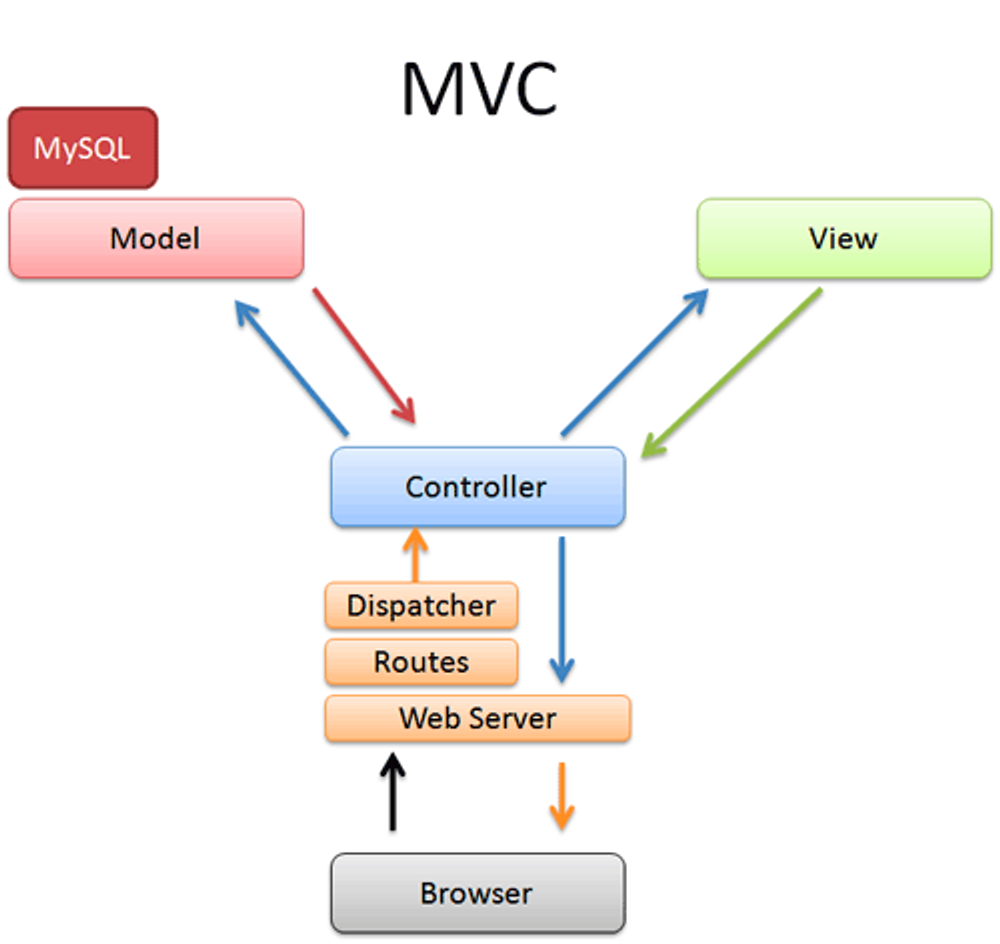
소프트웨어를 구성하는 요소들을 Model, View, Controller로 구분하여 관심사 분리
(2) Model
- 데이터와 비즈니스 로직을 담당
- 앱이 포함해야할 데이터가 무엇인지를 정의
- 데이터베이스와 연동하여 데이터를 저장하고 불러오는 등의 작업을 수행
(3) View
- 사용자 인터페이스를 담당
- 앱의 데이터를 보여주는 방식을 정의
- 사용자가 보는 화면과 버튼, 폼 등을 디자인하고 구현
- 표시할 데이터를 모델로부터 받아옴
(4) Controller
- Model과 View 사이의 상호작용을 조정하고 제어
- 사용자의 입력을 받아 Model에 전달 -> Model의 결과를 바탕으로 View를 업데이트
(5) MVC의 의의
사용자 인터페이스로부터 비즈니스 로직을 분리하여 애플리케이션의 시각적 요소나 그 이면에서 실행되는 비즈니스 로직을 서로 영향 없이 쉽게 유지보수 가능
2) Spring MVC
(1) Spring MVC의 구조
- Servlet API를 기반으로 구축된 독창적인 웹 프레임워크
- 중앙에 있는 DispatcherServlet이 요청을 처리하기 위한 공유 알고리즘을 제공하는 Front Controller 패턴을 중심으로 설계
(2) Servlet
- 자바를 사용하여 웹 페이지를 동적으로 생성하는 서버 측 프로그램 혹은 그 사양
- 서블릿의 구조
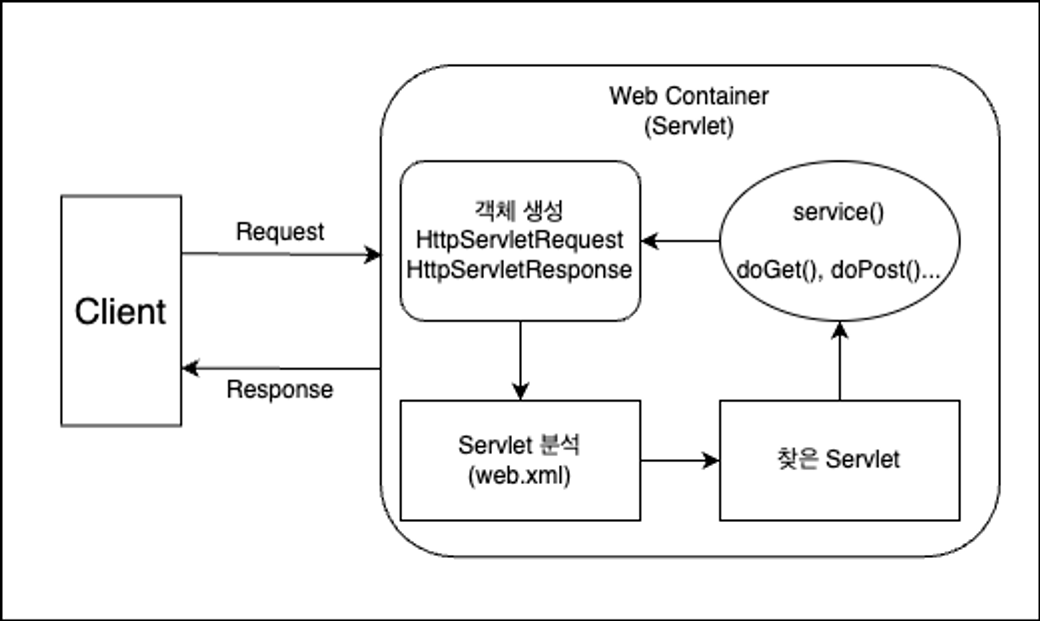
1. 사용자가 Client(브라우저)를 통해 서버에 HTTP Request
2. 요청을 받은 Servlet 컨테이너가 HttpServletRequest, HttpServletResponse 객체(약속된 HTTP의 규격을 맞추면서 쉽게 HTTP에 담긴 데이터를 사용하기 위한 객체) 생성
3. 설정된 정보를 통해 어떠한 Servlet에 대한 요청인지 분석
4. 해당 Servlet에서 service 메서드 호출 -> 브라우저의 요청 Method에 따라 doGet 혹은 doPost 등의 메서드 호출
5. 호출한 메서드들의 결과를 그대로 반환 or 동적 페이지 생성 뒤 HttpServletResponse 객체에 응답을 담아 Client(브라우저)에 반환
6. 응답이 완료시 생성된 HttpServletRequest, HttpServletResponse 객체 소멸
(3) Front Controller
-
Front Controller 사용 전과 후
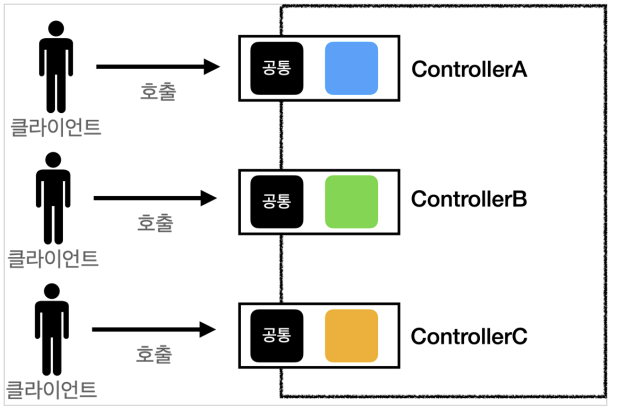

-
코드의 중복과 누락을 막기 위해 적용
-
Spring은 DispatcherServlet을 사용하여 Front Controller 패턴 방식으로 API 요청을 효율적으로 처리
-
Front Controller 구조
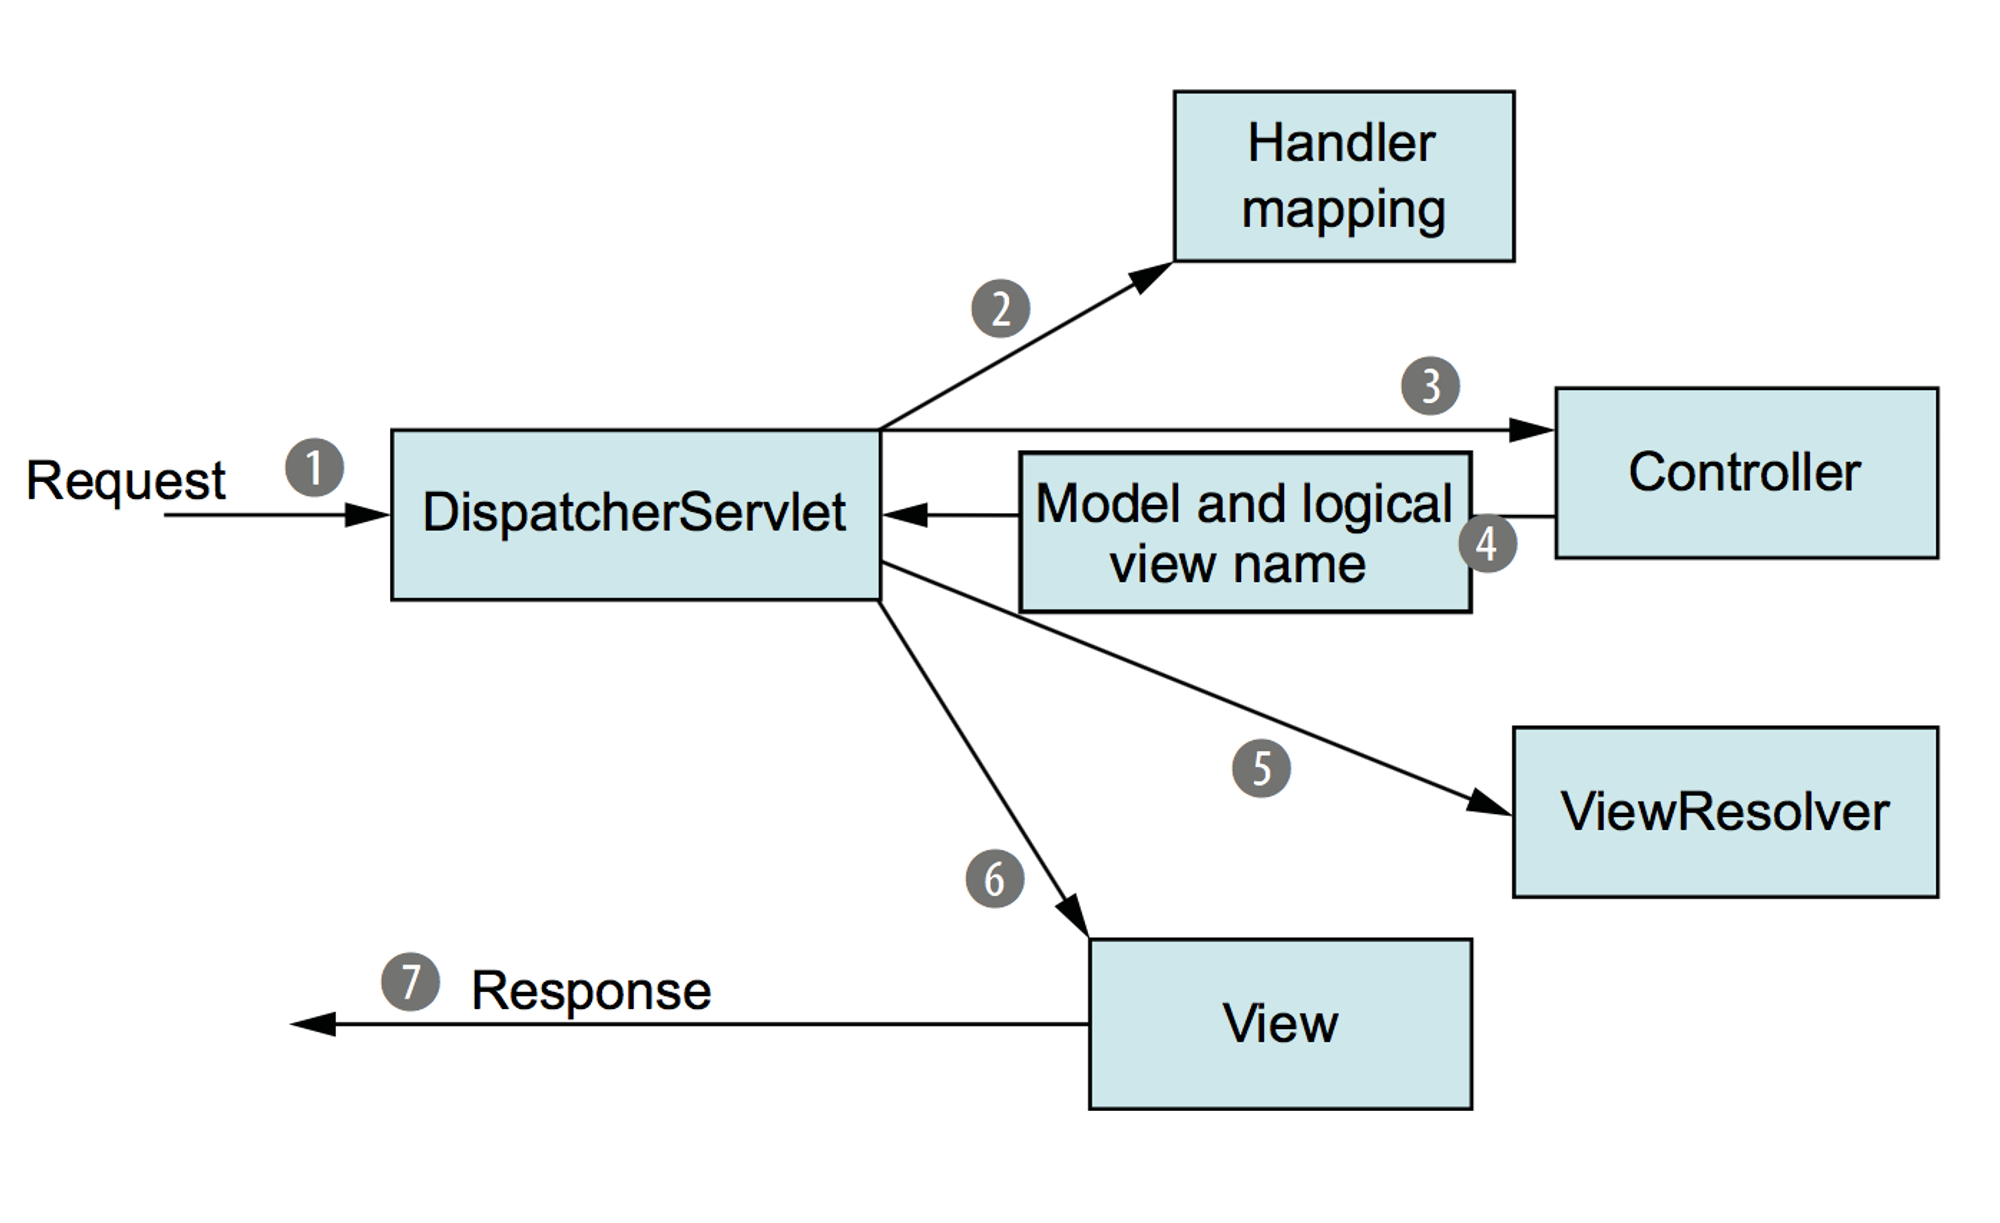
1. Client(브라우저)에서 HTTP 요청이 들어오면 DispatcherServlet 객체가 요청을 분석
2. ispatcherServlet 객체가 분석한 데이터를 토대로 Handler mapping을 통해 Controller를 찾아 요청을 전달
3. Controller는 요청에 대한 처리를 완료 후 데이터('Model')와 'View' 정보 전달
4. ViewResolver 통해 View에 Model을 적용하여 View를 Client에게 응답으로 전달
2. Controller
1) @Controller
해당 클래스가 Controller의 역할을 수행할 수 있도록 등록
@Controller
public class HelloController {
    @GetMapping("/api/hello")
    @ResponseBody
    public String hello() {
        return "Hello World!";
    }
}
2) @GET, @POST, @PUT, @DELETE
각각의 HTTP method에 해당하는 Mapping
@GetMapping("/api/get")
@ResponseBody
public String get() {
    return "GET Method Request";
}

@PostMapping("/api/post")
@ResponseBody
public String post() {
    return "POST Method Request";
}

@PutMapping("/api/put")
@ResponseBody
public String put() {
    return "PUT Method Request";
}

@DeleteMapping("/api/delete")
@ResponseBody
public String delete() {
    return "DELETE Method Request";
}
3) @RequestMapping
중복되는 URL 단축
@Controller
@RequestMapping("/api")
public class HelloController {
    @GetMapping("/hello")
    @ResponseBody
    public String hello() {
        return "Hello World!";
    }

    @GetMapping("/get")
    @ResponseBody
    public String get() {
        return "GET Method 요청";
    }

    @PostMapping("/post")
    @ResponseBody
    public String post() {
        return "POST Method 요청";
    }

    @PutMapping("/put")
    @ResponseBody
    public String put() {
        return "PUT Method 요청";
    }

    @DeleteMapping("/delete")
    @ResponseBody
    public String delete() {
        return "DELETE Method 요청";
    }
}
3. 정적 페이지와 동적 페이지
1) 정적 페이지
(1) 정적 페이지의 특징
- 웹 서버에 이미 저장된 html 문서를 클라이언트에게 전송
- 모든 사용자는 같은 결과의 웹 페이지를 서버에 요청하고 응답 받음
(2) Sping의 static 폴더 이용
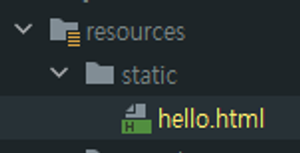
thymeleaf를 주석처리 해줘야 Controller 이용 가능
2) 동적 페이지
(1) 동적 페이지의 특징
- 요청 정보를 처리한 후에 제작된 HTML 문서를 클라이언트에게 전송
- 같은 페이지라도 사용자마다 다른 결과의 웹 페이지를 서버에 요청하고 응답 받음
(2) 동적 페이지의 처리 과정
1. Client 의 요청을 Controller에서 Model로 처리
(DB 조회가 필요하다면 DB 작업 후 처리한 데이터를 Model에 저장)
2. Template engine(Thymeleaf) 에게 View, Model 전달
3. Template engine이 View에 Model을 적용 → 동적 웹페이지 생성
4. Client(브라우저)에게 View(동적 웹 페이지, HTML)를 전달
thymeleaf
동적 페이지 처리를 위한 템플릿 엔진. 추가하면 자동으로 Controller에서 html 파일 찾는 경로를/resources/templates 로 설정.
Template engine 종류
타임리프(Thymeleaf), Groovy, FreeMarker, Jade, JSP 등
4. 데이터를 Client에 반환하는 방법
1) JSON
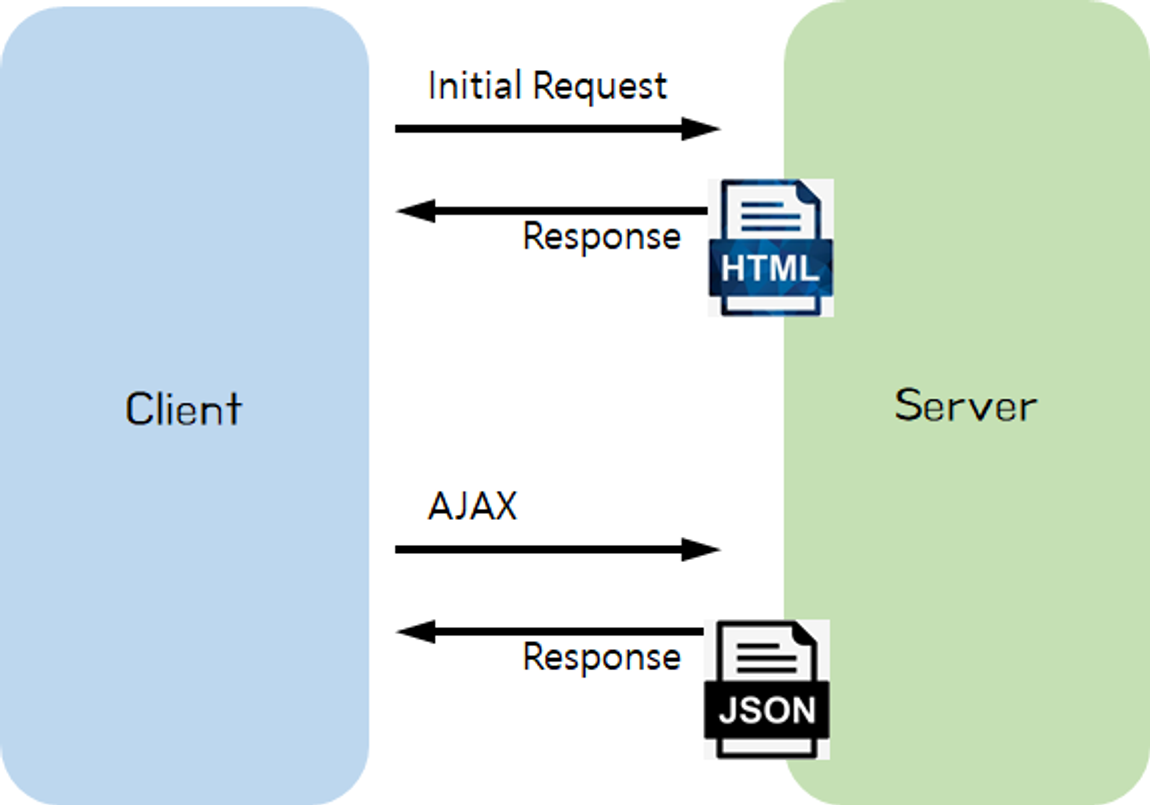
웹 생태계가 고도화 되는 과정중에 상대적으로 프론트엔드와 백엔드가 각각 따로 발전하게 되면서, 느슨하게 결합하는 방식을 더 많이 채택, 따라서 서버가 직접 뷰(html/css/js)를 반환하기 보다는 요청에 맞는 특정한 정보만 반환하는 것을 선호하게 됨으로써 데이터 교환 포맷 중 주로 JSON 형태로 데이터를 반환
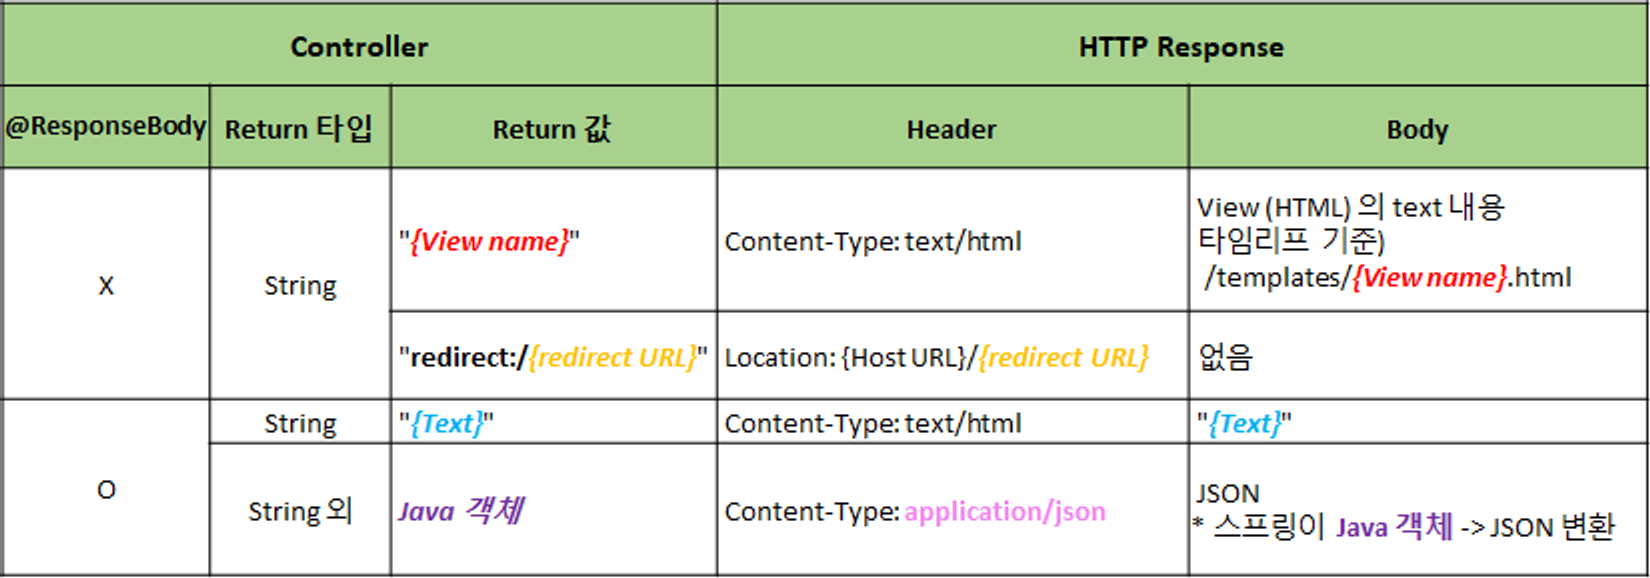
2) JSON 데이터 반환 방법
(1) @ResponseBody
// 반환값 String
@GetMapping("/response/json/string")
@ResponseBody
public String helloStringJson() {
    return "{\"name\":\"Robbie\",\"age\":95}";
}

// 반환값 Java Class
@GetMapping("/response/json/class")
@ResponseBody
public Star helloClassJson() {
    return new Star("Robbie", 95);
}
(2) @RestController
@RestController = @Controller + @ResponseBody
package com.sparta.springmvc.response;

import org.springframework.web.bind.annotation.GetMapping;
import org.springframework.web.bind.annotation.RequestMapping;
import org.springframework.web.bind.annotation.RestController;

@RestController
@RequestMapping("/response/rest")
public class ResponseRestController {
    // [Response header]
    //   Content-Type: text/html
    // [Response body]
    //   {"name":"Robbie","age":95}
    @GetMapping("/json/string")
    public String helloStringJson() {
        return "{\"name\":\"Robbie\",\"age\":95}";
    }

    // [Response header]
    //   Content-Type: application/json
    // [Response body]
    //   {"name":"Robbie","age":95}
    @GetMapping("/json/class")
    public Star helloClassJson() {
        return new Star("Robbie", 95);
    }
}
5. Jackson
1) Jackson Library
(1) 특징
- JSON 데이터 구조를 처리해주는 라이브러리
- Object를 JSON 타입의 String으로 변환
- JSON 타입의 String을 Object로 변환
(2) Spring-boot에서의 Jackson
- Spring 3.0버전 이후로 Jacskon과 관련된 API를 제공 -> 소스코드 작성 없이 JSON 데이터를 자동으로 처리
- SpringBoot의 starter-web에서는 default로 Jackson 관련 라이브러리들을 제공
- ObjectMapper 사용하여 JSON 데이터 처리
2) Object to JSON
@Test
@DisplayName("Object To JSON : get Method 필요")
void test1() throws JsonProcessingException {
    Star star = new Star("Robbie", 95);

    ObjectMapper objectMapper = new ObjectMapper(); // Jackson 라이브러리의 ObjectMapper
    String json = objectMapper.writeValueAsString(star);

    System.out.println("json = " + json);
}
3) JSON to Object
@Test
@DisplayName("JSON To Object : 기본 생성자 & (get OR set) Method 필요")
void test2() throws JsonProcessingException {
    String json = "{\"name\":\"Robbie\",\"age\":95}"; // JSON 타입의 String

    ObjectMapper objectMapper = new ObjectMapper(); // Jackson 라이브러리의 ObjectMapper

    Star star = objectMapper.readValue(json, Star.class);
    System.out.println("star.getName() = " + star.getName());
}
6. Path Variable & Request Param
1) Path Variable
(1) Path Variable 방식의 특징
- 서버에 보내려는 데이터를 URL 경로에 추가
- 브라우저에서 서버로 HTTP 요청을 데이터와 함께 보낼 때 데이터를 보내는 방식이 한 가지가 아니라 여러 가지가 있기 때문에 모든 방식에 대한 처리 방법을 학습해야 함
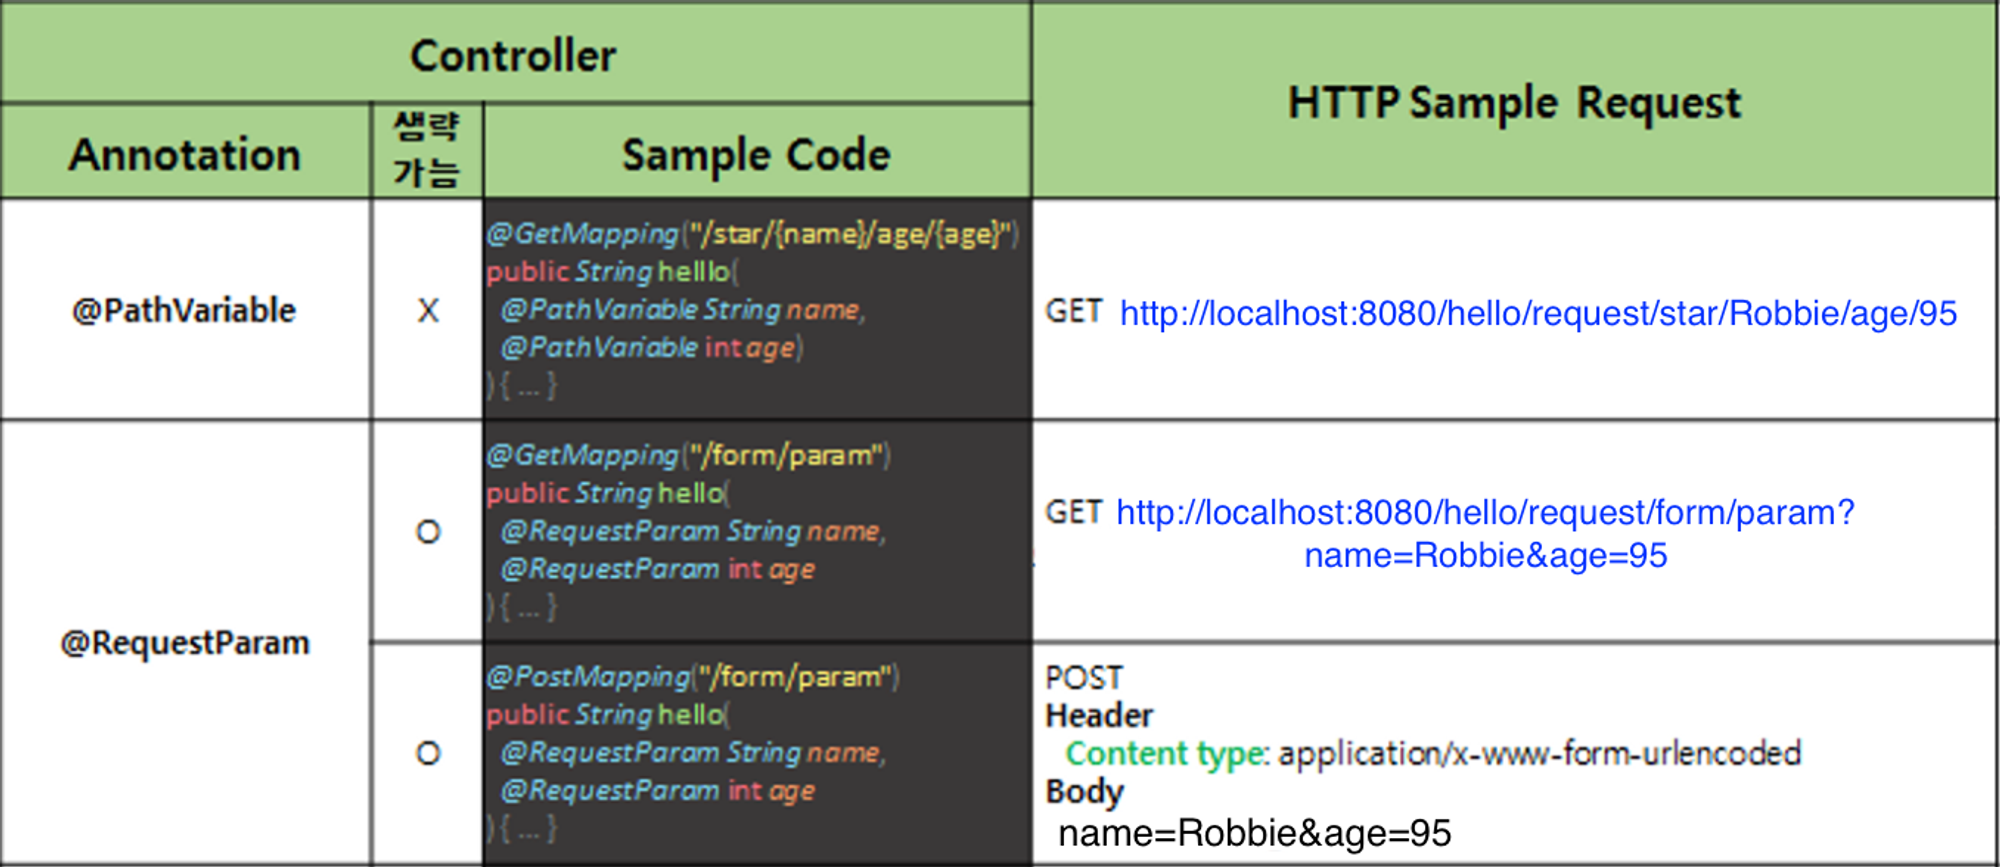
(2) 사용 방법

- /star/{name}/age/{age} : 데이터를 받기 위해서는 URL 경로에서 데이터를 받고자 하는 위치의 경로에 {data} 중괄호를 사용
- (@PathVariable String name, @PathVariable int age) : 해당 요청 메서드 파라미터에 @PathVariable 애너테이션과 함께 {name} 중괄호에 선언한 변수명과 변수타입을 선언하면 해당 경로의 데이터를 받아올 수 있음
2) Request Param
(1) Request Param 방식의 특징
GET http://localhost:8080/hello/request/form/param?name=Robbie&age=95
- 사용자가 요청시 전달하는 값을 Handler(Controller)의 매개변수로 1:1 맵핑 할 때 사용
- 서버에 보내려는 데이터를 URL 경로 마지막에 ? 와 & 를 사용하여 추가
- @RequestParam은 생략 가능
(2) 사용 방법
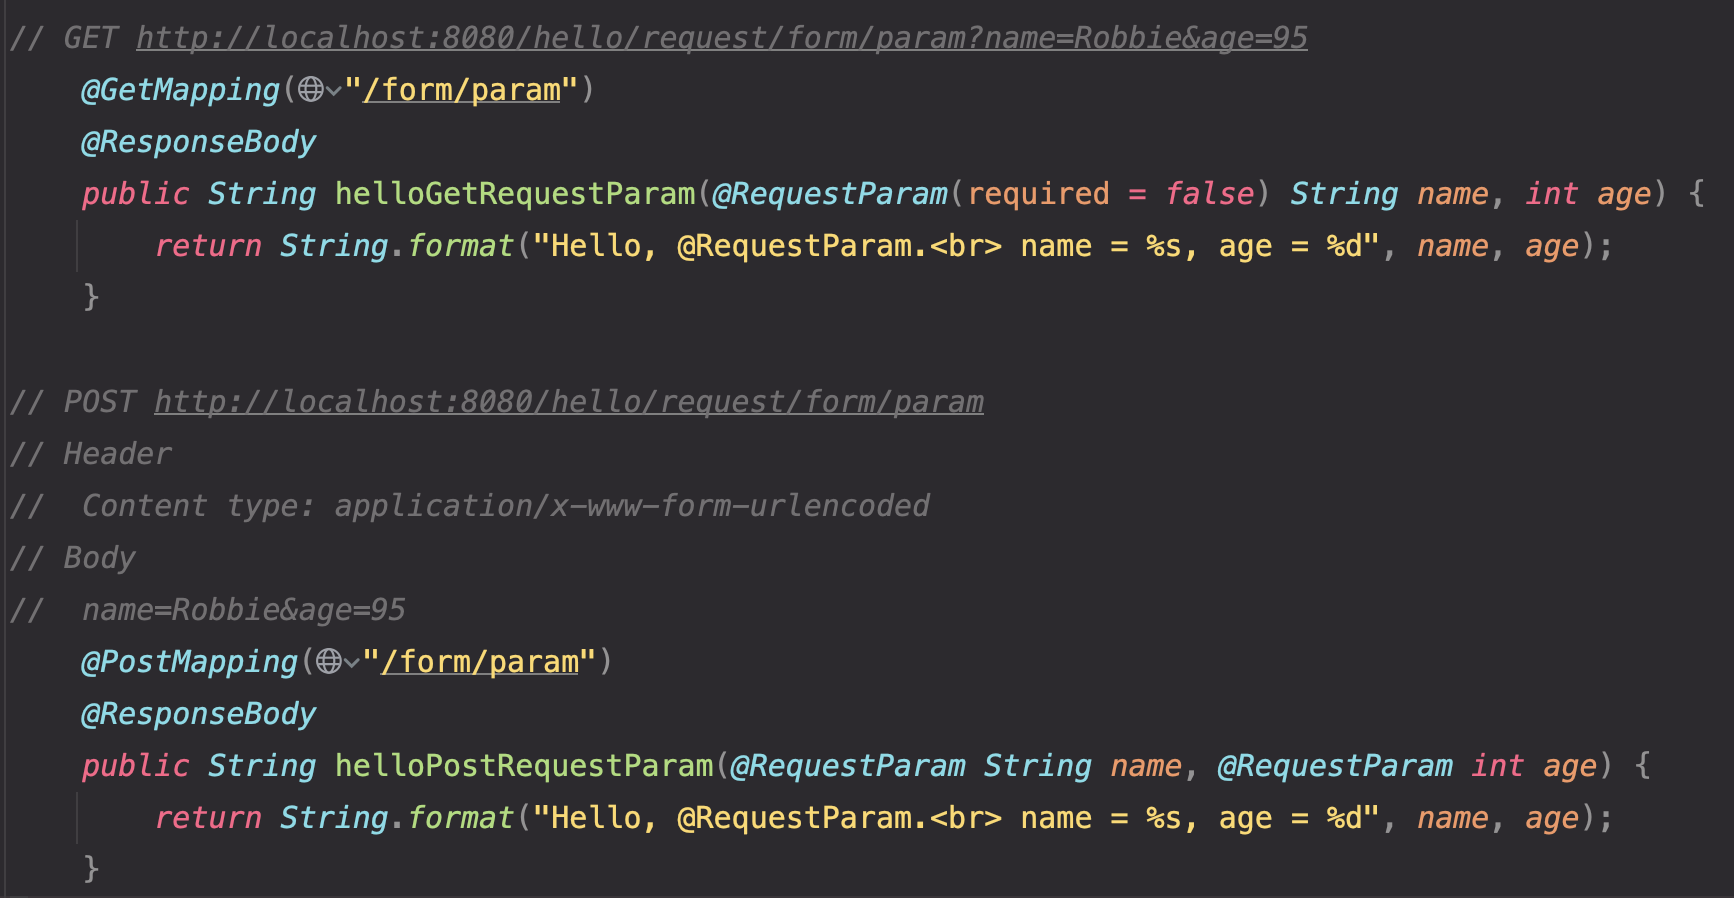
- @RequestParam(required = false) : required 옵션을 false로 설정하면 Client에서 전달받은 값들에서 해당 값이 포함되어있지 않아도 오류 발생 ❌
- @PathVariable(required = false) 옵션도 존재
- required = false를 적용시켰을 때 Client로 부터 값을 전달 받지 못한 해당 변수는 null로 초기화
7. HTTP 데이터를 객체로 처리하는 방법
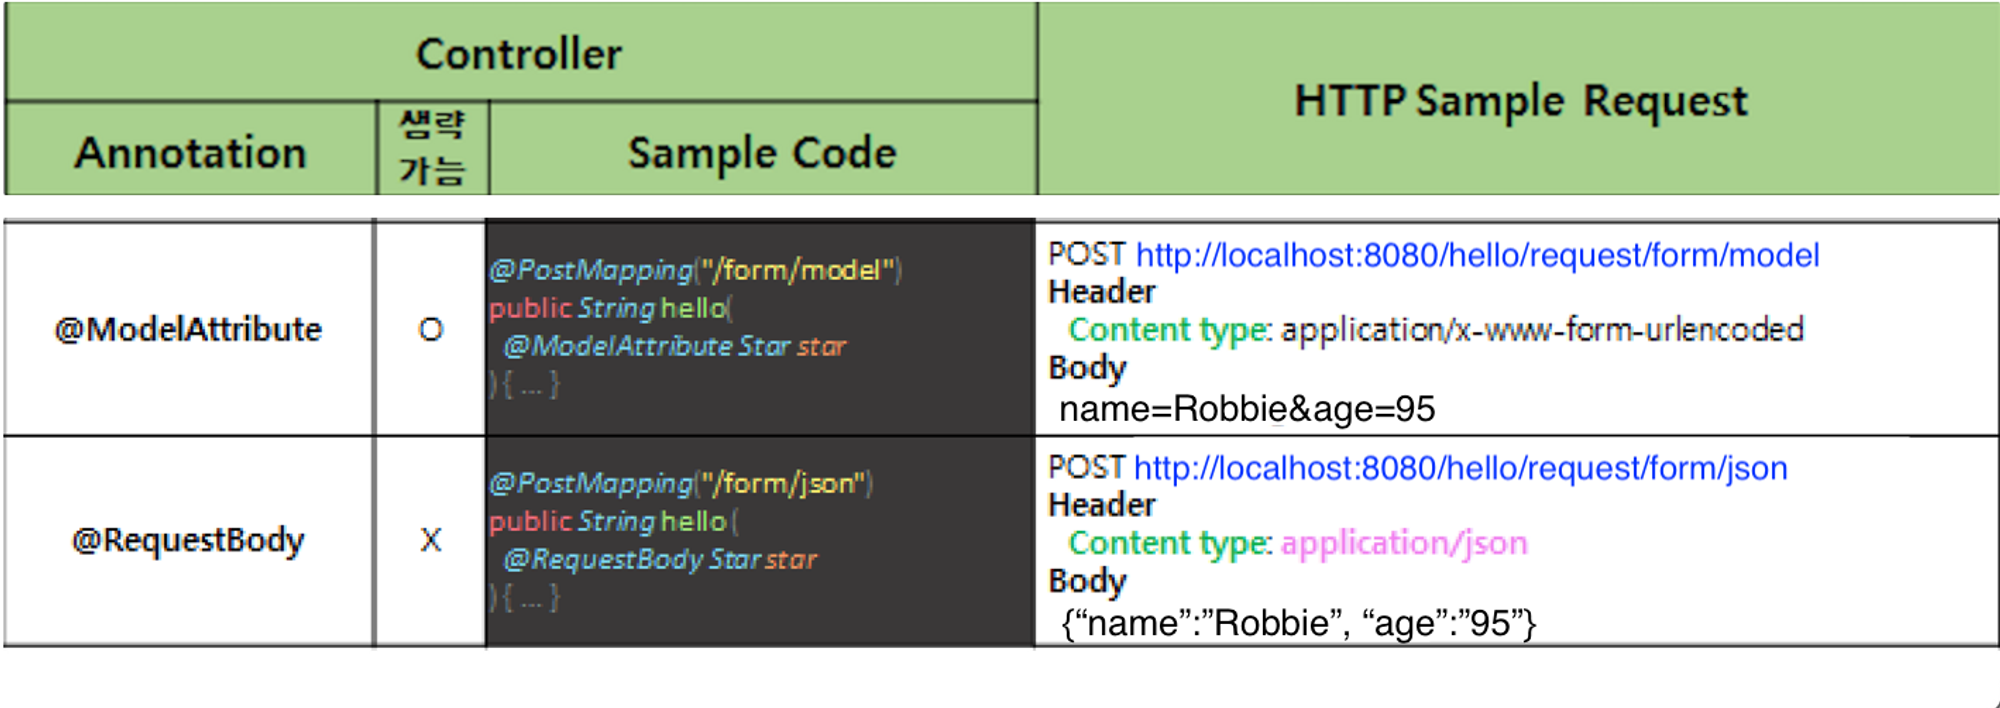
1) @ModelAttribute
(1) 특징
- 사용자가 요청시 전달하는 값을 오브젝트 형태로 매핑해주는 어노테이션
- @ModelAttribute는 생략 가능
- 해당 객체의 필드에 데이터를 넣어주기 위해 set or get 메서드 또는 오버로딩된 생성자가 필요
(2) form 태그 POST
// [Request sample]
// POST http://localhost:8080/hello/request/form/model
// Header
//  Content type: application/x-www-form-urlencoded
// Body
//  name=Robbie&age=95
@PostMapping("/form/model")
@ResponseBody
public String helloRequestBodyForm(@ModelAttribute Star star) {
    return String.format("Hello, @ModelAttribute.<br> (name = %s, age = %d) ", star.name, star.age);
}- HTML의 form 태그를 사용하여 POST 방식으로 HTTP 요청 보내기 가능
- 해당 데이터는 HTTP Body에 name=Robbie&age=95 형태로 담겨져서 서버로 전달
(3) Query String 방식
GET http://localhost:8080/hello/request/form/param/model?name=Robbie&age=95
// [Request sample]
// GET http://localhost:8080/hello/request/form/param/model?name=Robbie&age=95
@GetMapping("/form/param/model")
@ResponseBody
public String helloRequestParam(@ModelAttribute Star star) {
    return String.format("Hello, @ModelAttribute.<br> (name = %s, age = %d) ", star.name, star.age);
}- 파라미터에 선언한 Star 객체 생성
- 오버로딩된 생성자 혹은 Setter 메서드를 통해 요청된 name & age 의 값이 담김
2) @RequestBody
(1) 특징
- HTTP Body에 JSON 데이터를 담아 서버에 전달할 때 해당 Body 데이터를 Java의 객체로 전달
- set method 필요 ❌, but 직렬화를 위한 기본 생성자와 데이터 바인딩을 위한 필드명을 알아내기 위해 getter나 setter 중 1가지는 정의되어야 함
(2) 사용 방법
// [Request sample]
// POST http://localhost:8080/hello/request/form/json
// Header
//  Content type: application/json
// Body
//  {"name":"Robbie","age":"95"}
@PostMapping("/form/json")
@ResponseBody
public String helloPostRequestJson(@RequestBody Star star) {
    return String.format("Hello, @RequestBody.<br> (name = %s, age = %d) ", star.name, star.age);
}
@ModelAttribute와 @RequestBody의 차이
https://tecoble.techcourse.co.kr/post/2021-05-11-requestbody-modelattribute/
Spring에서 @RequestParam과 @ModelAttribute 구분하는 방법
Spring은 해당 파라미터(매개변수)가 SimpleValueType이라면 @RequestParam으로 간주하고 아니라면 @ModelAttribute가 생략되어있다 판단