
1. 그래픽
- 안드로이드는 화면에 선, 원, 사각형 등의 도형을 그리는 방식을 제공합니다.
- 관련 메서드에서 좌표를 직접 입력하여 그릴 수도 있고, 화면을 손가락으로 터치하여 그릴 수도 있습니다.
- 그래픽을 처리하는 방식을 잘 활용하면 그림판 같은 유용한 앱을 만들 수도 있습니다.
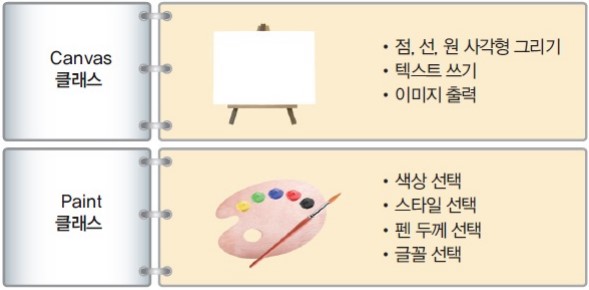
1-1. 캔버스와 페인트의 기본
- 화면에 도형을 그릴 때 사용하는 클래스는 Canvas와 Paint입니다.
- 캔버스와 페인트는 도화지, 붓과 같은 개념이라고 생각하면 됩니다.
- 대표적인 android.graphics.Canvas 클래스에서 점을 찍는 메서드의 원형은 아래와 같습니다.

- 위 메서드는 x와 y 좌표에 점을 찍는데, 좌표는 왼쪽 상단부터 (0, 0)으로 시작합니다.
- 점은 Paint 객체에 설정된 색상, 두께 등으로 그려질 것입니다.
- android.graphics.Paint 클래스에서 색상을 지정하는 메서드의 원형은 아래와 같습니다.

- 그래픽을 표현할 때는 View 클래스를 재정의하는 형태가 많이 사용됩니다.
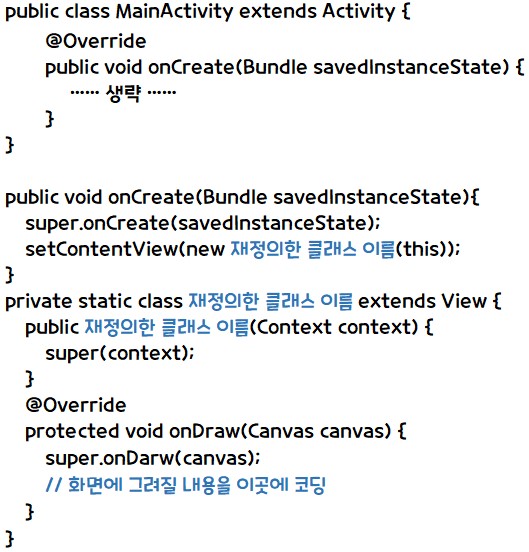
- 나머지는 자동 완성되거나 고정된 내용이므로 밑줄 친 부분만 변경하면 됩니다.
- 캔버스와 페인트를 사용하여 화면에 나타낼 내용은 주석 부분에 코딩합니다.
1-2 그래픽 처리의 기본
- 그래픽을 출력할 때는 주로 View.onDraw( ) 메서드를 오버라이딩해서 사용합니다.
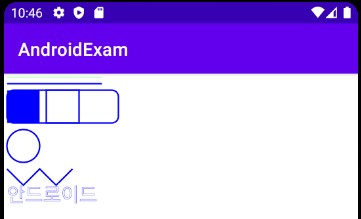
예제 9-1 그래픽 기본의 Java 코드
public class MainActivity extends AppCompatActivity {

    @Override
    protected void onCreate(Bundle savedInstanceState) {
        super.onCreate(savedInstanceState);
        // XML 파일 대신 재정의한 클래스를 화면에 보여줌
        setContentView(new MyGraphicView(this));
    }

    // View 클래스를 상속받아 MyGraphicView 클래스를 재정의
    private static class MyGraphicView extends View {
        // 재정의한 클래스의 생성자
        public MyGraphicView(Context context){
            super(context);
        }

        // 클래스가 생성되거나 무효화(invalidate)되면 호출되는 메서드
        // 일반적으로 화면에 그려질 내용을 이곳에 코딩함
        @Override
        protected void onDraw(Canvas canvas) {
            super.onDraw(canvas);
            Paint paint = new Paint();
            // 도형의 끝을 부드럽게 처리해줌
            paint.setAntiAlias(true);
            // 그려질 도형의 색을 paint 에 지정
            paint.setColor(Color.GREEN);
            // 선을 그림. 시작x, 시작y, 끝x, 끝y, Paint 로 파라미터는 5개임
            canvas.drawLine(10, 10, 300, 10, paint);

            paint.setColor(Color.BLUE);
            // 그려질 도형 또는 글자 외곽선의 두께를 설정함. 0으로 설정하면 기본인 1px로 지정됨
            paint.setStrokeWidth(5);
            canvas.drawLine(10, 30, 300, 30, paint);

            // 원이나 사각형 등 그려질 도형의 내부를 채울지 여부를 설정함
            // 기본은 도형 내부가 채워지는 Paint.Style.FILL
            paint.setStyle(Paint.Style.FILL);
            // Rect 클래스는 int 형을, RectF 클래스는 float 형 값을 가짐
            Rect rect1 = new Rect(10, 50, 10 + 100, 50 + 100);
            canvas.drawRect(rect1, paint);

            paint.setStyle(Paint.Style.STROKE);
            Rect rect2 = new Rect(130, 50, 130 + 100, 50 + 100);
            canvas.drawRect(rect2, paint);

            RectF rect3 = new RectF(10, 50, 250 + 100, 50 + 100);
            // 사각형의 모서리를 둥글게 처리함
            canvas.drawRoundRect(rect3, 20, 20, paint);

            // 원을 그림, 중심x, 중심y, 반지름, Paint 로 파라미터는 4개임
            canvas.drawCircle(60, 220, 50, paint);
            paint.setStrokeWidth(5);

            // Path 는 연결된 여러 점을 가진 클래스
            // moveTo( ) 메서드로 해당 점으로 이동한 다음 lineTo( ) 메서드로 점을 계속 추가함
            Path path = new Path();
            path.moveTo(10, 290);
            path.lineTo(10 + 50, 290 + 50);
            path.lineTo(10 + 100, 290);
            path.lineTo(10 + 150, 290 + 50);
            path.lineTo(10 + 200, 290);
            // 생성한 Path 를 그림
            canvas.drawPath(path, paint);

            paint.setStrokeWidth(0);
            paint.setTextSize(30);
            canvas.drawText("안드로이드", 10, 390, paint);
        }
    }
}
1-3 터치 이벤트
- 화면에 생성한 뷰를 터치하면 Touch 이벤트가 발생합니다. 앞의 예제에서는 도형을 그리기 위한 XY 좌표를 코드로 직접 입력했지만, 손가락으로 그림을 그리려면 터치 이벤트를 활용해야 합니다.
- 터치를 구현하려면 VIew 클래스의 onTouch( ) 메서드를 오버라이딩해서 코딩합니다.
- 일반적인 사용 형식은 아래와 같습니다.
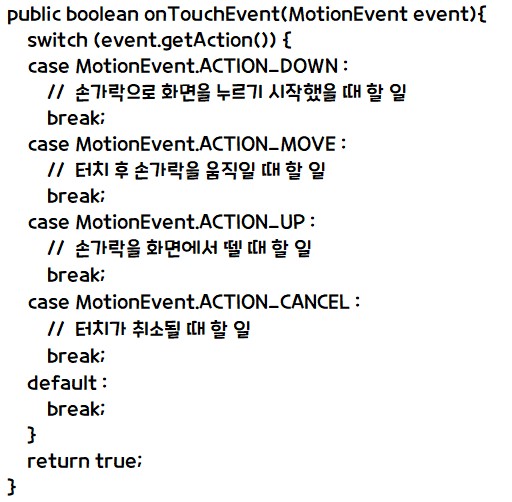
- 화면을 터치하면 위의 메서드가 실행되는데, ecent.getAction( )으로 터치한 동작을 언등 후 switch( ) ~ case 문으로 각 터치에 따라 구분을 합니다.
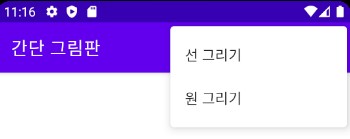
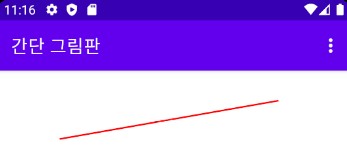
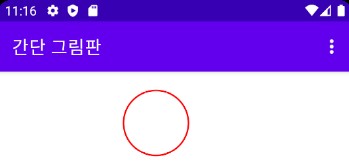
실습 9-1 간단 그림판 앱 만들기
예제 9-2, 3, 4, 5 Java 코드
public class MainActivity extends AppCompatActivity {
    // 전역상수 선언, 메뉴에서 선택한 것이 선인지 원인지를 구분하기 위해 사용할 것
    final static int LINE = 1, CIRCLE = 2;
    static int curShape = LINE;

    @Override
    protected void onCreate(Bundle savedInstanceState) {
        super.onCreate(savedInstanceState);
        setContentView(new MyGraphicView(this));
        setTitle("간단 그림판");
    }

    public boolean onCreateOptionsMenu(Menu menu) {
        super.onCreateOptionsMenu(menu);
        menu.add(0, 1, 0, "선 그리기");
        menu.add(0, 2, 0, "원 그리기");
        return true;
    }

    public boolean onOptionsItemSelected(MenuItem item){
        switch (item.getItemId()) {
            case 1 :
                curShape = LINE;    // 선
                return true;
            case 2 :
                curShape = CIRCLE;  // 원
                return true;
        }
        return super.onOptionsItemSelected(item);
    }

    private static class MyGraphicView extends View {
        // 시작점과 끝점 좌표를 저장히기 위한 클래스 멤버 변수 4개를 선언
        int startX = -1, startY = -1, stopX = -1, stopY = -1;
        public MyGraphicView(Context context) {
            super(context);
        }

        @Override
        public boolean onTouchEvent(MotionEvent event) {
            switch (event.getAction()) {
                // 처음 터치했을 때가 선의 시작점이나 원의 중심점이 되는데 이 위치를 기억
                case MotionEvent.ACTION_DOWN :
                    startX = (int) event.getX();
                    startY = (int) event.getY();
                    break;
                // 화면을 터치한 상태에서 드래그하는 것은 ACTION_MOVE에 해당
                case MotionEvent.ACTION_MOVE :
                // 화면에서 손가락을 떼면 발생
                case MotionEvent.ACTION_UP :
                    stopX = (int) event.getX();
                    stopY = (int) event.getY();
                    // invalidate( )를 호출하면 화면이 무효화되고
                    // onDraw( ) 메서드를 자동으로 실행
                    this.invalidate();
                    break;
            }
            return true;
        }

        @Override
        protected void onDraw(Canvas canvas) {
            super.onDraw(canvas);

            Paint paint = new Paint();
            paint.setAntiAlias(true);
            // 선의 두께
            paint.setStrokeWidth(5);
            // 채우기 여부
            paint.setStyle(Paint.Style.STROKE);
            // 선의 색상
            paint.setColor(Color.RED);

            switch (curShape) {
                case LINE :
                    canvas.drawLine(startX, startY, stopX, stopY, paint);
                    break;
                case CIRCLE :
                    int radius = (int) Math.sqrt(Math.pow(stopX - startX, 2)
                    					+ Math.pow(stopY - startY, 2));
                    canvas.drawCircle(startX, startY, radius, paint);
                    break;
            }
        }
    }
}
실습 9-1 결과
2. 이미지
- 사진과 같은 그림 파일을 안드로이드 화면에 출력할 수 있습니다.
- 사진에 다양한 효과를 주는 방법도 지원하는데, 이를 잘 활용하면 포토샵(Photoshop)과 비슷한 디지털 영상 처리 앱을 개발할 수 있습니다.
2-1 비트맵의 기본
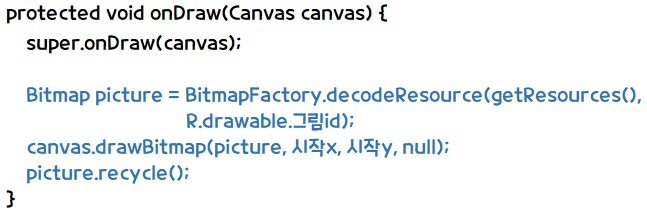
- Bitmap 클래스는 캔버스에 이미지 파일을 보여주는데 사용됩니다.
- 아래는 이미지 파일을 화면에 출력하는 가장 일반적인 형태입니다.
/res/drawable 폴더의 이미지 파일을 보여주는 onDraw( ) 메서드
SD 카드의 이미지 파일을 보여주는 onDraw( ) 메서드
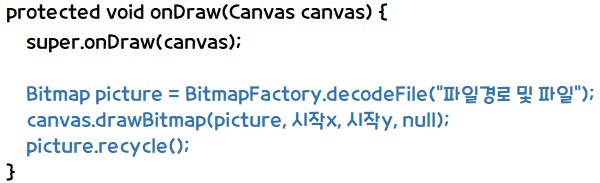
- 리소스의 이미지는 BitmapFactory.decodeResource( ) 메서드를 이용하여 접근하고, SD 카드의 이미지는 BitmapFactory.decodeFile( ) 메서드를 이용하여 접근했습니다.
- 이미지를 화면에 출력하는ㄴ 데에는 canvas.drawBitmap( ) 메서드를 공통적으로 사용했습니다.
- 마지막의 picture.recycle( ) 메서드는 비트맵 리소스를 해제합니다.
- 위는 그림 파일을 화면에 보여주기 위해 가장 많이 사용하는 형태이므로 잘 기억해두면 좋습니다.
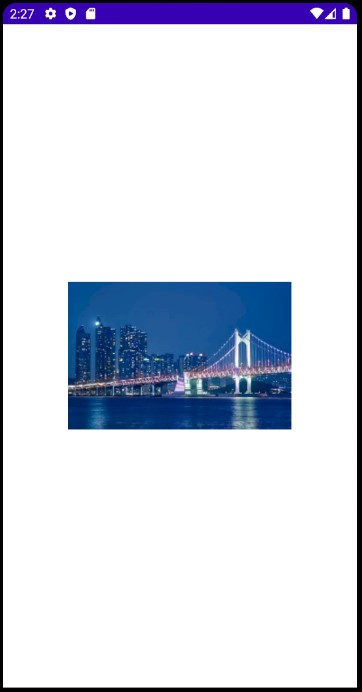
- drawBitmap(picture, 시작x, 시작y, null) 메서드로 화면에 출력할 때 이미지의 왼쪽상단에 해당하는 시작x와 시작t에는 0, 0 또는 적당한 값을 넣습니다. 이미지는 화면 중앙에 위치하는 것이 가장 보기 좋습니다.
- 아래는 시작x와 시작y를 정확히 계산하여 이미지를 화면 중앙에 출력하는 방법입니다.

예제 9-6 이미지를 화면 중앙에 출력하는 Java 코드
public class MainActivity extends AppCompatActivity {

    @Override
    protected void onCreate(Bundle savedInstanceState) {
        super.onCreate(savedInstanceState);
        setContentView(new MyGraphicView(this));

    }
    private static class MyGraphicView extends View {
        public MyGraphicView(Context context) {
            super(context);
        }

        @Override
        protected void onDraw(Canvas canvas) {
            super.onDraw(canvas);
            Bitmap picture =
            		BitmapFactory.decodeResource(getResources(),R.drawable.busan);

            // this.getWidth( )는 현재 뷰(MyGraphicView)의 너비를 구함
            int picX = (this.getWidth() - picture.getWidth()) / 2;
            int picY = (this.getHeight() - picture.getHeight()) / 2;

            canvas.drawBitmap(picture, picX, picY, null);
            picture.recycle();
        }
    }
}
2-2 이미지의 기하학적 변환
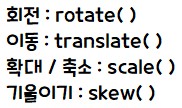
- 안드로이드는 이미지의 기하학적 변환을 위해 이동, 확대, 축소, 회전 등의 메서드를 제공합니다.
- 정확히 말하면 이미지에 기하학적 변환을 하는 것이 아니라 캔버스(도화지)에 대해 기하학적 변환을 한 다음 이미지 파일을 변환된 캔버스에 출력하는 것입니다.
- 도화지를 회전시킨 상태에서 그림을 그리면 결국 그림이 회전된 것으로 보이는 효과와 마찬가지입니다.
- Canvas 클래스의 기하학적 메서드
예제 9-7 기하학적 변환의 Java 코드
public class MainActivity extends AppCompatActivity {

    @Override
    protected void onCreate(Bundle savedInstanceState) {
        super.onCreate(savedInstanceState);
        setContentView(new MyGraphicView(this));

    }
    private static class MyGraphicView extends View {
        public MyGraphicView(Context context) {
            super(context);
        }

        @Override
        protected void onDraw(Canvas canvas) {
            super.onDraw(canvas);
            Bitmap picture =
            	BitmapFactory.decodeResource(getResources(), R.drawable.webtoon);

            int cenX = this.getWidth() / 2;
            int cenY = this.getHeight() / 2;
            int picX = (this.getWidth() - picture.getWidth()) / 2;
            int picY = (this.getHeight() - picture.getHeight()) / 2;

            // 캔버스를 45도 회전
            canvas.rotate(45, picX, picY);
            canvas.drawBitmap(picture, picX, picY, null);

            // 캔버스 이동
            canvas.translate(-150, 200);
            canvas.drawBitmap(picture, picX, picY, null);

            // 캔버드의 축척을 2배만큼 확대
            canvas.scale(2, 2, cenX, cenY);
            canvas.drawBitmap(picture, picX, picY, null);

            // 캔버스 기울이기
            canvas.skew(0.3f, 0.3f);
            canvas.drawBitmap(picture, picX, picY, null);

            picture.recycle();
        }
    }
}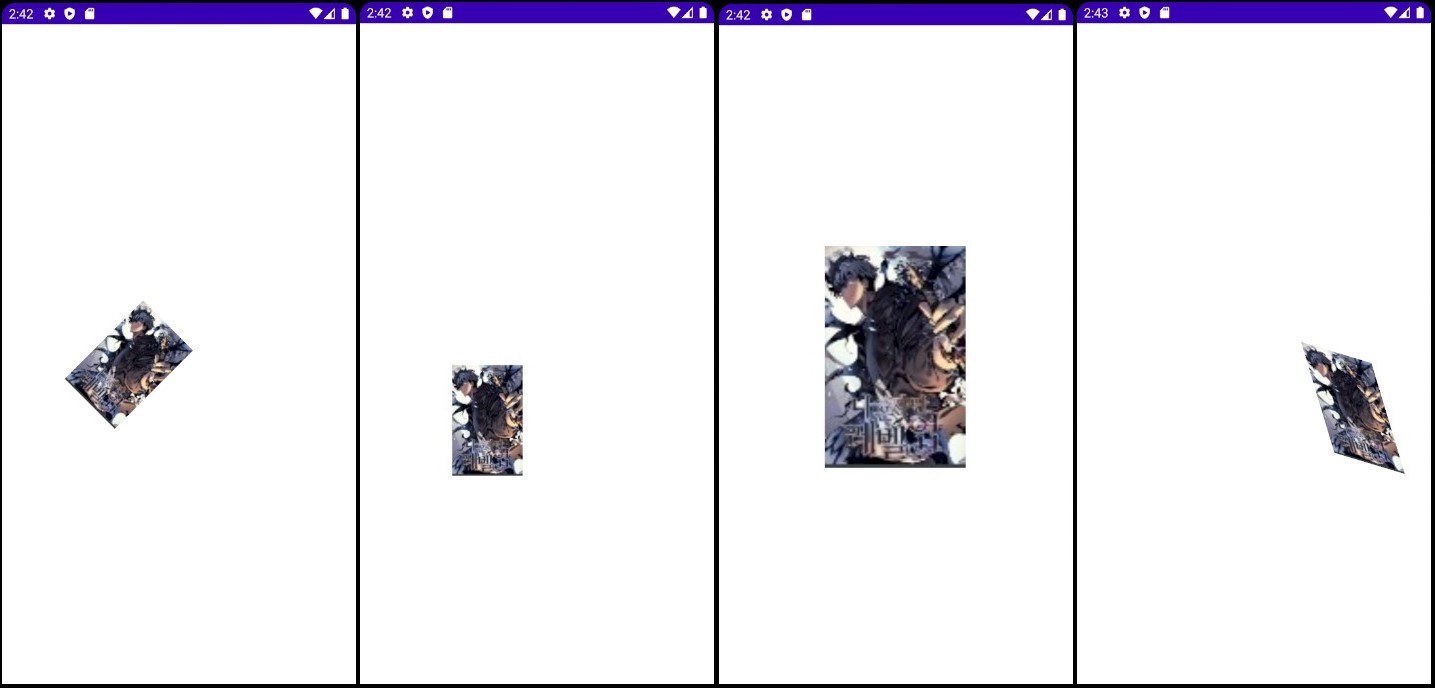
- 회전, 이동, 확대 / 축소, 기울이기의 순서입니다.
2-3 이미지 활용
- 포토샵 등의 이미지 처리 응용 프로그램으로 이미지에 다양한 효과를 줄 수 있습니다.
- 엠보싱, 블러링 등이 대표적이고 색상을 처리하려면 ColoerMatrix 클래스를 활용합니다.
블러링
- 블러링(blurring)은 이미지를 뿌옇게 만듭니다.
- 안드로이드에서는 블러링 효과를 위해 BlurMaskFilter 클래스를 제공합니다.
- BlurMaskFilter 클래스의 생성자는 아래와 같습니다.

- 반지름은 블러링이 될 너비인데, 반지름이 클록 이미지의 가장자리가 크게 블러링됩니다.
- 스타일에는 NORMAL, INNER, OUTER, SOLID가 있으며 아래와 같은 효과를 냅니다.
예제 9-8 블러링 효과의 Java 코드
public class MainActivity extends AppCompatActivity {

    @Override
    protected void onCreate(Bundle savedInstanceState) {
        super.onCreate(savedInstanceState);
        setContentView(new MyGraphicView(this));

    }
    private static class MyGraphicView extends View {
        public MyGraphicView(Context context) {
            super(context);
        }

        @Override
        protected void onDraw(Canvas canvas) {
            super.onDraw(canvas);
            Bitmap picture = BitmapFactory.decodeResource(getResources(), R.drawable.webtoon);

            int picX = (this.getWidth() - picture.getWidth()) / 2;
            int picY = (this.getHeight() - picture.getHeight()) / 2;

            Paint paint = new Paint();
            BlurMaskFilter bMask;

            bMask = new BlurMaskFilter(30, BlurMaskFilter.Blur.NORMAL);
            paint.setMaskFilter(bMask);
            canvas.drawBitmap(picture, picX, picY, paint);

            bMask = new BlurMaskFilter(30, BlurMaskFilter.Blur.INNER);
            paint.setMaskFilter(bMask);
            canvas.drawBitmap(picture, picX, picY, paint);

            bMask = new BlurMaskFilter(30, BlurMaskFilter.Blur.OUTER);
            paint.setMaskFilter(bMask);
            canvas.drawBitmap(picture, picX, picY, paint);

            bMask = new BlurMaskFilter(30, BlurMaskFilter.Blur.SOLID);
            paint.setMaskFilter(bMask);
            canvas.drawBitmap(picture, picX, picY, paint);

            picture.recycle();
        }
    }
}
- NORMAL, INNER, OUTER, SOLID의 순서입니다.
엠보싱
- 엠보싱(embossing)은 이미지가 볼록하게 튀어나와 보이는 효과를 냅니다.
- 안드로이드에서는 엠보싱 효과를 위해 EmbossMaskFilter 클래스를 제공합니다.
- EmbossMaskFilter 클래스의 생성자는 블러링보다 복잡하며 아래와 같습니다.

- 첫 번째 파라미터는 빛이 비추는 x, y, z 방향 배열입니다.
- 두 번째 파라미터는 빛의 밝기로 0부터 1까지 지정합니다.
- 반사 계수는 5 ~ 8 정도가 적당합니다.
- 블러링 크기는 볼록하게 표현하기 위한 가장자리의 크기를 나타냅니다.
예제 9-9 엠보싱 효과의 Java 코드
- Mainfest의 application 안에 android:hardwareAccelerated="false"를 추가해줘야 적용이 됩니다.
public class MainActivity extends AppCompatActivity {

    @Override
    protected void onCreate(Bundle savedInstanceState) {
        super.onCreate(savedInstanceState);
        setContentView(new MyGraphicView(this));

    }
    private static class MyGraphicView extends View {
        public MyGraphicView(Context context) {
            super(context);
        }

        @Override
        protected void onDraw(Canvas canvas) {
            super.onDraw(canvas);

            int cenX = this.getWidth() / 2;
            int cenY = this.getHeight() / 2;

            Paint paint = new Paint();
            paint.setColor(Color.MAGENTA);
            EmbossMaskFilter eMask;

            // 빛 방향{3, 3, 3}
            eMask = new EmbossMaskFilter(new float[] {10, 3, 3}, 0.5f, 5, 10);
            paint.setMaskFilter(eMask);
            canvas.drawCircle(cenX, cenY, 150, paint);

            // 빛 방향{10, 3, 3}
            eMask = new EmbossMaskFilter(new float[] {10, 3, 3}, 0.5f, 5, 10);
            paint.setMaskFilter(eMask);
            canvas.drawCircle(cenX, cenY, 150, paint);

            // 빛 방향{3, 10, 3}
            eMask = new EmbossMaskFilter(new float[] {3, 10, 3}, 0.5f, 5, 10);
            paint.setMaskFilter(eMask);
            canvas.drawCircle(cenX, cenY, 150, paint);

            // 빛 방향{3, 3, 10}
            eMask = new EmbossMaskFilter(new float[] {3, 3, 10}, 0.5f, 5, 10);
            paint.setMaskFilter(eMask);
            canvas.drawCircle(cenX, cenY, 150, paint);
        }
    }
}
- 왼쪽부터 빛 방향 {3, 3, 3}, {10, 3, 3}, {3,10, 3}, {3, 3, 10}의 순서입니다.
컬러매트릭스
- 안드로이드에서는 색상이나 밝기를 조절하기 위해 ColorMatrix 클래스와 ColorMatrixColorFilter 클래스를 사용합니다.
- 아래는 일반적인 사용형식입니다.

- float[] 에서 ColorMatrix에 사용할 배열을 만듭니다.
- 설정된 배열의 크기는 4 X 5이며 배열의 각 위치 값은 아래와 같습니다.

- Red, Green, Blue, Alpha의 값은 기본적으로 1이 설정되어 있는데, 이 값을 몇 배로 올리면 색상의 대비(contrast)가 커집니다. 색상을 밝게 하고 싶으면 Brightness에 양수를 입력하고, 어둡게 하고 싶으면 음수를 입력합니다.
예제 9-10 컬러매트릭스의 Java 코드
public class MainActivity extends AppCompatActivity {

    @Override
    protected void onCreate(Bundle savedInstanceState) {
        super.onCreate(savedInstanceState);
        setContentView(new MyGraphicView(this));

    }
    private static class MyGraphicView extends View {
        public MyGraphicView(Context context) {
            super(context);
        }

        @Override
        protected void onDraw(Canvas canvas) {
            super.onDraw(canvas);
            Bitmap picture = BitmapFactory.decodeResource(getResources(), R.drawable.flower);

            int picX = (this.getWidth() - picture.getWidth()) / 2;
            int picY = (this.getHeight() - picture.getHeight()) / 2;

            Paint paint = new Paint();
            float[] array = { 2, 0, 0, 0, -25,
                              0, 2, 0, 0, -25,
                              0, 0, 2, 0, -25,
                              0, 0, 0, 2, 0 };
            ColorMatrix cm = new ColorMatrix(array);
            paint.setColorFilter(new ColorMatrixColorFilter(cm));
            canvas.drawBitmap(picture, picX, picY, paint);

            picture.recycle();
        }
    }
}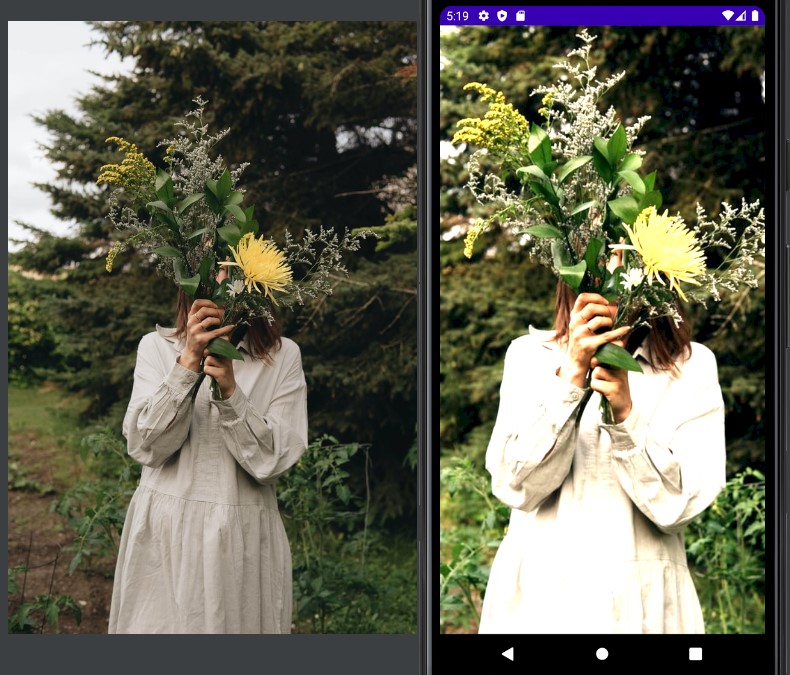
- 일차원 배열을 이차원 배열처럼 사용했습니다.
- RGB의 각 색상을 2배로 했습니다.
- 색상 값을 올리면 너무 밝아 보이므로 Brightness 값을 -25 정도로 낮추었습니다.
- ColorMatrix.setSaturation( ) 메서드를 사용하면 채도를 변경하거나 회색조(grayscale) 이미지로 변경할 수 있습니다.
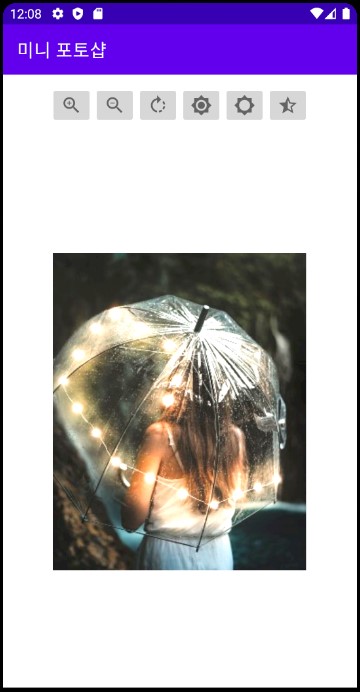
실습 9-2 미니 포토샵 앱 만들기
예제 9-11 activity_main.xml
<androidx.appcompat.widget.LinearLayoutCompat
    xmlns:android="http://schemas.android.com/apk/res/android"
    xmlns:tools="http://schemas.android.com/tools"
    android:layout_width="match_parent"
    android:layout_height="match_parent"
    android:orientation="vertical"
    tools:context=".MainActivity">

    <androidx.appcompat.widget.LinearLayoutCompat
        android:id="@+id/iconLayout"
        android:layout_width="match_parent"
        android:layout_height="0dp"
        android:layout_weight="10"
        android:gravity="center">

        <ImageButton
            android:id="@+id/ibZoomIn"
            android:layout_width="wrap_content"
            android:layout_height="wrap_content"
            android:src="@drawable/zoom_in" />
        <ImageButton
            android:id="@+id/ibZoomOut"
            android:layout_width="wrap_content"
            android:layout_height="wrap_content"
            android:src="@drawable/zoom_out" />
        <ImageButton
            android:id="@+id/ibRotate"
            android:layout_width="wrap_content"
            android:layout_height="wrap_content"
            android:src="@drawable/rotate" />
        <ImageButton
            android:id="@+id/ibBright"
            android:layout_width="wrap_content"
            android:layout_height="wrap_content"
            android:src="@drawable/brightness" />
        <ImageButton
            android:id="@+id/ibDark"
            android:layout_width="wrap_content"
            android:layout_height="wrap_content"
            android:src="@drawable/dark" />
        <ImageButton
            android:id="@+id/ibGray"
            android:layout_width="wrap_content"
            android:layout_height="wrap_content"
            android:src="@drawable/gray" />
    </androidx.appcompat.widget.LinearLayoutCompat>

    <androidx.appcompat.widget.LinearLayoutCompat
        android:id="@+id/pictureLayout"
        android:layout_width="match_parent"
        android:layout_height="0dp"
        android:layout_weight="90"
        android:gravity="center">

    </androidx.appcompat.widget.LinearLayoutCompat>

</androidx.appcompat.widget.LinearLayoutCompat>
예제 9-12, 13, 14, 15, 16 MainActivity.java 코드
public class MainActivity extends AppCompatActivity {
    private static final String TAG = "MainActivity2";

    // 위젯 변수 6개와 클래스 변수 1개를 전역변수로 선언
    private ImageButton ibZoomIn, ibZoomOut, ibRotate, ibBright, ibDark, ibGray;
    private MyGraphicView graphicView;
    // 축척으로 사용될 전역변수 2개를 선언
    private static float scaleX = 1, scaleY = 1;
    // 회전 각도로 사용될 전역변수 선언
    private static float angle = 0;
    // 색상 배수로 사용될 전역변수 선언
    private static float color = 1;
    // 채도 배수로 사용된 전역변수 선언
    private static float saturation = 1;

    @Override
    protected void onCreate(Bundle savedInstanceState) {
        super.onCreate(savedInstanceState);
        setContentView(R.layout.activity_main);
        setTitle("미니 포토샵");

        // activity_main.xml 의 pictureLayout 을 인플레이트 한 후
        // MyGraphicView 형 클래스 변수를 첨부
        // 결국 아래쪽 레이아웃에는 MyGraphicView 에서 설정한 내용이 출력 됨
        LinearLayoutCompat pictureLayout = findViewById(R.id.pictureLayout);
        graphicView = new MyGraphicView(this);
        pictureLayout.addView(graphicView);

        init();
        initLr();
    }

    public void init(){
        ibZoomIn = findViewById(R.id.ibZoomIn);
        ibZoomOut = findViewById(R.id.ibZoomOut);
        ibRotate = findViewById(R.id.ibRotate);
        ibBright = findViewById(R.id.ibBright);
        ibDark = findViewById(R.id.ibDark);
        ibGray = findViewById(R.id.ibGray);
    }

    public void initLr(){
        // 확대 버튼을 클릭할 때마다 축척 전역변수가 0.2씩 증가함
        ibZoomIn.setOnClickListener(v -> {
            scaleX = scaleX + 0.2f;
            scaleY = scaleY + 0.2f;
            // 확대를 위해서 onDraw( ) 메서드를 다시 호출해야하는데
            // 뷰의 invalidate( ) 메서드는 onDraw( )를 자동으로 호출함
            graphicView.invalidate();
        });
        // 확대 버튼을 클릭할 때마다 축척 전역변수가 0.2씩 감소함
        ibZoomOut.setOnClickListener(v -> {
            scaleX = scaleX - 0.2f;
            scaleY = scaleY - 0.2f;
            graphicView.invalidate();
        });
        // 회전하기 버튼을 클릭할 때마다 회전각도가 20도씩 증가함
        ibRotate.setOnClickListener(v -> {
            angle = angle + 20;
            graphicView.invalidate();
        });
        // 밝게하기 버튼을 클릭할 때마다 밝기가 0.2배씩 증가함
        ibBright.setOnClickListener(v -> {
            color = color + 0.2f;
            graphicView.invalidate();
        });
        // 어둡게하기 버튼을 클릭할 때마다 밝기가 0.2배씩 감소함
        ibDark.setOnClickListener(v -> {
            color = color - 0.2f;
            graphicView.invalidate();
        });
        // 회색영상 버튼을 클릭할 때마다 채도가 1이면 0으로, 0이면 1로 변경
        ibGray.setOnClickListener(v -> {
            if(saturation == 0) {
                saturation = 1;
            } else {
                saturation = 0;
            }
            graphicView.invalidate();
        });
    }

    // MyGraphicView 클래스를 정의
    private static class MyGraphicView extends View {
        public MyGraphicView(Context context) {
            super(context);
        }

        @Override
        protected void onDraw(Canvas canvas) {
            super.onDraw(canvas);

            // 화면(뷰)의 중앙을 구하고
            // 전역변수에 설정된 값으로 캔버스의 축척을 설정
            int cenX = this.getWidth() / 2;
            int cenY = this.getHeight() / 2;
            canvas.scale(scaleX, scaleY, cenX, cenY);
            // 전역변수에 설정된 각도로 캔버스를 회전시킴
            canvas.rotate(angle, cenX, cenY);

            Paint paint = new Paint();
            float[] array = { color, 0, 0, 0, 0,
                    0, color, 0, 0, 0,
                    0, 0, color, 0, 0,
                    0, 0, 0, 1, 0,};

            ColorMatrix cm = new ColorMatrix(array);
            // setSaturation( ) 메서드가 실행되면 위에 설정된 ColorMatrix
            if(saturation == 0) {
                cm.setSaturation(saturation);
            }

            paint.setColorFilter(new ColorMatrixColorFilter(cm));

            Bitmap picture =
            	BitmapFactory.decodeResource(getResources(), R.drawable.umbrella);

            int picX = (this.getWidth() - picture.getWidth()) / 2;
            int picY = (this.getHeight() - picture.getHeight()) / 2;

            canvas.drawBitmap(picture, picX, picY, paint);

            picture.recycle();
        }
    }
}
drawable 파일
실습 9-2 결과

Nil Desperandum <절대 절망하지 마라>