
1. 액티비티와 인텐트의 기본
1-1 안드로이드의 4대 컴포넌트
- 안드로이드의 4대 컴포넌트는 액티비티, 서비스, 브로드캐스트 리시버, 콘텐트 프로바이더입니다.
액티비티
- 액티비티(Activity)는 화면을 구성하는 가장 기본적인 컴포넌트입니다.
서비스
- 서비스(Service)는 눈에 보이는 화면(액티비티)과 상관없이 백그라운드에서 동작하는 컴포넌트입니다.
- 백신 프로그램처럼 눈에 보이지는 않지만 계속 동작하고 있습니다.
- 로컬에서 동작하는 서비스는 아래와 같은 세 단계를 거칩니다.

브로드캐스트 리시버
- 안드로이드는 여러 응용 프로그램이나 장치에 메시지를 전달하기 위해 방송(broadcasting) 메시지를 사용합니다.
- 안드로이드는 문자 메시지 도착, 배터리 방전, SD 카드 탁부착, 네트워크 환경 변화 등이 발생하면 전체 응용 프로그램이 알 수 있도록 방송 신호를 보냅니다.
- 브로드캐스트 리시버(Broadcast Receiver)는 이러한 방송 신호가 발생하면 반응합니다.
- 배터리가 얼마 남지 않았을 때 경고 문자나 소리를 발생시키는 기능을 구현할 수도 있습니다.
콘텐트 프로바이더
- 콘텐트 프로바이더(Content Provider)는 응용 프로그램사이에 데이터를 공유하기 위한 컴포넌트입니다.
- 안드로이드 응용 프로그램은 데이터에 자신만 접근할 수 있으므로 자신의 데이터를 외부에 공개하려면 콘텐트 프로바이더를 만들어야 합니다.
- 콘텐트 프로바이더의 정보를 제공하는 방법으로는 URI(Uniform Resource Identifier)가 있습니다.
- 아래는 콘텐트 프로바이더와 URI의 개념입니다.

1-2 액티비티의 개요
- 액티비티는 안드로이드폰에 나타나는 화면 하나하나를 말합니다.
- 액티비티는 사용자에게 보여주는 화면을 만들기 때문에 안드로이드의 4대 컴포넌트 중 가장 핵심적인 요소입니다.
- 지금까지 작성한 프로그램에서는 모두 액티비티를 만들어 사용했는데 화면이 하나였습니다.
- 응용 프로그램에 여러 개의 액티비티를 사용하는 방법도 있습니다.
액티비티 추가
- 안드로이드 프로젝트를 생성할 때 activity_main.xml과 MainActivity.java로 파일 이름을 지정했었습니다.
- activity_main.xml은 화면을 구성하는 코드로 되어 있지만 activity_main.xml이 아니라 MainActivity.java가 액티비티에 해당됩니다.
- 지금까지는 MainActivity.java에서 activity_main.xml이 필요한 경우 setContentView(R.layout.activity_main)로 화면에 불러와 사용했습니다.
- activity_main.xml을 사용하지 않고 Java 코드만으로 화면을 구성하는 방법도 있었습니다.
- 아래의 MainActivity.java는 Activity 클래스를 상속받으므로 MainActivity.java를 액티비티라고 부릅니다.
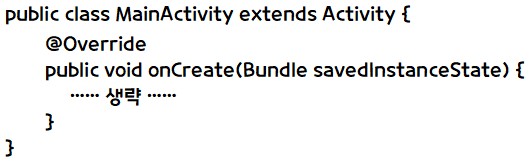
- 액티비티 하나당 화면을 하나씩 생성할 수 있습니다.
실습 10-1 새로운 액티비티 추가하기
예제 10-1 activity_main.xml 코드
<androidx.appcompat.widget.LinearLayoutCompat
    xmlns:android="http://schemas.android.com/apk/res/android"
    xmlns:tools="http://schemas.android.com/tools"
    android:orientation="vertical"
    android:layout_width="match_parent"
    android:layout_height="match_parent"
    tools:context=".MainActivity">

    <Button
        android:id="@+id/btnNewActivity"
        android:layout_width="match_parent"
        android:layout_height="wrap_content"
        android:text="새 화면 열기" />

</androidx.appcompat.widget.LinearLayoutCompat>
예제 10-2 second.xml 코드
<?xml version="1.0" encoding="utf-8"?>
<androidx.appcompat.widget.LinearLayoutCompat
    xmlns:android="http://schemas.android.com/apk/res/android"
    xmlns:tools="http://schemas.android.com/tools"
    android:orientation="vertical"
    android:layout_width="match_parent"
    android:layout_height="match_parent"
    android:background="@color/purple_200"
    tools:context=".MainActivity">

    <Button
        android:id="@+id/btnReturn"
        android:layout_width="match_parent"
        android:layout_height="wrap_content"
        android:text="돌아가기" />

</androidx.appcompat.widget.LinearLayoutCompat>
예제 10-3, 4 SecondActivity 코드
public class SecondActivity extends AppCompatActivity {

    private Button btnReturn;

    @Override
    protected void onCreate(Bundle savedInstanceState) {
        super.onCreate(savedInstanceState);
        setContentView(R.layout.second);

        init();
        initLr();
    }

    public void init(){
        btnReturn = findViewById(R.id.btnReturn);
    }

    public void initLr(){
        btnReturn.setOnClickListener(v -> {
            finish();
        });
    }
}
예제 10-5 MainActivity 코드
public class MainActivity extends AppCompatActivity {

    private Button btnNewActivity;

    @Override
    protected void onCreate(Bundle savedInstanceState) {
        super.onCreate(savedInstanceState);
        setContentView(R.layout.activity_main);

        init();
        initLr();
    }

    public void init(){
        btnNewActivity = findViewById(R.id.btnNewActivity);
    }

    public void initLr(){
        btnNewActivity.setOnClickListener(v -> {
            Intent intent = new Intent(getApplicationContext(), SecondActivity.class);
            startActivity(intent);
        });
    }
}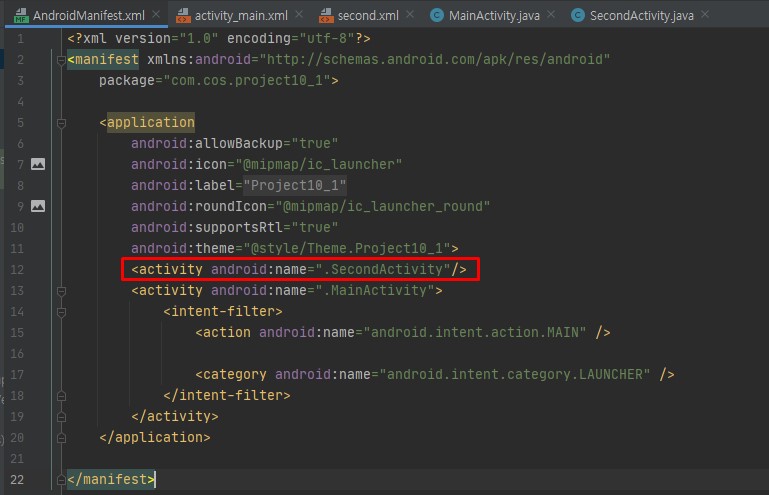
- Manifest에 사용할 SecondActivity를 등록해줍니다.
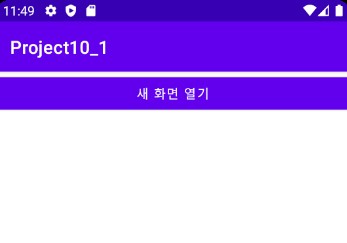
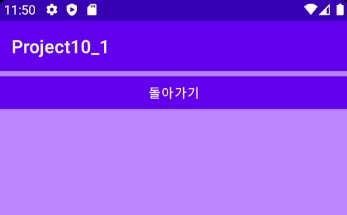
실습 10-1 결과
1-3 명시적 인텐트
- 인텐트(intent)는 안드로이드의 4대 컴포넌트가 서로 데이터를 주고받기 위한 메시지 객체입니다.
- 명시적 인텐트와 암시적 인텐트로 구분할 수 있습니다.
명시적 인텐트와 데이터 전달
- 명시적 인텐트(explicit intent)는 다른 액티비티의 이름을 명확히 지정할 때 사용하는 방법입니다.

- Intent( ) 생성자의 두 번째 파라미터에서는 액티비티 클래스를 넘길 수 있는데, 여기서는 그 전에 생성한 SecondActivity.class로 정확히 지정했습니다.
- 생성한 인텐트를 startActivity(intent)로 넘겨서 세컨트 액티비티를 실행했습니다.
- 위처럼 명확하게 액티비티의 이름을 지정했기 때문에 명시적 인텐트가 됩니다.
- 일반적으로 명시적 인텐트는 사용자가 새로운 액티비티를 직접 생성하고 호출할 때 사용됩니다.
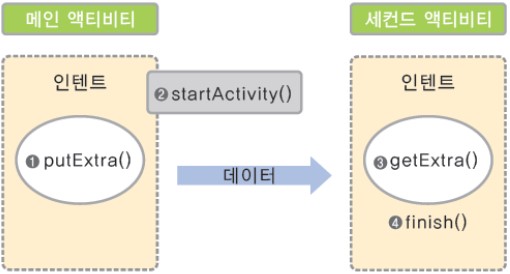
- 위 그림을 보면 putExtra( )를 이용하여 필요한 만큼 데이터를 인텐트에 넣은 다음 startActivity( )로 인텐트를 다른 액티비티에 넘깁니다.
- 인텐트를 받은 액티비티에서는 getStringExtra( ), getIntExtra( ), getBooleanExtra( ) 등의 메서드로 넘어온 데이터에 접근할 수 있습니다.
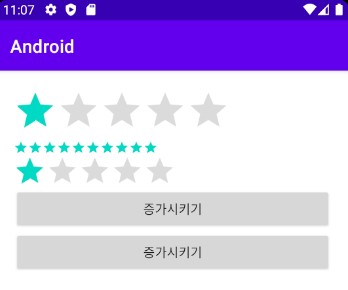
레이팅바
예제 10-6 레이팅바의 XML 코드
<androidx.appcompat.widget.LinearLayoutCompat
    xmlns:android="http://schemas.android.com/apk/res/android"
    xmlns:tools="http://schemas.android.com/tools"
    android:layout_width="match_parent"
    android:layout_height="match_parent"
    android:orientation="vertical"
    android:layout_margin="20dp"
    tools:context=".MainActivity">

    <RatingBar
        android:id="@+id/ratingBar1"
        android:layout_width="wrap_content"
        android:layout_height="wrap_content" />
    <RatingBar
        android:id="@+id/ratingBar2"
        android:layout_width="wrap_content"
        android:layout_height="wrap_content"
        style="?android:attr/ratingBarStyleSmall"
        android:stepSize="1"
        android:numStars="10"/>
    <RatingBar
        android:id="@+id/ratingBar3"
        android:rating="1.5"
        style="?android:attr/ratingBarStyleIndicator"
        android:layout_width="wrap_content"
        android:layout_height="wrap_content" />
    <androidx.appcompat.widget.AppCompatButton
        android:id="@+id/btnIncrease"
        android:layout_width="match_parent"
        android:layout_height="wrap_content"
        android:text="증가시키기" />
    <androidx.appcompat.widget.AppCompatButton
        android:id="@+id/btnDecrease"
        android:layout_width="match_parent"
        android:layout_height="wrap_content"
        android:text="증가시키기" />

</androidx.appcompat.widget.LinearLayoutCompat>
예제 10-7 레이팅바의 Java 코드
public class MainActivity extends AppCompatActivity{

    private RatingBar ratingBar1, ratingBar2, ratingBar3;
    private Button btnIncrease, btnDecrease;

    @Override
    protected void onCreate(Bundle savedInstanceState) {
        super.onCreate(savedInstanceState);
        setContentView(R.layout.activity_main);
        init();
        initLr();
    }

    public void init(){
        ratingBar1 = findViewById(R.id.ratingBar1);
        ratingBar2 = findViewById(R.id.ratingBar2);
        ratingBar3 = findViewById(R.id.ratingBar3);
        btnIncrease = findViewById(R.id.btnIncrease);
        btnDecrease = findViewById(R.id.btnDecrease);
    }

    public void initLr(){
        btnIncrease.setOnClickListener(v ->{
            ratingBar1.setRating(ratingBar1.getRating() + ratingBar1.getStepSize());
            ratingBar2.setRating(ratingBar2.getRating() + ratingBar1.getStepSize());
            ratingBar3.setRating(ratingBar3.getRating() + ratingBar1.getStepSize());
        });
        btnDecrease.setOnClickListener(v -> {
            ratingBar1.setRating(ratingBar1.getRating() - ratingBar1.getStepSize());
            ratingBar2.setRating(ratingBar2.getRating() - ratingBar1.getStepSize());
            ratingBar3.setRating(ratingBar3.getRating() - ratingBar1.getStepSize());
        });
    }
}
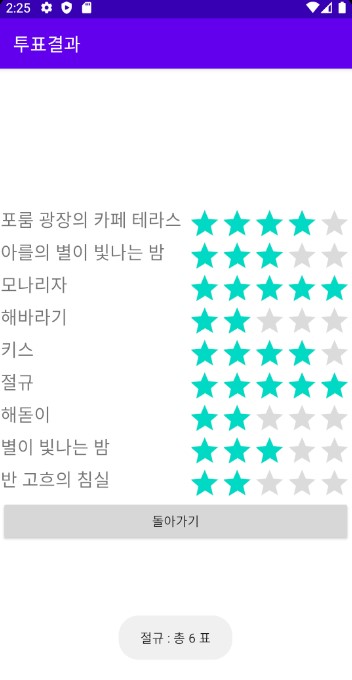
실습 10-2 명화 선호도 투표 앱 만들기
예제 10-8 activity_main.xml
<androidx.appcompat.widget.LinearLayoutCompat
    xmlns:android="http://schemas.android.com/apk/res/android"
    xmlns:tools="http://schemas.android.com/tools"
    android:layout_width="match_parent"
    android:layout_height="match_parent"
    android:orientation="vertical"
    android:layout_margin="3dp"
    tools:context=".MainActivity">
    <androidx.appcompat.widget.LinearLayoutCompat
        android:layout_width="match_parent"
        android:layout_height="0dp"
        android:layout_weight="30"
        android:orientation="horizontal">

        <ImageView
            android:id="@+id/iv1"
            android:layout_width="0dp"
            android:layout_height="match_parent"
            android:layout_weight="30"
            android:scaleType="fitXY"
            android:layout_margin="3dp"
            android:src="@drawable/cafe_terras" />
        <ImageView
            android:id="@+id/iv2"
            android:layout_width="0dp"
            android:layout_height="match_parent"
            android:layout_weight="30"
            android:scaleType="fitXY"
            android:layout_margin="3dp"
            android:src="@drawable/arles_starry_night" />
        <ImageView
            android:id="@+id/iv3"
            android:layout_width="0dp"
            android:layout_height="match_parent"
            android:layout_weight="30"
            android:scaleType="fitXY"
            android:layout_margin="3dp"
            android:src="@drawable/mona_lisa" />
    </androidx.appcompat.widget.LinearLayoutCompat>

    <androidx.appcompat.widget.LinearLayoutCompat
        android:layout_width="match_parent"
        android:layout_height="0dp"
        android:layout_weight="30"
        android:orientation="horizontal">

        <ImageView
            android:id="@+id/iv4"
            android:layout_width="0dp"
            android:layout_height="match_parent"
            android:layout_weight="30"
            android:scaleType="fitXY"
            android:layout_margin="3dp"
            android:src="@drawable/sunflower" />
        <ImageView
            android:id="@+id/iv5"
            android:layout_width="0dp"
            android:layout_height="match_parent"
            android:layout_weight="30"
            android:scaleType="fitXY"
            android:layout_margin="3dp"
            android:src="@drawable/the_kiss" />
        <ImageView
            android:id="@+id/iv6"
            android:layout_width="0dp"
            android:layout_height="match_parent"
            android:layout_weight="30"
            android:scaleType="fitXY"
            android:layout_margin="3dp"
            android:src="@drawable/the_scream" />
    </androidx.appcompat.widget.LinearLayoutCompat>

    <androidx.appcompat.widget.LinearLayoutCompat
        android:layout_width="match_parent"
        android:layout_height="0dp"
        android:layout_weight="30"
        android:orientation="horizontal">

        <ImageView
            android:id="@+id/iv7"
            android:layout_width="0dp"
            android:layout_height="match_parent"
            android:layout_weight="30"
            android:scaleType="fitXY"
            android:layout_margin="3dp"
            android:src="@drawable/sunrise" />
        <ImageView
            android:id="@+id/iv8"
            android:layout_width="0dp"
            android:layout_height="match_parent"
            android:layout_weight="30"
            android:scaleType="fitXY"
            android:layout_margin="3dp"
            android:src="@drawable/the_starry_night" />
        <ImageView
            android:id="@+id/iv9"
            android:layout_width="0dp"
            android:layout_height="match_parent"
            android:layout_weight="30"
            android:scaleType="fitXY"
            android:layout_margin="3dp"
            android:src="@drawable/van_goghs_bedroom" />
    </androidx.appcompat.widget.LinearLayoutCompat>

    <androidx.appcompat.widget.AppCompatButton
        android:id="@+id/btnResult"
        android:layout_width="match_parent"
        android:layout_height="0dp"
        android:layout_weight="10"
        android:background="@android:color/holo_blue_light"
        android:text="투표 종료" />

</androidx.appcompat.widget.LinearLayoutCompat>
예제 10-9 activity_result.xml
<TableLayout
    xmlns:android="http://schemas.android.com/apk/res/android"
    xmlns:tools="http://schemas.android.com/tools"
    android:layout_width="match_parent"
    android:layout_height="match_parent"
    android:stretchColumns="0"
    android:gravity="center_vertical"
    tools:context=".ResultActivity">
    <TableRow>
        <TextView
            android:id="@+id/tv1"
            android:text="그림 1"
            android:textSize="27dp" />
        <RatingBar
            android:id="@+id/ratingBar1"
            style="?android:attr/ratingBarStyleIndicator"
            android:layout_gravity="right" />
    </TableRow>
    <TableRow>
        <TextView
            android:id="@+id/tv2"
            android:text="그림 2"
            android:textSize="27dp" />
        <RatingBar
            android:id="@+id/ratingBar2"
            style="?android:attr/ratingBarStyleIndicator"
            android:layout_gravity="right" />
    </TableRow>
    <TableRow>
        <TextView
            android:id="@+id/tv3"
            android:text="그림 3"
            android:textSize="27dp" />
        <RatingBar
            android:id="@+id/ratingBar3"
            style="?android:attr/ratingBarStyleIndicator"
            android:layout_gravity="right" />
    </TableRow>
    <TableRow>
        <TextView
            android:id="@+id/tv4"
            android:text="그림 4"
            android:textSize="27dp" />
        <RatingBar
            android:id="@+id/ratingBar4"
            style="?android:attr/ratingBarStyleIndicator"
            android:layout_gravity="right" />
    </TableRow>
    <TableRow>
        <TextView
            android:id="@+id/tv5"
            android:text="그림 5"
            android:textSize="27dp" />
        <RatingBar
            android:id="@+id/ratingBar5"
            style="?android:attr/ratingBarStyleIndicator"
            android:layout_gravity="right" />
    </TableRow>
    <TableRow>
        <TextView
            android:id="@+id/tv6"
            android:text="그림 6"
            android:textSize="27dp" />
        <RatingBar
            android:id="@+id/ratingBar6"
            style="?android:attr/ratingBarStyleIndicator"
            android:layout_gravity="right" />
    </TableRow>
    <TableRow>
        <TextView
            android:id="@+id/tv7"
            android:text="그림 7"
            android:textSize="27dp" />
        <RatingBar
            android:id="@+id/ratingBar7"
            style="?android:attr/ratingBarStyleIndicator"
            android:layout_gravity="right" />
    </TableRow>
    <TableRow>
        <TextView
            android:id="@+id/tv8"
            android:text="그림 8"
            android:textSize="27dp" />
        <RatingBar
            android:id="@+id/ratingBar8"
            style="?android:attr/ratingBarStyleIndicator"
            android:layout_gravity="right" />
    </TableRow>
    <TableRow>
        <TextView
            android:id="@+id/tv9"
            android:text="그림 9"
            android:textSize="27dp" />
        <RatingBar
            android:id="@+id/ratingBar9"
            style="?android:attr/ratingBarStyleIndicator"
            android:layout_gravity="right" />
    </TableRow>
    <TableRow>
        <androidx.appcompat.widget.AppCompatButton
        android:id="@+id/btnReturn"
        android:layout_width="match_parent"
        android:layout_height="wrap_content"
        android:layout_span="2"
        android:text="돌아가기"/>
    </TableRow>

</TableLayout>
예제 10-10, 11, 12 MainAcitivity의 Java 코드
public class MainActivity extends AppCompatActivity {

    private ImageView image[] = new ImageView[9];
    private Button btnResult;

    @Override
    protected void onCreate(Bundle savedInstanceState) {
        super.onCreate(savedInstanceState);
        setContentView(R.layout.activity_main);
        setTitle("명화 선호도 투표");

        Integer imageId[] = {R.id.iv1, R.id.iv2, R.id.iv3, R.id.iv4, R.id.iv5, R.id.iv6,
        R.id.iv7, R.id.iv8, R.id.iv9};
        String imageName[] = {"포룸 광장의 카페 테라스", "아를의 별이 빛나는 밤", "모나리자", "해바라기",
        			"키스", "절규", "해돋이","별이 빛나는 밤", "반 고흐의 침실"};
        final int voteCount[] = new int[9];
        for(int i = 0; i < 9; i++){
            voteCount[i] = 0;
        }

        for(int i = 0; i < imageId.length; i++){
            final int index;
            index = i;
            image[index] = (ImageView) findViewById(imageId[index]);
            image[index].setOnClickListener(v -> {
                voteCount[index]++;
                Toast.makeText(getApplicationContext(), imageName[index] + " : 총 "
                + voteCount[index] + " 표", Toast.LENGTH_SHORT).show();
            });
        }

        btnResult.setOnClickListener(v -> {
            Intent intent = new Intent(getApplicationContext(), ResultActivity.class);
            intent.putExtra("VoteCount", voteCount);
            intent.putExtra("ImageName", imageName);
            startActivity(intent);
        });
    }
}
예제 10-13, 14 ResultActivity의 Java 코드
public class ResultActivity extends AppCompatActivity {

    @Override
    protected void onCreate(Bundle savedInstanceState) {
        super.onCreate(savedInstanceState);
        setContentView(R.layout.activity_result);
        setTitle("투표결과");

        Intent intent = getIntent();
        int[] voteResult = intent.getIntArrayExtra("VoteCount");
        String[] imageName = intent.getStringArrayExtra("ImageName");

        TextView tv[] = new TextView[imageName.length];
        RatingBar ratingBar[] = new RatingBar[imageName.length];

        Integer tvID[] = {R.id.tv1, R.id.tv2, R.id.tv3, R.id.tv4,
        		R.id.tv5, R.id.tv6, R.id.tv7, R.id.tv8, R.id.tv9 };
        Integer ratingBarID[] = {R.id.ratingBar1, R.id.ratingBar2, R.id.ratingBar3,
        			R.id.ratingBar4, R.id.ratingBar5, R.id.ratingBar6,
        			R.id.ratingBar7, R.id.ratingBar8, R.id.ratingBar9};

        for(int i = 0; i < voteResult.length; i++){
            tv[i] = (TextView) findViewById(tvID[i]);
            ratingBar[i] = (RatingBar) findViewById(ratingBarID[i]);
        }

        for(int i = 0; i < voteResult.length; i++){
            tv[i].setText(imageName[i]);
            ratingBar[i].setRating((float) voteResult[i]);
        }

        Button btnReturn = (Button) findViewById(R.id.btnReturn);
        btnReturn.setOnClickListener(v -> {
            finish();
        });
    }
}
실습 10-2 결과

2. 액티비티와 인텐트의 응용
2-1. 양방향 액티비티
- 메인 액티비티에서 세컨트 액티비티로 데이터를 넘긴 후에 세컨트 액티비티에서 메인 액티비티로 데이터를 돌려주는 경우도 있습니다.
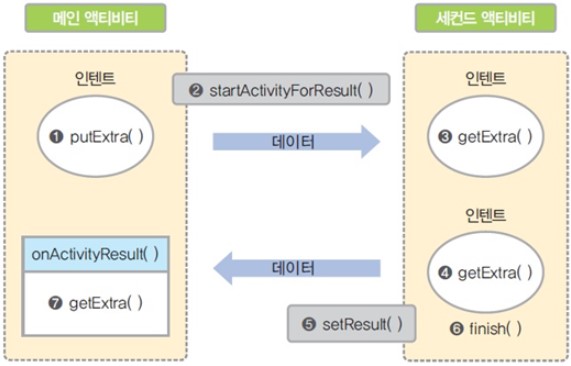
- 메인 액티비티에서 putExtra( )로 인텐트에 데이터를 넣는 것은 동일하지만, 세컨트 액티비티에서 데이터를 돌려받으려면 액티비티를 호출할 때 startActivityForResult( ) 메서드를 사용해야합니다.
- 세컨드 액티비티에서 finish( )로 끝내기 전에 메인 액티비티에 돌려줄 인턴트를 생성하여 putExtra( )로 데이터를 넣은 다음 setResult( )로 돌려줍니다.
- 메인 액티비티에서는 onActivityResult( ) 메서드르 오버라이딩하고 오버라이딩된 메서드 안에서 getExtar( )로 돌려받은 데이터를 사용합니다.
예제 10-15 activity_main.xml
<androidx.appcompat.widget.LinearLayoutCompat
    xmlns:android="http://schemas.android.com/apk/res/android"
    xmlns:tools="http://schemas.android.com/tools"
    android:layout_width="match_parent"
    android:layout_height="match_parent"
    android:orientation="vertical"
    android:layout_margin="20dp"
    tools:context=".MainActivity">

    <EditText
        android:id="@+id/etNum1"
        android:layout_width="match_parent"
        android:layout_height="wrap_content" />
    <EditText
        android:id="@+id/etNum2"
        android:layout_width="match_parent"
        android:layout_height="wrap_content" />
    <Button
        android:id="@+id/btnNewActivity"
        android:layout_width="match_parent"
        android:layout_height="wrap_content"
        android:text="더하기" />

</androidx.appcompat.widget.LinearLayoutCompat>
예제 10-16 second.xml
<androidx.appcompat.widget.LinearLayoutCompat
    xmlns:android="http://schemas.android.com/apk/res/android"
    xmlns:tools="http://schemas.android.com/tools"
    android:layout_width="match_parent"
    android:layout_height="match_parent"
    android:orientation="vertical"
    android:layout_margin="20dp"
    tools:context=".SecondActivity">

    <Button
        android:id="@+id/btnReturn"
        android:layout_width="match_parent"
        android:layout_height="wrap_content"
        android:text="돌아가기" />

</androidx.appcompat.widget.LinearLayoutCompat>
예제 10-17 MainActivity의 Java 코드
public class MainActivity extends AppCompatActivity{

    private EditText etNum1, etNum2;
    private Button btnNewActivity;

    @Override
    protected void onCreate(Bundle savedInstanceState) {
        super.onCreate(savedInstanceState);
        setContentView(R.layout.activity_main);
        setTitle("메인 액티비티");

        init();
        initLr();
    }

    public void init(){
        etNum1 = findViewById(R.id.etNum1);
        etNum2 = findViewById(R.id.etNum2);
        btnNewActivity = findViewById(R.id.btnNewActivity);
    }

    public void initLr(){
        btnNewActivity.setOnClickListener(v ->{
            Intent intent = new Intent(getApplicationContext(), SecondActivity.class);
            intent.putExtra("Num1", Integer.parseInt(etNum1.getText().toString()));
            intent.putExtra("Num1", Integer.parseInt(etNum2.getText().toString()));
            startActivityForResult(intent, 0);
        });
    }
    @Override
    protected void onActivityResult(int requestCode, int resultCode, Intent data) {
        super.onActivityResult(requestCode, resultCode, data);
        if (resultCode == RESULT_OK) {
            int hap = data.getIntExtra("Hap", 0);
            Toast.makeText(getApplicationContext(), "합계 : " + hap, Toast.LENGTH_SHORT).show();
        }
    }
}
예제 10-18 SecondActivity의 Java 코드
public class SecondActivity extends AppCompatActivity {

    @Override
    protected void onCreate(Bundle savedInstanceState) {
        super.onCreate(savedInstanceState);
        setContentView(R.layout.activity_second);
        setTitle("세컨드 액티비티");

        Intent intent = getIntent();
        final int hapValue = intent.getIntExtra("Num1", 0) + intent.getIntExtra("Num2", 0);

        Button btnReturn = (Button)findViewById(R.id.btnReturn);
        btnReturn.setOnClickListener(v -> {
            Intent outIntent = new Intent(getApplicationContext(), MainActivity.class);
            outIntent.putExtra("Hap", hapValue);
            setResult(RESULT_OK, outIntent);
            finish();;
        });
    }
}
2-2 암시적 인텐트
- 명시적 인텐트의 개념이 두 액티비티를 사용자가 직접 생성하고 코딩하는 것이라면, 암시적 인텐트(implicit intent, 묵시적 인텐트)는 약속된 액션을 지정하여 안드로이드에서 제공하는 기존 응용 프로그램을 실행하는 것입니다.
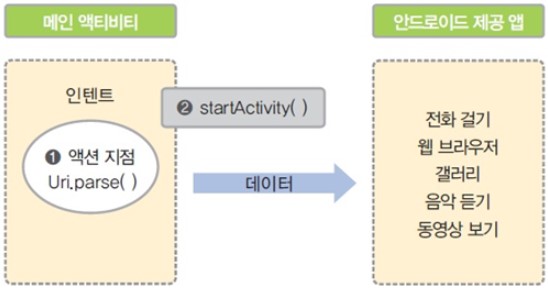
- 위 그림을 보면 메인 액티비티에서 인텐트를 생성할 때 실행하고자 하는 액션을 지정하고 액션의 데이터 값을 설정하면 기존의 안드로이드 응용 프로그램이 실행됩니다.
- 아래는 119에 응급전화를 거는 형식입니다.

- 전화 걸기와 구글 맵을 사용하려면 AndroidManifest.xml의 <application 위에 아래와 같이 권한을 추가 해야합니다.

예제 10-19 암시적 인텐트의 XML 파일
<androidx.appcompat.widget.LinearLayoutCompat
xmlns:android="http://schemas.android.com/apk/res/android"
xmlns:tools="http://schemas.android.com/tools"
android:layout_width="match_parent"
android:layout_height="match_parent"
android:orientation="vertical"
android:layout_margin="20dp"
tools:context=".MainActivity">
<androidx.appcompat.widget.AppCompatButton
android:id="@+id/btnDial"
android:layout_width="match_parent"
android:layout_height="wrap_content"
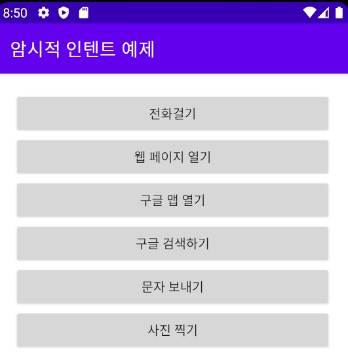
android:text="전화걸기" />
<androidx.appcompat.widget.AppCompatButton
android:id="@+id/btnWeb"
android:layout_width="match_parent"
android:layout_height="wrap_content"
android:text="웹 페이지 열기" />
<androidx.appcompat.widget.AppCompatButton
android:id="@+id/btnGoogle"
android:layout_width="match_parent"
android:layout_height="wrap_content"
android:text="구글 맵 열기" />
<androidx.appcompat.widget.AppCompatButton
android:id="@+id/btnSearch"
android:layout_width="match_parent"
android:layout_height="wrap_content"
android:text="구글 검색하기" />
<androidx.appcompat.widget.AppCompatButton
android:id="@+id/btnSms"
android:layout_width="match_parent"
android:layout_height="wrap_content"
android:text="문자 보내기" />
<androidx.appcompat.widget.AppCompatButton
android:id="@+id/btnPhoto"
android:layout_width="match_parent"
android:layout_height="wrap_content"
android:text="사진 찍기" />
</androidx.appcompat.widget.LinearLayoutCompat>예제 10-20 암시적 인텐트의 Java 코드
public class MainActivity extends AppCompatActivity{
private Button btnDial, btnWeb, btnGoogle, btnSearch, btnSms, btnPhoto;
@Override
protected void onCreate(Bundle savedInstanceState) {
super.onCreate(savedInstanceState);
setContentView(R.layout.activity_main);
setTitle("암시적 인텐트 예제");
init();
initLr();
}
public void init(){
btnDial = findViewById(R.id.btnDial);
btnWeb = findViewById(R.id.btnWeb);
btnGoogle = findViewById(R.id.btnGoogle);
btnSearch = findViewById(R.id.btnSearch);
btnSms = findViewById(R.id.btnSms);
btnPhoto = findViewById(R.id.btnPhoto);
}
public void initLr(){
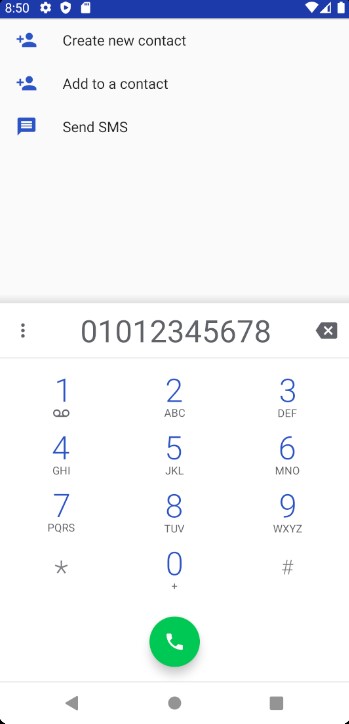
btnDial.setOnClickListener(v ->{
Uri uri = Uri.parse("tel:01012345678");
Intent intent = new Intent(Intent.ACTION_DIAL, uri);
startActivity(intent);
});
btnWeb.setOnClickListener(v ->{
Uri uri = Uri.parse("https://www.hanbit.co.kr");
Intent intent = new Intent(Intent.ACTION_VIEW, uri);
startActivity(intent);
});
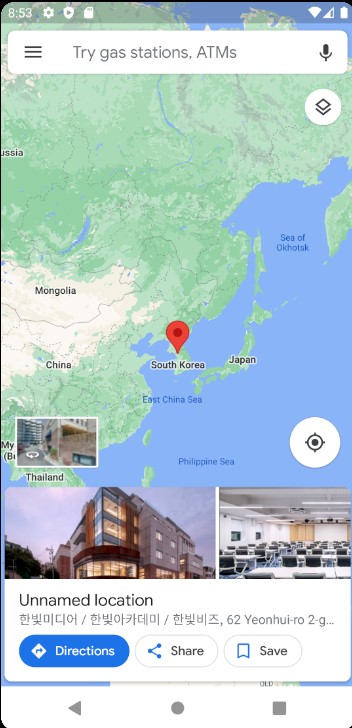
btnGoogle.setOnClickListener(v ->{
Uri uri = Uri.parse("https://maps.google.co.kr/maps?q="
+ 37.559133 + "," + 126.927824);
Intent intent = new Intent(Intent.ACTION_VIEW, uri);
startActivity(intent);
});
btnSearch.setOnClickListener(v ->{
Intent intent = new Intent(Intent.ACTION_WEB_SEARCH);
intent.putExtra(SearchManager.QUERY, "안드로이드");
startActivity(intent);
});
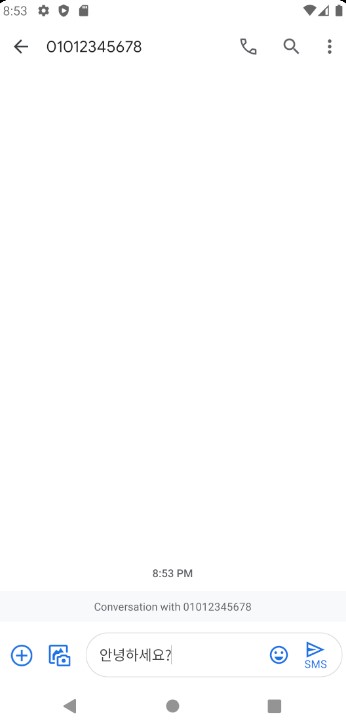
btnSms.setOnClickListener(v ->{
Intent intent = new Intent(Intent.ACTION_SENDTO);
intent.putExtra("sms_body", "안녕하세요?");
intent.setData(Uri.parse("smsto:" + Uri.encode("010-1234-5678")));
startActivity(intent);
});
btnPhoto.setOnClickListener(v ->{
Intent intent = new Intent(MediaStore.ACTION_IMAGE_CAPTURE);
startActivity(intent);
});
}
}
2-3 액티비티 생명주기
- 안드로이드 응용 프로그램은 PC용과 달리 화면이 작으므로 동시에 여러 개의 액티비티(화면)가 나올 수 없습니다.
- 응용 프로그램이 여러 개의 액티비티로 작성되어 있다면 앞에 나오는 액티비티 하나만 활성화된 상태이고 나머지는 모두 비활성화된 상태가 됩니다.
- 비활성화된 액티비티가 앞으로 나오면 앞에 있던 액티비티가 비활성화됩니다.
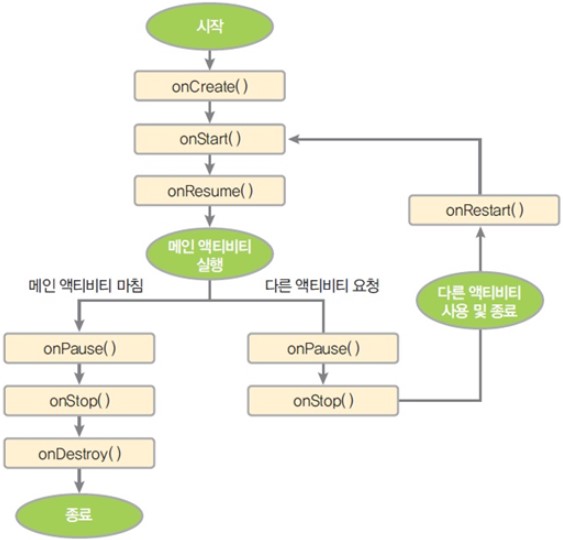
- 액티비티의 생명주기는 액티비티의 생성부터 소멸까지의 주기를 말합니다.
- 응용 프로그램이 시작하면 onCreate( ), onStart( ), onResume( ) 메서드가 수행되고 메인 액티비티 화면이 나옵니다.
- 이 상태가 메인 액티비티의 실행 상태입니다. - 위 상태에서 메인 액티비티를 끝내면 왼쪽의 onPause( ), onStop( ), onDestroy( ) 메서드가 차례로 수행되고 응용 프로그램이 종료됩니다.
- 만약 다른 액티비티를 요청하면 오른쪽의 onPaus( ), onStop( ) 메서드가 수행되고 메인 액티비티가 중지되며 다른 액티비티 화면이 나옵니다.
- 다른 액티비티의 사용을 종료하면 onRestart( ), onStart( ), onResume( ) 메서드가 수행되고 다시 메인 액티비티 화면이 나옵니다.
실습 10-3 로그캣을 이용하여 액티비티 생명주기 확인하기
예제 10-21 activity_main.xml
<androidx.appcompat.widget.LinearLayoutCompat
    xmlns:android="http://schemas.android.com/apk/res/android"
    xmlns:tools="http://schemas.android.com/tools"
    android:layout_width="match_parent"
    android:layout_height="match_parent"
    android:orientation="vertical"
    android:layout_margin="20dp"
    tools:context=".MainActivity">

    <androidx.appcompat.widget.AppCompatButton
        android:id="@+id/btnDial"
        android:layout_width="match_parent"
        android:layout_height="wrap_content"
        android:text="전화걸기" />
    <androidx.appcompat.widget.AppCompatButton
        android:id="@+id/btnEnd"
        android:layout_width="match_parent"
        android:layout_height="wrap_content"
        android:text="끝내기" />

</androidx.appcompat.widget.LinearLayoutCompat>
예제 10-22 MainActivity의 Java 코드
public class MainActivity extends AppCompatActivity {
    private static final String TAG = "MainActivity2";

    private Button btnDial, btnEnd;

    @Override
    protected void onCreate(Bundle savedInstanceState) {
        super.onCreate(savedInstanceState);
        setContentView(R.layout.activity_main);
        setTitle("액티비티 테스트 예제");

        Log.i(TAG, "onCreate()");

        init();
        initLr();
    }

    @Override
    protected void onStart() {
        super.onStart();
        Log.i(TAG, "onStart()");
    }

    @Override
    protected void onStop() {
        super.onStop();
        Log.i(TAG, "onStop()");
    }

    @Override
    protected void onDestroy() {
        super.onDestroy();
        Log.i(TAG, "onDestroy()");
    }

    @Override
    protected void onPause() {
        super.onPause();
        Log.i(TAG, "onPause()");
    }

    @Override
    protected void onResume() {
        super.onResume();
        Log.i(TAG, "onResume()");
    }

    @Override
    protected void onRestart() {
        super.onRestart();
        Log.i(TAG, "onRestart()");
    }

    public void init(){
        btnDial = findViewById(R.id.btnDial);
        btnEnd = findViewById(R.id.btnEnd);
    }

    public void initLr(){
        btnDial.setOnClickListener(v ->{
            Uri uri = Uri.parse("tel:01012345678");
            Intent intent = new Intent(Intent.ACTION_DIAL, uri);
            startActivity(intent);
        });
        btnEnd.setOnClickListener(v ->{
            finish();
        });
    }
}
실습 10-3 결과
- 로그를 찍어 봄으로써 메서드 실행 과정을 확인할 수 있습니다.

- 메인 액티비티를 실행 : onCreate( ), onStart( ), onResume( ) 메서드 실행
- 메인 액티비티를 실행시키면 기본적으로 onCreate( ), onStart( ), onResume( )가 기능하면서 메인 액티비티가 실행됩니다.
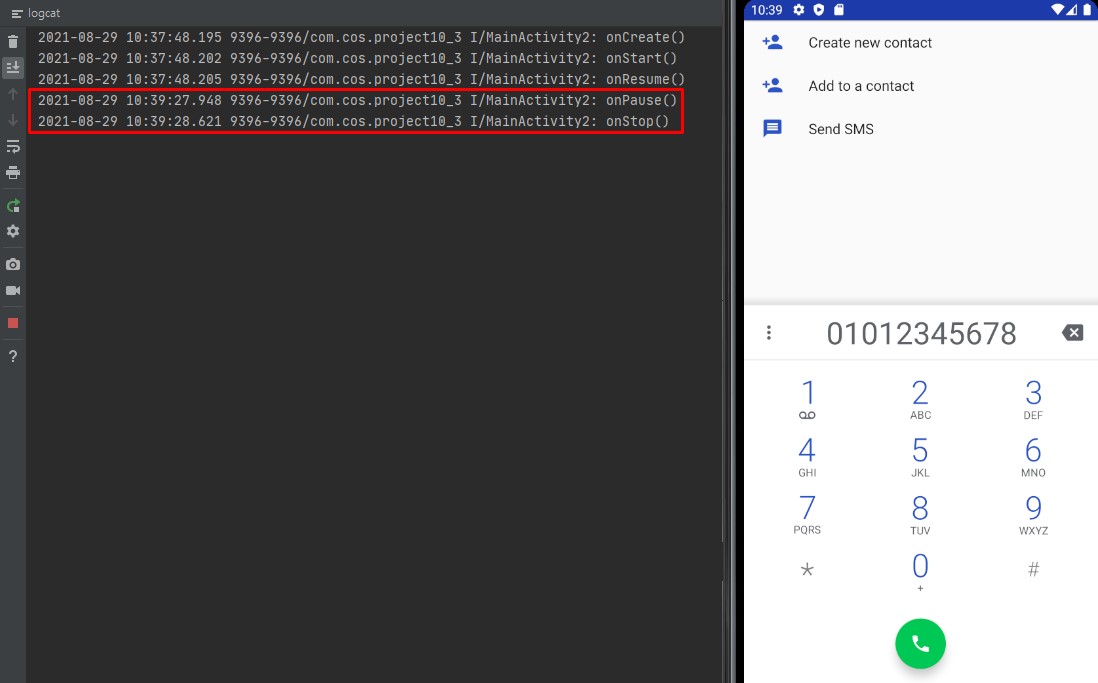
- 다른 액티비티 실행 : onPause( ), onStop( ) 메서드 실행
- 메인 액티비티에 일시정지가 걸린 후 정지가 기능하고 다른 액티비티로 전환됩니다.
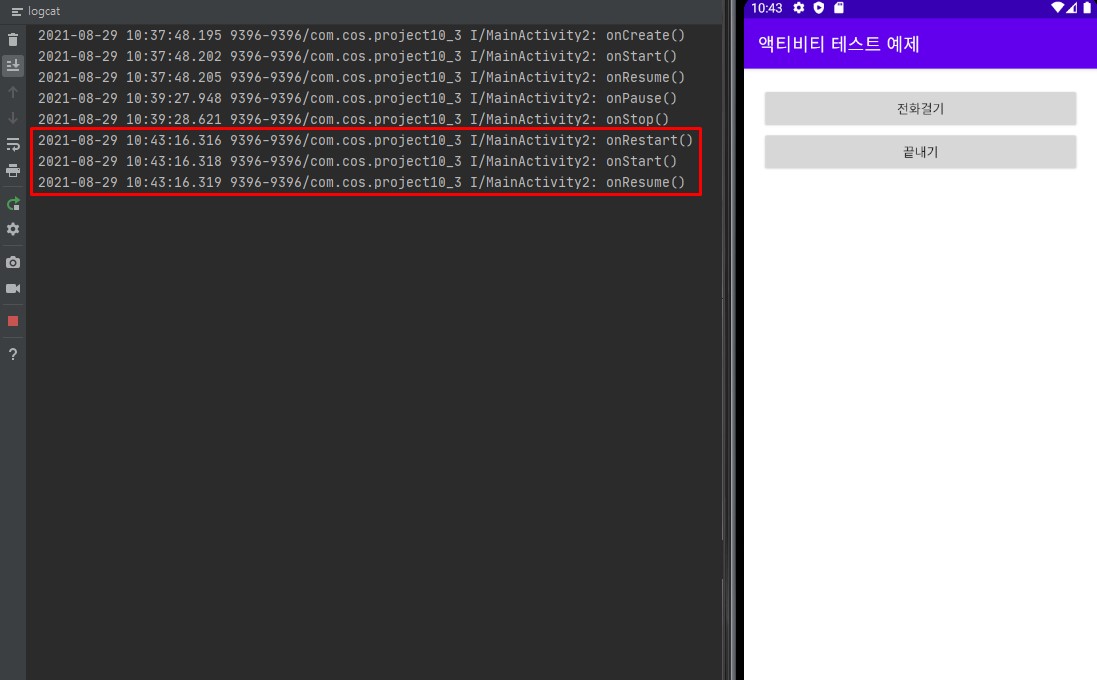
- 다시 메인 액티비티를 실행 : onRestart( ), onStart( ), onResume( ) 메서드 실행
- 다른 액티비티를 종료하고 다시 메인 액티비티로 돌아오면 onRestart를 이용해서 메인 액티비티가 재실행 됩니다.

Nil Desperandum <절대 절망하지 마라>