1. 리스트뷰와 그리드뷰
1-1 어댑터뷰
- Chapter 6에서 뷰그룹의 하위 클래스 중에서 레이아웃을 제외한 것을 뷰 컨테이너라고 했습니다.
- 뷰 컨테이너 중에서 스크롤뷰, 슬라이딩드로어, 뷰플리퍼, 탭호스트, 웹뷰에 대해서 배웠었습니다.
- 아래는 어댑터뷰의 계층도입니다.
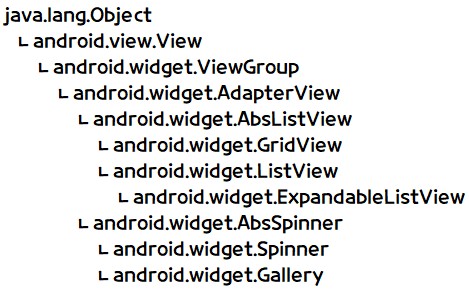
- 어댑터뷰는 그 자체를 사용하기보다는 하위 클래스를 사용합니다.
- 실제로 어댑터뷰를 사용할 때는 어댑터뷰의 모양을 설정하고 데이터를 채워주는 ArrayAdapter<T> 클래스를 함께 사용합니다.
1-2 리스트뷰
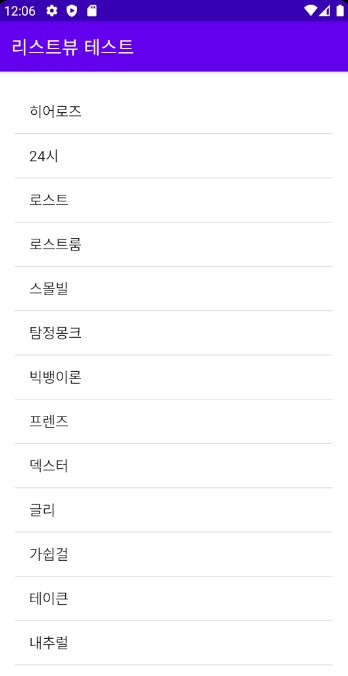
- 리스트뷰(ListView)는 데이터를 리스트 모양으로 보여주고 그 중 하나를 선택하는 용도로 사용됩니다.
XML을 이용한 리스트뷰 만들기
- 리스트뷰를 만드는 형식은 아래와 같습니다.

① 리스트뷰에 나열할 내용을 미리 String 배열로 만들어 놓습니다.
② 리스트뷰 변수를 생성하고 XML의 <ListView>에 대응시킵니다.
③ ArrayAdapter<String> 형 변수를 선언하고, 리스트의 모양과 내용을 ①의 배열로 채웁니다.
④ ③에서 생성한 ArrayAdapter를 ②의 리스트뷰 변수에 적용합니다.
⑤ 리스트뷰의 항목을 클릭했을 때 동작하는 리스너를 정의합니다.
예제 11-1 리스트뷰 기본 예제의 XML 코드
<androidx.appcompat.widget.LinearLayoutCompat
    xmlns:android="http://schemas.android.com/apk/res/android"
    xmlns:tools="http://schemas.android.com/tools"
    android:layout_width="match_parent"
    android:layout_height="match_parent"
    android:orientation="vertical"
    android:layout_margin="20dp"
    tools:context=".MainActivity">

   <ListView
       android:id="@+id/listView"
       android:layout_width="match_parent"
       android:layout_height="wrap_content" />

</androidx.appcompat.widget.LinearLayoutCompat>
예제 11-2 리스트뷰 기본 예제의 Java 코드
public class MainActivity extends AppCompatActivity{

    private ListView listView;
    final String[] mid = {"히어로즈", "24시", "로스트", "로스트룸", "스몰빌", "탐정몽크", "빅뱅이론",
    				"프렌즈", "덱스터", "글리", "가쉽걸", "테이큰", "내추럴", "브이"};

    @Override
    protected void onCreate(Bundle savedInstanceState) {
        super.onCreate(savedInstanceState);
        setContentView(R.layout.activity_main);
        setTitle("리스트뷰 테스트");

        init();
        initLr();
    }

    public void init(){
        listView = findViewById(R.id.listView);
        ArrayAdapter<String> adapter = new ArrayAdapter<String>(this,
        					android.R.layout.simple_list_item_1, mid);
        listView.setAdapter(adapter);
    }

    public void initLr(){
        listView.setOnItemClickListener(new AdapterView.OnItemClickListener() {
            @Override
            public void onItemClick(AdapterView<?> adapterView, View view, int i, long l) {
                Toast.makeText(getApplicationContext(), mid[i], Toast.LENGTH_SHORT).show();
            }
        });
    }
}
리스트뷰의 다양한 모양 설정
- 위 예제에서 리스트뷰의 모양은 android.R.layout.simple_list_item_1을 사용하여 지정했습니다.
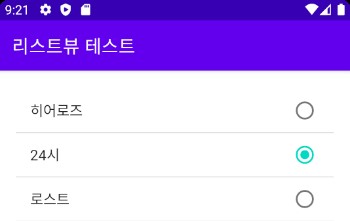
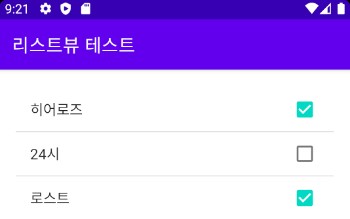
- 필요하다면 라디오버튼이나 체크박스로도 설정이 가능합니다.
- simple_list_item_1를 simple_list_item_single_choice로 바꾸면 라디오 버튼이 되고, simple_list_item_multiple_choice로 바꾸면 체크박스가 됩니다.
예제 11-3 모양을 변경한 리스트뷰의 Java 코드
ArrayAdapter<String> adapter = new ArrayAdapter<String>(this,
				android.R.layout.simple_list_item_single_choice, mid);
        listView.setChoiceMode(ListView.CHOICE_MODE_SINGLE);
        listView.setAdapter(adapter);
ArrayAdapter<String> adapter = new ArrayAdapter<String>(this,
				android.R.layout.simple_list_item_multiple_choice, mid);
        listView.setChoiceMode(ListView.CHOICE_MODE_MULTIPLE);
        listView.setAdapter(adapter);
리스트뷰의 동적 추가 • 삭제
- 앞의 예제는 리스트뷰의 항목을 코드에서 고정해놓았지만 동적으로 추가하거나 삭제할 수 있습니다.
- 리스트뷰의 항목을 동적으로 추가 • 삭제하려면 [예제 11-2]의 배열 대신 ArrayList<T>를 정의한 후 add( ) 와 remove( ) 메서드를 사용하면 됩니다.
예제 11-4 리스트뷰 동적 추가 • 삭제 XML 코드
<androidx.appcompat.widget.LinearLayoutCompat
    xmlns:android="http://schemas.android.com/apk/res/android"
    xmlns:tools="http://schemas.android.com/tools"
    android:layout_width="match_parent"
    android:layout_height="match_parent"
    android:orientation="vertical"
    android:layout_margin="20dp"
    tools:context=".MainActivity">

   <EditText
      android:id="@+id/etItem"
       android:layout_width="match_parent"
       android:layout_height="wrap_content" />
   <androidx.appcompat.widget.AppCompatButton
      android:id="@+id/btnAdd"
       android:layout_width="match_parent"
       android:layout_height="wrap_content"
       android:text="항목 추가"/>
   <ListView
       android:id="@+id/listView1"
       android:layout_width="match_parent"
       android:layout_height="wrap_content" />

</androidx.appcompat.widget.LinearLayoutCompat>
예제 11-5 리스트뷰 동적 추가 • 삭제의 Java 코드
public class MainActivity extends AppCompatActivity{

    final ArrayList<String> midList = new ArrayList<String>();
    private ListView listView1;
    private EditText etItem;
    private Button btnAdd;

    @Override
    protected void onCreate(Bundle savedInstanceState) {
        super.onCreate(savedInstanceState);
        setContentView(R.layout.activity_main);
        setTitle("리스트뷰 동적 추가 & 삭제 테스트");
        final ArrayAdapter<String> adapter = new ArrayAdapter<String>(this,
        					android.R.layout.simple_list_item_1, midList);
        listView1 = findViewById(R.id.listView1);

        listView1.setAdapter(adapter);

        etItem = findViewById(R.id.etItem);
        btnAdd = findViewById(R.id.btnAdd);
        btnAdd.setOnClickListener(v->{
            midList.add(etItem.getText().toString());
            adapter.notifyDataSetChanged();
        });
        listView1.setOnItemClickListener((AdapterView.OnItemClickListener)
        					(parent, view, position, id) -> {
            midList.remove(position);
            adapter.notifyDataSetChanged();
        });
    }
}
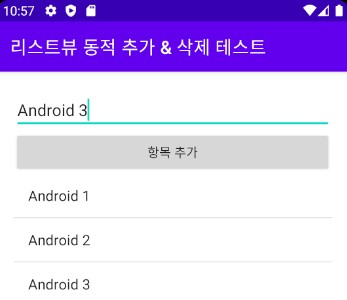
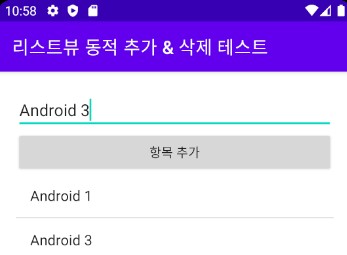
- item을 LongClick시 삭제가 됩니다.
1-3 그리드뷰
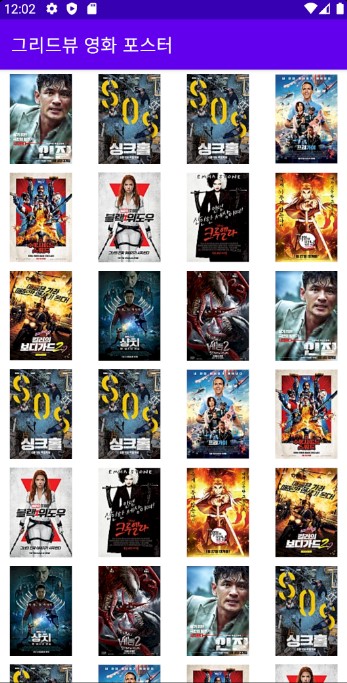
- 그리드뷰는 사진이나 그림을 격자모양으로 배치해줍니다.
- 버튼, 텍스트 등을 배치할 수도 있지만 주로 사진이나 그림을 배치합니다.
- XML 파일에는 간단히 <GridView>를 넣으면 되지만 Java 코드에는 필요한 내용을 반드시 코딩해야 합니다.
- 특히 <GridVIew>의 속성 중 열 개수를 지정하는 numColumns는 꼭 넣어야 합니다.
실습 11-1 영화 포스터 보기 1
예제 11-6 activity_main.xml
<androidx.appcompat.widget.LinearLayoutCompat
    xmlns:android="http://schemas.android.com/apk/res/android"
    xmlns:tools="http://schemas.android.com/tools"
    android:layout_width="match_parent"
    android:layout_height="match_parent"
    android:orientation="vertical"
    tools:context=".MainActivity">

    <GridView
        android:id="@+id/gridView"
        android:layout_width="match_parent"
        android:layout_height="wrap_content"
        android:gravity="center"
        android:numColumns="4" />

</androidx.appcompat.widget.LinearLayoutCompat>
예제 11-7 dialog.xml
<androidx.appcompat.widget.LinearLayoutCompat
    xmlns:android="http://schemas.android.com/apk/res/android"
    xmlns:tools="http://schemas.android.com/tools"
    android:layout_width="match_parent"
    android:layout_height="match_parent"
    android:orientation="vertical"
    android:gravity="center"
    tools:context=".MainActivity">

    <ImageView
        android:id="@+id/ivPoster"
        android:layout_width="wrap_content"
        android:layout_height="wrap_content" />

</androidx.appcompat.widget.LinearLayoutCompat>
예제 11-8, 9, 10, 11 MainActivity의 Java 코드
class MyGridAdapter extends BaseAdapter{
    Context context;
    public MyGridAdapter(Context c) {
        context = c;
    }

    @Override
    public int getCount() {
        return posterID.length;
    }

    @Override
    public Object getItem(int i) {
        return null;
    }

    @Override
    public long getItemId(int i) {
        return 0;
    }

    Integer[] posterID = {R.drawable.movie1, R.drawable.movie2, R.drawable.movie2,
    		R.drawable.movie3,
            R.drawable.movie4, R.drawable.movie5, R.drawable.movie6, R.drawable.movie7,
            R.drawable.movie8, R.drawable.movie9, R.drawable.movie10, R.drawable.movie1,
            R.drawable.movie2, R.drawable.movie2, R.drawable.movie3, R.drawable.movie4,
            R.drawable.movie5, R.drawable.movie6, R.drawable.movie7, R.drawable.movie8,
            R.drawable.movie9, R.drawable.movie10, R.drawable.movie1, R.drawable.movie2,
            R.drawable.movie2, R.drawable.movie3, R.drawable.movie4, R.drawable.movie5,
            R.drawable.movie6, R.drawable.movie7, R.drawable.movie8, R.drawable.movie9,
            R.drawable.movie10, R.drawable.movie1, R.drawable.movie2, R.drawable.movie2,
            R.drawable.movie3, R.drawable.movie4, R.drawable.movie5, R.drawable.movie6,
            R.drawable.movie7, R.drawable.movie8, R.drawable.movie9, R.drawable.movie10};

    @Override
    public View getView(int position, View convertView, ViewGroup parent) {
        ImageView imageView = new ImageView(context);
        imageView.setLayoutParams(new ViewGroup.LayoutParams(200, 300));
        imageView.setScaleType(ImageView.ScaleType.FIT_CENTER);
        imageView.setPadding(5, 5, 5, 5);

        imageView.setImageResource(posterID[position]);

        return imageView;
    }
}

public class MainActivity extends AppCompatActivity {

    @Override
    protected void onCreate(Bundle savedInstanceState) {
        super.onCreate(savedInstanceState);
        setContentView(R.layout.activity_main);
        setTitle("그리드뷰 영화 포스터");

        final GridView gridView = findViewById(R.id.gridView);
        MyGridAdapter gridAdapter = new MyGridAdapter(this);
        gridView.setAdapter(gridAdapter);
    }
}
실습 11-1 결과
2. 갤러리와 스피너
2-1 갤러리
- 갤러리(Gallery)는 사진이나 이미지를 배치하고 좌우로 스크롤하여 볼 수 있게 해줍니다.
- 단, 이미지 목록을 스크롤하는 기능만 있으므로 이미지를 클릭했을 때 큰 이미지가 나타나게 하려면 Java 코드를 추가해야 합니다.
- 앞에서 사용한 그리드뷰와 효과는 비슷하지만 좀 더 부드럽고 고급스러운 느낌이 납니다.
실습 11-2 영화 포스터 보기 2
예제 11-12 activity_main.xml 코드
<androidx.appcompat.widget.LinearLayoutCompat
   xmlns:android="http://schemas.android.com/apk/res/android"
   xmlns:tools="http://schemas.android.com/tools"
   android:layout_width="match_parent"
   android:layout_height="match_parent"
   android:orientation="vertical"
   android:layout_margin="20dp"
   tools:context=".MainActivity">

   <Gallery
      android:id="@+id/gallery"
      android:layout_width="match_parent"
      android:layout_height="wrap_content"
      android:spacing="5dp" />
   <ImageView
      android:id="@+id/ivPoster"
      android:layout_width="match_parent"
      android:layout_height="match_parent"
      android:padding="20dp" />

</androidx.appcompat.widget.LinearLayoutCompat>
예제 11-13, 14, 15 MainActivity.java 코드
- Gallery는 현재 버전에서 deprecated 상태로 Java 코드는 실습을 보류하겠습니다.
2-2 스피너
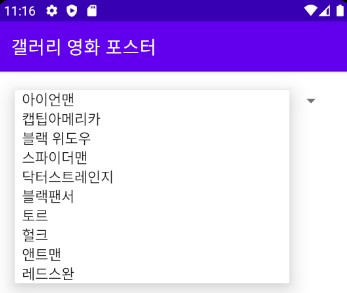
- 스피너(Spinner)는 PC의 드롭다운 박스와 비슷한 기능을 하므로 화면이 작은 스마트폰에서 여러 개중 하나를 선택할 수 있도록 확장하는 용도입니다.
예제 11-16 스피너 기본 예제의 XML 코드
<androidx.appcompat.widget.LinearLayoutCompat
   xmlns:android="http://schemas.android.com/apk/res/android"
   xmlns:tools="http://schemas.android.com/tools"
   android:layout_width="match_parent"
   android:layout_height="match_parent"
   android:orientation="vertical"
   android:layout_margin="20dp"
   tools:context=".MainActivity">

   <Spinner
       android:id="@+id/spinner"
       android:layout_width="match_parent"
       android:layout_height="wrap_content" />

</androidx.appcompat.widget.LinearLayoutCompat>
예제 11-17 스피너 기본 예제의 Java 코드
public class MainActivity extends AppCompatActivity{

    @Override
    protected void onCreate(Bundle savedInstanceState) {
        super.onCreate(savedInstanceState);
        setContentView(R.layout.activity_main);
        setTitle("갤러리 영화 포스터");
    final String[] movie = {"아이언맨", "캡팁아메리카", "블랙 위도우", "스파이더맨",
    			    "닥터스트레인지", "블랙팬서","토르", "헐크", "앤트맨", "레드스완"};

    Spinner spinner = findViewById(R.id.spinner);

    ArrayAdapter<String> adapter;
    adapter = new ArrayAdapter<String>(this, android.R.layout.simple_spinner_item, movie);
    spinner.setAdapter(adapter);
    }
}

