새로운 프로젝트 생성
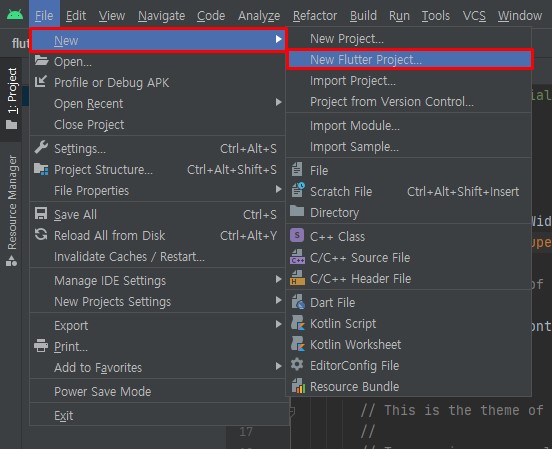
- File - New - New Flutter Project 선택합니다.
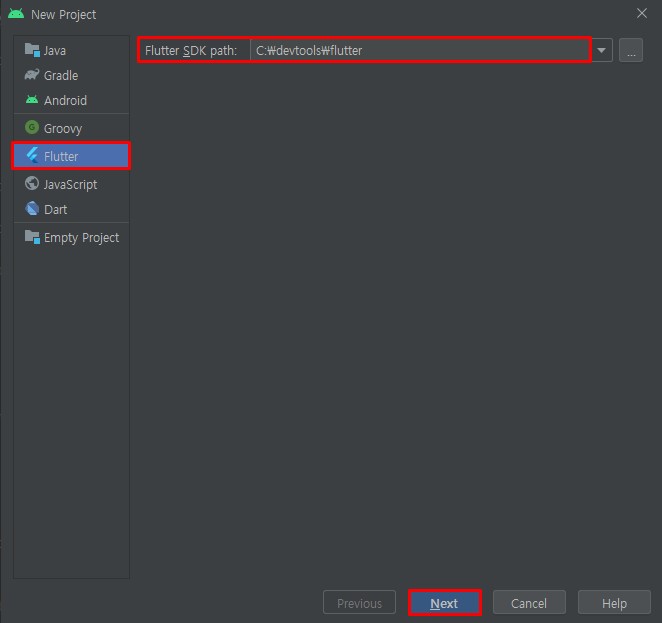
- SDK 경로를 지정해줍니다.
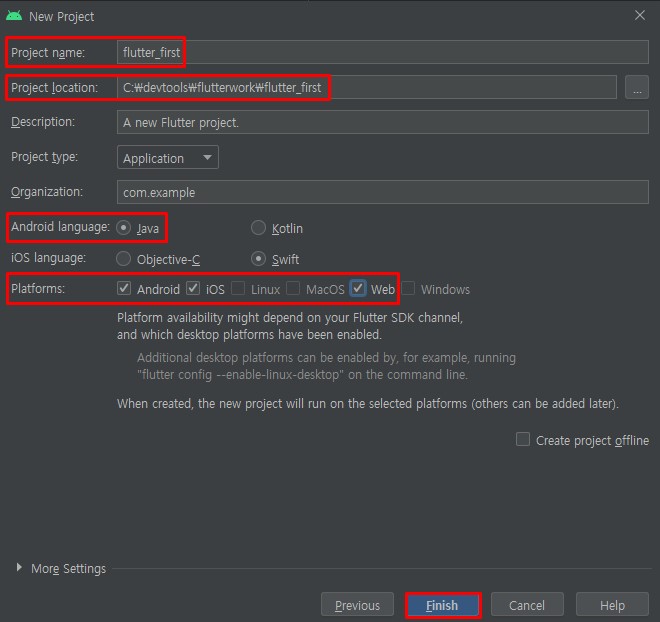
- 프로젝트의 이름, 위치, 언어, 플랫폼을 선택해줍니다.
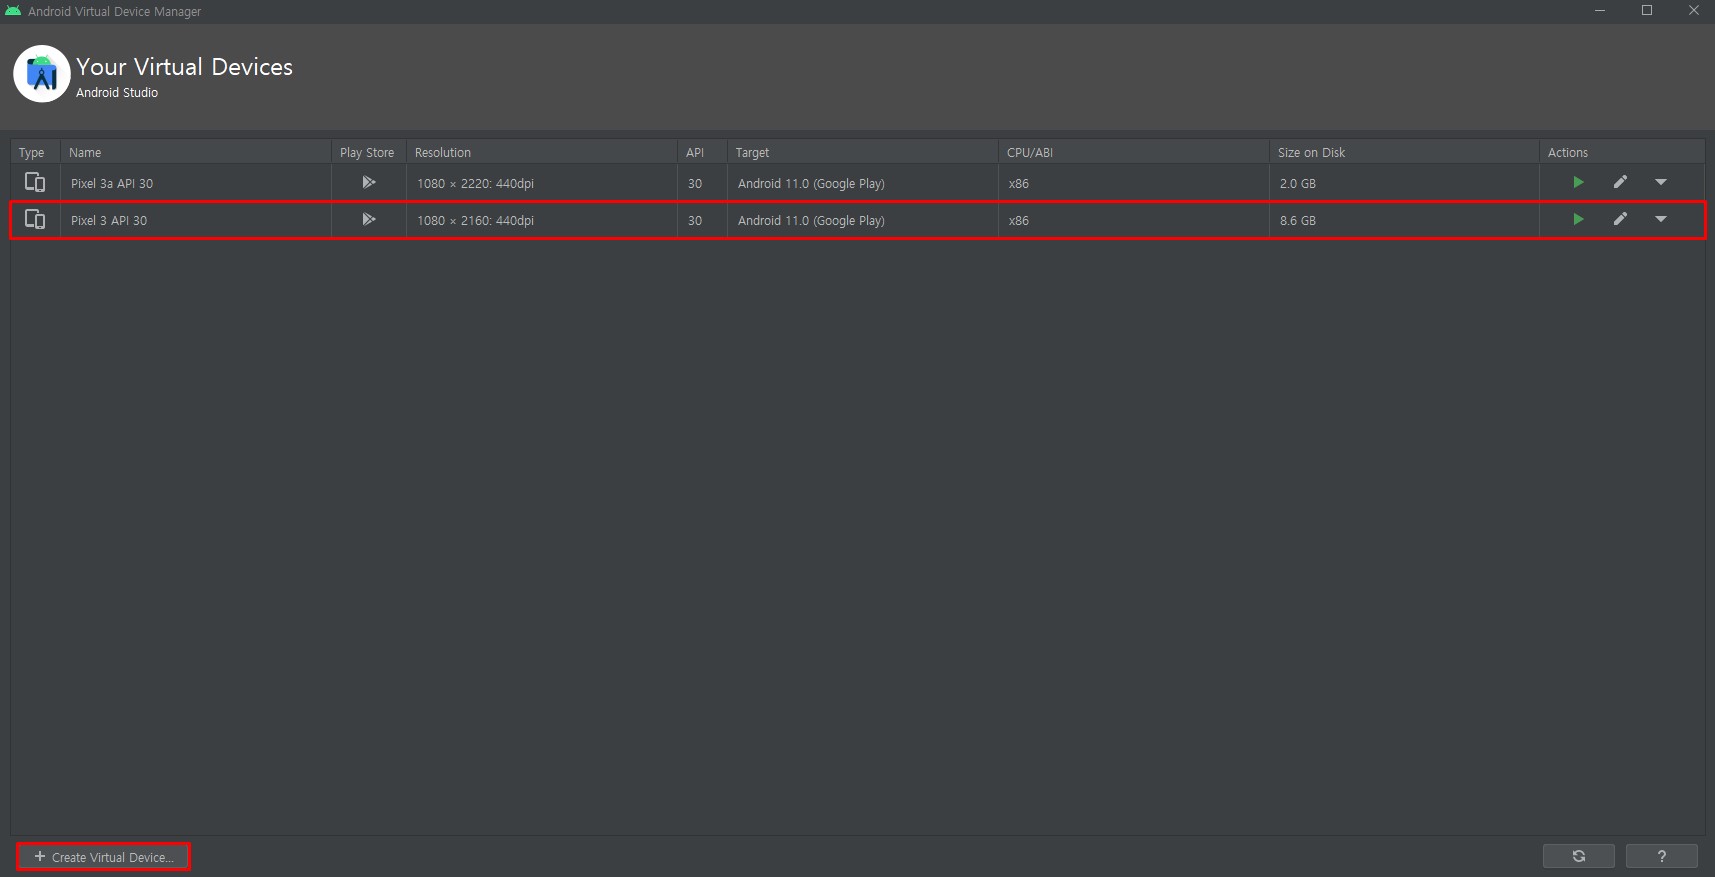
- 프로젝트가 생성이 되고 나면 AVD Manager를 열어서 Device를 생성해줍니다.
- Pixel 3에 최신버전(R)으로 만들어주고, 프로젝트를 실행해봅니다.
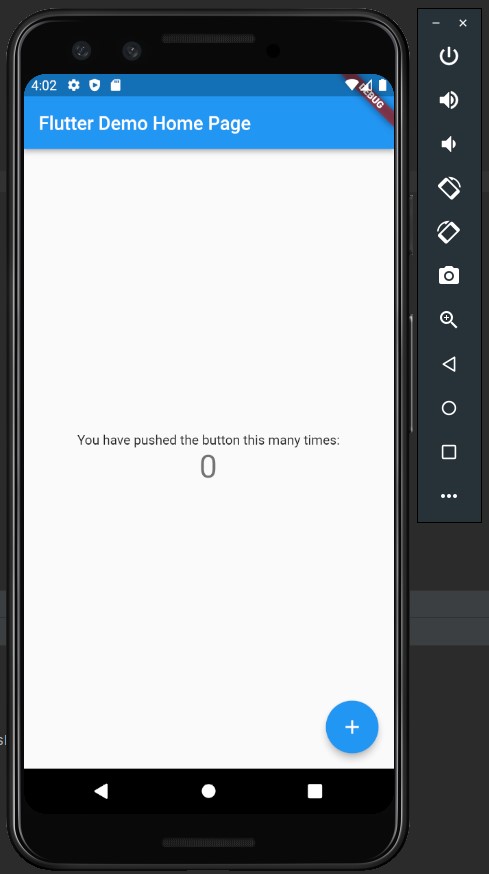
- 프로젝트가 잘 실행됨을 확인한 후 코드의 7번줄부터 삭제를 해줍니다.
- Ctrl + W를 이용하면 블럭으로 영역을 찾을 수 있습니다.
기능 둘러보기
Container
void main() {
  runApp(FirstApp());
}

class FirstApp extends StatelessWidget {
  const FirstApp({Key? key}) : super(key: key);

  @override
  Widget build(BuildContext context) {
    // Container 는 컨테이너라는 클래스입니다.
    // HTML 에서의 div 로 생각하면 됩니다.
    // 즉 빈박스입니다.
    return Container(
    	color: Colors.amberAccent,
    );
  }
}

- st를 입력하면 자동완성에 나타나는 stateless를 선택하면 자동으로 class를 만들어줍니다.
- class 이름을 FirstApp으로 한 뒤 main 함수 안에 runApp(FirstApp());을 입력 해줍니다.
- 프로젝트를 다시 실행하면 AVD의 화면이 검게 변합니다.
- Container는 컨테이너라는 클래스입니다.
- 명령어 color와 Colors를 이용해 배경색을 지정할 수 있습니다.
- HTML에서의 div로 생각하면 되므로, 즉 빈박스를 의미합니다.
MaterialApp
import 'package:flutter/material.dart';

void main() {
  runApp(FirstApp());
}

class FirstApp extends StatelessWidget {
  const FirstApp({Key? key}) : super(key: key);

  @override
  Widget build(BuildContext context) {
    // MaterialApp 은 AndroidApp 을 만든다는 뜻입니다.
    return MaterialApp(
      // Scaffold 는 기본 구조를 들고 있다는 뜻입니다.
      home: SafeArea(
        child: Scaffold(
          body: Text("Hello"),
        ),
      ),
    );
  }
}
- MaterialApp은 'AndroidApp을 만든다'는 뜻입니다.
- Scaffold는 '기본 구조를 들고 있다'는 뜻입니다.

- Scaffold에서 Alt + Enter를 누르면 위와 같은 창이 나타납니다.
- widget을 선택한 후 SafeArea로 바꿔주면 AVD의 핸드폰 상태창 아래쪽에 hello가 출력됩니다.
- 저장을 하면 화면이 바로 갱신되는 핫 리로드가 적용되어 있습니다.
최종 코드
// ignore_for_file: prefer_const_literals_to_create_immutables,
			prefer_const_constructors
import 'dart:io';

import 'package:flutter/material.dart';

// Flutter App의 가장 기본적인 형태가 flutter_first

// main스레드는 runApp을 실행시키고 종료됩니다.
void main() {
  // 비동기로 실행됨(이벤트 루프에 등록된다)
  runApp(FirstApp());
  sleep(Duration(seconds: 2));
  print("main 종료");
}

// 저장만하면 화면이 리로드됨. 핫 리로드(위쪽 아이콘의 번개모양)
class FirstApp extends StatelessWidget {
  const FirstApp({Key? key}) : super(key: key);

  // UI가 조금만 변경되도 아래 build 메서드만 재실행됩니다.
  @override
  Widget build(BuildContext context) {
    // MaterialApp은 AndroidApp을 만든다는 뜻입니다.
    // CupertinoApp은 iosApp을 만든다는 뜻입니다.
    return MaterialApp(
      home: SafeArea(
        // Scaffold는 기본 구조를 들고 있다는 뜻입니다.
        child: Scaffold(
          // 기본 구조 1. AppBar
          appBar: AppBar(
            backgroundColor: Colors.blueAccent,
            title: Text("First App"),
            leading: Icon(Icons.menu),
          ),
          // 기본 구조 2. body
          body: Text("Hello~~!"),
          // 기본 구조 3. floatingActionButton
          floatingActionButton: FloatingActionButton(
            child: Text("Button"),
            onPressed: () {
              print("버튼 클릭됨");
            },
          ),
          // 기본 구조 4. bottomNavigationBar
          bottomNavigationBar: BottomNavigationBar(
            items: [
              BottomNavigationBarItem(
                  label: "hello", icon: Icon(Icons.access_alarm_rounded)),
              BottomNavigationBarItem(
                  label: "hello", icon: Icon(Icons.access_alarm_rounded))
            ],
            backgroundColor: Colors.yellow,
          ),
        ),
      ),
    );
  }
}


