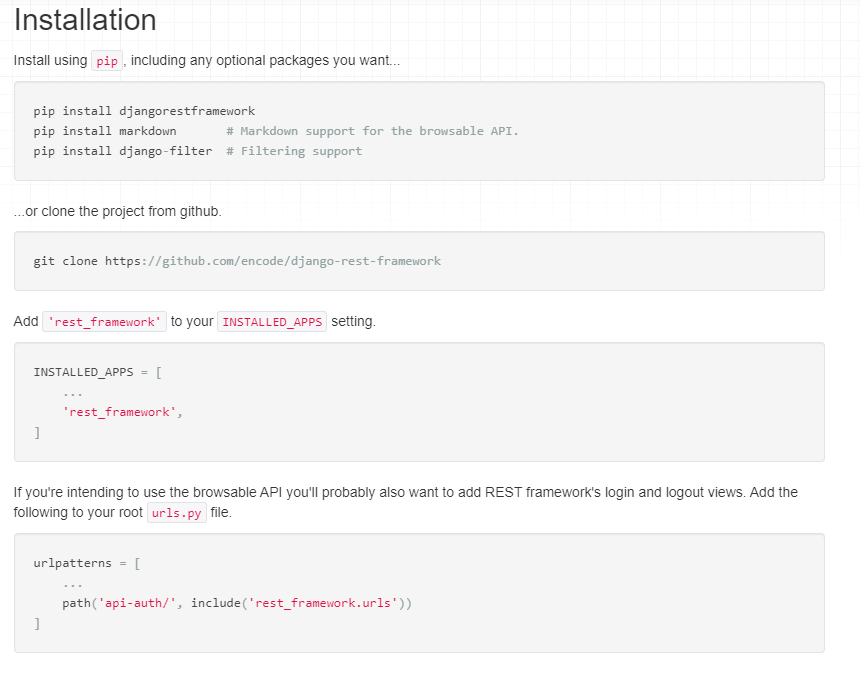
install
pip list
설치한 라이브러리 리스트 확인
pip install djangorestframeworkrequrements
- 팀 프로젝트시 팀원들이 필요한 라이브러리를 손쉽게 설치할 수 있다.
pip freeze > requirements.txtpip install -r requirements.txtvscode 프로젝트 생성
django-admin startproject <프로젝트이름> .gitignore설정
https://www.toptal.com/developers/gitignore
팀원과의 협력을 위해
windows,macos,vscode,pycharm 추가
python,django 추가
LANGUAGE_CODE = 'ko-kr'

TIME_ZONE = 'Asia/Seoul'
settigs.py 수정 (언어와 시간대 설정)
필드 이름으로 데이터베이스 보기
    def __str__(self):
        return str(self.title)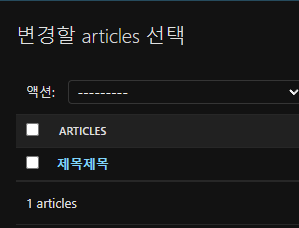
다음과 같이 필드의 이름을 title로 정했다.
from rest_framework.response import Response
from rest_framework.decorators import api_view
from .models import Articles
@api_view(['GET','POST'])
def index(request):
    articles_data = Articles.objects.all()
    article = articles_data[0]
    context = {
    "title": article.title,
    "comment": article.comment,
    "create_at": article.create_at,
    "update_at": article.update_at,
    }
    return Response(context)
Response
api_view
rest_framework의 내장 메소드
받는 데이터는 JSON형태이기에 JSON형태로 가공해줘야한다.
그러나 이런 방법은 귀찮기에 자동화한 방법을 사용한다
.. >> serializers.py
Serializer
-
Serializer
text > json -
DeSerializer
json > text
serializers.py 생성
from rest_framework import serializers
from .models import Articles

class SerializerArticle(serializers.ModelSerializer):
    class Meta:
        model = Articles
        fields = "__all__"
serilalizer model 을 상속받는다.
사용자가 만든 모델과 연결하고
모든 필드를 연결한다.
view 작성
- import 파일
from rest_framework import status
# HTTP STATUS CODE를 사용하기 위한 헤더, 연결상태를 전송할 수 있다.
from rest_framework.response import Response
# HTTP Resonse처럼, 어떠한 데이터를 전송할 수 있다.
from rest_framework.decorators import api_view
# api_view 데코레이터 헤더, GET,POST,PUT,DELETE요청을 제어할 수 있다.
from rest_framework.generics import get_object_or_404
# 지금까지 사용했던 모델의 데이터 탐색 방법은
# 모델.objects.get(id=id)의 방식을 사용했는데, 이때 탐색값이 없다면 DoesNotExist에러가 발생했다.
# get_object_or_404는 이름 그대로 object를 받거나, 404에러를 처리할 수 있다.
from .models import Articles
# 사용자가 정의한 model
from .serializers import SerializerArticle
# 사용자가 정의한 serializers model- articleAPI
@api_view(['GET','POST'])
# api_view 데코레이터를 사용함으로써, GET,POST 요청을 다룰 수 있다.
def articleAPI(request):
    if request.method == 'GET':
        articles_data = Articles.objects.all()
        articles = SerializerArticle(articles_data,many=True)
        # 쿼리로 뽑아낸 데이터를 JSON 형태로 묶어준다. 이때 many는 하나의 데이터가 아닌 여러개의 데이터인점을 알린 것
        return Response(articles.data)
        # 지금까지 context나 딕셔너리 형태를 그대로 반환했지만. 이제 .(dot)data를 붙여줘야 한다.
    elif request.method == 'POST':
        serializer = SerializerArticle(data = request.data)
        # 전송된 데이터를 가공하여 필드에 저장 (데이터 필드)
        if serializer.is_valid():
            # 유효성 검사를 자동으로 해준다.
            serializer.save()
            # 데이터 저장
            return Response(serializer.data,status=status.HTTP_201_CREATED)
            # 저장한 데이터를 출력시키기 위한 코드, 201상태와 함께 반환한다.
        else:
            return Response(serializer.errors,status=status.HTTP_400_BAD_REQUEST)
# 에러창은 보안상 관계로 개발환경에서만 사용하는것이 적합합다.- articleDetailAPI
상세페이지
@api_view(['GET','PUT','DELETE'])
# form과 달리 API는 PUT,PETCH,DELETE를 사용할 수 있다.
# PUT은 데이터 전체를 필요로하는 반면 , PETCH는 데이터 일부만을 필요로하고, 둘다 UpDate에 적합하다.
def articleDetailAPI(request,article_id):
    #상세 페이지
    if request.method == 'GET':
        article = get_object_or_404(Articles,id=article_id)
        # Articles모델에서 id값을 비교한다, 데이터가 없다면 404 에러를 담는다.
        serializer = SerializerArticle(article)
        # 탐색한 데이터를 변수에 저장
        return Response(serializer.data)
    elif request.method =='PUT':
        article = get_object_or_404(Articles,id=article_id)
        # Article 모델의 id값에 해당하는 object 탐색
        serializer = SerializerArticle(article,data=request.data)
        # object article 의 데이터를 변경한 내역을 변수에 저장
        if serializer.is_valid():
            # 유효성 검사후 저장
            serializer.save()
            return Response(serializer.data,status=status.HTTP_200_OK)
        else:
            return Response(serializer.errors,status=status.HTTP_400_BAD_REQUEST)
    elif request.method == 'DELETE':
        article = get_object_or_404(Articles, id=article_id)
        #Articles 모델에서 id값에 해당하는 object를 탐색 후 데이터 삭제
        article.delete()

        return Response(status=status.HTTP_404_NOT_FOUND)
Swagger
API를 쉽게 알아보게 도와주는 라이브러리
CBV
Class Base View
지금 까지 함수형을 기준으로 만든 View를 작성했다면
이제 클래스를 기반으로한 view를 만든다.
- CBV를 사용해야 하는 이유
장고에서 기본적으로 제공된 강력한 기능을
상속받아 사용하기 위함이다.
# from rest_framework.decorators import api_view
from rest_framework.views import APIView

class ArticleAPI(APIView):
    def get(self, request, format=None):
    	...

    def post(self, request, format=None):
        ....
api_view 데코레이터는 이제 사용할 필요가 없게 된다.
urls.py수정
path('',views.ArticleAPI.as_view(),name="index"),views.클래스.as_view() 형태로 변경되었다.
- 상세페이지 관련된 view 함수도 다음과 같이 CBV 형태로 변경되었다.
urls.py
path('<int:article_id>/',views.ArticleDetail.as_view(),name = "article_view")


views.py
class ArticleDetail(APIView):
    def get(self, request, article_id, format=None):
        pass
    def put(self, request, article_id, format=None):
        pass
    def delete(self, request, article_id, format=None):
        pass
인자값이 추가되어, 메서드에 인자값을 받는 형식이 추가되었다.
- 스웨거 적용, 사용하기
필요한 헤더파일
from drf_yasg.utils import swagger_auto_schemaclass ArticleAPI(APIView):
def get(self, request, format=None):
....
@swagger_auto_schema(request_body=SerializerArticle)
def post(self, request, format=None):
....post 형식의 메서드에만, 데코레이터로 사용한다.

적용이 잘 된 모습을 확인할 수 있다.
스웨거를 사용해야 하는 이유
1. 백엔드와 프론트 개발중, 사소한 오타에 의한 오류를 쉽게 찾아낼 수 있다.(JSON)
프론트 백엔드 연결
- 자바스크립트 Fetch API 사용
CORS ERROR
별도의 ORIGIN이 다른곳, 주소와 포트가 다른곳에서 요청을 보낼때, 보안상의 문제로 별도의 허용이 필요하다.
즉 백엔드에서 실행한 로컬 호스트 8000번과
프론트에서 실행한 로컬 호스트 n번과 연결이 필요하다.
install
python -m pip install django-cors-headersjavascript
window.onload = async function loadArticles() {
    const response = await fetch('http://127.0.0.1:8000/articles/', { method: 'GET' })
    response_json = await response.json()
    console.log(response_json)

    const articles = document.getElementById('articles')

    response_json.forEach(index => {
        console.log(index.title)
        const newArticle = document.createElement("div")
        newArticle.innerText = index.title
        articles.appendChild(newArticle)
    });
}