캐릭터와 입력 시스템
이번 section에서 할일!
- C++로 직접 분수대 만들어보기
- 캐릭터 EnhancedInput으로 직접 조종해보기
Actor란?
- World에 속한 content의 기본 단위
- Actor는 논리적인 개념이다.
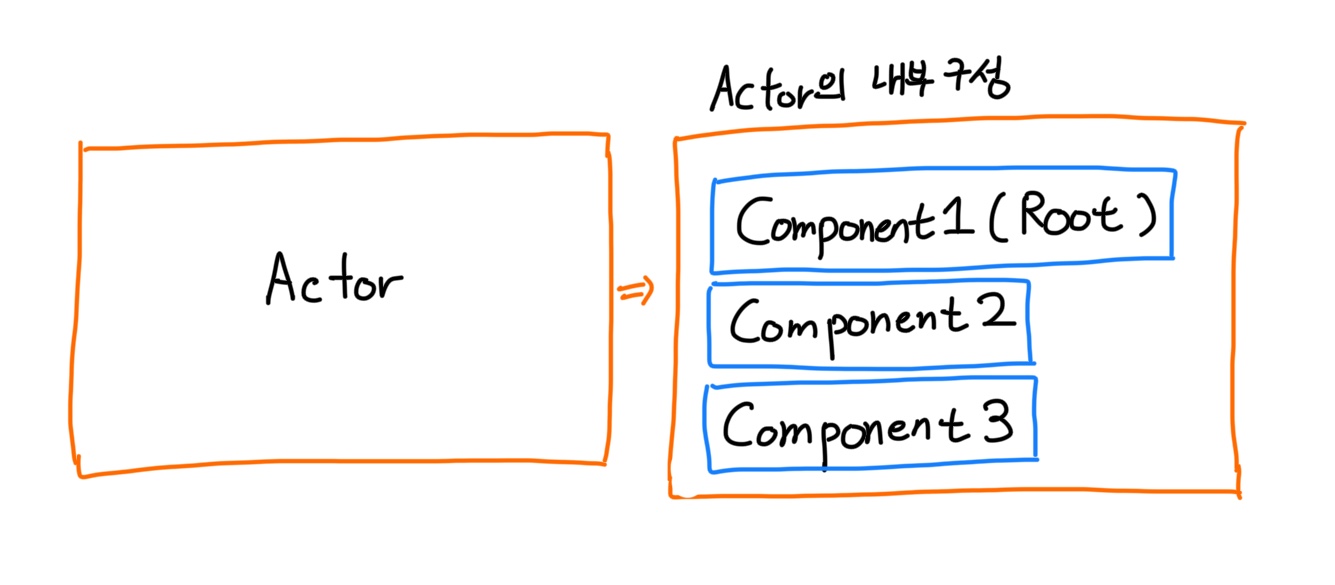
Component를 감싸는 포장 박스에 불과하다. 고로 실질적인 구현은 component가 진행하고, Actor는 다수의 component를 소유하고 있다. - 다수의 component를 대표하는 component를
Root component라고 한다. Actor는 root component를 가져야 하며, Root component의Transform은 Actor의 Transform을 의미한다.
C++ Actor에서 Component의 생성
- 언리얼 Reflection system에 등록해주기 위해
UPROPERTY를 설정하고TObjectPtr로 pointer를 선언한다. - Component의 등록
CDO에서 생성한 component는 자동으로 월드에 등록이 된다.- Runtime에서 동적할당으로 생성한
NewObjectcomponent는 반드시 등록 과정을 거쳐야 한다.RegisterComponent로 이를 해결할 수 있다. - 등록된 component는 월드의 기능을 사용할 수 있다.
- Component의 확장 설계
- Editor 편집 및 Blueprint의 승계를 위한 설정
- UPROPERTY에 지정자(Specifier)를 설정 가능.
- Component 지정자(중요 !!)
- Visible / Edit : 크게 객체 타입(Visible)과 값 타입(Edit)으로 사용 (접두사)
- Anywhere / DefaultsOnly / InstanceOnly : Editor에서 편집 가능 영역 (접미사)
- BlueprintReadOnly / BlueprintReadWrite : Blueprint로 확장시 읽기 혹은 읽기쓰기 권한을 부여
- Category : Editor 편집 영역(Detail)에서의 category 지정.
Unreal에서 Actor 만들기
Unreal Engine에서 Actor를 만드는 방법은 2가지가 있다. 하나는 온전히 Blueprint만 사용해서 만드는 방법이 있고, 다른 하나는 C++로만 사용해서 만드는 방법이 있다.
하지만, 각각의 장점이 있기 때문에 보통 둘다 섞어서 쓰는 방법을 많이 사용한다.이렇게 하려면 우선 Actor를 상속해서 C++ 클래스를 만든다. 그 다음, BP로 이 C++ 클래스를 상속해서 최종적인 클래스를 만든다.
방법 1 : BP로 분수대 만들기
- Step 1. Unreal Editor에서 Actor를 상속해서 Blueprint를 만든다.
- Step 2. Static Mesh를 추가하고 이를 Root Component로 만든다. 이 Static Mesh에는 분수대 static mesh를 적용시킨다.
- Step 3. Root component 밑에 static component 하나를 추가하고 여기에는 물 static mesh를 적용시킨다.
- Step 4. 귀엽게 point light까지 추가해보자.

완성하면 다음과 같은 계층 구조를 가진다.
방법 2 : C++로 분수대 만들기
// Fountain.h

...

public:
UPROPERTY(VisibleAnywhere, BlueprintReadWrite, Category = Mesh)
TObjectptr<class UStaticMeshComponent> Body;

UPROPERTY(VisibleAnywhere, BlueprintReadWrite, Category = Mesh)
TObjectptr<class UStaticMeshComponent> Water;
헤더에서는 TObjectptr의 사용, UStatucMeshComponent의 전방 선언, UPROPERTY 메크로 설정 등을 다음과 같이 해준다.
// Fountain.cpp
#include "Prop/RyanActor.h"
#include "Components/StaticMeshComponent.h"

// Sets default values
ARyanActor::ARyanActor()
{
 	// Set this actor to call Tick() every frame.  You can turn this off to improve performance if you don't need it.
	PrimaryActorTick.bCanEverTick = true;

	Body = CreateDefaultSubobject<UStaticMeshComponent>(TEXT("Body"));
	Water = CreateDefaultSubobject<UStaticMeshComponent>(TEXT("Water"));

	// RootComponent 또한 reserved 된 keyword
	RootComponent = Body;
	// RootComponent가 된 body밑에 들어감. 이제 Water는 Body transform 값에 영향을 받는다.
	Water->SetupAttachment(Body);

	// Water의 Body에 대한 relative location을 설정.
	// 참고로  FVector의 input 순서는 X,Y,Z이고 FRotator의 input순서는 Y,Z,X 순서이다.
	Water->SetRelativeLocation(FVector(0.f, 0.f, 140.f));

	{
		// FObjectFinder로부터 return되는 값들은 static으로
		ConstructorHelpers::FObjectFinder<UStaticMesh> Asset(TEXT("/Game/ArenaBattle/Environment/Props/SM_Plains_Castle_Fountain_01.SM_Plains_Castle_Fountain_01"));
		if (Asset.Object) {
			Body->SetStaticMesh(Asset.Object);
		}
	}

	{
		// FObjectFinder로부터 return되는 값들은 static으로
		ConstructorHelpers::FObjectFinder<UStaticMesh> Asset(TEXT("/Game/ArenaBattle/Environment/Props/SM_Plains_Fountain_02.SM_Plains_Fountain_02"));
		if (Asset.Object) {
			Water->SetStaticMesh(Asset.Object);
		}
	}
}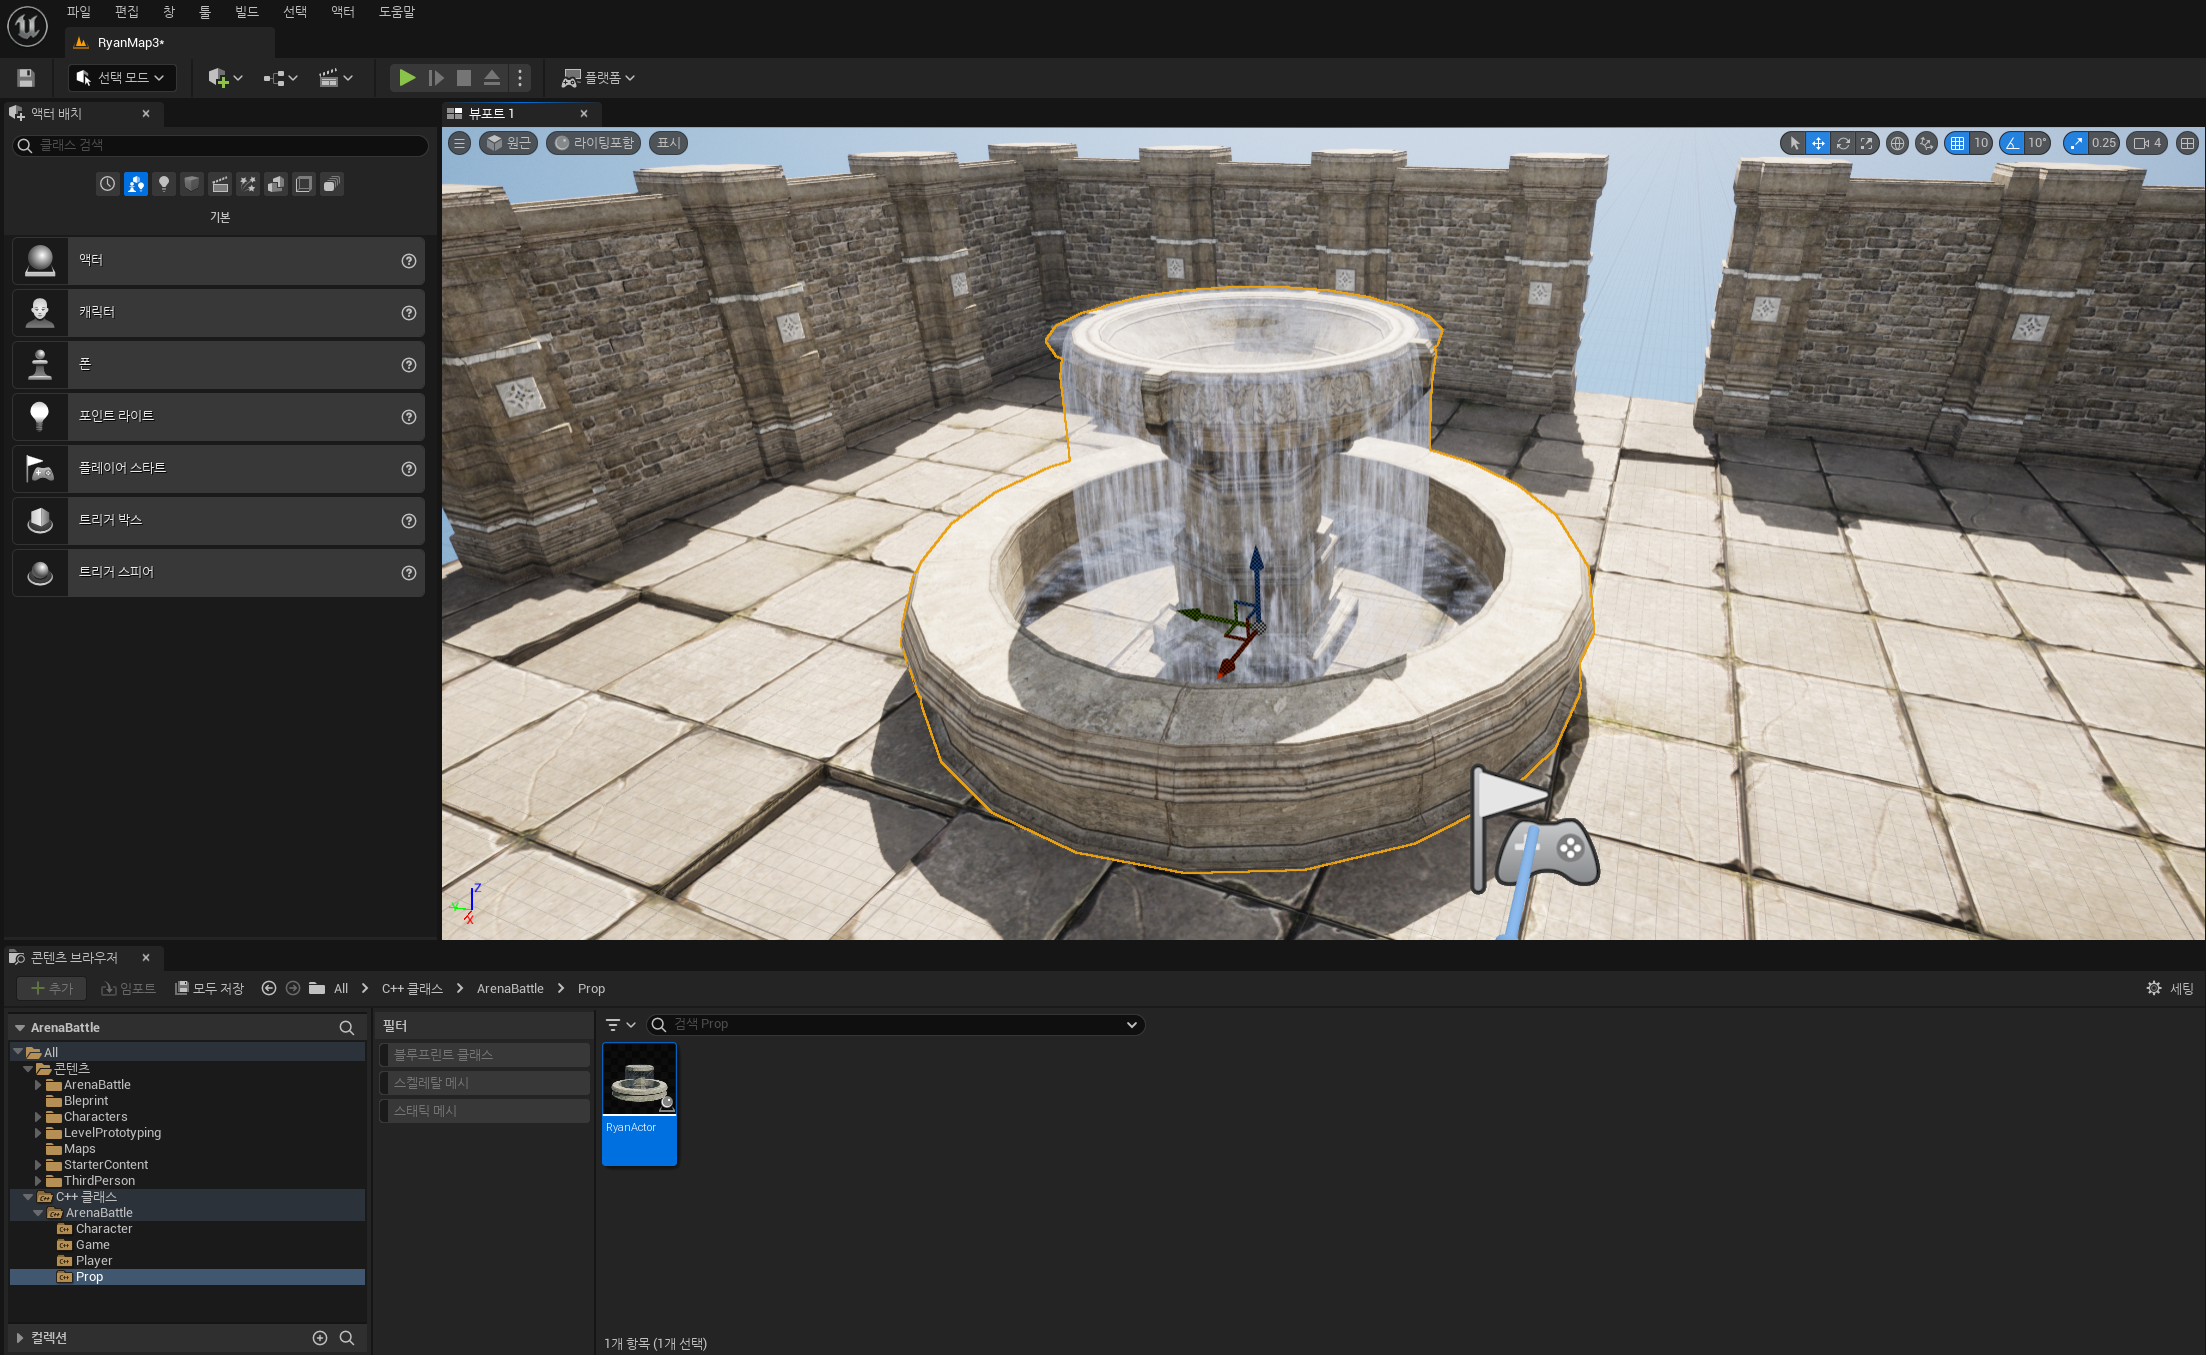
Cpp로 만든 fountain을 world에 배치한 모습. 여기서 등장한 CreateDefaultSubobject에 대해서 자세히 알고 싶다면 링크를 확인하자.
FClassFinder VS FObjectFinder 팁!
클래스 생성자 안에서 Class 정보와 Object 정보를 가져올 때 ConstructorHelpers namespace를 통해서 FClassFinder, FObjectFinder를 사용한다. 이후, 여기서 얻은 객체에서 FClassFinder로 가져왔으면 객체.Class, FObjectFinder로 가져왔으면 객체.Object로 값을 할당한다.
폰(Pawn)
Pawn은 Actor를 상속받은 특별한 Actor이며, player가 빙의해 입출력을 처리하도록 설계되어 있음.
폰은 길찾기를 사용할 수 있으며, 일반적으로 3가지 주요 component로 구성된다.
- Gimmick과 상호작용을 담당하는
Collision Component. 보통 Root component으로 설정. - 시각적인 비주얼을 담당하는
Mesh Component - 움직임을 담당하는
Movement Component
Component 중에서 Transform 없이 기능만 제공하는 component를 Actor Component라고 한다. 반대로 Transform이 있는 component를 Scene component라고 한다.
Enhanced Input
Unreal의 Input system에서는 Player의 입력은 Controller를 통해 Pawn으로 전달된다. 입력을 Controler가 처리할 수도, Pawn이 처리할 수도 있는데 일반적으로 Pawn이 처리하도록 설정한다.
향상된 입력 시스템(Enhanced Input)이란, 사용자의 입력 설정 변경에 유연하게 대처할 수 있도록 구조를 재수립. 사용자 입력 처리를 4단계로 세분화하고 각 설정을 독립적인 asset으로 대체
Enhanced Input system의 동작 과정
-
사용자의 입력 데이터를 죄종 함수레 mapping하는 과정을 체계적으로 구성
-
Platform에 따른 다양한 입력 장치의 설정, 이를 runtime에 자유롭게 switching 할 수 있음
- ex) 게임패드용 IMC, 키보드용 IMC
-
입력 값의 변경
- ex) AD/WS 입력값을 Y축과 X축으로 변경, 값 반전의 처리
-
이벤트 발생 조건의 상세 설정
- ex) 일반 버튼인지, 축 이동인지, 일정 이상 눌러야 하는지
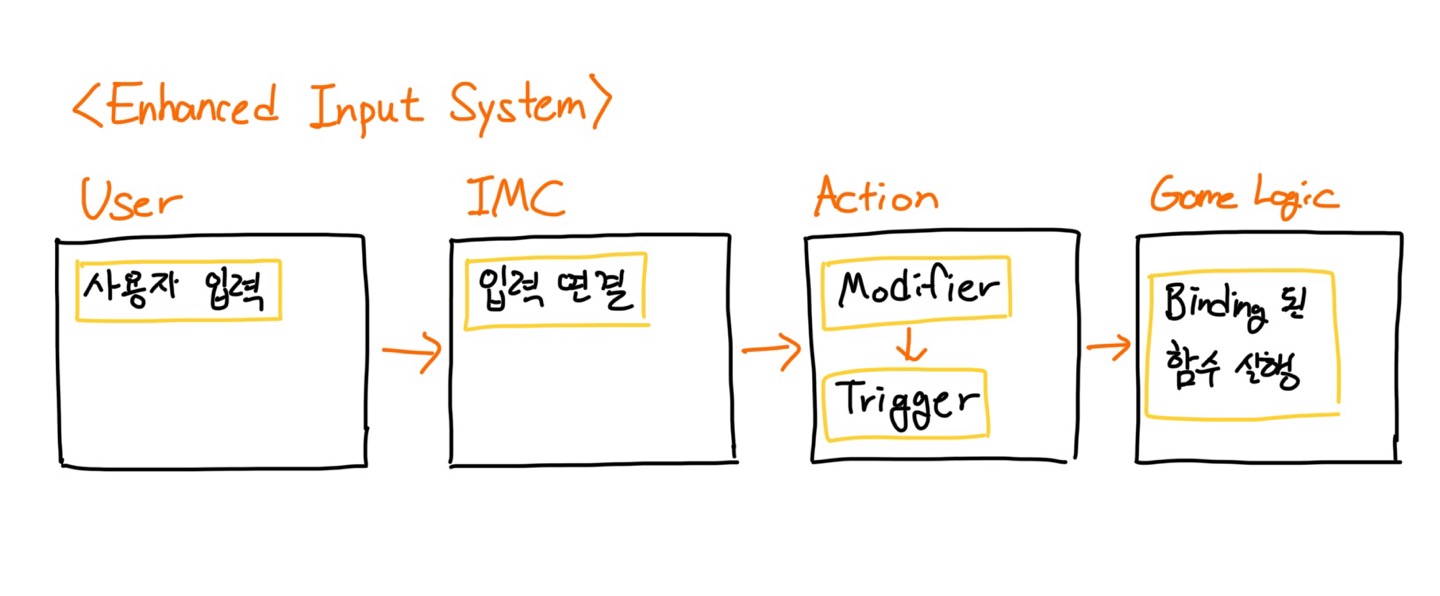
과거의 입력 시스템은 이 IA 부분이 Game Logic 안에 들어가 있었다고 생각하면 됨.
C++에서의 Enhanced Input
Step 1 ~ Step 3을 통해 어떻게 코드에서 Enhanced Input을 사용하는지 알아보자.
AMyRyanCharacter::AMyRyanCharacter()
{
...

	// Input
	static ConstructorHelpers::FObjectFinder<UInputMappingContext> InputMappingContextRef(TEXT("/Game/ArenaBattle/Input/IMC_Default.IMC_Default"));
	if (nullptr != InputMappingContextRef.Object)
	{
		DefaultMappingContext = InputMappingContextRef.Object;
	}

	static ConstructorHelpers::FObjectFinder<UInputAction> InputActionMoveRef(TEXT("/Game/ArenaBattle/Input/Actions/IA_Move.IA_Move"));
	if (nullptr != InputActionMoveRef.Object)
	{
		MoveAction = InputActionMoveRef.Object;
	}

	static ConstructorHelpers::FObjectFinder<UInputAction> InputActionJumpRef(TEXT("/Game/ArenaBattle/Input/Actions/IA_Jump.IA_Jump"));
	if (nullptr != InputActionJumpRef.Object)
	{
		JumpAction = InputActionJumpRef.Object;
	}

	static ConstructorHelpers::FObjectFinder<UInputAction> InputActionLookRef(TEXT("/Game/ArenaBattle/Input/Actions/IA_Look.IA_Look"));
	if (nullptr != InputActionLookRef.Object)
	{
		LookAction = InputActionLookRef.Object;
	}

}
Step 1 : 사전에 헤더에서 DefaultMappingContext, MoveAction, JumpAction, LookAction을 선언하고, 생성자에서는 ConstructorHelpers::FObjectFinder를 통해 IMC와 IA의 reference를 가져오고 이를 변수에 할당.
void AMyRyanCharacter::BeginPlay()
{
	Super::BeginPlay();

	APlayerController* PlayerController = CastChecked<APlayerController>(GetController());
	if (UEnhancedInputLocalPlayerSubsystem* Subsystem = ULocalPlayer::GetSubsystem<UEnhancedInputLocalPlayerSubsystem>(PlayerController->GetLocalPlayer()))
	{
		Subsystem->AddMappingContext(DefaultMappingContext, 0);
		//Subsystem->RemoveMappingContext(DefaultMappingContext);
	}
}
Step 2 : BeginPlay에서 Controller가 해당 IMC를 사용한다고 명시
void AMyRyanCharacter::SetupPlayerInputComponent(UInputComponent* PlayerInputComponent)
{
	Super::SetupPlayerInputComponent(PlayerInputComponent);

	UEnhancedInputComponent* EnhancedInputComponent = CastChecked<UEnhancedInputComponent>(PlayerInputComponent);

	EnhancedInputComponent->BindAction(JumpAction, ETriggerEvent::Triggered, this, &ACharacter::Jump);
	EnhancedInputComponent->BindAction(JumpAction, ETriggerEvent::Completed, this, &ACharacter::StopJumping);
	EnhancedInputComponent->BindAction(MoveAction, ETriggerEvent::Triggered, this, &AMyRyanCharacter::Move);
	EnhancedInputComponent->BindAction(LookAction, ETriggerEvent::Triggered, this, &AMyRyanCharacter::Look);
}
Step 3 : SetupPlayerInputComponent에서는 BindAction을 통해 어떤 IA가 어떤 함수를 trigger 할 것인지 명시
EnhancedInputComponent를 사용하기 위해서생성자, BeginPlay, SetupPlayerInputComponent 이 3가지 구역에 대한 코드 수정이 필요! 뒤의 강의에서는 IMC를 런타임에 switching하는 방법에 대해서 다룰 것인데, 거기서는 BeginPlay에서 PlayerController가 어떤 IMC를 사용하는지에 대한 로직을 모듈화하여서 사용한다.
Move와 Look 함수
IMC에 바인딩 되는 Move와 Look 함수는 다음과 같이 구현하였다.
void ARyanCharacterPlayer::Move(const FInputActionValue& Value)
{
	FVector2D MovementVector = Value.Get<FVector2D>();

	const FRotator Rotation = Controller->GetControlRotation();
	const FRotator YawRotation(0, Rotation.Yaw, 0);

	const FVector ForwardDirection = FRotationMatrix(YawRotation).GetUnitAxis(EAxis::X);
	const FVector RightDirection = FRotationMatrix(YawRotation).GetUnitAxis(EAxis::Y);

	AddMovementInput(ForwardDirection, MovementVector.X);
	AddMovementInput(RightDirection, MovementVector.Y);
}
먼저, 오일러 각으로 표현된 YawRotation 회전 정보를 회전 행렬에 넣는다. 그러면 회전 행렬로부터 해당 회전을 표현하는 3개의 기저축을 가져올 수 있는데, 앞 방향(기저 X축)과 우측 방향(기저 Y축)을 가져와서 최종 방향 벡터로 변환하는 작업을 진행.
void ARyanCharacterPlayer::Look(const FInputActionValue& Value)
{
	FVector2D LookAxisVector = Value.Get<FVector2D>();

	AddControllerYawInput(LookAxisVector.X);
	AddControllerPitchInput(LookAxisVector.Y);
}
마우스가 X축 방향으로 이동하면 Z(Yaw)축을 중심으로 카메라를 회전, 마우스가 Y 축 방향으로 이동하면 Y(Pitch)축을 중심으로 카메라를 회전시켜야 한다.
기타
TObjectPtr의 이점
-
Automatic Management of Object Lifespan: TObjectPtr is part of Unreal Engine's smart pointer system, specifically designed to handle UObjects. It automatically manages the reference counting for UObjects, making it safer and easier to manage object lifespans without worrying about manual cleanup or dereferencing null pointers.
-
Garbage Collection Integration: TObjectPtr is integrated with Unreal’s garbage collection system. This integration means that the UObject pointed to by TObjectPtr can be safely garbage collected when no longer in use, as long as no other valid TObjectPtr references exist to it.
-
Type Safety: By using TObjectPtr, you ensure type safety, as it enforces the use of UObjects and can help prevent bugs related to pointer misuse in the code.
-
Clear Intent: The usage of TObjectPtr makes it clear to other developers that the pointer is managed by Unreal's memory system, providing better code clarity and maintainability.
ConstructorHelpers::F~에서 Declaration과 Instantiation을 분리한다면?
(기존 코드)Declaration and Instantiation을 함께 쓴 Code
static ConstructorHelpers::FClassFinder<APawn> PawnFinder(TEXT("/Game/Blueprints/BP_MyPawn"));이를 선언과 초기화 부분을 분리한다면
Declaration
static ConstructorHelpers::FClassFinder<APawn> PawnFinder;Instantiation
static ConstructorHelpers::FClassFinder<APawn> PawnFinder;