12일차 내용 정리
javaScript로 요소 추가
inline CSS 적용
document.querySelector(적용할 요소 선택자).style.적용할 css코드 = string type으로 적용할 값마우스에 따라 박스 가로 세로 이동
offsetX : 가로축
offsetY : 세로축
CODE
<style>
        .box{
            width:500px;
            height:500px;
            border:1px solid red;
            margin:0 auto;
            cursor:crosshair; /*crosshair : 십자가 모양 pointer : 손가락 모양*/
            position:relative;
        }

        .point{
            width:10px;
            height:10px;
            background-color:yellowgreen;
            position:absolute;
            top:100px;
            left:100px;
            pointer-events:none; /*마우스 이벤트를 받지 않도록*/
        }
    </style>

    <div class="box">
        <div class="point"></div>
    </div>

    <script>
        /*
            1. .box div에 "mousemove" 이벤트가 발생했을 때 실행할 리스너 함수 등록
            2. 리스너 함수 안에서 이벤트가 일어난 곳의 좌표를 얻어낸다(offsetX, offsetY)
            3. 해당 좌표를 .point div의 top과 left에 반영
        */

        // 발생한 mousemove event에 대한 정보를 전달받을 수 있다(object 전달)
        document.querySelector(".box").addEventListener("mousemove", (e)=>{
            // 이벤트가 일어난 곳의 상대좌표 얻어내기
            const x =  e.offsetX; // 가로
            const y = e.offsetY;  // 세로
            // .point div의 top과 left에 반영하기(CSS 조작)
            document.querySelector(".point").style.left = `${x}px`;
            document.querySelector(".point").style.top = `${y}px`;
       });
    </script>
요소 생성 후 class 속성 추가
add() 활용
<script>
	const div = document.createElement("div")
	div.classList.add("point");
	div.style.top = "250px";
	div.style.left  = "250px";
    document.querySelector(".box").append(div);
</script>
그림판 만들기
change event와 target 이용
<style>
	.box{
		width:500px;
		height:500px;
		border:1px solid red;
		margin:0 auto;
		cursor:crosshair;
		position:relative;
	}

	.point{
		width:10px;
		height:10px;
        border-radius:50px;
		background-color:black;
		position:absolute;
		top:100px;
		pointer-events:none;
	}

	.panel{
		width:500px;
		margin:0 auto;
		border:1px solid blue;
	}
</style>
	<div class="panel">
        <input type="color" id="inputColor">
    </div>
    <div class="box"></div>

    <script>
        // 선택한 색상
        let selectedColor = "black"; // rgb(0,0,0) or #000000

        // 색상이 변경되었을 때 실행할 리스너 함수 등록록
        document.querySelector("#inputColor").addEventListener("change",(e)=>{
            // 선택한 생상을 얻어와서 selectedColor에 대입
            selectdColor = document.querySelector("#inputColor").value;
            //  e.target은 "change" 이벤트가 일어난 바로 그 요소의 참조값
            // 따라서 위의 code는 아래와 같이 변경해도 동작작
            selectedColor = e.target.value;
        });

        document.querySelector(".box").addEventListener("mousemove", (e)=>{
            // 이벤트가 일어난 곳의 상대좌표 얻어내기
            const x =  e.offsetX;
            const y = e.offsetY;
            const div = document.createElement("div");
            div.classList.add("point");
            div.style.top = `${y}px`;
            div.style.left  = `${x}px`;

            // selectedColor 변수에 있는 내용을 배경색으로 활용
            div.style.backgroundColor = selectedColor;
            document.querySelector(".box").append(div);
       });
    </script>
조건문
단일 if문
조건부로 실행할 때 사용, 해당 조건이 true일시 코드 실행
if(조건){실행할 코드}마우스 event
| event | 발생 시점 |
|---|---|
mousedown | 마우스 버튼 누를 때 |
mouseup | 마우스 버튼 뗄 때 |
mouseout | 마우스가 요소 영역 벗어날 때 |
mousemove | 마우스가 해당 요소에서 움직일 때 |
그림판 code
<style>
.box {
width: 500px;
height: 500px;
border: 1px solid red;
margin: 0 auto;
cursor: crosshair;
position: relative;
}
.point {
border-radius: 50%;
position: absolute;
pointer-events: none;
}
.panel {
width: 500px;
margin: 0 auto;
border: 1px solid blue;
}
</style>
<div class="panel">
<input type="color" id="inputColor">
<select id="selectWidth">
<option>2</option>
<option>4</option>
<option>6</option>
<option>8</option>
<option>10</option>
<option>12</option>
<option>14</option>
<option>16</option>
<option>18</option>
<option>20</option>
</select>
</div>
<div class="box"></div>
<script>
// 선택한 색상
let selectedColor = "black"; // rgb(0,0,0) or #000000
// 선택한 팬 크기
let selectedWidth = 2;
// width가 변경되었을 때 실행할 리스너 함수 등록
document.querySelector("#selectWidth").addEventListener("change", (e) => {
// 이벤트가 일어난 바로 그 요소의 value값을 읽어와서 변수에 대입
selectedWidth = e.target.value;
});
// 색상이 변경되었을 때 실행할 리스너 함수 등록
document.querySelector("#inputColor").addEventListener("change", (e) => {
// 선택한 생상을 얻어와서 selectedColor에 대입
selectedColor = e.target.value;
});
// 현재 그림을 그리고 있는 상태인지 여부를 관리할 변수를 만들고 초기값(false)를 대입
let isDrawing = false;
document.querySelector(".box").addEventListener("mousedown", () => {
isDrawing = true;
});
document.querySelector(".box").addEventListener("mouseup", () => {
isDrawing = false;
});
document.querySelector(".box").addEventListener("mouseout", () => {
isDrawing = false;
});
document.querySelector(".box").addEventListener("mousemove", (e) => {
// ()안에 있는 값이 true일 시에 실행
if (isDrawing) {
// 이벤트가 일어난 곳의 상대좌표 얻어내기
const x = e.offsetX;
const y = e.offsetY;
const div = document.createElement("div");
div.classList.add("point");
div.style.top = `${y - selectedWidth / 2}px`;
div.style.left = `${x - selectedWidth / 2}px`;
// selectedColor 변수에 있는 내용을 배경색으로 활용
div.style.backgroundColor = selectedColor;
// selectedWidth 변수에 있는 내용을 width와 height에 반영
div.style.width = `${selectedWidth}px`;
div.style.height = `${selectedWidth}px`;
document.querySelector(".box").append(div);
}
});
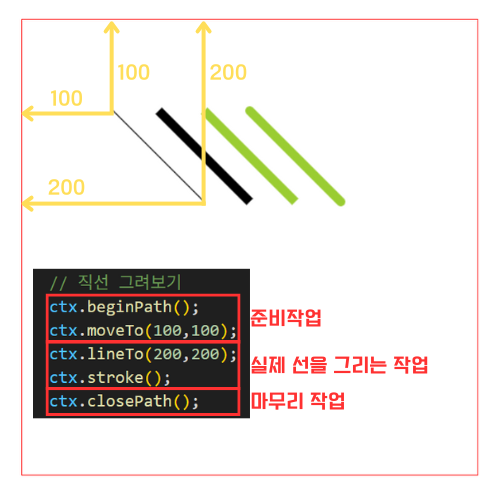
</script>canvas
그래픽을 그릴 수 있는 도화지 요소
| canvas method | 설명 |
|---|---|
| beginPath() | 경로 시작 |
| moveTo(x, y) | (x, y) 위치로 이동 |
| lineTo(x, y) | 현재 위치에서 (x, y)까지 직선 |
| lineWidth | 선 두께 설정 |
| strokeStyle | 선 색상 설정 |
| lineJoin | 선 모서리 모양 설정 |
| closePath() | 경로 닫기 |
| stroke() | 선 그림 |
canvas 요소 이용한 그림판
<style>
	.panel{
		width:500px;
		margin:0 auto;
		border:1px solid blue;
	}

	canvas{
		cursor:crosshair;
		margin:0 auto;
		border:1px solid red;
        /*canvas는 inline 요소이므로 block 요소로 변경*/
		display:block;
	}
</style>

<div class="panel">
	<input type="color" id="inputColor">
	<select id="selectWidth">
		<option>2</option>
		<option>4</option>
		<option>6</option>
		<option>8</option>
		<option>10</option>
		<option>12</option>
		<option>14</option>
		<option>16</option>
		<option>18</option>
		<option>20</option>
	</select>
</div>
<canvas width="500" height="500" id="myCanvas"></canvas>

<script>
	const canvas = document.querySelector("#myCanvas");
	const ctx = canvas.getContext("2d");


	// 선택한 색상
	let selectedColor = "black"; // rgb(0,0,0) or #000000
	// 선택한 팬 크기
	let selectedWidth = 2;

	// width가 변경되었을 때 실행할 리스너 함수 등록
	document.querySelector("#selectWidth").addEventListener("change", (e) => {
		// 이벤트가 일어난 바로 그 요소의 value값을 읽어와서 변수에 대입
		selectedWidth = e.target.value;
	});

	// 색상이 변경되었을 때 실행할 리스너 함수 등록
	document.querySelector("#inputColor").addEventListener("change", (e) => {
		selectedColor = e.target.value;
	});

	// 현재 그림을 그리고 있는 상태인지 여부를 관리할 변수를 만들고 초기값(false)를 대입
	let isDrawing = false;

	document.querySelector("canvas").addEventListener("mousedown", (e) => {
		isDrawing = true;
		// 선의 색상
		ctx.strokeStyle = selectedColor;
		// 선의 굵기
		ctx.lineWidth = selectedWidth;
		// 선의 시작점과 끝점을 둥글게
		ctx.lineCap = "round";
		// 모서리 부분도 둥글게
		ctx.lineJoin = "round";
		// 선을 그릴 준비를 하고 시작점으로 이동
		ctx.beginPath();
		ctx.moveTo(e.offsetX, e.offsetY);
	});
	document.querySelector("canvas").addEventListener("mouseup", () => {
		isDrawing = false;
		// 마무리 작업
		ctx.closePath();
        });
	document.querySelector("canvas").addEventListener("mouseout", () => {
		isDrawing = false;
		// 마무리 작업
		ctx.closePath();
	});

	document.querySelector("canvas").addEventListener("mousemove", (e) => {
		// ()안에 있는 값이 true일 시에 실행
		if (isDrawing) {
			// 이벤트가 일어난 곳의 상대좌표 얻어내기
			const x = e.offsetX;
			const y = e.offsetY;
			ctx.lineTo(x, y);
			ctx.stroke();
		}
	});
</script>
JSON
javaScript Object Notation의 약자
key 값은 반드시 " " (더블 따옴표)로 감싸야 한다
JSON.parse() : JSON 형식의 문자열을 javaScript 객체로 변환
JSON.stringify() : javaSCript 객체를 JSON 형식의 문자열로 변환
value가 될 수 있는 데이터
1. 숫자 => 1,2,3..
2. 문자 => "a", "bb", "ccc"...
3. 논리 => true, false
4. { } => object
5. [ ] => array
6. null => 비워둘거면 null
-> array 단독 데이터도 가능 (function은 불가)
예시
<script>
	const json1 = '{"num":1, "name":"유재석", "addr":"압구정"}';
	const json2 = '["유재석","박명수","정준하"]';

  	const result1 = JSON.parse(json1);
  	const result2 = JSON.parse(json2);
	const result3 = JSON.stringify({num:3, name:"정준하", addr:"서래마을"});
    const result4 = JSON.stringify([10,20,30]);

    const json3 = `
            [
                {"num":1, "name":"유재석", "isMan":true},
                {"num":2, "name":"박명수", "isMan":false},
                {"num":3, "name":"정준하", "isMan":false}
            ]
        `;
    // json 문자열 작성 규칙에 맞지 않게 작성하면 .parse() 작업 중에 에러 발생
	const result5 = JSON.parse(json3);

    const json4 = `{
            "num":1,
            "name":"유재석",
            "hobby":["당구", "테니스", "여행"],
            "health":{
                "weight":78,
                "height":17,
                "blood":"0"
            }
        }`;

	const result6 = JSON.parse(json4);
</script>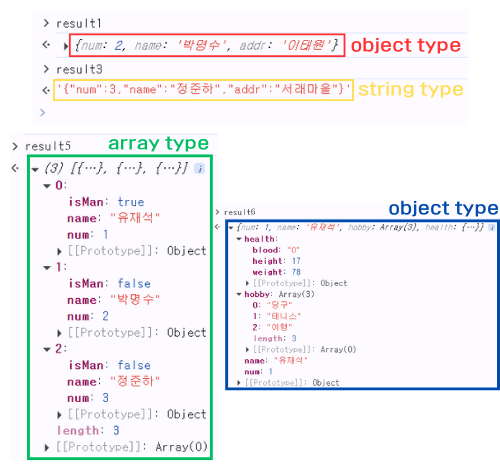
<JSON.parse(json1) 해석>
JSON              : Object type
JSON.parse        : Function type
JSON.parse(json1) : Object type

<JSON.stringify({num:3, name:"정준하", addr:"서래마을"}) 해석>
JSON                : Object type
JSON.stringify      : Function type
JSON.stringify({num:3, name:"정준하", addr:"서래마을"}) : String type

<JSON.parse(json3) 해석>
JSON              : Object type
JSON.parse        : Function type
JSON.parse(json3) : Array type

<JSON.parse(json4) 해석>
JSON              : Object type
JSON.parse        : Function type
JSON.parse(json3) : Object type
fetch()
네트워크를 통해 resource를 비동기적으로 요청하는 javaScript 내장 함수
주로 HTTP 요청을 보내고, 서버로부터 응답을 받아올 때 사용
fetch() 함수를 이용해 페이지 전환 없이 서버에 요청 가능
fetch(url).the(function(response)=>{}).then(unction(data)=>{});

fetch(url)				   /*응답처리*/
  .then(function(response){return response.json();})
  .then(function(data){});
			          /*데이터 처리*/
예시
<name.json 파일>
["유재석","박명수","정준하"]
--------------------------

<namePrint.html 파일>
<button id="getBtn"> 이름 목록 받아오기</button>
    <ul>

    </ul>
<script>
	document.querySelector("#getBtn").addEventListener("click", ()=>{
		// fetch() 함수를 이용해 페이지 전환없이 서버에 요청
		fetch("http://XXX.../names.json")
		.then((res)=>{
			return res.text();
		})
		.then((data)=>{
			// 서버에 응답한 문자열이 data에 들어있다 (json 형식의 문자열)
			console.log(data);

			// json 문자열을 실제 array로 변경
			const names = JSON.parse(data);
			names.forEach((item)=>{
			const li = document.createElement("li");
			li.innerText = item;
			document.querySelector("ul").append(li);
			})
		});
	});
</script>
학원 공부 내용 정리