13일차 내용 정리
ex) 본인의 이름과 성별, 취미를 작성해보세요.
JSON 형식
문자열은 반드시 ""(떠블 따옴표)로 감싸야한다
{
	 <key   value>
	"name":"유재석",
    "gender":"남자",
   	"hobby":"카페 수다"
}- value가 될 수 있는 건
1. 숫자 : 10, 20, 20.5...
2. 문자 : "xxx"..
3. 논리 : true, false
4. { } : objcet
5. [ ] : array
6. null : 비워둔다면 null
가장 많이 사용하는 json 형식
const 상수명 = `
	[
    	{key:value, key:value,..},
        {key:value, key:value,..},
        {key:value, key:value,..}..
    ]
`;
XML 형식
<person>
<name>유재석</name>
<gender>남자</gender>
<hobby>카페 수다</hobby>
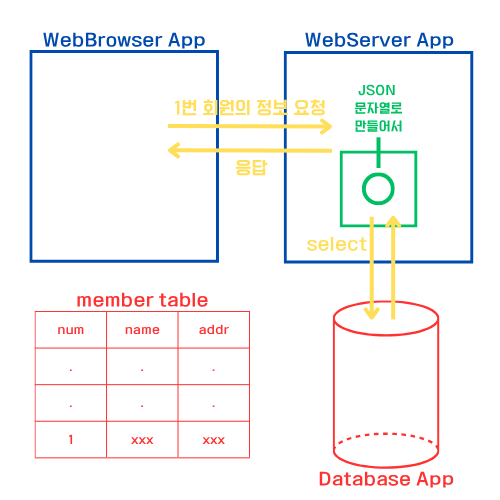
</person>서버 요청과 응답 흐름
fetch()
fetch(요청경로)							  // 요청
.then((response) => response.text();)     // 응답처리
.then((data) => {console.log(data);});    // 데이터 사용
	     ㄴ> 도착한 문자열은 함수의 매개변수에 전달

<서버가 정상적으로 응답하면 두개의 함수가 차례대로 호출>
예시1
<member.json 파일>

member = {
	"num":1,
    "name":"유재석",
    "addr":"압구정"
}<test.html 파일>
<button id="getBtn">1번 회원 정보 받아오기</button>
<p>번호 : <strong id="num"></strong></p>
<p>이름 : <strong id="name"></strong></p>
<p>주소 : <strong id="addr"></strong></p>
<script>
document.querySelector("#getBtn").addEventListener("click", ()=>{
fetch("member.json")
.then((res)=>{
return res.json();
})
.then((data)=>{
// data는 회원 한명의 정보가 들어 있는 object
console.log(data);
// object에 들어있는 내용을 이용해서 회원정보를 innerText로 출력
document.querySelector("#num").innerText = data.num;
document.querySelector("#name").innerText = data.name;
document.querySelector("#addr").innerText = data.addr;
});
});
</script>예시2
<info.json 파일>

{
    "name":"유재석",
    "hobby":["당구", "축구", "여행"]
}<test.html 파일>
<button id="getInfo">정보 받아오기</button>
<p>이름 : <strong id="name"></strong></p>
<h3>취미</h3>
<ul id="hobby">
</ul>
<script>
document.querySelector("#getInfo").addEventListener("click", ()=>{
fetch("info.json")
.then((res)=>{
return res.json();
})
.then((data)=>{
console.log(data);
document.querySelector("#name").innerText = data.name;
data.hobby.forEach((e)=>{
const li = document.createElement("li");
li.innerText = e;
document.querySelector("#hobby").append(li);
})
});
});
</script>insertAdjacentHTML()
HTML 코드를 문자열로 적어서 원하는 요소의 특정 위치에 바로 넣어주는 함수
요소.insertAdjacentHTML(위치, HTML 문자열);| 위치 | 지정한 위치 |
|---|---|
| beforebegin | 요소 바깥 앞 |
| afterbegin | 요소 안쪽 맨 앞 |
| beforeend | 요소 안쪽 맨 뒤 |
| afterend | 요소 바깥 뒤 |
beforeend : 리스트에 요소들을 순서대로 추가할 때 가장 많이 사용
afterbegin : 요소들을 맨 앞에 추가할 때 사용하지만 순서가 반대로
beforebegin, afterend : 요소 바깥에 추가해서 리스트 구조가 깨지므로 주의
예시
<info.json 파일>

{
    "name":"유재석",
    "hobby":["당구", "축구", "여행"]
}<test.html 파일>
<button id="getInfo">정보 받아오기</button>
<p>이름 : <strong id="name"></strong></p>
<h3>취미</h3>
<ul id="hobby">
</ul>
<script>
document.querySelector("#getInfo").addEventListener("click", ()=>{
fetch("info.json")
.then((res)=>{
return res.json();
})
.then((data)=>{
document.querySelector("#name").innerText = data.name;
data.hobby.forEach((item)=>{
// li 요소를 만들 수 있는 문자열 구성
const li = `<li>${item}</li>`;
document.querySelector("#hobby").insertAdjacentHTML("beforeend", li);
});
});;
});
</script>position별 순서
const hobby = document.querySelector("#hobby");- beforebegin
hobby.insertAdjacentHTML("beforebegin", "<li>당구</li>");
hobby.insertAdjacentHTML("beforebegin", "<li>축구</li>");
hobby.insertAdjacentHTML("beforebegin", "<li>여행</li>");

<h3>취미</h3>
<li>당구</li>
<li>축구</li>
<li>여행</li>
<ul id="hobby">
</ul>- afterbegin
hobby.insertAdjacentHTML("afterbegin", "<li>당구</li>");
hobby.insertAdjacentHTML("afterbegin", "<li>축구</li>");
hobby.insertAdjacentHTML("afterbegin", "<li>여행</li>");

<ul id="hobby">
  <li>여행</li>
  <li>축구</li>
  <li>당구</li>
</ul>- beforeend
hobby.insertAdjacentHTML("beforeend", "<li>당구</li>");
hobby.insertAdjacentHTML("beforeend", "<li>축구</li>");
hobby.insertAdjacentHTML("beforeend", "<li>여행</li>");
<ul id="hobby">
  <li>당구</li>
  <li>축구</li>
  <li>여행</li>
</ul>
4.afterend
hobby.insertAdjacentHTML("afterend", "<li>당구</li>");
hobby.insertAdjacentHTML("afterend", "<li>축구</li>");
hobby.insertAdjacentHTML("afterend", "<li>여행</li>");

<ul id="hobby">
</ul>
<li>당구</li>
<li>축구</li>
<li>여행</li>
table을 이용한 insertAdjacentHTML() 사용
<members.json 파일>

[
  {
    "num": 1,
    "name": "유재석",
    "addr": "압구정"
  },
  {
    "num": 2,
    "name": "박명수",
    "addr": "이태원"
  },
  {
    "num": 3,
    "name": "정준하",
    "addr": "서래마을"
  },
  {
    "num": 4,
    "name": "정형돈",
    "addr": "동묘"
  },
  {
    "num": 5,
    "name": "하하",
    "addr": "서교동"
  }
]<test.html 파일>
<style>
table, th, td{
border:1px solid black;
border-collapse:collapse; /*2중 경계선 방지*/
}
th, td{
width:200px;
}
thead{
background-color: lightcyan;
}
</style>
<div class="container">
<h1>회원목록</h1>
<table>
<thead>
<tr>
<th>번호</th>
<th>이름</th>
<th>주소</th>
</tr>
</thead>
<tbody>
</tbody>
</table>
</div>
<button id="getBtn">회원 목록 받아오기</button>
<script>
/*
1. 회원목록 받아오기 버튼을 누르면
2. 서버에 members.json을 요청하고
3. 응답되는 data를 이용해서 tbody에 tr을 5개 추가해 보세요요
*/
document.querySelector("#getBtn").addEventListener("click", ()=>{
fetch("members.json")
.then((res)=>{
return res.json();
})
.then((data)=>{
data.forEach((item)=>{
const tr = `
<tr>
<td>${item.num}</td>
<td>${item.name}</td>
<td>${item.addr}</td>
</tr>
`;
document.querySelector("tbody").insertAdjacentHTML("beforeend", tr)
});
});
});
</script>setAttribute
<images 폴더>
SouthKorea.png
Spain.png
Sweden.png
    .
    .
    .

<test.html 파일>
<div class="container">
        <img src="images/SouthKorea.png">
</div>

<script>
        const img2 = document.createElement("img");

        img2.setAttribute("src", "images/Spain.png");
        document.querySelector(".container").append(img2);
<script>
학원 공부 내용 정리