38일차 내용 정리
CSS
Display
inline
- width & height 지정 불가능
- left & right margin 과 padding 적용 가능
- top & bottom margin 과 padding 을 가질 수 없다
#one{
	border: 1px solid red;
	display: inline;
	margin:10px;  /*좌우 margin만 적용*/
	padding:10px; /*좌우 패딩만 효과가 있다*/
}
inline-block
- width, height, margin, padding 모두 적용 가능
- 왼쪽과 오른쪽에 다른 요소가 올 수 있다
#two{
	border: 1px solid blue;
	display: inline-block;
	margin:10px;
	padding:10px;
}
z-index
- 요소의 쌓임 순서를 결정
position : relative, absolute, fixed, sticky중 하나가 설정된 요소에서만 적용- z-index 값이 상대적으로 크면 작은거 보다 위에 배치
#one{
	position:relative;
	top: 100px;
	left: 100px;
	z-index: 10;
}

#two{
	top: 150px;
	left: 150px;
	z-index: 9;
}
#three{
	top: 200px;
	left: 200px;
	z-index: 8;
}
Text
font-style
- 글자 스타일
- 상속
normal
italic : 기울림꼴
font-family
- 글꼴
- 좌측부터 순서대로 적용
- 상속
Times New Roman | Consolas | NanumGothic | Gothic | serif | sans-serif
font-weight
- 글자의 굵기
normal | bold
font-size
- 글자의 크기
- 상속
- html 기본 글자 크기 =
16px
#one{
	font-size:20px;
}
text-decoration
- 글자 꾸미기
- 상속
none | underline | overline | line-through
➜ line :글자를 통과하는 선
color
- 글자 색상
- 상속
#one{
	color:red;
}
text-transform
- 글자 변환
none
uppercase : 대문자
lowercase : 소문자
capitalize : 첫 글자를 대문자
letter-spacing
- 자간 = 글자 하나하나 사이의 간격
- 상속
#one{
	letter-spacing:5px;
}
line-height
- 행간 = 행 사이의 간격
- 상속
#one{
	line-height:30px;
}
text-indent
- 첫 단어 들여쓰기
- 상속
#one{
	text-indent:100px;
}
text-align
- 글자 정렬
left | center | right
justify : 늘리기 = 줄의 양 끝에 맞추가 위해 단어 간격을 자동 조절
#one{
	text-align:left;
}

#two{
	text-align: center;
}

#three{
	text-align: right;
}
⭐ inline or inline-block 요소의 가운데 정렬에도 활용 가능.wrapper{
text-align:center;
}
.box{
width: 100px;
height: 100px;
background-color: yellow;
display: inline-block;
}가중치
- 단계적으로 적용되는 css 법칙
선택자의 가중치가 동일하다면 나중에 정의한 css 를 적용 = 오버라이드
p{
	background-color: red;
}

p{
	background-color: yellow;
}

➜ 배경색 : yellow- 단계적으로 적용되는 css 법칙
- 선택자가 상세할수록 가중치가 크다
- 선택자의 가중치가 동일하다면 나중에 정의한 css 를 적용 = 오버라이드
가중치 비교
- 요소명 선택자: 1점
클래스 선택자 : 10점
아이디 선택자 : 100점
inline css : 1000점
!important : 10000점
li{ background-color: yellow; } ➜ 1점

ul li{ background-color: blue; } ➜ 2점

.active{ background-color: green; } ➜ 10점

li.active{ background-color: red; } ➜ 11점

#one{ background-color: pink; } ➜ 100점

#one{ background-color: white !important; } ➜ 10000점
⭐ 구체적일수록 가중치가 크다visibility
- 보일지 여부를 선택
visibility : hidden : 요소가 보이지 않지만 공간 차지
display : none : 요소가 화면에서 사라지고 공간 차지 X
opacity
- 투명도
1.0 : 완전 불투명 (기본값)
0.5 : 반투명 (배경이 살짝 비침)
0.0 : 완전 투명 (안 보인다)
overflow
- 자식 컨텐츠가 부모 컨텐츠를 넘은 경우 보이게 한다
- 넘친 컨텐츠 처리
visible | hidden | scroll
auto : 넘치면 스크롤바를 보이게 한다
방향 설정
overflow-x : x 방향으로 넘친 걸 처리
overflow-y : y 방향으로 넘친 걸 처리
overflow : 양쪽 모두 처리
jsp
로그인
- 세션에서 로그인 정보 가져오기
String userName = (String)session.getAttribute("userName");➜ session.getAttribute() 는 object type 을 반환하기에 String type 으로 casting 필요
- 로그인 링크 생성
<li><a href="${pageContext.request.contextPath}/user/loginform.jsp">로그인</a></li>로그아웃
- 로그아웃 링크 생성
<li><a href="${pageContext.request.contextPath}/user/logout.jsp">로그아웃</a></li>- logout.jsp
<%
	// 세션에 저장된 값을 삭제하면 로그아웃
	// "userName" 이라는 키값으로 저장된 값을 삭제
	session.removeAttribute("userName");

	// 응답하기
%><script>
alert("로그아웃 완료");
location.href = "${pageContext.request.contextPath}/";
</script>➜ / : 최상위 경로 요청
Filter
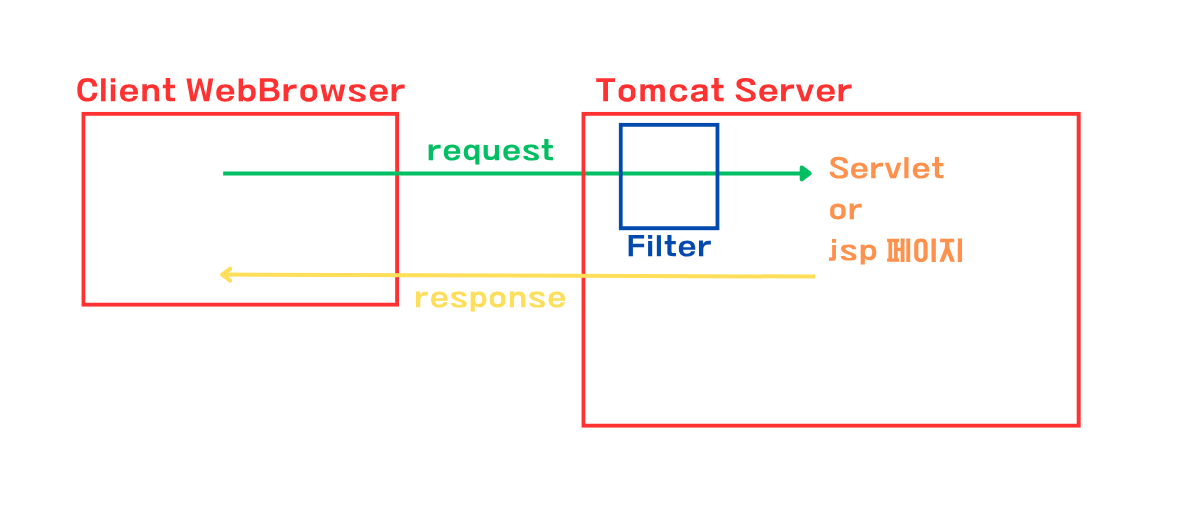
-
웹 어플리케이션이 클라이언트의 요청을 가로채서 전후 처리를 할 수 있게하는 기능
-
/member/*경로로 들어오는 모든 요청을 필터링
@WebFilter("/member/*") // "/member/" 회원의 모든 요청에 대해서 필터링하겠다
public class MyFilter implements Filter{

	@Override
	public void doFilter(ServletRequest request, ServletResponse response, FilterChain chain)
			throws IOException, ServletException {
		System.out.println("My Filter 동작");

		// 요청의 흐름 이어가기
		chain.doFilter(request, response);
	}

}
SecurityFilter
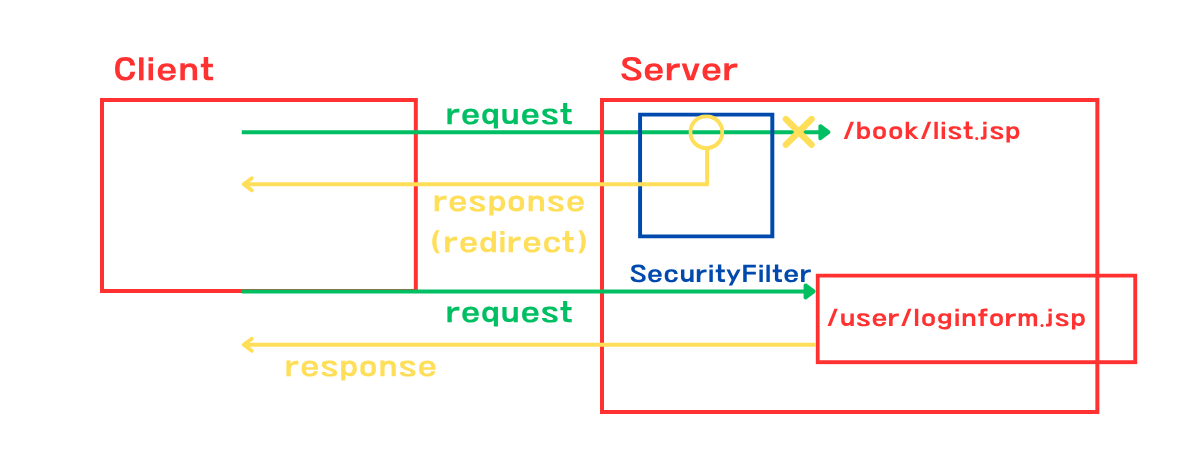
- 로그인 인증 필터
// 들어오는 모든 요청에 대해서 필터링 하겠다는 의미
@WebFilter("/*")
public class SecurityFilter implements Filter{
	// 로그인 없이 접근 가능한 경로 목록
	Set<String> whiteList = Set.of(
		"/index.jsp",
		"/user/loginform.jsp", "/user/login.jsp",
		"/user/signup-form.jsp", "/user/signup.jsp",
		"/images/"
	);

	@Override
	public void doFilter(ServletRequest request, ServletResponse response, FilterChain chain)
			throws IOException, ServletException {
		System.out.println("필터 수행됨");
		// 로그인을 했는지 확인 작업
		// 부모 type 을 자식 type 으로 casting
		HttpServletRequest req = (HttpServletRequest)request;
		HttpServletResponse res = (HttpServletResponse)response;

		// HttpSession 객체의 참조값 얻어내기
		HttpSession session = req.getSession();

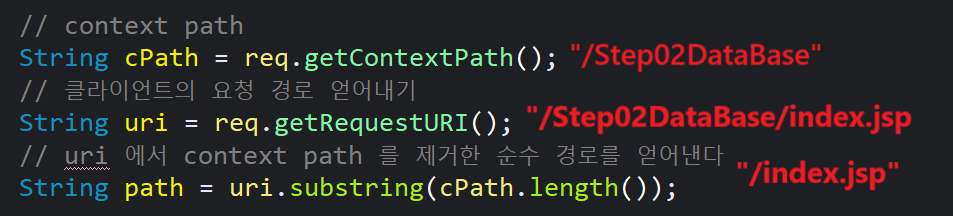
		// context path
		String cPath = req.getContextPath();
		// 클라이언트의 요청 경로 얻어내기
		String uri = req.getRequestURI();
		// uri 에서 context path 를 제거한 순수 경로를 얻어낸다
		String path = uri.substring(cPath.length());
		System.out.println(path);
		// 로그인 없이 접근 가능한 요청 경로면 필터링을 하지 않는다
		if(isWhiteList(path)) {
			chain.doFilter(request, response);
			return; // 메소드를 여기서 종료하기
		}

		// 로그인 여부 확인
		String userName = (String)session.getAttribute("userName");
		// 만일 로그인을 하지 않았다면
		if(userName ==  null) {
			// 로그인 페이지로 redirect (새로운 경로로 요청을 다시 하라고 응답) 이동시킨다
		    // query 문자열이 있으면 읽어와서
		    String query = req.getQueryString();
		    // 인코딩을 한 다음
		    String encodedUrl = query == null ? URLEncoder.encode(uri, "UTF-8")
		                                      : URLEncoder.encode(uri + "?" + query, "UTF-8");
		    // Redirect 되는 경로 뒤에 url 이라는 파라미터명으로 전달
		    res.sendRedirect(req.getContextPath() + "/user/loginform.jsp?url=" + encodedUrl);
		    return; // 메소드를 여기서 끝내기
		}
		chain.doFilter(request, response);
	}

    // 화이트리스트 검사
    private boolean isWhiteList(String path) {
    	// 만일 최상위 경로 요청이면 허용
        if ("/".equals(path)) return true;
        // 반복문 돌면서 모든 WhiteList 를 불러내서
        for (String prefix : whiteList) {
        	// 현재 요청경로와 대조한다
            if (path.startsWith(prefix)) {
            	System.out.println(path);
                return true;
            }
        }
        return false;
    }
}
⭐ Redirect 다시 요청하라고 새로운 경로를 준다- SecurityFilter 동작 흐름
- 로그인 후 원래 페이지로 리다이렉트 처리
// 로그인 여부 확인
String userName = (String)session.getAttribute("userName");
	// 만일 로그인을 하지 않았다면
	if(userName ==  null) {
		// 로그인 페이지로 redirect (새로운 경로로 요청을 다시 하라고 응답) 이동시킨다
		// query 문자열이 있으면 읽어와서
		String query = req.getQueryString();
		// 인코딩을 한 다음
		String encodedUrl = query == null ? URLEncoder.encode(uri, "UTF-8")
		                                  : URLEncoder.encode(uri + "?" + query, "UTF-8");
		// Redirect 되는 경로 뒤에 url 이라는 파라미터명으로 전달
		res.sendRedirect(req.getContextPath() + "/user/loginform.jsp?url=" + encodedUrl);
	}
	chain.doFilter(request, response);
}
⭐ url = /shop/buy.jsp?num=1&amount=2&xxx...- loginform.jsp 파일 수정
<%
	// GET 방식 파라미터 url 이라는 이름으로 전달되는 값이 있는지 읽어와 본다
	String url = request.getParameter("url");
	// 만일 넘어오는 값이 없다면
	if(url == null){
		// 로그인 후에 인덱스 페이지로 갈 수 있도록 한다
		String cPath = request.getContextPath();
		url = cPath+"/index.jsp";
	}
%>
<%-- 로그인 성공 후에 이동할 url 정보를 추가로 form 전송되도록 한다 --%>
<input type="hidden" name="url" value="<%=url%>"/>➜ 로그인 후 이동할 원래 요청 경로가 hidden input 으로 form에 담긴다
<input type="hidden" name="url" value="/Step02DataBase/book/list.jsp"/>- login.jsp 파일 수정
// 로그인 후에 가야 할 목적지 정보
String url = request.getParameter("url");
// 로그인 실패를 대비해서 목적지 정보를 인코딩한 결과도 준비한다
String encodedUrl = URLEncoder.encode(url, "UTF-8");<div class="container">
<%if(isValid) {%>
<p>
<strong><%=userName%></strong> 회원님 로그인 되었습니다
<a href="<%=url %>">확인</a>
</p>
<%} else {%>
<p>
아이디 혹은 비밀번호가 틀립니다
<a href="loginform.jsp?url=<%=encodedUrl %>">다시 로그인</a>
</p>
<%} %>
</div>마이페이지
- index.jsp 파일 수정
<%if(userName != null) {%>
	<a href="${pageContext.request.contextPath}/user/info.jsp"><%=userName %></a> 님 로그인 중
<%} %>- info.jsp
<%
	// 세션에 저장된 userName 을 읽어온다
	String userName = (String)session.getAttribute("userName");
	// DB 에서 사용자 정보를 읽어온다
	UserDto dto = new UserDao().getByUserName(userName);
%><div class="container">
<h1>회원 가입 정보</h1>
<table class="table table-bordered table-striped">
<tr>
<th>아이디</th>
<td><%=dto.getUserName()%></td>
</tr>
<tr>
<th>비밀번호</th>
<td>
<a href="edit-password.jsp">수정하기</a>
</td>
</tr>
<tr>
<th>이메일</th>
<td><%=dto.getEmail()%></td>
</tr>
<tr>
<th>프로필 이미지</th>
<td>
<i style="font-size:50px;" class="bi bi-person-circle"></i>
</td>
</tr>
<tr>
<th>최종 수정 날짜</th>
<td><%=dto.getUpdateAt()%></td>
</tr>
<tr>
<th>가입 날짜</th>
<td><%=dto.getCreatedAt()%></td>
</tr>
</table>
<a href="edit.jsp">개인 정보 수정(이메일, 프로필 사진)</a>
</div>비밀번호 수정
- edit-password.jsp
<div class="container">
	<h1>비밀번호 수정 양식</h1>
	<form action="update-password.jsp" method="post" id="editForm">
		<div>
			<label for="password">기존 비밀번호</label>
			<input type="text" name="password" id="password" />
		</div>
		<div>
			<label for="newPassword">새 비밀번호</label>
			<input type="text" name="newPassword" id="newPassword" />
		</div>
		<div>
			<label for="newPassword2">새 비밀번호 확인</label>
			<input type="text" id="newPassword2" />
		</div>
		<button type="submit">수정하기</button>
	</form>
</div><script>
// id 가 editForm 인 요소에 "submit" 이벤트가 일어났을 때 실행할 함수 등록
// form 안에 있는 submit 버튼을 누르면 해당 form 에는 "submit" 이벤트가 발생
document.querySelector("#editForm").addEventListener("submit", (e)=>{
/*
여기서 해야할 일
- 폼에 입력한 내용의 유효성을 검증한다
- 검증해서 유효하다면(잘 입력했다면) 관여하지 않는다(자동으로 폼이 제출된다)
- 유효하지 않다면 e.preventDefault(); 를 실행해서 폼 제출을 막아준다
*/
// 기존 비밀번호
const pwd = document.querySelector("#password").value;
// 새 비밀번호
const newPwd = document.querySelector("#newPassword").value;
// 새 비밀번호 확인
const newPwd2 = document.querySelector("#newPassword2").value;
if(pwd.trim() == ""){ // 문자열에서 공백 제거 (좌우 공백) 해서 비교
alert("기존 비밀번호를 입력하세요");
e.preventDefault();
} else if(newPwd.trim() == ""){
alert("새 비밀번호를 입력하세요");
e.preventDefault();
} else if(newPwd.trim() != newPwd2.trim()){
alert("새 비밀번호를 확인란과 동일하게 입력해주세요");
e.preventDefault();
}
})
</script>- update-password.jsp
<%
	// 1. 폼 전송되는 기존 비밀번호와 새 비밀번호를 읽어온다
	String password = request.getParameter("password");
	String newPassword = request.getParameter("newPassword");

	// 2. 세션에 저장된 userName 을 이용해서 가입정보를 DB 에서 불러온다
	String userName = (String)session.getAttribute("userName");
	UserDto dto = new UserDao().getByUserName(userName);

	// 3. 기존 비밀번호와 DB 에 저장된 비밀번호가 일치하는지 확인해서
	boolean isValid = BCrypt.checkpw(password, dto.getPassword());

	// 4. 일치한다면 새 비밀번호를 DB 에 수정 반영하고 로그아웃한다
	if(isValid){
		// 새 비밀번호를 암호화 한다
		String encodedPwd = BCrypt.hashpw(newPassword, BCrypt.gensalt());
		// dto 에 담고
		dto.setPassword(encodedPwd);
		// DB 에 수정 반영
		new UserDao().updatePassword(dto);
		// 로그아웃
		session.removeAttribute("userName");
	}

	// 5. 일치하지 않는다면 에러 정보를 응답하고 다시 입력할 수 있도록 한다
%><div class="container">
<%if(isValid) {%>
<p>
<strong><%=userName%></strong> 님의 비밀번호가 수정되고 로그아웃 되었습니다
<a href="loginform.jsp?url=${pageContext.request.contextPath}/user/info.jsp">다시 로그인</a>
</p>
<%} else {%>
<p>
기존 비밀 번호가 일치하지 않습니다. 다시 입력해 주세요.
<a href="edit-password.jsp">확인</a>
</p>
<%} %>
</div>- UserDao 파일에
update메소드 추가
// 비밀번호를 수정 반영하는 메소드
public boolean updatePassword(UserDto dto) {
	Connection conn = null;
	PreparedStatement pstmt = null;
	int rowCount = 0;
	try {
		conn = new DbcpBean().getConn();
		String sql = """
				UPDATE users
				SET password = ?, updatedAt = SYSDATE
				WHERE userName = ?
				""";
		pstmt = conn.prepareStatement(sql);
		pstmt.setString(1, dto.getPassword());
		pstmt.setString(2, dto.getUserName());
		rowCount = pstmt.executeUpdate();
	} catch (Exception e) {
		e.printStackTrace();
	} finally {
		try {
			if (pstmt != null)
				pstmt.close();
			if (conn != null)
				conn.close();
		} catch (Exception e) {
		}
	}
	if (rowCount > 0) {
		return true;
	} else {
		return false;
	}
}- edit.jsp
<%
	String userName = (String)session.getAttribute("userName");
	UserDto dto = new UserDao().getByUserName(userName);
%><div class="container">
<h1>가입정보 수정 양식</h1>
<%-- input type = "file" 이 있는 form 의 전송 방식은 다르다
따라서 enctype = "multipart/form-data" 속성을 form 에 추가한다
서버에서 해당 요청을 처리하는 방법도 다르기 때문에 jsp 가 아닌 서블릿에서 처리를 하자
--%>
<form action="${pageContext.request.contextPath}/user/update" method="post"
enctype="multipart/form-data">
<div>
<label for="userName">아이디</label>
<input type="text" name="userName" value="<%=dto.getUserName()%>" readonly/>
</div>
<div>
<label for="email">이메일</label>
<input type="text" name="email" value="<%=dto.getEmail()%>"/>
</div>
<div>
<label>프로필 이미지</label>
<div>
<%if(dto.getProfileImage() == null) {%>
<i style="font-size:50px;" class="bi bi-person-circle"></i>
<%} else {%>
<%-- 다음 시간에! --%>
<%} %>
</div>
<input type="file" name="profileImage" accept="image/*" />
</div>
<button type="submit">수정 확인</button>
<button type="reset">취소</button>
</form>
</div>⚠️ ProfileImage 부분은 새로운 개념이 나오기에 다음 시간에..
학원 공부 내용 정리