39일차 내용 정리
CSS
box-sizing
- 전체적인 크기를 유지하지만 content box 크기가 줄어든다
cotent-box : width 와 height 에 아무것도 포함하지 않는다 = default 값
border-box : width 와 height 에 padding 가 border 포함
.box{
	width : 100px;
	height : 100px;
	padding : 10px;
	margin : 10px;
	box-sizing : border-box;
}
.box2{
	width : 100px;
	height : 100px;
	padding : 10px;
	margin : 10px;
} <box> <box2>
120px
100px -------------
--------- | --------- |
| ----- | | | | |
| | | | 100px | | | | 120px
| ----- | | | | |
--------- | --------- |
-------------크기 & 거리 단위
px : 해상도에 따라 같은 px 를 지정해도 크기가 다를 수 있다
% : 상대적 비율
em : 물려받은 글자의 크기를 기준 (16px 물려받을 시 1.5em = 24px)
#one{
	font-size : 16px;
}
#two{
	font-size : 1em; ➜ 16px
}
#three{
	font-size : 2em; ➜ 32px
}
rem
- 최상위(root) 글자 크기의 배수
- html 요소의 글자의 크기를 기준
html{
	font-size : 16px;
}

#one{
	font-size : 1rem; ➜ 16px
}

#two{
	font-size : 2rem; ➜ 32px
}
BootStrap
- BootStrap CSS 로딩
<link href="https://cdn.jsdelivr.net/npm/bootstrap@5.3.7/dist/css/bootstrap.min.css" rel="stylesheet" integrity="sha384-LN+7fdVzj6u52u30Kp6M/trliBMCMKTyK833zpbD+pXdCLuTusPj697FH4R/5mcr" crossorigin="anonymous">격자식 배치
- 원래 div는
block요소이기에 아래로 쌓이지만 bootstrap으로 인해 옆으로 쌓인다
<div class="container">
	<h1>갤러리 사진 목록</h1>
  	<div class="row">
		<div class="col-6">
			첫번째 칼럼
		</div>
		<div class="col-6">
			두번째 칼럼
		</div>
	</div>
</div>
col-6 : 6칸을 가진다<div class="row"> = table 의 tr
<div class="col-6"> = table 의 td
<div class="row">
	<div class="col-6">
		<h3>제목입니다</h3>
		<p>Lorem, ipsum dolor sit amet consectetur adipisicing elit. Veritatis impedit, quis voluptatem, dolore expedita nulla nobis repellendus facere et beatae aut ex autem, sequi corrupti ipsam? Quae veritatis fuga blanditiis.</p>
		<button class="btn btn-primary">자세히 보기</button>
	</div>
	<div class="col-6">
		<h3>제목입니다</h3>
		<p>Lorem, ipsum dolor sit amet consectetur adipisicing elit. Veritatis impedit, quis voluptatem, dolore expedita nulla nobis repellendus facere et beatae aut ex autem, sequi corrupti ipsam? Quae veritatis fuga blanditiis.</p>
	</div>
</div>
jsp
마이페이지 이미지 정보 수정
- form 전송하는 내용 중에 file 이 있으면 form 전송방식이 달라야 한다
edit.jsp
- 기본 이미지 파일
<div>
	<label>프로필 이미지</label>
	<div>
		<a href="javascript:" href="javascript:" id="profileLink">
			<%if(dto.getProfileImage() == null) {%>
				<i style="font-size:100px;" class="bi bi-person-circle"></i>
			<%} else {%>
				<img src="" >
			<%} %>
		</a>
	</div>
	<input type="file" name="profileImage" accept="image/*" style="display:none;"/>
</div>- 이미지 수정
// 이미지를 감싸고 있는 링크를 클릭했을 때
document.querySelector("#profileLink").addEventListener("click", ()=>{
	// input type="file" 을 강제로 클릭
	document.querySelector("input[name=profileImage]").click();
});

// input 요소중에 name 속성의 값이 profileImage 인 요소를 선택해서 이벤트 리스너 함수 등록
document.querySelector("input[name=profileImage]").addEventListener("change", (e)=>{
	// 선택한 파일을 배열로 얻어내기
	const files = e.target.files;
	//FileReader 객체를 생성해서
    const reader=new FileReader();
	// 배열의 0 번방에 있는 파일 객체를 읽어들이고
    reader.readAsDataURL(files[0]);
	// 다 읽었을때 실행할 함수 등록
    reader.onload = ()=>{
 		// 읽은 데이터를 이용해서 img 요소를 만들 준비를 한다.
  		const img=`<img src="\${reader.result}"
            		style="width:100px;height:100px;border-radius:50%">`;
		// img 마크업 형식의 문자열을 실제로 HTML 로 해석이 되게끔 a 요소안에 넣기
        document.querySelector("#profileLink").innerHTML = img;
	};
});
UserUpdateServlet.java
/*
 * enctype = "multipart/form-data" 형식의 폼이 전송되었을 때 처리할 서블릿 만들기
 * */
@WebServlet("/user/update")
@MultipartConfig(
		fileSizeThreshold = 1024*1024*10, // 업로드 처리하기 위한 메모리 사이즈(10 Mega byte)
		maxFileSize = 1024*1024*50, // 업로드되는 최대 파일 사이즈 (50 Mega byte)
		maxRequestSize = 1024*1024*60) // 이 요청의 최대 사이즈(60 Mega byte), 파일 외의 다른 문자열도 전송되기 때문에
public class UserUpdateServlet extends HttpServlet{
	// post 방식 전송되었을 때 호출되는 메소드
	@Override
	protected void doPost(HttpServletRequest req, HttpServletResponse resp) throws ServletException, IOException {
		// 폼 전송되는 내용 추출
		String userName = req.getParameter("userName");
		String email = req.getParameter("email");
		// 파일 데이터 (<input type = "file" name = "profileImage">)
		Part filePart = req.getPart("profileImage");
		// 만일 업로드된 프로필 이미지가 있다면 (수정하지 않았다면 없다)
		if(filePart!=null && filePart.getSize() > 0) {
			// 원본 파일의 이름 얻어내기
			String orgFileName = filePart.getSubmittedFileName();
			// 저장할 파일의 경로 구성하기
			String filePath = "구성 에정";
			/*
			 * 업로드된 파일은 임시 폴더에 임시 파일로 저장할 수 있다
			 * 해당 파일에서 byte 알갱이를 읽어들일 수 있는 InputStream 객체를 얻어내서
			 * */
			InputStream is = filePart.getInputStream();
			// 원하는 목적지에 copy 를 해야 한다
			Files.copy(is, Paths.get(filePath));
		}
	}
}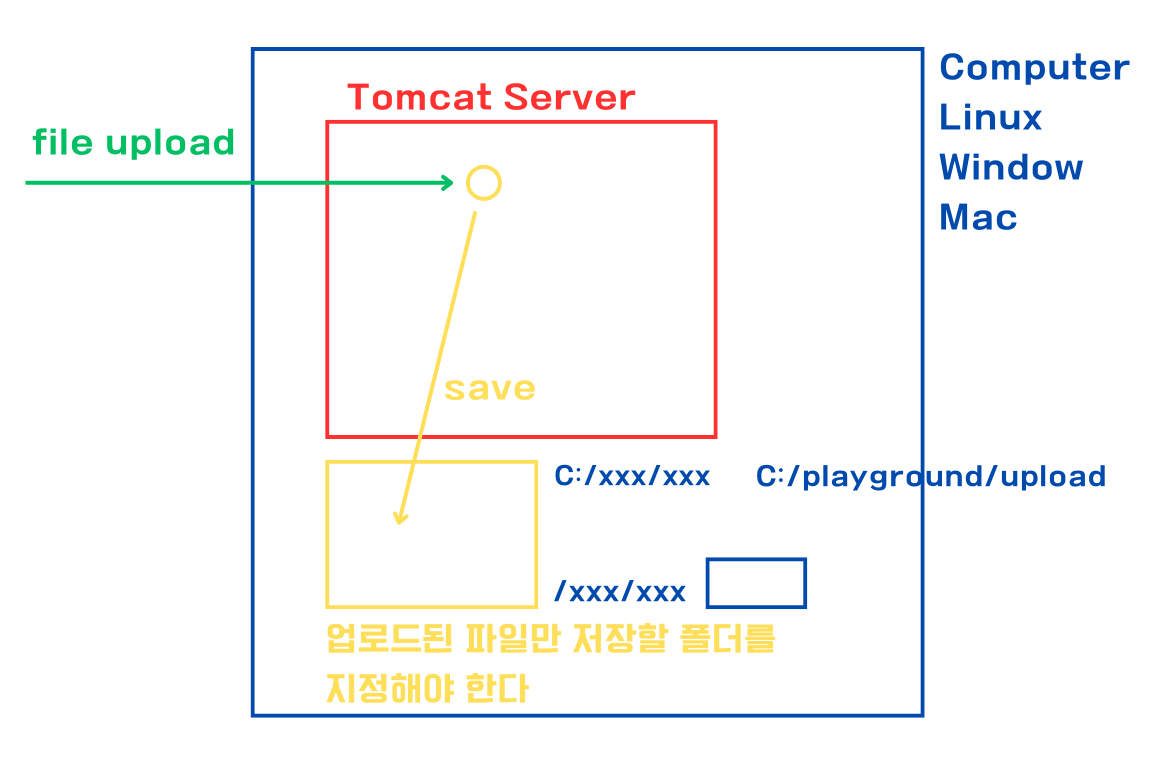
web.xml 에 코드 추가
- key & value 형태
<context-param>
	<description>업로드된 파일을 저장할 경로</description>
	<param-name>fileLocation</param-name>
	<param-value>C:/playground/upload</param-value>
</context-param>
➜ 작성한 해당 경로와 같이 playground 폴더 안에 upload 폴더 추가
UserUpdateServlet.java 코드 추가
// 업로드된 파일 저장경로를 저장할 필드 선언
String fileLocation;

// 이 서블릿이 초기화되는 시점에 최초 1번 호출되는 메소드
@Override
public void init() throws ServletException {
	// 무언가 초기화 작업을 여기서 하면 된다
	ServletContext context = getServletContext();
	// web.xml 파일에 "fileLocation" 이라는 이름으로 저장된 정보를 읽어와서 필드에 저장하기
	fileLocation = context.getInitParameter("fileLocation");
}
// 파일명이 겹치지 않게 랜덤한 id 값 얻어내기
String uid = UUID.randomUUID().toString();
// 저장될 파일명을 구성한다
String saveFileName = uid+orgFileName;
// 저장할 파일의 경로 구성하기
String filePath = fileLocation+"/"+saveFileName;➜ /a72f65c7-b6a2-4819-a074-f29f1ba7100aprofile1 형식으로 파일이 저장된다
마이페이지 프로필 사진은 유지하고 ? 머지? 먼 코드 내용인지 소제목 추천
// DB 에서 사용자가 정보를 불러온다
UserDto dto = new UserDao().getByUserName(userName);
// dto 에 이메일과 저장된 파일명을 담는다
dto.setEmail(email);
dto.setProfileImage(saveFileName);
// dao 의 email 과 profile 을 수정하는 메소드를 이용해서 수정 반영
} else { // 업로드된 프로필 이미지가 없으면 (이메일만 수정)
// dto 에 이메일만 담는다
dto.setEmail(email);
// dao 의 email 만 수정하는 메소드를 이용해서 수정 반영
}UserDao 에 코드 추가
- 이메일과 프로필을 수정하는 메소드
public boolean updateEmailProfile(UserDto dto) {
	Connection conn = null;
	PreparedStatement pstmt = null;
	int rowCount = 0;
	try {
		conn = new DbcpBean().getConn();
		String sql = """
				UPDATE users
				SET email=?, profileImage=?, updatedAt=SYSDATE
				WHERE userName=?
				""";
		pstmt = conn.prepareStatement(sql);
		pstmt.setString(1, dto.getEmail());
		pstmt.setString(2, dto.getProfileImage());
		pstmt.setString(3, dto.getUserName());
		rowCount = pstmt.executeUpdate();
	} catch (Exception e) {
		e.printStackTrace();
	} finally {
		try {
			if (pstmt != null)
				pstmt.close();
			if (conn != null)
				conn.close();
		} catch (Exception e) {
		}
	}
	if (rowCount > 0) {
		return true;
	} else {
		return false;
	}
}- 이메일을 수정하는 메소드
public boolean updateEmail(UserDto dto) {
	Connection conn = null;
	PreparedStatement pstmt = null;
	int rowCount = 0;
	try {
		conn = new DbcpBean().getConn();
		String sql = """
				UPDATE users
				SET email=?, updatedAt=SYSDATE
				WHERE userName=?
				""";
		pstmt = conn.prepareStatement(sql);
		pstmt.setString(1, dto.getEmail());
		pstmt.setString(2, dto.getUserName());
		rowCount = pstmt.executeUpdate();
	} catch (Exception e) {
		e.printStackTrace();
	} finally {
		try {
			if (pstmt != null)
				pstmt.close();
			if (conn != null)
				conn.close();
		} catch (Exception e) {
		}
	}
	if (rowCount > 0) {
		return true;
	} else {
		return false;
	}
}
싱글톤 패턴
private static UserDao dao;

// static 초기화 블럭 (이 클래스가 최초로 사용될 때 한 번 실행되는 블럭)
static {
	// static 초기화 작업을 여기서 한다 (UserDao 객체를 static 필드에 담는다)
	dao = new UserDao();
}

// 외부에서 UserDao 객체를 생성하지 못하도록 생성자를 private 로 막는다
private UserDao() {}

// UserDao 객체의 참조값을 리턴해주는 public static 메소드 제공
public static UserDao getInstance() {
	// static 필드에 저장된 dao 의 참조값을 리턴해준다
	return dao;
}
⭐ Dao 객체의 참조값이 필요하다면?
UserDao dao = UserDao.getInstance();
➜ 다른 파일들의 new UserDao() 를 다 변경해야 한다UserUpdateServlet.java 코드 보충
} else { // 업로드된 프로필 이미지가 없으면 (이메일만 수정)
	// dto 에 이메일만 담는다
	dto.setEmail(email);
	// dao 의 email 만 수정하는 메소드를 이용해서 수정 반영
	UserDao.getInstance().updateEmail(dto);
}
// 기존에 이미 저장된 프로필 사진이 있으면 파일 시스템에서 삭제하기
if(dto.getProfileImage() != null) {
String deleteFilePath = fileLocation+"/"+dto.getProfileImage();
// Files 클래스의 delete() 메소드를 이용해서 삭제하기
Files.delete(Paths.get(deleteFilePath));
}ImageServlet.java 생성
upload 폴더에 저장된 이미지 데이터를 응답하는 서블릿
- img 요소에 특정 이미지를 보여주려면
<img src="컨텐츠 경로/upload/저장된 파일명">형식으로 코딩
⚠️ 전제 조건
   SecurityFilter 에 whiteList 에 "/upload/" 를 추가 해야 동작
➜ /upload/xxx.png, /upload/xxx.jpg 형식의 요청을 이 서블릿에서 처리@WebServlet("/upload/*")
public class ImageServlet extends HttpServlet{
// 이미지 저장 경로
private String fileLocation;
@Override
public void init() throws ServletException {
ServletContext context = getServletContext();
fileLocation = context.getInitParameter("fileLocation");
}
@Override
protected void doGet(HttpServletRequest request, HttpServletResponse response)
throws ServletException, IOException {
// 1. URL 경로에서 이미지 이름 추출
String pathInfo = request.getPathInfo(); // 예: /xxx.jpg
if (pathInfo == null || pathInfo.equals("/")) {
response.sendError(HttpServletResponse.SC_BAD_REQUEST, "Image name missing.");
return;
}
// 맨 앞에 / 제거
String imageName = pathInfo.substring(1); // "xxx.jpg"
// 2. 파일 전체 경로 구성
File imageFile = new File(fileLocation, imageName);
// 3. 파일 존재 여부 확인
if (!imageFile.exists() || imageFile.isDirectory()) {
response.sendError(HttpServletResponse.SC_NOT_FOUND, "Image not found.");
return;
}
// 4. MIME 타입 설정 (ex: image/jpeg)
String mimeType = request.getServletContext().getMimeType(imageFile.getName());
if (mimeType == null) mimeType = "application/octet-stream";
response.setContentType(mimeType);
response.setContentLengthLong(imageFile.length());
// 5. 파일을 바이너리로 스트리밍
try (
FileInputStream fis = new FileInputStream(imageFile);
OutputStream os = response.getOutputStream();
) {
byte[] buffer = new byte[8192];
while(true) {
int readedByte=fis.read(buffer);
if(readedByte == -1)break;
os.write(buffer, 0, readedByte);
os.flush();
}
}
}
}info.jsp 프로필 이미지 코드 수정
th>프로필 이미지</th>
	<td>
		<%if(dto.getProfileImage() == null) {%>
			<i style="font-size:100px;" class="bi bi-person-circle"></i>
		<%} else{%>
			<img src="${pageContext.request.contextPath }/upload/<%=dto.getProfileImage() %>"
				style="width:100px;height:100px;border-radius:50%;"/>
	<%} %>
</td>
SecurityFilter.java 파일에 코드 추가
Set<String> whiteList = Set.of(
	"/index.jsp",
	"/user/loginform.jsp", "/user/login.jsp",
	"/user/signup-form.jsp", "/user/signup.jsp",
	"/images/", "/upload/"
);
edit.jsp 파일에 코드 수정
<label>프로필 이미지</label>
<div>
	<a href="javascript:" href="javascript:" id="profileLink">
		<%if(dto.getProfileImage() == null) {%>
			<i style="font-size:100px;" class="bi bi-person-circle"></i>
		<%} else {%>
			<img src="${pageContext.request.contextPath }/upload/<%=dto.getProfileImage() %>"
								style="width:100px;height:100px;border-radius:50%;"/>
		<%} %>
	</a>
</div>
상단에 로그인 or 로그아웃
navbar.jsp 파일 코드 수정
<%
	// 로그인된 userName 이 있는 읽어와 본다
	String userName = (String)session.getAttribute("userName");
%>
<!-- 오른쪽 사용자 메뉴 -->
<ul class="navbar-nav">
<%if (userName == null) {%>
<li class="nav-item">
<a class="btn btn-outline-light btn-sm me-2"
href="${pageContext.request.contextPath }/user/loginform.jsp">로그인</a>
</li>
<li class="nav-item">
<a class="btn btn-warning btn-sm"
href="${pageContext.request.contextPath }/user/signup-form.jsp">회원가입</a>
</li>
<%}else {%>
<li class="nav-item d-flex align-items-center me-2">
<a class="nav-link text-white p-0"
href="${pageContext.request.contextPath}/user/info.jsp">
<strong><%= userName %></strong>
</a>
</li>
<li class="nav-item d-flex align-items-center me-3 text-white">
<span>Signed in</span>
</li>
<li class="nav-item">
<a class="btn btn-danger btn-sm"
href="${pageContext.request.contextPath }/user/logout.jsp">로그아웃</a>
</li>
<%}%>
</ul>index 수정
<%@ page language="java" contentType="text/html; charset=UTF-8"
    pageEncoding="UTF-8"%>
<!DOCTYPE html>
<html>
<head>
<meta charset="UTF-8">
<title>/index.jsp</title>
<jsp:include page="/WEB-INF/include/resource.jsp"></jsp:include>
</head>
<body>
	<jsp:include page="/WEB-INF/include/navbar.jsp">
		<jsp:param value="index" name="thisPage"/>
	</jsp:include>
	<div class="container">
		<h1>인덱스 페이지 입니다</h1>
		<div id="carouselExampleIndicators" class="carousel slide">
		  <div class="carousel-indicators">
		    <button type="button" data-bs-target="#carouselExampleIndicators" data-bs-slide-to="0" class="active" aria-current="true" aria-label="Slide 1"></button>
		    <button type="button" data-bs-target="#carouselExampleIndicators" data-bs-slide-to="1" aria-label="Slide 2"></button>
		    <button type="button" data-bs-target="#carouselExampleIndicators" data-bs-slide-to="2" aria-label="Slide 3"></button>
		  </div>
		  <div class="carousel-inner">
		    <div class="carousel-item active">
		      <img src="images/japan01.png" class="d-block w-100" alt="...">
		    </div>
		    <div class="carousel-item">
		      <img src="images/japan02.png" class="d-block w-100" alt="...">
		    </div>
		    <div class="carousel-item">
		      <img src="images/japan03.png" class="d-block w-100" alt="...">
		    </div>
		  </div>
		  <button class="carousel-control-prev" type="button" data-bs-target="#carouselExampleIndicators" data-bs-slide="prev">
		    <span class="carousel-control-prev-icon" aria-hidden="true"></span>
		    <span class="visually-hidden">Previous</span>
		  </button>
		  <button class="carousel-control-next" type="button" data-bs-target="#carouselExampleIndicators" data-bs-slide="next">
		    <span class="carousel-control-next-icon" aria-hidden="true"></span>
		    <span class="visually-hidden">Next</span>
		  </button>
		</div>
	</div>
	<jsp:include page="/WEB-INF/include/footer.jsp"></jsp:include>
</body>
</html>
게시판
- 게시글 목록 링크 생성
<li><a href="${pageContext.request.contextPath}/borard/list.jsp"></a></li>- SecurityFilter 코드 추가
Set<String> whiteList = Set.of(
	"/index.jsp",
	"/user/loginform.jsp", "/user/login.jsp",
	"/user/signup-form.jsp", "/user/signup.jsp",
	"/images/", "/upload/", "/board/list.jsp"
	);
테이블 & 시퀀스 생성
CREATE TABLE board(
	num NUMBER PRIMARY KEY,
	writer VARCHAR2(20) NOT NULL,
	title VARCHAR2(50) NOT NULL,
	content CLOB,
	viewCount NUMBER DEFAULT 0,
	createdAt DATE DEFAULT SYSDATE
);

CREATE SEQUENCE board_seq;
BoardDto 생성
public class BoardDto {
	private int num;
	private String writer;
	private String title;
	private String content;
	private int viewContent;
	private String createdAt;

	// setter, getter
	public int getNum() {
		return num;
	}
	public void setNum(int num) {
		this.num = num;
	}
	public String getWriter() {
		return writer;
	}
	public void setWriter(String writer) {
		this.writer = writer;
	}
	public String getTitle() {
		return title;
	}
	public void setTitle(String title) {
		this.title = title;
	}
	public String getContent() {
		return content;
	}
	public void setContent(String content) {
		this.content = content;
	}
	public int getViewContent() {
		return viewContent;
	}
	public void setViewContent(int viewContent) {
		this.viewContent = viewContent;
	}
	public String getCreatedAt() {
		return createdAt;
	}
	public void setCreatedAt(String createdAt) {
		this.createdAt = createdAt;
	}
}
학원 공부 내용 정리