62일차 내용 정리
Thymeleaf
@Builder
- 해당 클래스에
클래스명Builder정적 내부 클래스를 자동 생성해 빌더 패턴 사용 가능
@Builder
class MemberDto {
    public static class MemberDtoBuilder {
        // 롬복이 자동으로 필드, setter 비슷한 메서드, build() 메서드를 생성함
    }
}@GetMapping("/member/detail")
public String memberDetail(Model model){
// Builder 객체 얻기
MemberDto.MemberDtoBuilder builder = MemberDto.builder();
// 값 설정 (메서드 체인 없이)
builder.num(1);
builder.name("xxx");
builder.addr("yyy");
// 체이닝 방식으로도 가능
builder.num(2).name("xxx").addr("yyy");
// 최종 객체 생성
MemberDto dto = builder.build();
model.addAttribute("dto", dto);
return "member/detail";
}th:href="@{ }
- 링크 속성을 동적으로 생성, context 경로 자동 포함
th:if
조건식이 true 면 렌더링(출력)
th:unless
조건식이 false 면 렌더링(출력)
unescape
- home.html 에 링크 추가
<li><a th:href="@{/unescape}">unescape 테스트</a></li>- TestController 에
unescape메소드 생성
@GetMapping("/unescape")
public String unescape(Model model) {
	// html 형식의 문자열을 template 페이지에 전달할 일도 있다
	String content = """
		<ul>
				<li>하나</li>
				<li>둘</li>
				<li>셋</li>
		</ul>
	""";
	model.addAttribute("content", content);
	return "unescape";
}- unescape.html 생성
<div class="container">
	<h3>목록</h3>
	<div>[[${content}]]</div>

	<h3>목록2</h3>
	<div th:text="${content}"></div>

	<h3>목록3</h3>
	<div>[(${content})]</div>
</div>- unescape 된 문자열 출력
목록
<ul> <li>하나</li> <li>둘</li> <li>셋</li> </ul>

목록2
<ul> <li>하나</li> <li>둘</li> <li>셋</li> </ul>

목록3

• 하나
• 둘
• 셋
th:utext
- unescape.html 코드 추가
<h3>목록4</h3>
<div th:utext="${content}"></div>
목록4
• 하나
• 둘
• 셋javascript 출력
- home.html 링크 추가
<li><a th:href="@{/javascript}">javascript 출력</a></li>- TestController
javascript메소드 생성
@GetMapping("/javascript")
public String javascript(Model model) {
	//로그인여부
	model.addAttribute("isLogin", false);
	//나이
	model.addAttribute("age", 15);
	//이름
	model.addAttribute("name", "유재석");

	//회원 한명의 정보
	MemberDto dto = MemberDto.builder()
					.num(1)
					.name("유재석")
					.addr("압구정")
					.build();
	// 해당 데이터를 Model 객체에 담고
	model.addAttribute("dto", dto);

	//DB 에서 select 한 결과라고 가정하자
	MemberDto dto1 = MemberDto.builder().num(1).name("유재석").addr("압구정").build();
	MemberDto dto2 = MemberDto.builder().num(2).name("박명수").addr("이태원").build();
	MemberDto dto3 = MemberDto.builder().num(3).name("정준하").addr("서래마을").build();

	// read only List
	List<MemberDto> list=List.of(dto1, dto2, dto3);

	//Model 객체에 "list" 라는 키값으로 담기
	model.addAttribute("list", list);

	return "javascript";
}
th:inline = " "
HTML 안에서 JavaScript, CSS 등 특정 영역의 코드를 처리할 방식을 지정해주는 속성
- javascript.html 생성
- javascript 에서 Thymeleaf 변수에 들어 있는 값을 편하게 사용할 수 있도록 도와준다
- template 페이지에 전달된 Model 데이터를 이용해서 클라이언트 웹브라우저에서 해석할 javascript 를 출력할 떄 사용하면 편리하다
- default 값도 설정 가능
String type은" "로 감싸주고
Dto나Map은{ } object로 만들어주고
List는[ ] array로 만들어준다
<div class="container">
	<h1>javascript 영역에 thymeleaf 로 렌더링</h1>
</div>
<script>
	let isLogin = [[${isLogin}]];
	let age = [[${age}]];
	let name = "[[${name}]]";
	let mem = {num:[[${dto.num}]]};
</script>

<script th:inline="javascript">
	let isLogin2 = /*[[${isLogin}]]*/ false;
	let age2 = /*[[${age}]]*/ 0;
	let name2 = /*[[${name}]]*/ "";
	let mem2 = /*[[${dto}]]*/ {};
	let list = /*[[${list}]]*/ [];
</script>
> isLogin2
< false
> age2
< 15
> name2
< '유재석'
> mem2
< {num: 1, name: '유재석', addr: '압구정'}
> list
< (3) [{…}, {…}, {…}]Spring04 프로젝트 thymeleaf 형식으로 변경
Spring 프로젝트에 Thymeleaf 추가
- Step04 프로젝트 마우스 우클릭 ➜ Spring ➜ Add Staters
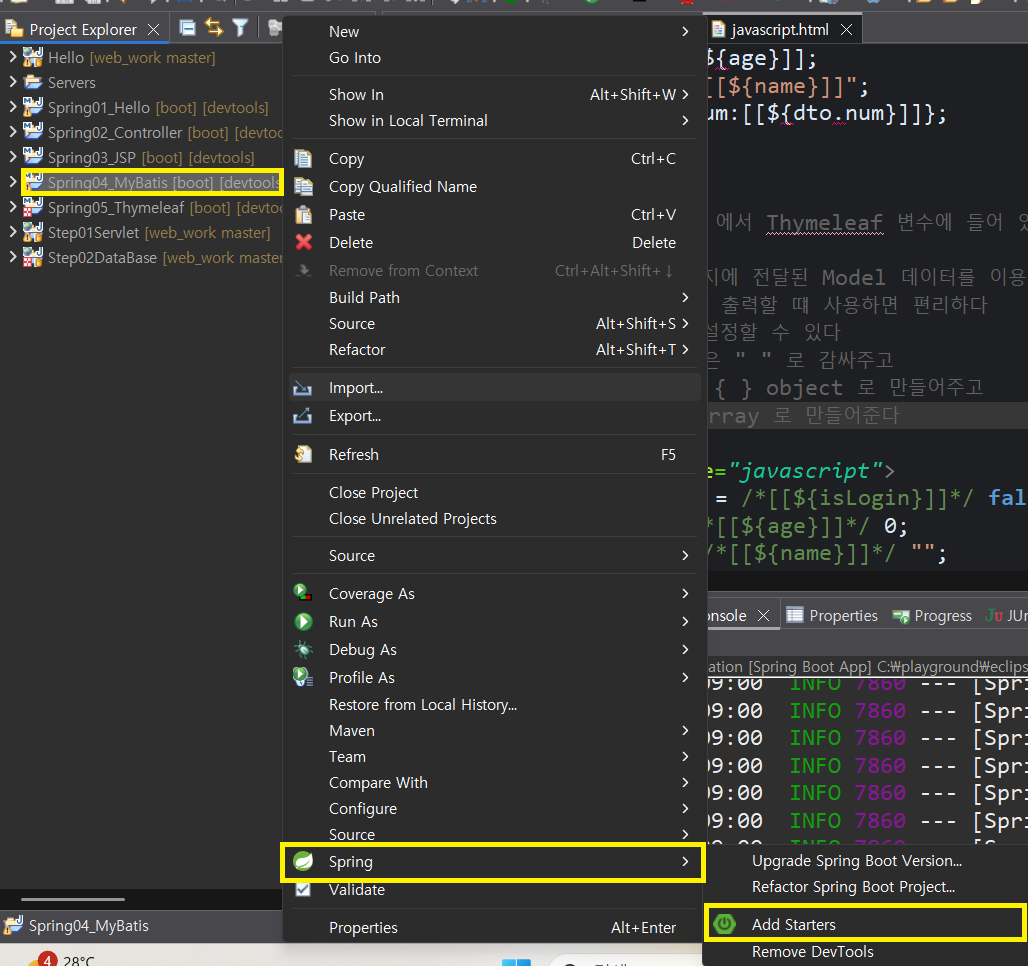
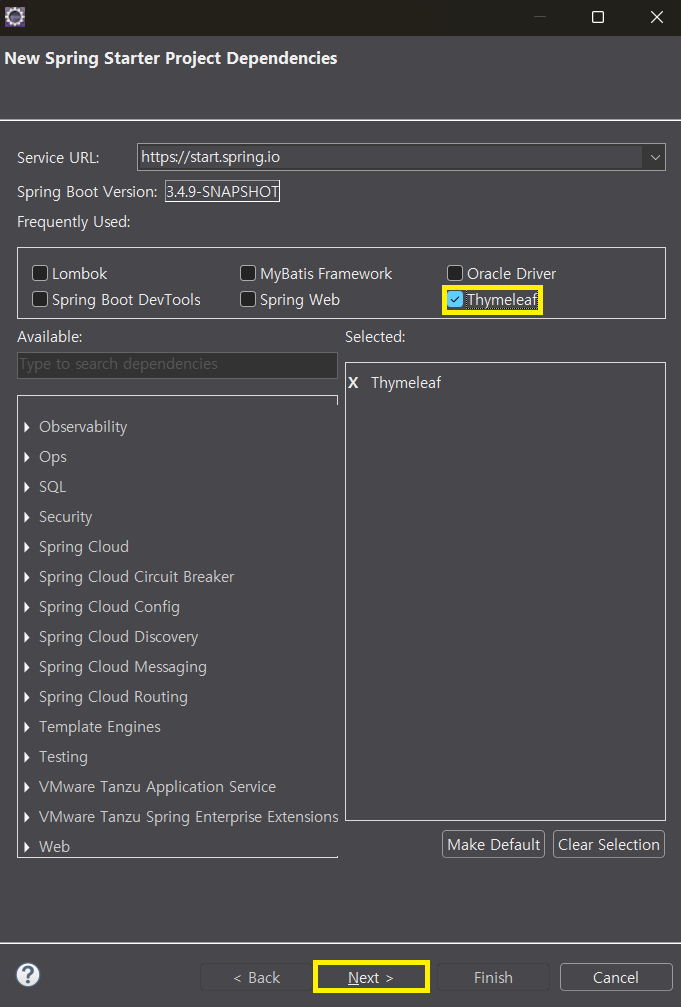
- Thymeleaf ➜ Next
- pom.xml ➜ Finish
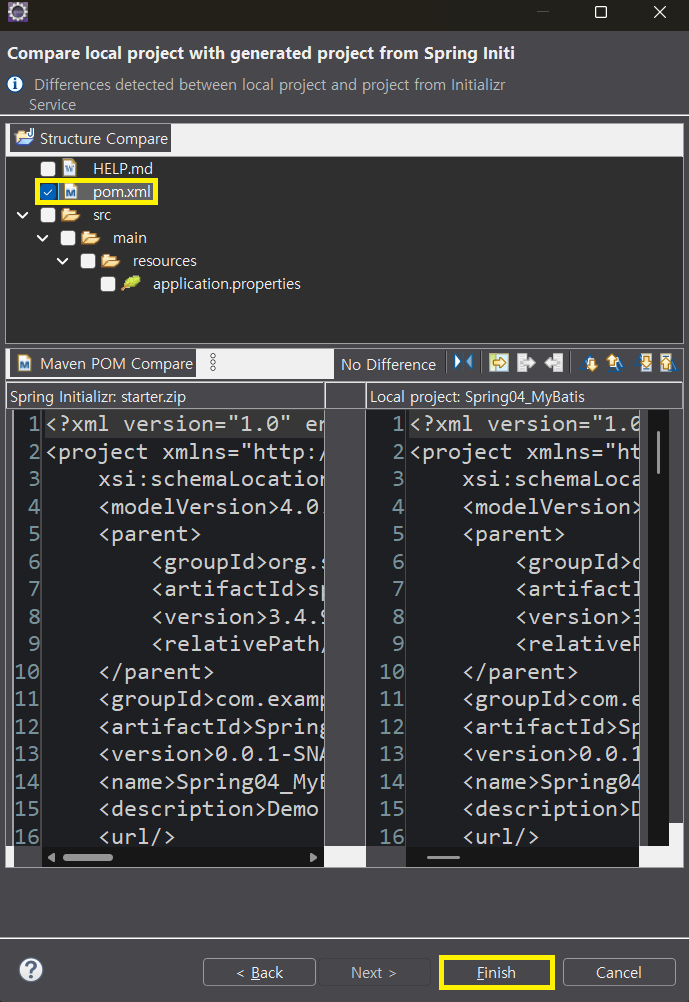
- pom.xml 에 해당 dependency 추가된 걸 확인
<dependency>
	<groupId>org.springframework.boot</groupId>
	<artifactId>spring-boot-starter-thymeleaf</artifactId>
</dependency>- application.properties 에서 해당 코드 주석 처리
# view page 위치에 붙을 접두어 설정
# spring.mvc.view.prefix=/WEB-INF/views/
# view page 위치에 붙을 접미어 설정
# spring.mvc.view.suffix=.jsp- home.html 생성
<div class="container">
	<h1>타임리프 인덱스 페이지</h1>
	<h3>회원</h3>
	<ul>
		<li><a th:href="@{/member/list}">회원 목록</a></li>
	</ul>
</div>- list.html 생성
<div class="container">
	<a th:href="@{/member/new-form}">회원 추가</a>
	<h1>회원 목록 입니다</h1>
	<table>
		<thead>
			<tr>
				<th>번호</th>
				<th>이름</th>
				<th>주소</th>
				<th>수정</th>
				<th>삭제</th>
			</tr>
		</thead>
		<tbody>
			<tr th:each="tmp : ${list}">
				<td>[[${tmp.num }]]</td>
				<td>[[${tmp.name }]]</td>
				<td>[[${tmp.addr }]]</td>
				<td>
					<a th:href="@{/member/edit(num=${tmp.num})}">수정</a>
				</td>
				<td>
					<a th:href="@{/member/delete(num=${tmp.num})}">삭제</a>
				</td>
			</tr>

		</tbody>
	</table>
</div>- new-form.html 생성
<div class="container">
	<h1>회원 추가 양식</h1>
	<form th:action="@{/member/save}" method="post">
		<div>
			<label for="name">이름</label>
			<input type="text" name="name" id="name"/>
		</div>
		<div>
			<label for="addr">주소</label>
			<input type="text" name="addr" id="addr"/>
		</div>
		<button type="submit">저장</button>
	</form>
</div>- edit.html 생성
<div class="container">
	<h1>회원 수정 폼</h1>
	<form th:action="@{/member/update}" method="post">
		<input type="hidden" name="num" th:value="${dto.num}"/>
		<div>
			<label for="name">이름</label>
			<input type="text" name="name" id="name" th:value="${dto.name}"/>
		</div>
		<div>
			<label for="addr">주소</label>
			<input type="text" name="addr" id="addr" th:value="${dto.addr}"/>
		</div>
		<button type="submit">수정 확인</button>
		<button type="reset">취소</button>
	</form>
</div>- update.html 생성
<div class="container">
	<p>
		<strong>[[${param.name}]]</strong>님의 정보 수정 완료
		<a th:href="@{/member/list}">목록 보기</a>
	</p>
</div>- delete.html 생성
<!--/*
	<script>
		alert("[[${param.num}]] 번 회원의 정보를 삭제 했습니다");
		location.href="[[@{/member/list}]]";
	</script>

	위와 동일한 동작을 아래 처럼 할수도 있다 (th:inline="javascript" 이용)
	*/-->

<script th:inline="javascript">
	alert( [[${param.num}]] + " 번 회원의 정보를 삭제 했습니다");
	location.href=[[@{/member/list}]] ;
</script>- error 폴더 생성 후 data-access.html 생성
<div class="container">
	<h1>[[${title}]]</h1>
	<p>[[${message}]]</p>
	<p>상태 코드 : <strong>[[${status}]]</strong></p>
	<a th:href="@{/}">인덱스로</a>
</div>- member-exception.html 생성
<div class="container">
	<h1 th:text="${title}"></h1>
	<p th:text="${message}"></p>
	<p>원인 : <strong th:text="${reason}"></strong></p>	</div>
파일 업로드
Spring06_FileUpload 프로젝트 생성
spring06.controller & spring06.dto 패키지 생성
- HomeController 클래스 생성
@Controller
public class HomeController {

	@GetMapping("/")
	public String home() {

		// templates/home.html 타임리프 페이지로 응답하겠다는 의미
		return "home";
	}
}- application.properties 코드 추가
server.port=9000
server.servlet.context-path=/spring06- home.html 생성
<div class="container">
	<h1>인덱스 페이지</h1>
	<ul>
		<li><a th:href="@{/file/new}">파일 업로드 테스트</a></li>
	</ul>
</div>- FileController 클래스 생성
@Controller
public class FileController {

	@GetMapping("/file/new")
	public String fileNew() {

		return "file/new";
	}
}- file 폴더 생성 후 new.html 생성
<div class="container">
	<h1>파일 업로드 테스트</h1>
	<form th:action="@{/file/upload}" method="post" enctype="multipart/form-data">
		<input type="text" name="title" placeholder="제목 입력"/>
		<br />
		<input type="file" name="myFile"/>
		<br />
		<button type="submit">업로드</button>
	</form>
</div>- application.properties 파일 업로드 관련 코드 추가
# 업로드 파일의 최대 크기
spring.servlet.multipart.max-file-size=50MB
# 업로드 요청의 최대 크기 (파일의 크기 + 폼 전송되는 문자열)
spring.servlet.multipart.max-request-size=60MB- resource 폴더 안에 custom.properties 파일 생성
# resources/custom.properties

# file save location
file.location=C:/playground/upload- Spring06FileUploadApplication 에 어노테이션 추가
- 우리가 직접 만든 custom.properties 파일을 spring 이 읽어들이도록 설정
@PropertySource(value="커스텀 properties 파일의 위치")- classpath: 는 resources 폴더를 가리킨다
@PropertySource(value="classpath:custom.properties")- FileController 에 파일 저장 위치 생성
- custom.properties 파일이 로딩되기 위해서는 main 메소드가 있는 클래스에
@PropertySource어노테이션 설정이 되어 있어야 한다 - custom.properties 파일에 있는 파일 업로드 경로를 읽어와서 필드에 담는다
@Value("${file.location}")   // spring framework 의 value 로 해야한다
private String fileLocation; // 파일을 저장할 위치- FileController 에
fileUpload메소드 생성
<input type="file" name="myFile">와 연관시켜 코드 작성
@PostMapping("/file/upload")
public String fileUpload(String title, MultipartFile myFile, Model model) {
	// 원본 파일명
	String orgFileName = myFile.getOriginalFilename();
	// 파일의 크기
	long fileSize = myFile.getSize();
	// 저장할 파일의 이름을 Universal Unique 한 문자열로 얻어내기
	String saveFileName = UUID.randomUUID().toString() + orgFileName;
	// 저장할 파일의 전체 경로 구성하기
	String filePath = fileLocation + File.separator + saveFileName;
	try {
		// 업로드된 파일을 저장할 파일 객체 생성
		File saveFile = new File(filePath);
		// 원하는 곳으로 파일을 이동 시킨다 (원하는 곳에 파일을 저장한다)
		myFile.transferTo(saveFile);
	} catch (Exception e) {
		e.printStackTrace();
	}

    // 원래는 DB 에 저장해야 하지만 테스트를 위해 view page 에 전달해서 출력
	model.addAttribute("title", title);
	model.addAttribute("orgFileName", orgFileName);
	model.addAttribute("fileSize", fileSize);
	model.addAttribute("saveFileName", saveFileName);

	return "file/upload";
}- upload.html 생성
<div class="container">
	<p>
		<strong>[[${orgFileName}]]</strong> 파일 업로드 완료
	</p>
	<p>
		저장된 파일명 : <strong th:text="${saveFileName}"></strong>
	</p>
	<p>
		파일의 크기 : <strong th:text="${fileSize}"></strong>
	</p>
	<p>
		제목 : <strong th:text="${title}"></strong>
	</p>

	<a th:href="@{/file/download(orgFileName=${orgFileName}, saveFileName=${saveFileName})}">다운로드</a>
</div>
profile1.jpg 파일 업로드 완료
저장된 파일명 : 5b3ede1e-6881-497f-9e90-85233620a02dprofile1.jpg
파일의 크기 : 32796
제목 : 프로필 사진
다운로드ResponseEntity<InputStreamResource>
파일 다운로드를 해주는 컨트롤러 메소드의 리턴 type
- FileController 에
download메소드 생성
- 파일을 다운로드 해주기 위해서는 원본 파일명, 저장된 파일명, 파일의 실제 크기가 중요하다
- 원래는 다운로드 해줄 파일의 PK 를 이용해서 DB 에서 읽어와야 하지만
이 예제에서는 GET 방식 파라미터로 넘어오는 값을 활용한다
@GetMapping("/file/download")
public ResponseEntity<InputStreamResource> download(String orgFileName, String saveFileName, long fileSize) {
	try {
		// 다운로드 시켜줄 원본 파일명
		String encodedName = URLEncoder.encode(orgFileName, "utf-8");
		// 파일명에 공백이 있는경우 파일명이 이상해지는걸 방지
		encodedName = encodedName.replaceAll("\\+"," ");
		// 응답 헤더정보(스프링 프레임워크에서 제공해주는 클래스) 구성하기 (웹브라우저에 알릴정보)
		HttpHeaders headers=new HttpHeaders();
		// 파일을 다운로드 시켜 주겠다는 정보
		headers.add(HttpHeaders.CONTENT_TYPE, "application/octet-stream");
		// 파일의 이름 정보(웹브라우저가 해당정보를 이용해서 파일을 만들어 준다)
		headers.add(HttpHeaders.CONTENT_DISPOSITION, "attachment;filename="+encodedName);
		// 파일의 크기 정보도 담아준다.
		headers.setContentLength(fileSize);
		// 읽어들일 파일의 경로 구성
		String filePath = fileLocation + File.separator + saveFileName;

		// 파일에서 읽어들일 스트림 객체
		InputStream is = new FileInputStream(filePath);
		// InputStreamResource 객체의 참조값 얻어내기
		InputStreamResource isr = new InputStreamResource(is);
		// ResponseEntity 객체를 구성해서
		ResponseEntity<InputStreamResource> resEntity=ResponseEntity.ok()
				.headers(headers)
				.body(isr);
		// 리턴해주면 파일이 다운로드 된다
		return resEntity;
	} catch(Exception e) {
		// 예외 정보를 콘솔에 출력
		e.printStackTrace();
		// 예외 발생시키기
		throw new RuntimeException("파일을 다운로드 하는 중 에러 발생!");
	}
}- FileDto 클래스 생성
@Data
public class FileDto {
	private String title;
	// <input type="file" name="myFile"> 에서 name 속성의 값과 필드명을 일치시켜야 한다
	private MultipartFile myFile;
	// 이외의 다른 필드도 있다고 가정
}- FileController 에
fileUpload2메소드 생성
@PostMapping("/file/upload2")
public String fileUpload2(Model model, FileDto dto) {

	// 매개변수에 전달된 FileDto 객체에 폼 전송된 내용이 모두 들어있다
	String title = dto.getTitle();
	MultipartFile myFile = dto.getMyFile();

	// 원본 파일명
	String orgFileName = myFile.getOriginalFilename();
	// 파일의 크기
	long fileSize = myFile.getSize();
	// 저장할 파일의 이름을 Universal Unique 한 문자열로 얻어내기
	String saveFileName = UUID.randomUUID().toString() + orgFileName;
	// 저장할 파일의 전체 경로 구성하기
	String filePath = fileLocation + File.separator + saveFileName;
	try {
		// 업로드된 파일을 저장할 파일 객체 생성
		File saveFile = new File(filePath);
		// 원하는 곳으로 파일을 이동 시킨다 (원하는 곳에 파일을 저장한다)
		myFile.transferTo(saveFile);
	} catch (Exception e) {
		e.printStackTrace();
	}

	// 원래는 DB 에 저장해야 하지만 테스트를 위해 view page 에 전달해서 출력
	model.addAttribute("title", title);
	model.addAttribute("orgFileName", orgFileName);
	model.addAttribute("fileSize", fileSize);
	model.addAttribute("saveFileName", saveFileName);

	return "file/upload";
}
이미지 업로드
- home.html 에 링크 추가
<li><a th:href="@{/gallery/new}">이미지 업로드 테스트</a></li>- GalleryController 클래스 생성
@Controller
public class GalleryController {
	@GetMapping("/gallery/new")
    	public String galleryNew() {

		return "gallery/new";
	}
}- gallery 폴더 생성 후 new.html 생성
accept="image/*": 이미지만 설정
<div class="container">
	<h3>이미지 업로드 테스트</h3>
	<form th:action="@{/gallery/upload}" method="post" enctype="multipart/form-data">
		<div>
			<label for="caption">설명</label>
			<input type="text" name="caption" id="caption"/>
		</div>
		<div>
			<label for="image">이미지</label>
			<input type="file" name="image" id="image" accept="image/*"/>
		</div>
		<button type="submit">업로드</button>
	</form>
</div>- GalleryDto 클래스 생성
@Data
public class GalleryDto {
	private String caption;
	private MultipartFile image;
}- GalleryController 에
upload메소드 생성
@PostMapping("/gallery/upload")
public String upload(GalleryDto dto, Model model) {

	return "gallery/upload";
}- GalleryController 파일을 저장할 위치 생성
@Value("${file.location}")
private String fileLocation;- GalleryController `` 메소드에 코드 추가
@PostMapping("/gallery/upload")
public String upload(GalleryDto dto, Model model) {
	// @Data 가 오버라이드한 toString() 메소드를 확인하기 위해
	System.out.println(dto); //원래는 dto 객체의 hash 값이 출력되야 하지만 필드를 확인할수 있는 문자열이 출력된다.

	// MultipartFile 객체
	MultipartFile image=dto.getImage();
	// 만일 파일이 업로드 되지 않았다면
	if(image.isEmpty()) {
			throw new RuntimeException("이미지가 업로드 되지 않았습니다.");
	}
	// 원본 파일명
	String orgFileName = image.getOriginalFilename();
	// 이미지의 확장자를 유지하기 위해 뒤에 원본 파일명을 추가한다
	String saveFileName = UUID.randomUUID().toString()+orgFileName;
	// 저장할 파일의 전체 경로 구성하기
	String filePath=fileLocation + File.separator + saveFileName;
	try {
		// 업로드된 파일을 저장할 파일 객체 생성
		File saveFile=new File(filePath);
		image.transferTo(saveFile);
	}catch(Exception e) {
		e.printStackTrace();
	}
	// 원래는 DB 에 저장해야 하지만 테스트를 위해 Model 에 담아서 응답한다.
	model.addAttribute("caption", dto.getCaption());
	model.addAttribute("saveFileName", saveFileName);

	return "gallery/upload";
}- upload.html 생성
<div class="container">
	<h1>이미지 업로드 결과</h1>
	<p>
		설명 : <strong th:text="${caption}"></strong>
	</p>
	<p>
		저장된 파일명 : <strong th:text="${saveFileName}"></strong>
	</p>
	<img src="/spring06/upload/xxx.png"/>
	<br />
	<img th:src="@{'/upload/' + ${saveFileName}}"/>
	<br />
	<img th:src="@{/upload/{fileName}(fileName=${saveFileName})}"/>
</div>
↱동적으로 구성할 수 있는 fileName 이라는 경로 변수를 선언하고
<img th:src="@{/upload/{fileName}(fileName=${saveFileName})}"/>
↳fileName 경로 변수에 값 전달- ImageController 클래스 생성
@Controller
public class ImageController {

	@Value("${file.location}")
	private String fileLocation;

    @GetMapping("/upload/{saveFileName}")
	public String image(){
    }

}- ImageController 에
image메소드 생성
"/upload/xxx.jpg""/upload/yyy.png""/upload/zzz.gif"
패턴의 요청이 오면 실제 해당 이미지를 읽어와서 실제 이미지 데이터를 응답하는 컨트롤러 메소드
@PathVariable 어노테이션
{saveFileName}경로 변수에 담긴 내용을 추출해서 String name 매개변수에 담는 기능을 수행
@GetMapping("/upload/{saveFileName}")
public ResponseEntity<InputStreamResource> image(@PathVariable("saveFileName") String name) throws IOException{
	// 이미지의 이름을 이용해서 응답할 이미지가 어디에 있는지 전체 경로를 구성한다.
	String filePath = fileLocation + File.separator + name;
	// File 객체 생성
	File file = new File(filePath);
	// 파일이 존재하지 않으면 예외 발생
	if(!file.exists()) {
		throw new RuntimeException("file not found!");
	}
	// mime type 알아내기
	String mimeType = Files.probeContentType(file.toPath());
	// InputStremResource 객체 얻어내기
	InputStreamResource isr = new InputStreamResource(new FileInputStream(file));

	// 이미지 데이터를 응답하는 ResponseEntity 객체를 구성해서 리턴해 준다.
	return ResponseEntity.ok()
			.contentType(MediaType.parseMediaType(mimeType))
			.contentLength(file.length())
			.body(isr);
}
Security
Spring07_Security 프로젝트 생성
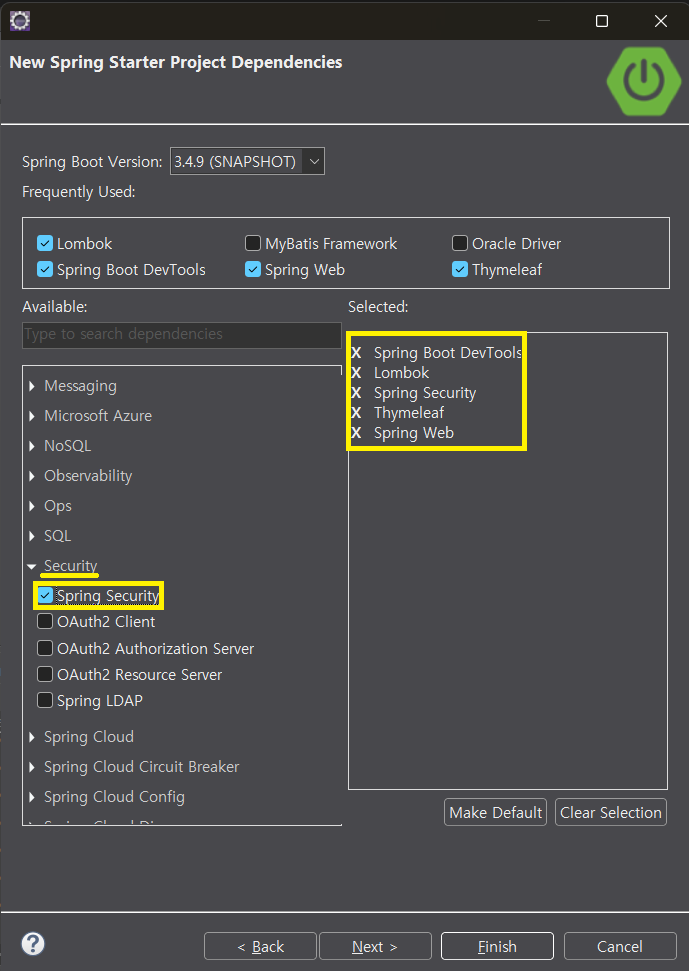
spring07.controller 패키지 생성
- application.properties 에 포트 번호 추가
server.port=9000- HomeController 생성
@Controller
public class HomeController {

	@GetMapping("/")
	public String home() {

		return "home";
	}
}- home.html 생성
<div class="container">
	<h1>인덱스 페이지</h1>
</div>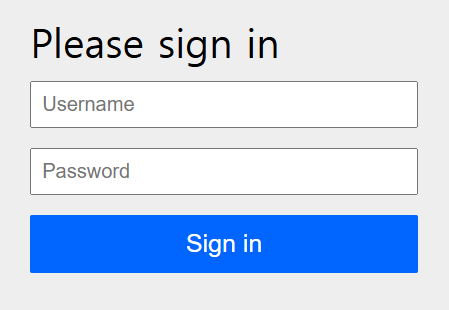
-
해당 userName에는 아무 거나 작성하고 password 입력

-
pom.xml 에 dependency 코드 추가 확인
<dependency>
	<groupId>org.springframework.boot</groupId>
	<artifactId>spring-boot-starter-security</artifactId>
</dependency>

<dependency>
	<groupId>org.thymeleaf.extras</groupId>
	<artifactId>thymeleaf-extras-springsecurity6</artifactId>
</dependency> 
학원 공부 내용 정리