71일차 내용 정리
어제 내용 복습
H2 DATABASE
개발과정에서 실제 DB가 존재하지 않아도 DB 사용을 가능하게 한다
tx.begin() : 트랜잭션 시작
persist() : 영구 저장
@Entity( )
만들어지는 테이블의 이름을 결정
생략 시 생성한 클래스명과 같이 생성
@Id : Primary Key 의 개념
@GeneratedValue(strategy = GenerationType.AUTO) : Sequence 의 개념
➜ 자동으로 번호를 넣을 수 있도록 한다
H2 DB 조회 방법
EntityManager를 이용한 조회
MEMBER_INFO테이블의 별칭을m이라고 지정하고
m의 모든 컬럼 정보를 조회하여 Member.class 타입 객체에 매핑하는 방식- 결과가 여러 행일 경우
.getResultList()메서드를 사용 Member.class를 전달했기 때문에 반환 타입은List<Member>가 된다
EntityManager em2 = emf.createEntityManager();
List<Member> members = em2.createQuery("SELECT m FROM MEMBER_INFO m", Member.class)
                          .getResultList();
for (Member mem : members) {
    System.out.println(mem.getNum() + " : " + mem.getName() + " : " + mem.getAddr());
}
em2.close();
Spring Data JPA Repository이용한 조회
- MemberRepository 객체의
findAll()메서드를 이용하여 전체 데이터를 조회
List<Member> list = memberRepo.findAll();
for(Member tmp : list) {
	System.out.println(tmp.getNum() + "|" + tmp.getName() + "|" + tmp.getAddr());
}
JpaRepository
extends JpaRepository<Entity 클래스명, 해당 Entity 에서 PK 의 data type>
- 인터페이스를 상속받은 인터페이스를 정의하는 것 만으로 구현 클래스가 만들어지고 해당 클래스로 생성된 객체가 bean 으로 관리가 된다
Dao 가 자동으로 만들어 진다고 생각하면 된다
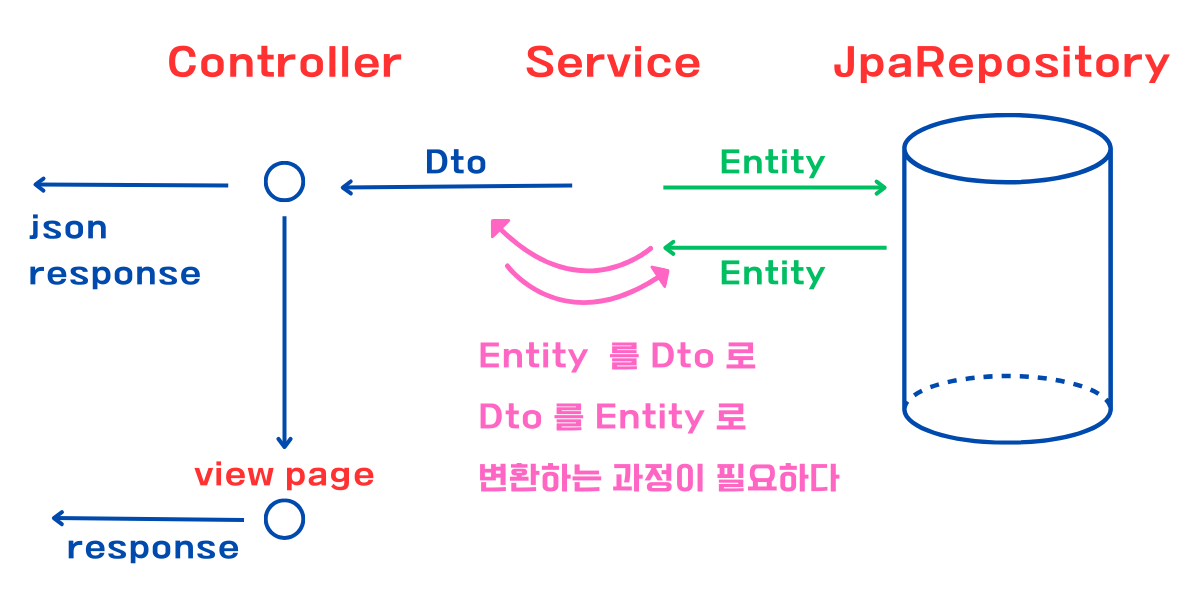
int ➜ Integer 로 바꾼 이유
처음에는 MemberDto의 num 필드를 int로 선언했지만,
Entity로 변환하는 toEntity()를 만들 때 null 값을 처리하지 못하는 문제가 발생

예를 들어, num  아무 값도 없으면 자동으로 0 이 들어가게 되고,
이게 실제로 0  건지 값이 없는 건지 구분이 안된다

그래서 int 대신 Integer로 변경

이렇게 하면 null도 처리 가능-
Member 객체에
toEntity메소드 삭제 -
MemberDto 에
num필드 type을Integer로 수정- toEntity 와 같이 사용하기 위해 int 대신에 Integer 를 사용한다
(long 대신에 Long 을 사용)
- toEntity 와 같이 사용하기 위해 int 대신에 Integer 를 사용한다
private Integer num;- MemberDto 에
toEntity메소드 생성 - 객체의 필드에 저장된 값을 이용해서 Entity 객체를 만들어서 반환하는
non static메소드- static 메소드가 아니라 필드에 있는 값 사용 가능
- 멤버 메소드 안에서 this. 은 생략 가능
public Member toEntity() {
	return Member.builder()
			.num(this.num) // null 일 가능성 존재
			.name(this.name)
			.addr(addr)
			.build();
}
⭐ class MemberDto
private int num ⟵ 0
private Integer num ⟵ null- MemberServiceImpl 에
addMember메소드 수정
@Transactional
@Override
public void addMember(MemberDto dto){
	memberRepo.save(dto.toEntity());
}
JPA 실습: Client
-
Client 객체 생성
-
@Entity어노테이션에 테이블명을 지정하지 않으면 클래스명과 동일하게 테이블이 생성된다
@NoArgsConstructor
@AllArgsConstructor
@Getter
@Setter
@Builder
@Entity // 테이블명을 지정하지 않으면 클래스명과 동일하게 테이블이 만들어진다
public class Client {
	// 고객 번호
	@Id
	@GeneratedValue(strategy = GenerationType.AUTO)
	private Long num;

	// 고객의 이름
	@Column(nullable = false, length = 20) // null 허용하지 않음, 최대 길기 20 글자
	private String userName;

	// 등록일
	@CreationTimestamp // 최초 저장되는 시점의 시간이 자동으로 들어 가도록
	private LocalDateTime createdAt;

	// 수정일
	@UpdateTimestamp // 최초 저장, 수정되는 시점의 시간이 자동으로 들어 가도록
	private LocalDateTime updatedAt;

	// 생일
	@Column(nullable = true) // 처음에는 비워두었다가 나중에 입력 가능하도록
	private LocalDate birthday; // 생일은 시간을 입력하지 않으므로 LocalDate type 으로
}- ClientRepository 인터페이스 생성
public interface ClientRepository extends JpaRepository<Client, Long>{

}- ClientDto 클래스 생성
@Builder
@AllArgsConstructor
@NoArgsConstructor
@Data
public class ClientDto {
	private Long num;
	private String userName;
	private LocalDateTime createdAt;
	private LocalDateTime updatedAt;
	private LocalDate birthday;

	// static toDto() 메소드
	public static ClientDto toDto(Client client) {
	    return ClientDto.builder()
	            .num(client.getNum())
	            .userName(client.getUserName())
	            .createdAt(client.getCreatedAt())
	            .updatedAt(client.getUpdatedAt())
	            .birthday(client.getBirthday())
	            .build();
	}

	// non static toEntity() 메소드
	public Client toEntity() {
        return Client.builder()
                .num(this.num)
                .userName(this.userName)
                .createdAt(this.createdAt) // save 시점에는 @CreationTimestamp가 자동 적용되므로 null이어도 됨
                .updatedAt(this.updatedAt) // update 시점에도 자동 적용
                .birthday(this.birthday)
                .build();
    }
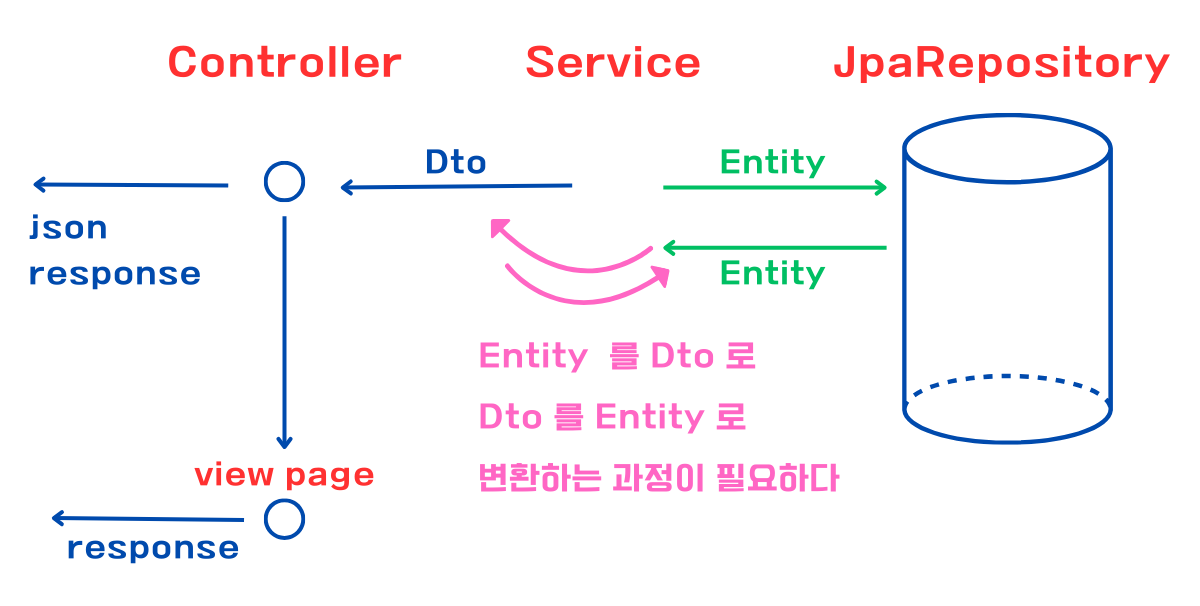
}
- ClientService 인터페이스 생성
public interface ClientService {
	// 회원 정보 추가 (생성 후 PK 반환)
	Long addClient(ClientDto dto);

	// 회원 목록 조회
	List<ClientDto> getClients();

	// 개인정보 수정 페이지용 : 단건 조회
	ClientDto getClient(Long num);

	// 생일 입력/수정 (개인정보 수정)
	void updateBirthday(Long num, LocalDate birthday);
}- ClientServiceImpl 클래스 생성
@RequiredArgsConstructor
@Service
public class ClientServiceImpl implements ClientService{

}- 의존 객체 생성자 주입
private final ClientRepository clientRepo;- Client 정보 저장
@Transactional
@Override
public Long addClient(ClientDto dto) {
	// dto 를 entity 로 변경해서 저장하고 리턴되는 값은 방금 저장한 Client entity 객체가 리턴된다
	Client saved = clientRepo.save(dto.toEntity());
	// entity 에 들어 있는 번호를 리턴
	return saved.getNum();
}- Client 목록 조회
- entity List 를 stream 으로 만들어서 map() 함수를 이용해서
dto 의 stream 으로 만든 다음 dto List 로 변경하기
- entity List 를 stream 으로 만들어서 map() 함수를 이용해서
@Transactional(readOnly = true)
@Override
public List<ClientDto> getClients() {
	List<ClientDto> list = clientRepo.findAll()
			.stream().map(ClientDto :: toDto).toList();
	return list;
}- Client 한 명의 정보 조회
@Transactional(readOnly = true)
@Override
public ClientDto getClient(Long num) {
	// Client entity = clientRepo.findById(num).get();

	Client entity = clientRepo.findById(num)
			.orElseThrow(()-> new IllegalArgumentException("존재하지 않습니다 num = "+num));
	// entity 를 dto 로 변경해서 리턴한다
	return ClientDto.toDto(entity);
}- Client 생일 수정
@Transactional
@Override
public void updateBirthday(Long num, LocalDate birthday) {
	// 번호에 해당하는 entity 를 가져와서
	Client entity = clientRepo.findById(num).get();
	// 생일 날짜를 넣어준다
	entity.setBirthday(birthday); // entity 를 수정하는 것 만으로 자동으로 반영된다
}
⭐ 단 해당 @Transactional 어노테이션이 존재해야 자동 반영- ClientController 클래스 생성
@RequiredArgsConstructor
@Controller
public class ClientController {- 의존 객체 주입
private final ClientService clientService;- client 목록 요청
GET "/client/list" ⟷ GET "/clients"
@GetMapping("/clients")
public String list(Model model) {
	// 응답에 필요한 데이터를 Model 객체에 담는다
	model.addAttribute("clients", clientService.getClients());

	// view page 에서 응답
	return "clients/list";
}- clients 폴더 생성 후 그 안에 list.html 생성
#temporals.format() 함수를 이용해서 날짜 format 을 만든다
yyyy: 년
MM: 일
dd: 일
HH: 24시간 표시
mm: 분
ss: 초
<div class="container py-5">
	<div class="d-flex justify-content-between mb-3">
		<h3>고객 목록</h3>
		<a th:href="@{/clients/new}" class="btn btn-primary">
			<i class="bi bi-person-plus"></i>
			신규 등록
		</a>
	</div>
	<table class="table table-hover">
		<thead>
			<tr>
				<th>번호</th>
				<th>이름</th>
				<th>생일</th>
				<th>등록일</th>
				<th>자세히</th>
			</tr>
		</thead>
		<tbody>
			<tr th:each="tmp : ${clients}">
				<td th:text="${tmp.num}"></td>
				<td th:text="${tmp.userName}"></td>
				<td th:text="${tmp.birthday}"></td>
				<td th:text="${#temporals.format(tmp.createdAt, 'yyyy년 MM월 dd일 hh:mm')}"></td>
				<td>
					<a th:href="@{|/clients/${tmp.num}|}">보기</a>
				</td>
			</tr>
		</tbody>
	</table>
</div>- Spring09JpaApplication 에 Client Sample Data 삽입
Client c1 = Client.builder().userName("유재석").build();
Client c2 = Client.builder().userName("박명수").build();
Client c3 = Client.builder().userName("정준하").build();

em.persist(c1);
em.persist(c2);
em.persist(c3);- home.html 에 Clients 링크 추가
<li><a th:href="@{/clients}">고객 목록</a></li>- clients 추가 form 요청
GET "/client/new-form" ⟷ GET "/clients/new"
@GetMapping("/clients/new")
public String newForm() {
	return "clients/new";
}- new.html 생성
<div class="container">
	<h3>새 Client 등록 양식</h3>
	<form th:action="@{/clients}" method="post">
		<div class="mb-3">
			<label class="form-label">이름 <span class="text-danger">* (필수 입력)</span></label>
			<input type="text" class="form-control" name="userName" />
		</div>
		<div>
			<label class="form-label">생일 (선택)</label>
			<input type="date" class="form-control" name="birthday" />
			<small class="form-text text-muted">나중에 입력 가능</small>
		</div>
		<button class="btn btn-success" type="submit">등록</button>
	</form>
</div>- clients 실제 추가 요청
@Valid어노테이션을 이용해서 dto 의 필드를 자동 검증하기 위한 의존 dependency 를 pom.xml 에 추가
<dependency>
	<groupId>org.springframework.boot</groupId>
	<artifactId>spring-boot-starter-validation</artifactId>
</dependency>- ClientDto 에
@NotBlank&@Size어노테이션 추가@Valid가 dto 의 어떤 필드를 어떤 조건으로 검증할지 dto 클래스에 표시
@NotBlank(message="이름은 필수입니다")
@Size(max=20, message="이름은 최대 20글자 까지 가능합니다")
private String userName;
POST "/client/save ⟷ POST "/clients"
- 검증 결과가
BindingResult객체에 담겨서 전달이 된다 - @Valid 로 검증을 한 dto 매개변수 선언 바로 뒤에 BindingResult 매개변수를 선언해야 한다
⚠️ 바인딩 결과를 view page 에서 활용하려면
Model 객체 혹은 RedirectAttributes (리다일렉트 이동할 경우) 객체에 정보를 담아 주어야 한다
model.addAttribute("key값", dto 객체);
model.addAttribute("org.springframework.validation.BindingResult.key값", BindingResult 객체);ra.model.addFlashAttribute("key 값", dto 객체);
ra.model.addFlashAttribute("org.springframework.validation.BindingResult.key값", BindingResult 객체);➜ 두 개를 반드시 세트로 key 값 을 일치시켜서 담아야 한다
@PostMapping("/clients")
public String create(@Valid ClientDto dto, BindingResult br, RedirectAttributes ra) {
	// 폼 입력 내용 중에 에러가 있는지 (검증 조건을 통과하지 못했는지) 여부를 알아내서
	boolean hasError = br.hasErrors();
	// 만일 에러가 있다면
	if(hasError) {
        ra.addFlashAttribute("clientDto", dto);
        ra.addFlashAttribute("org.springframework.validation.BindingResult.clientDto", br);
		return "redirect:/clients/new";
	}
	// 새 고객 정보를 저장한다
	Long num = clientService.addClient(dto);
	// 고객 정보가 자세히 보기로 리다일렉트
	return "redirect:/clients/"+num;
}-
new.html 에 form 에
th:object요소 추가와 코드 수정 및 에러 표시 추가-
th:object="${clientDto}": model 에 "clientDto" 라는 키값으로 전달된 dto 를 form 요소 안에서clientDto키를 생략하고 사용할 수 있도록 해준다 -
다른 편리한 기능도 사용할 수 있기 때문에 이렇게 사용하는게 일반적
-
*{전달된 dto 객체의 필드명}형식으로 사용 가능 -
th:field="*{전달된 dto 객체의 필드명}"을 form 의 입력 요소에 지정하면 name 속성, id 속성, value 속성의 값을 자동으로 완성해 준다
➜ 단 value 는 값이 null 이 아닌 경우에만)
-
<div class="mb-3">
	<label class="form-label" for="userName">userName <span class="text-danger">*</span></label>
	<input type="text" class="form-control" th:field="*{userName}" placeholder="이름 입력" />
	<small class="text-danger"
			th:if="${#fields.hasErrors('userName')}"
			th:errors="*{userName}">에러</small>
</div>- ClientController 에
newForm메소드에 매개변수Model& 코드 추가- 만일
clientDto라는 키값으로 저장되어 있는 값이model객체에 없다면 빈 ClientDto 객체라도 전달을 해 주어야 한다
➜ 전달해주지 않으면 thymeleaf 페이지에서 에러 발생
- 만일
@GetMapping("/clients/new")
public String newForm(Model model) {
	if(!model.containsAttribute("clientDto")) {
		model.addAttribute("clientDto", new ClientDto());
	}
	return "clients/new";
}-
ClientDto 에
birthday필드에 검증 조건 추가@Past: 과거
@PastOrPresent: 과거 또는 현재
@Future: 미래
@FutureOrPresent: 현재 또는 미래
이중에 하나로 검증 가능
@PastOrPresent(message="생일은 미래일 수 없습니다")
private LocalDate birthday;- new.html 에 에러 표시 추가
<div class="mb-3">
	<label class="form-label">생일 (선택)</label>
	<input type="date" th:field="*{birthday}" class="form-control" />
	<small class="form-text text-muted">나중에 입력 가능</small>
	<small class="text-danger"
		th:if="${#fields.hasErrors('birthday')}"
		th:errors="*{birthday}">에러</small>
</div>
내일 진행할 코드 내용
-
client 상세보기
GET "/client/detail?num=x" ⟷ GET "/clients/x" -
client 수정 form 요청
GET "/client/edit" ⟷ GET "/clients/x/edit" -
client 수정 반영 요청
POST "/client/update" ⟷ POST "/clients/x"