73일차 내용 정리
Setting
Oracle DB 주석 하고 H2 Database 주석 지우기
ddl-auto 를 `create-drop` 으로 변경
JPA 실습 : Emp & Dept
- DeptRepository 인터페이스 생성
public interface DeptRepository extends JpaRepository<Dept, Integer>{

}- Spring09JpaApplication 에
DeptRepository의존 주입
@Autowired
DeptRepository deptRepo;-
Spring09JpaApplication 에 부서 샘플 데이터 주입
-
Emp가 Dept 테이블의
deptno를 참조하기에 Dept 샘플 데이터를 먼저 주입해야 한다
// 부서 정보 저장하기
Dept d10 = new Dept(10, "ACCOUNTING", "NEW YORK");
Dept d20 = Dept.builder().deptno(20).dname("RESEARCH").loc("DALLAS").build();
Dept d30 = Dept.builder().deptno(30).dname("SALES").loc("CHICAGO").build();
Dept d40 = new Dept(40, "OPERATIONS", "BOSTON");

deptRepo.save(d10);
deptRepo.save(d20);
deptRepo.save(d30);
deptRepo.save(d40);List<Dept>를 전달해서 한 번에 저장할 수도 있다
deptRepo.saveAll(List.of(d10, d20, d30, d40));- Spring09JpaApplication 에 날짜 포맷 & 사원 샘플 데이터 주입
DateTimeFormatter fmt = DateTimeFormatter.ofPattern("dd-MM-yyyy");

// 2) 사원 저장 (Builder 사용)
empRepo.saveAll(List.of(
    Emp.builder().empno(7369).ename("SMITH").job("CLERK").mgr(7902)
        .hiredate(LocalDate.parse("17-12-1980", fmt)).sal(800.0).comm(null).dept(d20).build(),
    Emp.builder().empno(7499).ename("ALLEN").job("SALESMAN").mgr(7698)
        .hiredate(LocalDate.parse("20-02-1981", fmt)).sal(1600.0).comm(300.0).dept(d30).build(),
    Emp.builder().empno(7521).ename("WARD").job("SALESMAN").mgr(7698)
        .hiredate(LocalDate.parse("22-02-1981", fmt)).sal(1250.0).comm(500.0).dept(d30).build(),
    Emp.builder().empno(7566).ename("JONES").job("MANAGER").mgr(7839)
        .hiredate(LocalDate.parse("02-04-1981", fmt)).sal(2975.0).comm(null).dept(d20).build(),
    Emp.builder().empno(7654).ename("MARTIN").job("SALESMAN").mgr(7698)
        .hiredate(LocalDate.parse("28-09-1981", fmt)).sal(1250.0).comm(1400.0).dept(d30).build(),
    Emp.builder().empno(7698).ename("BLAKE").job("MANAGER").mgr(7839)
        .hiredate(LocalDate.parse("01-05-1981", fmt)).sal(2850.0).comm(null).dept(d30).build(),
    Emp.builder().empno(7782).ename("CLARK").job("MANAGER").mgr(7839)
        .hiredate(LocalDate.parse("09-06-1981", fmt)).sal(2450.0).comm(null).dept(d10).build(),
    Emp.builder().empno(7839).ename("KING").job("PRESIDENT").mgr(null)
        .hiredate(LocalDate.parse("17-11-1981", fmt)).sal(5000.0).comm(null).dept(d10).build(),
    Emp.builder().empno(7844).ename("TURNER").job("SALESMAN").mgr(7698)
        .hiredate(LocalDate.parse("08-09-1981", fmt)).sal(1500.0).comm(0.0).dept(d30).build(),
    Emp.builder().empno(7900).ename("JAMES").job("CLERK").mgr(7698)
        .hiredate(LocalDate.parse("03-12-1981", fmt)).sal(950.0).comm(null).dept(d30).build(),
    Emp.builder().empno(7902).ename("FORD").job("ANALYST").mgr(7566)
        .hiredate(LocalDate.parse("03-12-1981", fmt)).sal(3000.0).comm(null).dept(d20).build(),
    Emp.builder().empno(7934).ename("MILLER").job("CLERK").mgr(7782)
        .hiredate(LocalDate.parse("23-01-1982", fmt)).sal(1300.0).comm(null).dept(d10).build()
));- home.html 에 사원 목록 링크 추가
<li><a th:href="@{/emps}">사원 목록</a></li>- EmpDto 클래스 생성
@Data
@Builder
@AllArgsConstructor
@NoArgsConstructor
public class EmpDto {
	private Integer empno;
	private String ename;
	private String job;
	private Integer mgr;
	private LocalDate hiredate;
	private Double sal;
	private Double comm;
	private Integer deptno;

	public static EmpDto toDto(Emp e) {
		return EmpDto.builder()
				.empno(e.getEmpno())
				.ename(e.getEname())
				.job(e.getJob())
				.mgr(e.getMgr())
				.hiredate(e.getHiredate())
				.sal(e.getSal())
				.comm(e.getComm())
				.deptno(e.getDept().getDeptno()) // 부서번호를 넣어주는 부분에 주목
				.build();
	}
}- DeptDto 클래스 생성
@Data
@Builder
@AllArgsConstructor
@NoArgsConstructor
public class DeptDto {
	private Integer deptno;
	private String dname;
	private String loc;

	public static DeptDto toDto(Dept d) {
		return DeptDto.builder()
				.deptno(d.getDeptno())
				.dname(d.getDname())
				.loc(d.getLoc())
				.build();
	}
}- EmpDeptDto 클래스 생성
@Data
@Builder
@AllArgsConstructor
@NoArgsConstructor
public class EmpDeptDto {
	private Integer empno;
	private String ename;
	private String job;
	private Integer mgr;
	private LocalDate hiredate;
	private Double sal;
	private Double comm;
	//Emp 와 Dept 에 같이 있는 정보
	private Integer deptno;
	//Dept Entity 에만 있는 정보
	private String dname;
	private String loc;

	public static EmpDeptDto toDto(Emp emp) {

		return EmpDeptDto.builder()
				.empno(emp.getEmpno())
				.ename(emp.getEname())
				.job(emp.getJob())
				.mgr(emp.getMgr())
				.hiredate(emp.getHiredate())
				.sal(emp.getSal())
				.comm(emp.getComm())
				.deptno(emp.getDept().getDeptno())
				.dname(emp.getDept().getDname())
				.loc(emp.getDept().getLoc())
				.build();
	}
}- EmployService 인터페이스 생성
public interface EmployService {
	public List<EmpDto> getEmpList();
	public List<DeptDto> getDeptList();
	public EmpDeptDto getEmpDetail(int empno);
	public DeptDto getDeptDetail(int deptno);
}- EmployServiceImpl 클래스 생성 후 의존 객체 주입 & 메소드 오버라이드
@Service
@RequiredArgsConstructor
public class EmployServiceImpl implements EmployService{

	private final EmpRepository empRepo;
	private final DeptRepository deptRepo;

	@Transactional(readOnly = true)
	@Override
	public List<EmpDto> getEmpList() {
		return empRepo.findAll().stream().map(EmpDto :: toDto).toList();
	}

	@Transactional(readOnly = true)
	@Override
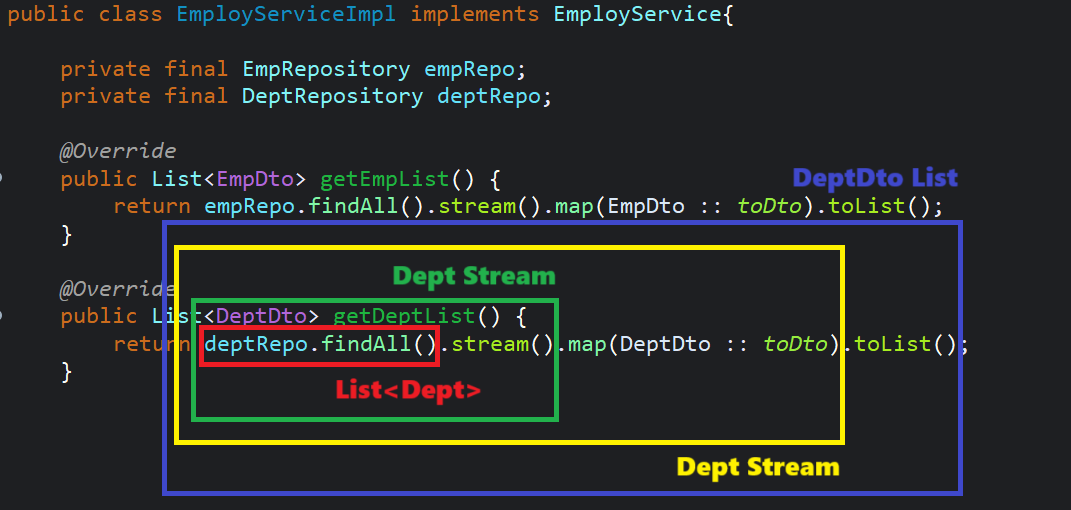
	public List<DeptDto> getDeptList() {
		return deptRepo.findAll().stream().map(DeptDto :: toDto).toList();
	}

	@Transactional(readOnly = true)
	@Override
	public EmpDeptDto getEmpDetail(int empno) {
		// 사원 번호를 이용해서 Emp entity 를 얻어내고
		Emp e = empRepo.findById(empno).get();
		// Emp entity 를 EmpDeptDto 로 변경해서 리턴한다
		return EmpDeptDto.toDto(e);
	}

	@Transactional(readOnly = true)
	@Override
	public DeptDto getDeptDetail(int deptno) {
		return DeptDto.toDto(deptRepo.findById(deptno).get());
	}
}
- EmployController 클래스 생성 후 의존 객체 주입
@RequiredArgsConstructor
@Controller
public class EmployController {
	private final EmployService employService;
}
사원 목록
- EmployController 에
empList메소드 생성
@GetMapping("/emps")
public String empList(Model model) {
	// 사원 목록을 Model 객체에 담는다
	model.addAttribute("empList", employService.getEmpList());
	return "emps/list";
}- emps 폴더 생성 후 list.html 생성
<div class="container">
	<h1>사원 목록</h1>
	<table class="table table-striped">
		<thead>
			<tr>
				<th>사원 번호</th>
				<th>사원 이름</th>
				<th>직책</th>
				<th>자세히</th>
			</tr>
		</thead>
		<tbody>
			<tr th:each="tmp : ${empList}">
				<td th:text="${tmp.empno}"></td>
				<td th:text="${tmp.ename}"></td>
				<td th:text="${tmp.job}"></td>
				<td>
					<a th:href="@{|/emps/${tmp.empno}|}">보기</a>
				</td>
			</tr>
		</tbody>
	</table>
</div>
상세 보기
- EmployController 에
empDetail메소드 생성
@GetMapping("/emps/{empno}")
public String empDetail(@PathVariable int empno, Model model) {
	// 사원의 자세한 정보
	EmpDeptDto dto = employService.getEmpDetail(empno);
	// 응답에 필요한 데이터를 "emp" 라는 키값으로 담기
	model.addAttribute("emp", dto);
	return "emps/detail";
}- detail.html 생성
<div class="container my-5">
    <!-- 제목 -->
    <h2 class="mb-4">사원 상세 정보</h2>

    <!-- 사원 카드 -->
    <div class="card shadow-lg rounded-3">
        <div class="card-header bg-primary text-white">
            <strong th:text="${emp.ename}"></strong>
            <span class="ms-2 text-light">(사원번호: <span th:text="${emp.empno}"></span>)</span>
        </div>
        <div class="card-body">
            <div class="row mb-3">
                <div class="col-md-6">
                    <h5 class="card-title">기본 정보</h5>
                    <ul class="list-group list-group-flush">
                        <li class="list-group-item">직책: <span th:text="${emp.job}"></span></li>
                        <li class="list-group-item">상사번호: <span th:text="${emp.mgr}"></span></li>
                        <li class="list-group-item">입사일: <span th:text="${#temporals.format(emp.hiredate, 'yyyy-MM-dd')}"></span></li>
                    </ul>
                </div>
                <div class="col-md-6">
                    <h5 class="card-title">급여 정보</h5>
                    <ul class="list-group list-group-flush">
                        <li class="list-group-item">급여: <span th:text="${emp.sal}"></span></li>
                        <li class="list-group-item">커미션:
                            <span th:text="${emp.comm != null ? emp.comm : '-'}"></span>
                        </li>
                    </ul>
                </div>
            </div>

            <hr>

            <h5 class="card-title">부서 정보</h5>
            <ul class="list-group list-group-flush">
                <li class="list-group-item">부서번호: <span th:text="${emp.deptno}"></span></li>
                <li class="list-group-item">부서명: <span th:text="${emp.dname}"></span></li>
                <li class="list-group-item">지역: <span th:text="${emp.loc}"></span></li>
            </ul>
        </div>
        <div class="card-footer text-end">
            <a th:href="@{/emps}" class="btn btn-secondary">목록으로</a>
        </div>
    </div>
</div>
부서 목록
- home.html 에 부서 목록 링크 추가
<li><a th:href="@{/depts}">부서 목록</a></li>- EmployController 에
deptList메소드 생성
@GetMapping("/depts")
public String deptList(Model model) {
	// 부서 목록
	List<DeptDto> deptList = employService.getDeptList();
	model.addAttribute("deptList", deptList);
	return "depts/list";
}- depts 폴더 생성 후 list.html 생성
<div class="container">
	<h1>부서 목록</h1>
	<table class="table table-striped">
		<thead>
			<tr>
				<th>부서 번호</th>
				<th>부서명</th>
				<th>자세히</th>
			</tr>
		</thead>
		<tbody>
			<tr th:each="tmp : ${deptList}">
				<td th:text="${tmp.deptno}"></td>
				<td th:text="${tmp.dname}"></td>
				<td>
					<a th:href="@{|/depts/${tmp.deptno}|}">보기</a>
				</td>
			</tr>
		</tbody>
	</table>
</div>
상세 보기
- EmployController 에
deptDetail메소드 생성
@GetMapping("/depts/{deptno}")
public String deptDetail(@PathVariable int deptno, Model model) {
	// 경로 변수에 전달된 부서 번호를 이동해서 부서의 자세한 정보를 얻어와서
	DeptDto dto = employService.getDeptDetail(deptno);
	// Model 객체에 담고
	model.addAttribute("dept", dto);
	// 응답하기
	return "depts/detail";
}- detail.html 생성
<div class="container">
	<h1>부서 목록</h1>
	<table class="table table-striped">
		<thead>
			<tr>
				<th>부서 번호</th>
				<th>부서명</th>
				<th>자세히</th>
			</tr>
		</thead>
		<tbody>
			<tr th:each="tmp : ${deptList}">
				<td th:text="${tmp.deptno}"></td>
				<td th:text="${tmp.dname}"></td>
				<td>
					<a th:href="@{|/depts/${tmp.deptno}|}">보기</a>
				</td>
			</tr>
		</tbody>
	</table>
</div>
해당 부서의 근무 사원 목록
JPQL
- EmpRepository 에 Query 문 & 메소드 생성
- 메소드명은 우리가 마음대로 생성
@Param("deptno")⟷:deptno
// 실행할 query 문 (JPQL) 을 직접 작성한다
@Query("SELECT e FROM Emp e WHERE e.dept.deptno = :deptno ORDER BY e.ename ASC")
public List<Emp> findEmps(@Param("deptno") Integer deptno);
⭐ findAllByOrderByEnameAsc 메소드의 경우
정해진 규칙으로 메소드명을 생성// 메소드에 전달된 매개변수의 순서를 이용해서 값을 바인딩할 수도 있다
@Query("SELECT e FROM Emp e WHERE e.dept.deptno = ?1 ORDER BY e.ename ASC")
public List<Emp> findEmps2(@Param("deptno") Integer deptno);-
Emp entity@ManyToOneDept dept가 있기 때문에 이걸 할용해서 메소드 만들기Dept_Deptno➜ Emp 의 dept 필드를 타고 들어가 Dept entity 의 deptno 속성을 조건으로 사용extends JpaRepository<Emp, Integer>에서 첫번째generic type이 Emp 이기 때문에 Emp entity 에서 dept 라는 필드를 타고 들어가는 것
// 정해진 규칙으로 메소드명을 작성해서 위와 같은 결과 얻어내기
public List<Emp> findByDept_DeptnoOrderByEnameAsc(Integer deptno);- EmployService 에
getEmpListByDeptno메소드 생성
public List<EmpDto> getEmpListByDeptno(int deptno);- EmployServiceImpl 에 메소드 오버라이드
@Transactional(readOnly = true)
@Override
public List<EmpDto> getEmpListByDeptno(int deptno) {
	List<EmpDto> empList1 = empRepo.findEmps(deptno).stream().map(EmpDto :: toDto).toList();
	List<EmpDto> empList2 = empRepo.findEmps2(deptno).stream().map(EmpDto :: toDto).toList();
	List<EmpDto> empList3 = empRepo.findByDept_DeptnoOrderByEnameAsc(deptno)
			.stream().map(EmpDto :: toDto).toList();
	return empList1;
}- EmployController 에
deptDetail메소드에 코드 추가
// 해당 부서에 근무하는 사원의 정보도 얻어와서 Model 객체에 담는다
List<EmpDto> empList = employService.getEmpListByDeptno(deptno);
model.addAttribute("empList", empList);- depts 의 detail.html 에 코드 추가
<h2>부서에서 근무하는 사원목록 <span class="text-primary" th:text="${empList.size()}"></span> 명</h2>
<ul>
	<li th:each="tmp : ${empList}">
		<a th:href="@{|/emps/${tmp.empno}|}" th:text="${tmp.ename}"></a>
	</li>
</ul>
React
React
Terminal ➜ New Terminal 실행
npm입력
PS C:\playground\react\hello-app> npm- window power shell 에서 npm 실행 불가시 아래를 한번 실행 후
npm다시 입력
PS C:\playground\react\hello-app> Set-ExecutionPolicy RemoteSigned -Scope CurrentUser
PS C:\playground\react\hello-app> npm
npm <command>

Usage:

npm install        install all the dependencies in your project
npm install <foo>  add the <foo> dependency to your project
npm test           run this project's tests
npm run <foo>      run the script named <foo>
npm <command> -h   quick help on <command>
npm -l             display usage info for all commands
npm help <term>    search for help on <term> (in a browser)
npm help npm       more involved overview (in a browser)

All commands:

    access, adduser, audit, bugs, cache, ci, completion,
    config, dedupe, deprecate, diff, dist-tag, docs, doctor,
    edit, exec, explain, explore, find-dupes, fund, get, help,
    help-search, hook, init, install, install-ci-test,
    install-test, link, ll, login, logout, ls, org, outdated,
    owner, pack, ping, pkg, prefix, profile, prune, publish,
    query, rebuild, repo, restart, root, run-script, sbom,
    search, set, shrinkwrap, star, stars, start, stop, team,
    test, token, uninstall, unpublish, unstar, update, version,
    view, whoami

Specify configs in the ini-formatted file:
    C:\Users\USER\.npmrc
or on the command line via: npm <command> --key=value

More configuration info: npm help config
Configuration fields: npm help 7 config

npm@10.9.3 C:\Program Files\nodejs\node_modules\npm
PS C:\playground\react\hello-app>- react 서버 실행
npm run dev입력
PS C:\playground\react\hello-app> npm run devpackage.json 파일 = pom.xml 파일과 비슷한 기능을 하는 문서
public 폴더 = 클라이언트에게 공개되는 폴더 = static 폴더와 같은 폴더
ctrl + c로 서버 끄기
PS C:\playground\react\hello-app> ^C- 새로운 프로젝트 생성
npm create vite react-basic-
React & JavaScript 선택
-
생성한 폴더로 이동
cd react-basic- 현재 폴더의 package.json 파일에 명시된 의존 dependency 설치
- node_modulse
npm install-
react-basic 폴더로 VSCODE 열기
-
react 서버 실행
npm run dev- ctrl 누른 상태에서 해당 링크 클릭하면 react 사이트가 열린다
App.jsx 에서 내용 지우고 뼈대만 남기기
function App() {

  return (
    <>

    </>
  )
}

export default Appdiv&h1요소 추가
<div className="container">
	<h1>인덱스 페이지</h1>
</div>
index.css 안의 코드 다 지우기
이미지
assets 폴더 안에 images 폴더 삽입
- App.jsx 에 이미지 관련 코드 추가
import koreaImg from './assets/images/SouthKorea.png'- react 에서 inline css 는
object로 작성
const myStyle = {
	width:"100px",
    height:"100px",
    border:"1px solid green",
  	borderRadius:"50%"
};<img src={koreaImg} alt="대한민국" style={myStyle}/>- assets 폴더 안에 css 폴더 생성 후 costom.css 파일 생성
h1{
    color:red;
}- App.jsx 에 css 로딩
import './assets/css/custom.css'- ctrl+c 로 서버 다운 후
bootstrap설치
PS C:\playground\react\react-basic> npm install bootstrap- 설치한 이후에 bootstrap css 로딩하기
import 'bootstrap/dist/css/bootstrap.css'- 버튼 추가
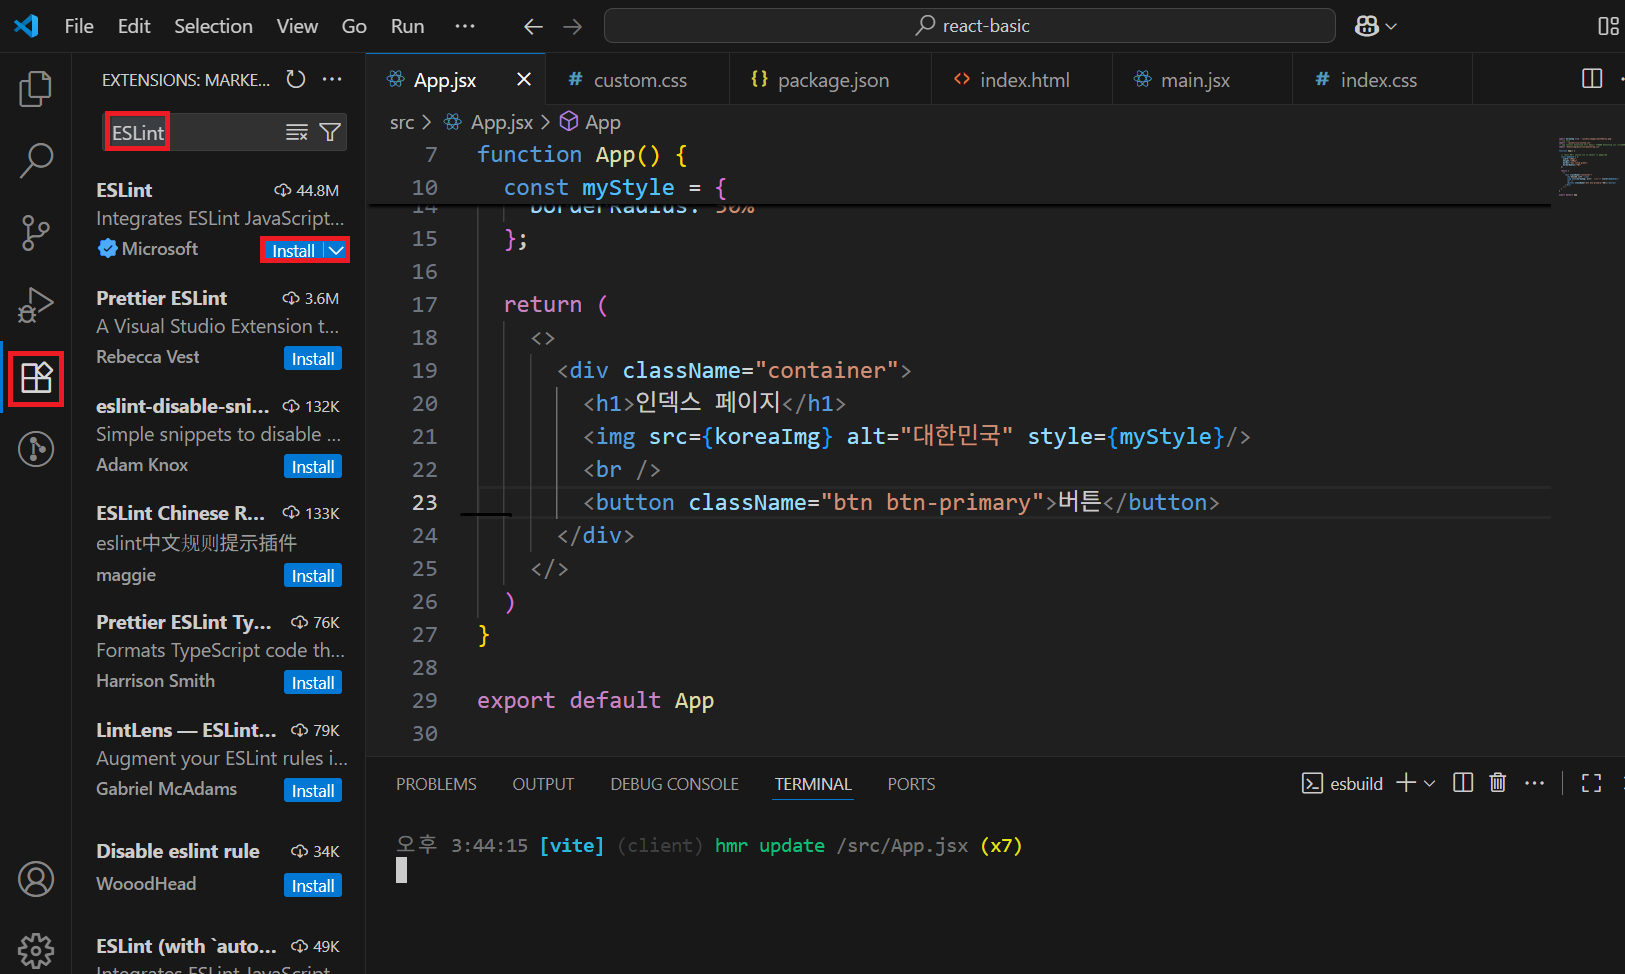
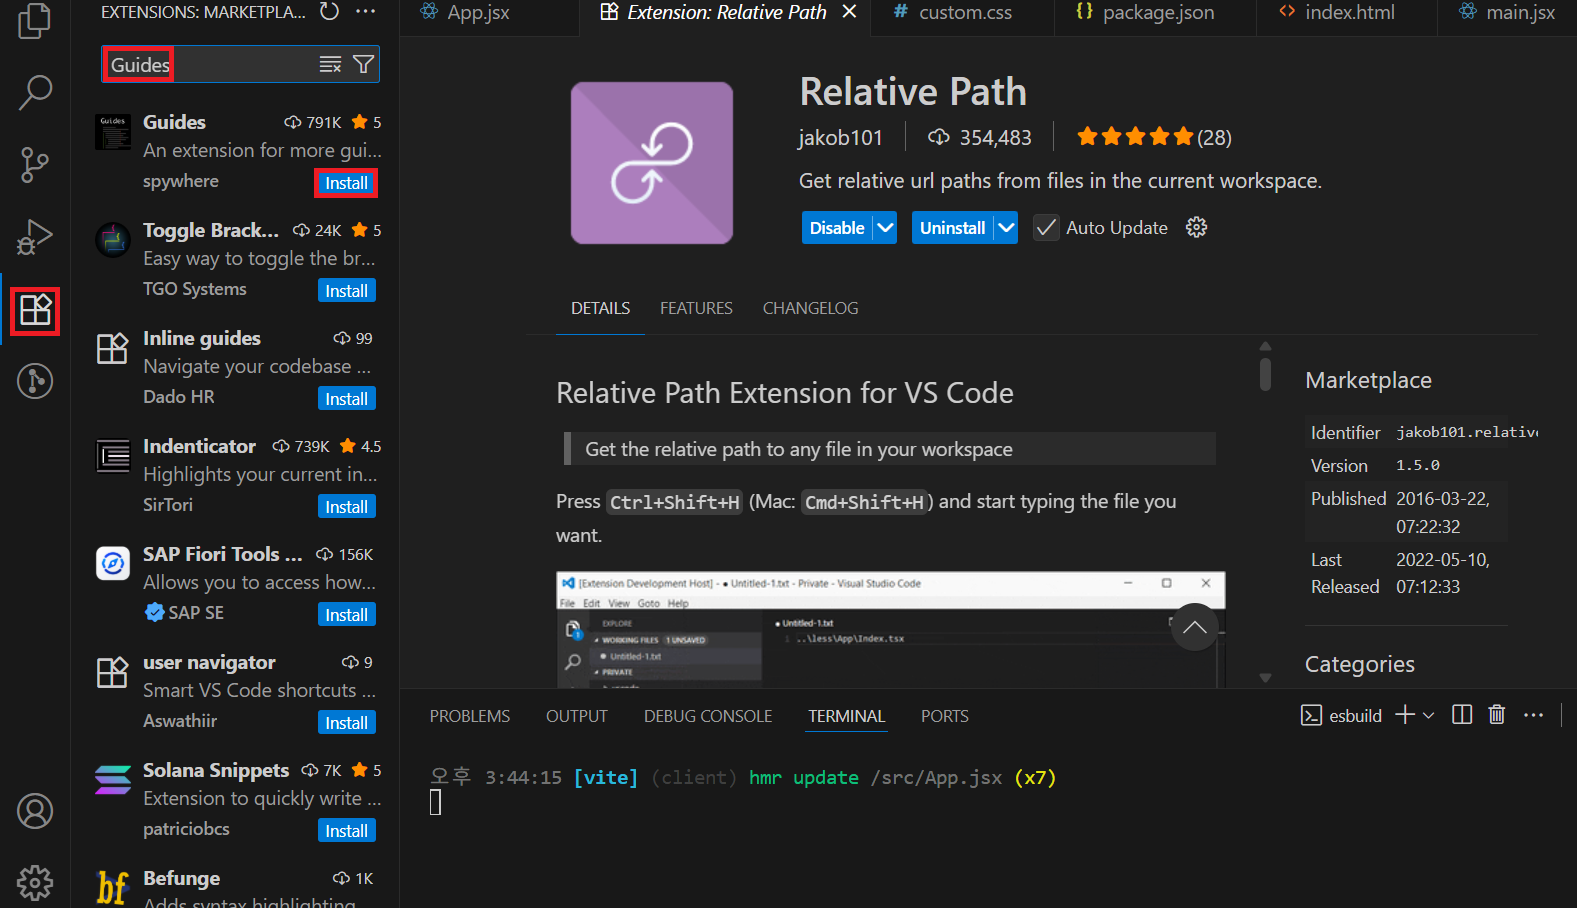
<button className="btn btn-primary">버튼</button>vs code 에 react 개발을 위한 확장 프로그램 설치
- ESLint ( javascript 문법 체크)
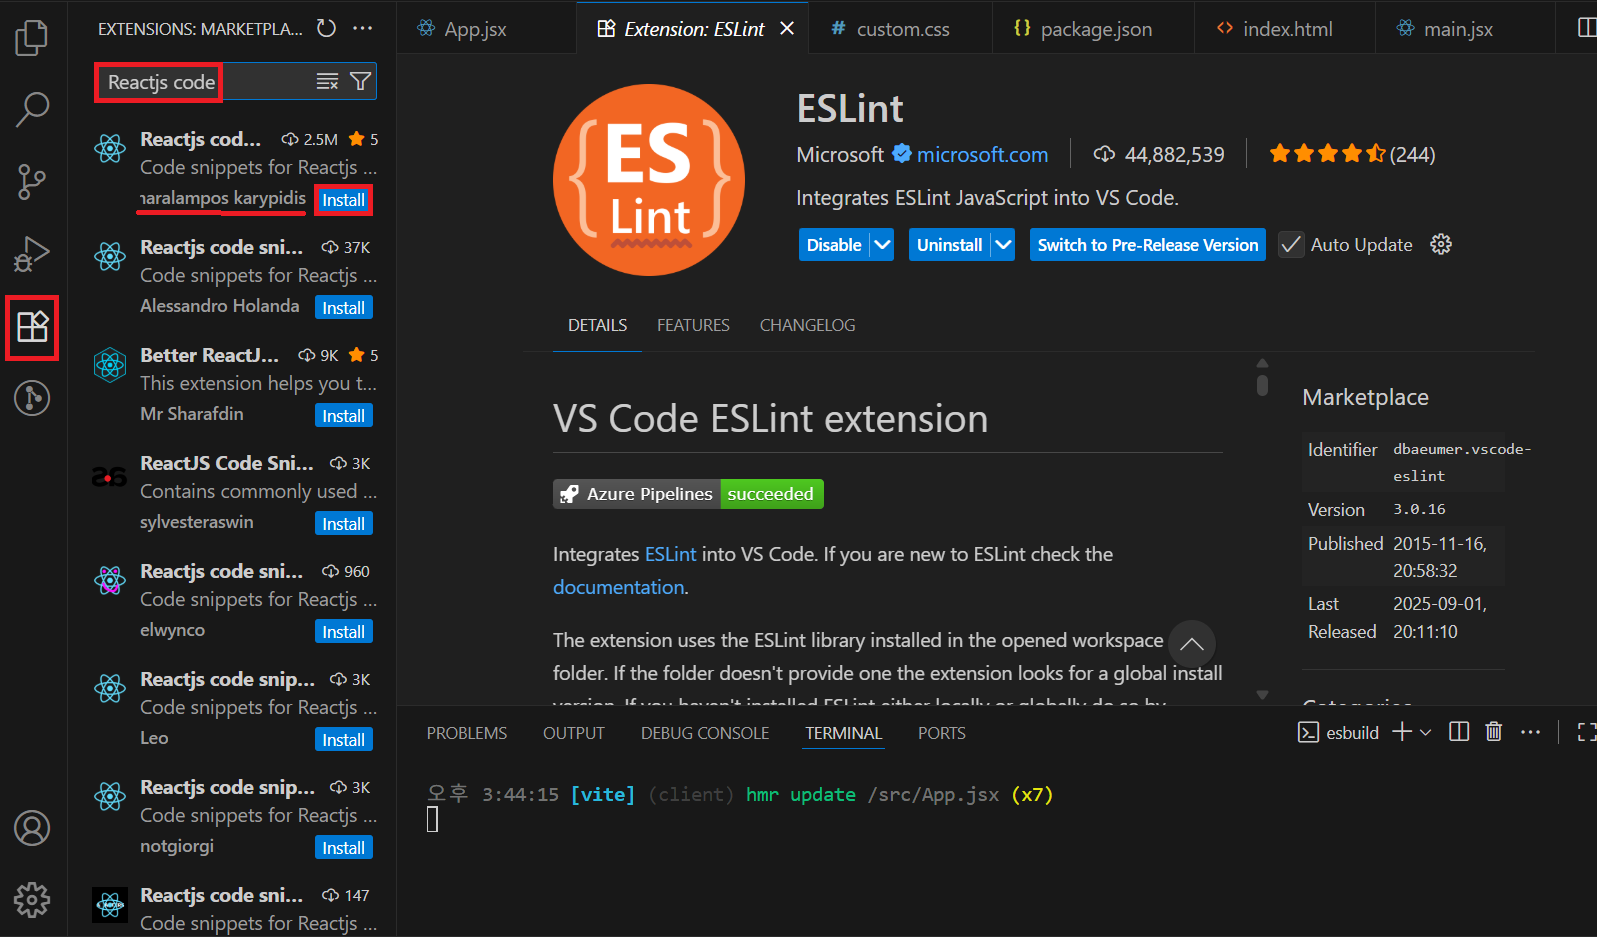
- Reactjs code snippets (Charalampos Karypidis)
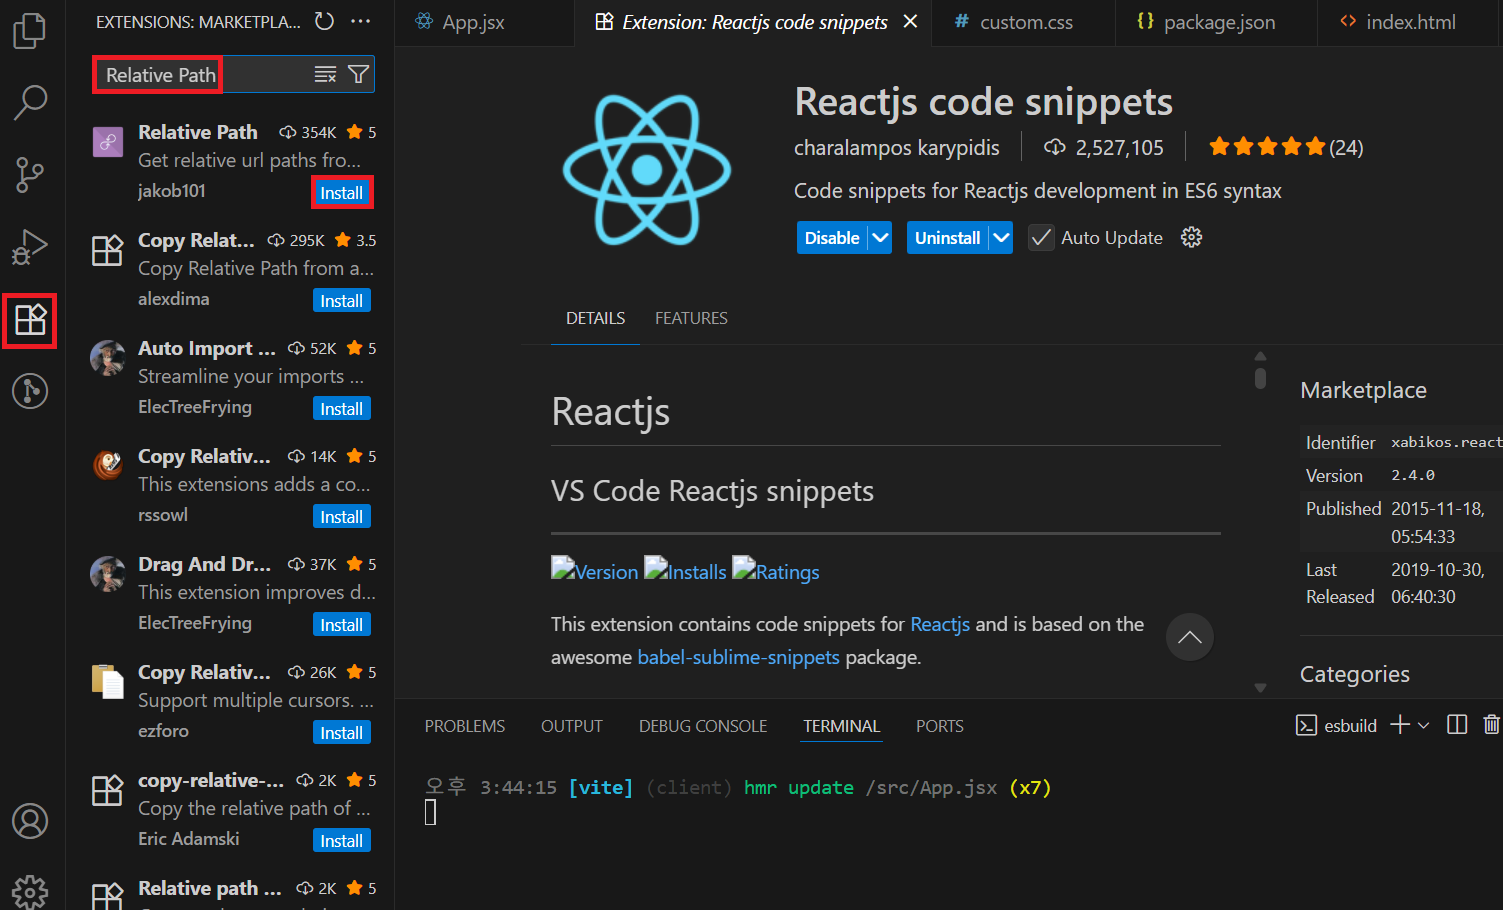
- Relative Path (상대경로에 있는 파일 경로를 편하게 작성할 수 있는 도구 입니댜)
- Guides (들여쓰기 가이드라인을 그려준다)
@RestController
컨트롤러에서 리턴하는 데이터를 json 으로 응답하고자 할 때 사용하는 어노테이션
- RestMemberController 클래스 생성 후
hello메소드 생성
@RestController
public class RestMemberController {
	@GetMapping("/v1/member/hello")
	public String hello() {
		return "hello, world";
	}
}
hello, world- RestMemberController 에
hello2메소드 생성
@GetMapping("/v1/member/hello2")
public MemberDto hello2() {
	return MemberDto.builder().num(1).name("유재석").addr("압구정").build();
}{"num":1,"name":"유재석","addr":"압구정"}- RestMemberController 에
hello3메소드 생성
@GetMapping("/v1/member/hello3")
public List<String> hello3(){
	return List.of("유재석", "박명수", "정준하");
}["유재석","박명수","정준하"]- ResetMemberController 에
@RequestMapping어노테이션 추가 &
각 메소드에v1지우기
@RequestMapping("/v1")
@RestController
public class RestMemberController {

	@GetMapping("/member/hello")
	public String hello() {
		return "hello, world";
	}

	@GetMapping("/member/hello2")
	public MemberDto hello2() {
		return MemberDto.builder().num(1).name("유재석").addr("압구정").build();
	}

	@GetMapping("/member/hello3")
	public List<String> hello3(){
		return List.of("유재석", "박명수", "정준하");
	}
}
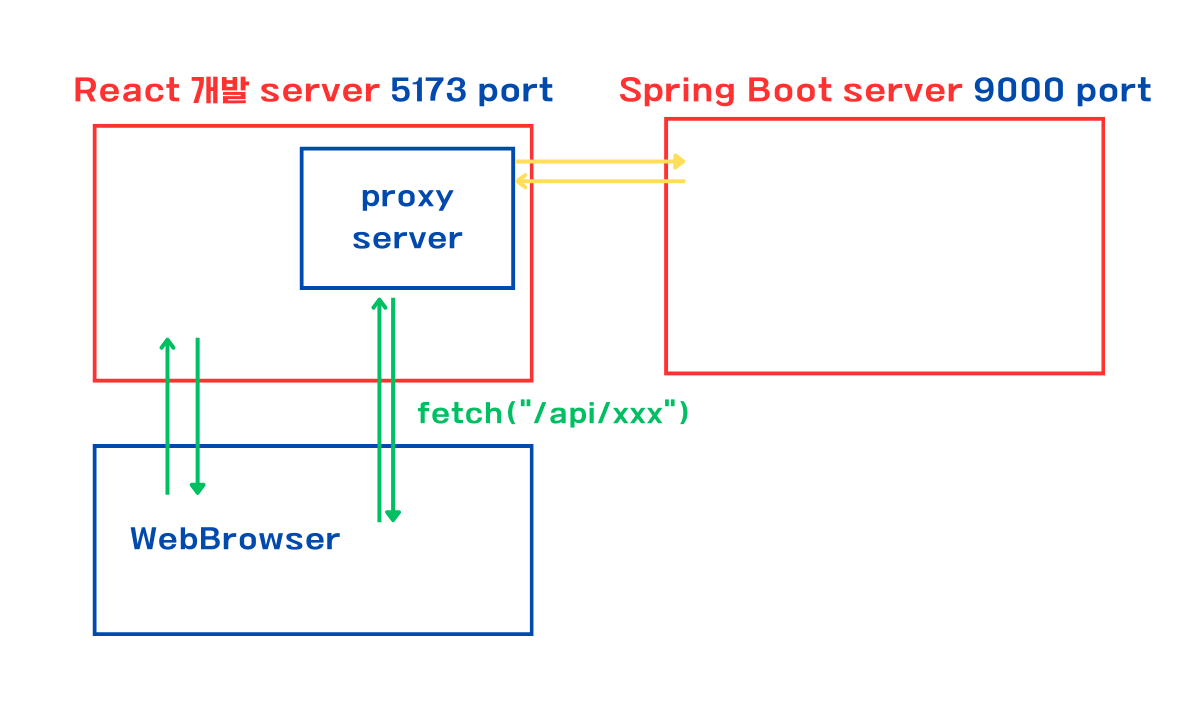
React 연동 시 유의 사항
/api로 시작하는 요청을http://localhost:8888로 프록시 한다- changeOrigin : true ➜ CORS 문제 해결
- secure : false ➜ HTTPS 인증서가 없어도 허용
- rewrite :
(path) => path.replace(/^\/api/, '') - ex) /api/users ➜ http://localhost:8888/users
/api를 백엔드에서 필요하면 삭제하지 말고 그대로 사용한다
예제
fetch('/api/users')
.then((res) => res.json())
.then((data) => console.log(data));
➜ 실제로는 http://localhost:8888/users 로 요청이 간다
- vite.config.js 에
proxy코드 추가
server: {
	proxy: {
		'/api': {  // 프록시할 경로
			target: 'http://localhost:9000', // 백엔드 서버 주소
			changeOrigin: true,
			secure: false,
			rewrite: (path) => path.replace(/^\/api/, ''), // '/api' 제거
		},
	},
},- App.jsx 에
button에onClick코드 추가
<button className="btn btn-primary" onClick={()=>{
	fetch("/api/v1/member/hello")
    .then(res=>res.text())
    .then(data=>{
        console.log(data);
    });
}}>버튼</button>hello2&hello3요청 코드 추가
<button className="btn btn-primary" onClick={()=>{
	fetch("/api/v1/member/hello2")
    .then(res=>res.json())
    .then(data=>{
        console.log(data);
    });
}}>버튼</button>{num: 1, name: '유재석', addr: '압구정'}<button className="btn btn-primary" onClick={()=>{
fetch("/api/v1/member/hello3")
.then(res=>res.json())
.then(data=>{
console.log(data);
});
}}>버튼</button>(3) ['유재석', '박명수', '정준하']- RestMemberController 에
MemberService의존 객체 주입 &
list메소드 생성
private final MemberService memberService;

@GetMapping("/members")
public List<MemberDto> list(){
	List<MemberDto> list = memberService.getAll();
	return list;
}[{"num":3,"name":"원숭이","addr":"동물원"},{"num":2,"name":"해골","addr":"행신동"},{"num":1,"name":"김구라","addr":"노량진"}]- VSCODE 로 이동해 App2.jsx 파일 생성
import { useState } from "react"

export default function App2(){
    const sample1 = <tr>
        <td>1</td>
        <td>유재석</td>
        <td>압구정</td>
    </tr>;

    const sample2 = <tr>
        <td>2</td>
        <td>박명수</td>
        <td>이태원</td>
    </tr>;

    const sample3 = <tr>
        <td>3</td>
        <td>정준하</td>
        <td>서래마을</td>
    </tr>;

    // 아래의 상태값을 member 는 sampleArray 와 같은 구조의 배열이다
    const sampleArray = [sample1, sample2, sample3];

    // tr jsx 객체가 여러 개 들어갈 배열을 상태값으로 관리
    const [members, setMembers] = useState([]);

    const handleClick = () => {
        fetch("/api/v1/members")
        .then(res=>res.json())
        .then(data => {
            // data 는 회원 목록이 들어 있는 이런 모양의 배열 [{},{},{}]
            // tr 에 회원 정보 각각의 회원 정보가 들어 있는 새로운 배열을 만들어내서
            const newArray = data.map(item=><tr>
                <td>{item.num}</td>
                <td>{item.name}</td>
                <td>{item.addr}</td>
            </tr>);
            // 상태값을 변경한다
            setMembers(newArray);
        });
    };

    return(
        <div className="container">
            <button onClick={handleClick}>목록 받아오기</button>
            <h3>회원 목록</h3>
            <table>
                <thead>
                    <tr>
                        <th>번호</th>
                        <th>이름</th>
                        <th>주소</th>
                    </tr>
                </thead>
                <tbody>
                    {members}
                </tbody>
            </table>
        </div>
    )
}- App3.jsx 파일 생성
export default function App3(){
    // jsx 객체가 들어 있는 배열
    const foods = [
        <li>김밥</li>,
        <li>라면</li>,
        <li>떡볶이</li>
    ];

    return(
        <div className="container">
            <h1>친구 목록</h1>
            <ul>
                {foods}
            </ul>
        </div>
    )
}
친구 목록
김밥
라면
떡볶이-
배열 랜더링
<li>{item}</li>:: 람다식
map 함수 안에서 리턴한 아이테믕로 구성된 새로운 배열이 만들어진다
// 배열에 들어 있는 string 을 이용해서
const data = ["java", "jsp", "spring"]
// li 요소 여러 개가 들어 있는 jsx 의 배열을 만들어서 아래에서 렌더링하기
const programming = data.map(item=><li>{item}</li>);

return(
	<h1>교육 과정</h1>
	<ul>
		{programming}
	</ul>
)
교육 과정
java
jsp
springdata.map(item=><li>{item}</li>)풀어서 나열한다면 해당 코드
const programming1 = data.map((item)=>{
	return <li>{item}</li>
});-
App2.jsx 를 지우고 App3.jsx 를 App2.jsx 로 Rname 한 후 App3.jsx 생성
rsf + 엔터하면 기본 뼈대가 자동으로 생성
import React, { useState } from 'react';

function App3() {
    // 회원 목록을 상태값으로 관리하기
    const [members, setMembers] = useState([]);

    return (
        <div className='container'>
            <button onClick={()=>{
                // 서버로부터 받아온 배열이라고 가정하자
                const newArray = [
                    {num:1, name:"유재석", addr:"압구정"},
                    {num:2, name:"박명수", addr:"이태원"},
                    {num:3, name:"정준하", addr:"서래마을"}
                ]
                // 새로운 배열로 상태값을 변경한다
                setMembers(newArray);
            }}>받아오기</button>
            <h1>회원 목록</h1>
            <table>
                <thead>
                    <tr>
                        <th>번호</th>
                        <th>이름</th>
                        <th>주소</th>
                    </tr>
                </thead>
                <tbody>
                    {members.map(item=><tr>
                        <td>{item.num}</td>
                        <td>{item.name}</td>
                        <td>{item.addr}</td>
                    </tr>)}
                </tbody>
            </table>
        </div>
    );
}

export default App3;
학원 공부 내용 정리