자바스크립트로 작성했습니다.
(더 많은 기능들이 있는데... 맛만 보는 글)
로그인, 회원가입 등 form을 사용하는 기능들은 프론트엔드에서 가장 기본적이면서도 중요한 부분입니다. 어렵지 않을 것 같지만 막상 하다보면 (저와 같은 초보자들에게는...) 꽤 까다로운 부분이 있습니다.
계속해서 많은 useSteate가 필요하게 되고, 사용자가 input에 입력하는 value를 체크(validation)하거나 form안의 input이 다 채워지지 않았는데 submit을 하는 경우라던지, error 체크 등..
react-hook-form 을 사용하면 좀 더 효율적으로 form을 다룰 수 있습니다.
예제
빠르게 react app을 하나 만들어 보겠습니다.
📌 npx create-react-app react-test
예제 시나리오
- "login 상태라면" 홈(localhost:3000)은
<Home />이다. - "login 상태가 아니라면" 홈(localhost:3000)은
<Login />이다. <Login />에서는 회원가입 페이지(<SignUp />)로 이동하는 버튼이 있다.
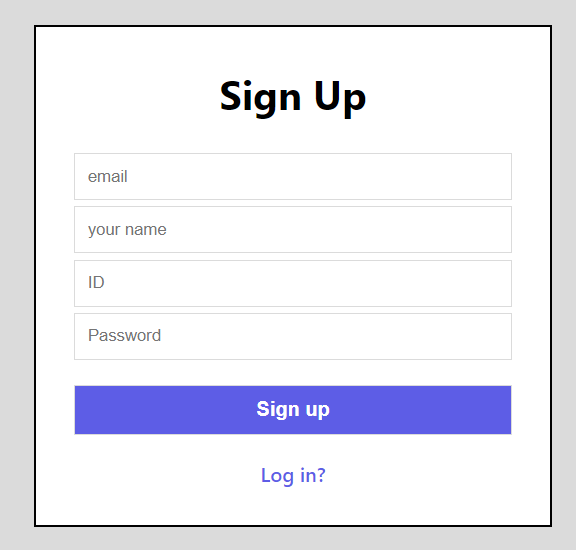
예제 UI
시나리오를 위한 파일세팅...

예제코드 참조
react-hook-form 사용 전..
useState
react에 내장되어 있는 hook, useState를 활용할 수 있습니다.
Login.js
...

function Login() {
  const [id, setId] = useState("");

  const onIdChange = (e) => {
    setId(e.target.value);
  };

  const handleSubmit = (e) => {
    // submit을 할 때 페이지 자체가 새로고침이 되는 것을 막음
    e.preventDefault();
    console.log(id);
  };

  return (
    <div className="container">
      <form onSubmit={handleSubmit}>
        <h1>Login</h1>
        <input onChange={onIdChange} value={id} type="text" placeholder="ID" />
        <input type="password" placeholder="Password" />
        <input className="btn" type="submit" value="Log in" />
        <Link to="/sign-up">sign up?</Link>
      </form>
    </div>
  );
}

export default Login;
ID 입력칸에 text를 입력하고 submit을 하면 콘솔에 입력한 ID가 출력됩니다.
validation
제출양식
만약 입력된 ID가 10자 이상이어야 한다면, error 메세지를 띄우도록 새로운 useState를 만들고 handleSubmit에 if문을 추가할 수 있습니다.
제출버튼 비활성화
HTML의 disabled 속성을 사용할 수 있습니다.
Login.js
...

function Login() {
  const [id, setId] = useState("");
  const [idError, setIdError] = useState("");

  const onIdChange = (e) => {
    setIdError("");
    setId(e.target.value);
  };

  const handleSubmit = (e) => {
    e.preventDefault();
    if (id.length < 10) {
      setIdError("too short");
    } else {
      console.log(id);
    }
  };

  return (
    <div className="container">
      <form onSubmit={handleSubmit}>
        <h1>Login</h1>
        <input onChange={onIdChange} value={id} type="text" placeholder="ID" />
        {idError}
        <input type="password" placeholder="Password" />
        <input
          className="btn"
          type="submit"
          value="Log in"
          disabled={id === "" && id.length < 10}
        />
        <Link to="/sign-up">sign up?</Link>
      </form>
    </div>
  );
}

export default Login;
위 예시가 완벽히 좋은 예시는 아니지만 input 마다 useState를 생성해야하고 매번 유효성 검사를 실행하는 것은 비효율적입니다.
react-hook-form 에서는 이러한 문제들을 해결하고 더 좋은 로직으로 form을 구현 할 수 있습니다.
react-hook-form 사용하기
📌 npm install react-hook-form
useForm
useForm은 여러가지 함수를 가지고 있는 객체입니다.
콘솔을 통해 어떤 함수를 가지고 있는지 알아봅시다.
Login.js
import "./App.css";
import { Link } from "react-router-dom";
import { useForm } from "react-hook-form";

function Login() {
  const useform = useForm();

  console.log(useform);

  return (
    <div className="container">
      <form>
        <h1>Login</h1>
        <input type="text" placeholder="ID" />
        <input type="password" placeholder="Password" />
        <input className="btn" type="submit" value="Log in" />
        <Link to="/sign-up">sign up?</Link>
      </form>
    </div>
  );
}

export default Login;
리액트 앱을 실행시키고 개발자도구(F12)를 통해 콘솔을 확인해보면,
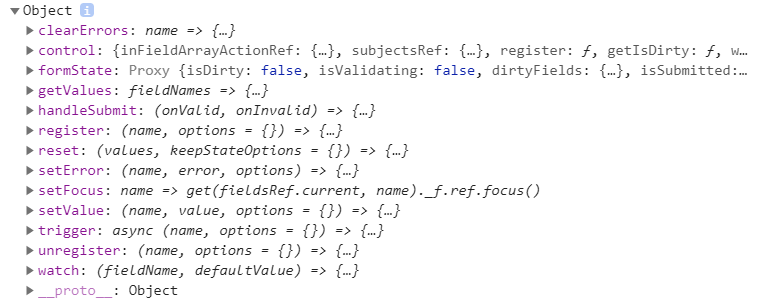
이제 우리는 이것들을 골라서 사용할 수 있습니다.
이번 예제에서는 몇 가지만 사용해보도록 하겠습니다.
register & watch
콘솔에서 확인한 것처럼 register는 name, options를 가집니다.
우선 name만 사용해보겠습니다.
Login.js
import "./App.css";
import { Link } from "react-router-dom";
import { useForm } from "react-hook-form";

function Login() {
  // 1
  const { register, watch } = useForm();
  // 3
  console.log(watch("id"));

  return (
    <div className="container">
      <form>
        <h1>Login</h1>
    	// 2
        <input {...register("id")} type="text" placeholder="ID" />
        <input type="password" placeholder="Password" />
        <input className="btn" type="submit" value="Log in" />
        <Link to="/sign-up">sign up?</Link>
      </form>
    </div>
  );
}

export default Login;-
useForm()에서 구조분해할당을 통해register,watch를 꺼냈습니다. -
register()의 사용법입니다."id"는register()의 첫번째 전달값으로 유일하여야 합니다. 해당input의name이라고 생각합시다. -
watch()를 사용하여 콘솔을 통해 input값의 value를 확인할 수 있습니다. -
...
console.log(watch());
...
<input {...register("id")} type="text" placeholder="ID" />
<input {...register("password")} type="password" placeholder="Password"/>
...
이런식으로 "id"와 "password"의 value 값을 객체형태로 얻어낼 수 있습니다.
handleSubmit
handleSubmit을 사용하면 "제출"시 새로고침 현상이 일어나지 않습니다. (event.preventDefault()를 하지 않아도 됨)
콘솔에서 확인한 것처럼 handleSubmit가 가지는 2가지 전달값onValid와 onInvalid는 form에 있는 input이 유효한지 검사하는 함수입니다.
"제출"을 했을 때 form이 유효하다면 onValid가 실행되고, 유효하지 않다면 onInvalid가 실행됩니다.
useForm에서 handleSubmit을 가져오고, <form>에 적용시킨 뒤, onValid와 onInvalid가 무엇인지 확인해봅시다.
Login.js
import "./App.css";
import { Link } from "react-router-dom";
import { useForm } from "react-hook-form";

function Login() {
  //handleSubmit을 가져옵니다.
  const { register, watch, handleSubmit } = useForm();
  //"제출"을 했을 때 무슨일이 일어나는지 확인해봅시다.
  const onValid = (data) => console.log(data, "onvalid");
  const onInvalid = (data) => console.log(data, "onInvalid");

  return (
    <div className="container">
      //form에 handleSubmit을 적용시킵니다.
      <form onSubmit={handleSubmit(onValid, onInvalid)}>
        <h1>Login</h1>
        <input
          {...register("id")}
          type="text"
          placeholder="ID"
        />
        <input
          {...register("password")}
          type="password"
          placeholder="Password"
        />
        <input className="btn" type="submit" value="Log in" />
        <Link to="/sign-up">sign up?</Link>
      </form>
    </div>
  );
}

export default Login;
input에 아무것도 입력하지 않고 제출을 눌러보겠습니다.
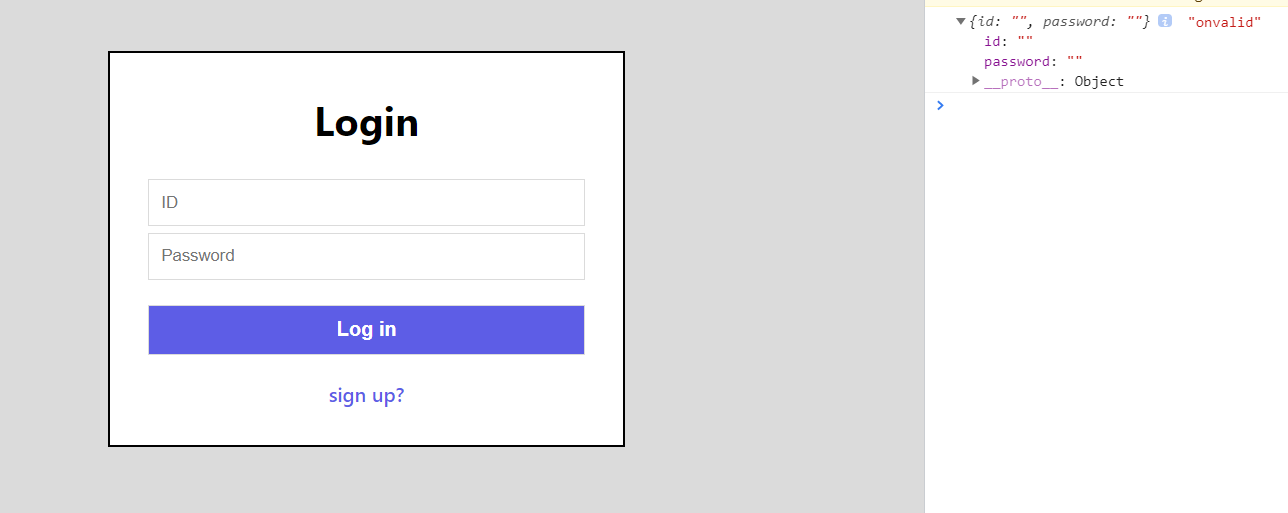
아무것도 입력하지 않았는데 onvalid를 출력합니다. 즉 form이 유효하다는 것을 알려주네요.
handleSubmit을 제대로 사용하기 위해서는 앞서 register에서 다루지 않았던 options가 필요합니다.
register options
handleSubmit과 함께 앞서 register에서 사용하지 않았던 options를 사용해봅시다.
input value가 최소 5글자 이상이어야 하거나 필수(required)여야 한다면 register의 두번째 전달값으로 option을 넣어줄 수 있습니다.
<input {...register("id", { required: true, minLength: 5 })}
... />-
options에는
required, min, max, minLength, maxLength, pattern, validate가 있습니다. -
required
required : "string"형태로 설정하면 default값이 true이고, "message"를 추가합니다. 이것은 아래에서 다시 다루겠습니다. -
pattern
{...register("lastName", { pattern: /^[A-Za-z]+$/i })}와 같이 정규표현식을 이용할 수 있습니다. -
validate
Boolean 값을 반환합니다.
validation
다시 handleSubmit으로 돌아와서,
id와 password는 필수(required)이어야 하며, id는 5글자 이상이어야 한다고 가정해봅시다.
Login.js
...
<input {...register("id", { required: true, minLength: 5 })} type="text" placeholder="ID" />
<input {...register("password", { required: true })} type="password" placeholder="Password" />
...
다시 아무것도 입력하지 않고 제출을 눌러보면,
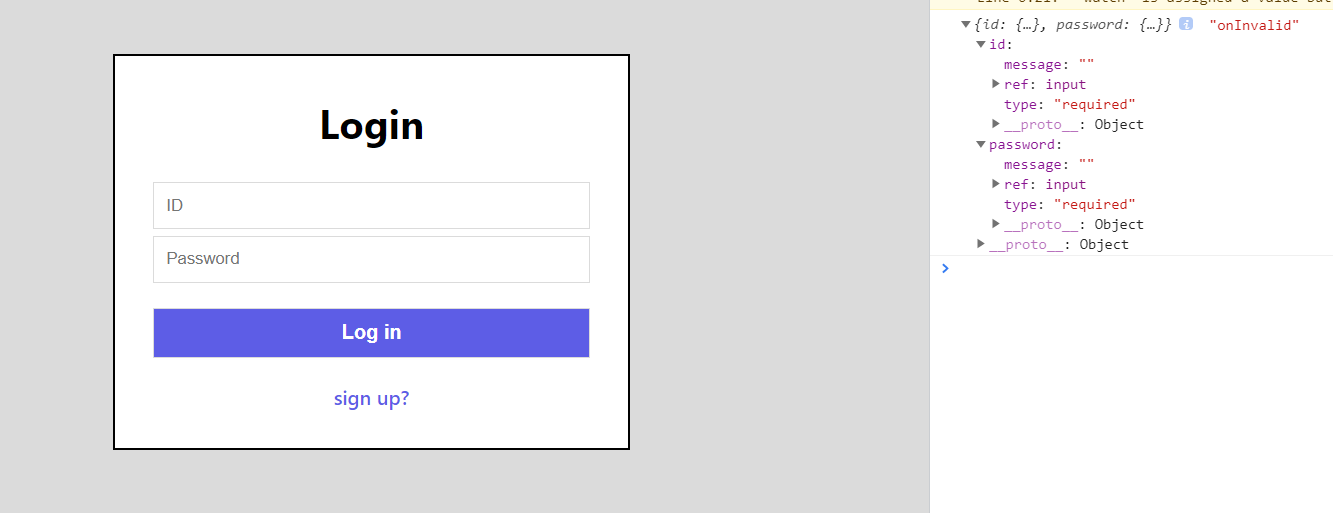
onInvalid가 실행되면서 form은 유효하지 않다는 것을 알려줍니다.
message
register options에 required를 string으로 설정하면, 디폴트값이 true이면서 onInvalid에 메세지를 추가합니다.
Login.js
...
<input {...register("id", { required: "id error", minLength: 5 })} type="text" placeholder="ID" />
<input {...register("password", { required: "password error" })} type="password" placeholder="Password" />
...
아무것도 입력하지 않고 제출을 해보면,
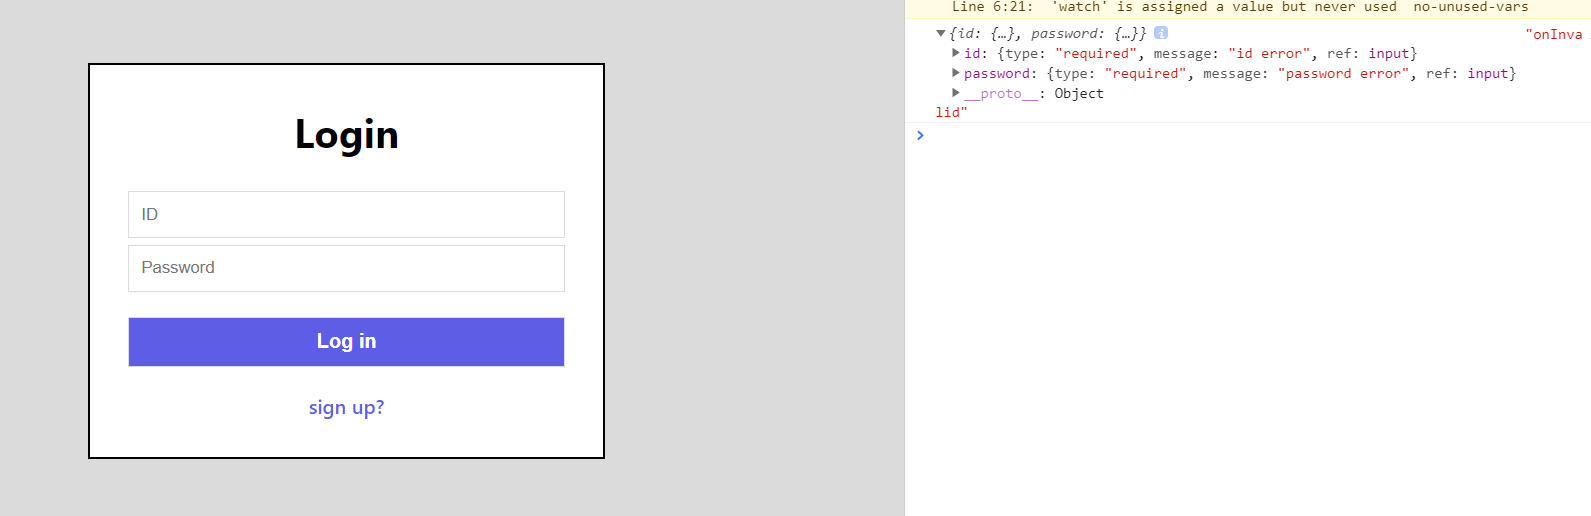
onInvalid가 실행되고 message가 추가된 것을 알 수 있습니다.
하지만 id와 password를 모두 입력했지만 id를 5글자 미만으로 입력했다면 onInvalid지만 message값은 비어있게 됩니다.
이때는 아래과 같은 형태로 입력할 수 있습니다.
{...register("id", {
  required: "id error",
  minLength: {
    value: 5,
    message: "too short",
  },
})}
formState
errors
handleSubmit을 통해 설정한 양식에 맞지 않는 input을 검출했습니다.
하지만 formState 의 errors를 사용하면 훨씬 더 간편하게 error를 검출할 수 있습니다.
방법은 정말 간단합니다.
const { register, handleSubmit, formState: { errors } } = useForm();

console.log(errors)
위와 같이 errors를 가져와서 콘솔로 확인해보면 onInvalid와 같은 결과를 반환합니다.
mode
useForm()은 내부에 여러가지 arguments 를 가지고 있습니다.
useForm({
  mode: 'onSubmit',
  reValidateMode: 'onChange',
  defaultValues: {},
  resolver: undefined,
  context: undefined,
  criteriaMode: "firstError",
  shouldFocusError: true,
  shouldUnregister: false,
  shouldUseNativeValidation: false,
})
이 중, mode에 대해 알아봅시다.
기본적으로 useForm은 "onSubmit" mode입니다. 바로 위에서 errors를 통해 에러 검출을 할 때, "submit"을 했을 때 콘솔을 통해 errors를 알려줍니다.
... = useForm({ mode: "onChange" });하지만 이렇게 mode를 바꿔서 errors를 출력할 수 있습니다.
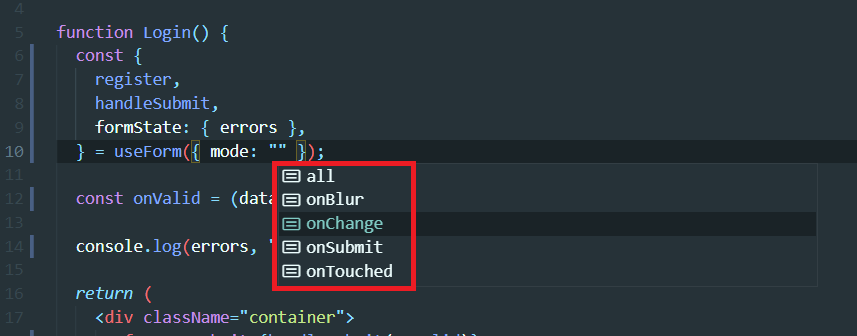
원하는대로 mode를 변경하고, DOM을 통해 UI를 개선시킬 수 있습니다.
📖 참조
예제코드
- Router를 위해 📌
npm i react-router-dom
App.css
body {
  background-color: rgb(219, 219, 219);
}

.container {
  height: 100vh;
  display: flex;
  flex-direction: column;
  justify-content: center;
  align-items: center;
}

form {
  background-color: white;
  width: 350px;
  border: 2px solid black;
  padding: 10px 30px 30px;
  display: flex;
  flex-direction: column;
  text-align: center;
}

input {
  border: 0.5px solid rgb(219, 219, 219);
  padding: 10px;
  margin-top: 5px;
}

.btn {
  margin: 20px 0px;
  background-color: rgb(93, 93, 230);
  font-size: 16px;
  color: white;
  font-weight: 600;
  cursor: pointer;
}

h3 {
  color: blue;
  font-size: 14px;
}

a {
  font-weight: 600;
  color: rgb(93, 93, 230);
  text-decoration: none;
}
App.js
import { useState } from "react";
import "./App.css";
import { BrowserRouter as Router, Switch, Route, Link } from "react-router-dom";
import Home from "./Home";
import Login from "./Login";
import SignUp from "./SignUp";

function App() {
  //로그인상태가 아니라는 것을 가정
  const [isLoggedIn, setIsLoggedIn] = useState(false);

  return (
    <Router>
      <Switch>
        <Route path="/" exact>
          {isLoggedIn ? <Home /> : <Login />}
        </Route>
        <Route path="/sign-up">
          <SignUp />
        </Route>
      </Switch>
    </Router>
  );
}

export default App;
screen
//Login.js
import "./App.css";
import { Link } from "react-router-dom";

function Login() {
  return (
    <div className="container">
      <form>
        <h1>Login</h1>
        <input type="text" placeholder="ID" />
        <input type="password" placeholder="Password" />
        <input className="btn" type="submit" value="Log in" />
        <Link to="/sign-up">sign up?</Link>
      </form>
    </div>
  );
}

export default Login;

//SignUp.js
import "./App.css";
import { Link } from "react-router-dom";

function SignUp() {
  return (
    <div className="container">
      <form>
        <h1>Sign Up</h1>
        <input type="text" placeholder="email" />
        <input type="text" placeholder="your name" />
        <input type="text" placeholder="ID" />
        <input type="password" placeholder="Password" />
        <input className="btn" type="submit" value="Sign up" />
        <Link to="/">Log in?</Link>
      </form>
    </div>
  );
}

export default SignUp;

//Home.js
function Home() {
  return <h1>Home</h1>;
}

export default Home;
좋은 글 덕분에 잘 구현했습니다.
하나 질문은 아이디 중복체크를 하려고 하니 처음 페이지를 열어서 필드값이 공백일때도 메시지가 처리됩니다. yup을 이용하여 formstate를 사용중인데 중복체크 처리를 어떤 식으로 해야하는지 알 수 있을까요? 설명을 잘 못해서 죄송합니다..