
Basic of Socket.io
Socket.IO의 기본 아이디어는 원하는 데이터와 함께 원하는 이벤트를 보내고 받을 수 있다는 것입니다.
JSON으로 인코딩할 수 있는 모든 개체가 가능하며 이진 데이터 도 지원됩니다.
Connection state recovery
연결 상태 복구
먼저 연결 해제가 없었던 것처럼 가장하여 연결 해제를 처리해 보겠습니다. 이 기능을 "연결 상태 복구"라고 합니다.
이 기능은 서버에서 보낸 모든 이벤트를 임시로 저장하고 클라이언트가 다시 연결될 때 클라이언트 상태를 복원하려고 시도합니다.
하지만 이것은 정말 놀라운 기능인데 왜 기본적으로 활성화되어 있지 않습니까?
여기에는 몇 가지 이유가 있습니다.
항상 작동하는 것은 아닙니다. 예를 들어 서버가 갑자기 충돌하거나 다시 시작되면 클라이언트 상태가 저장되지 않을 수 있습니다.
확장할 때 이 기능을 활성화하는 것이 항상 가능한 것은 아닙니다.
즉, 일시적인 연결 끊김 후(예: 사용자가 WiFi에서 4G로 전환하는 경우) 클라이언트 상태를 동기화할 필요가 없기 때문에 이는 정말 훌륭한 기능입니다.
Server delivery
목적 : build a chat working both after a temporary disconnection and a full page refresh.
There are two common ways to synchronize the state of the client upon reconnection:
재연결할 때 상태를 동기화하는 일반적 방법은 2가지가 있습니다.
- either the server sends the whole state
  서버가 모든 상태를 다 보내거나
- or the client keeps track of the last event it has processed and the server sends the missing pieces
  클라이언트가 마지막 진행된 이벤트를 추적을 진행하며 서버가 빠진 부분을 보내줍니다.
Both are totally valid solutions and choosing one will depend on your use case. In this tutorial, we will go with the latter.
두 개의 방법 모두 유효한 솔루션이며 당신의 상황에 근거해 방법을 선택하면 됩니다. 이 튜토리얼에서는 후자를 진행하겠습니다.
First, let's persist the messages of our chat application. Today there are plenty of great options, we will use SQLite here.
우선, 채팅 어플리케이션의 메세지를 유지하도록 하겠습니다. 오늘날 많은 옵션이 있지만 sqlite를 이용할 것입니다.
| TIP
| If you are not familiar with SQLite, there are plenty of tutorials available online, like (this one)[https://www.sqlitetutorial.net/].
Let's install the necessary packages:
npm install sqlite sqlite3We will simply store each message in a SQL table:
// index.js
const express = require('express');
const { createServer } = require('node:http');
const { join } = require('node:path');
const { Server } = require('socket.io');
const sqlite3 = require('sqlite3');
const { open } = require('sqlite');

async function main() {
  // open the database file
  const db = await open({
    filename: 'chat.db',
    driver: sqlite3.Database
  });

  // create our 'messages' table (you can ignore the 'client_offset' column for now)
  await db.exec(`
    CREATE TABLE IF NOT EXISTS messages (
        id INTEGER PRIMARY KEY AUTOINCREMENT,
        client_offset TEXT UNIQUE,
        content TEXT
    );
  `);

  const app = express();
  const server = createServer(app);
  const io = new Server(server, {
    connectionStateRecovery: {}
  });

  app.get('/', (req, res) => {
    res.sendFile(join(__dirname, 'index.html'));
  });

  io.on('connection', (socket) => {
    socket.on('chat message', async (msg) => {
      let result;
      try {
        // store the message in the database
        result = await db.run('INSERT INTO messages (content) VALUES (?)', msg);
      } catch (e) {
        // TODO handle the failure
        return;
      }
      // include the offset with the message
      io.emit('chat message', msg, result.lastID);
    });
  });

  server.listen(3000, () => {
    console.log('server running at http://localhost:3000');
  });
}

main();
The client will then keep track of the offset:
offset을 트랙하도록 client에 명령합시다
<!-- index.html -->
<script>
  const socket = io({
    auth: {
      serverOffset: 0
    }
  });

생략

  socket.on('chat message', (msg, serverOffset) => {
    const item = document.createElement('li');
    item.textContent = msg;
    messages.appendChild(item);
    window.scrollTo(0, document.body.scrollHeight);
    socket.auth.serverOffset = serverOffset;
  });
</script>
// index.js
if (!socket.recovered) {
// if the connection state recovery was not successful
try {
await db.each('SELECT id, content FROM messages WHERE id > ?',
[socket.handshake.auth.serverOffset || 0],
(_err, row) => {
socket.emit('chat message', row.content, row.id);
}
)
} catch (e) {
// something went wrong
}
}Client delivery
목적 : Let's see how we can make sure that the server always receives the messages sent by the clients.
INFO
By default, Socket.IO provides an "at most once" guarantee of delivery (also known as "fire and forget"), which means that there will be no retry in case the message does not reach the server.
기본적으로, Socket.IO "최대, 한번" 보장을 제공합니다.(이것은 "실행 후 삭제"라고도 함) 이것은 서버에 메시지가 도달하지 않는 경우 재실행은 없다는 것을 의미합니다.
Buffered events
When a client gets disconnected, any call to socket.emit() is buffered until reconnection:
클라이언트의 연결이 끊어지면 socket.emit()다시 연결될 때까지 모든 호출이 버퍼링됩니다.
This behavior might be totally sufficient for your application. However, there are a few cases where a message could be lost:
- the connection is severed while the event is being sent
- the server crashes or get restarted while processing the event
- the database is temporarily not available
At least once 적어도 최소 한번
We can implement an "at least once" guarantee:
우리는 "최소한번" 보장을 구현할 수 있습니다.
- manually with an acknowledgement:
승인을 통해 수동으로: - or with the retries option:
또는 retries 옵셥으로
In both cases, the client will retry to send the message until it gets an acknowledgement from the server:
두 경우 모두에서, 클라이언트는 서버로부터 승인을 받을때까지 메시지 보내기를 재실행합니다.
TIP
With the retries option, the order of the messages is guaranteed, as the messages are queued and sent one by one. This is not the case with the first option.
이 retries옵션을 사용하면 메시지가 큐에 추가되어 하나씩 전송되므로 메시지 순서가 보장됩니다. 첫 번째 옵션에서는 그렇지 않습니다.
Exactly once 정확히 한번만
The problem with retries is that the server might now receive the same message multiple times, so it needs a way to uniquely identify each message, and only store it once in the database.
재실행했을 때 문제점은 서버가 여러번 같은 메시지를 맏을 수 있다는 것입니다. 그래서 각 메시지를 유일하게 파악할수 있는 방법이 필요합니다. 그리고 데이터베이스에 이를 딱 한번만 저장해야합니다.
Let's see how we can implement an "exactly once" guarantee in our chat application.
We will start by assigning a unique identifier to each message on the client side:
<script>
  let counter = 0; // uniquely

  const socket = io({
    auth: {
      serverOffset: 0
    },
    // enable retries
    ackTimeout: 10000,
    retries: 3,
  });

  const form = document.getElementById('form');
  const input = document.getElementById('input');
  const messages = document.getElementById('messages');

  form.addEventListener('submit', (e) => {
    e.preventDefault();
    if (input.value) {
      // compute a unique offset
      const clientOffset = `${socket.id}-${counter++}`;
      socket.emit('chat message', input.value, clientOffset);
      input.value = '';
    }
  });

  socket.on('chat message', (msg, serverOffset) => {
    const item = document.createElement('li');
    item.textContent = msg;
    messages.appendChild(item);
    window.scrollTo(0, document.body.scrollHeight);
    socket.auth.serverOffset = serverOffset;
  });
</script>
And then we store this offset alongside the message on the server side:
// index.js
// [...]

io.on('connection', async (socket) => {
  socket.on('chat message', async (msg, clientOffset, callback) => {
    let result;
    try { // 들어온 메시지를 데이터베이스에 저장을 시도했다가
      result = await db.run('INSERT INTO messages (content, client_offset) VALUES (?, ?)', msg, clientOffset);
    } catch (e) {
      if (e.errno === 19 /* SQLITE_CONSTRAINT */ ) { // 성공적으로 저장하면
        // the message was already inserted, so we notify the client
        callback(); // 결과에 따라 콜백을 호출하는 방식으로 동작합니다. 여기서 콜백은 클라이언트에게 메시지가 성공적으로 저장되었음을 알려주는 역할
      } else {
        // nothing to do, just let the client retry
      }
      return;
    }
    io.emit('chat message', msg, result.lastID);
    // acknowledge the event
    callback();
  });

  if (!socket.recovered) {
    try {
      await db.each('SELECT id, content FROM messages WHERE id > ?',
        [socket.handshake.auth.serverOffset || 0],
        (_err, row) => {
          socket.emit('chat message', row.content, row.id);
        }
      )
    } catch (e) {
      // something went wrong
    }
  }
});

// [...]
This way, the UNIQUE constraint on the client_offset column prevents the duplication of the message.
CAUTION
Do not forget to acknowledge the event, or else the client will keep retrying (up to retries times).
socket.on('chat message', async (msg, clientOffset, callback) => {
  // ... and finally
  callback();
});
Now that our application is resilient to temporary network interruptions, let's see how we can horizontally scale it in order to be able to support thousands of concurrent clients.
이제 우리 어플리케이션은 일시적은 네트워크 장애에도 유지됩니다. 수천명의 클라이언트를 감당하기 위해 수평적인 스케일 확대는 어떻게 해야할지 봅시다.
NOTE
- Horizontal scaling (also known as "scaling out") means adding new servers to your infrastructure to cope with new demands
- Vertical scaling (also known as "scaling up") means adding more resources (processing power, memory, storage, ...) to your existing infrastructure
First step: let's use all the available cores of the host. By default, Node.js runs your Javascript code in a single thread, which means that even with a 32-core CPU, only one core will be used. Fortunately, the Node.js cluster module provides a convenient way to create one worker thread per core.
첫 번째 단계: 호스트의 사용 가능한 모든 코어를 사용하겠습니다. 기본적으로 Node.js는 단일 스레드에서 Javascript 코드를 실행합니다. 즉, 32코어 CPU에서도 하나의 코어만 사용됩니다. 다행히 Node.js cluster모듈은 코어당 하나의 작업자 스레드를 생성하는 편리한 방법을 제공합니다.
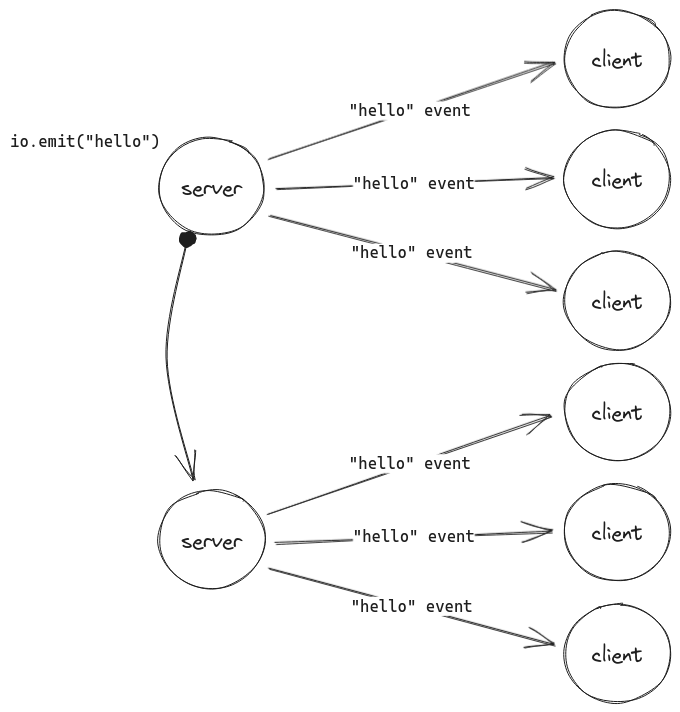
We will also need a way to forward events between the Socket.IO servers. We call this component an "Adapter".
또한 Socket.IO 서버 간에 이벤트를 전달하는 방법도 필요합니다. 우리는 이 구성 요소를 "어댑터"라고 부릅니다.
npm install @socket.io/cluster-adapter// index.js
const express = require('express');
const { createServer } = require('node:http');
const { join } = require('node:path');
const { Server } = require('socket.io');
const sqlite3 = require('sqlite3');
const { open } = require('sqlite');
const { availableParallelism } = require('node:os'); // 어댑터
const cluster = require('node:cluster');
const { createAdapter, setupPrimary } = require('@socket.io/cluster-adapter');
if (cluster.isPrimary) {
const numCPUs = availableParallelism();
// create one worker per available core
for (let i = 0; i < numCPUs; i++) {
cluster.fork({
PORT: 3000 + i
});
}
// set up the adapter on the primary thread
return setupPrimary();
}
async function main() {
const app = express();
const server = createServer(app);
const io = new Server(server, {
connectionStateRecovery: {},
// set up the adapter on each worker thread
adapter: createAdapter()
});
// [...]
// each worker will listen on a distinct port
const port = process.env.PORT;
server.listen(port, () => {
console.log(`server running at http://localhost:${port}`);
});
}
main();That's it! This will spawn one worker thread per CPU available on your machine. Let's see it in action:
그러면 컴퓨터에서 사용 가능한 CPU당 하나의 작업자 스레드가 생성됩니다
As you can see in the address bar, each browser tab is connected to a different Socket.IO server, and the adapter is simply forwarding the chat message events between them.
NOTE
In most cases, you would also need to ensure that all the HTTP requests of a Socket.IO session reach the same server (also known as "sticky session").
대부분의 경우, 너는 소켓.io 세션의 모든 HTTP 요청이 같은 서버에 요청하는지 확실히해야할 필요가 있다.
This is not needed here though, as each Socket.IO server has its own port.
지금 여기에서는 필요없지만, 왜냐면 지금은 각 소켓 서버에 자체 포트가 있기 때문에
And that finally completes our chat application! In this tutorial, we have seen how to:
send an event between the client and the server
클라이언트와 서버사이에 이벤트를 주고받는 법
broadcast an event to all or a subset of connected clients
연결된 모든 클라이언트 또는 하위 집합에 이벤트를 브로드캐스트하는 법
handle temporary disconnections
일시적인 연결 끊김 처리
scale up
확장
You should now have a better overview of the features provided by Socket.IO. Now it's your time to build your own realtime application!
애플리케이션을 개선하기 위한 몇 가지 아이디어는 다음과 같습니다.
누군가 연결하거나 연결을 끊을 때 연결된 사용자에게 메시지를 브로드캐스트합니다.
별명에 대한 지원을 추가합니다.
보낸 사용자에게 동일한 메시지를 보내지 마십시오. 대신 Enter 키를 누르는 즉시 메시지를 직접 추가하세요.
"{user}님이 입력 중" 기능을 추가했습니다.
누가 온라인에 있는지 보여주세요.
비공개 메시지를 추가하세요.
개선사항을 공유하세요!
