
🚨 완성본 미리보기
짜잔 ! 많이 우당탕 거리지만 콘텐츠 높이만큼 커지는 바텀 시트를 구현했다.
혹시나 코드 작성을 위해 제 블로그에 들어오셨다면 !! 아래 내용을 참고 부탁드립니다 ~ !
- 개발 언어 :
Next.js,typescript,react - 참고글 : Boris님의 리액트에서 Bottom Sheet 만들기 게시글
🚨 UI
1. html
<div
  className={`bottomSheet ${isAct ? "is-act" : ""}`}
  ref={sheet}
  style={{ transform: `translateY(${bottomSheetStyle.transform}px)`, height: `${bottomSheetStyle.height}px` }}
  >
  <div className="handlebar" onClick={(e) => handleClick(e)}>
    <span className="hidden">핸들바</span>
  </div>
  <div className="contents" ref={content}>
    {children}
  </div>
</div>
2. CSS
.bottomSheet {
  position: fixed;
  top: calc(100% - 125px);
  left: 0;
  z-index: 1;
  width: 100%;
  height: auto;
  min-height: 30rem;
  background: #fff;
  border-radius: 2rem 2rem 0 0;
  box-shadow: 0 -0.4rem 1rem 0 rgba(0, 0, 0, 0.2);
  padding: var(--layout-padding);
  padding-top: 0;
  padding-bottom: calc(var(--layout-padding) + 2rem);
  display: flex;
  flex-direction: column;
  overflow-y: auto;
  transition: all 0.5s;

  .handlebar {
    height: 50px;
    position: relative;
    display: flex;
    background: linear-gradient(to bottom, #fff 50%, transparent);
    position: sticky;
    inset: var(--layout-padding);
    top: 0;
    flex-shrink: 0;
    cursor: pointer;

    &::after {
      content: "";
      width: 16rem;
      height: 0.4rem;
      background: var(--color-gray-30);
      border-radius: 1rem;
      margin: var(--layout-padding) auto 0;
    }
  }
}

@media (min-width: 1024px) {
  .bottomSheet {
    inset: unset;
    top: 6rem;
    right: 0;
    width: 50%;
    max-width: 50rem;
    max-height: none;
    overflow-y: auto;
    height: calc(100% - 6rem) !important;
    border-radius: 0;

    box-shadow: none;
    background: none;
    padding: 0;
    flex-direction: row;
    align-items: center;
    transform: translateX(calc(100% - 2.8rem)) !important;

    .contents {
      height: 100%;
      padding: var(--layout-padding);
      border-radius: 2rem 0 0 2rem;
      background: #fff;
      box-shadow: 0 -0.4rem 1rem 0 rgba(0, 0, 0, 0.2);
      flex-grow: 1;
      overflow-y: auto;
    }

    .handlebar {
      inset: unset;
      flex-shrink: 0;
      width: 2.8rem;
      height: 6rem;
      background: #fff;
      z-index: 1;
      box-shadow: -0.2rem 0 0.3rem 0 rgba(0, 0, 0, 0.1);
      border-radius: 1rem 0 0 1rem;
      display: flex;
      justify-content: center;
      align-items: center;
      padding: 0;

      &::after {
        background: url(/icon-arrow.svg) no-repeat;
        width: 1.1rem;
        height: 2rem;
        margin: 0;
        transform: rotate(0);
        margin-right: 0;
        transition: all 0.5s;
      }
    }

    &.is-act {
      transform: translateX(0) !important;

      .handlebar::after {
        margin-right: -0.5rem;
        transform: rotate(180deg);
      }
    }
  }
}
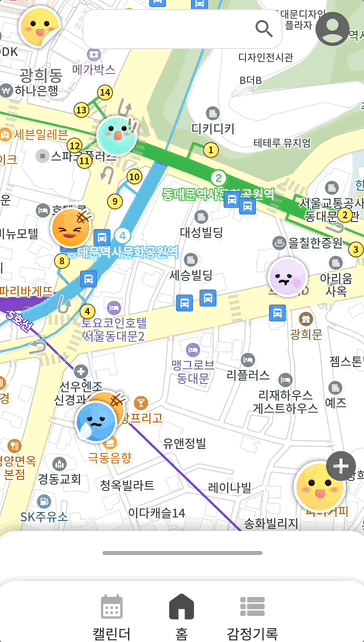
📍 핸들바
콘텐츠 높이에 따라 바텀 시트의 높이가 달라지다보니, 그에 따라 핸들바의 위치도 달라져야 했다.
- content의 높이 < bottom sheet 높이 : 핸들바
relative - content의 높이 > bottom sheet 높이 : 핸들바
fixed
| 콘텐츠의 높이가 작은 경우(relative) | 콘텐츠의 높이가 큰 경우 (fixed) |
|---|---|
 |  |
이를 구현하기 위해서 핸들바에 position: sticky 속성을 사용했다.
바텀 시트가 스크롤이 생기지 않으면 relative가 적용되어 자연스럽게 자리를 차지하고 있고, 스크롤이 생기면 fixed가 적용되어 스크롤을 해도 핸들바가 계속 노출된다.
📍 반응형
바텀 시트가 mobile에선 위아래로, PC에선 양옆으로 이동해야했다.
우선 코드는 mobile first로 작성되어 기본 기준은 모바일이다.
PC인 경우, is-act 클래스를 추가하여 양옆 이동이 되도록 구현했다.
🚨 기능
0. 전체 코드
"use client";
import { bottomSheetStyleState, isActBottomSheetState } from "@/atoms/atoms";
import "@/components/bottom-sheet/bottom-sheet.scss";
import { useRef, useEffect } from "react";
import { useRecoilState } from "recoil";

interface BottomSheetMetrics {
  touchStart: {
    sheetY: number;
    touchY: number;
  };
  touchMove: {
    prevTouchY?: number;
    movingDirection: "none" | "down" | "up";
  };
  isContentAreaTouched: boolean;
}
const windowHeight = typeof window !== "undefined" ? window.innerHeight : 0;

const BottomSheet = ({ children }: { children: React.ReactNode }) => {
  const [isAct, setIsAct] = useRecoilState(isActBottomSheetState);
  const [bottomSheetStyle, setBottomSheetStyle] = useRecoilState(bottomSheetStyleState);
  const MIN_Y = 80;
  const MAX_Y = windowHeight - 160;
  const docHeight = 60;
  const sheet = useRef<HTMLDivElement>(null);
  const content = useRef<HTMLDivElement>(null);
  const metrics = useRef<BottomSheetMetrics>({
    touchStart: {
      sheetY: 0,
      touchY: 0,
    },
    touchMove: {
      prevTouchY: 0,
      movingDirection: "none",
    },
    isContentAreaTouched: false,
  });

  useEffect(() => {
    const canUserMoveBottomSheet = () => {
      const { touchMove, isContentAreaTouched } = metrics.current;
      if (!isContentAreaTouched) return true;
      if (sheet.current!.getBoundingClientRect().y !== MIN_Y) return true;
      const contentEl = content.current!;
      if (touchMove.movingDirection === "down" && contentEl.scrollTop <= 0) return true;
      if (touchMove.movingDirection === "up" && contentEl.scrollTop + contentEl.clientHeight >= contentEl.scrollHeight)
        return true;
      return false;
    };

    const handleTouchStart = (e: TouchEvent) => {
      const { touchStart } = metrics.current;
      touchStart.sheetY = sheet.current!.getBoundingClientRect().y;
      touchStart.touchY = e.touches[0].clientY;
    };

    const handleTouchMove = (e: TouchEvent) => {
      const { touchStart, touchMove } = metrics.current;
      const currentTouch = e.touches[0];
      const height = content.current!.clientHeight;

      if (touchMove.prevTouchY === undefined) touchMove.prevTouchY = touchStart.touchY;
      // 맨 처음 앱 시작하고 시작시
      if (touchMove.prevTouchY === 0) touchMove.prevTouchY = touchStart.touchY;
      if (touchMove.prevTouchY < currentTouch.clientY) touchMove.movingDirection = "down";
      if (touchMove.prevTouchY > currentTouch.clientY) touchMove.movingDirection = "up";

      if (canUserMoveBottomSheet()) {
        if (height < content.current!.clientHeight) {
          e.preventDefault();
          const touchOffset = currentTouch.clientY - touchStart.touchY;
          let nextSheetY = touchStart.sheetY + touchOffset;
          if (nextSheetY <= MIN_Y) nextSheetY = MIN_Y;
          if (nextSheetY >= MAX_Y) nextSheetY = MAX_Y;
          setBottomSheetStyle({ transform: nextSheetY - MAX_Y, height });
        }
      }
    };

    const handleTouchEnd = (e: TouchEvent) => {
      const { touchMove } = metrics.current;
      const currentSheetY = sheet.current!.getBoundingClientRect().y;
      const height = content.current!.clientHeight + docHeight + 20;
      if (currentSheetY !== MIN_Y) {
        if (!sheet.current!.scrollTop && touchMove.movingDirection === "down") {
          setBottomSheetStyle({ transform: 0, height });
        }
        if (touchMove.movingDirection === "up") {
          setBottomSheetStyle({
            transform: Math.max(-height, -windowHeight * 0.8) + docHeight,
            height: Math.min(height, windowHeight * 0.8),
          });
        }
      }

      // metrics 초기화
      metrics.current = {
        touchStart: {
          sheetY: 0,
          touchY: 0,
        },
        touchMove: {
          prevTouchY: 0,
          movingDirection: "none",
        },
        isContentAreaTouched: false,
      };
    };

    sheet.current!.addEventListener("touchstart", handleTouchStart);
    sheet.current!.addEventListener("touchmove", handleTouchMove);
    sheet.current!.addEventListener("touchend", handleTouchEnd);
  }, []);

  useEffect(() => {
    const handleTouchStart = () => {
      metrics.current!.isContentAreaTouched = true;
    };
    content.current!.addEventListener("touchstart", handleTouchStart);
  }, []);

  const handleClick = (e: React.MouseEvent) => {
    if (e.type !== "click") return;
    setIsAct(!isAct);
  };

  return (
    <div
      className={`bottomSheet ${isAct ? "is-act" : ""}`}
      ref={sheet}
      style={{ transform: `translateY(${bottomSheetStyle.transform}px)`, height: `${bottomSheetStyle.height}px` }}
    >
      <div className="handlebar" onClick={(e) => handleClick(e)}>
        <span className="hidden">핸들바</span>
      </div>
      <div className="contents" ref={content}>
        {children}
      </div>
    </div>
  );
};

export default BottomSheet;
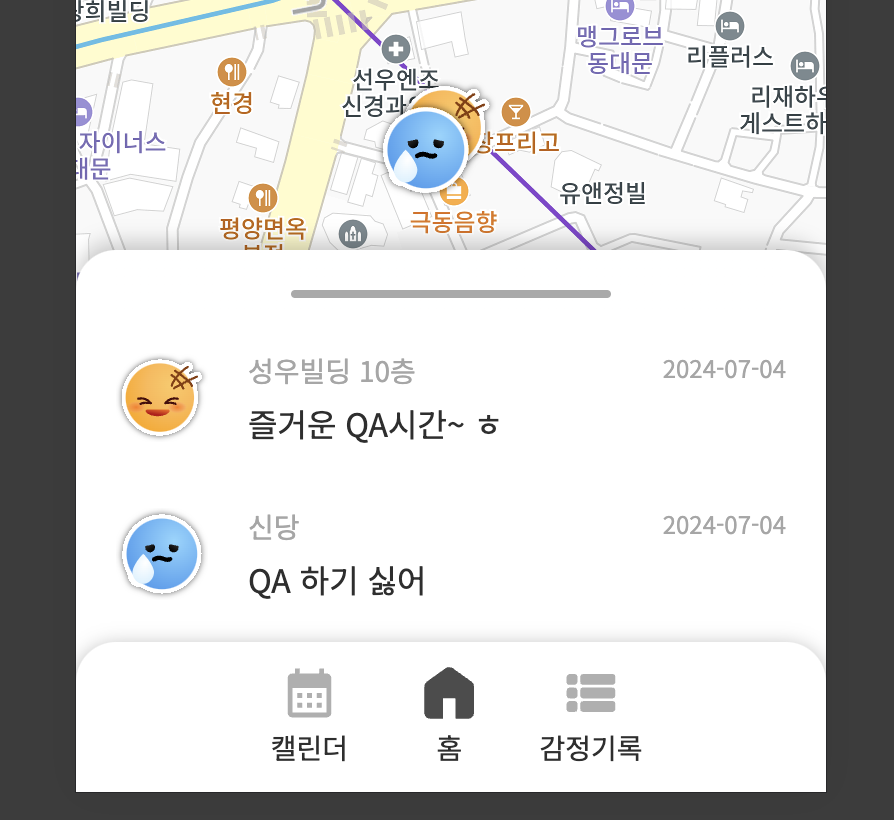
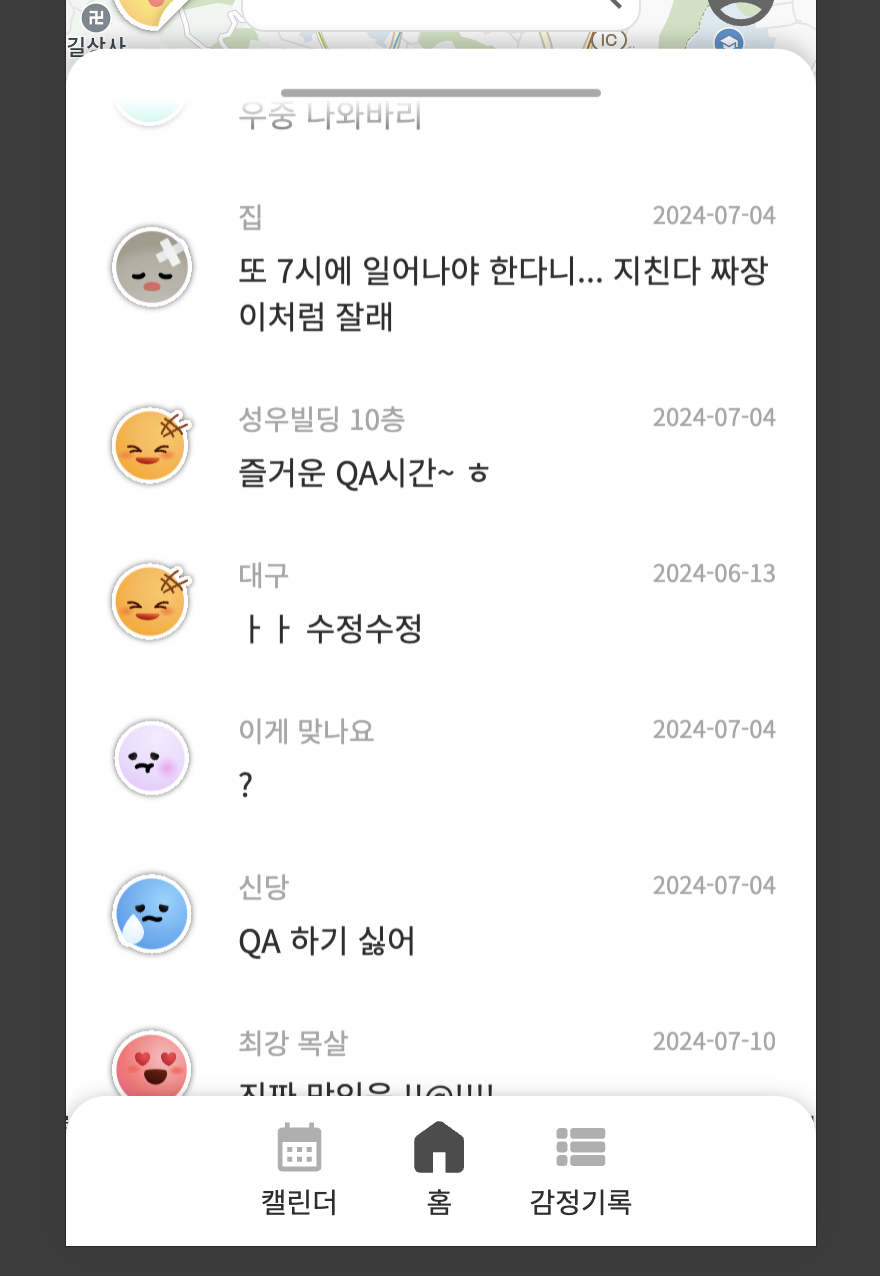
1. 콘텐츠 높이만큼 커지기
| 바텀 시트 높이가 고정된 경우 | 바텀 시트 높이가 콘텐츠 만큼인 경우 |
|---|---|
 |  |
📍 배경
처음 Boris님의 코드에선 바텀 시트가 활성화 되었을 때 높이가 지정되어있었다. 만약 콘텐츠가 화면의 5% 정도의 작아도, 나머지 75%의 여백이 함께 노출되었다. (위의 표 참고)
데이터 목록을 표시할 때 바텀 시트를 사용한 이유는 데이터 목록과 지도를 함께 노출하여 지도의 영역을 변경하며 동기적으로 데이터를 확인하기 위해서다.
하지만 콘텐츠의 높이가 작은 경우에도 바텀 시트가 지도를 다 가리면 지도 탐색에 불편함이 생겨 사용자를 답답하게 만든다는 생각이 들었다. 따라서 바텀 시트가 콘텐츠 만큼만 커지게 코드를 수정하였다.
📍 코드
const handleTouchEnd = (e: TouchEvent) => {
  ...
  const height = content.current!.clientHeight + docHeight;
  if (touchMove.movingDirection === "up") {
    sheet.current!.style.setProperty("transform", Math.max(-height, -window.innerHeight * 0.8) + docHeight);
    sheet.current!.style.setProperty("height", Math.min(height, window.innerHeight * 0.8));
  } else if (touchMove.movingDirection === "down") {
    sheet.current!.style.setProperty("transform", 0);
    sheet.current!.style.setProperty("height", height);
  }
  ...
}
📍 바텀 시트 활성화, 스크롤 방향이 up 인 경우
height는 콘텐츠의 높이와 80vh 둘 중 더 작은 값이 높이가 되도록 Math.min 메서드를 사용했다. 따라서 콘텐츠의 높이가 바텀 시트의 최대 높이보다 작은 경우 해당 높이가 적용된다.
transform은 바텀 시트가 위로 올라오며 보여져야 했다. 따라서 높이와는 반대로 네거티브 값이 적용되어야 했기 때문에 값은 같지만 음수가 되도록했고 Math.max 메서드를 이용했다.
콘텐츠의 높이는 useRef 훅을 활용하여 확인했다.
📍 바텀 시트 비활성화, 스크롤 방향이 down 인 경우
바텀 시트가 아래로 내려가는 경우는 훨씬 간단하다.
transform을 사용해 화면 아래로 내리기 때문에 높이는 중요하지 않았다.
따라서 transform은 다시 0으로, 높이는 기존 콘텐츠의 높이만큼 차지하게 했다.
📍 오류
하지만 다른 마커를 클릭하여 콘텐츠가 달라지고, 그에 따라 콘텐츠의 높이가 이전 콘텐츠와 확연히 다른 경우에 이전의 높이가 적용되는 이슈가 있다 ...
TODO: 콘텐츠 높이 잡기
2. 공통 컴포넌트화
📍 배경
콘텐츠의 높이만큼 바텀 시트의 높이가 설정되어야 해서 공통 컴포넌트로 변경하는 작업이 까다로웠다. useRef 로 받아온 콘텐츠의 높이를 다른 컴포넌트에선 설정할 수 없었다.
따라서 아래 2가지의 전역 변수를 설정했다.
- 바텀시트 활성화 여부
- 바텀시트 스타일(height, transform)
📍 bottom-sheet.tsx
isAct 값은 PC에서 클릭 이벤트를 처리하기 위한 값이다.
const [isAct, setIsAct] = useRecoilState(isActBottomSheetState);
const [bottomSheetStyle, setBottomSheetStyle] = useRecoilState(bottomSheetStyleState);
...
const handleTouchMove = (e: TouchEvent) => {
  ...
  if (canUserMoveBottomSheet()) {
    if (height < content.current!.clientHeight) {
      ...
      setBottomSheetStyle({ transform: nextSheetY - MAX_Y, height });
    }
  }
};

...
return (
  <div
    className={`bottomSheet ${isAct ? "is-act" : ""}`}
    ref={sheet}
    style={{ transform: `translateY(${bottomSheetStyle.transform}px)`, height: `${bottomSheetStyle.height}px` }}
    >
    <div className="contents" ref={content}>
      {children}
    </div>
  </div>
);
📍 handle-marker.tsx
바텀 시트를 사용하고자 하는 컴포넌트에서 querySelector를 활용하여 콘텐츠의 높이를 확인했다.
const setBottomSheet = () => {
  const contentElement = document.querySelector(".bottomSheet .contents");
  const sheetHeight = contentElement?.clientHeight ?? 0;
  setBottomSheetStyle({
  	transform: Math.max(-sheetHeight, -windowHeight * 0.8),
    height: Math.min(sheetHeight, windowHeight * 0.8),
  });
};

const handleClick = (marker: kakao.maps.Marker, type: string) => {
  ...
  setIsActBottomSheet(true);
  if (windowWidth < 1024) setBottomSheet();
  ...
};
3. 터치 이벤트 오류
이렇게 열심히 작업을 하다가 처음으로 배포를 했다. 배포하고 실제로 터치 이벤트가 어떻게 발생하는지 보았는데요 ? 정말 충격 그 자체였다.
🥹 : 미리 했어야 했지만 .. 타입스크립트를 처음 사용하면서 수많은 타입 오류를 마주해 배포가 미뤄졌어요 ,, 배포는 꼭 미리 하기 ,,, !!
글을 작성하는 이 시점에는 수정된 버전으로 다시 배포가 되어서 ... 충격과 공포인 제 코드를 보여드릴 수가 없는데요 ? 문제는 다음과 같았다.
📍 문제 상황
위로 스와이프를 하면 바텀 시트는 아래로 내려감 (??)
정말 어처구니 없는 상황이죠? 배포의 기쁨도 잠시, 무진장 크리티컬한 오류 분석에 들어갔다. 바텀 시트를 위로 스와이프해서 활성화되어야 하는데 바텀 시트가 내려간다라 ,,,
📍 바텀 시트 활성화 조건
바텀 시트에 터치 이벤트가 발생하면 아래의 함수를 통해 활성화 여부를 체크한다.
현재 문제는 바텀 시트를 활성화할 때, 즉 움직임 방향이 up인 경우 발생하기 때문에 아래의 조건을 추가했다. 콘텐츠의 scrollTop 값과 높이를 더한 값이 스크롤을 고려한 높이보다 클 때만 바텀 시트가 활성화되도록 했다.
const canUserMoveBottomSheet = () => {
  // ❌ 이전 버전
  if (touchMove.movingDirection === "down") return content.current!.scrollTop <= 0

  // ⭕️ 수정 버전
  ...
  const contentEl = content.current!;
  if (touchMove.movingDirection === "down" && contentEl.scrollTop <= 0) return true;
  if (touchMove.movingDirection === "up" && contentEl.scrollTop + contentEl.clientHeight >= contentEl.scrollHeight) return true;
  return false;
};
📍 콘텐츠 내부 스크롤, 바텀 시트 비활성화 구분
바텀 시트를 위로 스와이프해서 활성화시키면 비활성화되는 (ㅋㅋ) 오류를 수정하니 다른 오류도 마주했다. 내부 스크롤과 바텀 시트 비활성화 이벤트에 충돌이 발생했다.
손가락이 화면에서 떨어지는 handleTouchEnd 이벤트에서 콘텐츠 스크롤의 위치를 파악했다. 따라서 scrollTop이 0일 때만 바텀 시트가 비활성화 되도록 조건을 추가했다.
- 콘텐츠의 scrollTop이 0: 바텀시트 비활성화
- 콘텐츠의 scrollTop이 0이 아님: 콘텐츠 스크롤 (바텀시트 X)
const handleTouchEnd = (e: TouchEvent) => {
  ...
  const height = content.current!.clientHeight + docHeight + 20;
  if (currentSheetY !== MIN_Y) {
    // ✅ 조건 추가
    if (!sheet.current!.scrollTop && touchMove.movingDirection === "down") {
      setBottomSheetStyle({ transform: 0, height });
    }
    ...
  }
4. next.js : window 몰라요
클라이언트 컴포넌트임에도 넥스트가 window를 찾지 못하는 불상사가 일어났다.
이를 방지하고자 window를 찾지 못하는 경우, window의 높이를 0으로 지정했다.
const windowHeight = typeof window !== "undefined" ? window.innerHeight : undefined;처음엔 위와 같이 설정했으나, undefined 일 수 있는 대상에게 뭔갈 할 수 없다며 타입스크립트가 오류를 내뿜었다. 그래서 넘버 타입의 초기화 느낌으로 0을 할당했다.
넥스트에서 window를 사용할 땐 이와 같은 오류가 항상 발생하니 참고하자!
(만약 더 좋은 방법을 아신다면 댓글 부탁드립니다.)
🚨 참고자료