_-_Security_Filter.png)
Web Security
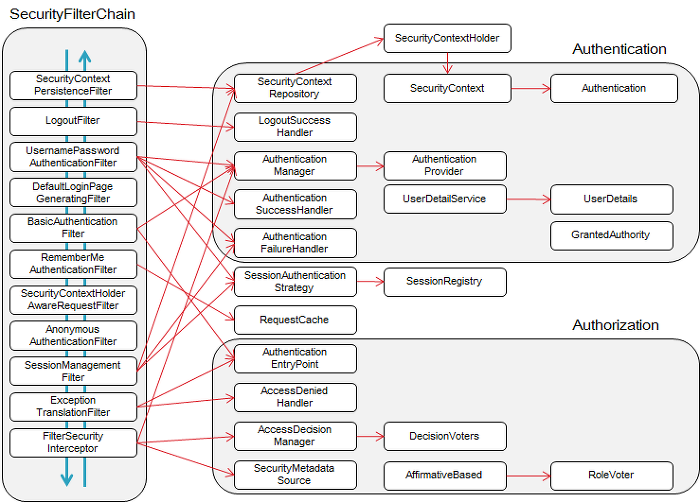
기본 설정시 Spring Security는 일련의 서블릿 필터 체인을 자동으로 구성한다.
(web tier에 있는 Spring Security는 Servlet Filter에 기반을 두고 있다.)
일반적인 웹 환경에서 브라우저가 서버에게 요청을 보내게 되면, DispatcherServlet(FrontController)가 요청을 받기 이전에 많은 ServletFilter(서블릿 필터)를 거치게 된다.
JWTAuthenticationTokenFilter
그럼 JWT 토큰을 사용하여 인증하는 부분을 커스텀하고, 스프링 시큐리티에 Filter을 적용시켜 보자.
1. 커스텀한 Security Filter 추가하기
WebSecurityConfigure.java - @Bean 생성
@Bean
public JwtAuthenticationTokenFilter jwtAuthenticationTokenFilter(AuthenticationManager authenticationManager, JWT jwt) {
	return new JwtAuthenticationTokenFilter(authenticationManager, jwt);
}
//...
WebSecurityConfigure.java - configure에 addFilterBefore() 추가
@Override
protected void configure(HttpSecurity http) throws Exception {
        // ...
     http
             .addFilterBefore(jwtAuthenticationTokenFilter(authenticationManagerBean(), jwt()), UsernamePasswordAuthenticationFilter.class);
}
2. Security Filter 커스텀하여 작성하기
내가 알기론
BasicAuthenticationFilter대신GenericFilterBean을 상속받아 사용해도 된다.
차이점에 대해서는 더 알아봐야 겠지만 Servlet Filter 기능이 있다면 사용이 가능해도 되는듯하다.
다음으로 JWT Token을 받아 수행하는 Filter를 작성해보자.
난 BasicAuthenticationFilter를 상속받아서 doFilterInternal를 Override 받았다.
doFilterInternal 메서드는 JWT 토큰을 받고, 내어보내는 endpoint 이다.
protected void doFilterInternal(HttpServletRequest request, HttpServletResponse response, FilterChain chain)
            throws IOException, ServletException
내가 커스텀하여 작성한 doFilterInternal 메서드의 동작 흐름은 다음과 같다.
1) HttpServletRequest request에서 Header(jwtToken)를 획득한다.
2) Header에 JwtToken이 null이 아니면, JwtToken을 복호화하여 안에 정보를 획득한다.
3) 만료 시간(expiredAt)과 현재 시간을 비교하여 RefreshToken을 생성할지 고려한다.
4) JwtToken안에 있는 payload 즉, Claims를 꺼내고 권한정보까지 만들어 인증처리된 Authentication을 생성한다.
5) 생성한 Authentication을 SecurityContextHolder에 저장한다.
6) 스프링의 나머지 FilterChain들을 수행할 수 있도록 doFilter(request,response)를 호출한다.
JwtAuthenticationTokenFilter.java
public class JwtAuthenticationTokenFilter extends BasicAuthenticationFilter {
    @Value("${jwt.token.header}")
    private String tokenHeader;

    private static final Pattern BEARER = Pattern.compile("^Bearer$", Pattern.CASE_INSENSITIVE);

    private final JWT jwt;

    public JwtAuthenticationTokenFilter(AuthenticationManager authenticationManager, JWT jwt) {
        super(authenticationManager);
        this.jwt = jwt;
    }

    // endpoint every request hit with authorization
    @Override
    protected void doFilterInternal(HttpServletRequest request, HttpServletResponse response, FilterChain chain)
            throws IOException, ServletException {

        String jwtToken = getAuthenticationToken(request);

        if( jwtToken != null ) {
            JWT.Claims claims = jwt.verify(jwtToken);
            log.info("[JwtAuthenticationTokenFilter] claims: {}", claims);

            if( needRefresh(claims, 1000L * 60L) ) { // 10분
                log.info("[JwtAuthenticationTokenFilter] refresh token");
                String refreshJwtToken = jwt.refreshToken(jwtToken);
                response.setHeader(tokenHeader, refreshJwtToken);
            }

            Long userKey = claims.getUserKey();
            String email = claims.getEmail();
            String name = claims.getName();
            List<GrantedAuthority> authorities = getAuthorities(claims);

            JwtAuthenticationToken authentication =
                    new JwtAuthenticationToken(new JwtAuthentication(userKey,name,email),null, authorities);
            authentication.setDetails(new WebAuthenticationDetailsSource().buildDetails(request));
            SecurityContextHolder.getContext().setAuthentication(authentication);
        }

        // Continue filter execution
        chain.doFilter(request, response);
    }

    private String getAuthenticationToken(HttpServletRequest request)  {
        // Read the Authorization header, where the JWT Token should be
        String token = request.getHeader(tokenHeader);
        if( token != null ) {
            if( log.isDebugEnabled() )
                log.debug("[JwtAuthenticationTokenFiler] token: {} ", token);

            try {
                token = URLDecoder.decode(token, "UTF-8");
                String[] parts = token.split(" "); // Bearer ~encodedToken
                if( parts.length == 2 ) {
                    String bearer = parts[0];
                    String encodedToken = parts[1];
                    return BEARER.matcher(bearer).matches() ? encodedToken : null;
                }

            } catch (UnsupportedEncodingException e) {
                log.error(e.getMessage(), e);
            }
        }

        return null;
    }

    private boolean needRefresh(JWT.Claims claims, long rangeOfRefreshMillis) {
        long exp = claims.getExpiresAt().getTime();
        if( exp > 0 ) {
            long remain = exp - System.currentTimeMillis();
            return remain < rangeOfRefreshMillis ? true : false;
        }
        return false;
    }

    private List<GrantedAuthority> getAuthorities(JWT.Claims claims) {
        String[] roles = claims.getRoles();
        return roles.length == 0 || roles == null ?
                Collections.emptyList() :
                Arrays.stream(roles).map(SimpleGrantedAuthority::new).collect(toList());
    }
}
마무리
Spring Security에서 JWT 토큰을 검증하는 Filter를 커스텀해보았다.
HTTP 프로토콜에서 request, response를 받을 수 있는 BasicAuthenticationFilter을 상속받아 필요에 따라 커스텀하여 작성하였다.
JWT 토큰은 HTTP 구조 중 헤더에 있기 때문에 헤더에서 JWT 토큰을 받아 검증하고, 인증이 되면 SecurityContext에 보관하여 보안을 통과하게 된다.
이처럼 스프링 시큐리티는 기본적으로 서블릿 필터를 가지고 있어 인증이 되지 않으면 보안상 웹 페이지 접근에 제한 처리를 해버린다.
따라서, 매번 웹 uri로 자원에 접근할때 WebSecurityConfigure에서 configure()에 설정해둔 uri 매칭에 따라permitAll()이나 Role을 가지고 있는지 체크하는 hasRole을 통해 인증과정을 거친다.
이때, addFilterBefore로 추가한 JwtAuthenticationTokenFilter도 당연히 Filter로 사용하게 되고 JWT 토큰을 검증하여 로그인 인증을 통과 시킨다.
이와 관련된 내용을 더 찾아보고 싶다면 다음 사이트를 추천합니다! 👉 Spring Security tutorial
참고
다음 블로그들을 참고하여 작성하였습니다.
Spring Security Filter Chain
Spring Security 아키텍처
JWT Security JwtAuthenticationFilter 구현
(프로그래머스) 단순 CRUD는 그만! 웹 백엔드 시스템 구현 온라인 스터디(Java반) 강의를 수강하고 제가 이해한대로 정리했습니다. 문제가 될시 삭제하겠습니다!