
가계부 프로젝트에서 제일 중요한 것이 한 달 사용 내역을 한 눈에 확인할 수 있는 캘린더라고 생각한다
date-picker같은 라이브러리를 사용해서 구현할 수도 있지만 첫 프로젝트이고 가계부에서 캘린더는 정말 정말 메인 기능이라고 생각하기 때문에 직접 만들어보고 싶었다
라이브러리는 단순히 date를 pick! 해야 할 때 쓰기로 하고, 일단 내역 확인에서는 직접 만들어보기로 했다
import React, { useState } from 'react';
import moment, { Moment } from 'moment';
import { QueryObserverResult, UseQueryResult, useQuery } from 'react-query';
import '../../styles/components/_Calender.scss';
import { useParams } from 'react-router';
import { isAfter, isSameDay } from 'date-fns';
import CalendarModal from './CalendarModal';
import accounts from '../../api/accounts';

interface CalendarProps {
  today: Moment;
  incomeType: (type: string) => string;
  expenditureType: (type: string) => string;
  getAccountRefetch: QueryObserverResult['refetch'];
}

// 월별, 일별 수입/지출 총 금액 조회
interface TotalStatus {
  day: string;
  expenditure_sum: number;
  income_sum: number;
}

interface AccountTotalResponseDto {
  accountTotalResponseDtoList: TotalStatus[];
  expenditure_sum: number;
  income_sum: number;
}

function Calendar({
  today,
  incomeType,
  expenditureType,
  getAccountRefetch,
}: CalendarProps): JSX.Element {
  // 현재 가계부의 id 조회
  const { id } = useParams<{ id?: string }>();

  // 현재 조회하고 있는 달
  const currentMonth = today.format('YYYY-MM');

  // 월별, 일별 수입/지출 총 금액 조회
  const {
    data: getTotalMonthDate,
    refetch: getTotalMonthDateRefetch,
  }: UseQueryResult<AccountTotalResponseDto> = useQuery(
    ['getTotalMonthDate', id, currentMonth],
    () => accounts.getTotalMonthDate(id as string, currentMonth)
  );

  const monthTotal = getTotalMonthDate?.accountTotalResponseDtoList;
react-query로 받아온 데이터를 일별 수입 / 지출에 표시해주기 위해 monthTotal이라는 변수에 할당해주었다
  // 숫자 형식화 함수
  const formatNumber = (value: number) => {
    if (value >= 100000000) {
      const stringValue = value.toString();
      const remainingDigits = stringValue.substring(0, stringValue.length - 8);
      return `${remainingDigits}억원`;
    }
    if (value >= 100000) {
      const stringValue = value.toString();
      const firstTwoDigits = stringValue.substring(0, stringValue.length - 4);
      return `${firstTwoDigits}만원`;
    }
    if (value >= 10000 && value < 100000) {
      const stringValue = value.toString();
      const firstDigit = stringValue[0];
      const secondDigit = stringValue[1];
      return `${firstDigit}만${secondDigit}천원`;
    }
    if (value >= 1000 && value < 10000) {
      const firstDigit = Math.floor(value / 1000);
      return `${firstDigit}천원`;
    }
    return `${value.toLocaleString().split('.')[0]}원`;
  };
큰 금액을 입력하다 보면 한정된 캘린더의 크기를 넘어서 표시되는 경우가 있었다
👉 억단위까지 테스트....!! (실제로 억 이상 입력하는 유저가 있었음)
숫자 형식화 함수를 만들어 금액 단위를 나누어서 표현하게 했다
  // 날짜 클릭 시 상세 모달
  const [calendarModal, setCalendarModal] = useState<boolean>(false);
  const [selectedDate, setSelectedDate] = useState<string>('');
  // 모달 오픈/클로즈 애니메이션
  const [modalAnimation, setModalAnimation] = useState('');

  const calendarModalOpen = (date: string): void => {
    if (isSameDay(new Date(date), new Date())) {
      setSelectedDate(date);
      setCalendarModal(true);
      setModalAnimation('modalAnimation');
    }
    if (!isAfter(new Date(date), new Date())) {
      setSelectedDate(date);
      setCalendarModal(true);
      setModalAnimation('modalAnimation');
    }
  };

  const firstWeek = today.clone().startOf('month').week();
  const lastWeek =
    today.clone().endOf('month').week() === 1
      ? 53
      : today.clone().endOf('month').week();
이번달의 첫째 주와 마지막 주가 올 해의 몇번째 주인지 확인
  const calendarArr = () => {
    let result: JSX.Element[] = [];
    let currentweek = firstWeek;

    const generateTableCells = (week: number): JSX.Element[] =>
      Array(7)
        .fill(0)
        .map((_, index) => {
          const days = today
            .clone()
            .startOf('year')
            .week(week)
            .startOf('week')
            .add(index, 'day');
날짜 생성을 위해 일주일의 날짜를 가지는 배열을 생성한다
          const matchingData = monthTotal?.find(
            (item) => item.day === days.format('YYYY-MM-DD')
          );

          if (moment().format('YYYYMMDD') === days.format('YYYYMMDD')) {
            return (
              <button
                type="button"
                className="td"
                key={days.format('YYYY-MM-DD')}
                style={{ color: 'black' }}
                onClick={() => calendarModalOpen(days.format('YYYY-MM-DD'))}
              >
                <span className="today" data-text={days.format('D')}>
                  {days.format('D')}
                </span>
                <div className="accountPriceHeight">
                  {matchingData?.expenditure_sum ? (
                    <span className="accountPrice expenditure">
                      -{formatNumber(matchingData.expenditure_sum)}
                    </span>
                  ) : (
                    ''
                  )}
                  {matchingData?.income_sum ? (
                    <span className="accountPrice income">
                      +{formatNumber(matchingData.income_sum)}
                    </span>
                  ) : (
                    ''
                  )}
                </div>
              </button>
            );
          }
해당 날짜가 오늘이라면 css를 다르게 줘야하기 때문에 if문을 두개로 만들었다
날짜를 클릭하면 일일 상세 내역이 나타나야 하기 때문에 key에는 고유한 값인 해당 날짜를 할당해주었다
그리고 날짜 밑에 react-query로 가져온 해당 날짜의 수입과 지출 금액을 각각 나타냈다
          if (days.format('MM') !== today.format('MM')) {
            return (
              <button
                type="button"
                className="notThisMonthBox"
                key={days.format('YYYY-MM-DD')}
              >
                <span>{days.format('D')}</span>
              </button>
            );
          }
그리고 달력을 주 단위로 만들었기 때문에 이번달이 아니더라도 같은 주에 속해있으면
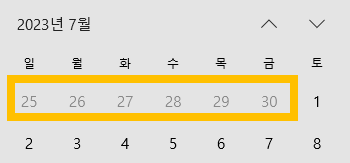
👉 예) 7월 달력에 6월이 나와있으면 보기 싫으니까!
.notThisMonthBox {
  box-sizing: border-box;
  display: flex;
  justify-content: space-between;
  align-items: center;
  flex-direction: column;
  width: 100%;
  height: 56.5px;
  border-radius: 0px;
  padding-bottom: 10px;
  cursor: default;
  & span {
    color: white;
  }
}
아예 글자가 보이지 않고 클릭도 할 수 없게 해주었다
          return (
            <button
              type="button"
              className="td"
              key={days.format('YYYY-MM-DD')}
              onClick={() => calendarModalOpen(days.format('YYYY-MM-DD'))}
            >
              <span className="eachDate">{days.format('D')}</span>
              <div className="accountPriceHeight">
                {matchingData?.expenditure_sum ? (
                  <span className="accountPrice expenditure">
                    -{formatNumber(matchingData.expenditure_sum)}
                  </span>
                ) : (
                  ''
                )}
                {matchingData?.income_sum ? (
                  <span className="accountPrice income">
                    +{formatNumber(matchingData.income_sum)}
                  </span>
                ) : (
                  ''
                )}
              </div>
            </button>
          );
        });

    for (currentweek; currentweek <= lastWeek; currentweek += 1) {
      result = result.concat(
        <tr className="tr" key={currentweek}>
          {generateTableCells(currentweek)}
        </tr>
      );
    }

    return result;
  };
이렇게 만든 각 주들의 배열을 for문을 통해 마지막주까지 반복하면서 result배열에 tr(행)로 추가해줬다
  return (
    <div className="calBackground">
      {calendarModal && (
        <CalendarModal
          setCalendarModal={setCalendarModal}
          selectedDate={selectedDate}
          incomeType={incomeType}
          expenditureType={expenditureType}
          getAccountRefetch={getAccountRefetch}
          getTotalMonthDateRefetch={getTotalMonthDateRefetch}
          modalAnimation={modalAnimation}
          setModalAnimation={setModalAnimation}
        />
      )}
      <div className="days">
        <p className="sun">일</p>
        <p>월</p>
        <p>화</p>
        <p>수</p>
        <p>목</p>
        <p>금</p>
        <p className="sat">토</p>
      </div>
      <table className="dates">
        <tbody className="date">{calendarArr()}</tbody>
      </table>
    </div>
  );
}

export default Calendar;
달력의 윗부분에는 요일을 표시해서 주말만 색을 다르게 하고, 그 밑에 table로 위에서 만들어준 캘린더를 출력해줬다