1. JSON
- JavaScript Object Notation의 약자
- 데이터 표시하는 방법 중 하나로
데이터를 문자열이 형태로 나타내기 위해 사용된다. - JavaScript의 Object를 기반으로 하는 텍스트 형식
- key 이름을
큰 따옴표("")로 감싼다. - Client와 Server가 JSON이라는 특별한 형식의 데이터로 정보를 주고 받는다.
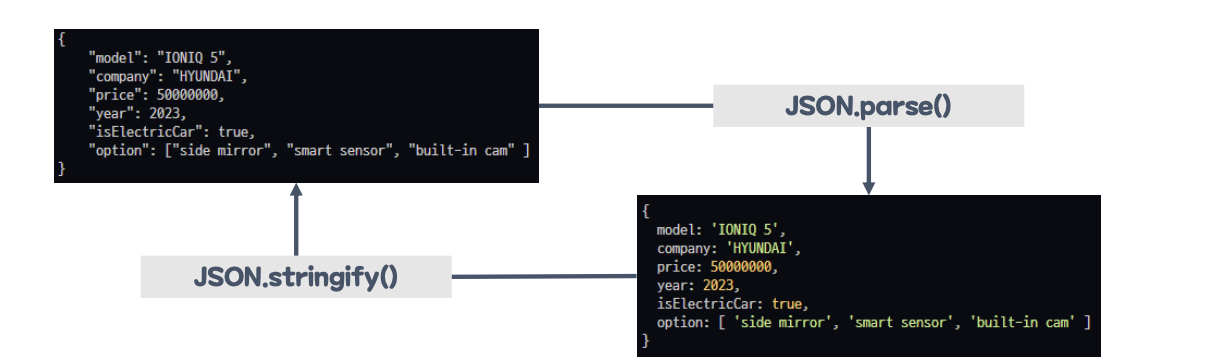
1-1. JSON 내장객체
- JavaScript Object와 JSON 문자열을 서로 변환할 수 있도록 메서드 제공
-JSON.parse(): JSON 문자열을 JavaScript 객체로 변환
-JSON.stringify(): JavaScript 객체를 JSON 문자열로 변환
2. 회원가입 예제
2-1. axios의 get 메소드를 이용해 받게끔 작업
- 그냥 html이 아닌
ejs 템플릿로 작업한다는 것을 알아두자. -> html에서 js코드를 사용할 수 있다.
✅ 터미널에서 아래의 코드를 순서대로 작성
npm init -y
npm i express ejs
npm i -g nodemon
axios cdn이다. html head에 작성해주고 시작하면 된다! <script src="https://cdn.jsdelivr.net/npm/axios/dist/axios.min.js"></script>
실행코드
ejs 코드
<body>
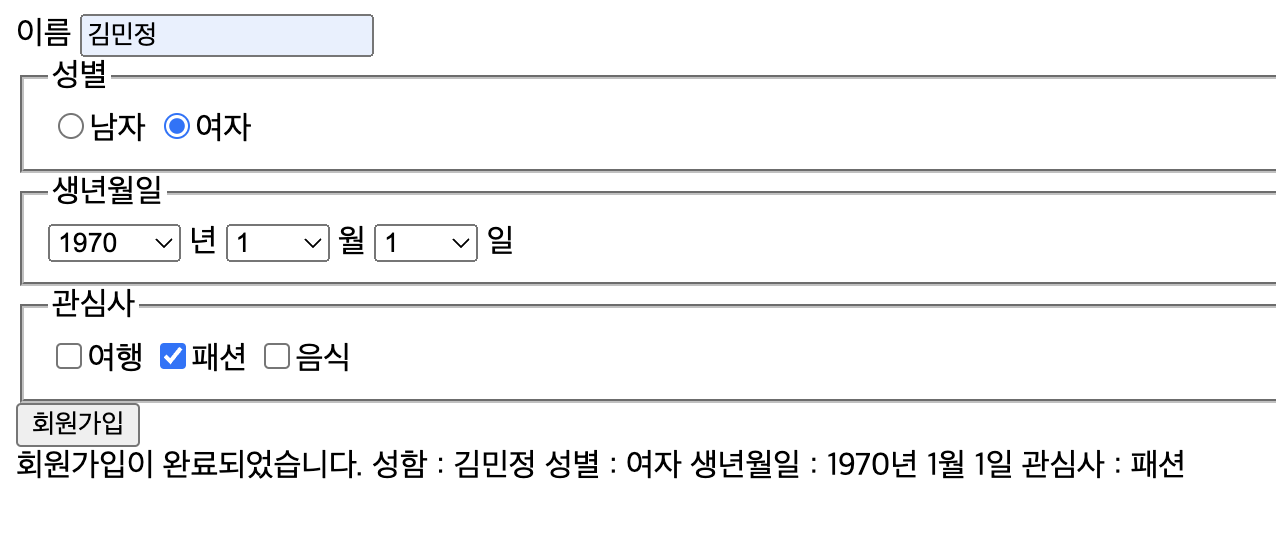
<form name = "register-form">
<label for="name" name="name">이름</label>
<input type="text" name="name" id="name" />
<fieldset>
<legend>성별</legend>
<label for="male">
<input type="radio" name="gender" value="남자" id = "male" required>남자</input>
</label>
<label for="female">
<input type="radio" name="gender" value="여자" id = "female" required>여자</input>
</label>
</fieldset>
<fieldset>
<legend>생년월일</legend>
<!-- <input type="date" name="birth" id="birth"> -->
<select name="year" id="year">
<optgroup label="년">
<% for(let i =1970;i <=2024 ; i++){ %>
<option value="<%= i%>"><%= i%></option>
<% } %>
</optgroup>
</select>
<label for = "year">년</label>
<select name="month" id="month">
<optgroup label="월">
<% for(let i =1;i <= 12; i++){ %>
<option value="<%= i%>"><%= i%></option>
<% } %>
</optgroup>
</select>
<label for = "month">월</label>
<select name="day" id="day">
<optgroup label="일">
<% for(let i =1;i <= 31; i++){ %>
<option value="<%= i%>"><%= i%></option>
<% } %>
</optgroup>
</select>
<label for = "day">일</label>
</fieldset>
<fieldset>
<legend>관심사</legend>
<label for="trip">
<input type="checkbox" name="interests" id = "trip" value="여행">여행</input>
</label>
<label for="fashion">
<input type="checkbox" name="interests" id = "fashion"value ="패션">패션</input>
</label>
<label for="food">
<input type="checkbox" name="interests" value="음식" id = "food">음식</input>
</label>
</fieldset>
<button type="button" onclick = "axiosGetPrac()">회원가입</button>
</form>
<!-- result 페이지를 추가로 만들지 않고 그냥 한 화면에서 결과 나오게끔 하기위해 div 생성. -->
<div class = "result"></div>
<script>
const resultBox = document.querySelector('.result')
function axiosGetPrac(){
const form = document.forms['register-form'];
const interests = [];
const checked = form.querySelectorAll('input[type="checkbox"]:checked'); //체크박스에서 체크되어있는 모든 값들을 가져오는 선택자.
checked.forEach((elem) => {
interests.push(elem.value);
});
//백엔드로 보낼 데이터
const data = {
name : form.name.value,
gender : form.gender.value,
year : form.year.value,
month : form.month.value,
day : form.day.value,
interests,
};
axios({
method : 'get',
url : '/axios',
params : data,
}).then((res)=>{
console.log('res',res)
resultBox.textContent = `회원가입이 완료되었습니다. 성함 : ${res.data.name}
성별 : ${res.data.gender}
생년월일 : ${res.data.year}년 ${res.data.month}월 ${res.data.day}일
관심사 : ${res.data.interests}`
})
}
</script>
</body>js코드
const express = require('express');
const app = express();
const PORT = 8000;

//body-parser
app.use(express.urlencoded({ extended: true }));
app.use(express.json());

//view engine
app.set('view engine', 'ejs');
app.set('views', './views');

//===router (실제 페이지 생성)
app.get('/', (req, res) => {
    res.render('pracget'); //page
});

//데이터 요청 및 응답
const id = 'kdt11';
const pw = '1234';
app.get('/axios', (req, res) => {
    console.log('요청값', req.query);
    res.send(req.query);
    //res.send({response : req.query})하게되면 콘솔에 data객체에 response : name이름 이런식으로 뜨게 됌
});

app.listen(PORT, () => {
    console.log(`http://localhost:${PORT}`);
});
실행결과
 -> 이렇게 바로 프론트 화면에 결과 값이 나오는 것을 확인할 수 있다.
추가설명
.then((res)=>{
          console.log('res',res)
          resultBox.textContent = `회원가입이 완료되었습니다. 성함 : ${res.data.name}
          성별 : ${res.data.gender}
          생년월일 : ${res.data.year}년 ${res.data.month}월 ${res.data.day}일
          관심사 : ${res.data.interests}`
     })
-> 여기에서 ${res.year}이 아니라 ${res.data.year}인 이유를 알기 위해 res를 콘솔에서 출력해보면,
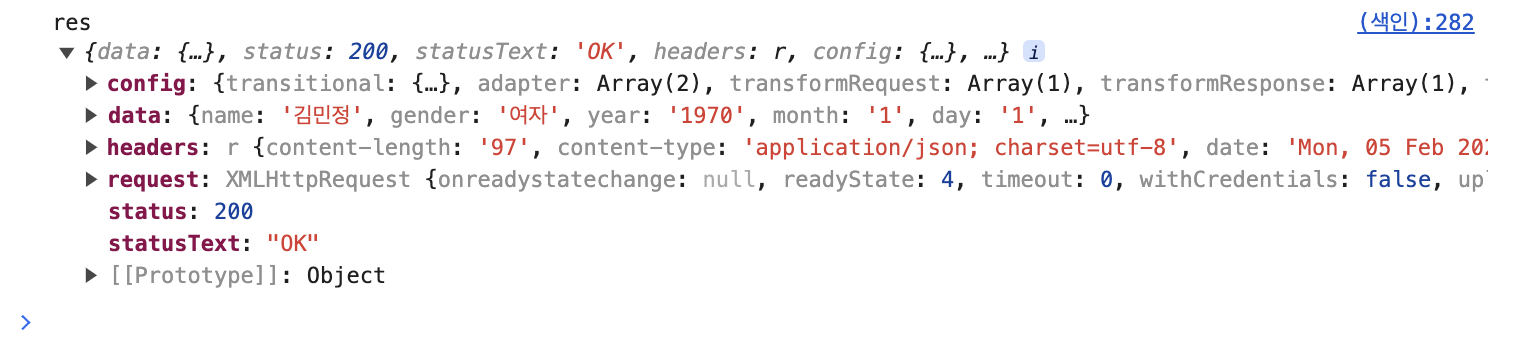 -> res안에 data안의 객체에 저장되기 때문이다. 객체안의 객체.
2-2. axios 방법의 post 메소드 이용
- index.js에서 id,pw를 변수로 저장해두고, 로그인할 수 있게 하기.
- 결과를 받아와
실패 메시지는 빨간글자,성공 메시지는 파란글자로 같은 화면에 나타나게 만들기
실행코드
ejs 코드
<body>
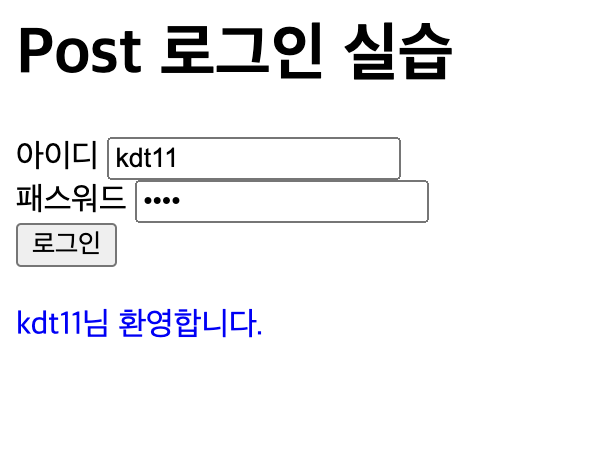
<h1>Post 로그인 실습</h1>
<form method="post">
<label for="username">아이디</label>
<input type="text" id="username" required />
<br />
<label for="pw">패스워드</label>
<input type="password" id="pw" required />
<br />
<button type="button" onclick="login()">로그인</button>
</form>
<br />
<div class="result"></div>
<script>
const resultBox = document.querySelector('.result');
function login() {
//백엔드로 요청 보낼 데이터
const data = {
id: document.querySelector('#username').value,
pw: document.querySelector('#pw').value,
};
axios({
method: 'post',
url: '/resultPost',
data,
}).then((res) => {
console.log('res', res);
const { result, userInfo } = res.data;
if (result) {
resultBox.textContent = `${userInfo.id}님 환영합니다.`;
resultBox.style.color = 'blue';
} else {
resultBox.textContent = '아이디 또는 패스워드가 틀렸습니다.';
resultBox.style.color = 'red';
}
});
}
</script>
</body>js코드
const express = require('express');
const app = express();
const PORT = 8000;

//body-parser
app.use(express.urlencoded({ extended: true }));
app.use(express.json());

//view engine
app.set('view engine', 'ejs');
app.set('views', './views');

//===router (실제 페이지 생성)
app.get('/', (req, res) => {
    res.render('pracget'); //page
});

app.get('/axiosPost', (req, res) => {
    res.render('post');
});
//데이터 요청 및 응답
const id = 'kdt11';
const pw = '1234';
app.get('/axios', (req, res) => {
    console.log('요청값', req.query);
    res.send(req.query);

});

app.post('/resultPost', (req, res) => {
    console.log('요청값', req.body);
    //유저가 적은 값이랑 이미 저장되어있는 값이랑 동일하냐 묻기위해선 아래와 같이 새로 할당가능 변수를, 객체 구조 할당을 통해 가능.
    // 회원가입할때 이런 형식으로 만들게 됨
    const { id: reqId, pw: reqPw } = req.body;
    if (id === reqId && pw === reqPw) {
        res.send({ result: true, userInfo: { id } });
    } else {
        res.send({ result: false, userInfo: null });
    }
});

app.listen(PORT, () => {
    console.log(`http://localhost:${PORT}`);
실행결과
 -> 백엔드에 저장된 아이디, 비밀번호와 다르게 기입했을 때 결과
 -> 백엔드에 저장된 값과 동일하면 파란글씨로 출력
마무리
백엔드는 처음에만 어렵고 나중엔 여러 코드를 동일하게 쓰는 경우가 많다던데... 많은 노력이 필요할 것 같다 😂

중요한 건 꺾여도 다시 일어서는 마음