
❗ 해당 문서는 지속적으로 업데이트 될 예정입니다.
❗ 잘못된 정보나 오류가 있으면 댓글로 편하게 남겨주세요!🥰
가상 요소는 실제 HTML 페이지에 요소가 존재 하지는 않지만, 요소가 추가된 것과 같은 효과를 내는 CSS 선택자이다. 가상 요소를 사용하지 않고 그냥 헤더에 border-left를 적용해 비슷한 장식적 효과를 나타낼 수 있지만 border-radius를 이용해 깔쌈하게 디자인의 통일성을 주고자 가상 요소를 사용해보고자 한다.
CSS에 컨텐트(content) 속성을 가지는 일부 가상 요소(::before, ::after)는 웹 브라우저 개발자 도구에서도 하나의 요소(Element)로 처리되며, HTML 소스 보기에서 별도로 가상 요소가 함께 표시가 된다.
가상 요소는 하단 HTML 태그에 스타일을 준 것과 완전히 유사하게 보인다.
For example, the following document fragment and style sheet:<p> Text </p> p:before { display: block; content: 'Some'; }...would render in exactly the same way as the following document fragment and style sheet:
<p><span>Some</span> Text </p>
span { display: block }
Similarly, the following document fragment and style sheet.
<h2> Header </h2>
h2:after { display: block; content: 'Thing'; }
...would render in exactly the same way as the following document fragment and style sheet:
<h2> Header <span>Thing</span></h2>
h2 { display: block; }
span { display: block; }
👉 네이버에서 가상 요소를 어떻게 활용했나?
li:before{
content: '';
display: inline-block;
position: absolute;
top: 3px;
left: 12px;
width: 1px;
height: 12px;
border-radius: 0.5px;
background-color: #dadada;
}
가상 요소는 content의 value는 다양하다. string,또는 img등 다양하게 줄 수 있다. 해당 코드처럼 content를 string으로 주고 비어두면, 해당 요소는 inline으로 콘텐츠에 양에 따라 넓이가 늘어나기 때문에 콘텐츠를 저렇게 비워두면 아무것도 표시되지 않는다. 따라서 inline-block으로 display를 바꿔주고, position absolute를 통해 위치를 정해줄 수 있다.
 #footer .partner_box .link_partner+.link_partner:before {
    content: "";
    display: inline-block;
    width: 1px;
    height: 11px;
    background-color: #e4e8eb;
    vertical-align: -1px;
    margin: 0 8px;
}
vertical-align은 inline요소 또는 inline-block요소들끼리 수직 정렬을 어떻게 할지 지정하는 속성이기 때문에, 다른 요소들과 정렬을 맞춰줄 때 vertical-align을 해주면 쉽게 정렬을 해줄 수 있다.
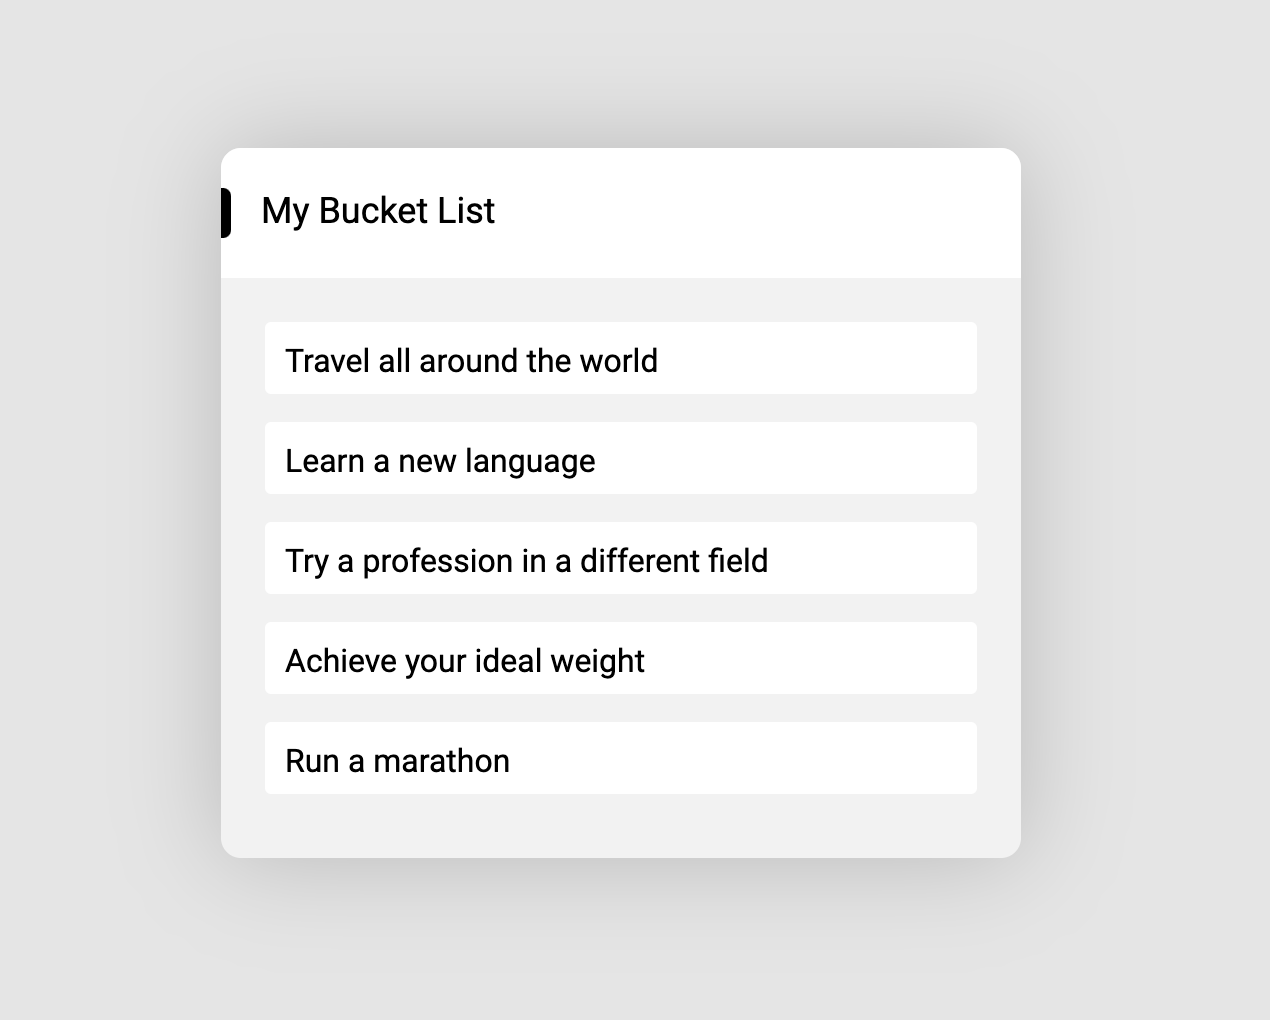
.header::before {
    content: "";
    display: inline-block;
    height: 25px;
    width: 5px;
    background-color: black;
    vertical-align: middle;
    border-radius: 0 4px 4px 0;
    margin-right: 15px;
}
나는 이렇게 before가상 요소를 통해 장식적 요소를 추가해주었다.


종찬님의 피드백 (4.4)
가상요소의 width, height를 em단위로 설정한다면 차후 타이틀의 폰트사이즈에 대응되는 장식요소가 될 수 있겠습니다.
역시 이런 확장성은 생각못했는데 증말루 넘 멋쨍이시다. 차후에 폰트 사이즈에 대응되고, 타이틀이 한줄 이상으로 유지 보수 될 수 있는 케이스를 커버하고 오른쪽에 button요소도 추가, 각 항목 디자인도 변화해보는 과제를 해보려고 한다. 같이 하실 분 모집합니다 헤헤~!

참고 자료 : https://www.w3.org/TR/CSS2/generate.html#before-after-content


잘 읽었어요 삼콩님!! ::before이나 ::after같은 가상 요소는 | 뿐 아니라 하이픈(-), 다양한 이모지들까지 스트링 콘텐츠들을 시맨틱한 구조를 해치지 않고 넣을 수 있어서 참 유용한 것 같습니다 :- )