
1. 기존 API 문서화의 문제점과 Rest Docs
어떻게 하면 문서를 항상 최신화할 수 있을까?
API는 클라이언트에게 기능만 제공하기 때문에, API를 어떻게 사용해야하는지 문서화를해 제공한다. 개발자들은 Swagger, Postman, 심지어 워드 등 다양한 툴을 사용해 문서화를 해왔다. 기존 문서화의 가장 큰 문제점은 코드와 문서의 불일치였다. 코드와 문서가 분리되어 있다보니, 문서를 항상 최신으로 업데이트하는 것은 귀찮은 일이었고, 이때문에 누락되기 일쑤였다. Rest Docs는 코드와 문서의 강결합을 통해 이를 해결하고자 한다
2. MockMvc를 통해 snippet 생성하기
Rest Docs의 문서는 코드를 실행해 생성된 snippet의 조합으로 이루어진다
2-1. 의존성 추가
- 스프링은 MockMvc를 통해 api 테스트 후 문서화를 자동화할 수 있도록 도와주는
spring-restdocs-mockmvc의존성을 제공한다
        <dependency>
            <groupId>org.springframework.restdocs</groupId>
            <artifactId>spring-restdocs-mockmvc</artifactId>
            <scope>test</scope>
        </dependency>
2-2. document() 메소드
- 기본적으로
requestFieldssnippet과responseFieldssnippets을 만들 수 있다. MockMvc 테스트를 위해 입력된 요청이나 반환된 응답에 대해 모든 필드를 정의해줘야한다. 만약 프로덕션 코드와 테스트 코드는 수정되어 요청/응답이 변했지만, rest docs의 정의가 변하지 않았으면 테스트는 실패한다. API와 문서가 항상 동일하게 유지할 수 있는 것이다
    @Test
    @DisplayName("게시글을 저장할 수 있다")
    void savePost() throws Exception {
        // Given
        PostRequest postRequest = new PostRequest("test title", "");

        // When Then
        mockMvc
            .perform(post("/api/v1/posts")
                .contentType(MediaType.APPLICATION_JSON)
                .content(objectMapper.writeValueAsString(postRequest)))
            .andExpect(status().isCreated())
            .andDo(print())
            .andDo(document("save-post",  // Rest Docs
                requestFields(
                    fieldWithPath("title").type(JsonFieldType.STRING).description("post title"),
                    fieldWithPath("content").type(JsonFieldType.STRING).description("post content")
                ),
                responseFields(
                    fieldWithPath("data.id").type(JsonFieldType.NUMBER).description("id"),
                    fieldWithPath("data.title").type(JsonFieldType.STRING).description("title"),
                    fieldWithPath("data.content").type(JsonFieldType.STRING).description("content"),
                    fieldWithPath("serverDateTime").type(JsonFieldType.STRING).description("server time")
                )
            ));
}- 이제 테스트를 실행하면
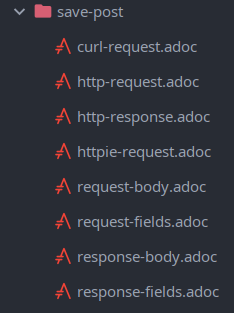
target디렉토리 하위의generated-snippets에 snippet들이 생성된다
2-3. JSON 포멧팅
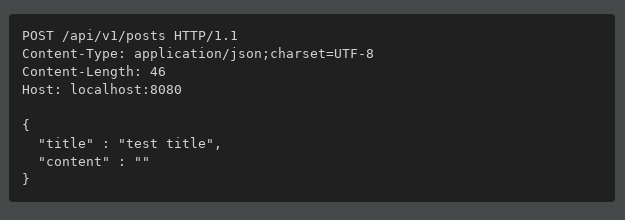
- 위 코드로 snippet을 생성하면 바디가 아래와 같이 한줄로 나온다. 지금은 바디가 짧아서 괜찮지만, 조금이라도 길어지면 읽기 힘들어진다.
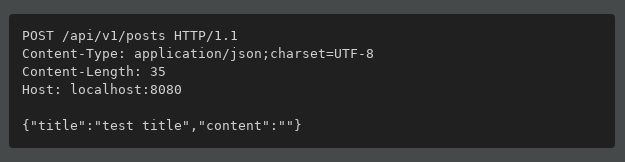
document()메소드의 인자로preprocessXXXX(prettyPrint())메소드를 전달해 해결할 수 있다
.andDo(document("save-post",
    preprocessRequest(prettyPrint()),  // 요청 포멧팅
    preprocessResponse(prettyPrint()),  // 응답 포멧팅
    requestFields(
        fieldWithPath("title").type(JsonFieldType.STRING).description("post title"),
        fieldWithPath("content").type(JsonFieldType.STRING).description("post content")
    ),
    responseFields(
        fieldWithPath("data.id").type(JsonFieldType.NUMBER).description("id"),
        fieldWithPath("data.title").type(JsonFieldType.STRING).description("title"),
        fieldWithPath("data.content").type(JsonFieldType.STRING).description("content"),
        fieldWithPath("serverDateTime").type(JsonFieldType.STRING).description("server time")
    )
));
3. snippet으로 API 문서 만들기
3-1. asciidoc
- asciidoc은 문서 작성을 위한 포멧이다. 위에 snippet들을 생성해보면,
.adoc이라는 확장자로 생성된것을 확인할 수 있다. Spring Rest Docs는 기본적으로 asciidoc을 사용해 문서화한다
3-2. 문서 작성하기
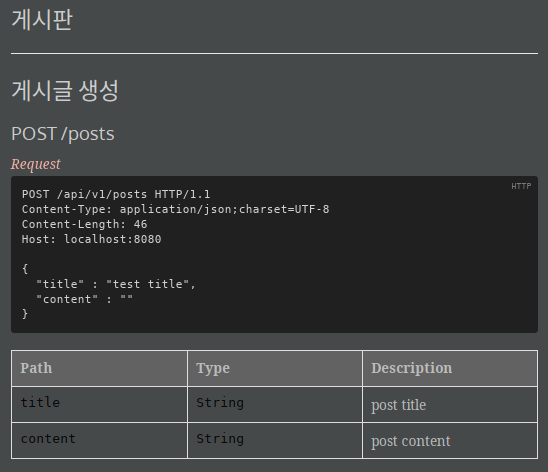
- snippet들을 사용해 문서를 작성할 수 있다
// poject.src.docs.asciidocs 디렉토리에 작성한다

// index.asciidoc
:hardbreaks:
ifndef::snippets[]
:snippets: ../../../target/generated-snippets    // snippet의 위치를 지정한다
endif::[]

== 게시판

== 게시글 생성

=== POST /posts

.Request
include::{snippets}/save-post/http-request.adoc[]     // snippet을 사용
include::{snippets}/save-post/request-fields.adoc[]   // snippet을 사용

.Response
include::{snippets}/save-post/http-response.adoc[]    // snippet을 사용
include::{snippets}/save-post/response-fields.adoc[]  // snippet을 사용
3-3. asciidoctor 플러그인 추가하기
Asciidoctor is a fast, open source, Ruby-based text processor for parsing AsciiDoc® into a document model and converting it to output formats such as HTML 5, DocBook 5, manual pages, PDF, EPUB 3, and other formats.
- asciidoctor를 통해 asciidoc 포멧의 문서를 HTML 같은 다양한 형식으로 변환해줄 수 있다
<plugin>
<groupId>org.asciidoctor</groupId>
<artifactId>asciidoctor-maven-plugin</artifactId>
<executions>
<execution>
<id>generate-docs</id>
<phase>prepare-package</phase>
<goals>
<goal>process-asciidoc</goal>
</goals>
<configuration>
<backend>html</backend>
<doctype>book</doctype>
</configuration>
</execution>
</executions>
<dependencies>
<dependency>
<groupId>org.springframework.restdocs</groupId>
<artifactId>spring-restdocs-asciidoctor</artifactId>
<version>${spring-restdocs.version}</version>
</dependency>
</dependencies>
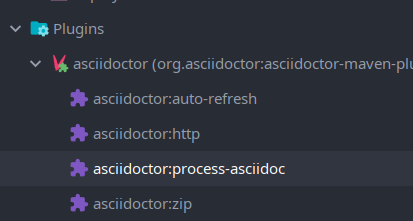
</plugin>3-4. HTML 문서 생성하기
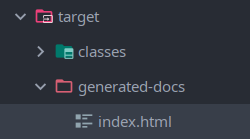
- 이제 작성한 asciidoc문서를 asciidoctor를 통해 html로 만들 수 있다. asciidoctor plugin에서 process-asciidoc을 실행한다
targer/generated-docs경로에 html 파일이 생성된다
참고하면 좋은 링크
Spring Rest Docs : https://docs.spring.io/spring-restdocs/docs/current/reference/html5/
AsciiDoc : https://asciidoc-py.github.io/userguide.html

편하게 읽기 좋은 단위의 포스트를 추구하는 개발자입니다