
앞서 학습한 리펙토링과 테스트코드에 이어 테스트 코드의 결과를 쉽게 확인하기 위한 장치인
테스트 프레임워크에 대해 알아보고 사용해보자.
⛔️ JEST 공식문서 와 코딩앙마 - Jest강좌를 정리한 내용입니다.
🌱 테스트 프레임워크
자바스크립트의 테스트 프레임워크에는 다양한 종류가 있다.
Jest
- Facebook에서 만든 테스트 프레임워크로 가장 많이 사용되고 있다.
- 빠른 속도와 간편한 설정으로 인기가 높은 프레임워크다.
- 테스트 더블(Mock, Stub 등)과 같은 기능을 제공하며 코드 커버리지와 함께 사용하기 좋다.
- Jest는 Jasmine을 기반으로 만들어졌으며, 테스트 실행 속도가 빠르고 사용하기 쉽다.
Mocha
- 가장 오래된 테스트 프레임워크 중 하나로, 유연한 사용법이 특징이다.
- BDD, TDD, Qunit 등 다양한 스타일로 테스트를 작성할 수 있다.
- 다양한 언어와 라이브러리에 대한 지원이 가능하다.
- 브라우저와 Node.js 환경에서 모두 사용할 수 있다.
Jasmine
- BDD(Behavior-Driven Development) 스타일로 테스트를 작성할 수 있다.
- 다른 테스트 프레임워크에 비해 문법이 간단하고 가독성이 좋다.
- DOM 조작에 대한 테스트도 가능하다.
- 브라우저와 Node.js 환경에서 모두 사용할 수 있다.
Cypress
- End-to-end 테스트를 위한 테스트 프레임워크다.
- 브라우저 상에서 테스트를 수행하며, 실제 유저의 경험을 모방할 수 있다.
- 디버깅이 용이하고 강력한 검색 기능을 제공한다.
Selenium
- 다양한 언어와 브라우저를 지원하는 오픈소스 웹 애플리케이션 자동화 도구다.
- Selenium은 여러 가지 언어로 API를 제공하며, 다양한 환경에서 사용할 수 있다.
🌱 Jest
Jest는 zero config 철학으로 별도의 설정없이 테스트 코드를 빠르게 작성할 수 있다.
"Zero Configuration"는 소프트웨어 개발에서 자동화를 강조하는 철학이다.
이 철학은 사용자가 소프트웨어를 설정하거나 구성하는 데 필요한 번거로움을 최소화하고,
개발자가 가능한 한 적은 수의 명령어나 설정으로 개발에 집중할 수 있도록 한다.
☘️ Jest 설치
npm install jest --save-dev
// --save-dev (개발에서만 사용할때)
// package.json 수정
// "test" : "jest" 로 수정
{
"name": "jest_study",
"version": "1.0.0",
"description": "",
"main": "index.js",
"scripts": {
"test": "jest"
},
"author": "",
"license": "ISC",
"devDependencies": {
"jest": "^29.5.0"
}
}
☘️ Jest 실행
// fn.js
const fn = {
  add: (num1, num2) => num1 + num2,
};

module.exports = fn;

// fn.test.js
const fn = require("./fn");

test("1은 1이야", () => {
  expect(1).toBe(1);
});

test("2 더하기 3은 5야", () => {
  expect(fn.add(2, 3)).toBe(5);
});

// 테스트를 위한 오류값 입력
test("3 더하기 3은 6야", () => {
  expect(fn.add(3, 3)).toBe(6);
});
npm test로 실행 해준다.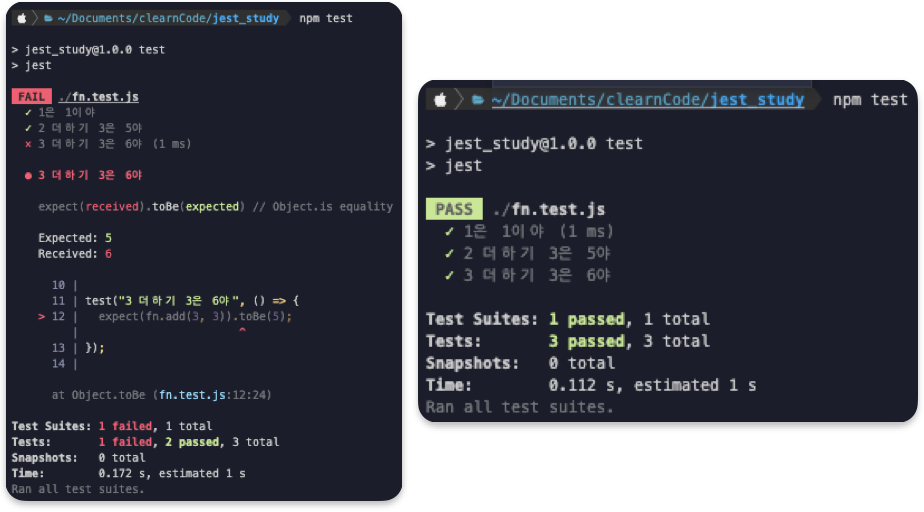
테스트 결과를 확인 할수 있다.
테스트코드에서 사용된
toBe()를Matchers라 한다.
Jest는 Matchers를 사용하여 다양한 테스트를 할수 있다.
🌱 Matchers 알아보기
☘️ Common Matchers
toBe()
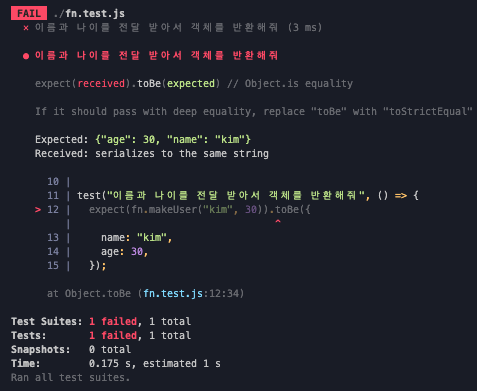
원시값은 toBe() 매처로 테스트가 가능하다.
하지만 객체나 배열의 경우 재귀적으로 돌면서 값을 확인하기 때문에 일치하는 값이라도 테스트시 실패가 된다.
// fn.js
const fn = {
  add: (num1, num2) => num1 + num2,
  makeUser: (name, age) => ({ name, age }),
};

module.exports = fn;

// fn.test.js
const fn = require("./fn");

test("이름과 나이를 전달 받아서 객체를 반환해줘", () => {
  expect(fn.makeUser("kim", 30)).toBe({
    name: "kim",
    age: 30,
  });
});
toEqual(), toStrictEqual()
객체의 동일성을 확인하기 위해서는 toEqual() 매처를 사용한다.
const fn = require("./fn");

test("이름과 나이를 전달 받아서 객체를 반환해줘", () => {
  expect(fn.makeUser("kim", 30)).toEqual({
    name: "kim",
    age: 30,
  });
});
// FAIL
하지만, toEqual()은 객체의 undefined 키값을 무시한다.
더욱 정확한 테스트를 위해서는toStrictEqual()을 사용하는 것이 좋다.
// fn.js
const fn = {
  add: (num1, num2) => num1 + num2,
  makeUser: (name, age) => ({ name, age, gender: undefined }),
};

// fn.test.js
const fn = require("./fn");

test("이름과 나이를 전달 받아서 객체를 반환해줘", () => {
  expect(fn.makeUser("kim", 30)).toStrictEqual({
    name: "kim",
    age: 30,
  });
});
// PASS
☘️ Truthiness
- toBeNull matches only null
- toBeUndefined matches only undefined
- toBeDefined is the opposite of toBeUndefined
- toBeTruthy matches anything that an if statement treats as true
- toBeFalsy matches anything that an if statement treats as false
test("null", () => {
  const n = null;
  expect(n).toBeNull();
  expect(n).toBeDefined();
  expect(n).not.toBeUndefined();
  expect(n).not.toBeTruthy();
  expect(n).toBeFalsy();
});
// PASS

test("zero", () => {
  const z = 0;
  expect(z).not.toBeNull();
  expect(z).toBeDefined();
  expect(z).not.toBeUndefined();
  expect(z).not.toBeTruthy();
  expect(z).toBeFalsy();
});
// PASS
☘️ Numbers
숫자를 비교하는 다양한 매처
test("two plus two", () => {
  const value = 2 + 2;
  expect(value).toBeGreaterThan(3);
  expect(value).toBeGreaterThanOrEqual(3.5);
  expect(value).toBeLessThan(5);
  expect(value).toBeLessThanOrEqual(4.5);

  // toBe and toEqual are equivalent for numbers
  expect(value).toBe(4);
  expect(value).toEqual(4);
});
// PASS
사용자가 입력한 id 길이를 제한하거나 업로드된 파일 크기가 적당한지 판별할 때 사용가능하다.
test("ID는 10자 이하여야 합니다.", () => {
  const id = "THE_BLACK_ORDER";
  expect(id.length).toBeLessThanOrEqual(10);
});
// FAIL

test("ID는 10자 이하여야 합니다.", () => {
  const id = "THE_BLACK";
  expect(id.length).toBeLessThanOrEqual(10);
});
// PASS
소숫점의 경우 toEqual이 아닌 toBeCloseTo를 사용하자.
tiny rounding error가 발생할 수 있다.
test("0.1 더하기 0.2는 0.3 입니다.", () => {
  expect(fn.add(0.1, 0.2)).toBe(0.3);
});
// FAIL

test("0.1 더하기 0.2는 0.3 입니다.", () => {
  expect(fn.add(0.1, 0.2)).toBeCloseTo(0.3);
});
// PASS
☘️ Strings
문자열은 정규 표현식과 toMatch()를 통해 테스트가 가능하다.
test("there is no I in team", () => {
  expect("team").not.toMatch(/I/);
});
// PASS

test('but there is a "stop" in Christoph', () => {
  expect("Christoph").toMatch(/stop/);
});
// PASS
☘️ Arrays and iterables
배열에서 특정 요소가 있는지 확인하기 위해서는 toContain()을 사용한다.
const shoppingList = ["trash bags", "paper towels", "milk"];

test("the shopping list has milk on it", () => {
  expect(shoppingList).toContain("milk");
  expect(new Set(shoppingList)).toContain("milk");
});
// PASS
☘️ Exceptions
어떤 함수를 실행했을때 예외가 발생하는지 확인하기 위해서는 toThrow()를 사용한다.
함수가 Error 객체를 throw하는지 검사한다.
const fn = {
  compileAndroidCode: () => {
    throw new Error("you are using the wrong JDK!");
  },
};

test("compiling android goes as expected", () => {
  expect(() => fn.compileAndroidCode()).toThrow();
  expect(() => fn.compileAndroidCode()).toThrow(Error);
  // pass

  // You can also use a string that must be contained in the error message or a regexp
  expect(() => fn.compileAndroidCode()).toThrow("you are using the wrong JDK");
  expect(() => fn.compileAndroidCode()).toThrow(/JDK/);
  // pass

  // Or you can match an exact error message using a regexp like below
  expect(() => fn.compileAndroidCode()).toThrow(
    /^you are using the wrong JDK$/
  ); // Test fail

  expect(() => fn.compileAndroidCode()).toThrow(
    /^you are using the wrong JDK!$/
  ); // Test pass
});
🌱 비동기 처리에서의 테스트 코드
☘️ 콜백함수 테스트코드
비동기 처리중 하나인 setTimeout() 을 테스트해보자.
// fn2.js
const fn = {
  getName: (callBack) => {
    const name = "kim";
    setTimeout(() => {
      callBack(name);
    }, 3000);
  },
};

// fn2.test.js
const fn = require("./fn2");

test("3초 후에 받아온 이름은 kim", () => {
  function callBack(name) {
    expect(name).toBe("kim");
  }
  fn.getName(callBack);
});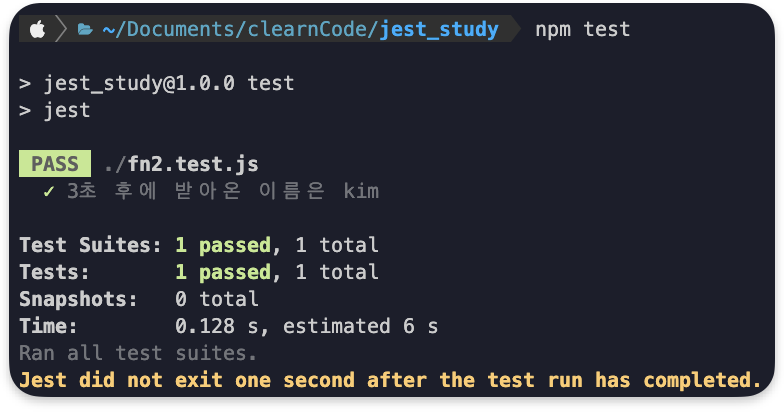
결과는 나왔지만, 3초 후가 아닌 약 0.1초 후에 결과가 나왔다.
비동기 함수인 callBack()은 일어나지 않고 fn.getName()에서 실행이 종료되기 때문이다.
const fn = require("./fn2");

test("3초 후에 받아온 이름은 kim", (done) => {
  function callBack(name) {
    expect(name).toBe("kim");
    done(); // 전달한 콜백함수가 실행되어야 한다.
  }
  fn.getName(callBack);
});
테스크 함수에
done이라는 콜백함수를 전달해주면 콜백함수 done이 실행될 때 까지 테스트 함수가 종료되지 않는다.
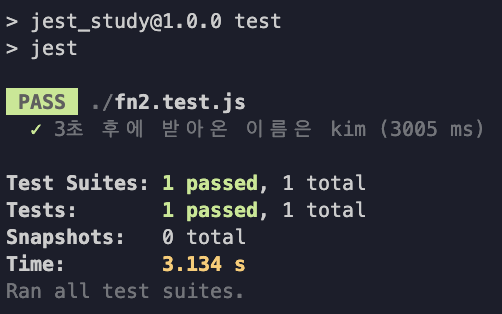
약 3초 후에 테스트가 잘 통과 됨을 확인할 수 있다.
api 통신에서 사용되는 try..catch.. 에도 적용할 수 있다.
// fn2.js
const fn = {
  getName: (callBack) => {
    const name = "kim";
    setTimeout(() => {
      //   callBack(name);
      throw new Error("서버에러..");
    }, 3000);
  },
};

// fn2.test.js
const fn = require("./fn2");

test("3초 후에 받아온 이름은 kim", (done) => {
  function callBack(name) {
    try {
      expect(name).toBe("kim");
      done();
    } catch (error) {
      done();
    }
  }
  fn.getName(callBack);
});
☘️ Promise 테스트코드
// fn2.js
const fn = {
  getAge: () => {
    const age = 30;
    return new Promise((res, rej) => {
      setTimeout(() => {
        res(age);
      }, 3000);
    });
  },
};

// fn2.test.js
const fn = require("./fn2");

// return 이 반드시 존재해야 한다.
test("3초 후에 받아온 나이는 30", () => {
  return fn.getAge().then((age) => {
    expect(age).toBe(30);
  });
});
// PASS
Promise를 사용하면 Jest에서는 콜백함수 실행까지 기다려준다.
즉, test함수에 콜백함수 done을 전달할 필요가 없다.
다만, Promise로 전달되었기에 test함수 내에서 return이 되도록 주의하자.
resolves, rejects 매처를 사용하기
Promise 테스크코드에 resolves, rejects 매처를 사용하면 더 간단하게 표현이 가능하다.
const fn = require("./fn2");

// resolves 매처 사용
test("3초 후에 받아온 나이는 30", () => {
  //   return fn.getAge().then((age) => {
  //     expect(age).toBe(30);
  //   });
  return expect(fn.getAge()).resolves.toBe(30);
});
// PASS
// fn2.js
const fn = {
getAge: () => {
const age = 30;
return new Promise((res, rej) => {
setTimeout(() => {
rej("error");
}, 3000);
});
},
};
// fn2.test.js
const fn = require("./fn2");
// rejects 매처 사용
test("3초 후에 에러가 나온다.", () => {
return expect(fn.getAge()).rejects.toMatch("error");
});
// PASS☘️ Async/Await 테스트코드
위 예제 Promise 코드에서 async, await 코드로 변경만 해주면 된다.
const fn = require("./fn2");

test("3초 후에 받아온 나이는 30", async () => {
  const age = await fn.getAge();
  expect(age).toBe(30);
});
// PASS
// resolves 매처 사용
test("3초 후에 받아온 나이는 30", async () => {
await expect(fn.getAge()).resolves.toBe(30);
});🌱 테스트 전/후 처리
테스트를 진행할 때 테스트 전/후에 처리되어야 하는 경우가 발생할 수 있다.
아래 예제를 보자.
const fn = require("./fn2");
let num = 0;
test("0더하기 1은 1이야", () => {
num = fn.add(num, 1);
expect(num).toBe(1);
});
test("0더하기 2는 2야", () => {
num = fn.add(num, 2);
expect(num).toBe(2);
});
test("0더하기 3은 3이야", () => {
num = fn.add(num, 3);
expect(num).toBe(3);
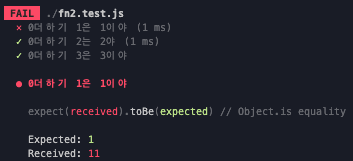
});테스트 함수의 값으 문제가 없으므로 모두 PASS가 나와야 하지만,
결과는 FAIL이 된다.
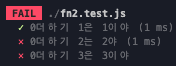
앞선 테스트 함수에서 변수 num값이 재할당 되기 때문이다.
이런 문제를 방지하기 위해 Jest는 헬퍼함수를 제공해준다.
☘️ beforeEach(), afterEach()
테스트 하나가 실행된 후 헬퍼함수 내부의 값을 초기화 해준다.
// 초기 num 값
let num = 10;

// 모든 테스트 전에 num값을 0으로 초기화
beforeEach(() => {
  num = 0;
});

test("0더하기 1은 1이야", () => {
  num = fn.add(num, 1);
  expect(num).toBe(1);
});
test("0더하기 2는 2야", () => {
  num = fn.add(num, 2);
  expect(num).toBe(2);
});
test("0더하기 3은 3이야", () => {
  num = fn.add(num, 3);
  expect(num).toBe(3);
});
// 첫 테스트 이후 num값을 0으로 초기화
let num = 10

afterEach(() => {
  num = 0;
});

test("0더하기 1은 1이야", () => {
  num = fn.add(num, 1);
  expect(num).toBe(1);
});
test("0더하기 2는 2야", () => {
  num = fn.add(num, 2);
  expect(num).toBe(2);
});
test("0더하기 3은 3이야", () => {
  num = fn.add(num, 3);
  expect(num).toBe(3);
});
☘️ beforeAll(), afterAll()
각 테스트 케이스마다 실행하는 헬퍼함수가 아닌 전체(코드블럭) 테스트 케이스 시작 전, 후를 설정하는 헬퍼 함수다.
-
beforeAll()은 테스트 스위트 전체에서 가장 처음 실행된다.
-
이 함수를 사용하면 모든 테스트가 실행되기 전에 필요한
전역 상태를 설정하거나데이터베이스 연결등의 작업을 수행할 수 있다. -
beforeAll() 함수는 모든 테스트 케이스에서 공통적으로 사용되는 코드를 작성할 때 유용하다.
-
afterAll()은 테스트 스위트 전체에서 가장 마지막에 실행된다.
-
이 함수를 사용하면 모든 테스트가 실행된 후에 필요한 정리 작업을 수행할 수 있다.
-
데이터베이스 연결을 종료하거나파일을 삭제하는 등의 작업을 수행할 수 있습니다.
// beforEach, afterEach를 사용하는 경우
const fn = require("./fn2");

let user;

beforeEach(async () => {
  user = await fn.connectUserDb();
});

afterEach(() => {
  return fn.disconnectDb();
});

test("이음은 kim", () => {
  expect(user.name).toBe("kim");
});
test("나이는 30", () => {
  expect(user.age).toBe(30);
});
test("성별은 남자", () => {
  expect(user.gender).toBe("male");
});
// 매 test case 마다 Db데이터를 받아와서 실행한다.
// 결과는 PASS지만 3초 이상의 시간이 걸린다.

// beforeAll, afterAll를 사용하는 경우
let user;

beforeAll(async () => {
  user = await fn.connectUserDb();
});

afterAll(() => {
  return fn.disconnectDb();
});

test("이음은 kim", () => {
  expect(user.name).toBe("kim");
});
test("나이는 30", () => {
  expect(user.age).toBe(30);
});
test("성별은 남자", () => {
  expect(user.gender).toBe("male");
});
// user 데이터를 한번 받아오고 하위 테스트 케이스를 실행한다.
// PASS, TIME = 1s
☘️ describe()
describe() 함수는 테스트 스위트(블록)을 생성하고, 그 안에 포함되는 test()나 it() 함수를 사용하여 테스트 케이스를 작성한다.
- describe() 함수는 특정 부분의 동작을 설명하는 문자열과 콜백 함수를 인수로 받는다.
- 콜백 함수는 해당 테스트 스위트의 테스트 케이스를 작성하는 데 사용된다.
describe('Calculator', () => {
  let calculator;

  beforeEach(() => {
    // 각각의 테스트 케이스에서 Calculator 인스턴스를 사용하기 위해 인스턴스 생성
    calculator = new Calculator();
  });

  describe('addition', () => {
    test('adds 1 + 2 to equal 3', () => {
      expect(calculator.add(1, 2)).toBe(3);
    });

    test('adds 0 + 0 to equal 0', () => {
      expect(calculator.add(0, 0)).toBe(0);
    });
  });

  describe('subtraction', () => {
    test('subtracts 4 - 2 to equal 2', () => {
      expect(calculator.subtract(4, 2)).toBe(2);
    });

    test('subtracts 0 - 0 to equal 0', () => {
      expect(calculator.subtract(0, 0)).toBe(0);
    });
  });
});