[42cursurs]Ray Tracing in One Weekend 5-Surface Normals and Multiple Objects(1)
miniRT (ray tracing tutorial)
이전 포스트에서 풍경 안에 구를 그렸지만 입체감이 없어 그저 붉은 원처럼 보인다. 이번엔 shading으로 표면의 입체감을 살려보자.
Shading with Surface Normals
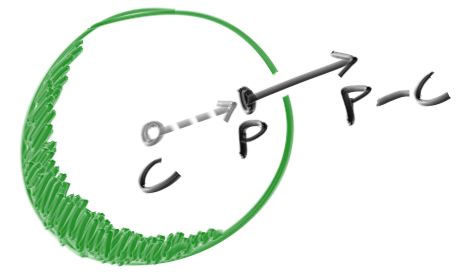
원문의 normal은 구의 중심에서 구의 표면의 임의의 점 P방향의 방향벡터를 뜻한다. normal이니 방향벡터니 설명하면 길어지니 우리가 챙길 것은 구의 표면에 따라 다른 색상을 입혀서 구의 입체감을 표현하기 위해 normal 이라는 방법을 썼다는 것만 챙기자.
main.cc
double hit_sphere(const point3& center, double radius, const ray& r) {
    vec3 oc = r.origin() - center;
    auto a = dot(r.direction(), r.direction());
    auto b = 2.0 * dot(oc, r.direction());
    auto c = dot(oc, oc) - radius*radius;
    auto discriminant = b*b - 4*a*c;
    if (discriminant < 0) {
        return -1.0;
    } else {
    // 근의 공식으로 교차점의 t값을 구한다.
        return (-b - sqrt(discriminant) ) / (2.0*a);
    }
}

color ray_color(const ray& r) {
    auto t = hit_sphere(point3(0,0,-1), 0.5, r);
    if (t > 0.0) { // 구와 교차할 경우
    	// 교차점 P의 위치벡터에서 구의 중심 C의 위치벡터를 빼면 벡터 PC다.
        // 벡터 PC의 단위벡터인 normal N을 구했다.
        vec3 N = unit_vector(r.at(t) - vec3(0,0,-1));
        // normal의 값에 따라 반환하는 색상이 달라진다.
        return 0.5*color(N.x()+1, N.y()+1, N.z()+1);
    }
    vec3 unit_direction = unit_vector(r.direction());
    t = 0.5*(unit_direction.y() + 1.0);
    return (1.0-t)*color(1.0, 1.0, 1.0) + t*color(0.5, 0.7, 1.0);
}
Simplifying the Ray-Sphere Intersection Code
새로 작성한 코드의 hit_sphere의 연산을 줄이는 작업이다. 크게 다른 점은 없다.
main.cc- before
double hit_sphere(const point3& center, double radius, const ray& r) {
    vec3 oc = r.origin() - center;
    auto a = dot(r.direction(), r.direction());
    auto b = 2.0 * dot(oc, r.direction());
    auto c = dot(oc, oc) - radius*radius;
    auto discriminant = b*b - 4*a*c;

    if (discriminant < 0) {
        return -1.0;
    } else {
        return (-b - sqrt(discriminant) ) / (2.0*a);
    }
}
main.cc- after
double hit_sphere(const point3& center, double radius, const ray& r) {
    vec3 oc = r.origin() - center;
    auto a = r.direction().length_squared();
    auto half_b = dot(oc, r.direction());
    auto c = oc.length_squared() - radius*radius;
    auto discriminant = half_b*half_b - a*c;

    if (discriminant < 0) {
        return -1.0;
    } else {
    // b 대신 half_b, 2a 를 a로 약분해줬다.
        return (-half_b - sqrt(discriminant) ) / a;
    }
}
근의 공식의 분자 분모를 각각 2로 나눠서 연산을 줄였다.
An Abstraction for Hittable Objects
물체 여러개를 생성하기 위해 객체를 추상화한다. 이렇게 나눠줘야 이후에 코딩할 때도 편하고 가독성도 좋아진다.
hittable.h
#ifndef HITTABLE_H
#define HITTABLE_H

#include "ray.h"

struct hit_record {
// 교차점의 좌표와 normal, 교차점에 닿은 광선의 t값을 기록할 구조체
    point3 p;
    vec3 normal;
    double t;
};

class hittable {
    public:
    // 광선의 교차여부를 판단하는 함수
        virtual bool hit(const ray& r, double t_min, double t_max, hit_record& rec) const = 0;
};

#endif
hittable은 광선과 충돌 가능한 '특성'이라고 이해하자. 구는 충돌 가능한 특성을 지니고 있다. 앞으로 다양한 물체를 생성할 때 편리 하려고 저런 짓을 한다고 생각하고 넘어가자. hit함수의 t_min, t_max는 광원에 가장 가까운 물체를 선정하기 위해 주는 t의 범위다. 불투명한 물체A 뒤에 있는 물체B에 직선으로 뻗은 광선이 닿을 수 있다해도, 그 앞에 먼저 광선에 부딪힌 물체A가 있을 경우 광선이 물체B에 닿지않았다고 판단하기 위함이다.
sphere.h
hittable한 구를 클래스로 구현했다.
#ifndef SPHERE_H
#define SPHERE_H

#include "hittable.h"
#include "vec3.h"

class sphere : public hittable {
    public:
    // sphere class의 생성자
        sphere() {}
        sphere(point3 cen, double r) : center(cen), radius(r) {};
	// hittable하므로 교차여부를 판별하는 기능의 함수를 가진다.
        virtual bool hit(
            const ray& r, double tmin, double tmax, hit_record& rec) const override;

    public:
    // sphere의 중심 좌표와 반지름 길이를 가진다.
        point3 center;
        double radius;
};

// hittable class의 hit함수 구현
bool sphere::hit(const ray& r, double t_min, double t_max, hit_record& rec) const {
    vec3 oc = r.origin() - center;
    auto a = r.direction().length_squared();
    auto half_b = dot(oc, r.direction());
    auto c = oc.length_squared() - radius*radius;
    auto discriminant = half_b*half_b - a*c;

    if (discriminant > 0) {
        auto root = sqrt(discriminant);

        auto temp = (-half_b - root) / a;
        if (temp < t_max && temp > t_min) {
            rec.t = temp;
            rec.p = r.at(rec.t);
            rec.normal = (rec.p - center) / radius;
            return true;
        }

        temp = (-half_b + root) / a;
        if (temp < t_max && temp > t_min) {
            rec.t = temp;
            rec.p = r.at(rec.t);
            rec.normal = (rec.p - center) / radius;
            return true;
        }
    }

    return false;
}


#endif
구현된 hit함수를 보면 hit_sphere와 달라진 점이 있다. 원래 근의 공식의 값이 최대 두 개이므로 저렇게 짰다. 그럼 hit_sphere에서는 어째서 한가지만 반환하는가 의문이 든다. 우리가 sphere를 class로 구현한 경우 광원과 구의 중심에 따라 물체와 교차하는 광선의 t값이 어떻게 될지 모르기 때문이다. 복잡하다면 hit의 경우 일반화한거고 hit_sphere의 경우 특정 구를 정해놓고 쓰므로 t에 대해서도 알고 있기 때문이라고만 알아두자.