오늘의 퀴즈는 2가지, 노트북 도형찾기 퀴즈와 얼굴 모자이크 프로그램 만들기 이다.
먼저 이때 필요한 지식부터 알아보자.
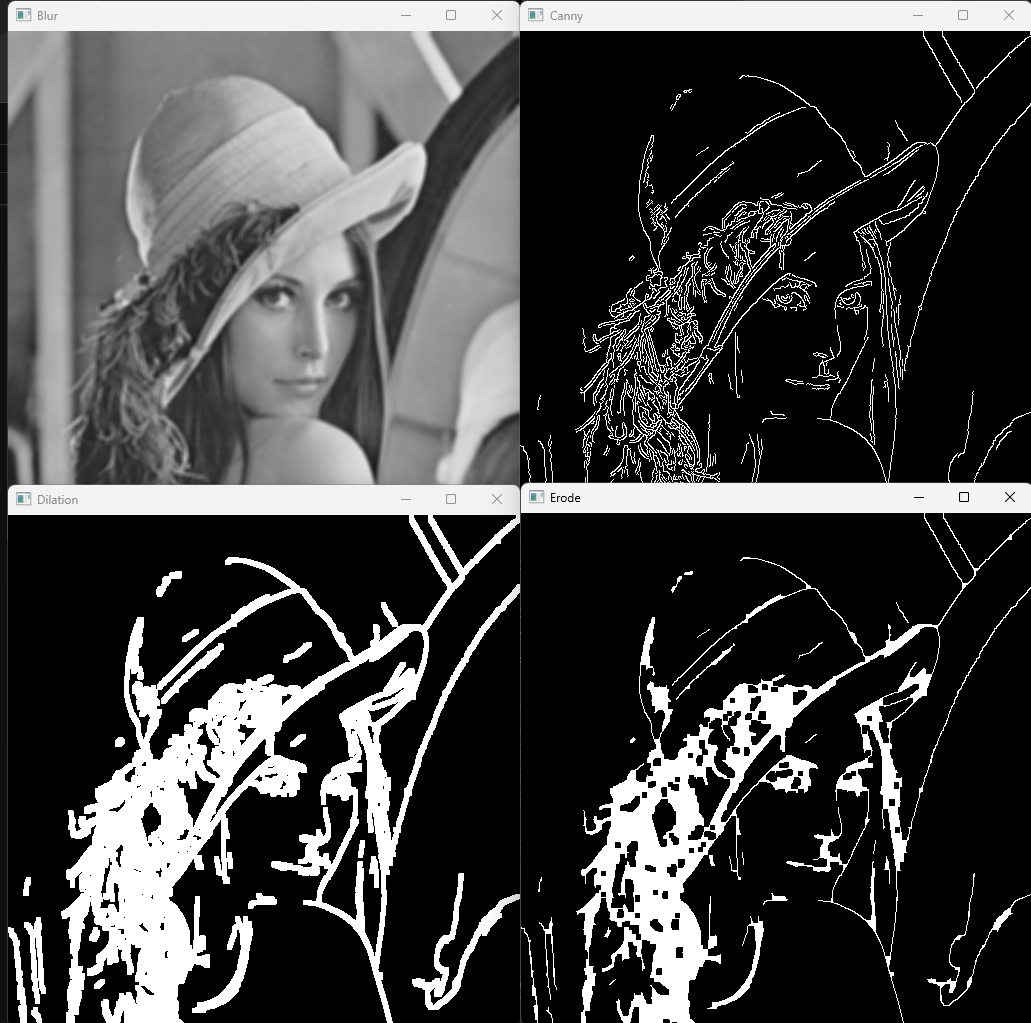
Blur, Canny, Erode, Dilation
위 네 가지는 모두 기본적인 이미지 처리 기법이다.
Blur
Blur는 이미지의 픽셀 값을 주변 픽셀 값들과 평균화하여 이미지를 부드럽게 만드는 기법이다.
블러를 통해 노이즈 제거를 쉽게 할 수 있다.
Canny
Canny는 이미지의 외각선 부분을 감지하는 기법으로, 이미지 외각선을 따서 객체 인식을 더 쉽게 하거나 선을 따로 추출해낼 수 있다.
Erode
Erode는 이미지의 픽셀 값을 주변 픽셀 값들과 비교하여 더 작은 값으로 변환하는 기법이다. 이를 통해 이미지의 밝은 영역을 축소하고, 어두운 영역을 확장하는 효과를 낼 수 있다.
또한, 이를 활용해 뼈대를 추출해내거나 겹쳐있는 물체를 분리할 수도 있다.
Dilation
Dilation는 이미지의 픽셀 값을 주변 픽셀 값들과 비교하여 더 큰 값으로 변환하는 기법이다. 이 기법은 Erode와 반대로 이미지의 밝은 영역을 확장하고, 어두운 영역을 축소한다.
이를 통해 분리된 객체를 연결하거나 비어있는 부분을 채워낼 수 있다.
import cv2
import numpy as np
from matplotlib import pyplot as plt

img = cv2.imread('data/lena.jpg')
img = cv2.cvtColor(img, cv2.COLOR_BGR2GRAY)

kernal = np.ones((5,5), np.uint8) # 원본 이미지를 5x5 사이즈 커널로

blur = cv2.blur(img, (5, 5)) # 노이즈를 줄일 수 있음
canny = cv2.Canny(img, 100, 200) # 이미지 외각선을 따는데 도움을 줌
blured_canny = cv2.Canny(blur, 100, 200)
dilation = cv2.dilate(canny, kernal, iterations = 1) # 1이 하나라도 있으면 1로
eroded = cv2.erode(dilation, kernal, iterations = 1) # 0이 하나라도 있으면 0으로

cv2.imshow('Blur', blur)
cv2.imshow('Canny', canny)
cv2.imshow('Blured Canny', blured_canny)
cv2.imshow('Dilation', dilation)
cv2.imshow('Erode', eroded)

cv2.waitKey()
cv2.destroyAllWindows()
Affine
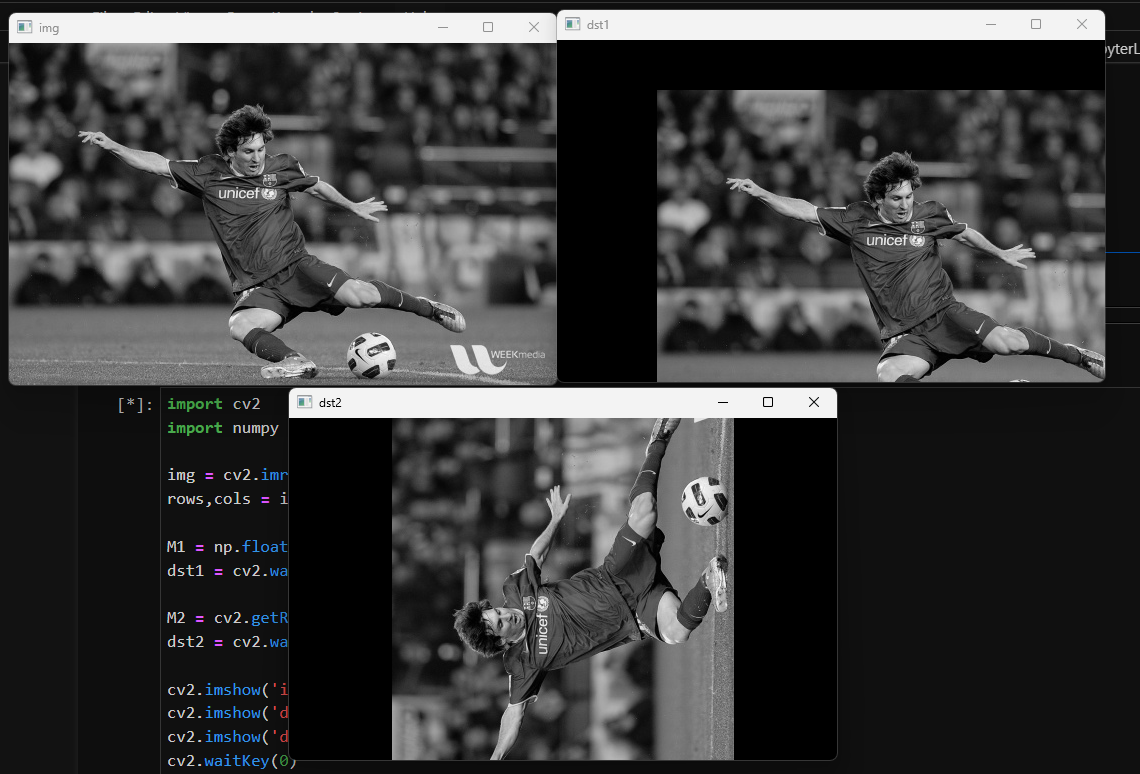
Affine은 기하학적 변형을 할 수 있게 해 준다. 쉽게 말해서 점, 직선, 평면 등을 변형시키는 함수이다. 이미지 처리에서는 다음과 같이 쓸 수 있다.
import cv2
import numpy as np

img = cv2.imread('data/messi5.jpg',0)
rows,cols = img.shape

M1 = np.float32([[1,0,100],[0,1,50]])
dst1 = cv2.warpAffine(img,M1,(cols,rows))

M2 = cv2.getRotationMatrix2D((cols/2,rows/2),90,1)
dst2 = cv2.warpAffine(img,M2,(cols,rows))

cv2.imshow('img',img)
cv2.imshow('dst1',dst1)
cv2.imshow('dst2',dst2)
cv2.waitKey(0)
cv2.destroyAllWindows()
Coutour
contour는 이미지에서 동일한 픽셀 값 또는 색상을 가진 픽셀들의 연결된 경계선을 의미한다. 쉽게 말해 이미지의 윤곽선을 추출하는 기술이라고 볼 수 있다.
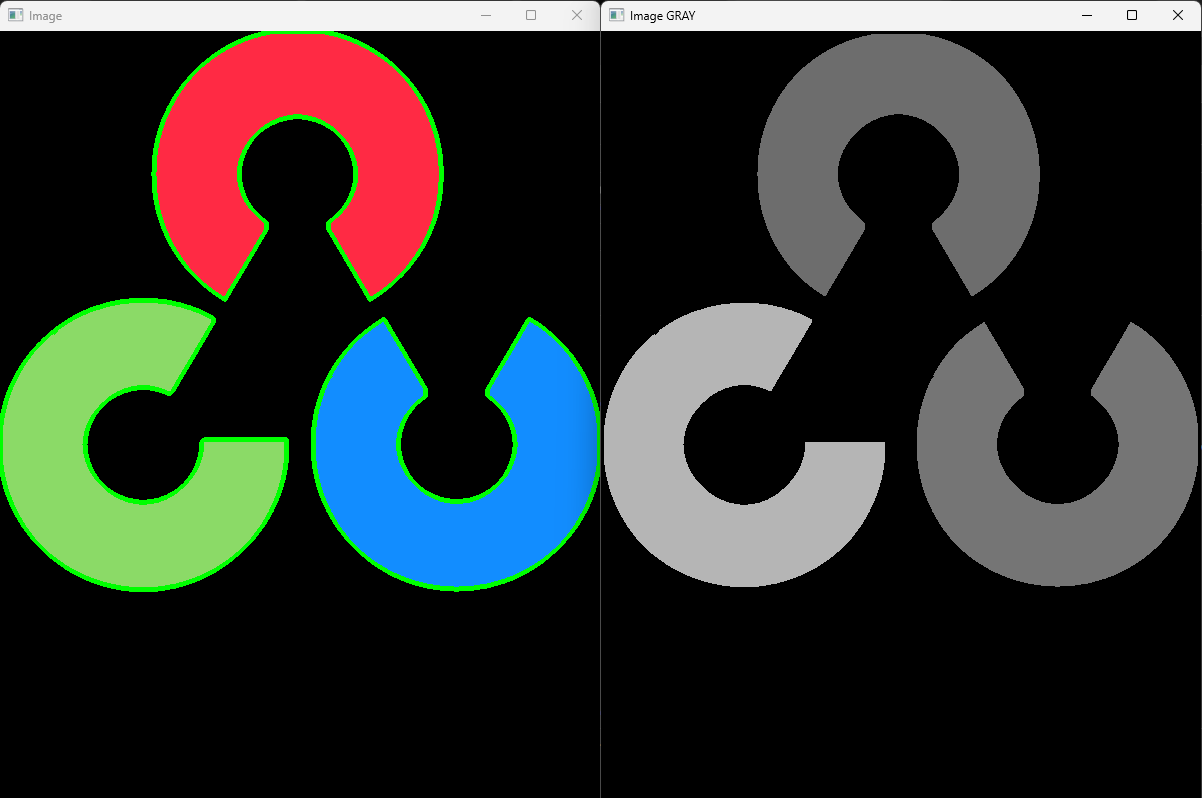
사진을 보면 왼쪽 사진에 초록색 윤곽선이 contour을 이용한 것이다.
import cv2

img = cv2.imread('data/opencv-logo.png')
imgray = cv2.cvtColor(img, cv2.COLOR_BGR2GRAY)
ret, thresh = cv2.threshold(imgray, 70, 255, 0) # 2진화. 70을 기준으로 작으면 0 크면 1
contours, hierarchy = cv2.findContours(thresh, cv2.RETR_TREE, cv2.CHAIN_APPROX_NONE)
#등치선 추출 대상 이미지, 등치선 추출 방식, 등치선 결과에 대한 근사치화 방식
print("Number of contours = " + str(len(contours)))
print(contours[0])

cv2.drawContours(img, contours, -1, (0, 255, 0), 3)
cv2.drawContours(imgray, contours, -1, (0, 255, 0), 3)

cv2.imshow('Image', img)
cv2.imshow('Image GRAY', imgray)
cv2.waitKey(0)54
cv2.destroyAllWindows()
도형 검출
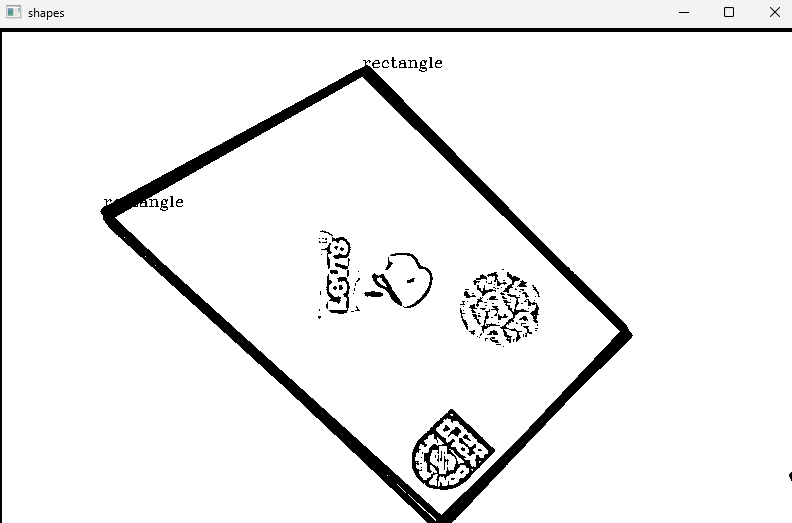
앞에서 배운 것들을 활용하서 도형 검출도 할 수 있다.
import numpy as np
import cv2

img = cv2.imread('data/shapes.jpg')
imgGrey = cv2.cvtColor(img, cv2.COLOR_BGR2GRAY) # 그레이스케일
_, thrash = cv2.threshold(imgGrey, 220, 255, cv2.THRESH_BINARY) # 2진화
contours, _ = cv2.findContours(thrash, cv2.RETR_TREE, cv2.CHAIN_APPROX_NONE) # 컨투어 찾음
print(len(contours))
cv2.imshow("img", img)
for contour in contours:
    approx = cv2.approxPolyDP(contour, 0.01* cv2.arcLength(contour, True), True) # 변의 갯수 가져옴
    cv2.drawContours(img, [approx], 0, (0, 0, 0), 5)


    x = approx.ravel()[0]
    y = approx.ravel()[1] - 5
    if len(approx) == 3:
        cv2.putText(img, "Triangle", (x, y), cv2.FONT_HERSHEY_COMPLEX, 0.5, (0, 0, 0))
    elif len(approx) == 4:
        x1 ,y1, w, h = cv2.boundingRect(approx)
        aspectRatio = float(w)/h
        print(aspectRatio)
        if aspectRatio >= 0.95 and aspectRatio <= 1.05:
            cv2.putText(img, "square", (x, y), cv2.FONT_HERSHEY_COMPLEX, 0.5, (0, 0, 0))
        else:
            cv2.putText(img, "rectangle", (x, y), cv2.FONT_HERSHEY_COMPLEX, 0.5, (0, 0, 0))
    elif len(approx) == 5:
        cv2.putText(img, "Pentagon", (x, y), cv2.FONT_HERSHEY_COMPLEX, 0.5, (0, 0, 0))
    elif len(approx) == 10:
        cv2.putText(img, "Star", (x, y), cv2.FONT_HERSHEY_COMPLEX, 0.5, (0, 0, 0))
    else:
        cv2.putText(img, "Circle", (x, y), cv2.FONT_HERSHEY_COMPLEX, 0.5, (0, 0, 0))


cv2.imshow("shapes", img)
cv2.waitKey(0)
cv2.destroyAllWindows()
문제 1 - 노트북 도형 찾기
이번엔 앞에서 배운 것들을 토대로 노트북 도형을 알아내는 프로그램을 만들어 보자.
import cv2
import matplotlib.pyplot as plt


block_size = 9
C = 5
img = cv2.imread('data/laptop.png', cv2.IMREAD_GRAYSCALE)
img = cv2.resize(img, (800, 500))
img = cv2.blur(img, (5, 5))
img = cv2.adaptiveThreshold(img, 255, cv2.ADAPTIVE_THRESH_GAUSSIAN_C, cv2.THRESH_BINARY, block_size, C)

contours, _ = cv2.findContours(img, cv2.RETR_TREE, cv2.CHAIN_APPROX_NONE)

for contour in contours:
    approx = cv2.approxPolyDP(contour, 0.01* cv2.arcLength(contour, True), True)
    cnt = approx
    area = cv2.contourArea(cnt)
    if area < 4600:
        continue;
    cv2.drawContours(img, [approx], 0, (0, 0, 0), 5)
    x = approx.ravel()[0]
    y = approx.ravel()[1] - 5
    if len(approx) == 3:
        cv2.putText(img, "Triangle", (x, y), cv2.FONT_HERSHEY_COMPLEX, 0.5, (0, 0, 0))
    elif len(approx) == 4:
        x1 ,y1, w, h = cv2.boundingRect(approx)
        aspectRatio = float(w)/h
        print(aspectRatio)
        if aspectRatio >= 0.95 and aspectRatio <= 1.05:
            cv2.putText(img, "square", (x, y), cv2.FONT_HERSHEY_COMPLEX, 0.5, (0, 0, 0))
        else:
            cv2.putText(img, "rectangle", (x, y), cv2.FONT_HERSHEY_COMPLEX, 0.5, (0, 0, 0))
    elif len(approx) == 5:
        cv2.putText(img, "Pentagon", (x, y), cv2.FONT_HERSHEY_COMPLEX, 0.5, (0, 0, 0))
    elif len(approx) == 10:
        cv2.putText(img, "Star", (x, y), cv2.FONT_HERSHEY_COMPLEX, 0.5, (0, 0, 0))
    else:
        cv2.putText(img, "Circle", (x, y), cv2.FONT_HERSHEY_COMPLEX, 0.5, (0, 0, 0))

cv2.imshow("shapes", img)
cv2.waitKey(0)
cv2.destroyAllWindows()
문제 2 - 얼굴 모자이크 하기
이번에는 얼굴을 인식시켜 모자이크를 씌워보자.

얼굴이 푸짐해서 다 안 가려짐;;
이마 까면 다 얼굴로 인식하긴 한다.
import cv2

faceCascade= cv2.CascadeClassifier("data/haarcascade_frontalface_default.xml")

cap = cv2.VideoCapture(0)
factor = 15
while(cap.isOpened()):
    ret, frame = cap.read()
    if ret :
        faces = faceCascade.detectMultiScale(frame,1.1,4)

        for (x,y,w,h) in faces:
            roi = frame[y:y+h, x:x+w]

            small_roi = cv2.resize(roi, (w//factor, h//factor)) # 축소
            mosaic_roi = cv2.resize(small_roi, (w,h), interpolation=cv2.INTER_NEAREST) # 확대하면 깨지는걸 이용해서 모자이크 만듦

            frame[y:y+h, x:x+w] = mosaic_roi

        cv2.imshow('frame', frame)
        if cv2.waitKey(1) & 0xFF == ord('q'):
            break
    else:
        break

cap.release()
cv2.destroyAllWindows()