본 포스팅은 How to implement a YOLO (v3) object detector from scratch in PyTorch: Part 2 내용을 번역한 것입니다!
개인적으로 공부하며 작성한 내용이라 오류 있으면 알려주시면 감사하겠습니다
본 편은 YOLO(v3) 밑바닥부터 구현해보기 2탄이다. 지난 시간에는 YOLO가 어떻게 작동하는지를 설명했고, 이번 편에서는 PyTorch를 이용하여 YOLO layer을 구현해볼 것이다. 즉, 이번 편이 모델의 building block을 구현하는 파트입니다.
코드는 Python 3.5 버전, PyTorch 0.4 버전에서 실행되도록 설계 되었고, Github repo 에서 확인할 수 있다.
이 튜토리얼은 5부분으로 구성 되어 있다(각 시리즈 번역 완료 후 링크 업데이트 예정) :
1. 1탄:Yolo가 어떻게 작동하는지 이해하기
2. 2탄(이번 편) : 네트워크 구조의 layer 생성하기
3. 3탄: 네트워크의 forward pass 구현하기
4. 4탄: Objectness score과 Non-maximun suppression
5. 5탄: 파이프라인의 입력값과 출력값 설계하기
전제조건
-
1탄의 지식: YOLO가 어떻게 작동하는지 알아야한다.
-
nn.Module,nn.Sequential, torch.nn.parameter 클래스등을 이용하여 custom architecture을 구현할 줄 아는등 PyTorch의 기본적인 사용법을 알아야한다.
PyTorch에 대한 기본적인 경험이 있다고 가정한다. 막 처음 시작한다면, framework를 조금 다루어보고 시작하는 것을 추천한다.
시작하기
먼저 detector을 담을 directory를 생성한다.
그런 다음 darknet.py 파일을 생성한다. Darknet은 YOLO에 내제한 architecture의 이름이다. 이 파일에 YOLO 신경망 코드를 작성할 것이다. util.py 라는 파일이 다양한 helper function들로 보조하는 파일이 될 것이다. 이 두 가지 파일 모두 detector 폴더에 저장하자. git을 이용하여 변경 사항을 추적해도 좋다.
Configuration File
공식적인 코드(c언어)는 신경망을 만들기 위해 configuration file을 이용한다. Cfg파일은 신경망의 layout을 block 별로 설명한다. 만약 caffe를 써본 적이 있다면 .protxt 와 유사하다고 생각하면 된다.
우리는 공식 cfg파일을 이용하여 우리의 신경망을 만들어 볼 것이다. detector dir에 저장할 파일을 여기에서 다운 받고 cfg 폴더에 저장하자. 리눅스라면 다음 코드를 입력하여 해도 좋다(하지만 나는 윈도우):
mkdir cfg
cd cfg
wget https://raw.githubusercontent.com/pjreddie/darknet/master/cfg/yolov3.cfg
cfg 파일을 열면 다음과 같은 형태로 되어 있을 것이다.
[convolutional]
batch_normalize=1
filters=64
size=3
stride=2
pad=1
activation=leaky

[convolutional]
batch_normalize=1
filters=32
size=1
stride=1
pad=1
activation=leaky

[convolutional]
batch_normalize=1
filters=64
size=3
stride=1
pad=1
activation=leaky

[shortcut]
from=-3
activation=linear
4개의 block으로 되어 있는데, 3개는 convolutional layer에 관한 것이고, 하나는 shortcut layer에 관한 것이다. Shortcut layer은 skip connection으로, ResNet에서 사용하는 것과 유사하다. YOLO에는 5개의 layer이 있다:
Convolutional
[convolutional]
batch_normalize=1
filters=64
size=3
stride=1
pad=1
activation=leaky
Shortcut
[shortcut]
from=-3
activation=linear
Shortcut layer는 skip connection으로, ResNet에서 이용하는 것과 유사하다. from 변수는 -3으로, shortcut layer의 출력값이 이전의 feature map과 3번째 layer을 역방향으로 더하여 구한다는 의미이다.
Upsample
[upsample]
stride=2
위 코드는 stride를 이용하여 직전의 feature map을 bilinear upsampling 하도록 한다.
Route
[route]
layers = -4

[route]
layers = -1, 61
Rout layer는 설명이 좀 필요하다. layer 속성이 있는데, 이는 하나 또는 2개의 값을 가질 수 있다.
Layer 속성이 하나의 값을 가질 때, indexed 값으로 feature map을 출력한다. 우리 예시에는 -4 값으로 되어 있는데, 따라서 layer의 feature map은 route layer의 뒤에서 4번째 layer을 출력하게 된다.
Layer이 2개의 값을 가지게 되면, index값을 합하여 feature map을 출력한다. 예제의 route값이 -1,61이므로 뒤에서 1번째 feature map과 61번째 feature map이 차원에 따라 합쳐져 출력된다.
YOLO
[yolo]
mask = 0,1,2
anchors = 10,13,  16,30,  33,23,  30,61,  62,45,  59,119,  116,90,  156,198,  373,326
classes=80
num=9
jitter=.3
ignore_thresh = .5
truth_thresh = 1
random=1
YOLO Layer은 1탄에서 설명한 detection layer에 해당한다. anchor은 9개의 anchor을 의미하고, mask 속성 값으로 index된 anchor 값 만이 이용된다. 위 코드에 의하면 mask 값의 0,1,2 번째 anchor 만이 이용되는 것이다. 각 cell이 3개의 detection box를 예측하기 때문에 적절하다고 볼 수 있다. 우리는 총 3개의 detection layer을 3 scale로 만들기 때문에 9개의 anchor을 만드는 것이다.
Net
[net]
# Testing
batch=1
subdivisions=1
# Training
# batch=64
# subdivisions=16
width= 320
height = 320
channels=3
momentum=0.9
decay=0.0005
angle=0
saturation = 1.5
exposure = 1.5
hue=.1
cfg 파일에는 net이라고 하는 block이 있는데, 신경망 input 값과 training 파라미터 정보만을 가지고 있어 layer라고 하기에는 부족하다. forward pass에서 이용되지는 않는다. 그렇지만 forward pass에서 anchor을 조정할 때 쓰이는 신경망의 input size와 같은 정보를 제공해준다.
Parsing the configuration file
시작하기 전에 필요한 라이브러리들을 darknet.py 파일에 import 해주자.
from __future__ import division

import torch
import torch.nn as nn
import torch.nn.functional as F
from torch.autograd import Variable
import numpy as np
이제 parse_cfg 함수를 정의해보자. 이 함수는 config 파일의 경로를 입력값으로 받는다.
def parse_cfg(cfgfile):
    """
    configuration file을 입력 받는다.

    block 리스트를 반환한다. 각 block은 인공신경망에 구축될 block을 의미한다. block은 dicitonary list로 되어있다.

    """
cfg 파일을 parsing하여 각각의 block을 dict 자료구조로 저장할 것이다. 각 블록의 속성과 그 값은 dictionary의 key-value 의 쌍으로 되어있다. cfg파일을 parse 하면서, block이라는 변수 이름으로 blocks dict에 추가한다. parse_cfg는 이 block을 return 한다.
먼저, cfg 파일의 정보를 string list로 저장한다. 아래의 코드는 list 정보를 preprocessing 한다.
    file = open(cfgfile,"r")
    lines = file.read().split('\n') # 줄별로 list에 저장
    lines = [x for x in lines if len(x) > 0] # 비어있는 줄 제거
    lines = [x for x in lines if x[0]!='#'] #주석 제거
    lines = [x.rstrip().lstrip() for x in lines] #좌우 끝의 공백 제거
그 다음, 결과 block을 얻기 위해 list loop을 돈다.
    block ={}
    blocks = []

    for line in lines :
        if line[0] == "[":          #새 블록이 시작된다면
            if len(block)!=0:   #block이 비어있지 않다면 이전의 block의 값이라는 의미
                blocks.append(block) #block list에 block 값을 append한다
                block = {}           #block 값을 초기화 해준다.
            block["type"] = line[1:-1].rstrip()
        else:
            key,value = line.split("=")
            block[key.rstrip()] = value.lstrip()
    blocks.append(block)
    return blocks
building block 생성하기
이제 parse_cfg로 파싱된 cfg 리스트 값으로 PyTorch 모듈을 만들어보자.
5종류의 layer가 있다. PyTorch는 미리 만들어진 convolutional 과 upsample layer을 위한 type이 있다. 확장 nn.Moudle 클래스를 이용하여 직접 모듈을 작성해보자.
create_models 함수는 parse_cfg가 리턴한 blocks 리스트를 인자로 받는다.
def create_modules(blocks):
    net_info = blocks[0]               #input과 preprocessing에 대한 정보를 얻음
    module_list = nn.ModuleList()
    prev_filters = 3
    output_filters = []
blocks loop을 돌기 전에 net_info 변수를 정의해서 신경망에 대한 정보를 저장할 공간을 마련한다.
nn.ModuleList
우리 함수는 nn.ModuleList를 return 한다. 이 클래스는 nn.Module object를 가지는 다른 일반적인 list와 유사하다. 다른 점이 있다면, mm.ModuleList를 nn.Module object에 추가하게 되면, nn.ModuleList 에 속한 모든 nn.Module의 모든 파라미터 s가 nn.Module object에 추가 된다.
새로운 convolutional layer을 정의할 때, 우리는 kernel의 차원을 결정해야한다. height, width값은 cfg 파일로 결정되고, 이전 layer의 kernel의 depth는 filter의 수(혹은 feature map의 depth)이다. 이 뜻은 convolution layer에 적용되는 filter의 수를 계속 추적해야 한다는 것이다. 우리는 prev_filter변수를 이용하여 이를 추적할 것이다. 먼저 3으로 prev_filter을 초기화한다. 이미지는 3개의 RGB 채널이 있기 때문이다.
route layer는 이전 layer로 부터 feature map을 가져온다. 만약 직전에 convolutional layer가 있었다면, 그 이전에 쓰인 feature map으로 커널에 적용된다. 따라서 각각의 선행하는 layer들의 filter 개수를 추적하고 있어야한다. 우리가 iterate 하면서, 필터의 개수를 output_filters 리스트에 추가한다.
block list를 iterate하면서, 각 block 별 PyTorch 모듈을 생성해보자.
 for index, x in enumerate(blocks[1:]):
        module = nn.Sequential()

        #check the type of block
        #create a new module for the block
        #append to module_list
nn.Sequential 은 nn.Module 객체를 순차적으로 실행하는 클래스이다. cfg 파일을 보면 하나의 블록이 1개 이상의 layer을 포함하는 것을 알 수 있다. 예를 들어, 블록 type의 convolutional 은 convolutional layer뿐만 아니라 leaky ReLU 활성함수와, batch norm layer도 가지고 있다. 우리는 nn.Sequential 을 이용하여 이 layer들을 연결하고 add_module 함수로 정의 한다. 아래 코드가 convolutional 과 upsample layer의 구현 예시다.
if(x["type"] == "convolutional"):
            #layer 정보 가져오기
            activation = x[activation]
            try :
                batch_normalize = int(x["batch_normalize"])
                bias = False
            except:
                batch_normalize = 0
                bias = True

            filters = int(x["filters"])
            padding = int(x["pad"])
            kernel_size = int(x["size"])
            stride = int(x["stride"])

            if padding:
                pad = (kernel_size - 1) // 2
            else:
                pad = 0

            #Convolutional layer 추가
            conv = nn.Conv2d(prev_filters, filters, kernel_size, stride, pad,bias = bias )
            module.add_module("conv_{0}".format(index),conv)

            #Batch Nor layer
            if batch_normalize :
                bn = nn.LeakyReLU(0.1,inplace=True)
                module.add_module("leaky_{0}".format(index), bn)

            #활성 함수 check
            #Yolo는 linear, leaky Relu 둘 중 하나
            if activation == "leaky":
                activn = nn.LeakyReLU(0.1,inplace= True)
                module.add_module("leaky_{0}".format(index),activn)

        #upsampling layer일 경우
        #bilinear sampling
        elif (x["type"] == "upsample"):
            stride = int(x["stride"])
            upsample = nn.Upsample(scale_factor= 2, mode =  "bilinear ")
            module.add_module("upsample_{}".format(index),upsample)
Route Layer/Shortcut layers
이제 Route layer, Shortcut layer에 대한 코드를 작성해보자.
        #route layer의 경우
        elif (x["type"]=="route"):
            x["layers"]= x["layers"].split(',')

            #route 시작하기
            start = int(x["layers"][0])
            #하나만 있을 경우 종료
            try:
                end = int(x["layers"][1])
            except:
                end = 0

            #positive anotation
            if start>0 :
                start = start - index
            if end > 0 :
                end = end -index

            route = EmptyLayer()
            module.add_module("route_{0}".format(index),route)

            if end <0 :
                filters = output_filters[index +start] +output_filters[index+end]
            else :
                filters = output_filters[index + start]

        #skip connection에 해당하는 shortcut
        elif x["type"] == "shortcut" :
            module.add_module("shortcut_{}".format(index),shortcut)
Route layer을 생성한 코드에 대해 설명해보자. 먼저, Layer의 속성값을 추출해냈다. integer로 casting하고 list에 저장하였다.
그 다음, emptyLayer라는 새 Layer를 호출했는데 이름과 같이 빈 layer이다.
이 함수는 다음과 같이 정의 되어 있다.
class EmptyLayer(nn.Module):
    def __init__(self):
        super(EmptyLayer,self).__init__()
Empty Layer?
빈 layer은 아무것도 안할 것 같아 이상하게 들릴 수 있다. Route layer는 다른 layer들 처럼 어떠한 operation을 수행한다. (이전의 layer을 forward/concatenation) PyTorch에서는, 새로운 layer을 생성하면, nn.Module의 subclass로 만들고 nn.Module object의 이전에 있던 함수의 function을 써준다.
Route block의 layer을 다지인 하기 위해서, nn.Module object layer의 멤버와 속성값을을 초기화 해야한다. 그런 다음, 우리는 concatenate 또는 이전 feature map을 가져 오는 등의 코드를 작성할 수 있게 된다. 마지막으로, 이 layer을 실행하여 신경망의 forward 함수로 실행하게 된다.
하지만 concatenation 코드를 고려할 때, 꽤나 짧고 심플하여(torch.cat을 호출하여 feature map에 적용), 이러한 layer을 또 하나 생성하는 것은 불필요한 추상화라고 생각된다. 대신 우리가 할 일은 route layer에 dummy layer을 하나 두어 concatenation을 직접 nn.Module object에 해주는 형태로 해주는 것이다. (만약 마지막 줄이 이해가 안된다면.. nn.Module class에 대해 읽어 보는 것을 추천한다.)
route layer의 바로 앞에 있는 Convolutional layer는 이전 feature map에 kernel(concatenate 되었을 확률이 큼)을 적용한다. 아래 코드는 route layer에서 나온 filter의 개수를 추적하기 위해 필터 변수를 업데이트한다.
        if end < 0 :
            #map을 concatenating 한다면
            filters = output_filters [index+start] + output_filters[index+end]
        else:
            filters = output_filters [index +start]
shortcut layer 역시 empty layer을 이용한다. 아주 간단한 작업을 하기 때문이다. 뒤에 있는 layer에 이전의 feature map 만을 추가하기 때문에 필터 변수를 업데이트 할 필요가 없다.
YOLO Layer
드디어 YOLO layer을 작성할 시간이다.
코드를 입력하세요new layer인 DetectionLayer을 정의한다. bounding box를 detect하기 위한 anchor을 가지고 있다.
detection layer는 다음과 같이 정의 되어 있다.
코드를 입력하세요loop의 마지막은 저장하는 작업이다.
코드를 입력하세요이게 loop의 마지막이다. create_modules의 마지막은 net_info와 module_list를 return 한다.
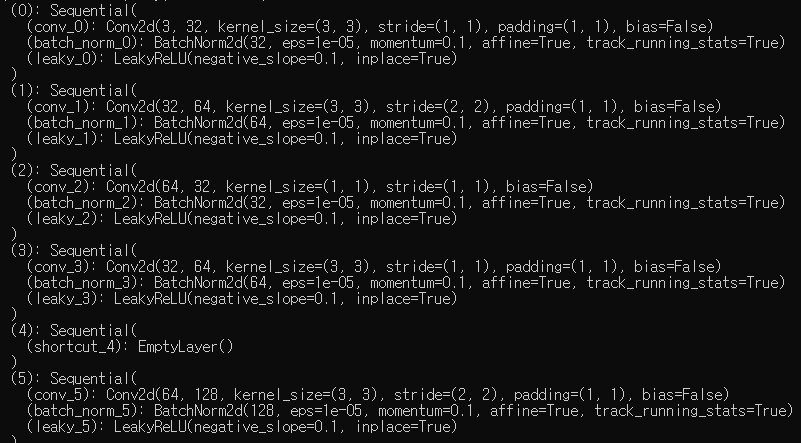
작성한 코드 테스트 해보기
이제 아래의 코드를 darknet.py 마지막에 작성해서 파일을 실행해보자.
blocks = parse_cfg("cfg/yolov3.cfg")
print(create_modules(blocks))
아주 긴 list 가 출력된다.
이번 편은 여기까지이다.
다음 편에서는 building block들을 정리하여 이미지로부터 결과를 도출해보도록하자.

혹시 3편은 안올려주시나요??ㅠㅠ 엄청난 도움을 받고 있습니다ㅠ