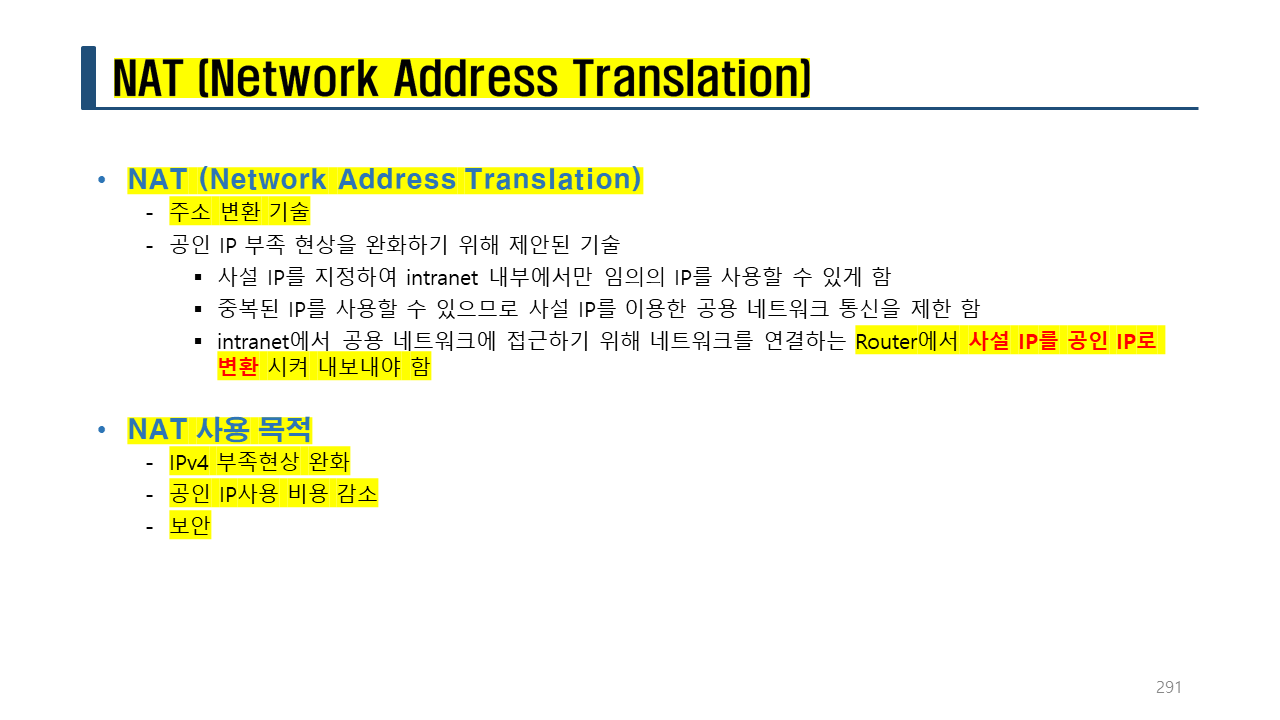
네트워크 주소변환 구현 및 테스트 - NAT (Network Address Translation) (교육 19일차)


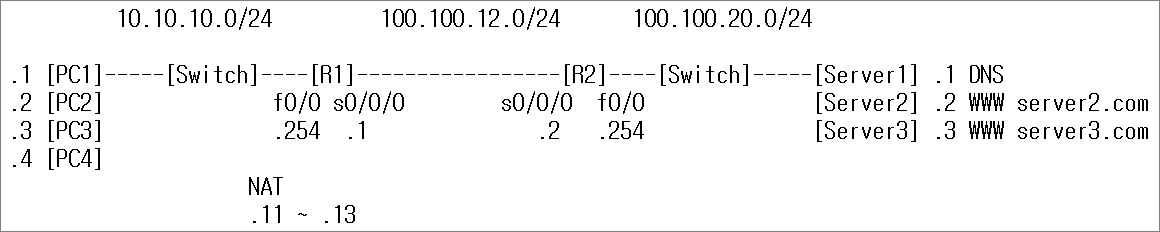
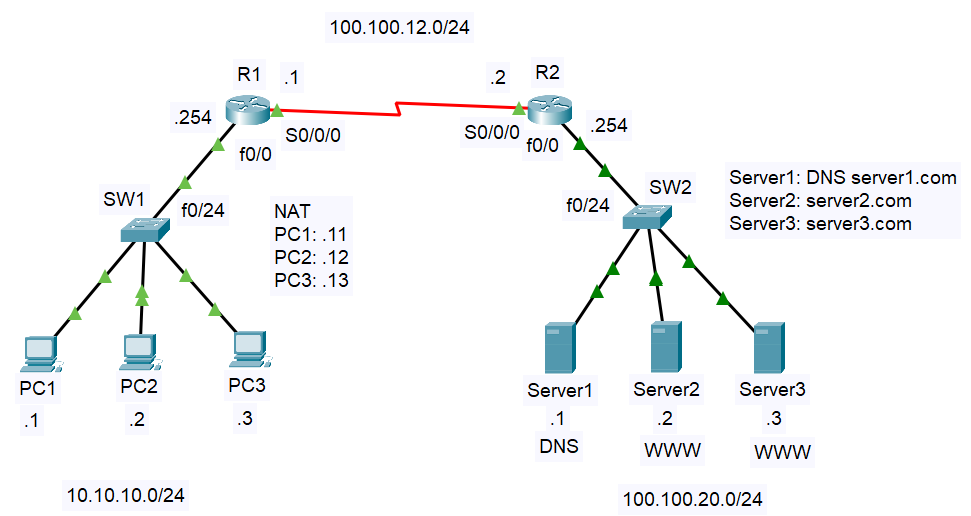
실습> NAT를 이용한 네트워크 설정하기 1
파일명: nat1.pkt
프로그램: 패킷트레이서
라우터: 2811
모듈: HWIC-2T
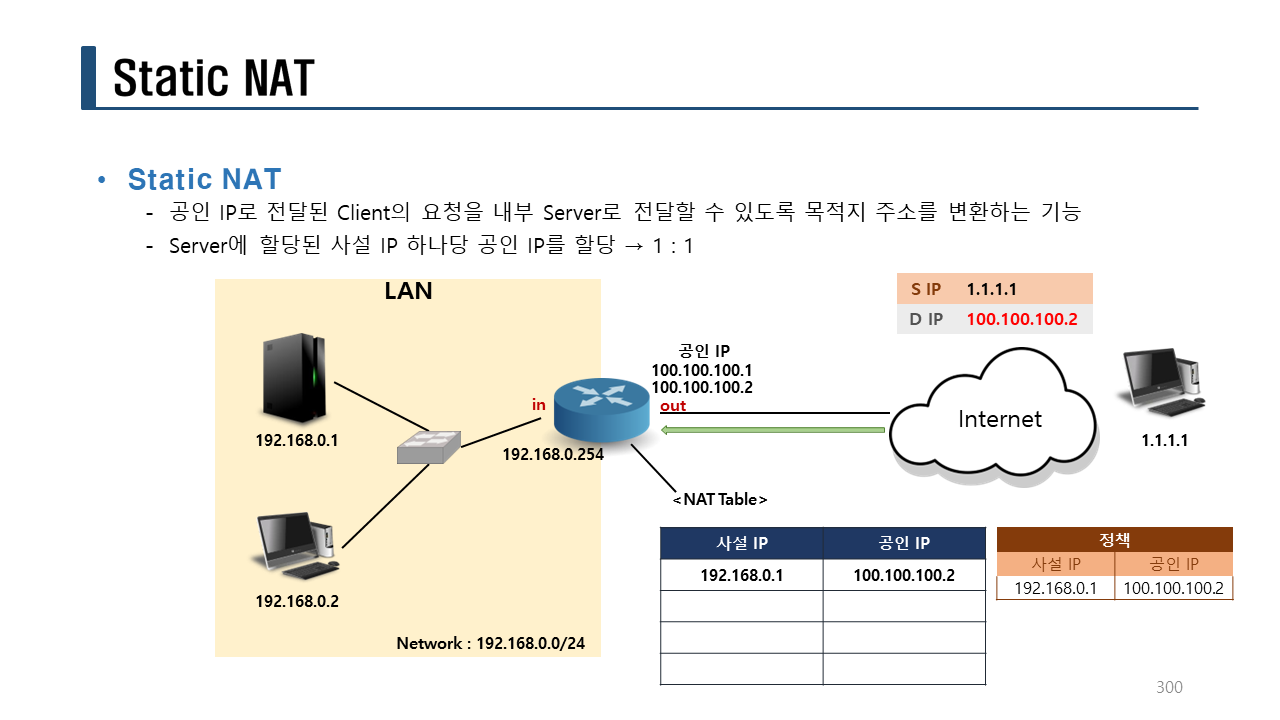
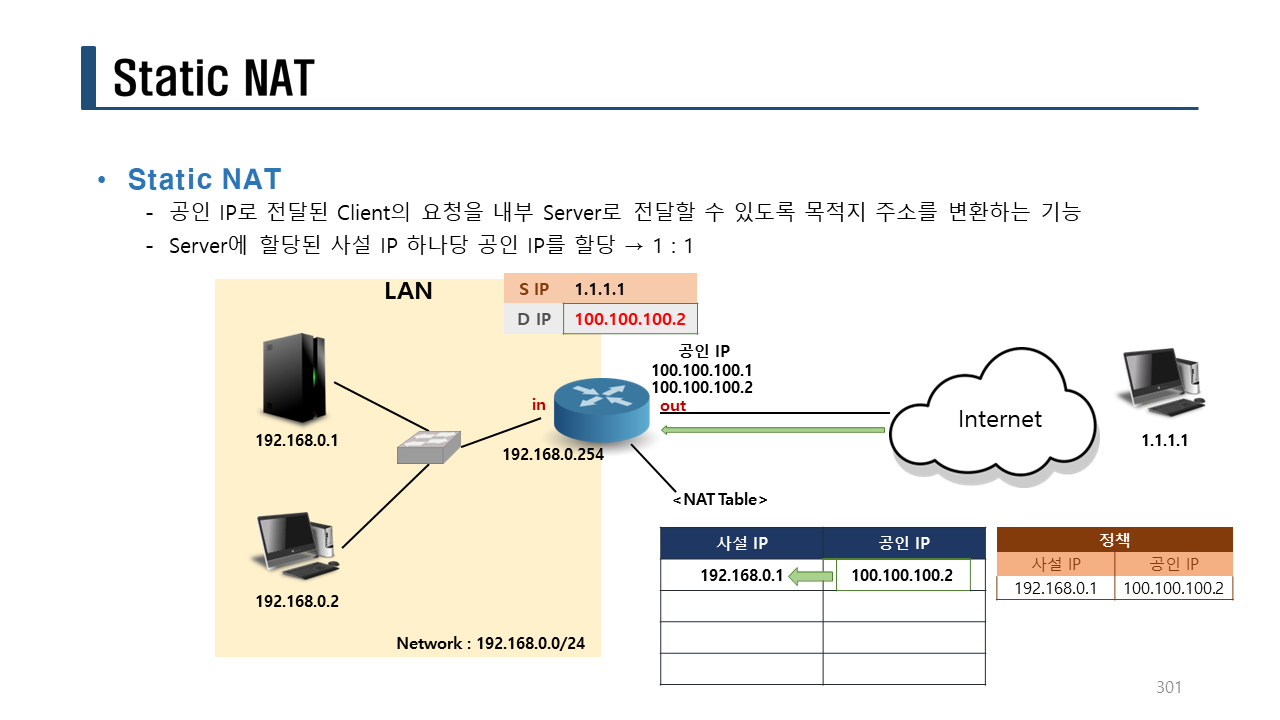
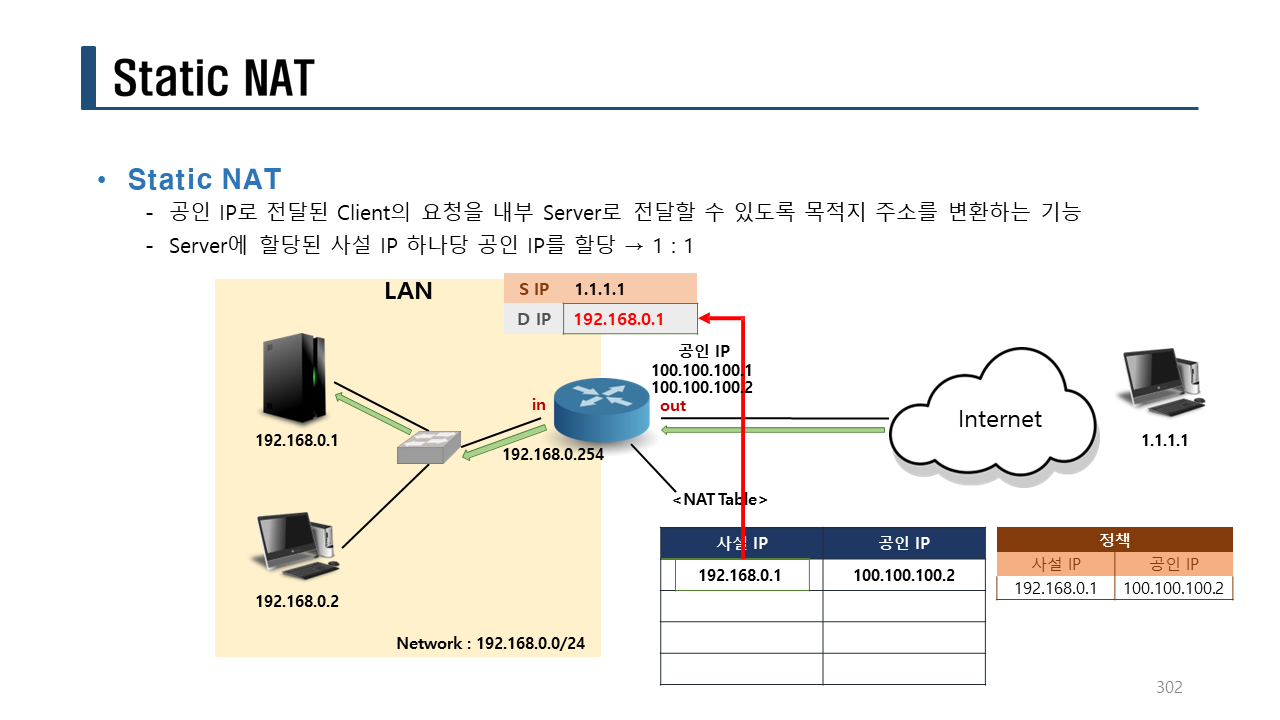
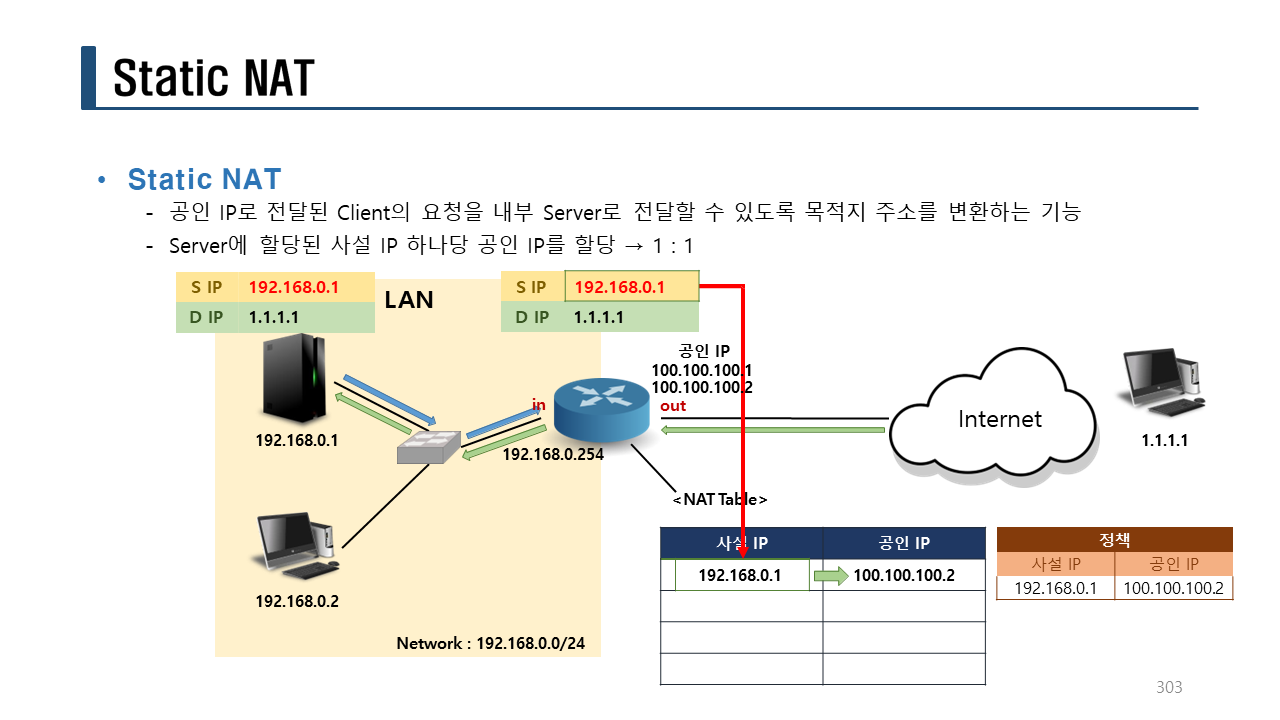
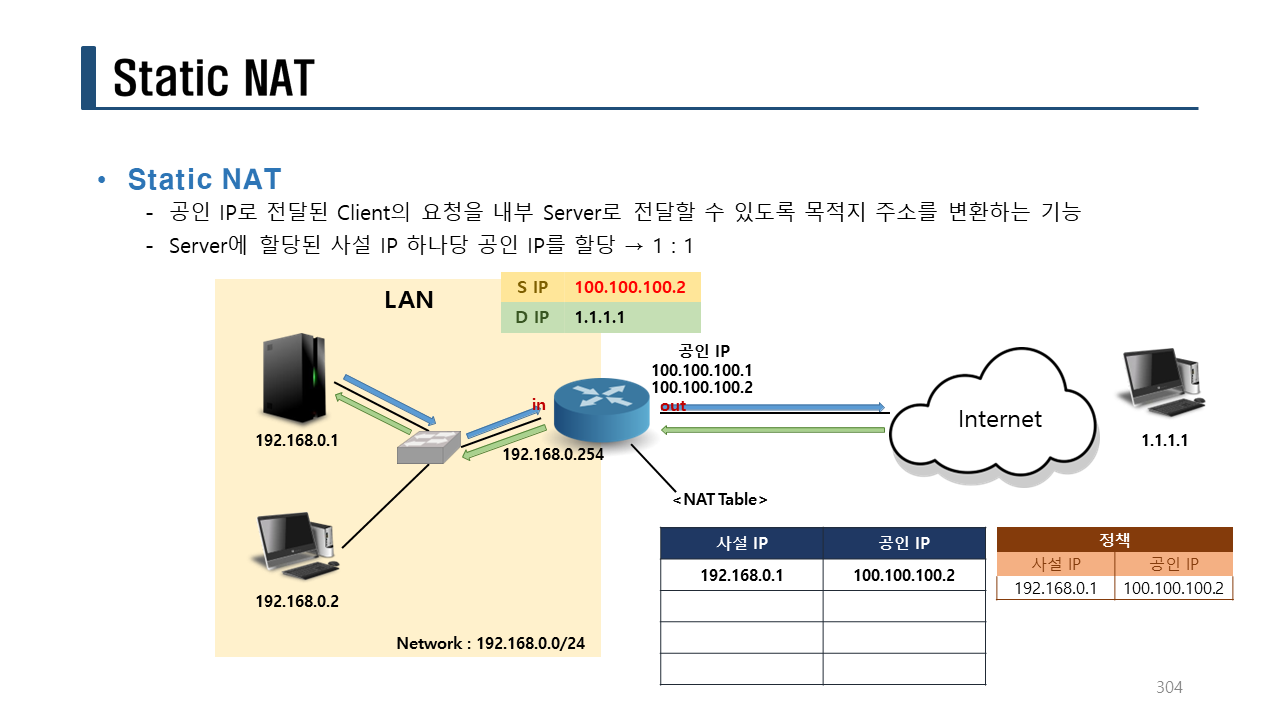
NAT 종류: static NAT
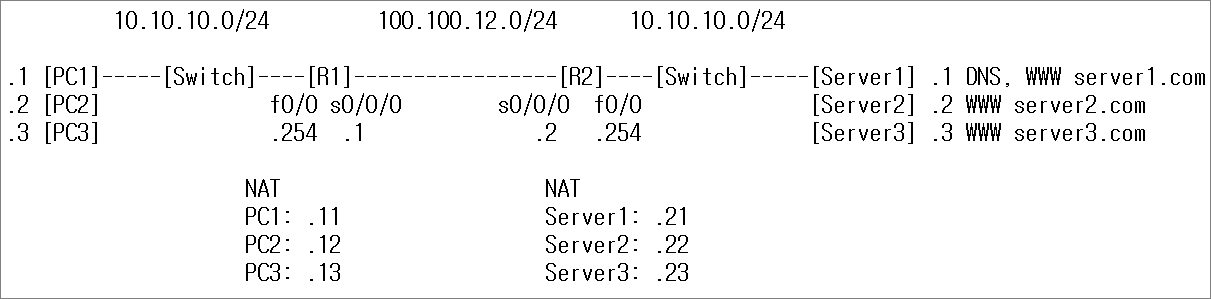
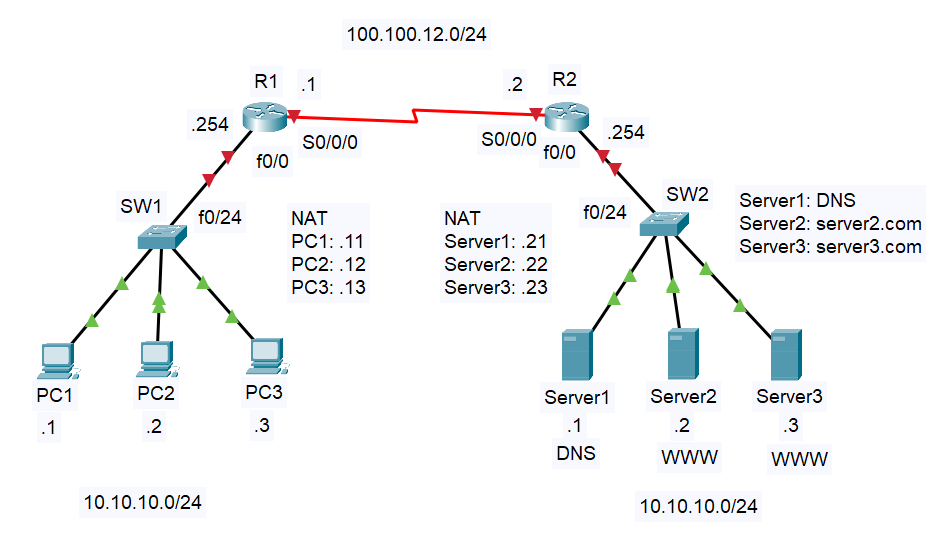
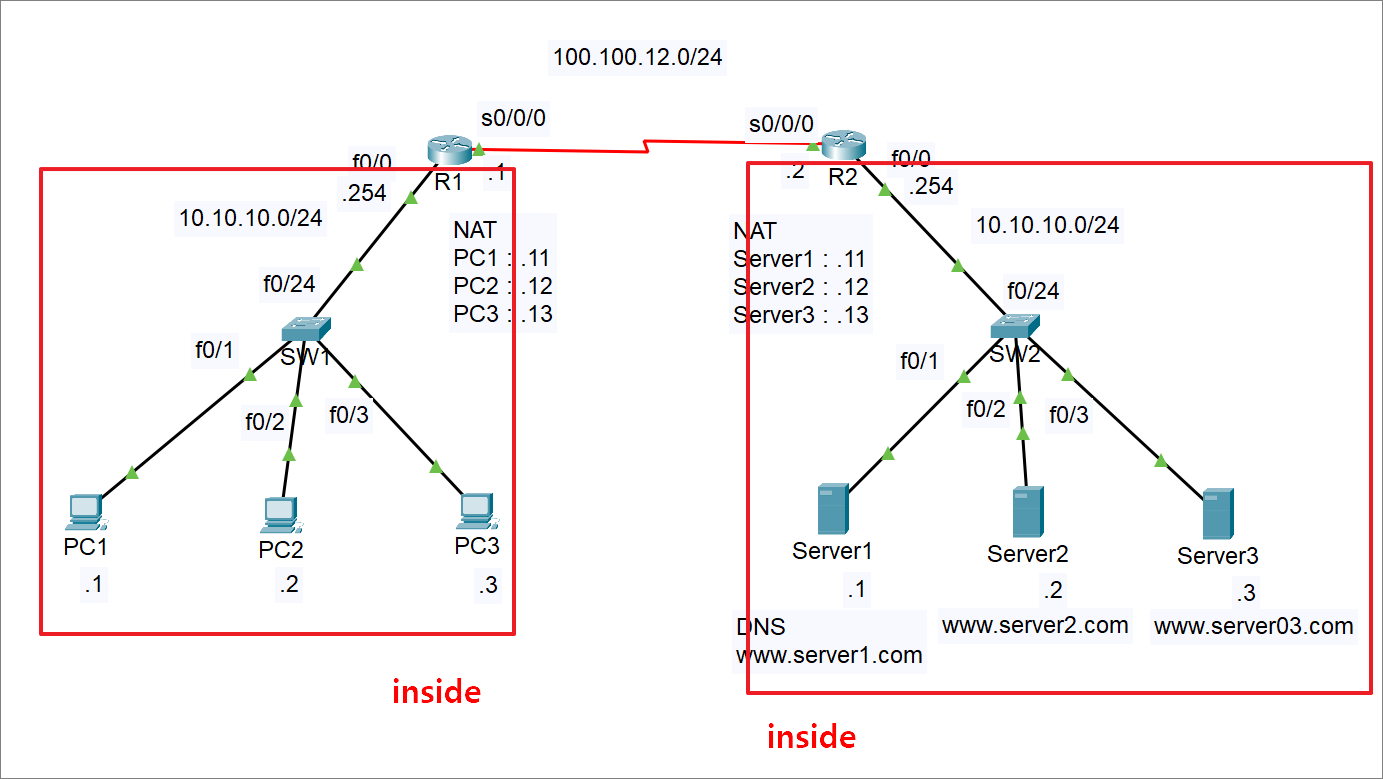
1. PC 설정
PC1을 설정한다.
IPv4 Address: 10.10.10.1
Subnet Mask: 255.255.255.0
Default Gateway: 10.10.10.254
DNS Server: 100.100.12.21
PC2을 설정한다.
IPv4 Address: 10.10.10.2
Subnet Mask: 255.255.255.0
Default Gateway: 10.10.10.254
DNS Server: 100.100.12.21
PC3을 설정한다.
IPv4 Address: 10.10.10.3
Subnet Mask: 255.255.255.0
Default Gateway: 10.10.10.254
DNS Server: 100.100.12.21
2. Server 설정
Server1을 설정한다.
IPv4 Address: 10.10.10.1
Subnet Mask: 255.255.255.0
Default Gateway: 10.10.10.254
DNS Server: 10.10.10.1
Server2를 설정한다.
IPv4 Address: 10.10.10.2
Subnet Mask: 255.255.255.0
Default Gateway: 10.10.10.254
DNS Server: 10.10.10.1
Server3을 설정한다.
IPv4 Address: 10.10.10.3
Subnet Mask: 255.255.255.0
Default Gateway: 10.10.10.254
DNS Server: 10.10.10.1
DNS Service 등록:
server1.com: 100.100.12.21
www.server1.com: 100.100.12.21
server2.com: 100.100.12.22
www.server2.com: 100.100.12.22
server3.com: 100.100.12.23
www.server3.com: 100.100.12.23
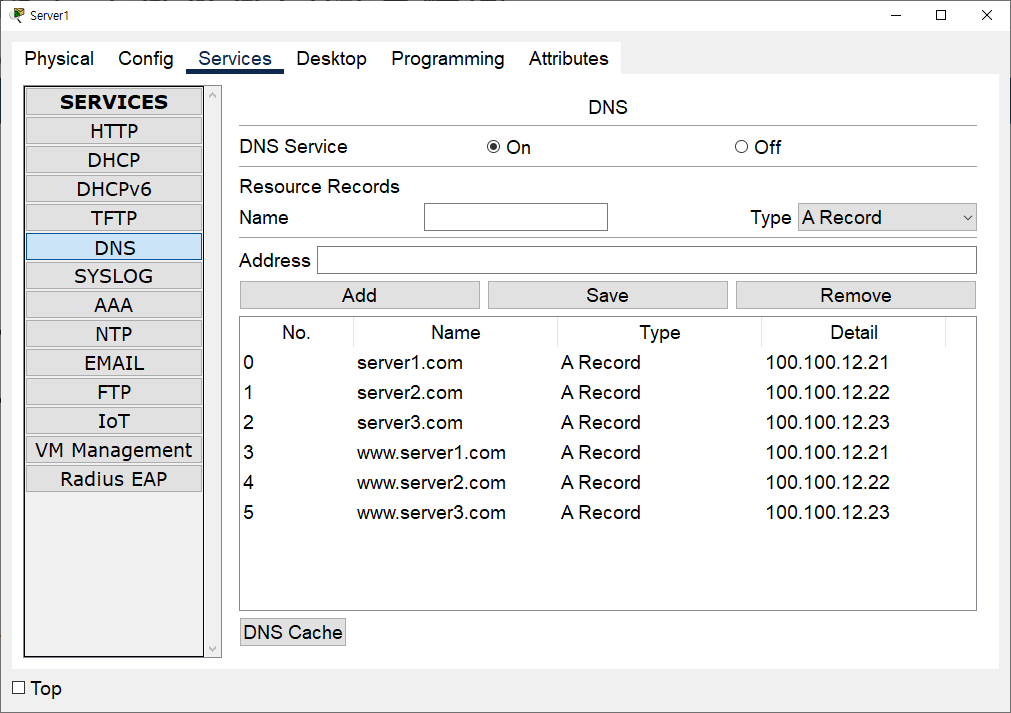
① DNS : 도메인주소 -> IP주소 "인터넷에서 도메인 주소를 알려주는 114 서버"
② A(Address) record : IP주소를 알려주는 DNS 서버의 기능
HTTP Service 등록:
server1.com: Welcome to server1.com.
server2.com: Welcome to server2.com.
server3.com: Welcome to server3.com.
3. 라우터 설정
R1 라우터를 설정한다.
!R1
en
conf t
hostname R1
no ip domain-lookup
int f0/0
ip add 10.10.10.254 255.255.255.0
no sh
int s0/0/0
ip add 100.100.12.1 255.255.255.0
no sh
end
sh ip int b
!
R2 라우터를 설정한다.
!R2
en
conf t
hostname R2
no ip domain-lookup
int f0/0
ip add 10.10.10.254 255.255.255.0
no sh
int s0/0/0
ip add 100.100.12.2 255.255.255.0
no sh
end
sh ip int b
!
4. NAT 설정
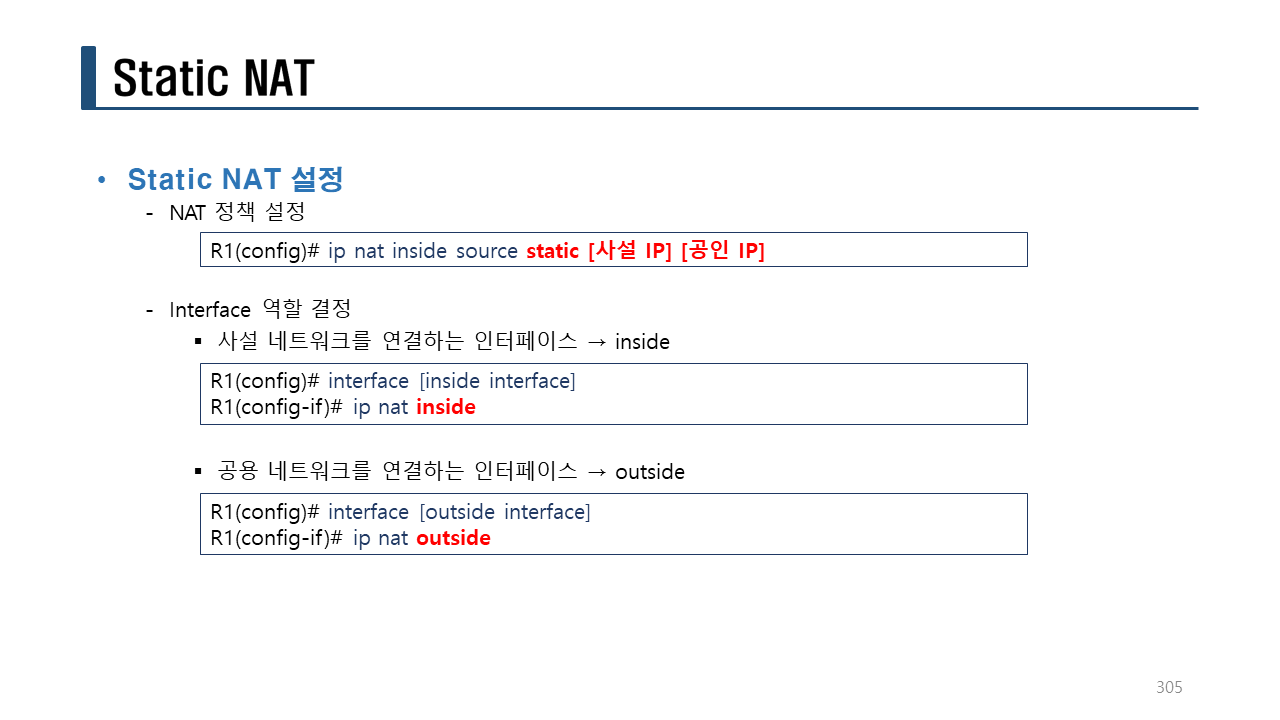
라우터에서 static NAT를 설정한다.
!R1
ip nat inside source static 10.10.10.1 100.100.12.11
ip nat inside source static 10.10.10.2 100.100.12.12
ip nat inside source static 10.10.10.3 100.100.12.13
int f0/0
ip nat inside
int s0/0/0
ip nat outside
!
!R2
ip nat inside source static 10.10.10.1 100.100.12.21
ip nat inside source static 10.10.10.2 100.100.12.22
ip nat inside source static 10.10.10.3 100.100.12.23
int f0/0
ip nat inside
int s0/0/0
ip nat outside
!
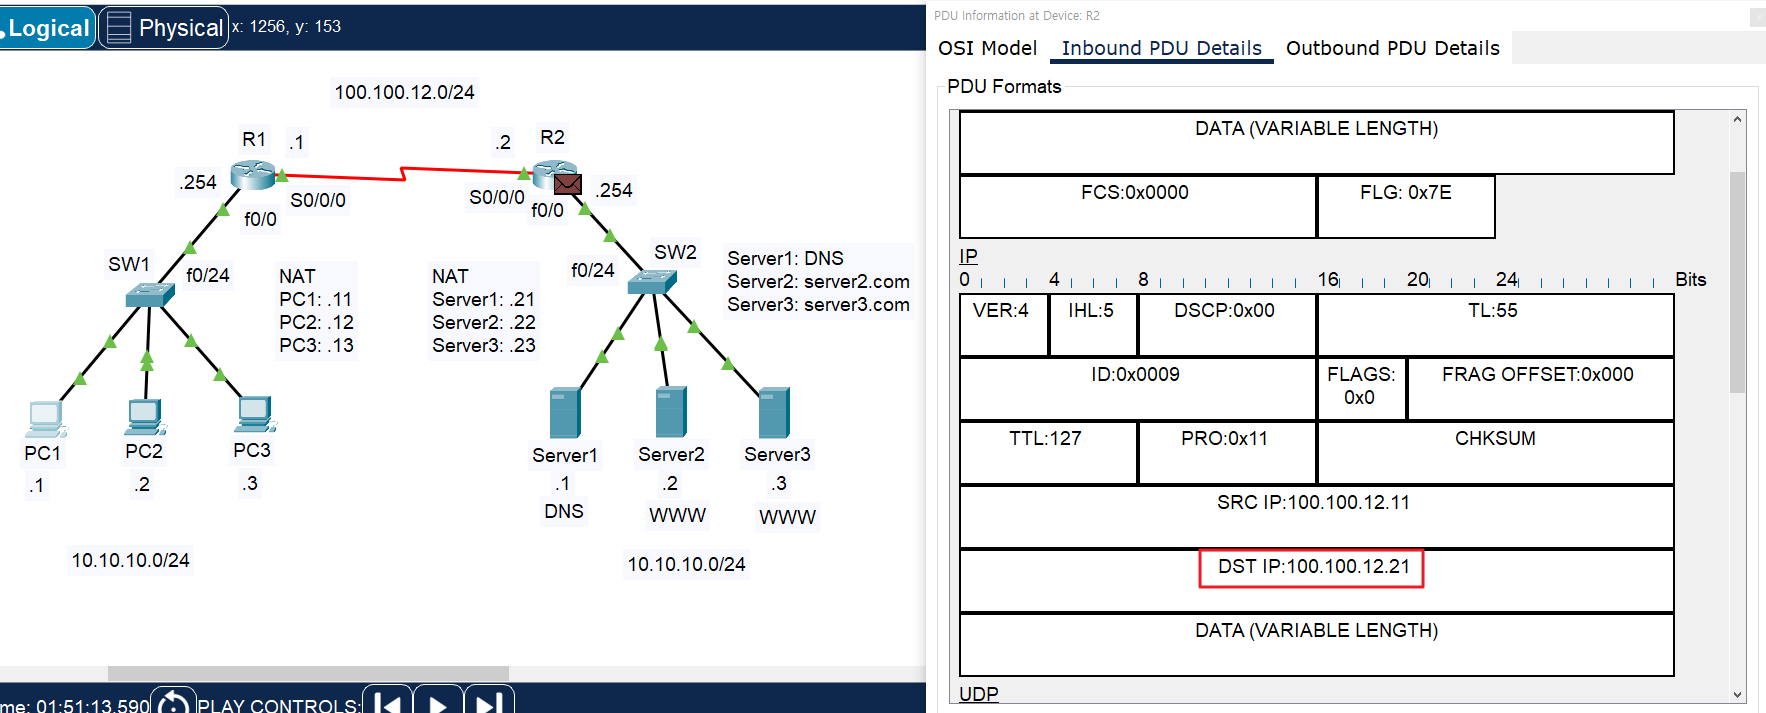
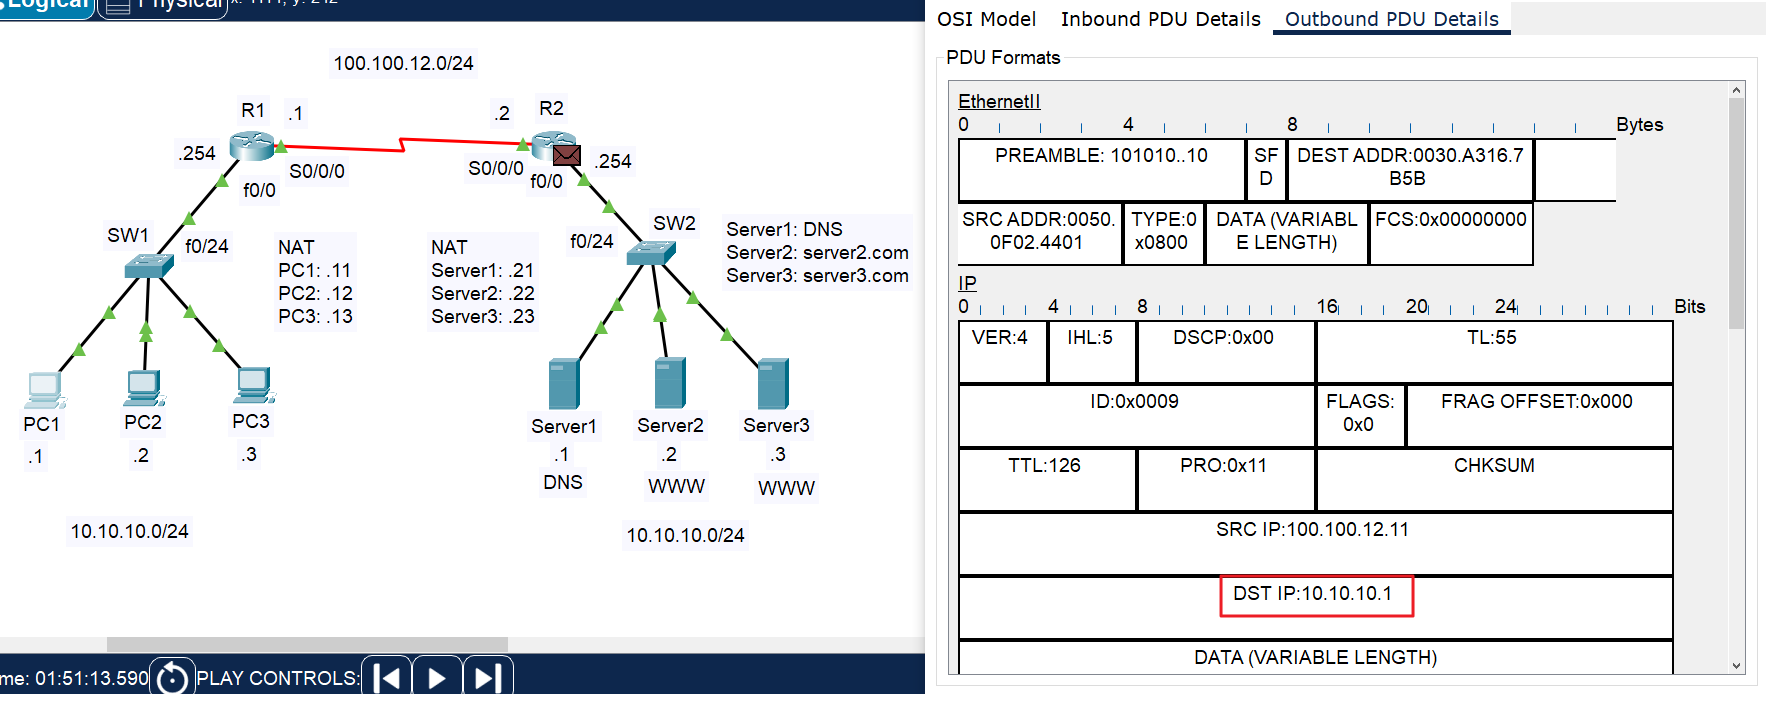
5. 분석
PC1에서 분석한다.
C:>ping 100.100.12.21
C:>ping server2.com
C:>ping server3.com
R1에서 확인한다.
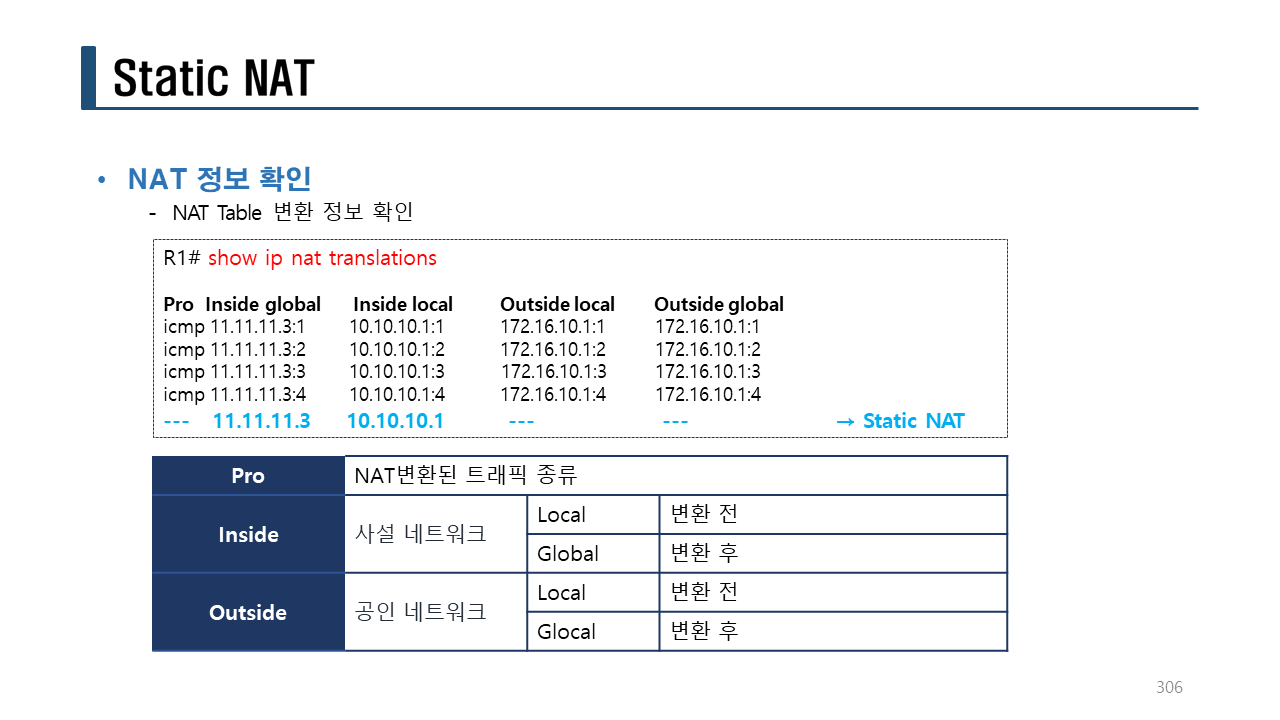
R1#sh ip nat translations
Pro Inside global Inside local Outside local Outside global
--- 100.100.12.11 10.10.10.1 --- ---
--- 100.100.12.12 10.10.10.2 --- ---
--- 100.100.12.13 10.10.10.3 --- ---
tcp 100.100.12.11:1025 10.10.10.1:1025 100.100.12.21:80 100.100.12.21:80
tcp 100.100.12.11:1026 10.10.10.1:1026 100.100.12.22:80 100.100.12.22:80
tcp 100.100.12.11:1027 10.10.10.1:1027 100.100.12.23:80 100.100.12.23:80
R1#sh ip nat statistics
Total translations: 6 (3 static, 3 dynamic, 3 extended)
Outside Interfaces: Serial0/0/0
Inside Interfaces: FastEthernet0/0
Hits: 29 Misses: 10
Expired translations: 7
Dynamic mappings:
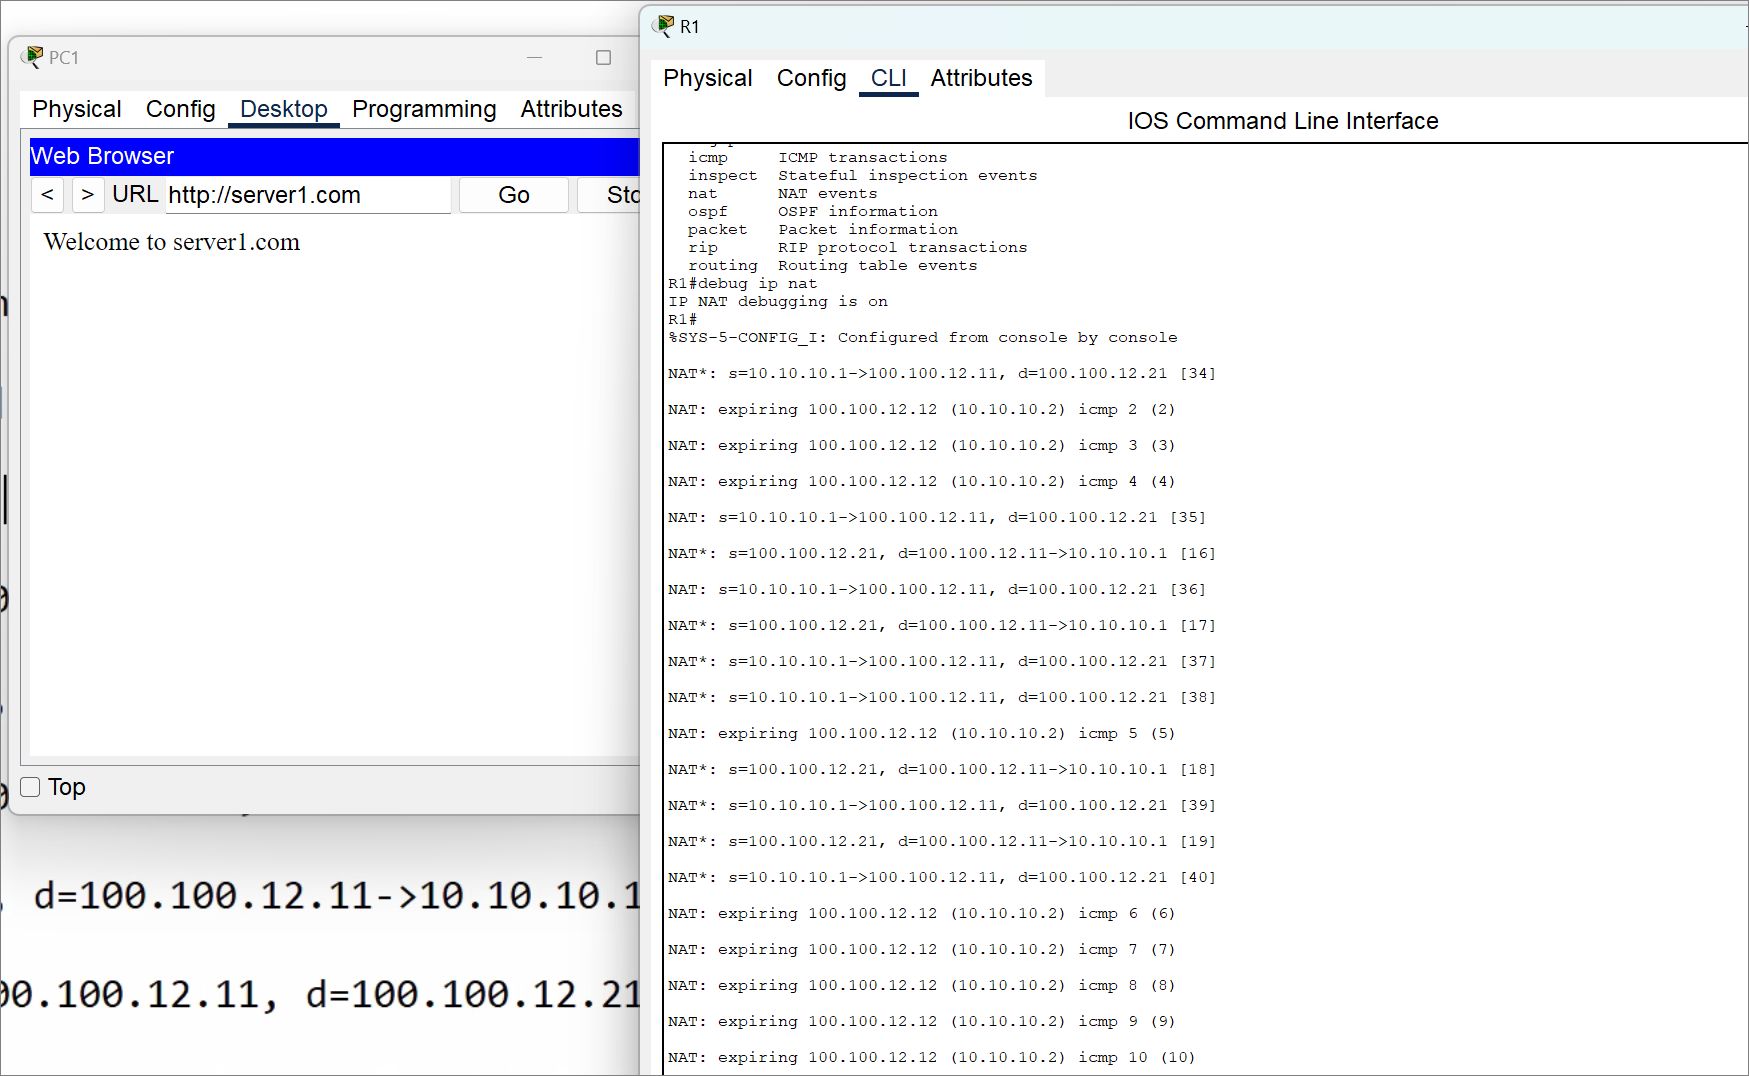
R1#debug ip nat
IP NAT debugging is on
PC1에서 웹브라우저를 열어서 http://server1.com/ 으로 접속한다.
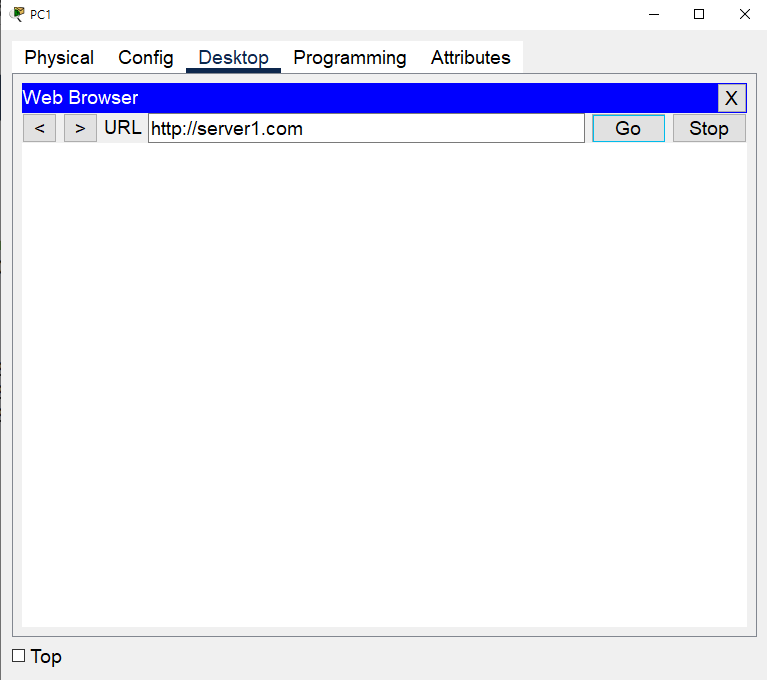
NAT 동작을 확인할 수 있다.
R1#
NAT: s=10.10.10.1->100.100.12.11, d=100.100.12.21 [29]
NAT*: s=100.100.12.21, d=100.100.12.11->10.10.10.1 [10]
NAT: s=10.10.10.1->100.100.12.11, d=100.100.12.21 [30]
NAT*: s=100.100.12.21, d=100.100.12.11->10.10.10.1 [11]
NAT*: s=10.10.10.1->100.100.12.11, d=100.100.12.21 [31]
NAT*: s=10.10.10.1->100.100.12.11, d=100.100.12.21 [32]
NAT*: s=100.100.12.21, d=100.100.12.11->10.10.10.1 [12]
NAT*: s=10.10.10.1->100.100.12.11, d=100.100.12.21 [33]
NAT*: s=100.100.12.21, d=100.100.12.11->10.10.10.1 [13]
NAT*: s=10.10.10.1->100.100.12.11, d=100.100.12.21 [34]
분석이 끝나면 debug를 꺼준다.
R1#no debug ip nat
IP NAT debugging is off
R2에서 확인한다.
R2#sh ip nat translations
Pro Inside global Inside local Outside local Outside global
--- 100.100.12.21 10.10.10.1 --- ---
--- 100.100.12.22 10.10.10.2 --- ---
--- 100.100.12.23 10.10.10.3 --- ---
tcp 100.100.12.21:80 10.10.10.1:80 100.100.12.11:1025 100.100.12.11:1025
tcp 100.100.12.22:80 10.10.10.2:80 100.100.12.11:1026 100.100.12.11:1026
tcp 100.100.12.23:80 10.10.10.3:80 100.100.12.11:1027 100.100.12.11:1027
R2#sh ip nat statistics
Total translations: 6 (3 static, 3 dynamic, 3 extended)
Outside Interfaces: Serial0/0/0
Inside Interfaces: FastEthernet0/0
Hits: 29 Misses: 10
Expired translations: 7
Dynamic mappings:
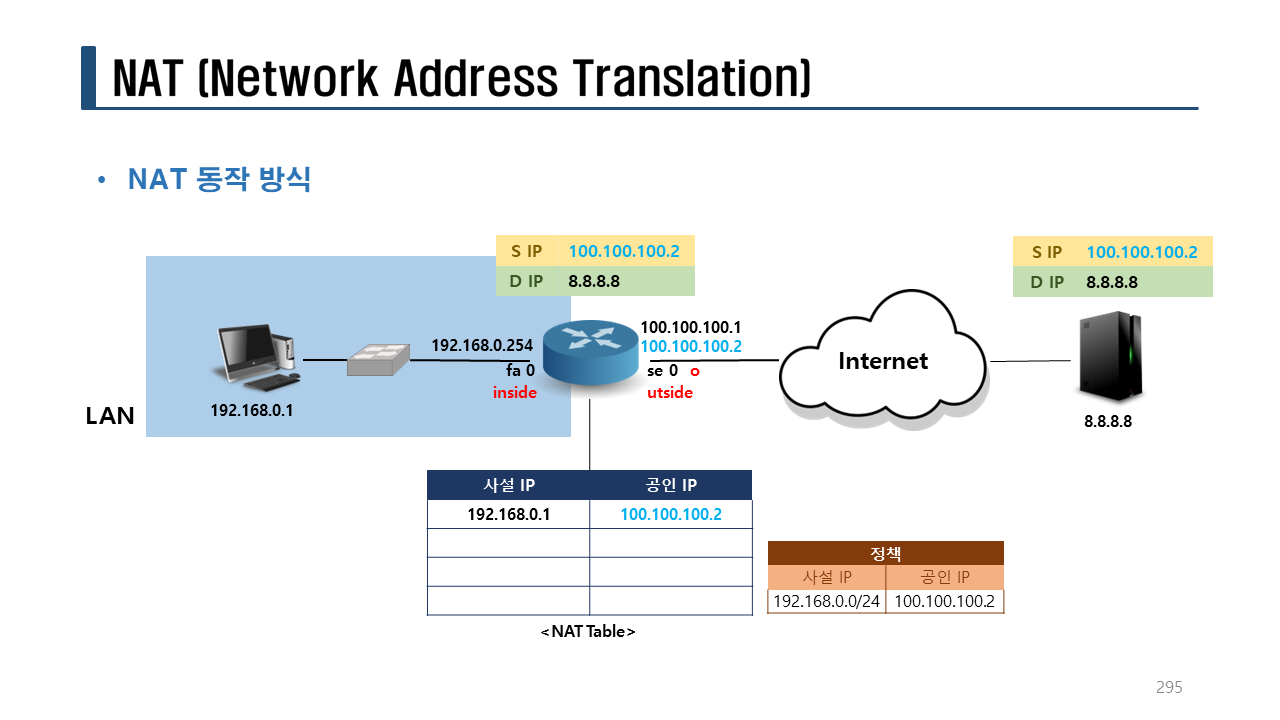
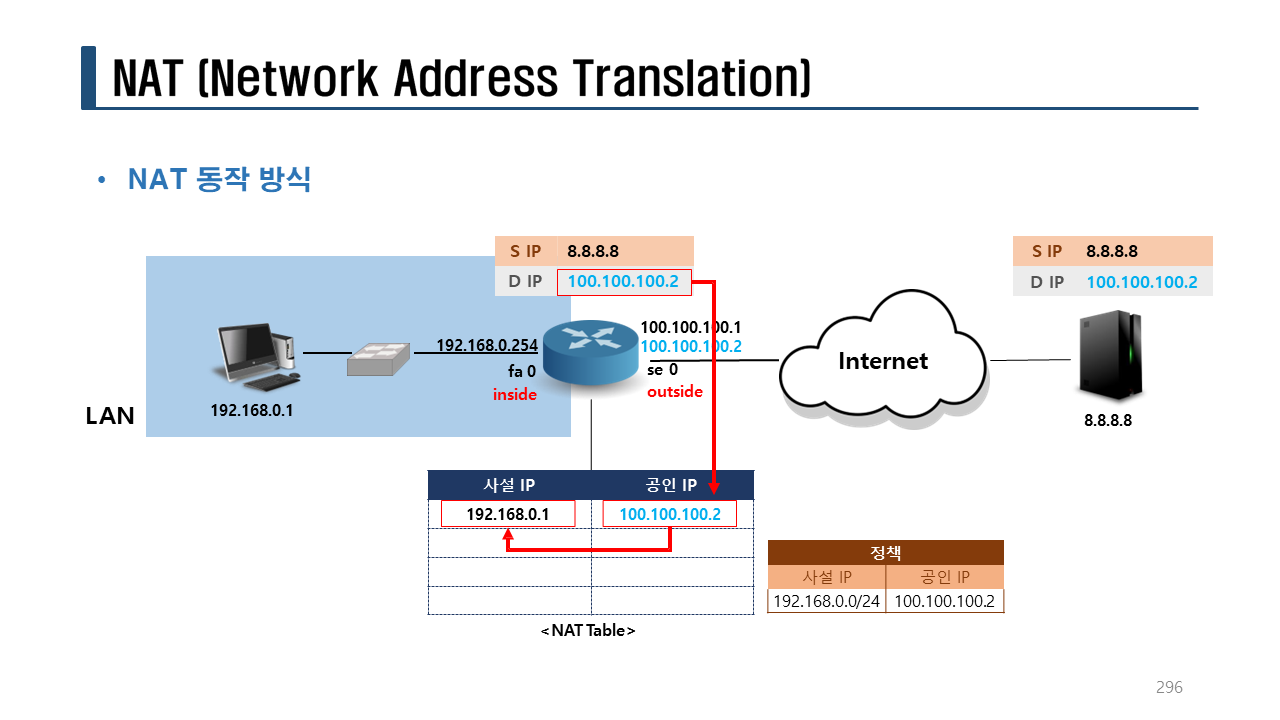
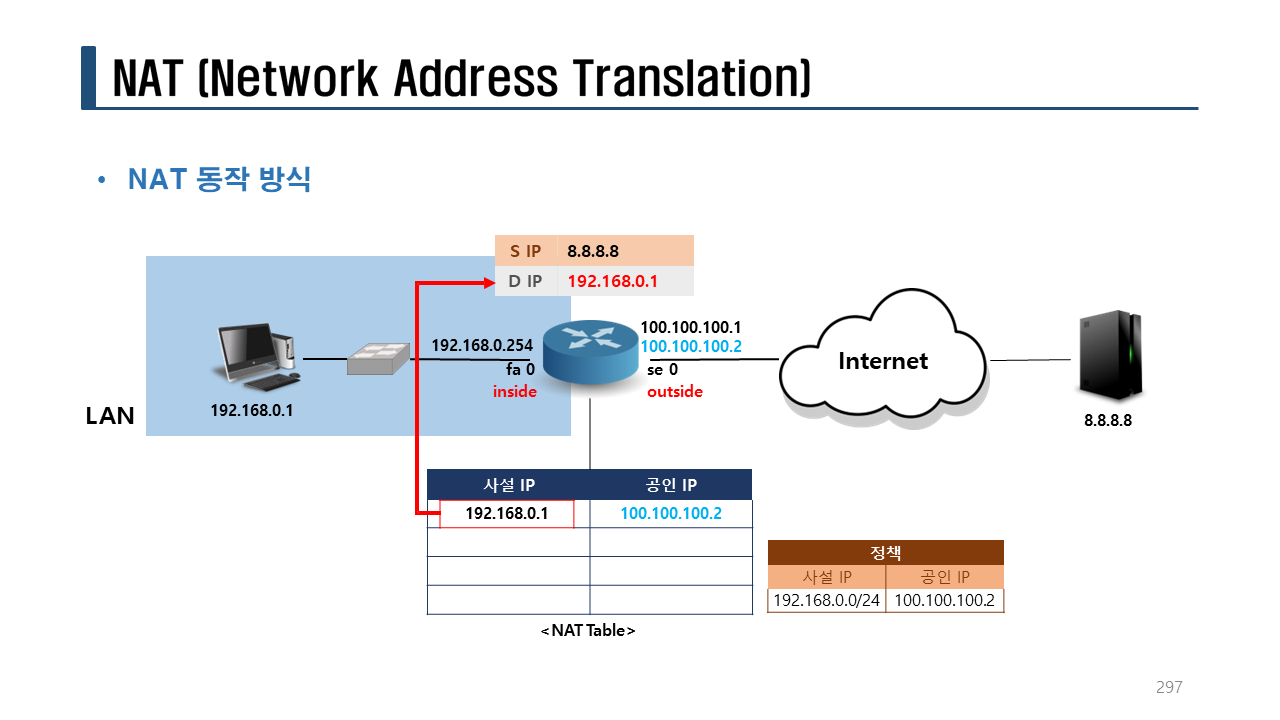
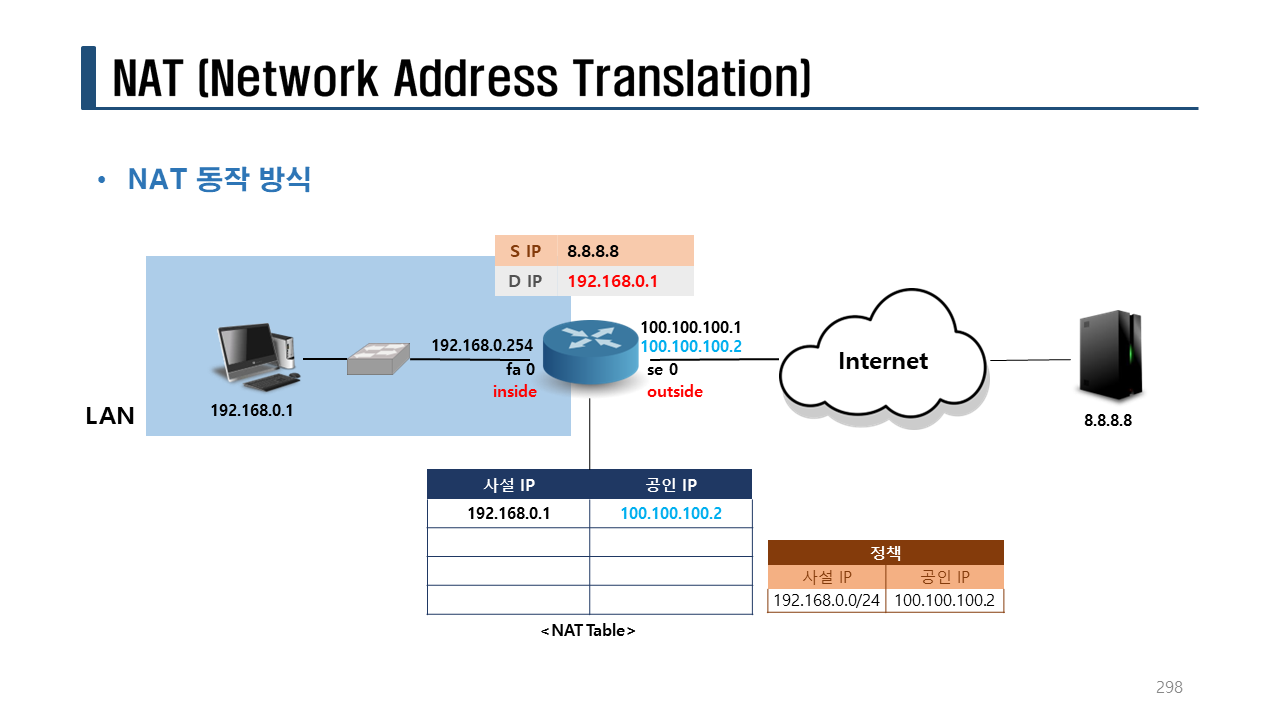
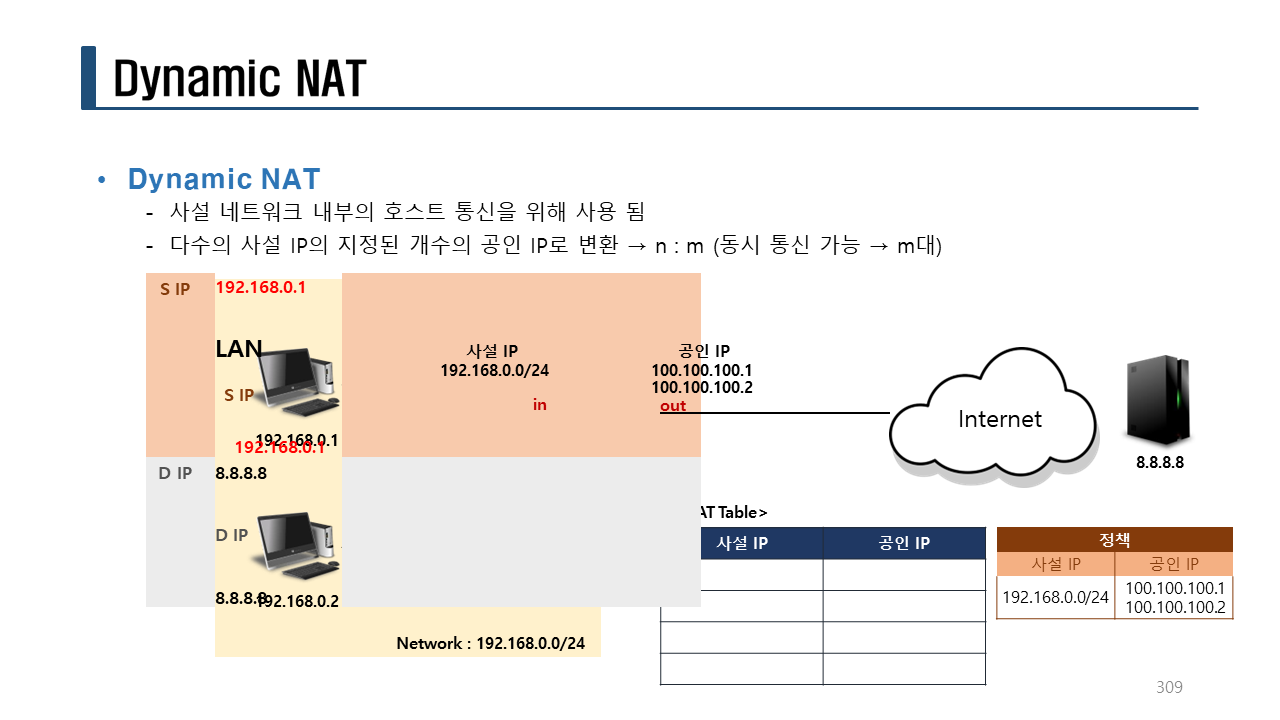
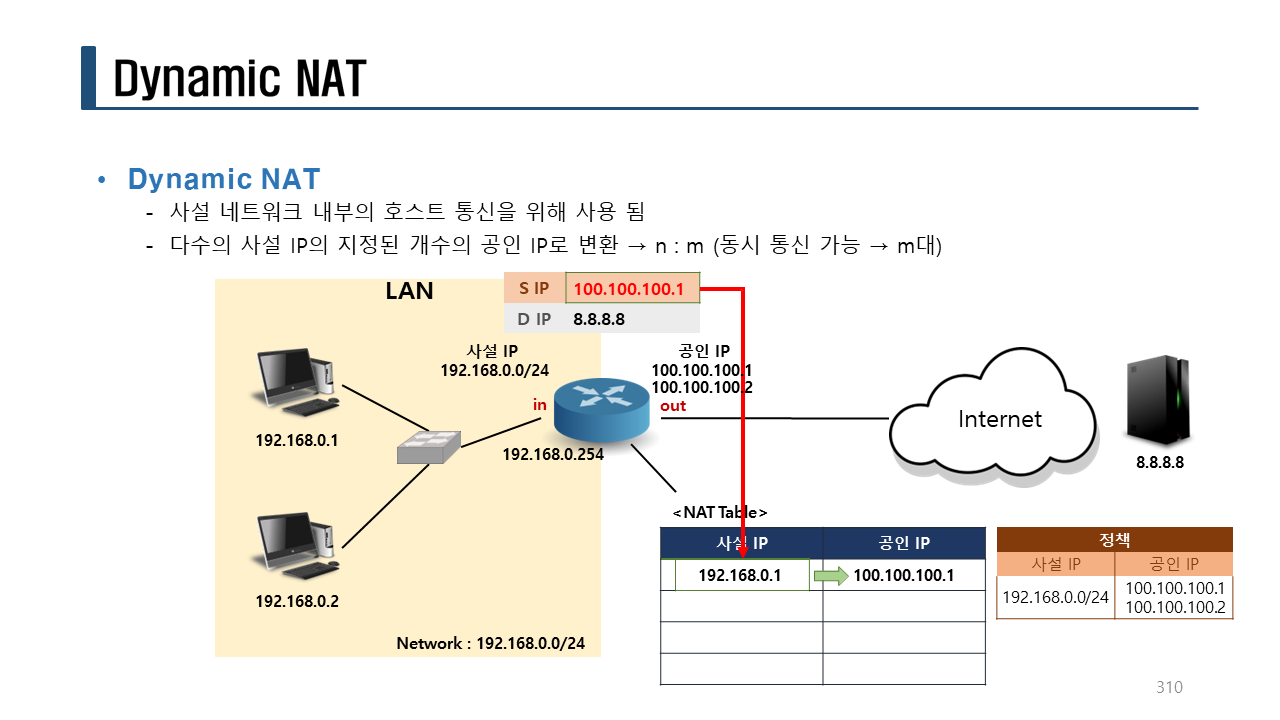
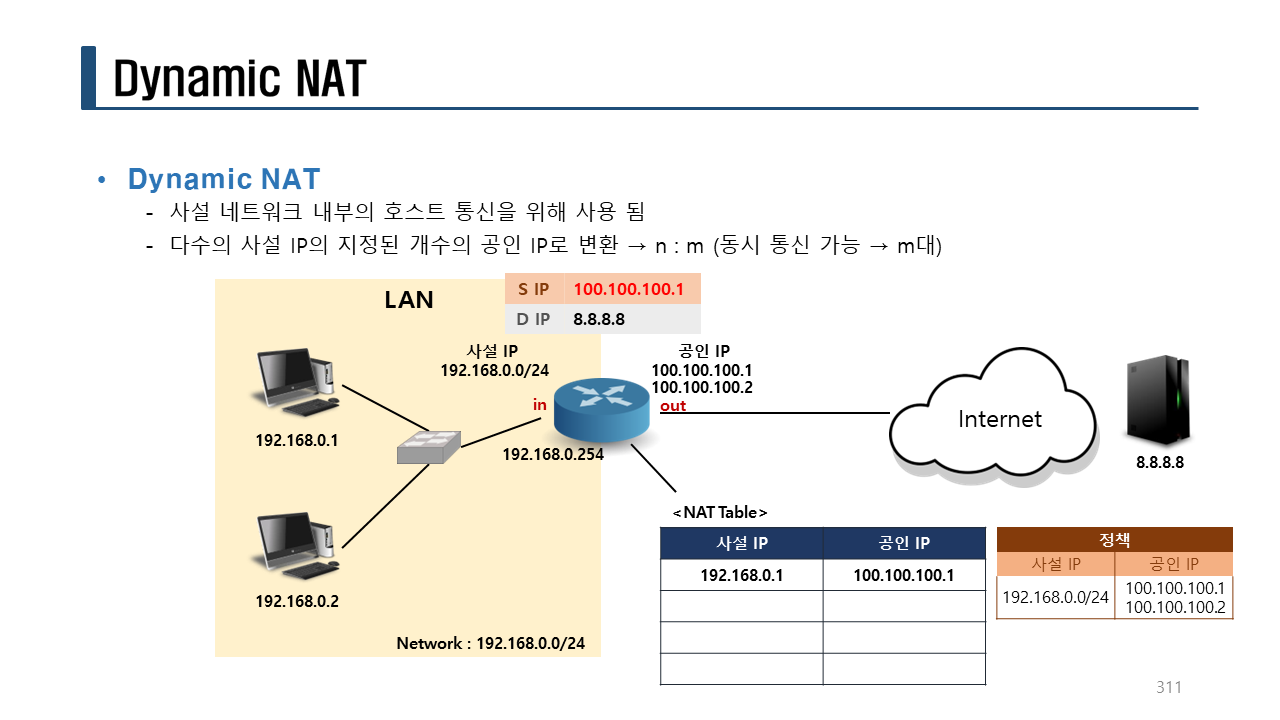
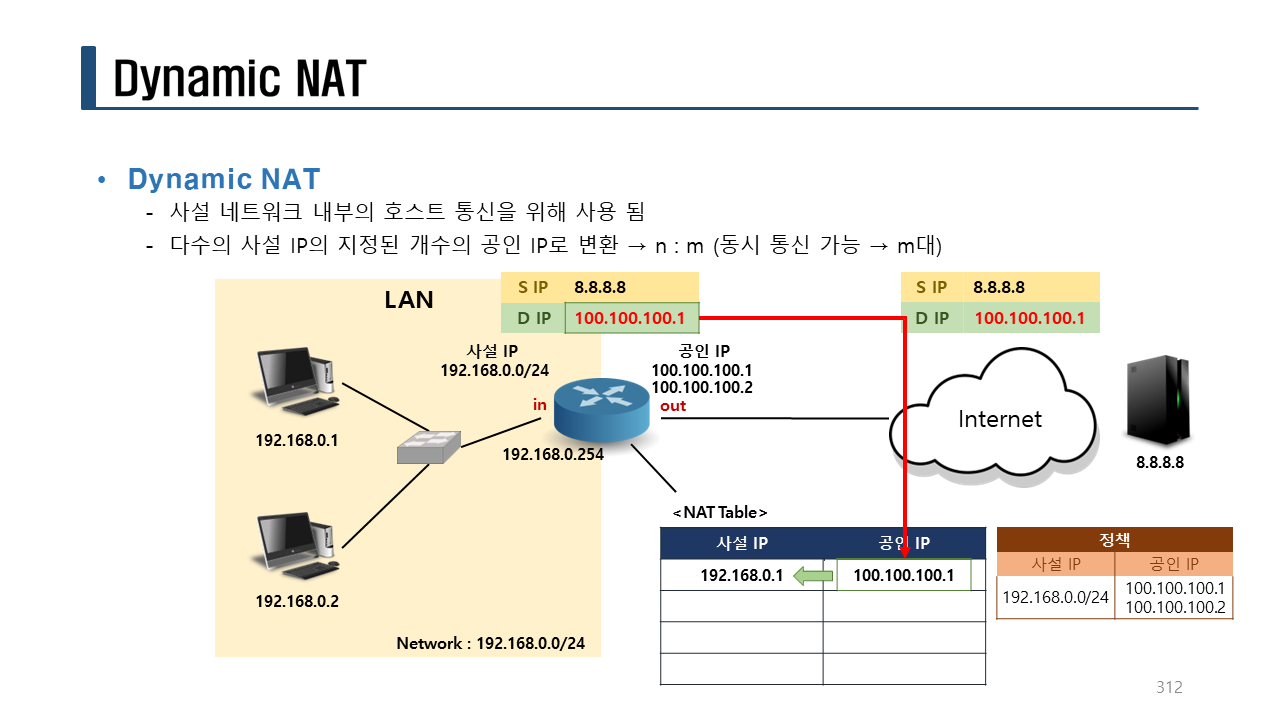
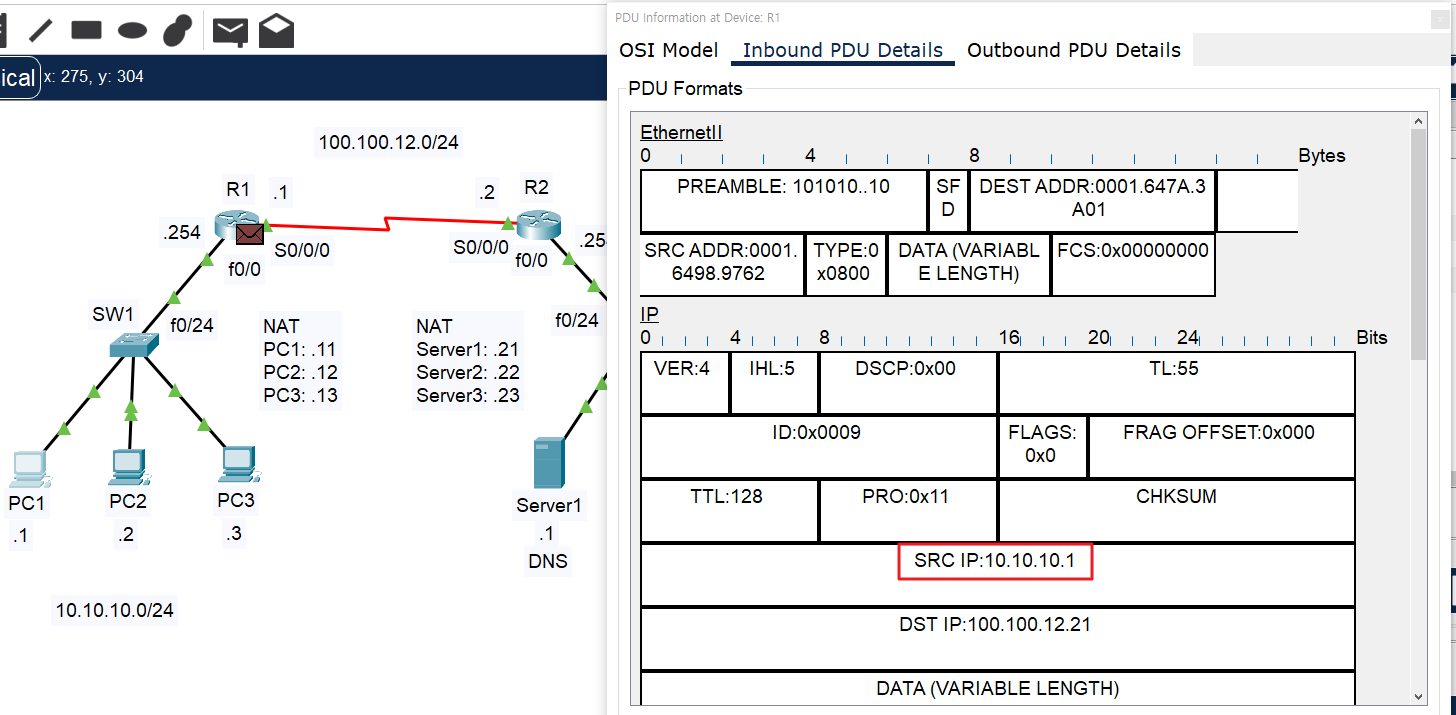
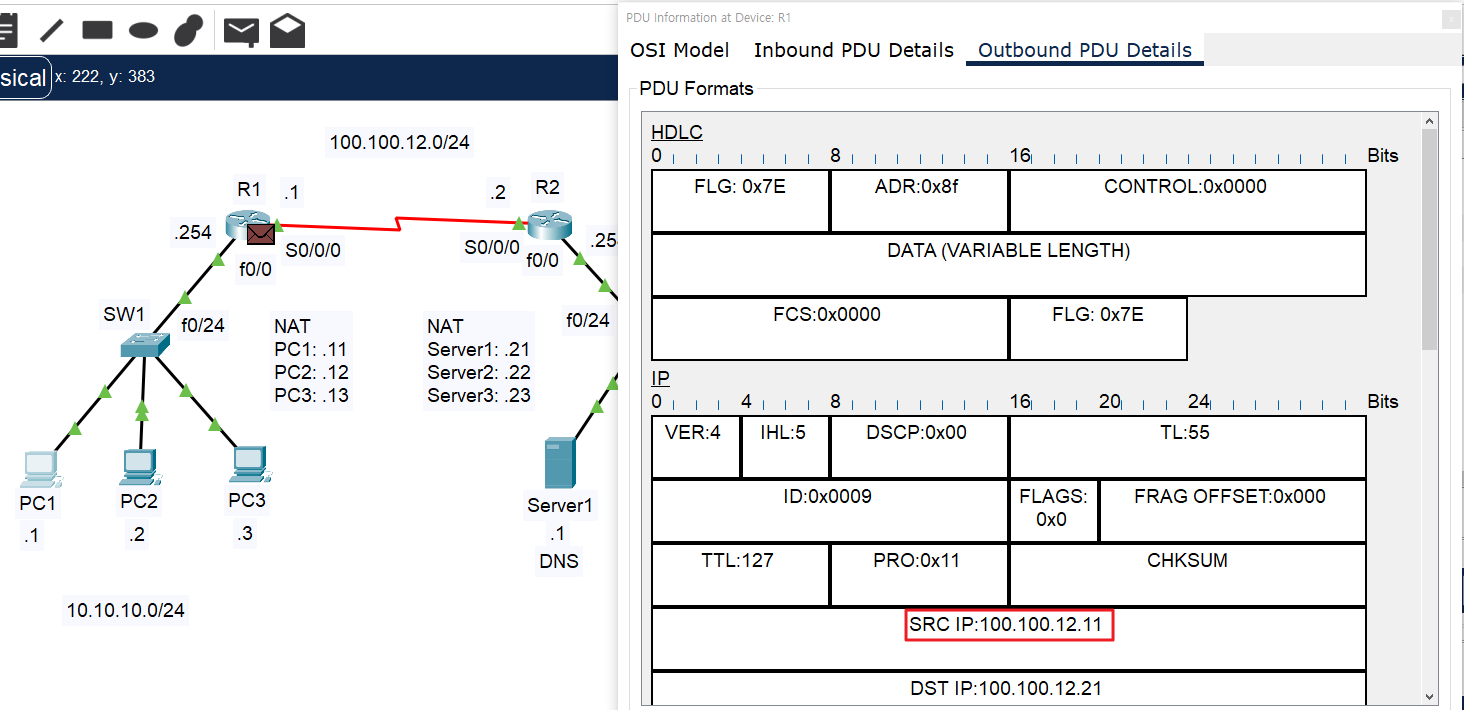
패킷트레이서 시뮬레이션을 통해 Inbound, Outbound에서의 NAT Table에 설정한 사설IP -> 공인IP로의 변환 (Source IP와 Destination IP)의 변환을 볼 수 있다.
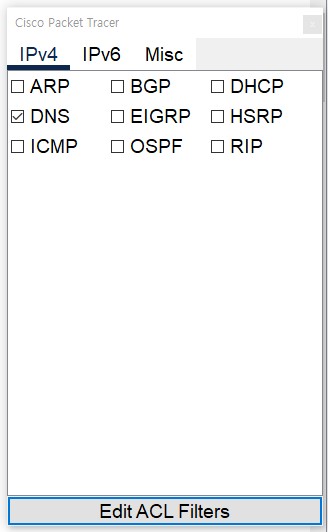
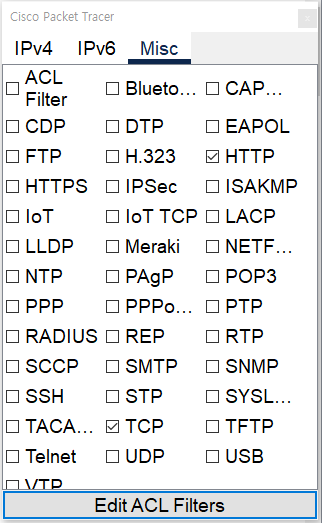
- Edit Filters 설정 : DNS, TCP, HTTP
실습> NAT를 이용한 네트워크 설정하기 2
파일명: nat2.pkt
프로그램: 패킷트레이서
라우터: 2811
모듈: HWIC-2T
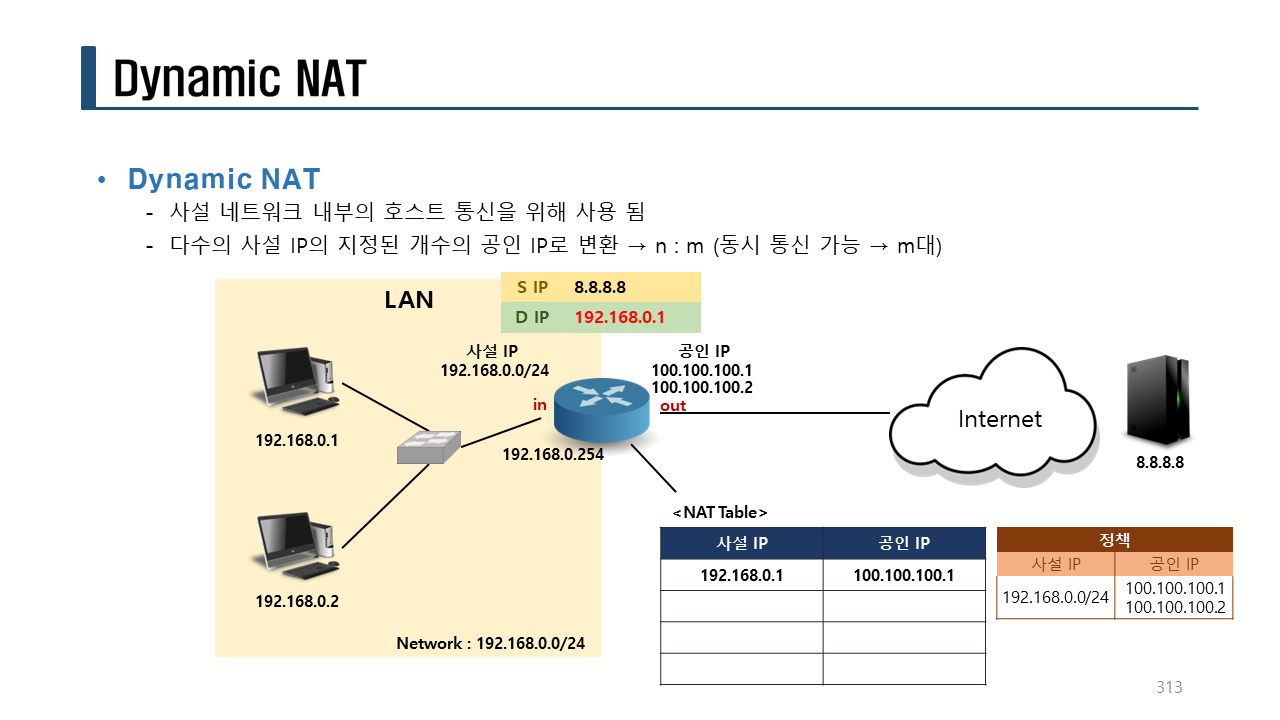
NAT 종류: dynamic NAT
1. PC 설정
PC1을 설정한다.
IPv4 Address: 10.10.10.1
Subnet Mask: 255.255.255.0
Default Gateway: 10.10.10.254
DNS Server: 100.100.20.1
PC2을 설정한다.
IPv4 Address: 10.10.10.2
Subnet Mask: 255.255.255.0
Default Gateway: 10.10.10.254
DNS Server: 100.100.20.1
PC3을 설정한다.
IPv4 Address: 10.10.10.3
Subnet Mask: 255.255.255.0
Default Gateway: 10.10.10.254
DNS Server: 100.100.20.1
PC4를 설정한다.
IPv4 Address: 10.10.10.4
Subnet Mask: 255.255.255.0
Default Gateway: 10.10.10.254
DNS Server: 100.100.20.1
2. Server 설정
Server1을 설정한다.
IPv4 Address: 100.100.20.1
Subnet Mask: 255.255.255.0
Default Gateway: 100.100.20.254
DNS Server: 100.100.20.1
Server2를 설정한다.
IPv4 Address: 100.100.20.2
Subnet Mask: 255.255.255.0
Default Gateway: 100.100.20.254
DNS Server: 100.100.20.1
Server3을 설정한다.
IPv4 Address: 100.100.20.3
Subnet Mask: 255.255.255.0
Default Gateway: 100.100.20.254
DNS Server: 100.100.20.1
DNS Service 등록:
server1.com: 100.100.20.1
www.server1.com: 100.100.20.1
server2.com: 100.100.20.2
www.server2.com: 100.100.20.2
server3.com: 100.100.20.3
www.server3.com: 100.100.20.3
HTTP Service 등록:
server1.com: Welcome to server1.com.
server2.com: Welcome to server2.com.
server3.com: Welcome to server3.com.
3. 라우터 설정
라우터에 네트워크를 설정한다.
!R1
en
conf t
hostname R1
int f0/0
ip add 10.10.10.254 255.255.255.0
no sh
int s0/0/0
ip add 100.100.12.1 255.255.255.0
no sh
!
!R2
en
conf t
hostname R2
int f0/0
ip add 100.100.20.254 255.255.255.0
no sh
int s0/0/0
ip add 100.100.12.2 255.255.255.0
no sh
!
4. NAT 설정
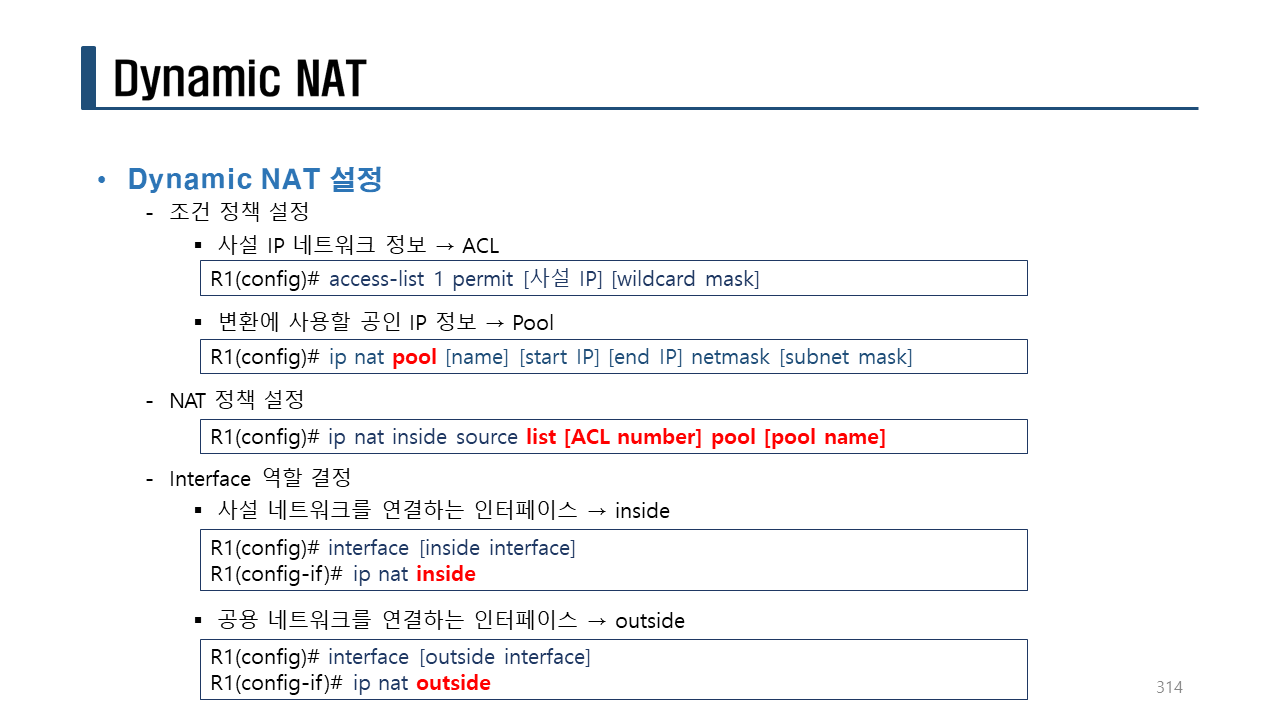
라우터에서 dynamic NAT를 설정한다.
nat 정책 설정:
– access-list 1 permit [사설 IP][wildcard mask]
– ip nat pool [name][start IP] [end IP] netmask [subnet mask]
– ip nat inside source list [ACL number] pool [pool name]
Interface 역할 설정:
– 사설 네트워크를 연결하는 인터페이스: ip nat inside
– 공용 네트워크를 연결하는 인터페이스: ip nat outside
!R1 Dynamic NAT
conf t
access-list 1 permit 10.10.10.0 0.0.0.255
ip nat pool test 100.100.12.11 100.100.12.13 netmask 255.255.255.0
ip nat inside source list 1 pool test
int f0/0
ip nat inside
int s0/0/0
ip nat outside
!
라우팅 설정을 한다.
!R1 RIPv2
conf t
router rip
version 2
network 100.100.12.0
no auto-summary
!
!R2 RIPv2
conf t
router rip
version 2
network 100.100.12.0
network 100.100.20.0
no auto-summary
!
!R1
end
sh ip route
!
!R2
end
sh ip route
!
5. 분석
PC1에서 분석한다.
C:>ping server1.com
C:>ping server2.com
C:>ping server3.com
R1에서 확인한다.
R1#sh ip nat translations
R1#sh ip nat statistics
R1#debug ip nat
시뮬레이션에서 확인한다.
PC1에서 웹브라우저를 열어서 http://server1.com/ 으로 접속한다.
NAT 동작을 확인할 수 있다.
분석이 끝나면 debug를 꺼준다.
R1#no debug ip nat
R2에서 확인한다.
R2#sh ip nat translations
R2#sh ip nat statistics
6. 분석 2
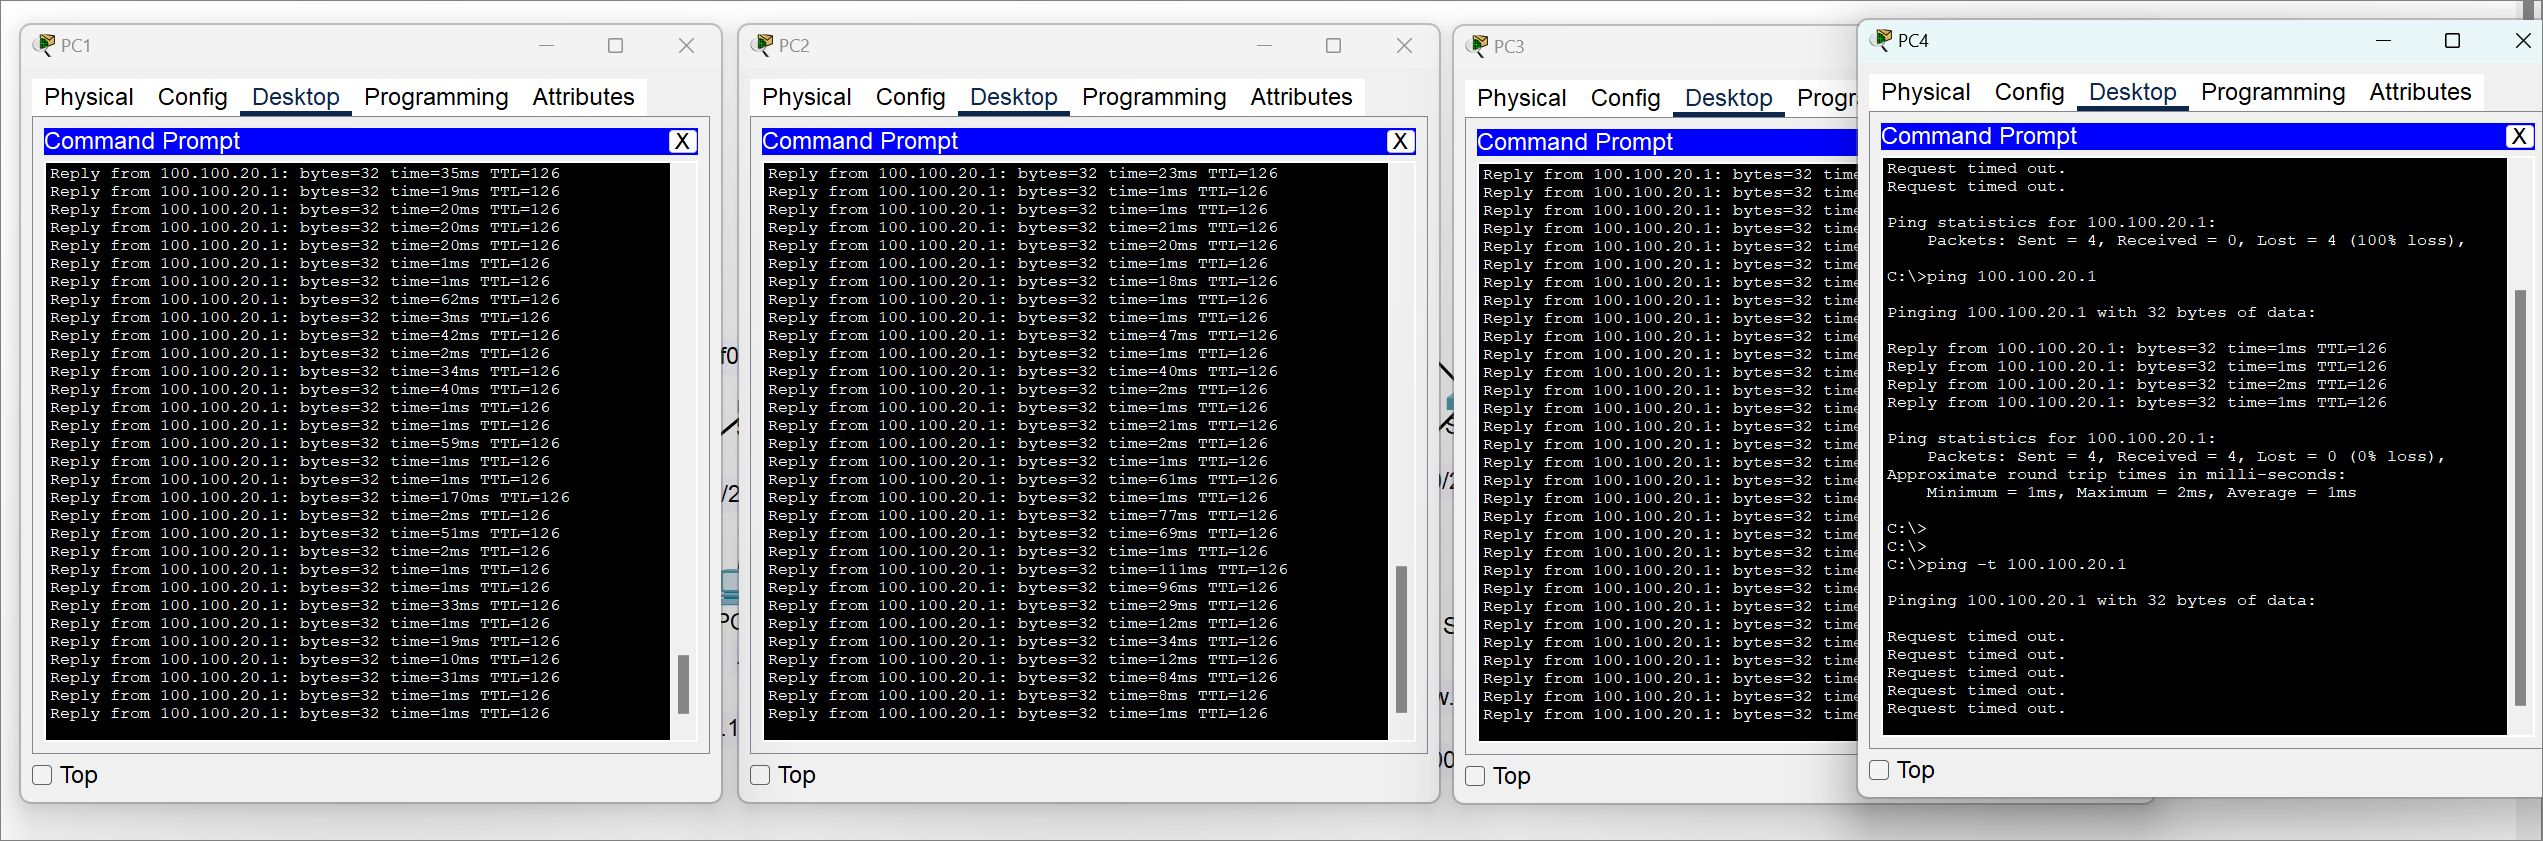
PC1에서 100.100.20.1로 무한루프(종료되지 않고 계속 반속) ping test를 실시한다.
C:>ping -t 100.100.20.1
Reply from 100.100.20.1: bytes=32 time=30ms TTL=126 <-- 통신 가능
Reply from 100.100.20.1: bytes=32 time=14ms TTL=126
Reply from 100.100.20.1: bytes=32 time=1ms TTL=126
:
:(생략)
PC2에서 100.100.20.1로 무한루프(종료되지 않고 계속 반속) ping test를 실시한다.
C:>ping -t 100.100.20.1
Reply from 100.100.20.1: bytes=32 time=30ms TTL=126 <-- 통신 가능
Reply from 100.100.20.1: bytes=32 time=14ms TTL=126
Reply from 100.100.20.1: bytes=32 time=1ms TTL=126
:
:(생략)
PC3에서 100.100.20.1로 무한루프(종료되지 않고 계속 반속) ping test를 실시한다.
C:>ping -t 100.100.20.1
Reply from 100.100.20.1: bytes=32 time=30ms TTL=126 <-- 통신 가능
Reply from 100.100.20.1: bytes=32 time=14ms TTL=126
Reply from 100.100.20.1: bytes=32 time=1ms TTL=126
:
:(생략)
PC4에서 100.100.20.1로 무한루프(종료되지 않고 계속 반속) ping test를 실시한다.
C:>ping -t 100.100.20.1
Pinging 100.100.20.1 with 32 bytes of data:
Request timed out. <-- 통신 불가능
Request timed out. <-- IP주소 3개 이후에 연결하므로 공인 IP주소가 부족하기 때문이다.
Request timed out.
실습> NAT를 이용한 네트워크 설정하기 3
파일명: nat3.pkt
프로그램: 패킷트레이서
라우터: 2811
모듈: HWIC-2T
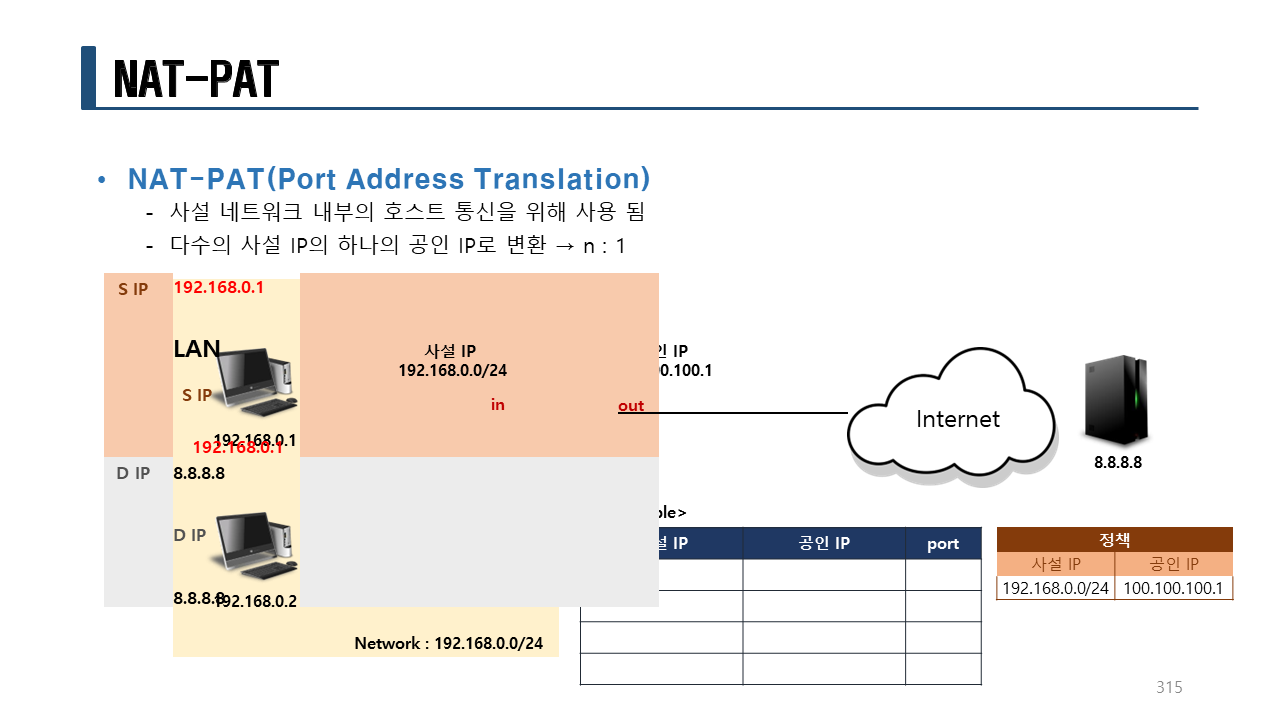
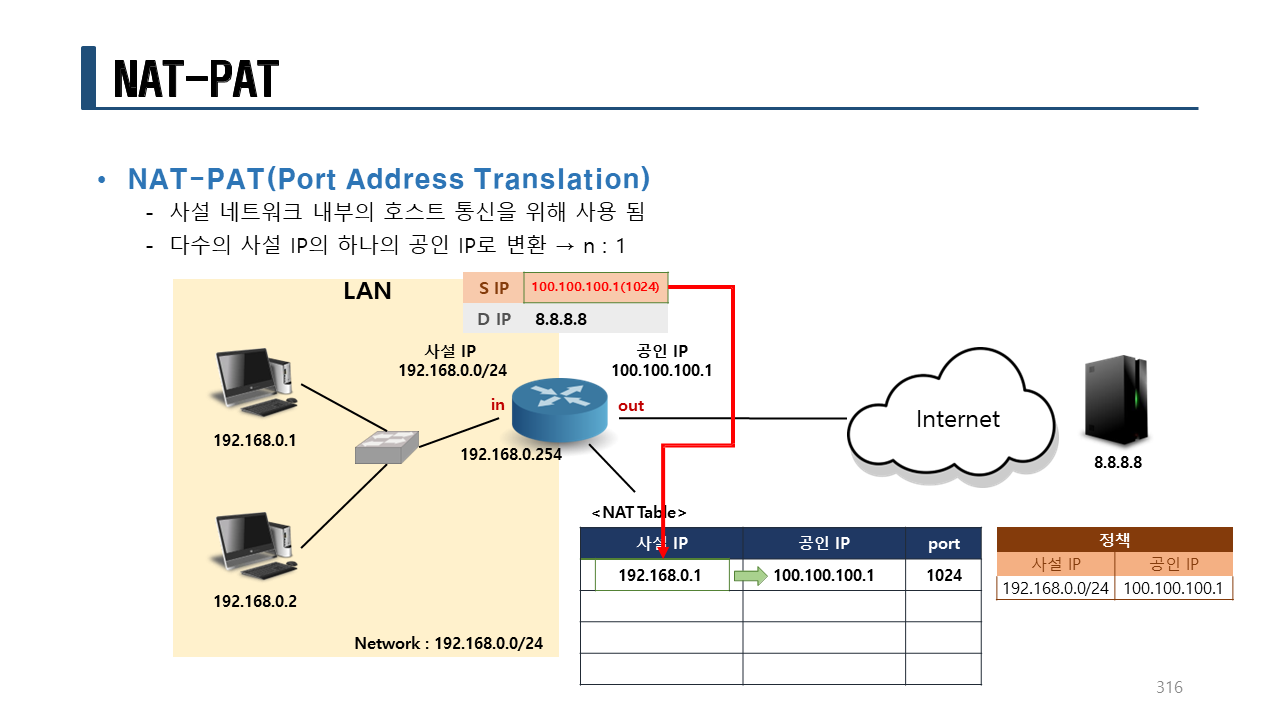
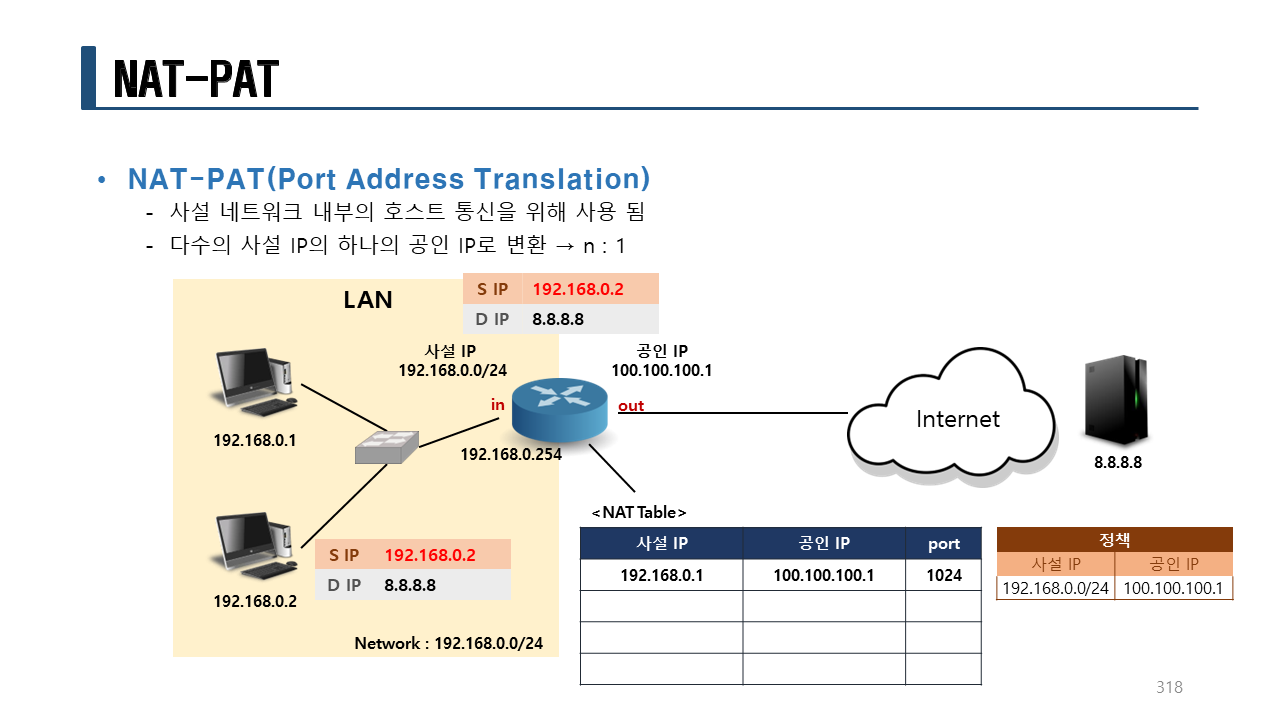
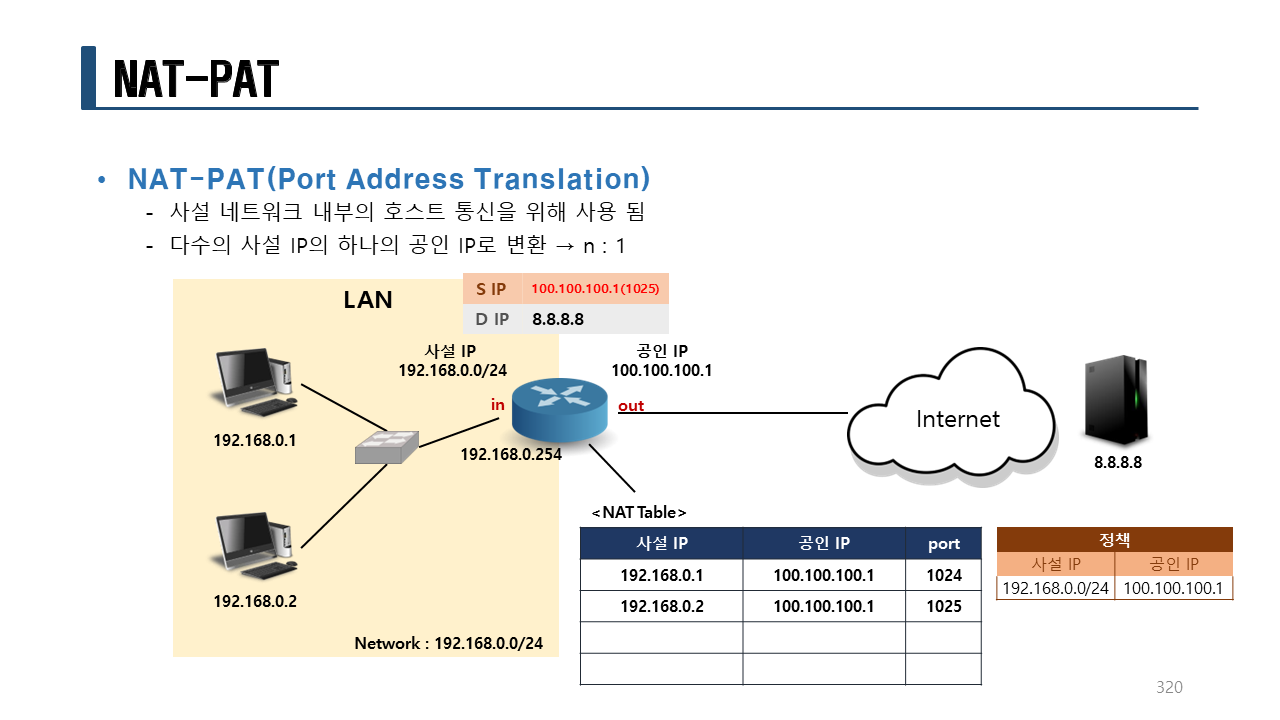
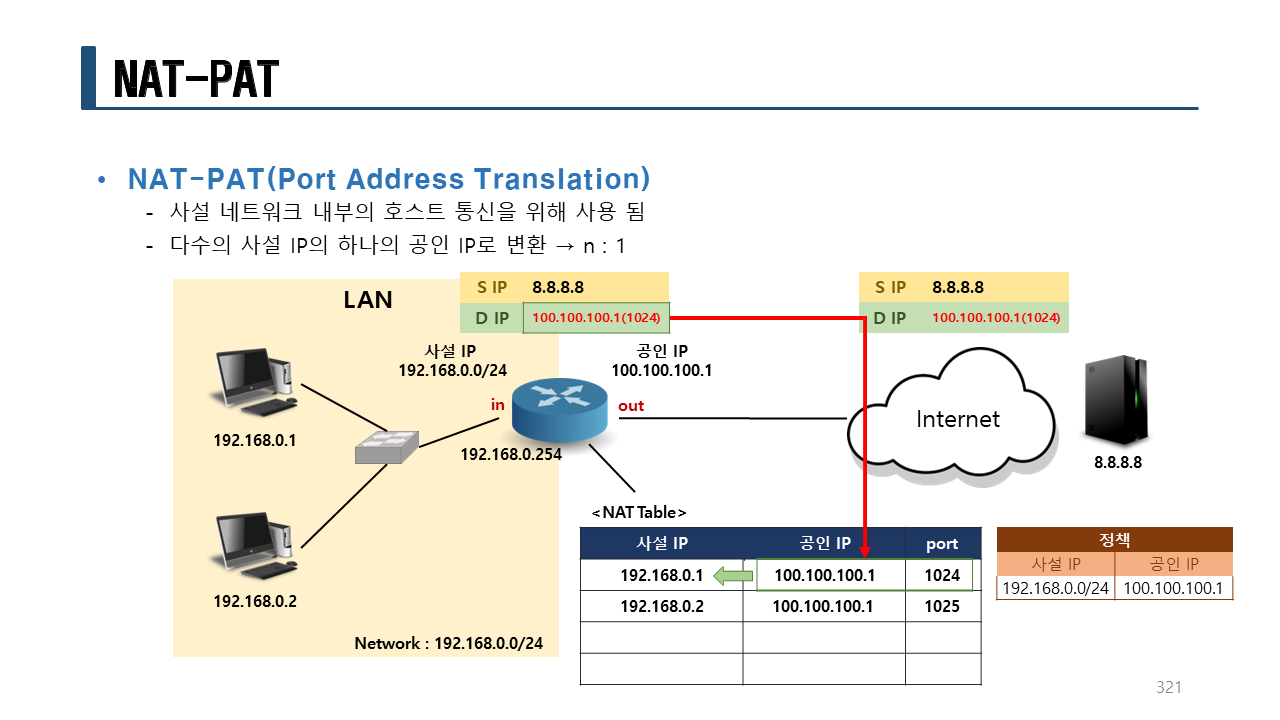
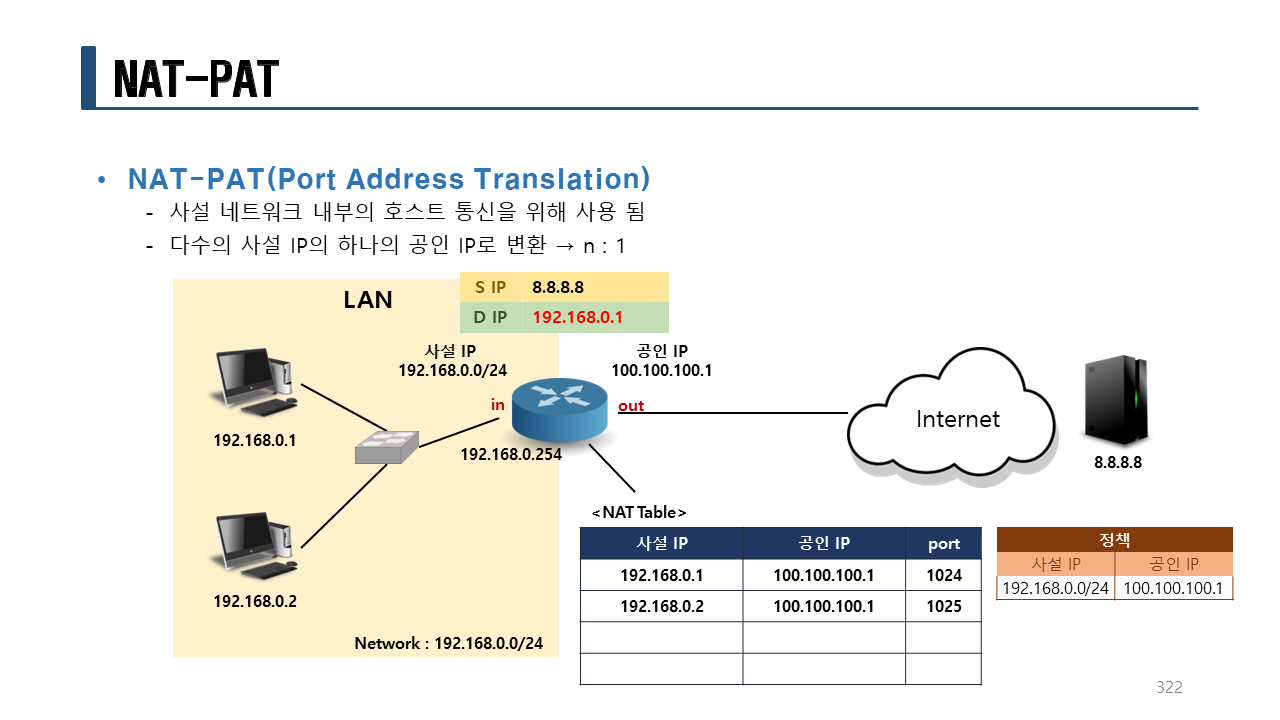
NAT 종류: NAT-PAT

1. PC 설정
PC1을 설정한다.
IPv4 Address: 10.10.10.1
Subnet Mask: 255.255.255.0
Default Gateway: 10.10.10.254
DNS Server: 100.100.20.1
PC2을 설정한다.
IPv4 Address: 10.10.10.2
Subnet Mask: 255.255.255.0
Default Gateway: 10.10.10.254
DNS Server: 100.100.20.1
PC3을 설정한다.
IPv4 Address: 10.10.10.3
Subnet Mask: 255.255.255.0
Default Gateway: 10.10.10.254
DNS Server: 100.100.20.1
PC4를 설정한다.
IPv4 Address: 10.10.10.4
Subnet Mask: 255.255.255.0
Default Gateway: 10.10.10.254
DNS Server: 100.100.20.1
2. Server 설정
Server1을 설정한다.
IPv4 Address: 100.100.20.1
Subnet Mask: 255.255.255.0
Default Gateway: 100.100.20.254
DNS Server: 100.100.20.1
Server2를 설정한다.
IPv4 Address: 100.100.20.2
Subnet Mask: 255.255.255.0
Default Gateway: 100.100.20.254
DNS Server: 100.100.20.1
Server3을 설정한다.
IPv4 Address: 100.100.20.3
Subnet Mask: 255.255.255.0
Default Gateway: 100.100.20.254
DNS Server: 100.100.20.1
DNS Service 등록:
server1.com: 100.100.20.1
www.server1.com: 100.100.20.1
server2.com: 100.100.20.2
www.server2.com: 100.100.20.2
server3.com: 100.100.20.3
www.server3.com: 100.100.20.3
HTTP Service 등록:
server1.com: Welcome to server1.com.
server2.com: Welcome to server2.com.
server3.com: Welcome to server3.com.
3. 라우터 설정
라우터에 네트워크를 설정한다.
!R1
en
conf t
hostname R1
int f0/0
ip add 10.10.10.254 255.255.255.0
no sh
int s0/0/0
ip add 100.100.12.1 255.255.255.0
no sh
!
!R2
en
conf t
hostname R2
int f0/0
ip add 100.100.20.254 255.255.255.0
no sh
int s0/0/0
ip add 100.100.12.2 255.255.255.0
no sh
!
4. NAT 설정
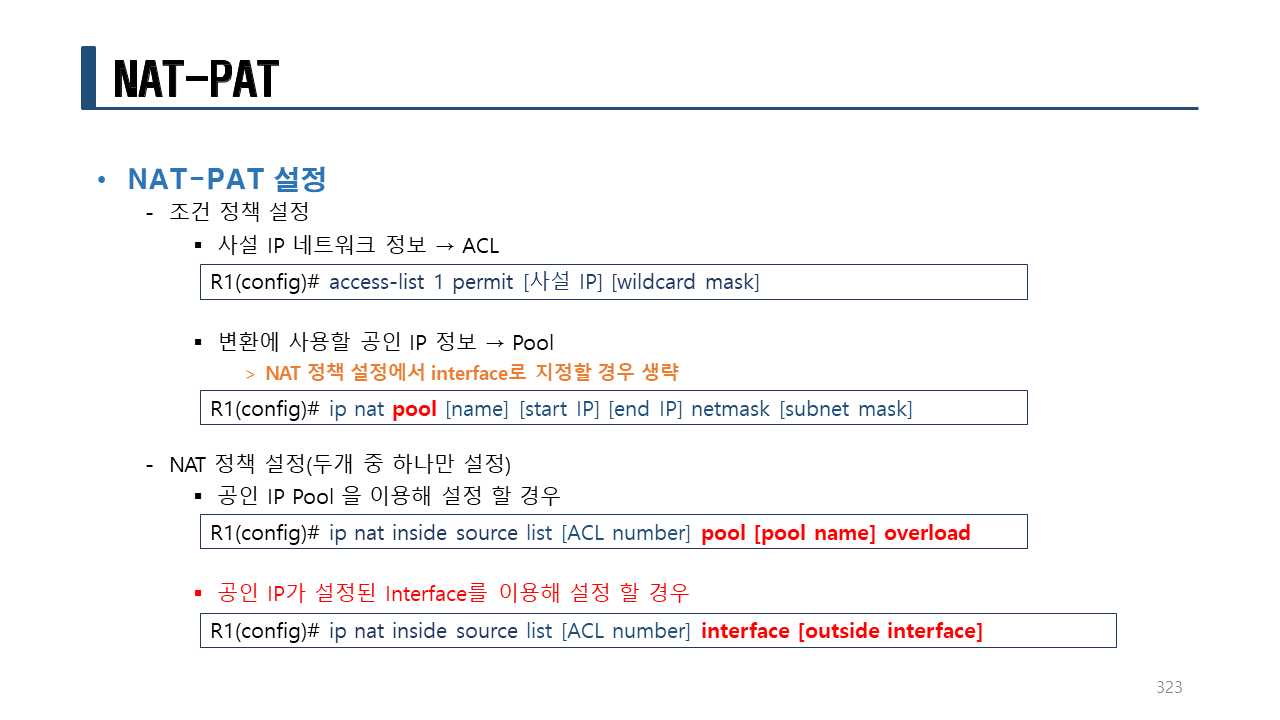
라우터에서 NAT-PAT(Port Address Translation)를 설정한다.
R1 에서 NAT-PAT를 설정한다. (Interface를 설정할 때는 설정이 4개!)
nat 정책 설정:
– access-list 1 permit [사설 IP][wildcard mask]
– ip nat inside source list [ACL number] interface [outside interface]
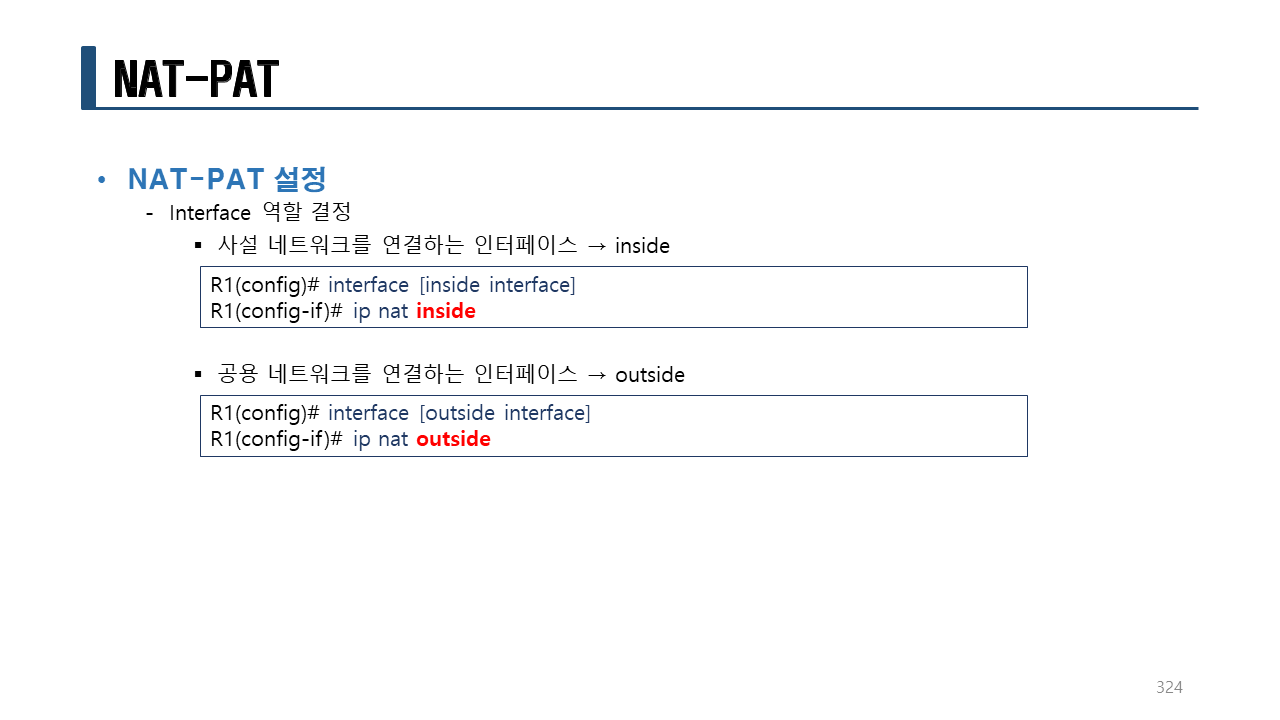
Interface 역할 설정:
– 사설 네트워크를 연결하는 인터페이스: ip nat inside
– 공용 네트워크를 연결하는 인터페이스: ip nat outside
R1 에서 NAT-PAT를 설정한다. (공인 IP주소를 설정할 때는 설정이 5개!)
nat 정책 설정:
– access-list 1 permit [사설 IP][wildcard mask]
– ip nat pool [name][start IP] [end IP] netmask [subnet mask]
– ip nat inside source list [ACL number] pool [pool name] overload
Interface 역할 설정:
– 사설 네트워크를 연결하는 인터페이스: ip nat inside
– 공용 네트워크를 연결하는 인터페이스: ip nat outside
R1 에서 NAT-PAT를 설정한다. (Interface를 설정할 때는 설정이 4개!)
!R1 NAT-PAT
conf t
access-list 1 permit 10.10.10.0 0.0.0.255
ip nat inside source list 1 interface s0/0/0
int f0/0
ip nat inside
int s0/0/0
ip nat outside
!
R1 에서 NAT-PAT를 설정한다. (공인 IP주소를 설정할 때는 설정이 5개!)
이전에 설정된 NAT-PAT 설정을 해제하고 설정한다.
!R1 NAT-PAT
conf t
no access-list 1
no ip nat inside source list 1 int s0/0/0
int f0/0
no ip nat inside
int s0/0/0
no ip nat outside
!
access-list 1 permit 10.10.10.0 0.0.0.255
ip nat pool test 100.100.12.11 100.100.12.11 netmask 255.255.255.0
ip nat inside source list 1 pool test overload
int f0/0
ip nat inside
int s0/0/0
ip nat outside
!
라우팅 설정을 한다.
!R1 RIP
conf t
router rip
version 2
network 100.100.12.0
no auto-summary
!
!R2 RIP
conf t
router rip
version 2
network 100.100.12.0
network 100.100.20.0
no auto-summary
!
5. 분석
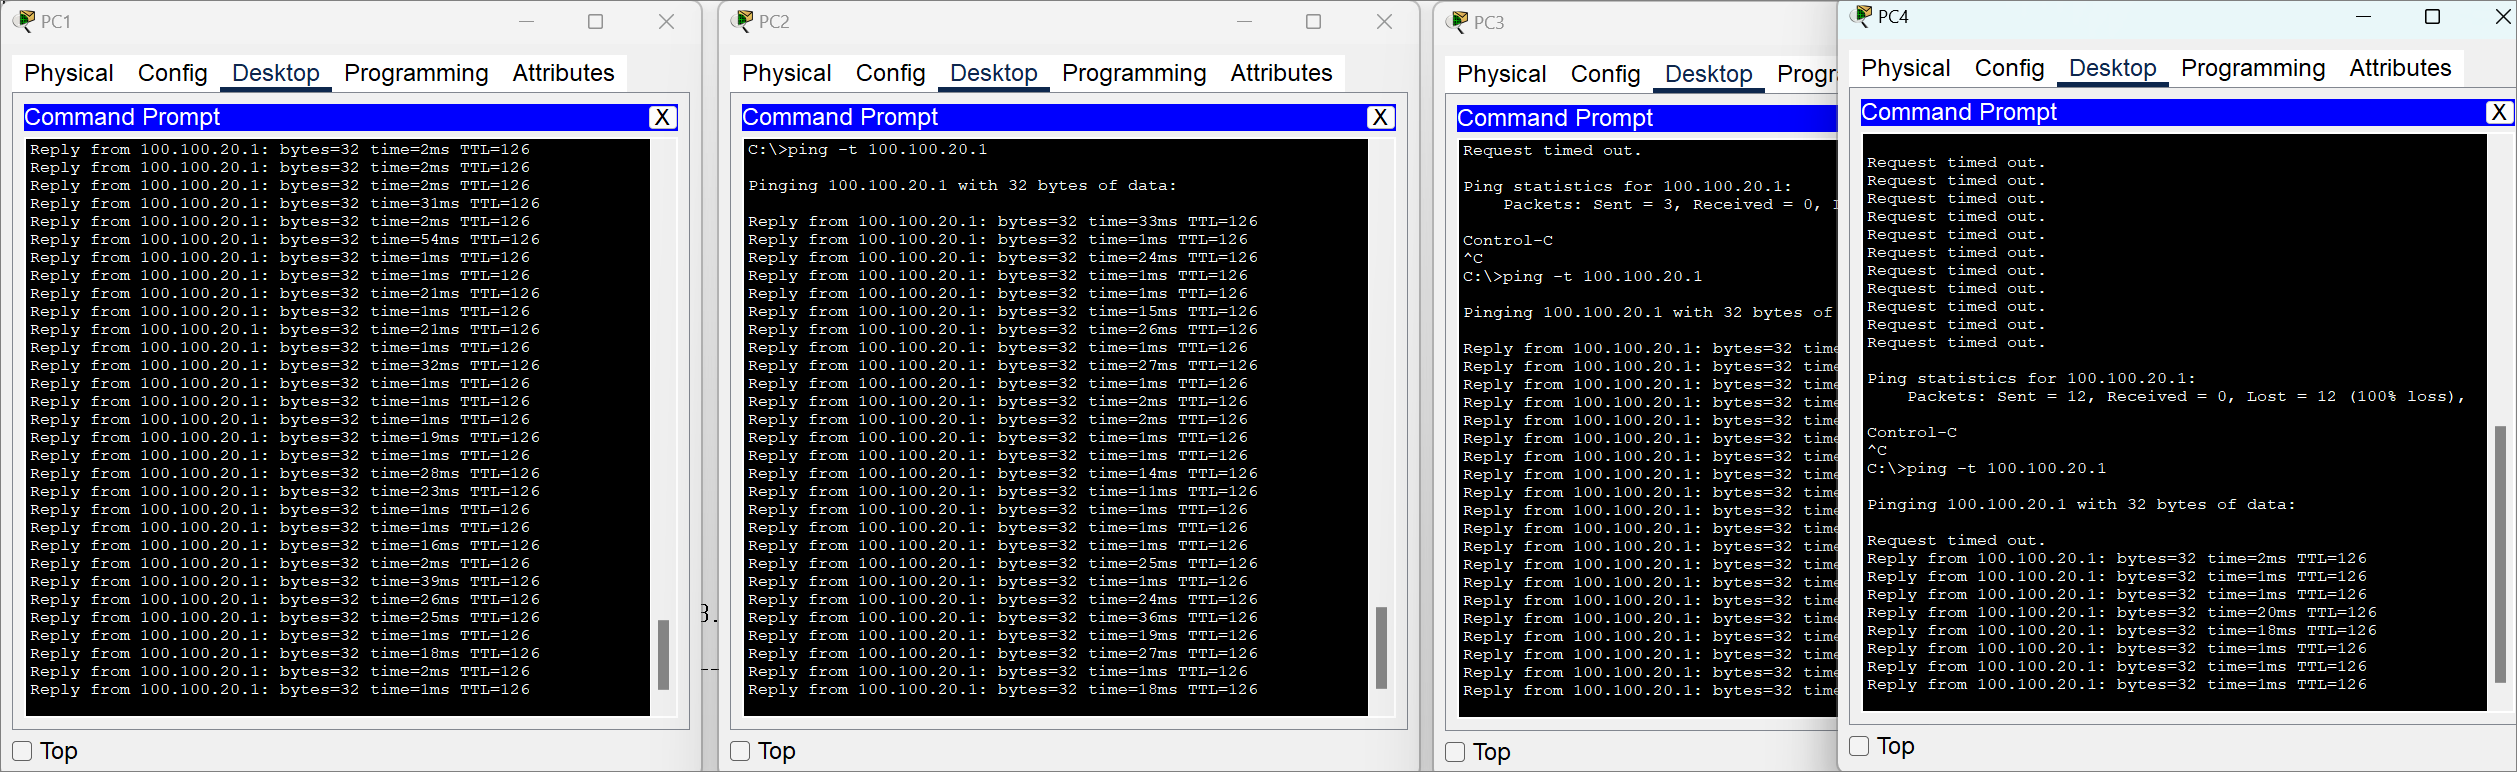
PC1에서 100.100.20.1로 무한루프(종료되지 않고 계속 반속) ping test를 실시한다.
C:>ping -t 100.100.20.1
Reply from 100.100.20.1: bytes=32 time=30ms TTL=126 <-- 통신 가능
Reply from 100.100.20.1: bytes=32 time=14ms TTL=126
Reply from 100.100.20.1: bytes=32 time=1ms TTL=126
:
:(생략)
PC2에서 100.100.20.1로 무한루프(종료되지 않고 계속 반속) ping test를 실시한다.
C:>ping -t 100.100.20.1
Reply from 100.100.20.1: bytes=32 time=30ms TTL=126 <-- 통신 가능
Reply from 100.100.20.1: bytes=32 time=14ms TTL=126
Reply from 100.100.20.1: bytes=32 time=1ms TTL=126
:
:(생략)
PC3에서 100.100.20.1로 무한루프(종료되지 않고 계속 반속) ping test를 실시한다.
C:>ping -t 100.100.20.1
Reply from 100.100.20.1: bytes=32 time=30ms TTL=126 <-- 통신 가능
Reply from 100.100.20.1: bytes=32 time=14ms TTL=126
Reply from 100.100.20.1: bytes=32 time=1ms TTL=126
:
:(생략)
PC4에서 100.100.20.1로 무한루프(종료되지 않고 계속 반속) ping test를 실시한다.
C:>ping -t 100.100.20.1
Reply from 100.100.20.1: bytes=32 time=30ms TTL=126 <-- 통신 가능
Reply from 100.100.20.1: bytes=32 time=14ms TTL=126
Reply from 100.100.20.1: bytes=32 time=1ms TTL=126
6. 라우터 전체 설정
!R1
en
conf t
hostname R1
router rip
version 2
network 100.100.12.0
no auto-summary
int f0/0
ip add 10.10.10.254 255.255.255.0
no sh
int s0/0/0
ip add 100.100.12.1 255.255.255.0
no sh
exit
access-list 1 permit 10.10.10.0 0.0.0.255
ip nat inside source list 1 interface s0/0/0
int f0/0
ip nat inside
int s0/0/0
ip nat outside
end
copy run start
sh ip int b
!
!R2
en
conf t
hostname R2
router rip
version 2
network 100.100.12.0
network 100.100.20.0
no auto-summary
int f0/0
ip add 100.100.20.254 255.255.255.0
no sh
int s0/0/0
ip add 100.100.12.2 255.255.255.0
no sh
end
copy run start
sh ip int b
sh ip route
!
미션1> NAT를 이용한 네트워크 설정하기 1
파일명: nat4.pkt
프로그램: 패킷트레이서
라우터: 2811
모듈: HWIC-2T
라우팅: RIPv2

1. PC 설정
R1의 10.10.10.0/24 네트워크의 PC들을 설정한다.
R3의 10.10.10.0/24 네트워크의 PC들을 설정한다.
2. 라우터 설정
R1 라우터를 설정한다.
!R1
conf t
int f0/0
ip add 10.10.10.254 255.255.255.0
no sh
int s0/0/0
ip add 100.100.12.1 255.255.255.0
no sh
!
router rip
version 2
network 100.100.12.0
no auto-summary
passive-interface f0/0
!
end
sh ip int b
sh ip route
!
R2 라우터를 설정한다.
!R2
conf t
int s0/0/1
ip add 100.100.12.2 255.255.255.0
no sh
int s0/0/0
ip add 100.100.23.2 255.255.255.0
no sh
!
router rip
version 2
network 100.100.12.0
network 100.100.23.0
no auto-summary
!
end
sh ip int b
sh ip route
!
R3 라우터를 설정한다.
!R3
conf t
int f0/0
ip add 10.10.10.254 255.255.255.0
no sh
int s0/0/1
ip add 100.100.23.3 255.255.255.0
no sh
!
router rip
version 2
network 100.100.23.0
no auto-summary
passive-interface f0/0
!
end
sh ip int b
sh ip route
!
3. 통신 확인
PC1> ping 10.10.10.254
84 bytes from 10.10.10.254 icmp_seq=1 ttl=255 time=15.542 ms
84 bytes from 10.10.10.254 icmp_seq=2 ttl=255 time=15.981 ms
84 bytes from 10.10.10.254 icmp_seq=3 ttl=255 time=15.656 ms
84 bytes from 10.10.10.254 icmp_seq=4 ttl=255 time=15.702 ms
84 bytes from 10.10.10.254 icmp_seq=5 ttl=255 time=15.312 ms
<-- R1에서 Reply가 올 수 있다.(이유는 사설 네트워크의 IP주소 이지만 자신이 가지고 있는 connected 된 네트워크 이므로 ...)
PC1> ping 100.100.12.1
84 bytes from 100.100.12.1 icmp_seq=1 ttl=255 time=15.032 ms
84 bytes from 100.100.12.1 icmp_seq=2 ttl=255 time=15.391 ms
84 bytes from 100.100.12.1 icmp_seq=3 ttl=255 time=15.578 ms
84 bytes from 100.100.12.1 icmp_seq=4 ttl=255 time=15.139 ms
84 bytes from 100.100.12.1 icmp_seq=5 ttl=255 time=15.156 ms
PC1> ping 100.100.12.2
100.100.12.2 icmp_seq=1 timeout <-- R2에서 Reply가 올 수 없다.(이유는 사설 네트워크의 IP주소 이므로 ...)
100.100.12.2 icmp_seq=2 timeout
100.100.12.2 icmp_seq=3 timeout
100.100.12.2 icmp_seq=4 timeout
100.100.12.2 icmp_seq=5 timeout
4. NAT 설정
R1 에서 Static NAT를 설정한다. (설정이 3개닷!)
nat 정책 설정: ip nat inside source static [사설 IP][공인 IP]
Interface 역할 설정:
– 사설 네트워크를 연결하는 인터페이스: ip nat inside
– 공용 네트워크를 연결하는 인터페이스: ip nat outside

!R1
conf t
ip nat inside source static 10.10.10.1 100.100.12.10
int f0/0
ip nat inside
int s0/0/0
ip nat outside
end
!
PC1> ping 100.100.12.2
84 bytes from 100.100.12.2 icmp_seq=1 ttl=254 time=14.498 ms
84 bytes from 100.100.12.2 icmp_seq=2 ttl=254 time=15.092 ms
84 bytes from 100.100.12.2 icmp_seq=3 ttl=254 time=15.345 ms
84 bytes from 100.100.12.2 icmp_seq=4 ttl=254 time=15.144 ms
84 bytes from 100.100.12.2 icmp_seq=5 ttl=254 time=15.237 ms
R1#sh ip nat translations
Pro Inside global Inside local Outside local Outside global
icmp 100.100.12.10:16884 10.10.10.1:16884 100.100.12.2:16884 100.100.12.2:16884
icmp 100.100.12.10:17140 10.10.10.1:17140 100.100.12.2:17140 100.100.12.2:17140
icmp 100.100.12.10:17396 10.10.10.1:17396 100.100.12.2:17396 100.100.12.2:17396
icmp 100.100.12.10:17652 10.10.10.1:17652 100.100.12.2:17652 100.100.12.2:17652
icmp 100.100.12.10:17908 10.10.10.1:17908 100.100.12.2:17908 100.100.12.2:17908
--- 100.100.12.10 10.10.10.1 --- ---
디버깅을 이용해서 분석한다.
R1#debug ip nat
IP NAT debugging is on
PC1> ping 100.100.12.2 -c 1
84 bytes from 100.100.12.2 icmp_seq=1 ttl=254 time=14.160 ms
R1#
Mar 1 00:06:20.743: NAT: s=10.10.10.1->100.100.12.10, d=100.100.12.2 [493] <-- echo request
Mar 1 00:06:20.783: NAT: s=100.100.12.2, d=100.100.12.10->10.10.10.1 [493] <-- echo reply
R1#undebug all
All possible debugging has been turned off
내부망(사설 네트워크)에 있는 10.10.10.2 에서 100.100.12.2 로 ping test를 할 때 통신이 되게 설정한다.
10.10.10.2 -> 100.100.12.11 로 static NAT로 변환한다.
PC2> ping 100.100.12.2
100.100.12.2 icmp_seq=1 timeout
100.100.12.2 icmp_seq=2 timeout
100.100.12.2 icmp_seq=3 timeout
100.100.12.2 icmp_seq=4 timeout
100.100.12.2 icmp_seq=5 timeout
!R1
conf t
ip nat inside source static 10.10.10.1 100.100.12.11
<-- ip nat inside, ip nat outside 설정을 필요없다. (이유는 이미 설정되어 있으므로 ...)
!
do sh run
:
!
interface FastEthernet0/0
ip address 10.10.10.254 255.255.255.0
ip nat inside <-- 설정이 되어 있다.
ip virtual-reassembly
duplex auto
speed auto
!
interface Serial0/0
ip address 100.100.12.1 255.255.255.0
ip nat outside <-- 설정이 되어 있다.
ip virtual-reassembly
clock rate 2000000
!
ip nat inside source static 10.10.10.1 100.100.12.10 <-- 설정이 되어 있다.
ip nat inside source static 10.10.10.2 100.100.12.11 <-- 설정이 되어 있다.
PC2> ping 100.100.12.2
84 bytes from 100.100.12.2 icmp_seq=1 ttl=254 time=15.998 ms
84 bytes from 100.100.12.2 icmp_seq=2 ttl=254 time=15.024 ms
84 bytes from 100.100.12.2 icmp_seq=3 ttl=254 time=15.430 ms
84 bytes from 100.100.12.2 icmp_seq=4 ttl=254 time=15.388 ms
84 bytes from 100.100.12.2 icmp_seq=5 ttl=254 time=15.788 ms
R3 에서 Static NAT를 설정한다.
PC1에서 100.100.23.10으로 ping test를 할 때 PC4번으로 IP주소를 변환한다.

NAT 설정 전
PC1> ping 100.100.23.10
100.100.23.2 icmp_seq=1 ttl=254 time=30.015 ms (ICMP type:11, code:0, TTL expired in transit)
100.100.23.2 icmp_seq=2 ttl=254 time=30.483 ms (ICMP type:11, code:0, TTL expired in transit)
100.100.23.2 icmp_seq=3 ttl=254 time=30.552 ms (ICMP type:11, code:0, TTL expired in transit)
100.100.23.2 icmp_seq=4 ttl=254 time=30.255 ms (ICMP type:11, code:0, TTL expired in transit)
*100.100.23.2 icmp_seq=5 ttl=254 time=30.114 ms (ICMP type:11, code:0, TTL expired in transit)
NAT 설정 후
!R3
conf t
ip nat inside source static 10.10.10.1 100.100.23.10
int f0/0
ip nat inside
int s0/0/1
ip nat outside
end
!
PC1> ping 100.100.23.10
84 bytes from 100.100.23.10 icmp_seq=1 ttl=61 time=30.201 ms
84 bytes from 100.100.23.10 icmp_seq=2 ttl=61 time=30.334 ms
84 bytes from 100.100.23.10 icmp_seq=3 ttl=61 time=30.736 ms
84 bytes from 100.100.23.10 icmp_seq=4 ttl=61 time=30.677 ms
84 bytes from 100.100.23.10 icmp_seq=5 ttl=61 time=30.240 ms
미션2> NAT를 이용한 네트워크 설정하기 2
파일명: nat5.pkt
프로그램: 패킷트레이서
라우터: 2811
모듈: HWIC-2T
라우팅: RIPv2

1. PC 설정
R1의 10.10.10.0/24 네트워크의 PC들을 설정한다.
R3의 10.10.10.0/24 네트워크의 PC들을 설정한다.
2. 라우터 설정
R1 라우터를 설정한다.
!R1
conf t
int f0/0
ip add 10.10.10.254 255.255.255.0
no sh
int s0/0/0
ip add 100.100.12.1 255.255.255.0
no sh
!
router rip
version 2
network 100.100.12.0
no auto-summary
passive-interface f0/0
!
end
sh ip int b
sh ip route
!
R2 라우터를 설정한다.
!R2
conf t
int s0/0/1
ip add 100.100.12.2 255.255.255.0
no sh
int s0/0/0
ip add 100.100.23.2 255.255.255.0
no sh
!
router rip
version 2
network 100.100.12.0
network 100.100.23.0
no auto-summary
!
end
sh ip int b
sh ip route
!
R3 라우터를 설정한다.
!R3
conf t
int f0/0
ip add 10.10.10.254 255.255.255.0
no sh
int s0/0/1
ip add 100.100.23.3 255.255.255.0
no sh
!
router rip
version 2
network 100.100.23.0
no auto-summary
passive-interface f0/0
!
end
sh ip int b
sh ip route
!
3. 통신 확인
PC1> ping 10.10.10.254
84 bytes from 10.10.10.254 icmp_seq=1 ttl=255 time=15.542 ms
84 bytes from 10.10.10.254 icmp_seq=2 ttl=255 time=15.981 ms
84 bytes from 10.10.10.254 icmp_seq=3 ttl=255 time=15.656 ms
84 bytes from 10.10.10.254 icmp_seq=4 ttl=255 time=15.702 ms
84 bytes from 10.10.10.254 icmp_seq=5 ttl=255 time=15.312 ms
<-- R1에서 Reply가 올 수 있다.(이유는 사설 네트워크의 IP주소 이지만 자신이 가지고 있는 connected 된 네트워크 이므로 ...)
PC1> ping 100.100.12.1
84 bytes from 100.100.12.1 icmp_seq=1 ttl=255 time=15.032 ms
84 bytes from 100.100.12.1 icmp_seq=2 ttl=255 time=15.391 ms
84 bytes from 100.100.12.1 icmp_seq=3 ttl=255 time=15.578 ms
84 bytes from 100.100.12.1 icmp_seq=4 ttl=255 time=15.139 ms
84 bytes from 100.100.12.1 icmp_seq=5 ttl=255 time=15.156 ms
PC1> ping 100.100.12.2
100.100.12.2 icmp_seq=1 timeout <-- R2에서 Reply가 올 수 없다.(이유는 사설 네트워크의 IP주소 이므로 ...)
100.100.12.2 icmp_seq=2 timeout
100.100.12.2 icmp_seq=3 timeout
100.100.12.2 icmp_seq=4 timeout
100.100.12.2 icmp_seq=5 timeout
4. NAT 설정
R1 에서 Dynamic NAT를 설정한다. (설정이 5개닷!)
nat 정책 설정:
– access-list 1 permit [사설 IP][wildcard mask]
– ip nat pool [name][start IP] [end IP] netmask [subnet mask]
– ip nat inside source list [ACL number] pool [pool name]
Interface 역할 설정:
– 사설 네트워크를 연결하는 인터페이스: ip nat inside
– 공용 네트워크를 연결하는 인터페이스: ip nat outside

!R1
conf t
access-list 1 permit 10.10.10.0 0.0.0.255
ip nat pool khpool 100.100.12.10 100.100.12.11 netmask 255.255.255.0
ip nat inside source list 1 pool khpool
int f0/0
ip nat inside
int s0/0/0
ip nat outside
end
!
PC1> ping 100.100.12.2
84 bytes from 100.100.12.2 icmp_seq=1 ttl=254 time=14.498 ms
84 bytes from 100.100.12.2 icmp_seq=2 ttl=254 time=15.092 ms
84 bytes from 100.100.12.2 icmp_seq=3 ttl=254 time=15.345 ms
84 bytes from 100.100.12.2 icmp_seq=4 ttl=254 time=15.144 ms
84 bytes from 100.100.12.2 icmp_seq=5 ttl=254 time=15.237 ms
R1#sh ip nat translations
Pro Inside global Inside local Outside local Outside global
icmp 100.100.12.10:16884 10.10.10.1:16884 100.100.12.2:16884 100.100.12.2:16884
icmp 100.100.12.10:17140 10.10.10.1:17140 100.100.12.2:17140 100.100.12.2:17140
icmp 100.100.12.10:17396 10.10.10.1:17396 100.100.12.2:17396 100.100.12.2:17396
icmp 100.100.12.10:17652 10.10.10.1:17652 100.100.12.2:17652 100.100.12.2:17652
icmp 100.100.12.10:17908 10.10.10.1:17908 100.100.12.2:17908 100.100.12.2:17908
--- 100.100.12.10 10.10.10.1 --- ---
!R1
sh run
:
!
interface FastEthernet0/0
ip address 10.10.10.254 255.255.255.0
ip nat inside <-- 설정이 되어 있다.
ip virtual-reassembly
duplex auto
speed auto
!
interface Serial0/0
ip address 100.100.12.1 255.255.255.0
ip nat outside <-- 설정이 되어 있다.
ip virtual-reassembly
clock rate 2000000
!
:
:(생략)
ip nat pool khpool 100.100.12.10 100.100.12.11 netmask 255.255.255.0 <-- 설정이 되어 있다.
ip nat inside source list 1 pool khpool <-- 설정이 되어 있다.
!
access-list 1 permit 10.10.10.0 0.0.0.255 <-- 설정이 되어 있다.
PC1> ping 100.100.12.2 -t
84 bytes from 100.100.12.2 icmp_seq=1 ttl=254 time=14.805 ms
84 bytes from 100.100.12.2 icmp_seq=2 ttl=254 time=16.010 ms
84 bytes from 100.100.12.2 icmp_seq=3 ttl=254 time=15.973 ms
:
:(생략)
PC2> ping 100.100.12.2 -t
84 bytes from 100.100.12.2 icmp_seq=2 ttl=254 time=15.979 ms
84 bytes from 100.100.12.2 icmp_seq=3 ttl=254 time=15.857 ms
84 bytes from 100.100.12.2 icmp_seq=4 ttl=254 time=15.315 ms
:
:(생략)
PC3> ping 100.100.12.2 -t
100.100.12.2 icmp_seq=1 timeout <-- 이미 공인 IP주소 2개가 사용되고 있으므로 사용할 수 없다.
100.100.12.2 icmp_seq=2 timeout
100.100.12.2 icmp_seq=3 timeout
:
:(생략)
PC1> ping 100.100.12.2 -t
84 bytes from 100.100.12.2 icmp_seq=1 ttl=254 time=14.805 ms
84 bytes from 100.100.12.2 icmp_seq=2 ttl=254 time=16.010 ms
84 bytes from 100.100.12.2 icmp_seq=3 ttl=254 time=15.973 ms
:
:(생략)
^C <-- Ctrl + C 로 중지한다.
PC2> ping 100.100.12.2 -t
84 bytes from 100.100.12.2 icmp_seq=2 ttl=254 time=15.979 ms
84 bytes from 100.100.12.2 icmp_seq=3 ttl=254 time=15.857 ms
84 bytes from 100.100.12.2 icmp_seq=4 ttl=254 time=15.315 ms
:
:(생략)
^C <-- Ctrl + C 로 중지한다.
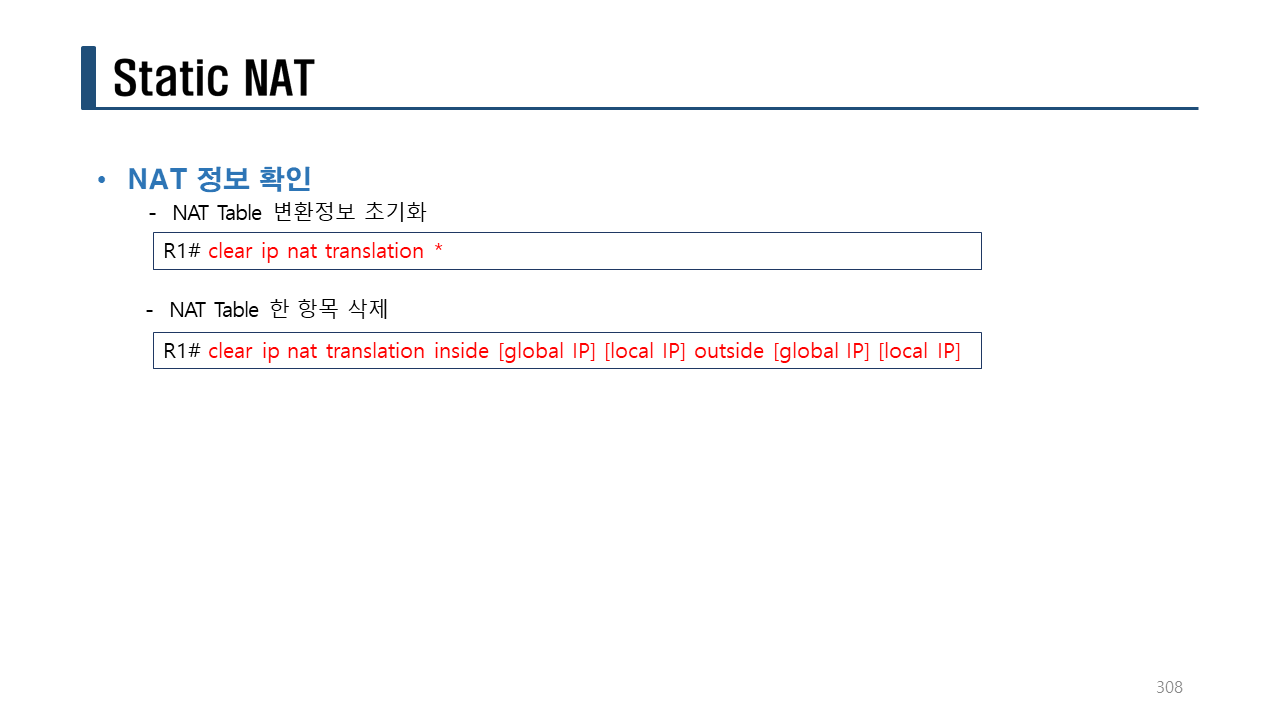
NAT Table의 변환 정보를 초기화한다.
R1#clear ip nat translation
R1#sh ip nat translations
PC3> ping 100.100.12.2
84 bytes from 100.100.12.2 icmp_seq=1 ttl=254 time=16.557 ms <-- NAT Table을 초기화 했으므로
84 bytes from 100.100.12.2 icmp_seq=2 ttl=254 time=15.324 ms <-- 아무나 2대까지 사용할 수 있다.
84 bytes from 100.100.12.2 icmp_seq=3 ttl=254 time=15.272 ms
84 bytes from 100.100.12.2 icmp_seq=4 ttl=254 time=15.902 ms
84 bytes from 100.100.12.2 icmp_seq=5 ttl=254 time=15.312 ms
실습> 자신의 사설 IP주소와 공인IP주소 확인하기
강의장의 컴퓨터에서 NAT 확인하기
1. 사설 IP주소
사설 IP주소는 cmd창에서 이더넷, 무선, Wifi 등으로 설정된 IP주소를 확인한다.
C:\Users\user2>ipconfig
Windows IP 구성
이더넷 어댑터 이더넷:
연결별 DNS 접미사. . . . :
링크-로컬 IPv6 주소 . . . . : fe80::8b5b:7613:553d:f5da%3
IPv4 주소 . . . . . . . . . : 192.168.20.213
서브넷 마스크 . . . . . . . : 255.255.255.0
기본 게이트웨이 . . . . . . : 192.168.20.1
2. 공인 IP주소
공인 IP주소는 아래 주소로 접속해서 확인한다.
https://linuxmaster.net/ipaddress.html
IP address is x.x.x.x.
##########
VLAN
##########
Switchport
Access mode: 하나의 VLAN을 사용하여 통신하는 모드로 주로 PC, 서버, 단말 장비들이 연결되는 포트
Trunk mode : 다수의 VLAN을 사용하여 통신하는 모드로 Switch, IP Phone 과 같은 장비가 연결되는 포트
VLAN 생성 형식:
conf t
vlan <번호>
name <이름> <-- 생략하면 기본값은 자동으로 설정된다.
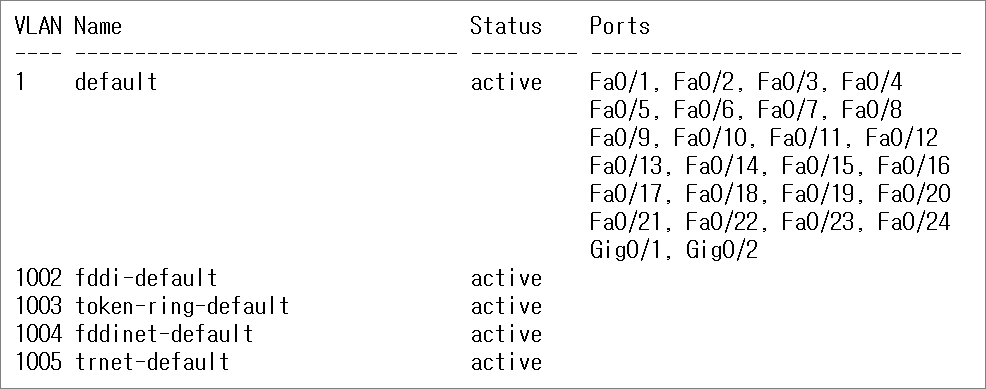
VLAN 확인 형식:
sh vlan
sh vlan brief
인터페이스를 access mode로 설정할 경우 특정 VLAN에 포함 시키는 형식:
int <인터페이스명>
switchport mode access
switchport access vlan <번호>
실습> VLAN 설정하기 1
파일명: vlan1.pkt
!
en
conf t
hostname SW1
end
sh vlan b
!
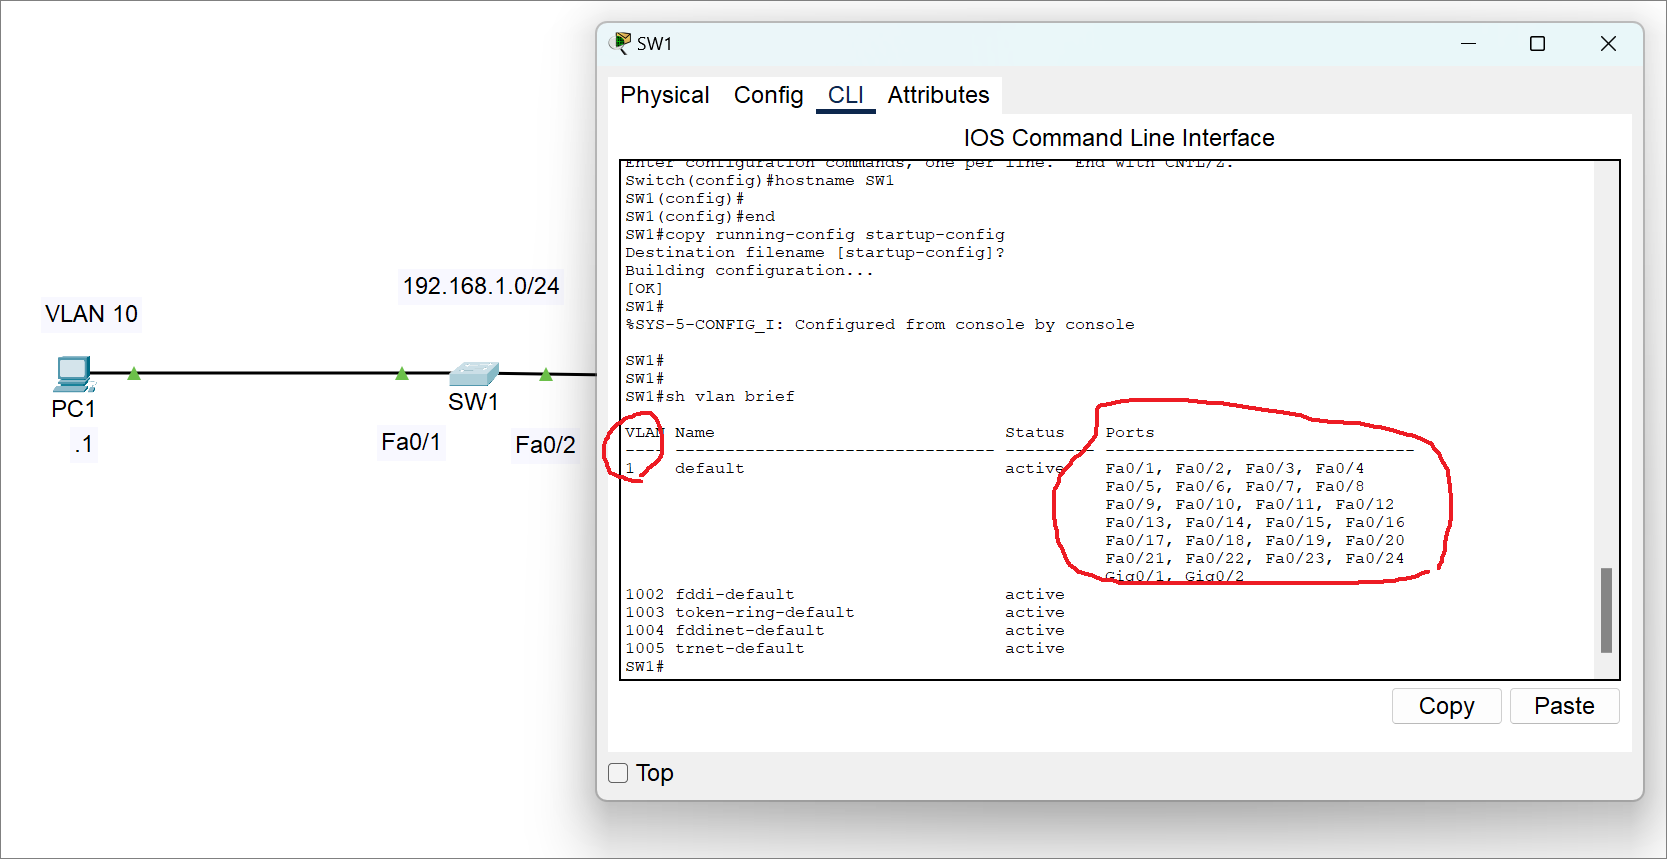
SW1#sh vlan b
!SW1
en
sh vlan b
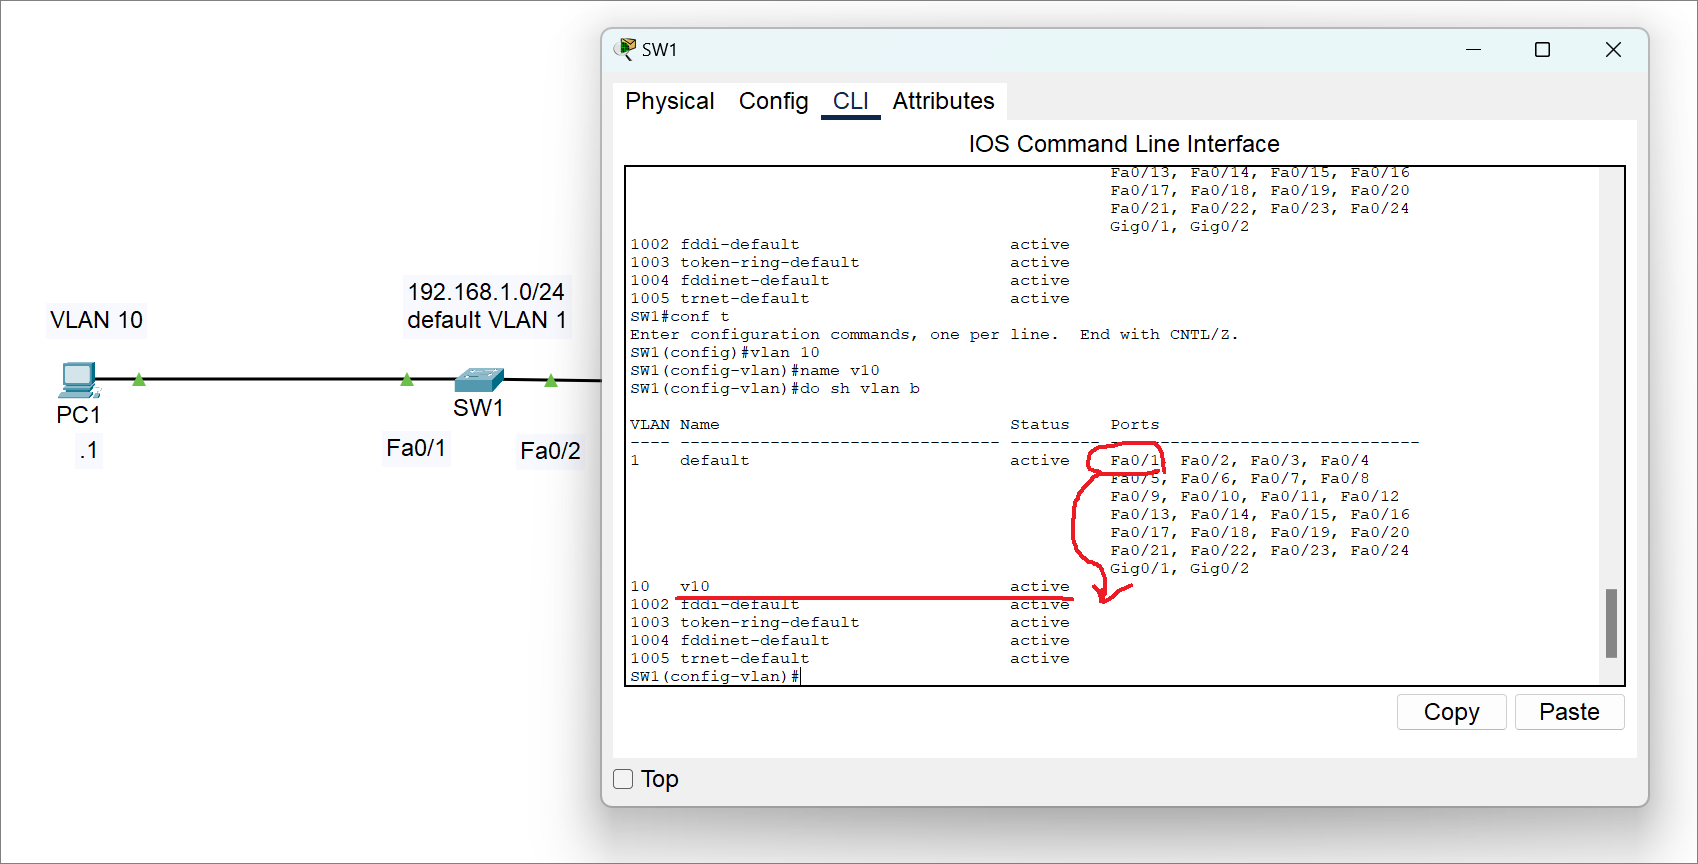
conf t
vlan 10
name v10
vlan 20
name v20
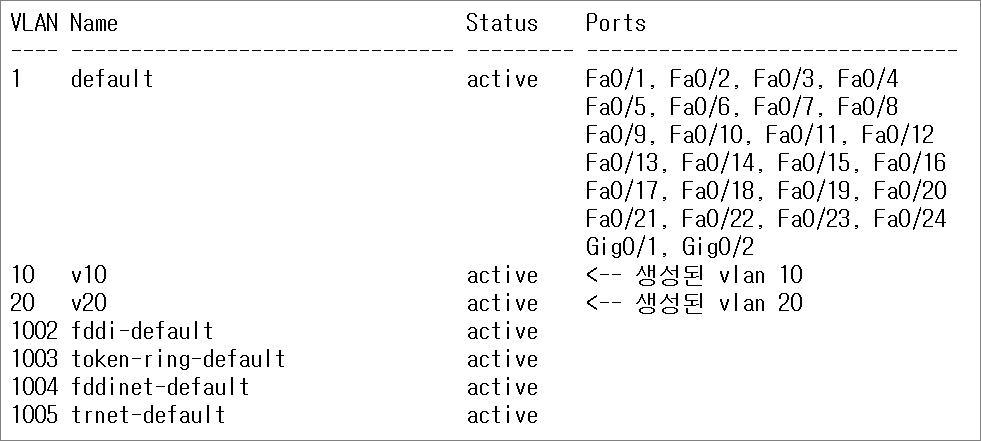
do sh vlan b
!
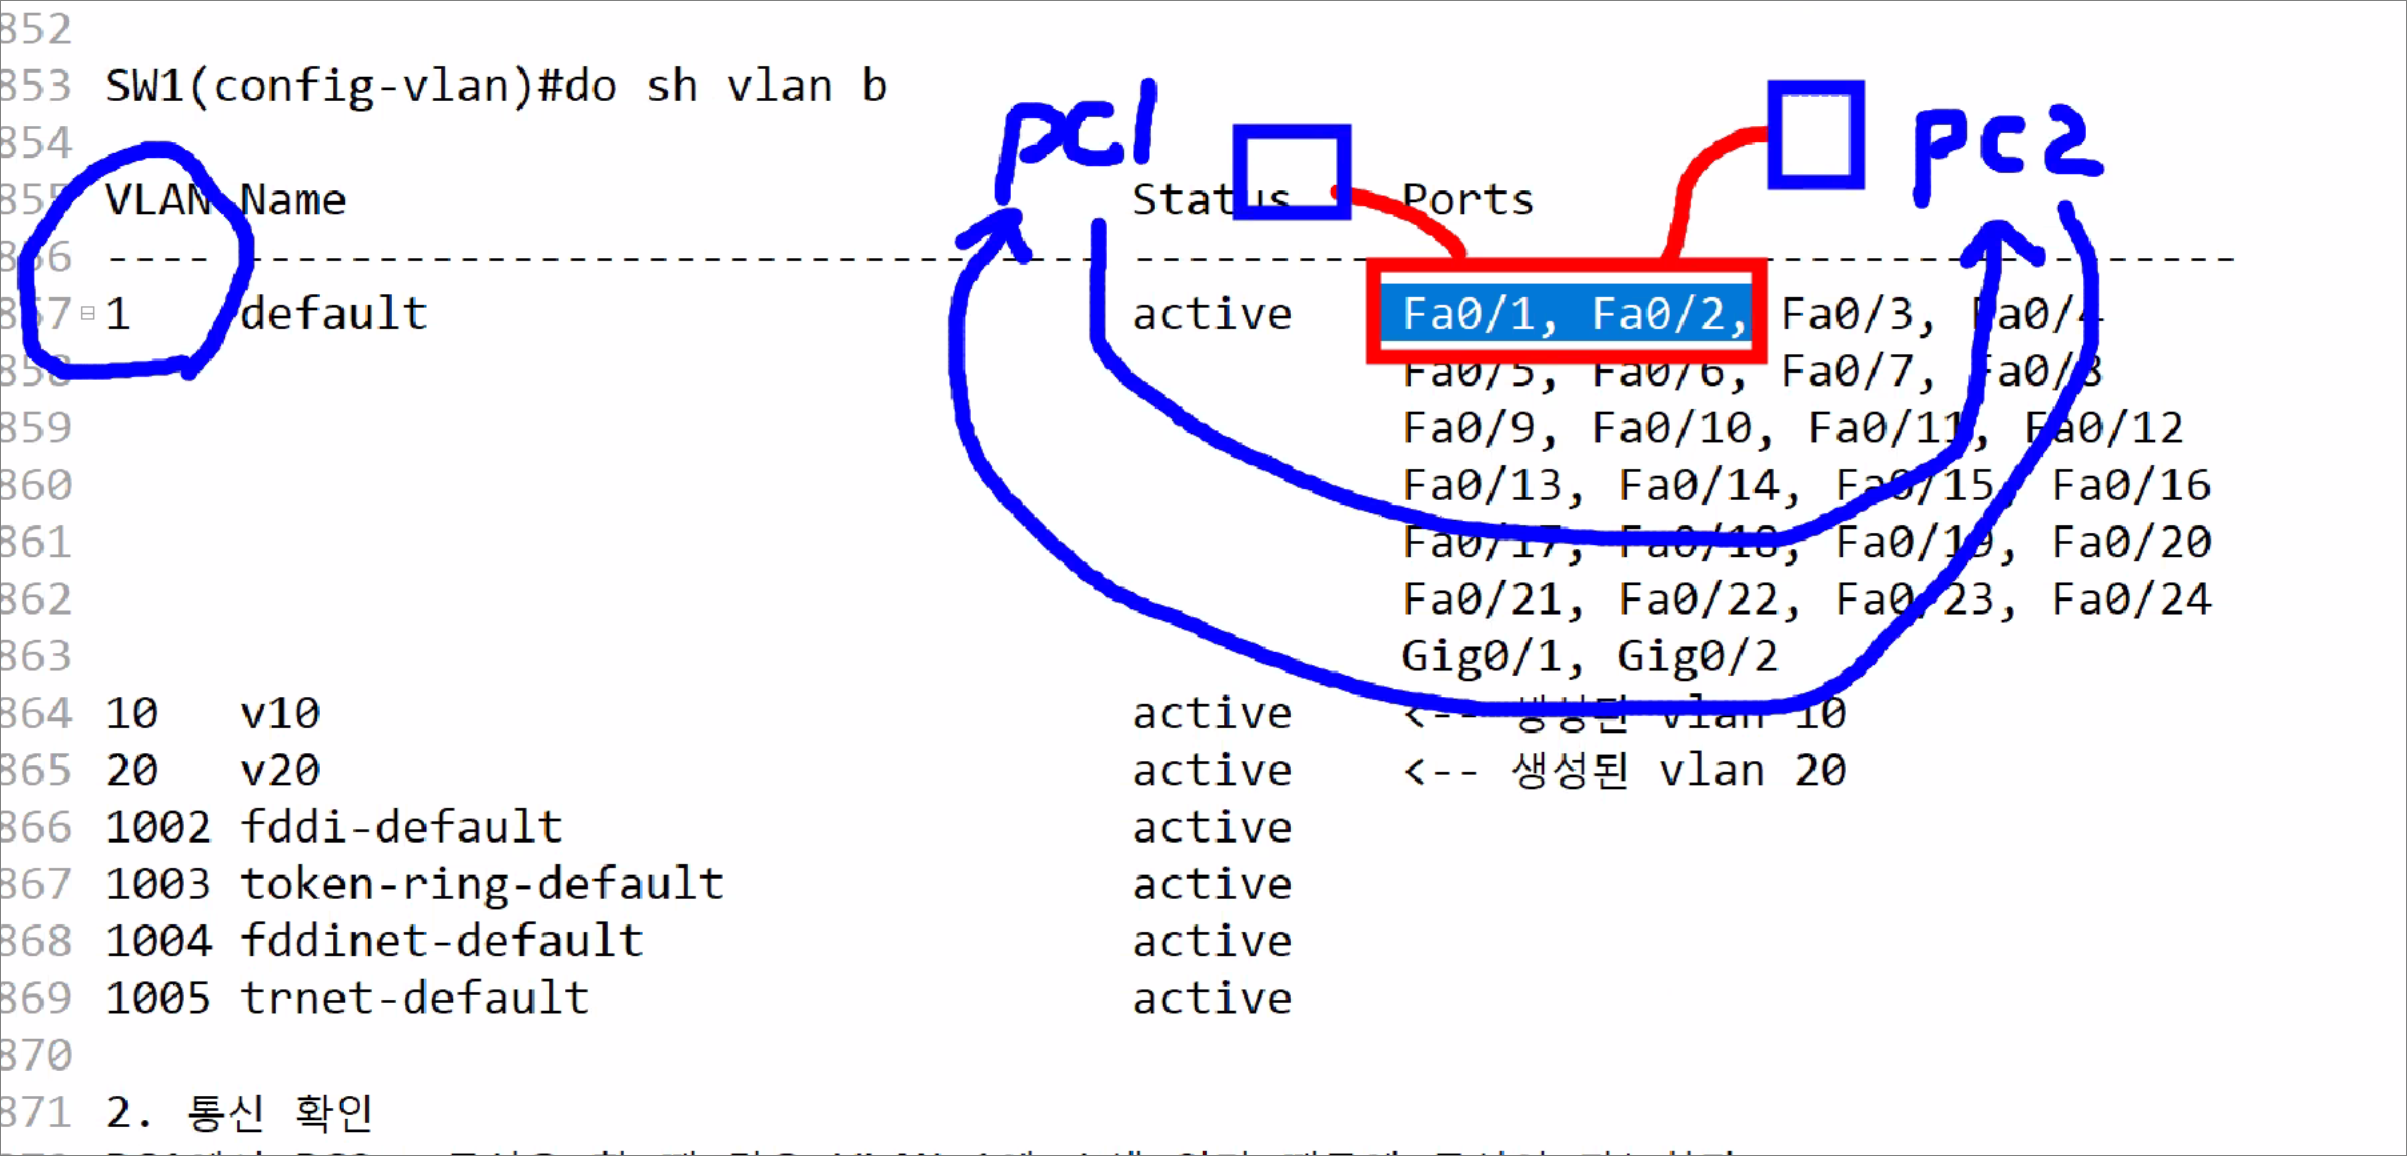
SW1(config-vlan)#do sh vlan b
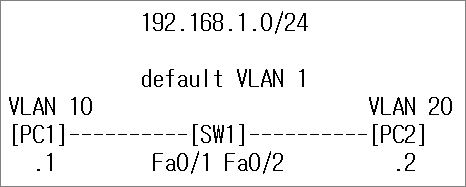
2. 통신 확인
PC1에서 PC2로 통신을 할 때 같은 VLAN 1에 속해 있기 때문에 통신이 가능하다.
C:>ping 192.168.1.2
Pinging 192.168.1.2 with 32 bytes of data:
Reply from 192.168.1.2: bytes=32 time=1ms TTL=128
Reply from 192.168.1.2: bytes=32 time=3ms TTL=128
Reply from 192.168.1.2: bytes=32 time<1ms TTL=128
Reply from 192.168.1.2: bytes=32 time<1ms TTL=128
Ping statistics for 192.168.1.2:
Packets: Sent = 4, Received = 4, Lost = 0 (0% loss),
Approximate round trip times in milli-seconds:
Minimum = 0ms, Maximum = 3ms, Average = 1ms
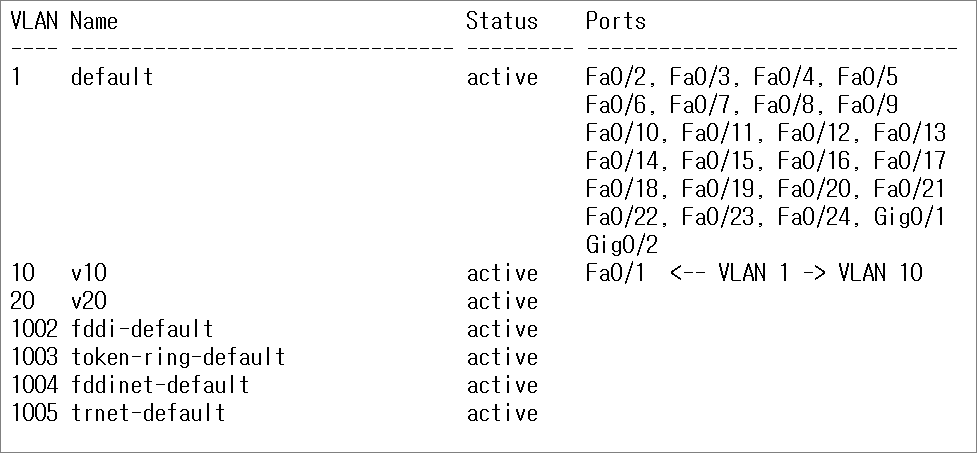
3. VLAN 분리
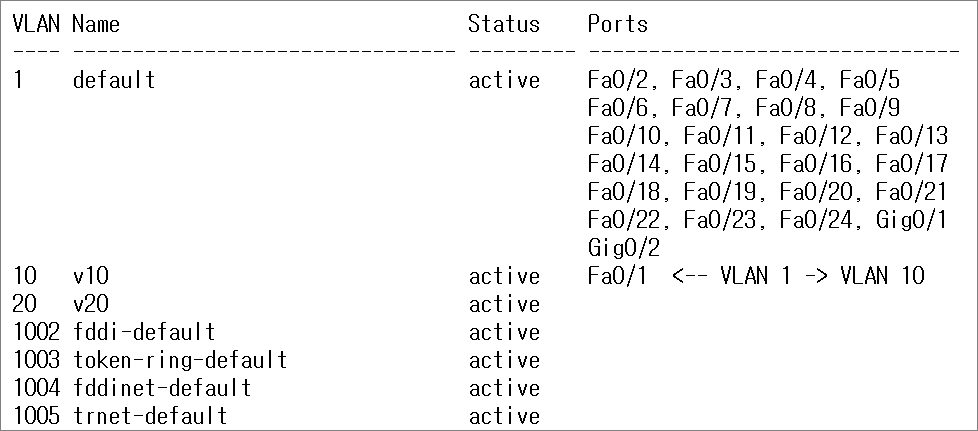
Fa0/1 : VLAN 1 -> VLAN 10
Fa0/2 : VLAN 1 -> VLAN 20
Fa0/1 포트를 변경한다.
!SW1
conf t
int fa0/1
switchport mode access
switchport access vlan 10
do sh vlan b
!
Switch(config-if)#do sh vlan b
2. 통신 확인
PC1에서 PC2로 통신을 할 때 같은 VLAN 1에 속해 있기 때문에 통신이 가능하다.
C:>ping 192.168.1.2
Pinging 192.168.1.2 with 32 bytes of data:
Reply from 192.168.1.2: bytes=32 time=1ms TTL=128
Reply from 192.168.1.2: bytes=32 time=3ms TTL=128
Reply from 192.168.1.2: bytes=32 time<1ms TTL=128
Reply from 192.168.1.2: bytes=32 time<1ms TTL=128
Ping statistics for 192.168.1.2:
Packets: Sent = 4, Received = 4, Lost = 0 (0% loss),
Approximate round trip times in milli-seconds:
Minimum = 0ms, Maximum = 3ms, Average = 1ms
3. VLAN 분리
Fa0/1 : VLAN 1 -> VLAN 10
Fa0/2 : VLAN 1 -> VLAN 20
Fa0/1 포트를 변경한다.
!SW1
conf t
int fa0/1
switchport mode access
switchport access vlan 10
do sh vlan b
!
Switch(config-if)#do sh vlan b
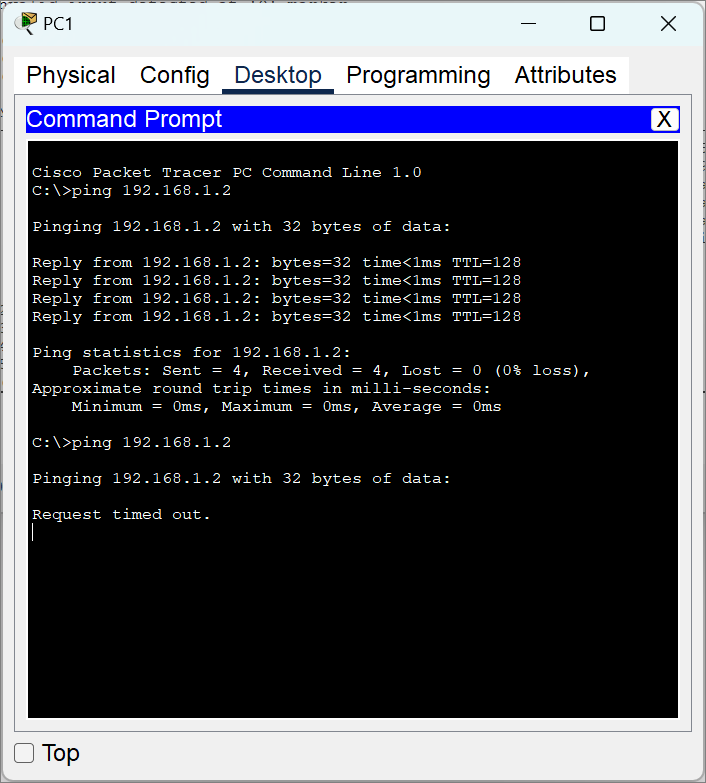
PC1에서 PC2로 ping test를 하면 통신이 안된다.
이유는? PC1과 PC2가 192.168.1.0/24 의 같은 네트워크에 속해 있어도 VLAN 정보가 다르므로 서로 통신할 수 있다.
C:>ping 192.168.1.2
Pinging 192.168.1.2 with 32 bytes of data:
Request timed out.
Request timed out.
Request timed out.
Request timed out.
Ping statistics for 192.168.1.2:
Packets: Sent = 4, Received = 0, Lost = 4 (100% loss),
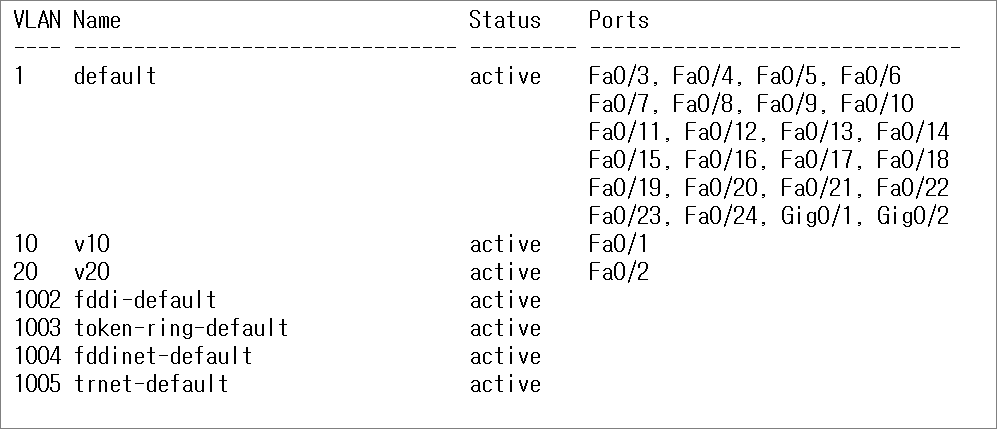
Fa0/2 포트를 변경한다.
!SW2
conf t
int fa0/2
switchport mode access
switchport access vlan 20
do sh vlan b
!
Switch(config-if)#do sh vlan b
원래대로 돌려놓기
!SW1
conf t
int f0/1
switchport mode access
switchport access vlan 1
int f0/2
switchport mode access
switchport access vlan 1
no vlan 10
no vlan 20
end
sh vlan b
!
