오랜만에 자바스크립트 30 포스팅이다! 최근에 진행하는 프로젝트에 신경 쓰느라, 상대적으로 계속 우선순위에서 밀리고 있다😂😂
그래서 드디어! 주말 오전에 짬을 내서 진행해보았다.
이번 실습은 Link Highlighter로, a tag를 가진 element에 마우스가 hover되면 ✨highlight✨가 짠! 하고 생기는 실습이었다.
시작해보자!
Learning Point
- element.getBoundingClientRect에 대해 학습한다.
- mouseEnter 이벤트에 대해 학습한다.
HTML Part
<!DOCTYPE html>
<html lang="en">
  <head>
    <meta charset="UTF-8" />
    <title>👀👀👀Follow Along Nav</title>
    <link rel="stylesheet" href="style.css" />
  </head>
  <body>
    <nav>
      <ul class="menu">
        <li><a href="">Home</a></li>
        <li><a href="">Order Status</a></li>
        <li><a href="">Tweets</a></li>
        <li><a href="">Read Our History</a></li>
        <li><a href="">Contact Us</a></li>
      </ul>
    </nav>

    <div class="wrapper">
      <p>
        Lorem ipsum dolor sit amet, <a href="">consectetur</a> adipisicing elit.
        Est <a href="">explicabo</a> unde natus necessitatibus esse obcaecati
        distinctio, aut itaque, qui vitae!
      </p>
      <p>
        Aspernatur sapiente quae sint <a href="">soluta</a> modi, atque
        praesentium laborum pariatur earum <a href="">quaerat</a> cupiditate
        consequuntur facilis ullam dignissimos, aperiam quam veniam.
      </p>
      <p>
        Cum ipsam quod, incidunt sit ex <a href="">tempore</a> placeat maxime
        <a href="">corrupti</a> possimus <a href="">veritatis</a> ipsum fugit
        recusandae est doloremque? Hic, <a href="">quibusdam</a>, nulla.
      </p>
      <p>
        Esse quibusdam, ad, ducimus cupiditate <a href="">nulla</a>, quae magni
        odit <a href="">totam</a> ut consequatur eveniet sunt quam provident
        sapiente dicta neque quod.
      </p>
      <p>
        Aliquam <a href="">dicta</a> sequi culpa fugiat
        <a href="">consequuntur</a> pariatur optio ad minima, maxime
        <a href="">odio</a>, distinctio magni impedit tempore enim repellendus
        <a href="">repudiandae</a> quas!
      </p>
    </div>
  </body>
</html>
CSS Part
html {
  box-sizing: border-box;
}

*,
*:before,
*:after {
  box-sizing: inherit;
}

body {
  min-height: 100vh;
  margin: 0; /* Important! */
  font-family: sans-serif;
  background: linear-gradient(
      45deg,
      hsla(340, 100%, 55%, 1) 0%,
      hsla(340, 100%, 55%, 0) 70%
    ),
    linear-gradient(
      135deg,
      hsla(225, 95%, 50%, 1) 10%,
      hsla(225, 95%, 50%, 0) 80%
    ),
    linear-gradient(
      225deg,
      hsla(140, 90%, 50%, 1) 10%,
      hsla(140, 90%, 50%, 0) 80%
    ),
    linear-gradient(
      315deg,
      hsla(35, 95%, 55%, 1) 100%,
      hsla(35, 95%, 55%, 0) 70%
    );
}

.wrapper {
  margin: 0 auto;
  max-width: 500px;
  font-size: 20px;
  line-height: 2;
  position: relative;
}

a {
  text-decoration: none;
  color: black;
  background: rgba(0, 0, 0, 0.05);
  border-radius: 20px;
}

.highlight {
  transition: all 0.2s;
  border-bottom: 2px solid white;
  position: absolute;
  top: 0;
  background: white;
  left: 0;
  z-index: -1;
  border-radius: 20px;
  display: block;
  box-shadow: 0 0 10px rgba(0, 0, 0, 0.2);
}

.menu {
  padding: 0;
  display: flex;
  list-style: none;
  justify-content: center;
  margin: 100px 0;
}

.menu a {
  display: inline-block;
  padding: 5px;
  margin: 0 20px;
  color: black;
}
Javascript Part
const highlight = document.createElement("span");
highlight.classList.add("highlight");
document.body.appendChild(highlight);

const makeHighlight = (e) => {
  const boundingRect = e.target.getBoundingClientRect();
  const position = {
    width: boundingRect.width,
    height: boundingRect.height,
    top: boundingRect.top + window.scrollY,
    left: boundingRect.left,
  };

  highlight.style.width = `${position.width}px`;
  highlight.style.height = `${position.height}px`;
  highlight.style.transform = `translate(${position.left}px,${position.top}px)`;
};
const triggers = document.querySelectorAll("a");
triggers.forEach((trigger) => {
  trigger.addEventListener("mouseenter", makeHighlight);
});
정리
element.getBoundingClientRect
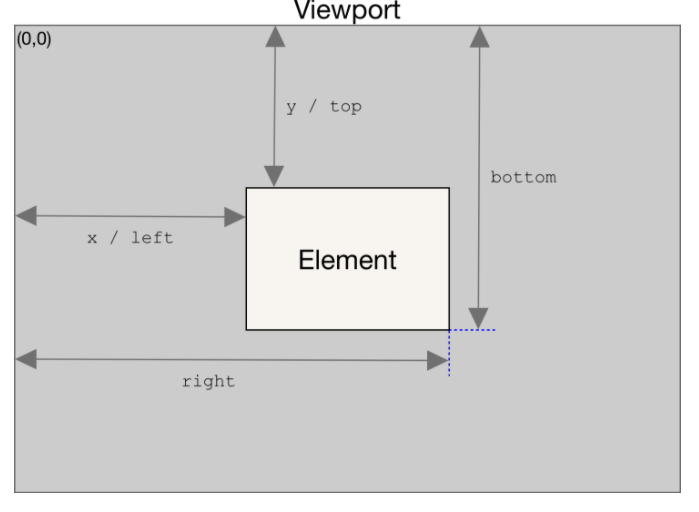
getBoundingClientRect 함수는 해당 element의 위치 정보를 반환해주는 함수이다. viewport 기준으로 현재 element의 좌측 상단의 좌표인 x/left, y/top과 우측 하단의 좌표인 right,bottom을 반환한다.

right와 bottom은 css에서의 right bottom과 반대되는 기준이므로 주의가 필요하다😊
mouseenter
element에 mouse가 올라갔을때 발생하는 event이다. css의 hover와 비슷하다고 생각하면 된다. MDN reference를 찾아 보다가 'mouseover'라는 event도 있어서 찾아봤는데,
mouseover는 직접 이벤트를 걸지않은 자식요소에 마우스 포인터가 와도 발생하지만 mouseenter는 오로지 자기 자신에게 마우스 포인터가 와야만 발생하는 차이가 있다고 한다.
https://recoveryman.tistory.com/51 잘 정리된 블로그가 있어 공유합니다 :)
리액트를 사용하다가 이렇게 순수 자바스크립트만을 사용해서 코딩을 하다 보면 가끔 '내가 같은거를 공부하는게 맞나?' 하는 생각이 들 때가 있다.😂
벌써 2월도 마지막 주를 향해 달려가고 있는데, 시간이 참 빠르다는 생각이 든다. 시간에 뒤쳐지지 않도록 더 열심히 해야겠다. 💪💪

👏