가시다(gasida) 님이 진행하는 AEWS(Amazon EKS Workshop Study) 3기 과정으로 학습한 내용을 정리 또는 실습한 내용을 정리한 게시글입니다. 12주차는 방신철님께서 Amazon VPC Lattice for Amazon EKS 주제로 강의를 해주셨습니다.
🔍 애플리케이션 네트워킹의 새로운 접근
클라우드 환경에서 마이크로서비스 아키텍처가 보편화되면서, 서비스 간 통신의 보안, 가시성, 정책 제어가 점점 더 중요해지고 있습니다. 바로 이런 문제를 해결하기 위해 등장한 것이 AWS VPC Lattice입니다.
🚧 기존 애플리케이션 네트워킹 방식의 한계
Ingress와 Service Mesh는 Kubernetes 환경에서 널리 사용되던 네트워킹 방식이지만, 다음과 같은 제약이 존재했습니다.
🔒 Ingress의 한계
- L7 중심: HTTP/HTTPS에는 최적화되어 있지만, gRPC, TCP, UDP 등 비 L7 프로토콜에는 제한적
- 벤더 종속성: 고급 기능 사용 시 컨트롤러별 어노테이션 의존 → 이식성/표준화 부족
🧭 Service Mesh의 한계
- 동서 트래픽 위주 설계: 외부-내부 통신(북-남 트래픽)에 대한 기능은 제한적
- 복잡한 네트워크 설정: VPC Peering, TGW, 교차 계정 IAM 등 → 운영/보안 부담 증가
- 사이드카 프록시 운영 부담: 멀티 클러스터/멀티 VPC 환경에서는 프록시 관리 복잡성 심화
📈 복잡해진 클라우드 환경에서의 새로운 요구사항
- 역할 분리: 인프라, 개발, DevOps 팀 간 명확한 책임 분리 필요
- 멀티 VPC/멀티 클러스터 관리: 리소스를 일관되게 제어할 수 있는 구조 필요
- 이기종 컴퓨팅 환경 지원: EC2, ECS, Lambda 등 다양한 워크로드를 통합 관리 가능한 네트워킹 레이어 요구
☁️ VPC Lattice란?
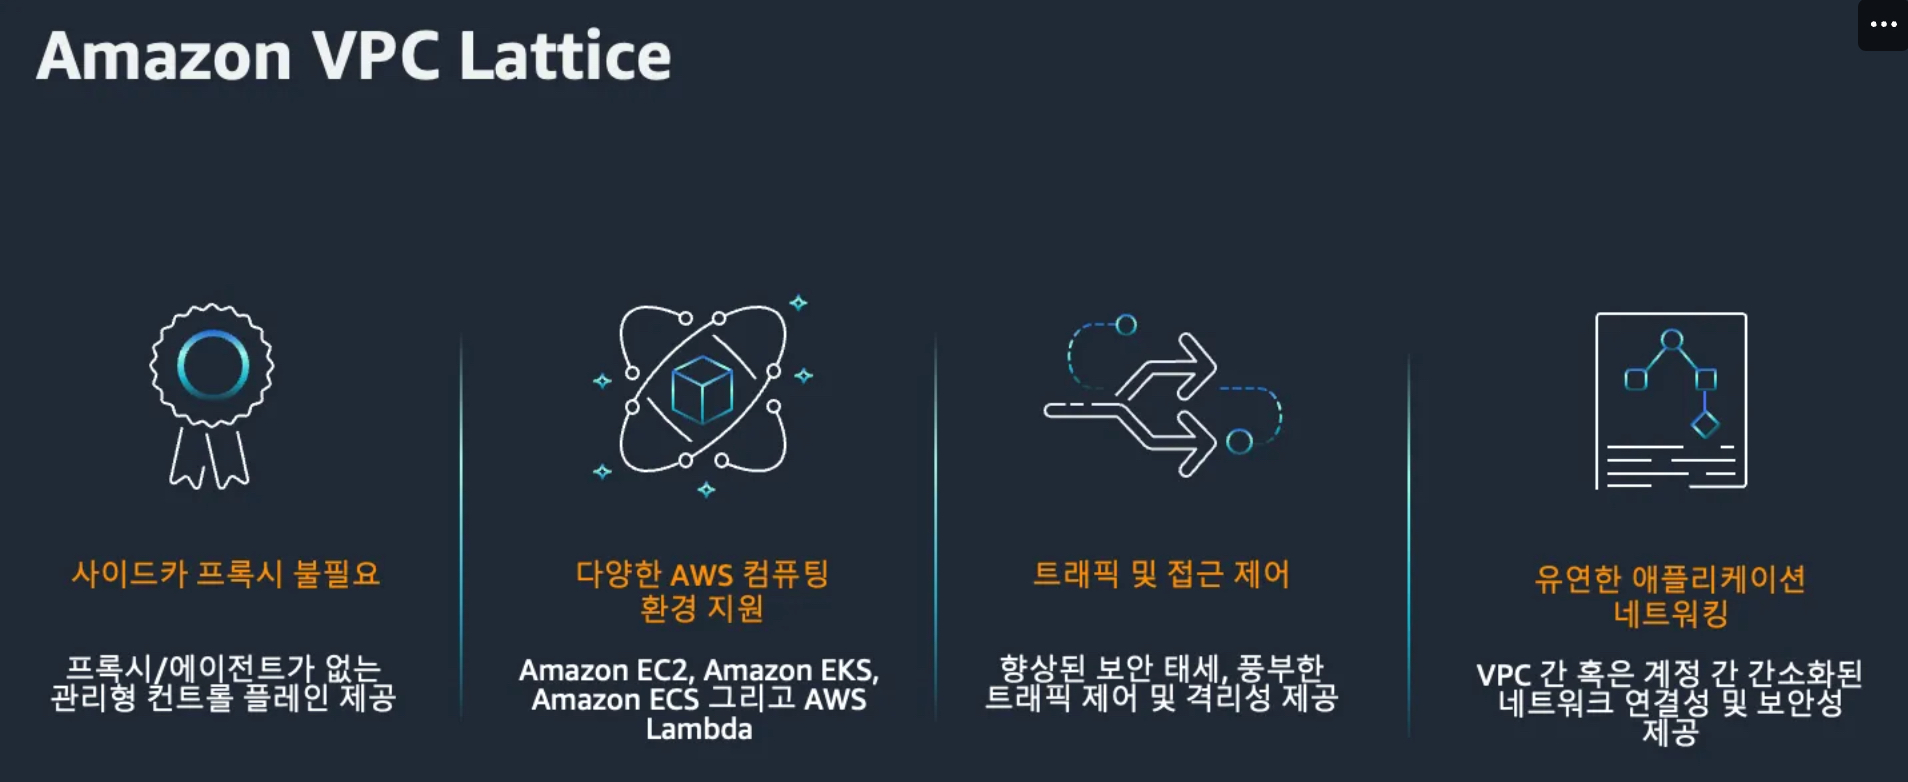
AWS VPC Lattice는 여러 VPC와 계정에 걸쳐 있는 서비스 간의 통신, 정책, 모니터링을 표준화해주는 애플리케이션 계층의 서비스 네트워킹 솔루션입니다.
쉽게 말해, VPC Lattice는 마이크로서비스가 어디에 있든 서로 안전하게 통신하고, 일관된 방식으로 트래픽을 제어할 수 있게 해주는 서비스 메시-like 서비스입니다.
Envoy나 Istio와 같은 오픈소스 서비스 메시와 비슷한 목적이지만, AWS가 완전관리형으로 제공하는 것이 큰 차이점입니다.
🎯 왜 VPC Lattice가 필요할까?
기존에는 VPC, Security Group, NLB/ALB, Transit Gateway 등을 조합해서 마이크로서비스 간 통신을 구성해야 했죠. 이 과정은 다음과 같은 문제를 일으킵니다:
- 복잡한 네트워킹 구성
- 보안 정책의 일관성 부족
- 멀티 VPC/계정 간 통신의 어려움
- 서비스 레벨에서의 관찰성 부족
VPC Lattice는 이러한 복잡성을 추상화해서, 서비스 단위로 네트워킹과 보안 정책을 설정할 수 있도록 해줍니다.
⚙️ 어떻게 동작할까?
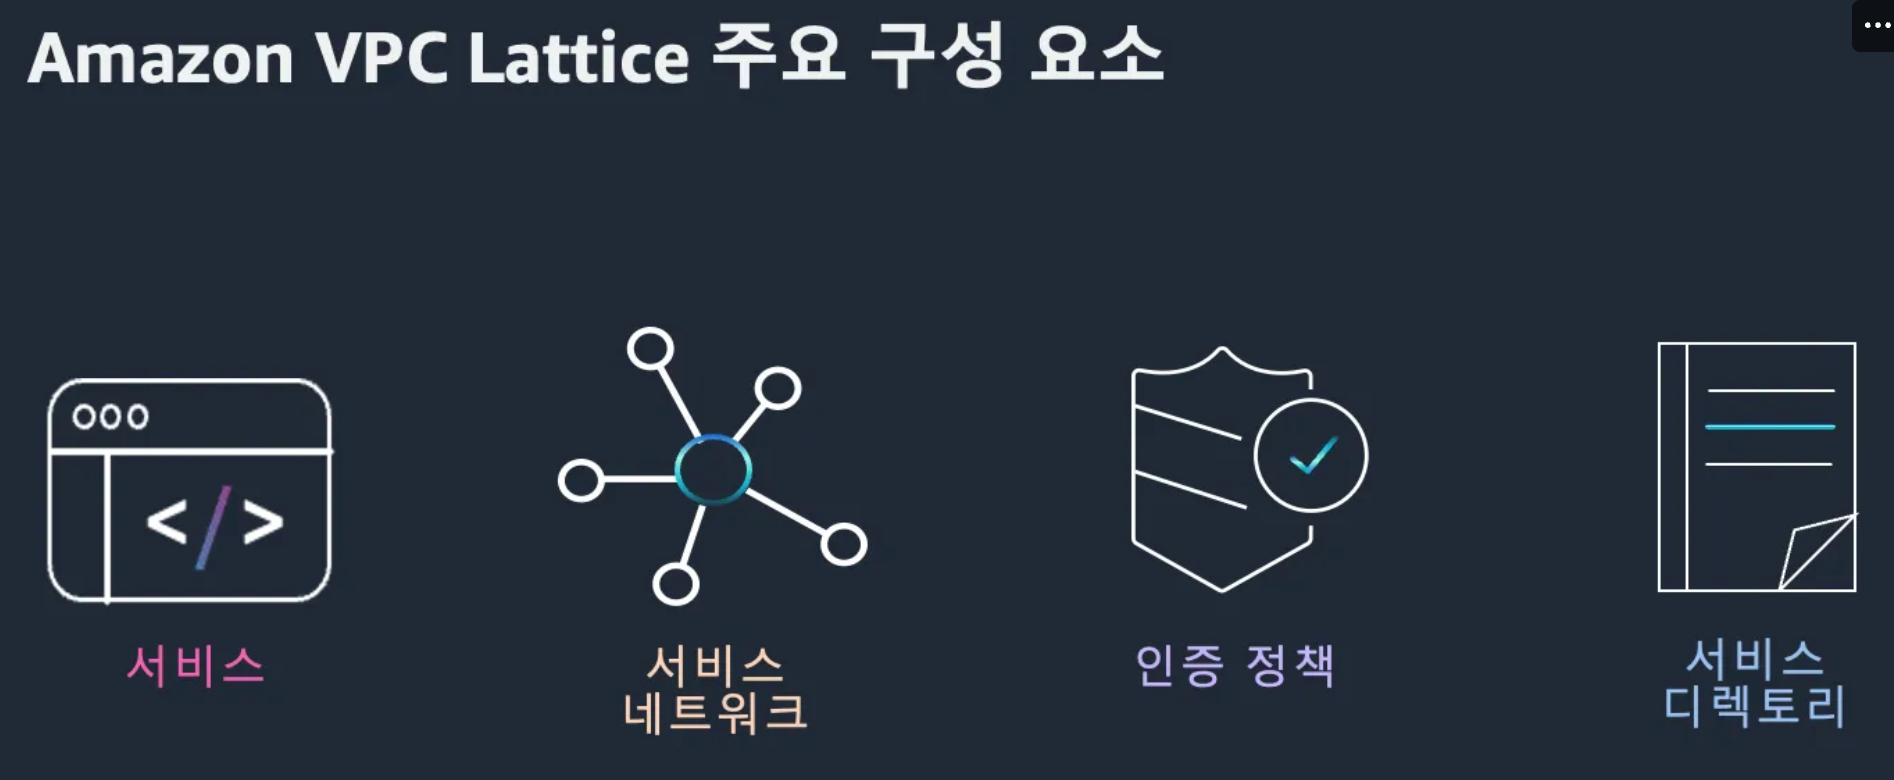
VPC Lattice는 크게 4가지 구성 요소로 이루어져 있습니다:
- 서비스 (Service)
- 외부에 노출할 애플리케이션 엔드포인트. URI로 접근.
- 서비스 네트워크 (Service Network)
- 서비스들을 논리적으로 묶어주는 네트워크 공간.
- 정책 (AuthZ Policy)
- 누가 어떤 서비스에 접근 가능한지 제어.
- 서비스 등록 (Service Association)
- 특정 VPC 또는 서비스 네트워크에 서비스를 연결.
여기서 중요한 건 VPC나 IP를 직접 건드리지 않고도, 서비스 단위로 통신을 설정할 수 있다는 점입니다.
🧱 VPC Lattice의 Service
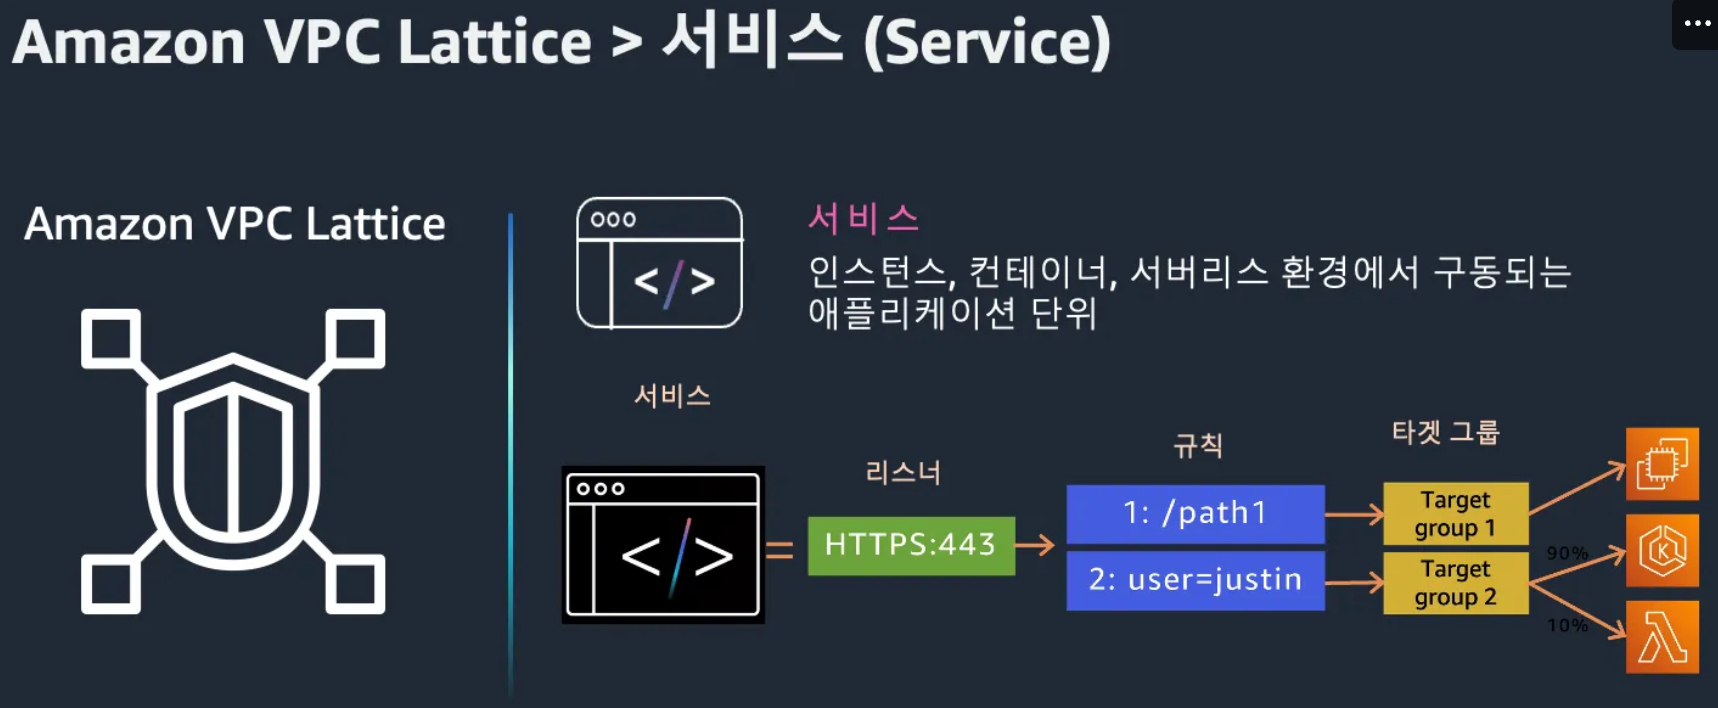
Service는 특정 기능을 수행하는 독립 배포 가능한 소프트웨어 단위로, VPC나 계정에 구애받지 않고 다양한 컴퓨팅 환경(EC2, ECS, Lambda 등)에서 실행 가능함.
🔧 구성 요소
- 리스너: 트래픽을 수신할 포트와 프로토콜 정의 (HTTP/1.1, HTTP/2, gRPC, HTTPS)
- 규칙: 리스너에 설정되는 라우팅 조건 및 작업 정의 (우선순위, 조건, 대상 그룹 지정)
- 대상 그룹: 요청이 전달되는 백엔드 리소스 모음 (EC2, IP, Lambda, Pod 등)
🌟 주요 특징
- 고유한 VPC Lattice 도메인 네임 제공
- 경로/헤더 기반 라우팅 지원
- 다양한 AWS 컴퓨팅 서비스와 연동 가능
- 헬스 체크 기반 안정적 트래픽 처리
🌐 Service Network
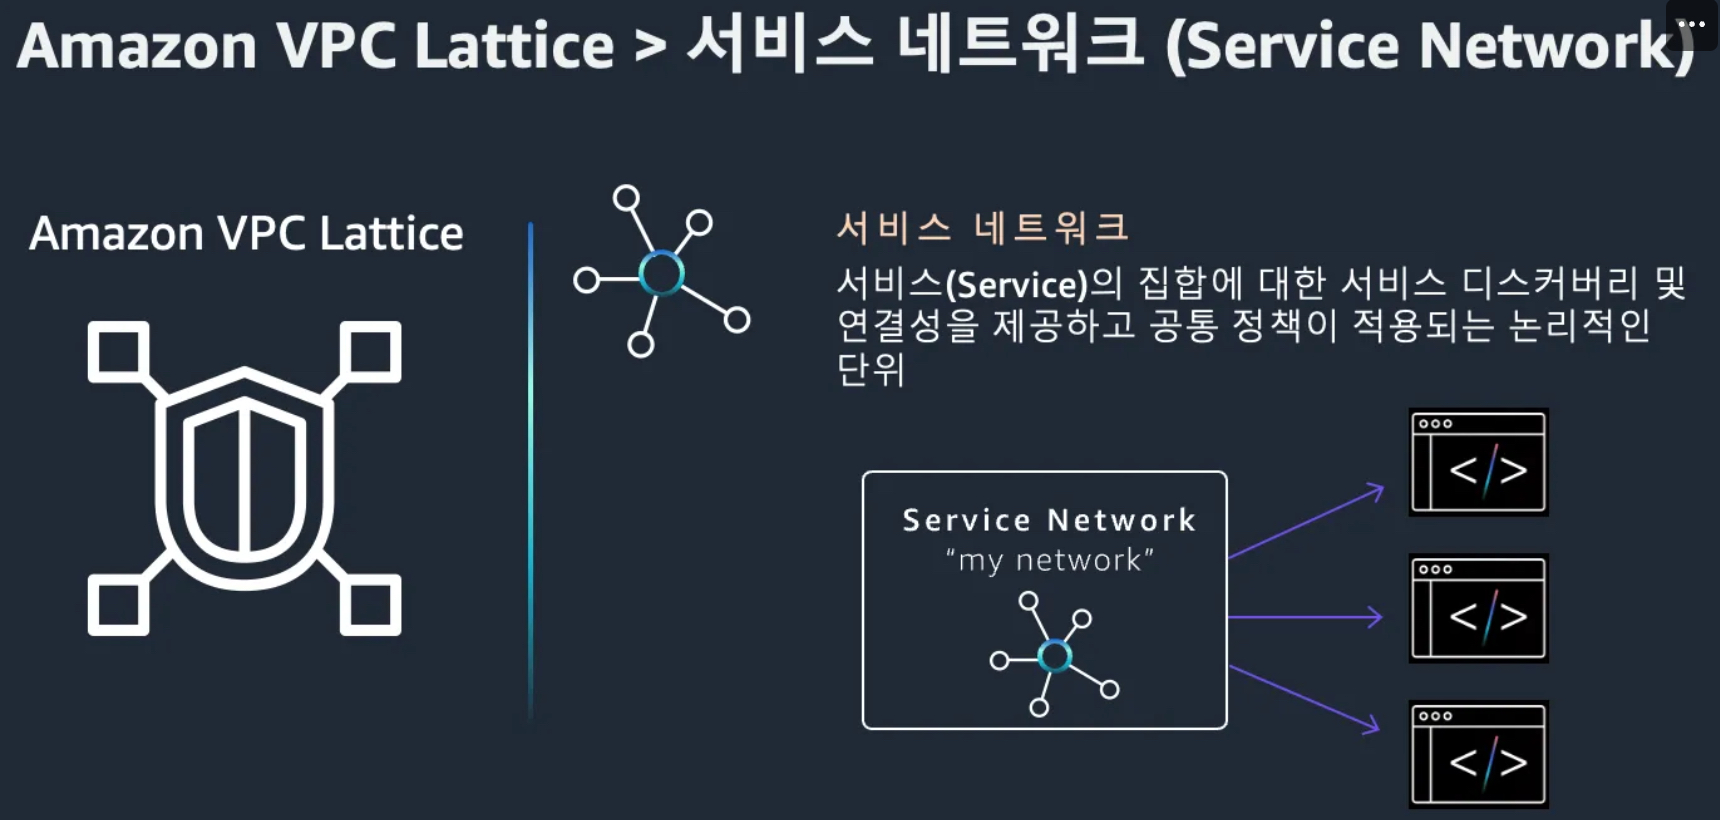
Service Network는 VPC Lattice의 핵심 구성 요소로, 여러 서비스와 VPC를 하나의 논리적 네트워크로 묶어 통신과 접근 제어를 중앙에서 관리할 수 있게 해줍니다.
🧩 주요 기능
- 🔗 여러 VPC와 서비스 통합
- 🔄 계정 간 / 리전 간 연결 지원
- 🔐 중앙 집중식 액세스 제어
- 📊 모니터링 및 정책 기반 접근 제어 제공
🔐 Auth Policy
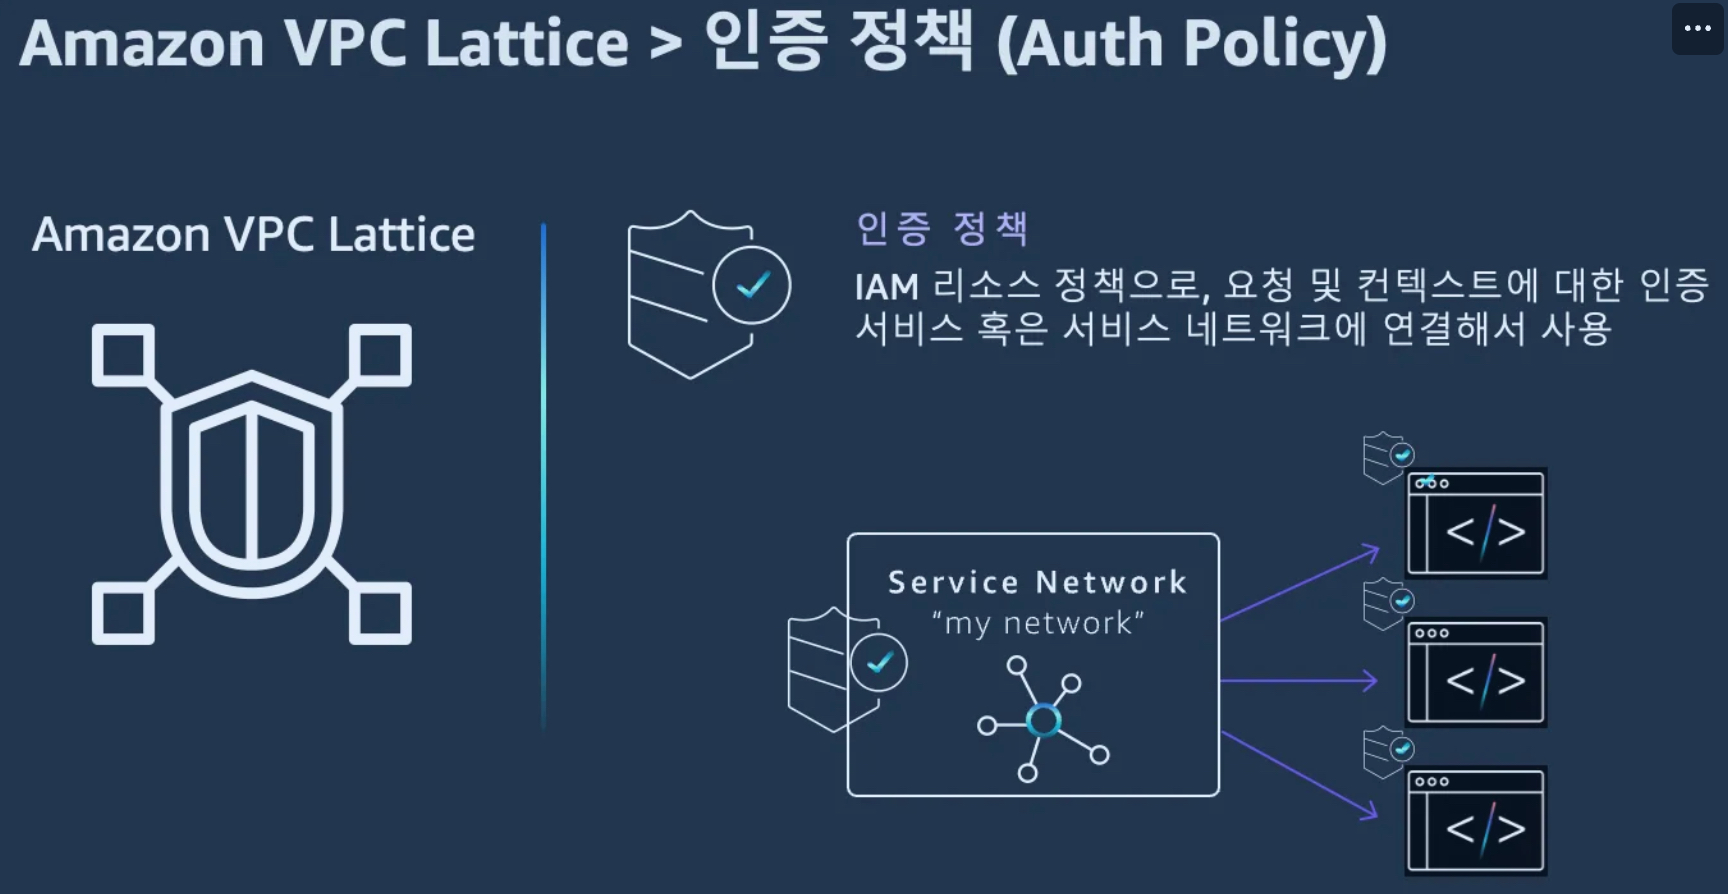
Auth Policy는 VPC Lattice에서 IAM 기반의 세분화된 접근 제어 정책으로, 서비스에 대한 누가, 어떻게 접근할 수 있는지를 정의합니다.
🧰 주요 기능
- 👤 IAM 사용자/역할 기반 접근 제어
- 🌐 서비스 단위 또는 Service Network 단위 적용 가능
- 📥 HTTP 메소드, 경로, 헤더 기준 조건부 정책 구성
- 🔒 AWS 리소스 간 안전하고 통제된 통신 제공
Lattice Auth Policy는 제로 트러스트 네트워킹 구현의 기반이 됩니다.
📚 Service Directory
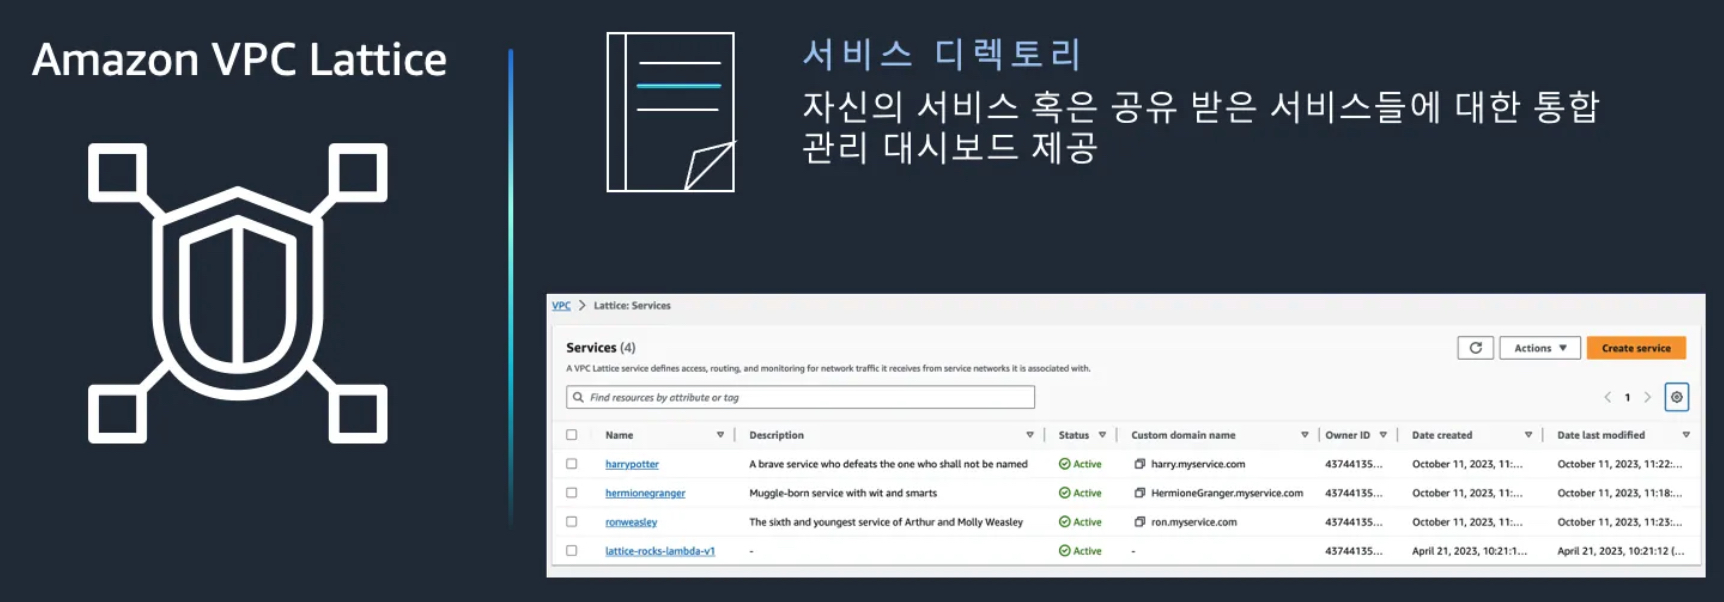
Service Directory는 VPC Lattice 내의 모든 서비스를 중앙에서 검색하고 관리할 수 있는 카탈로그로, 개발자와 운영자가 필요한 서비스를 쉽게 찾고 사용할 수 있도록 도와줍니다.
🧭 주요 기능
- 📖 서비스의 중앙 집중식 목록 및 메타데이터 관리
- 🔍 서비스 검색 및 필터링 기능 제공
- 👀 접근 가능한 서비스에 대한 가시성 향상
- 📝 서비스 설명 및 태그 등 정보 제공
조직 내 다양한 서비스들을 한눈에 파악하고 효율적으로 활용할 수 있게 해주는 핵심 도구입니다.
🔐 보안과 정책 제어
VPC Lattice는 IAM 기반의 서비스 접근 제어를 지원합니다. 예를 들어, “VPC A에 있는 서비스는 VPC B의 주문 서비스에만 접근 가능” 같은 정책을 IAM 정책으로 정의할 수 있습니다.
또한 TLS 종단 간 암호화, 요청 레벨 로깅, 액세스 로그, 트래픽 모니터링 등 서비스 메시급 보안 및 관찰성 기능도 제공합니다.
🛠️ 사용 사례
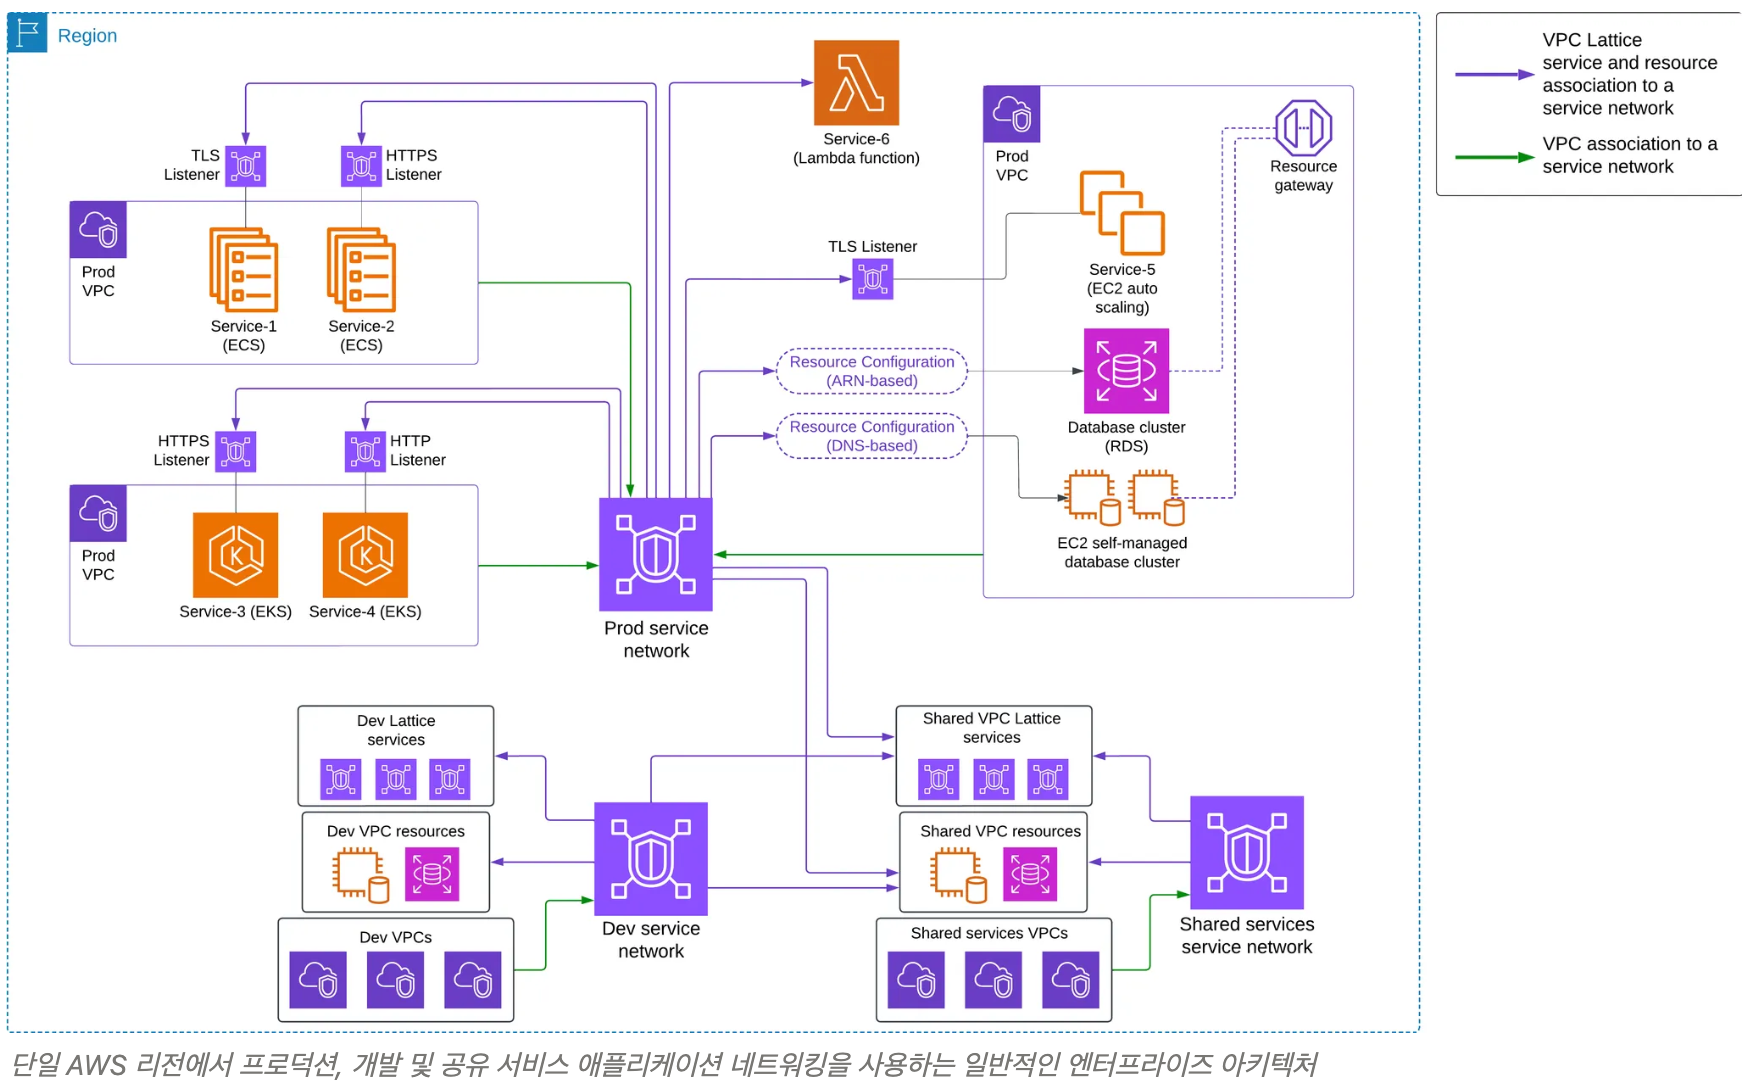
- 사용 사례 #1 : 단일 리전의 애플리케이션 간 연결
- 사용 사례 #2 : 온프레미스에서 AWS에 배포된 애플리케이션으로 접근하는 경우
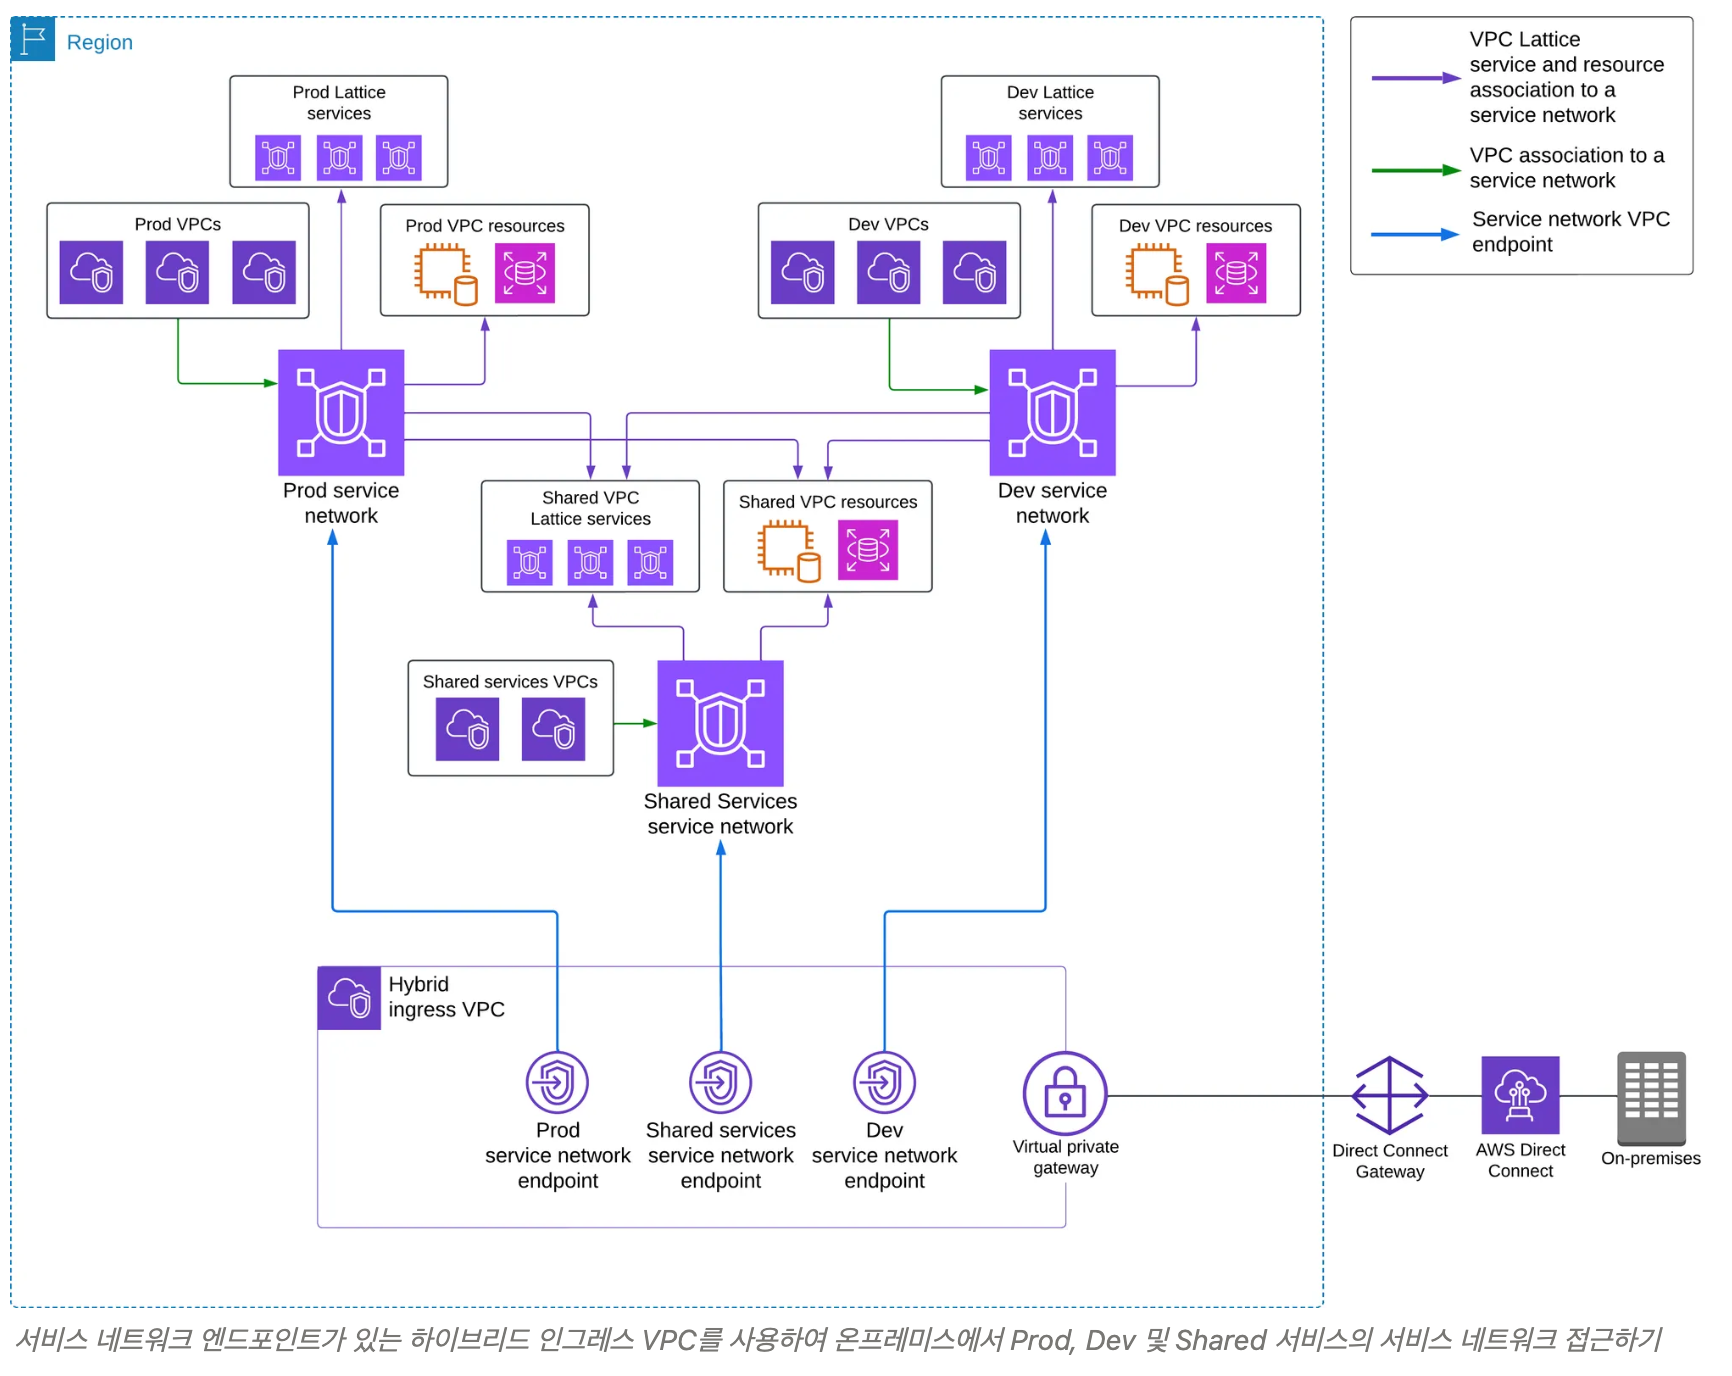
- 사용 사례 #3 : 여러 AWS 리전에 걸친 애플리케이션 간의 연결
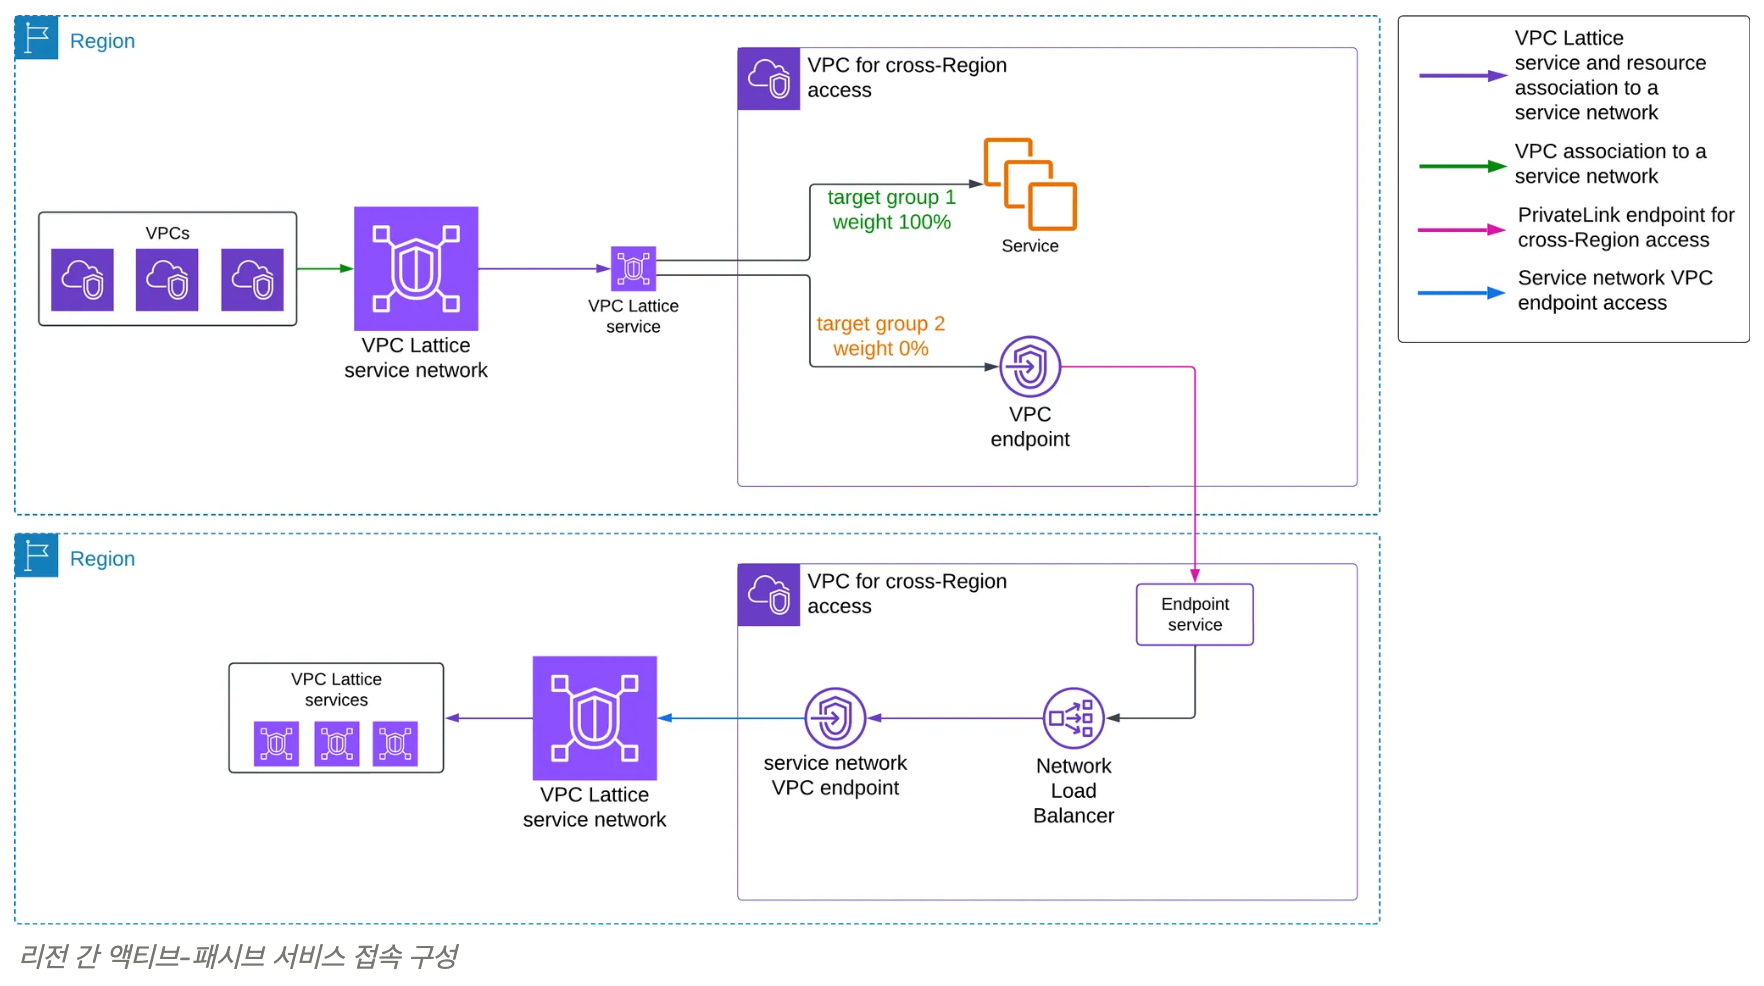
- 사용 사례 #4 : 다중 계정 간 애플리케이션의 연결
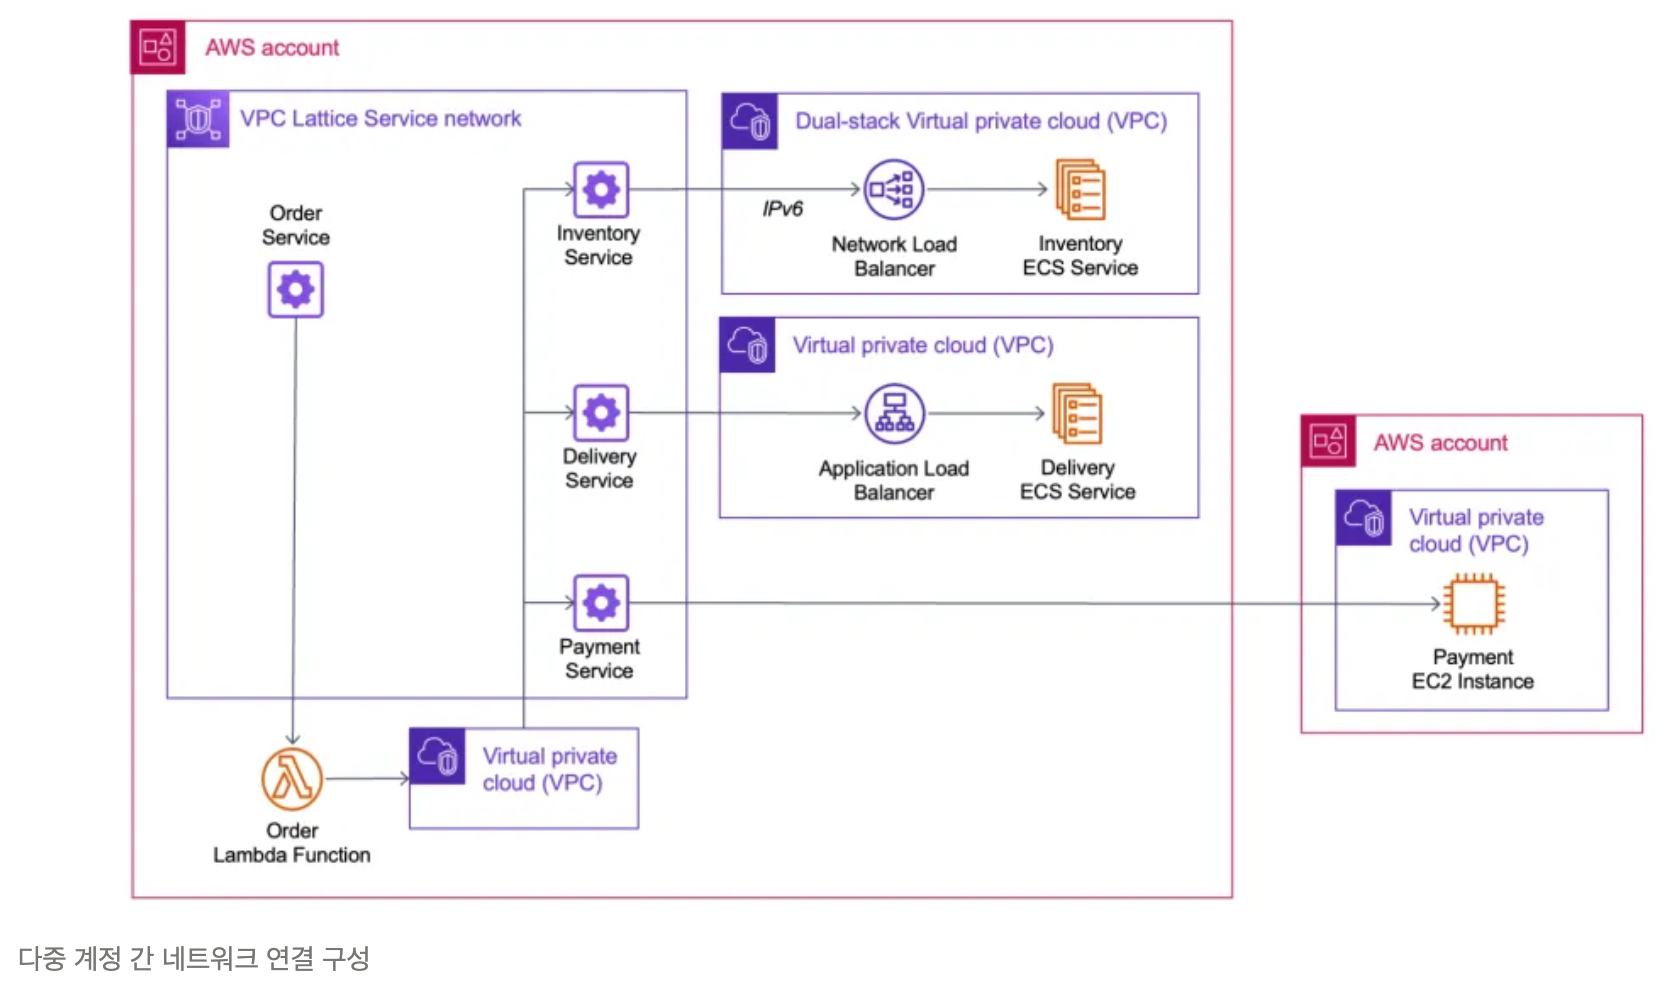
🥊 VPC Lattice vs AWS App Mesh: 서비스 메시 비교
| 항목 | VPC Lattice | App Mesh |
|---|---|---|
| 출시 시기 | 2022년 re:Invent에서 발표 | 2018년 출시 |
| 관리 방식 | 완전관리형 (Fully managed) | 제어 플레인은 AWS가 관리하지만 Envoy 사이드카는 직접 운영 필요 |
| 대상 워크로드 | 모든 워크로드 (EC2, Lambda, Fargate 등) | 주로 컨테이너 기반 (ECS, EKS, EC2) |
| 서비스 등록 방식 | 서비스 네트워크와 서비스 등록 방식으로 추상화 | Envoy 사이드카를 각 서비스에 배포하고 App Mesh에 등록 |
| 보안 및 인증 | IAM 기반 인증 및 정책, TLS 지원 | mTLS, IAM 인증, fine-grained RBAC |
| 트래픽 제어 기능 | 기본적인 라우팅, L7 트래픽 필터링, 정책 기반 접근 제어 | 고급 라우팅 (canary, retry, failover, timeout 등) |
| 관찰성 | CloudWatch 기반의 로그 및 지표 제공 | CloudWatch + X-Ray, Envoy에서 세부 지표 수집 |
| Cross-VPC/Account 지원 | 네이티브로 지원 | 일부는 복잡한 설정 필요 (Transit Gateway 등 활용) |
| 운영 복잡도 | 낮음 (시작이 쉬움) | 높음 (사이드카 운영, 설정 복잡성 존재) |
| 서드파티 통합 | 제한적 (AWS 환경에 최적화) | Envoy 기반으로 오픈소스와 연동 가능 |
| 적합한 경우 | 간단한 네트워킹/보안/정책 중심의 서비스 통신이 필요한 경우 | 복잡한 마이크로서비스 간 L7 트래픽 제어와 고급 기능이 필요한 경우 |
🧠 요약하면…
- VPC Lattice는 쉽고 빠르게 멀티 VPC/계정 간의 통신을 구성할 수 있도록 설계된 완전관리형 서비스 메시입니다. "서비스 네트워킹을 단순화"하려는 목적이 강합니다.
- 사용이 매우 간단하고, IAM 기반 정책과 서비스 네트워크 개념이 직관적입니다.
- 컨테이너가 아니어도 사용 가능하다는 점에서 범용성이 뛰어납니다.
- App Mesh는 오픈소스 Envoy 기반의 서비스 메시로, 복잡한 트래픽 제어와 고급 기능이 필요한 환경에 적합합니다.
- 컨테이너 환경에 강력하고, L7 레벨의 세밀한 통제가 필요할 때 유리합니다.
- 대신 사이드카 관리 및 설정 복잡도가 있기 때문에 운영 부담은 더 큽니다.
🎯 언제 어떤 걸 선택할까?
| 상황 | 추천 솔루션 |
|---|---|
| "서로 다른 VPC/계정의 Lambda, ECS, EC2가 간단하게 통신하고 싶다" | ✅ VPC Lattice |
| "mTLS, 고급 라우팅 정책, 서드파티 통합까지 필요한 EKS 기반 서비스 메시를 구축하고 싶다" | ✅ App Mesh |
| "DevOps 리소스가 부족하고, 운영 자동화가 우선이다" | ✅ VPC Lattice |
| "Istio나 Envoy에 익숙하고, 오픈소스 통합을 고려 중이다" | ✅ App Mesh |
🚪 Gateway API란?
Kubernetes 네트워킹의 새로운 표준
🎬 등장 배경 – 왜 Gateway API가 나왔을까?
Kubernetes에서 인그레스(ingress)는 외부 트래픽을 클러스터 내부로 라우팅하는 핵심 자원이지만, 여러 문제가 있었습니다.
Ingress의 한계
- ✅ 너무 추상적이다: path, host 기준 라우팅 외에는 제한적
- 🔧 구현체마다 Annotation 의존도가 높음 (예: NGINX Ingress Controller vs AWS ALB Controller)
- 📦 L7 (HTTP/HTTPS)에만 초점 → L4(LB, TCP/UDP) 라우팅은 별도 CRD 사용해야 함
이런 문제들을 해결하기 위해 등장한 것이 바로 Gateway API입니다.
Kubernetes SIG-NETWORK에서 주도하는 Ingress의 차세대 대체자이며, 더 유연하고 확장 가능한 네트워킹 API입니다.
🧩 주요 구성 요소 (CRD 기반)
Gateway API는 5가지 주요 리소스로 구성되며, 기존 Ingress보다 훨씬 더 명확하게 책임을 나눕니다.
| 리소스 | 설명 |
|---|---|
| GatewayClass | 로드밸런서의 종류 정의. Ingress Controller에 해당. |
| Gateway | 실제로 클러스터 내에서 생성되는 Load Balancer. IP/Port 설정 포함. |
| HTTPRoute / TCPRoute / GRPCRoute 등 | 트래픽을 서비스로 라우팅하는 규칙 정의. 멀티 프로토콜 지원. |
| ReferenceGrant | cross-namespace 참조 허용을 위한 정책 객체 |
| BackendPolicy (확장) | 서비스에 대한 timeout, retry 등 세부 정책 (implementer 확장 가능) |
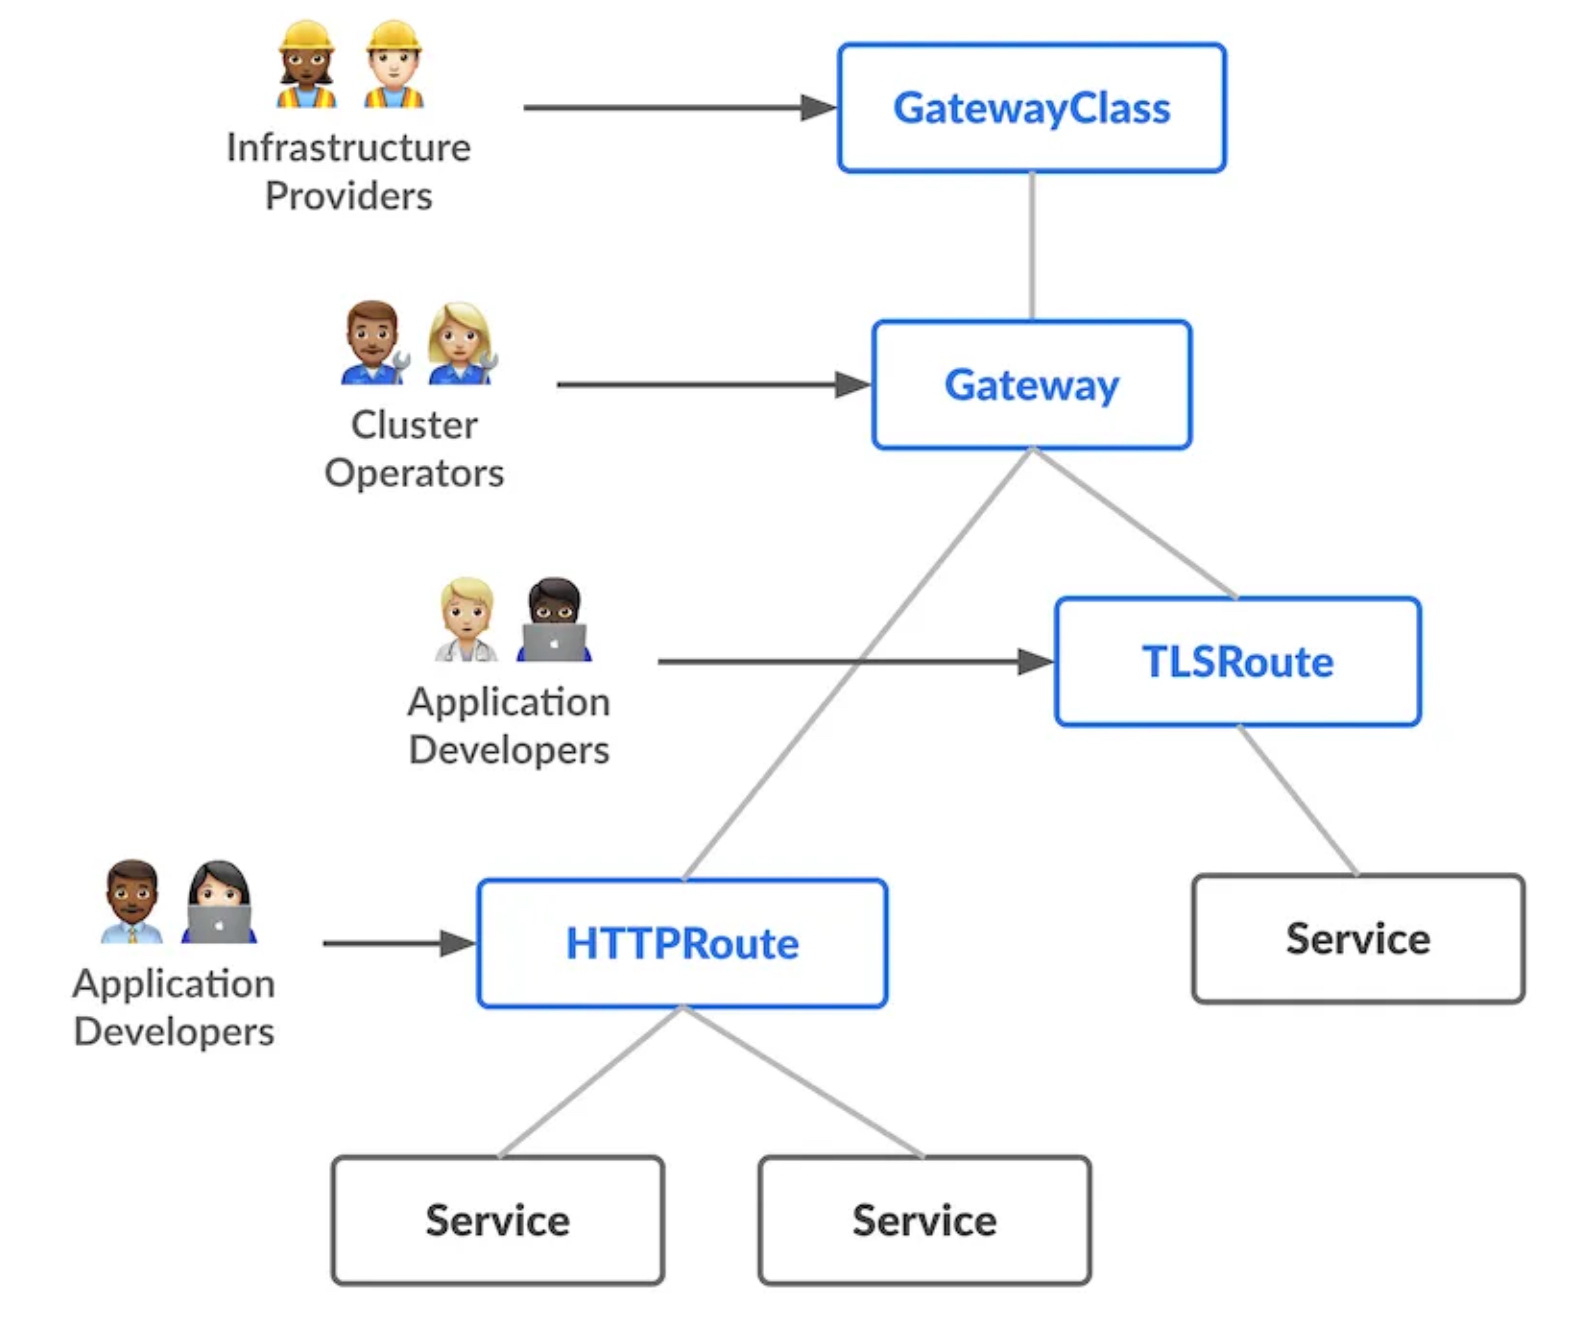
🧠 Gateway API의 핵심 특징
| 특징 | 설명 |
|---|---|
| ✅ 역할 분리 | Gateway와 라우팅 규칙(HTTPRoute)을 분리하여, 네트워크 팀과 앱 팀의 협업 가능 |
| 🧩 CRD 기반 확장성 | TCP, gRPC, TLS 등 다양한 L4/L7 프로토콜 지원 |
| 🎯 Cross-namespace 지원 | 라우팅과 서비스가 다른 네임스페이스에 있어도 안전하게 연결 가능 |
| 🛡️ 정책 기반 접근 제어 | ReferenceGrant로 보안적 참조 제어 |
| 📦 다중 리스너 지원 | 하나의 Gateway에 여러 포트를 구성 가능 (예: 80/443 동시에) |
🧰 Gateway API Controller란?
Gateway API는 자체적으로 동작하지 않습니다. Ingress처럼 컨트롤러가 실제 리소스를 관리합니다.
이 컨트롤러를 Gateway API Controller라고 부릅니다.
주요 Gateway API Controller 예시
| 컨트롤러 | 설명 |
|---|---|
| Contour Gateway | Envoy 기반, CNCF 지원 |
| Istio | Istio 1.18+부터 Gateway API 지원 |
| Kong Gateway | 오픈소스 API 게이트웨이 Kong에서 Gateway API 지원 |
| NGINX Gateway | NGINX 공식 Gateway API 지원 컨트롤러 |
| AWS Gateway Controller (preview) | AWS Load Balancer Controller의 후속 후보로 준비 중 |
컨트롤러가 하는 일
- GatewayClass를 watch하고 Gateway를 생성
- HTTPRoute 등과 연동해 라우팅 규칙을 Envoy/NGINX 등에 반영
- L7/L4 트래픽을 서비스로 전달
즉, Gateway API는 추상화된 API 스펙이고, 실제 실행은 컨트롤러가 담당합니다.
🏁 마무리
Gateway API는 단순한 Ingress의 대체가 아닙니다.
서비스 메쉬, API 게이트웨이, 로드 밸런서까지 통합할 수 있는 클라우드 네이티브 네트워킹의 표준 플랫폼입니다.
✅ 유연하고
✅ 확장 가능하며
✅ 구현체 중립적인
Kubernetes 네트워킹의 미래에 대비하고 싶다면, Gateway API를 지금 바로 실험해보는 것을 추천합니다.
Gateway API 구성 요소와 VPC Lattice 오브젝트 간 매핑 관계
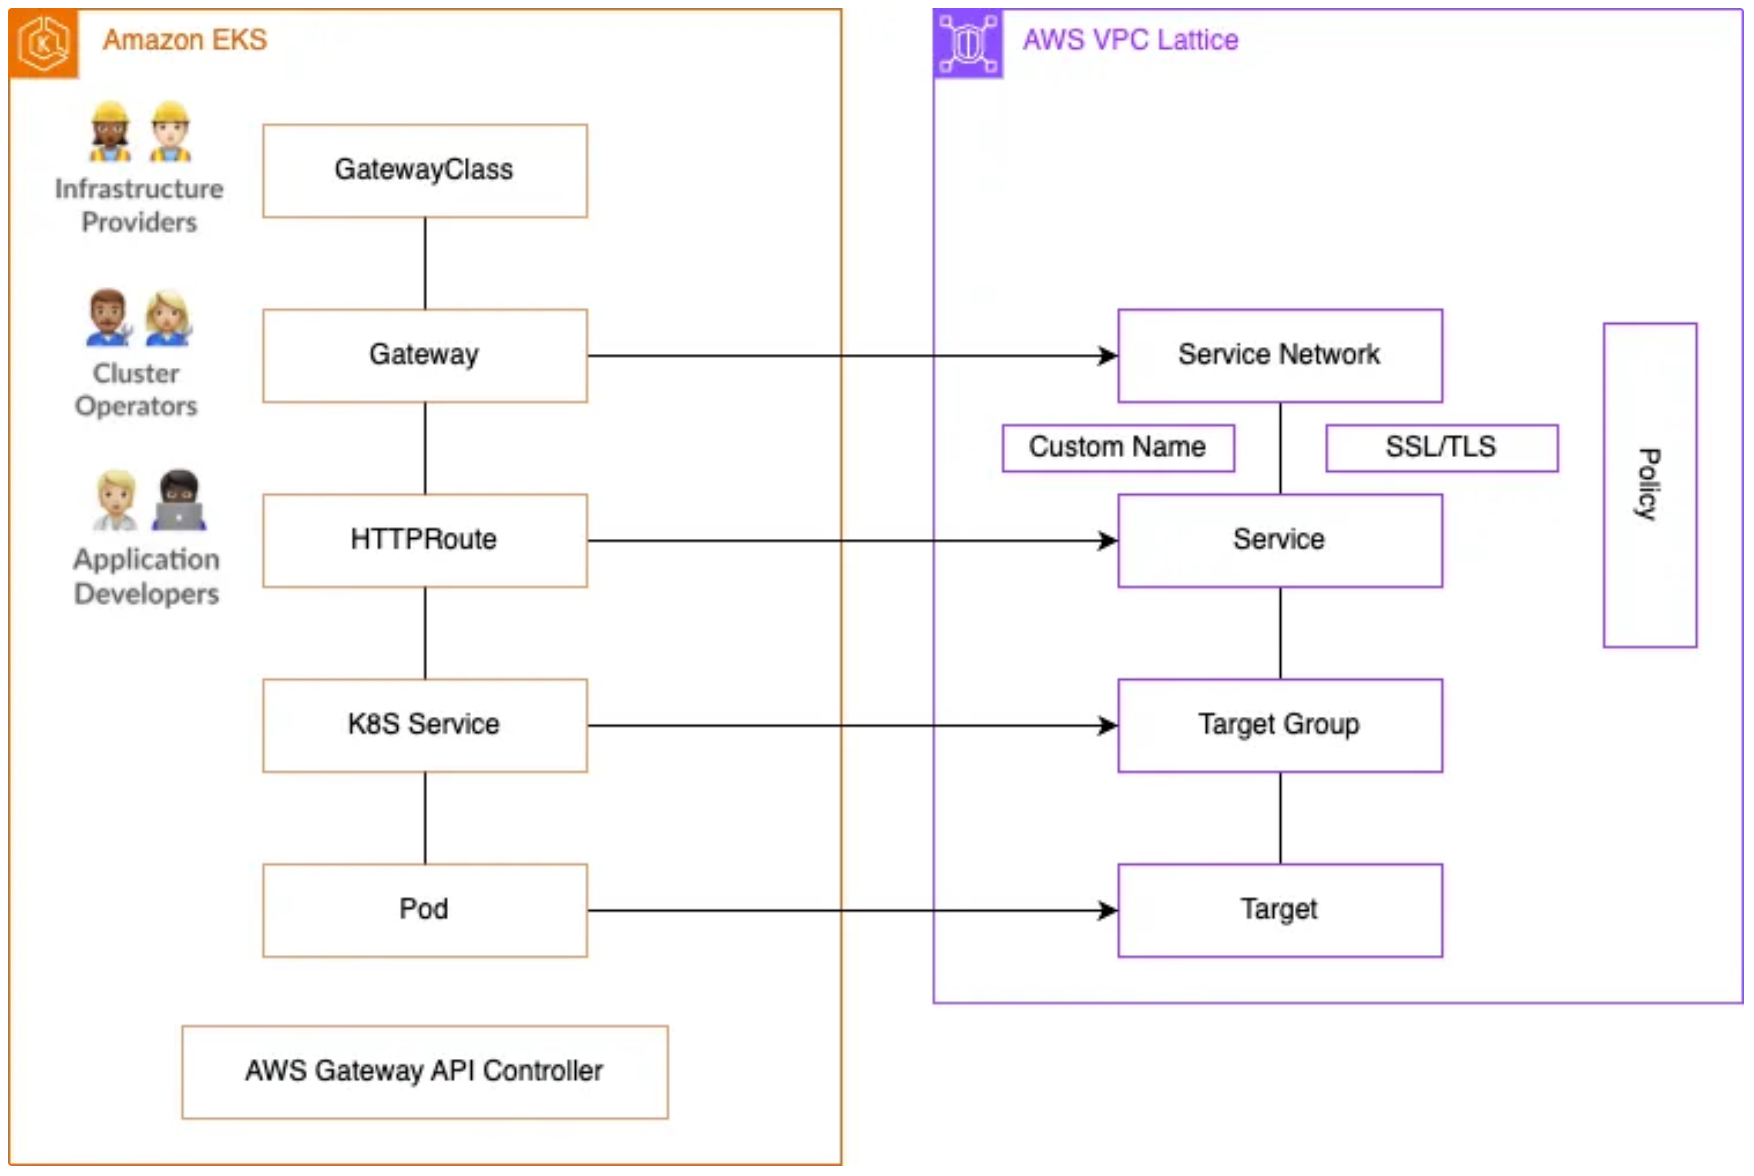
Amazon EKS에서 VPC Lattice로 Gateway API를 사용하기 위한 요구사항
- 쿠버네티스 1.28 이상 필요: 공식 문서에서 v1.28부터 기존 Ingress가 Frozen 상태로 전환되었으며, Gateway API를 통한 현대화 아키텍처 구현이 권장
- AWS Gateway API Controller 설치: VPC Lattice 리소스와 쿠버네티스 API 객체 간 매핑을 처리하는 컨트롤러 배포 필요
- AWS Gateway API Controller 설치 및 구성 방법에 대해서는 이 문서를 참조하세요.
VPC Lattice 실습
Simple Client to Server communication
💡 이번 실습에서는 Amazon EKS Blueprints for Terraform : Amazon VPC Lattice - Simple Client to Server Communication을 활용합니다.
이 패턴은 Terraform을 사용해 두 개의 VPC(클라이언트용, 서버용)를 배포하고, Amazon VPC Lattice를 통해 클라이언트와 서버 애플리케이션 간의 통신을 설정합니다.
📦 주요 구성 요소
- 서버 애플리케이션: Amazon EKS 클러스터 내 배포
- 클라이언트 애플리케이션: 별도 VPC에서 실행
- VPC Lattice: VPC 간 서비스 연결 제공
- Route 53 + External DNS: 사용자 지정 도메인 이름 설정 및 자동 등록
이 구성은 다중 VPC 간 통신, 도메인 기반 접근, IaC(Infrastructure as Code) 환경을 구현하는 데 적합합니다.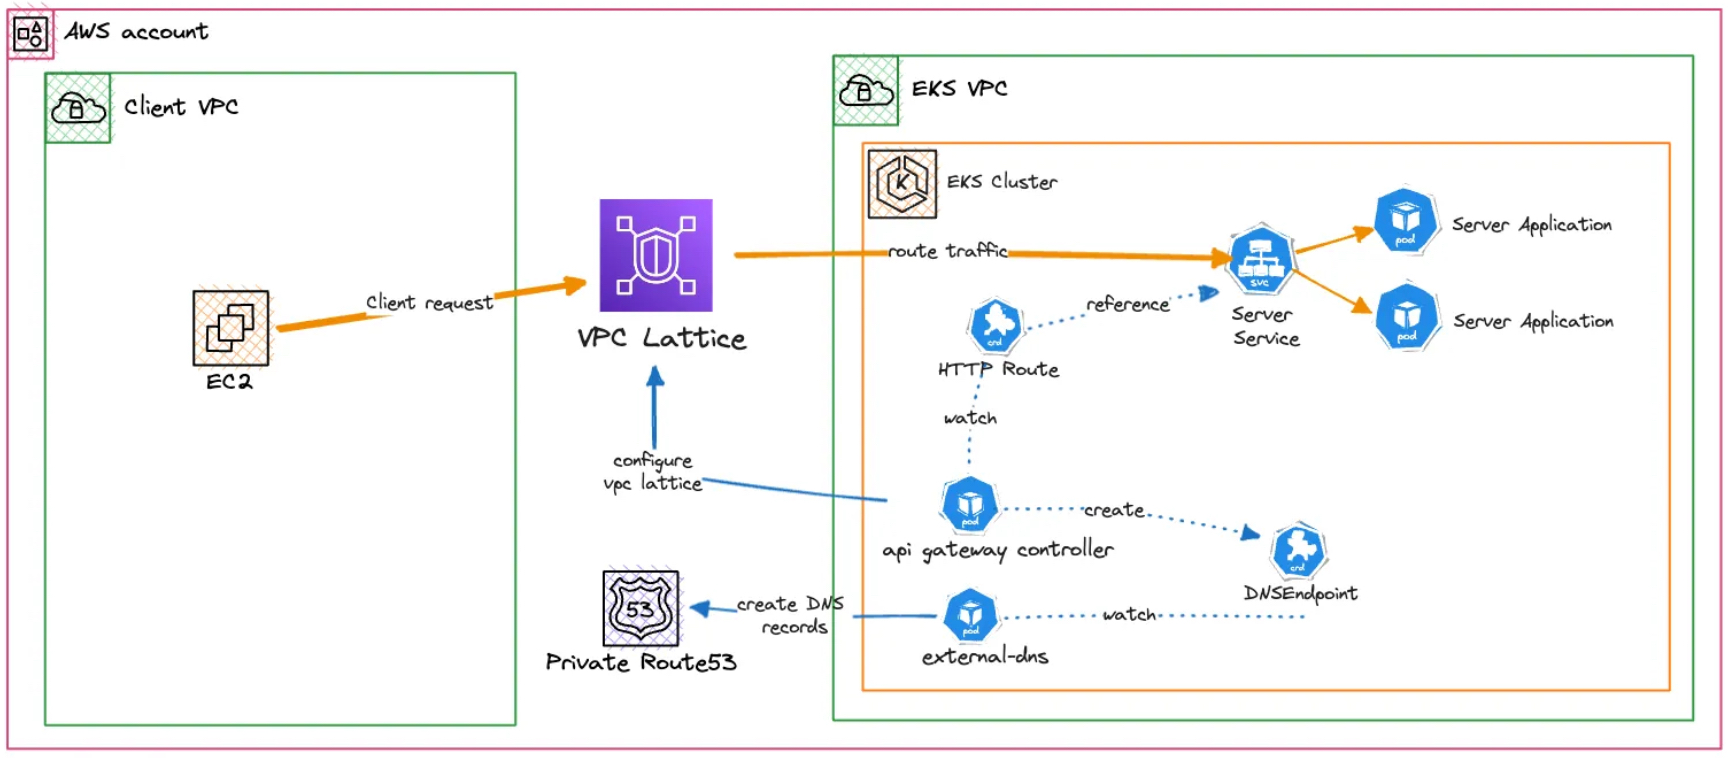
Terraform 코드 준비 및 프로비저닝
- 아래 명령을 통해 실습용 코드를 clone 해주세요. 이 프로젝트의 디렉터리는 실습하기 편한 곳으로 설정해주세요.
git clone https://github.com/aws-ia/terraform-aws-eks-blueprints.git- 터미널을 통해 terraform-aws-eks-blueprints 프로젝트의
/patterns/vpc-lattice/client-server-communication디렉터리로 이동해주세요.
cd terraform-aws-eks-blueprints/patterns/vpc-lattice/client-server-communication-
main.tf 파일 내의 29번째 라인에서 region 값을
ap-northeast-2로 수정해주세요.

-
아래 명령을 순차적으로 실행하여 실습 인프라를 프로비저닝 해주세요.
terraform init
terraform apply -target="module.client_vpc" -auto-approve
terraform apply -target="module.cluster_vpc" -auto-approve
terraform apply -target=aws_route53_zone.primary -auto-approve

terraform apply -target="module.client_sg" -auto-approve
terraform apply -target="module.endpoint_sg" -auto-approve

terraform apply -target="module.client" -auto-approve
terraform apply -target="module.vpc_endpoints" -auto-approve

terraform apply -target="module.eks" -auto-approve
terraform apply -target="module.addons" -auto-approve

terraform apply -auto-approve- 모든 인프라가 프로비저닝 완료되었으면 아래 명령을 수행하여 kubectl config 설정을 완료해주세요.
aws eks update-kubeconfig --name client-server-communication --alias client-server-communication --region ap-northeast-2
Updated context client-server-communication in /Users/sjkim/.kube/config- 아래 명령을 수행하여 Amazon EKS 엔드포인트 요청이 정상적으로 수신되는지 확인해보세요. 정상일 경우, 아래와 같이 Pod 조회가 수행되어야 합니다.
kubectl get po -A
NAMESPACE                           NAME                                                              READY   STATUS    RESTARTS   AGE
apps                                server-6d44dd47-bt5m4                                             1/1     Running   0          3m22s
apps                                server-6d44dd47-j4xqr                                             1/1     Running   0          3m22s
aws-application-networking-system   aws-gateway-api-controller-aws-gateway-controller-chart-d79mngn   1/1     Running   0          5m34s
aws-application-networking-system   aws-gateway-api-controller-aws-gateway-controller-chart-d7fwsx8   1/1     Running   0          5m34s
external-dns                        external-dns-555c676b8-cq6xk                                      1/1     Running   0          4m5s
kube-system                         aws-node-8rlrj                                                    2/2     Running   0          8m30s
kube-system                         aws-node-lkwjj                                                    2/2     Running   0          8m45s
kube-system                         aws-node-mfmrh                                                    2/2     Running   0          8m45s
kube-system                         coredns-5b9dfbf96-hfl2m                                           1/1     Running   0          12m
kube-system                         coredns-5b9dfbf96-jhjlx                                           1/1     Running   0          12m
kube-system                         kube-proxy-2mfkp                                                  1/1     Running   0          8m45s
kube-system                         kube-proxy-cdjzb                                                  1/1     Running   0          8m30s
kube-system                         kube-proxy-nglpj                                                  1/1     Running   0          8m45s
Terraform 코드 살펴보기
-
아래 그림과 같이 IDE를 통해, terraform-aws-eks-blueprints 디렉토리를 엽니다.
-
이후 페이지 왼쪽 메뉴바의
terraform-aws-eks-blueprints>patterns>vpc-lattice>client-server-communication순서로 폴더를 엽니다.
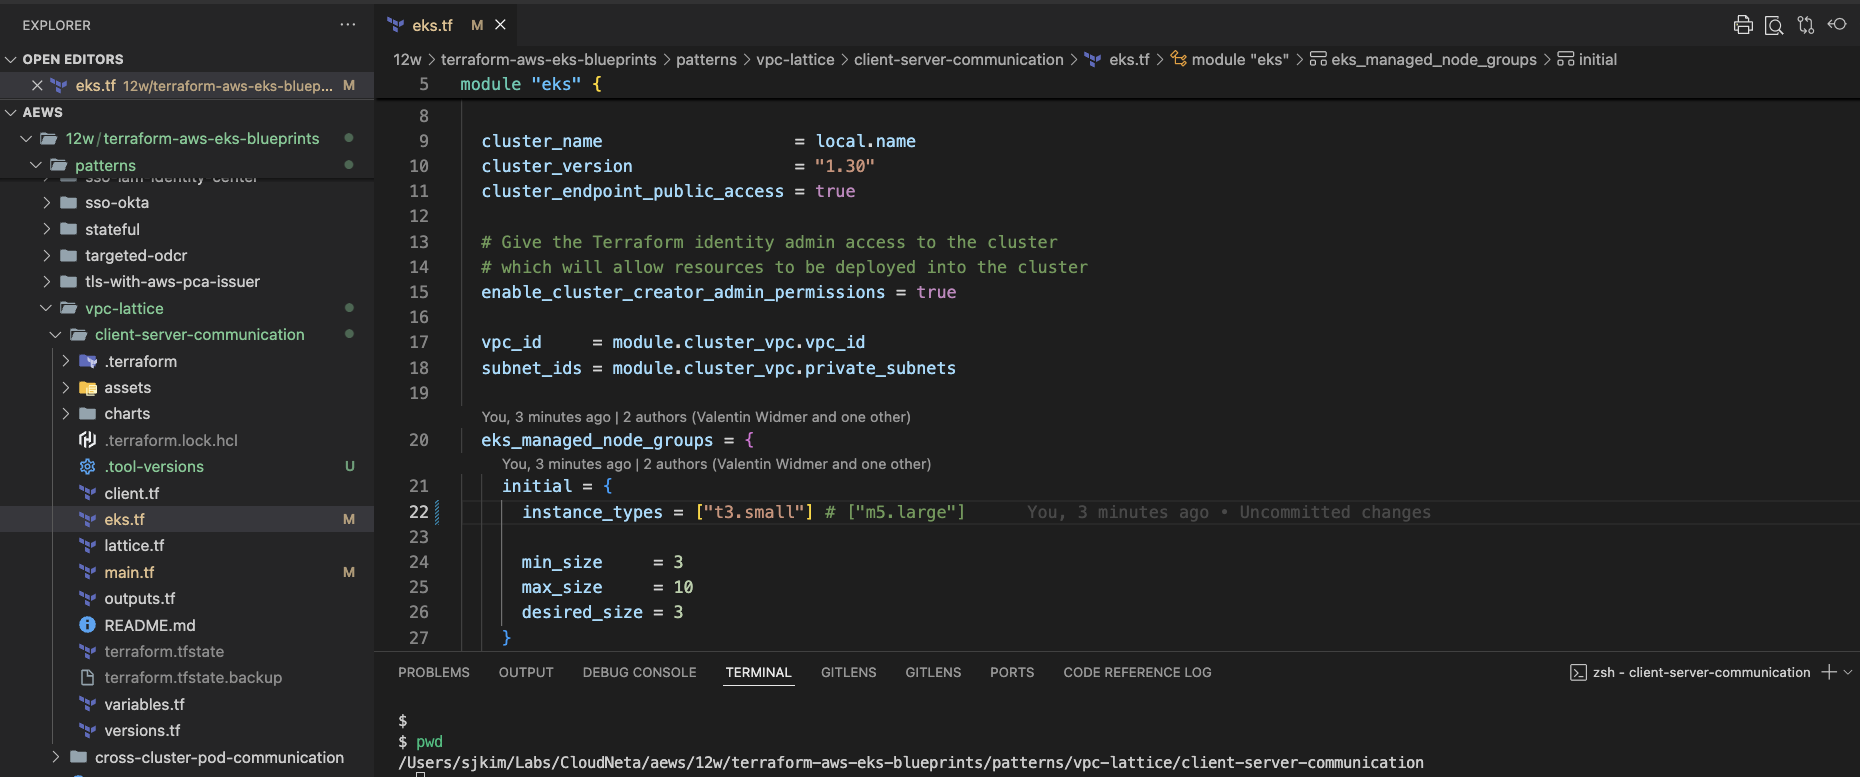
client.tf 살펴보기
client.tf파일을 살펴보겠습니다. 이 파일에서는 VPC Lattice를 통해 EKS Cluster의 애플리케이션으로 요청을 전달하는 클라이언트 역할을 하는 리소스에 대한 명세가 작성되어 있습니다.
client모듈에서는 프로비저닝 할 EC2 인스턴스에 대한 명세가 적혀있습니다.- 인스턴스 유형은
t2.micro입니다. AmazonSSMManagedInstanceCoreIAM Role을 설정합니다.client_sg모듈을 참조하여 Security Group을 설정합니다.
- 인스턴스 유형은
module "client" {
  source  = "terraform-aws-modules/ec2-instance/aws"
  version = "~> 5.0"

  name = "client"

  instance_type               = "t2.micro"
  subnet_id                   = module.client_vpc.private_subnets[0]
  create_iam_instance_profile = true
  iam_role_description        = "IAM role for client"
  iam_role_policies = {
    AmazonSSMManagedInstanceCore =   "arn:aws:iam::aws:policy/AmazonSSMManagedInstanceCore"
  }
  vpc_security_group_ids = [module.client_sg.security_group_id]

  tags = local.tags
}- 이어서
vpc_endpoints모듈에서는 client에서 Systems Manager를 사용하기 위한 VPC Endpoint를 구성하기 위한 명세가 적혀있습니다.- VPC Endpoint에서 구성할 서비스는
ssm,ssmmessages,ec2messages입니다. - 적용할 서브넷은
client_vpc모듈을 참조하여private_subnets을 대상으로 합니다. endpoint_sg모듈을 참조하여 Security Group을 설정합니다.
- VPC Endpoint에서 구성할 서비스는
module "vpc_endpoints" {
  source  = "terraform-aws-modules/vpc/aws//modules/vpc-endpoints"
  version = "~> 5.0"

  vpc_id = module.client_vpc.vpc_id

  endpoints = { for service in toset(["ssm", "ssmmessages", "ec2messages"]) :
  replace(service, ".", "_") =>
    {
      service             = service
      subnet_ids          = module.client_vpc.private_subnets
      private_dns_enabled = true
      tags                = { Name = "${local.name}-${service}" }
    }
  }

  security_group_ids = [module.endpoint_sg.security_group_id]
  tags = local.tags
}- 그 다음으로는 client의 EC2 인스턴스와 VPC Endpoint에서 사용할 각각의 Security Group(모듈
client_sg및endpoint_sg)에 대한 명세가 적혀있습니다.client_sg모듈에서는 EC2 인스턴스의 Egress 설정이 명세되어 있습니다.endpoint_sg모듈에서는client_vpc의 모듈을 참조하여private_subnets_cidr_blocks값에 대해 443 포트를 허용하는 Ingress 설정이 명세되어 있습니다.
module "client_sg" {
  source  = "terraform-aws-modules/security-group/aws"
  version = "~> 5.0"

  name        = "client"
  description = "Security Group for EC2 Instance Egress"

  vpc_id = module.client_vpc.vpc_id

  egress_with_cidr_blocks = [
    {
      from_port   = 0
      to_port     = 0
      protocol    = "-1"
      cidr_blocks = "0.0.0.0/0"
    },
  ]

  tags = local.tags
}

module "endpoint_sg" {
  source  = "terraform-aws-modules/security-group/aws"
  version = "~> 5.0"

  name        = "ssm-endpoint"
  description = "Security Group for EC2 Instance Egress"

  vpc_id = module.client_vpc.vpc_id

  ingress_with_cidr_blocks = [for subnet in module.client_vpc.private_subnets_cidr_blocks :
    {
      from_port   = 443
      to_port     = 443
      protocol    = "TCP"
      cidr_blocks = subnet
    }
  ]

  tags = local.tags
}- 마지막으로,
client_vpc모듈에서는 이 모든 client를 위한 리소스가 구성될 VPC에 대한 내용이 명세되어 있습니다.- client vpc에 대한 cidr 값은
main.tf내에 명세되어있는client_vpc_cidr값을 참조합니다. - 가용영역(
azs) 값도 마찬가지로main.tf내에 명세되어있는azs값을 참조합니다. - terraform의 cidrsubnet 함수는 주어진 대역 내에서 새 비트 수에 따른 서브네팅을 수행합니다.
- client vpc에 대한 cidr 값은
module "client_vpc" {
  source  = "terraform-aws-modules/vpc/aws"
  version = "~> 5.0"

  name = local.name
  cidr = local.client_vpc_cidr

  azs             = local.azs
  private_subnets = [for k, v in local.azs : cidrsubnet(local.client_vpc_cidr, 4, k)]

  tags = local.tags
}
eks.tf 살펴보기
- 이번에는
eks.tf파일을 살펴보겠습니다. 이 파일에서는 VPC Lattice를 통해 서비스를 제공할 EKS 클러스터의 애플리케이션 및 그 인프라에 대한 명세가 작성되어 있습니다.가장 첫번째로 볼 수 있는eks모듈은 EKS 클러스터에 대한 명세입니다.- EKS 클러스터의 버전은
1.30입니다. - EKS 클러스터의 public access를 허용합니다.
- EKS 클러스터의 VPC 정보는
cluster_vpc모듈을 참조합니다. - 관리형 노드그룹을 구성하며,
t3.small인스턴스 유형을 사용하고 최소 3개, 최대 10개, 기본 3개의 노드 갯수를 설정합니다.
- EKS 클러스터의 버전은
module "eks" {
  source  = "terraform-aws-modules/eks/aws"
  version = "~> 20.11"

  cluster_name                   = local.name
  cluster_version                = "1.30"
  cluster_endpoint_public_access = true

  # Give the Terraform identity admin access to the cluster
  # which will allow resources to be deployed into the cluster
  enable_cluster_creator_admin_permissions = true

  vpc_id     = module.cluster_vpc.vpc_id
  subnet_ids = module.cluster_vpc.private_subnets

  eks_managed_node_groups = {
    initial = {
      instance_types = ["t3.small"] #["m5.large"]

      min_size     = 3
      max_size     = 10
      desired_size = 3
    }
  }

tags = local.tags
}- 다음은
cluster_vpc모듈입니다. 이 모듈에서는 EKS 클러스터가 프로비저닝 될 VPC에 대한 명세가 담겨있습니다.- 해당 VPC의 cidr 값은
main.tf내에 명세되어있는cluster_vpc_cidr값을 참조합니다. - NAT Gateway를 한 개만 프로비저닝 합니다.
- Ingress 구성을 위한 elb 태그를 추가합니다.
- 해당 VPC의 cidr 값은
module "cluster_vpc" {
  source  = "terraform-aws-modules/vpc/aws"
  version = "~> 5.0"

  name = local.name
  cidr = local.cluster_vpc_cidr

  azs             = local.azs
  private_subnets = [for k, v in local.azs : cidrsubnet(local.cluster_vpc_cidr, 4, k)]
  public_subnets  = [for k, v in local.azs : cidrsubnet(local.cluster_vpc_cidr, 8, k + 48)]

  enable_nat_gateway = true
  single_nat_gateway = true

  public_subnet_tags = {
    "kubernetes.io/role/elb" = 1
  }

  private_subnet_tags = {
    "kubernetes.io/role/internal-elb" = 1
  }

  tags = local.tags
}- 다음은
addons모듈입니다. 이 모듈에서는 EKS 클러스터에 설치할 EKS Add-on에 대한 명세가 담겨있습니다. 해당 모듈을 통해서 AWS Gateway API Controller를 추가합니다.
module "addons" {
  source  = "aws-ia/eks-blueprints-addons/aws"
  version = "~> 1.16"

  cluster_name      = module.eks.cluster_name
  cluster_endpoint  = module.eks.cluster_endpoint
  cluster_version   = module.eks.cluster_version
  oidc_provider_arn = module.eks.oidc_provider_arn

  enable_aws_gateway_api_controller = true
  aws_gateway_api_controller = {
    chart_version           = "v1.0.3"
    create_namespace        = true
    namespace               = "aws-application-networking-system"
    source_policy_documents = [data.aws_iam_policy_document.gateway_api_controller.json]
    set = [
      {
        name  = "clusterName"
        value = module.eks.cluster_name
      },
      {
        name  = "log.level"
        value = "debug"
      },
      {
        name  = "clusterVpcId"
        value = module.cluster_vpc.vpc_id
      },
      {
        name  = "defaultServiceNetwork"
        value = ""
      },
      {
        name  = "latticeEndpoint"
        value = "https://vpc-lattice.${local.region}.amazonaws.com"
      }
    ]
    wait = true
  }
  enable_external_dns = true
  external_dns_route53_zone_arns = try([aws_route53_zone.primary.arn], [])
  external_dns = {
    set = [
        {
          name  = "domainFilters[0]"
          value = "example.com"
	    },
        {
          name  = "policy"
          value = "sync"
        },
        {
          name  = "sources[0]"
          value = "crd"
        },
        {
          name  = "sources[1]"
          value = "ingress"
        },
        {
          name  = "txtPrefix"
          value = module.eks.cluster_name
        },
        {
          name  = "extraArgs[0]"
          value = "--crd-source-apiversion=externaldns.k8s.io/v1alpha1"
        },
        {
          name  = "extraArgs[1]"
          value = "--crd-source-kind=DNSEndpoint"
        },
        {
          name  = "crdSourceApiversion"
          value = "externaldns.k8s.io/v1alpha1"
        },
        {
          name  = "crdSourceKind"
          value = "DNSEndpoint"
        }
    ]
  }

  tags = local.tags
}

data "aws_iam_policy_document" "gateway_api_controller" {
  statement {
  sid       = ""
  effect    = "Allow"
  resources = ["*"] # For testing purposes only (highly recommended limit access to specific resources for production usage)

  actions = [
    "vpc-lattice:*",
    "iam:CreateServiceLinkedRole",
    "ec2:DescribeVpcs",
    "ec2:DescribeSubnets",
    "ec2:DescribeTags",
    "ec2:DescribeSecurityGroups",
    "logs:CreateLogDelivery",
    "logs:GetLogDelivery",
    "logs:UpdateLogDelivery",
    "logs:DeleteLogDelivery",
    "logs:ListLogDeliveries",
    "tag:GetResources",
  ]
  }
}- 다음은
demo_application리소스 입니다. 이 리소스를 통해서 EKS 클러스터 내에 간단한 데모 애플리케이션을 배포합니다../charts/demo-application디렉터리 내의 yaml을 참조하여 데모 애플리케이션을 배포합니다.depends_on을 통해addons모듈이 구성되고 난 이후에 리소스를 배포하도록 설정합니다.
resource "helm_release" "demo_application" {
  name             = "demo-application"
  chart            = "./charts/demo-application"
  create_namespace = true
  namespace        = "apps"

  depends_on = [module.addons]
}- 데모 애플리케이션에 대한 yaml 명세서를 간단히 살펴보겠습니다.
charts/demo-application폴더를 참조해주세요.apiVersion: gateway.networking.k8s.io/v1beta1 kind: GatewayClass metadata: name: amazon-vpc-lattice spec: controllerName: application-networking.k8s.aws/gateway-api-controller --- apiVersion: gateway.networking.k8s.io/v1beta1 kind: Gateway metadata: name: my-services namespace: apps spec: gatewayClassName: amazon-vpc-lattice listeners: - name: http protocol: HTTP port: 80 --- apiVersion: gateway.networking.k8s.io/v1beta1 kind: HTTPRoute metadata: name: server namespace: apps spec: hostnames: - server.example.com parentRefs: - name: my-services sectionName: http rules: - backendRefs: - name: server kind: Service port: 8090 matches: - path: type: PathPrefix value: / --- apiVersion: apps/v1 kind: Deployment metadata: name: server labels: app: server spec: replicas: 2 selector: matchLabels: app: server template: metadata: labels: app: server spec: containers: - name: server image: public.ecr.aws/x2j8p8w7/http-server:latest env: - name: PodName value: "server pod" --- apiVersion: v1 kind: Service metadata: name: server spec: selector: app: server ports: - protocol: TCP port: 8090 targetPort: 8090 - 마지막으로 아래 데이터 및 리소스를 통해 VPC Lattice에 대한 IPv4 주소의 EC2 Prefix List를 생성하고, 이 Prefix List에 대한 Security Group Ingress 규칙을 생성합니다.
data "aws_ec2_managed_prefix_list" "vpc_lattice_ipv4" {
  name = "com.amazonaws.${local.region}.vpc-lattice"
}

resource "aws_vpc_security_group_ingress_rule" "cluster_sg_ingress" {
  security_group_id = module.eks.node_security_group_id

  prefix_list_id = data.aws_ec2_managed_prefix_list.vpc_lattice_ipv4.id
  ip_protocol    = "-1"
}
lattice.tf 살펴보기
lattice.tf파일을 열어 VPC Lattice에 대한 구성을 살펴보겠습니다.- 우선, VPC Lattice service network를 위한 리소스 명세를 살펴보겠습니다.
this리소스에서는my-services라는 이름의 VPC Lattice service network를 생성합니다.cluster_vpc리소스에서는 앞서 만든 VPC Lattice service network에cluster vpc를 association 합니다.client_vpc리소스에서는 앞서 만든 VPC Lattice service network에client vpc를 association 합니다.demo_application이 배포되고 난 이후 120초를 기다립니다.
resource "aws_vpclattice_service_network" "this" {
  name      = "my-services"
  auth_type = "NONE"

  tags = local.tags
}

resource "aws_vpclattice_service_network_vpc_association" "cluster_vpc" {
  vpc_identifier             = module.cluster_vpc.vpc_id
  service_network_identifier = aws_vpclattice_service_network.this.id
}

resource "aws_vpclattice_service_network_vpc_association" "client_vpc" {
  vpc_identifier             = module.client_vpc.vpc_id
  service_network_identifier = aws_vpclattice_service_network.this.id
}

resource "time_sleep" "wait_for_lattice_resources" {
  depends_on = [helm_release.demo_application]

create_duration = "120s"
}- 다음으로 VPC Lattice service를 위한 커스텀 도메인을 생성하는 부분을 살펴보겠습니다.
example.com이라는 명칭의 public hosted zone을 생성합니다.client vpc의 id 값을 hosted zone과 연결합니다.- 여기서 records는 external-dns에서 HTTPRoute를 생성할 때, VPC Lattice Gateway API Copntroller에서 생성한 DNSEndpoint 객체를 사용해서 생성됩니다.
resource "aws_route53_zone" "primary" {
  name = "example.com"

  vpc {
  vpc_id = module.client_vpc.vpc_id
}

  tags = local.tags
}
💡 Terraform 용어 가이드
- 모듈(module) : 재사용 가능한 Terraform 코드 블록으로, 여러 리소스를 그룹화하여 하나의 템플릿으로 관리할 수 있습니다.
- 리소스(resource) : Terraform의 핵심 구성 요소로, 실제 인프라 리소스를 생성하거나 관리합니다.
- 데이터(data) : 이미 존재하는 인프라 리소스나 다른 Terraform 코드에서 생성된 리소스 정보를 가져오는 데 사용됩니다.
프로비저닝 된 인프라 확인
Terraform을 통해 어떤 인프라가 구성되었는지 확인해보겠습니다.
-
VPC
- cluster vpc가
10.0.0.0/16CIDR 주소 범위로 구성되어 있습니다. - client vpc가
10.1.0.0/16CIDR 주소 범위로 구성되어 있습니다.

- cluster vpc가
-
Subnet
- client vpc의 서브넷은
private subnet 3개로 구성되어 있습니다. - cluster vpc의 서브넷은
public subnet 3개,private subnet 3개로 구성되어 있습니다.
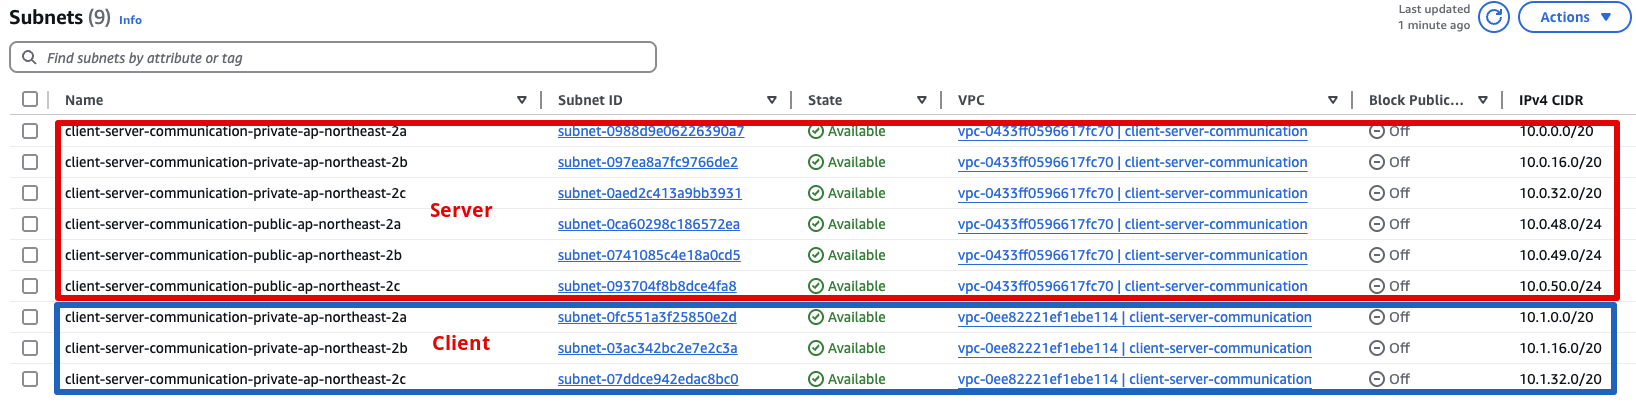
- client vpc의 서브넷은
-
EC2
- cluster 측 워크로드로 3개의 ec2 인스턴스(워커 노드) 구성되어 있습니다 - client 측 워크로드로 1개의 ec2 인스턴스 구성되어 있습니다.

- cluster 측 워크로드로 3개의 ec2 인스턴스(워커 노드) 구성되어 있습니다 - client 측 워크로드로 1개의 ec2 인스턴스 구성되어 있습니다.
-
EKS Cluster
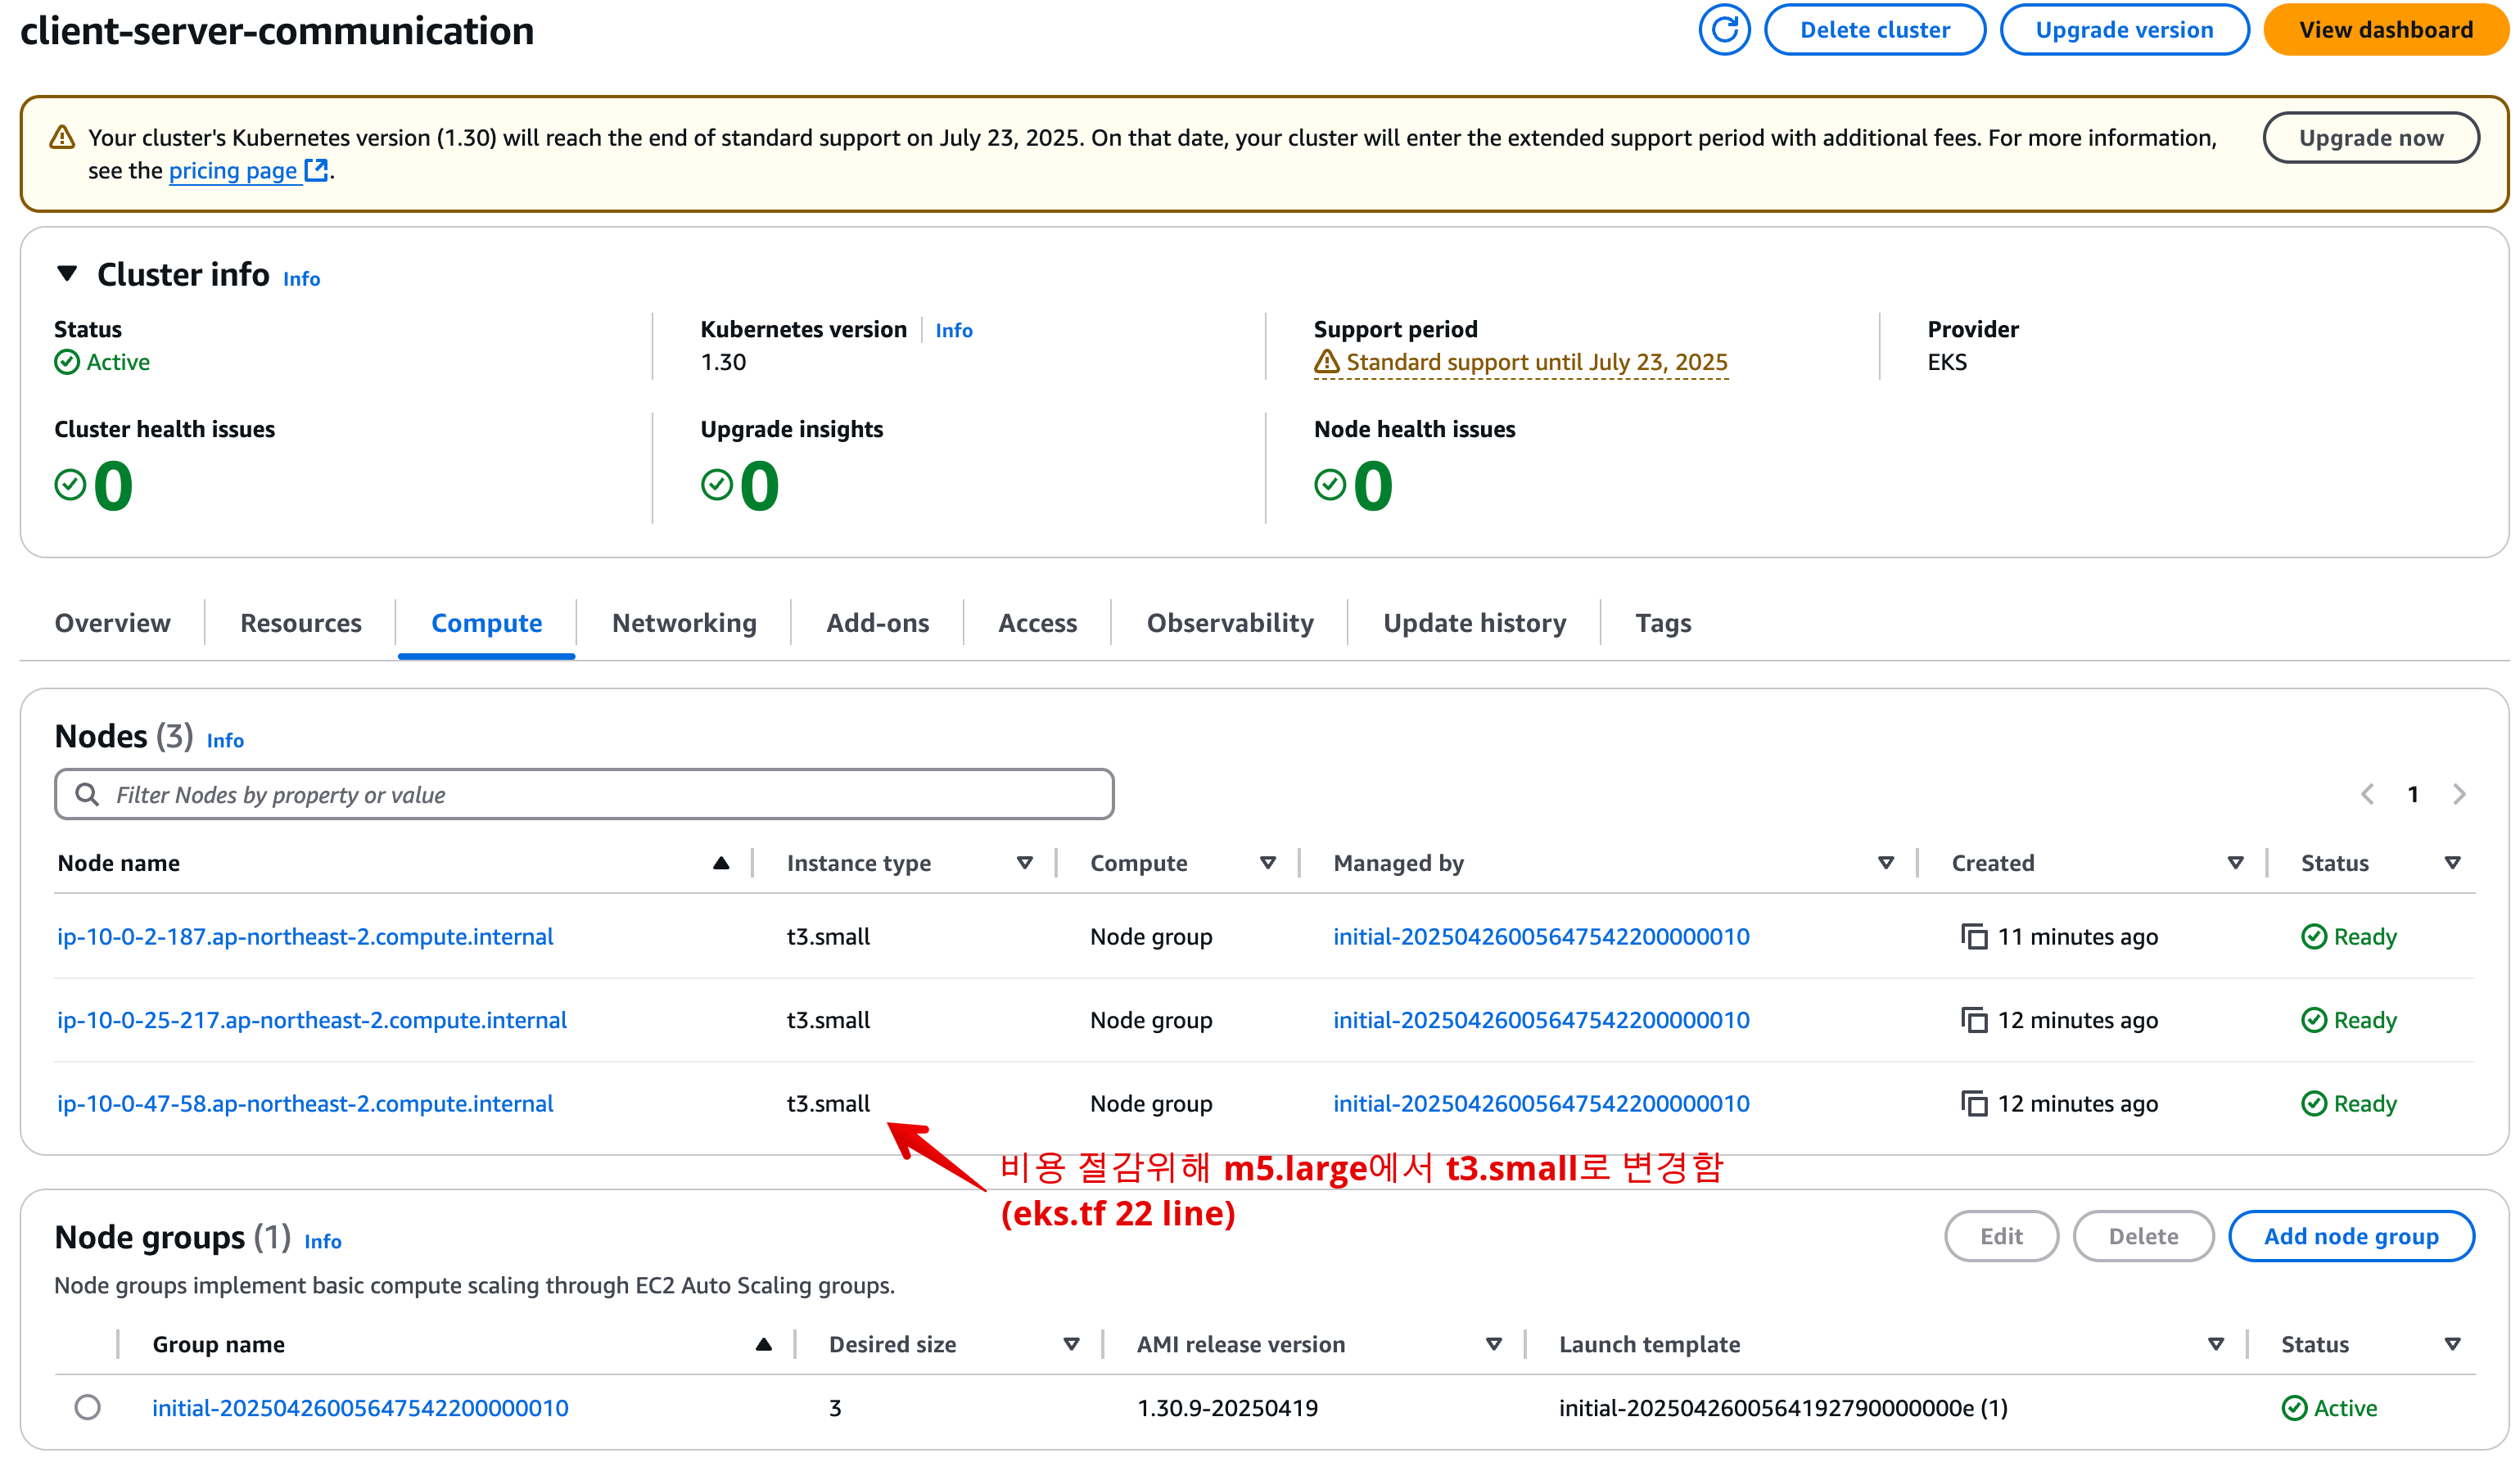
-
Node
NAME                                             STATUS   ROLES    AGE   VERSION               INTERNAL-IP   EXTERNAL-IP   OS-IMAGE                       KERNEL-VERSION                    CONTAINER-RUNTIME
ip-10-0-2-187.ap-northeast-2.compute.internal    Ready    <none>   80m   v1.30.9-eks-5d632ec   10.0.2.187    <none>        Amazon Linux 2023.7.20250414   6.1.132-147.221.amzn2023.x86_64   containerd://1.7.27
ip-10-0-25-217.ap-northeast-2.compute.internal   Ready    <none>   81m   v1.30.9-eks-5d632ec   10.0.25.217   <none>        Amazon Linux 2023.7.20250414   6.1.132-147.221.amzn2023.x86_64   containerd://1.7.27
ip-10-0-47-58.ap-northeast-2.compute.internal Ready <none> 81m v1.30.9-eks-5d632ec 10.0.47.58 <none> Amazon Linux 2023.7.20250414 6.1.132-147.221.amzn2023.x86_64 containerd://1.7.27- Pod
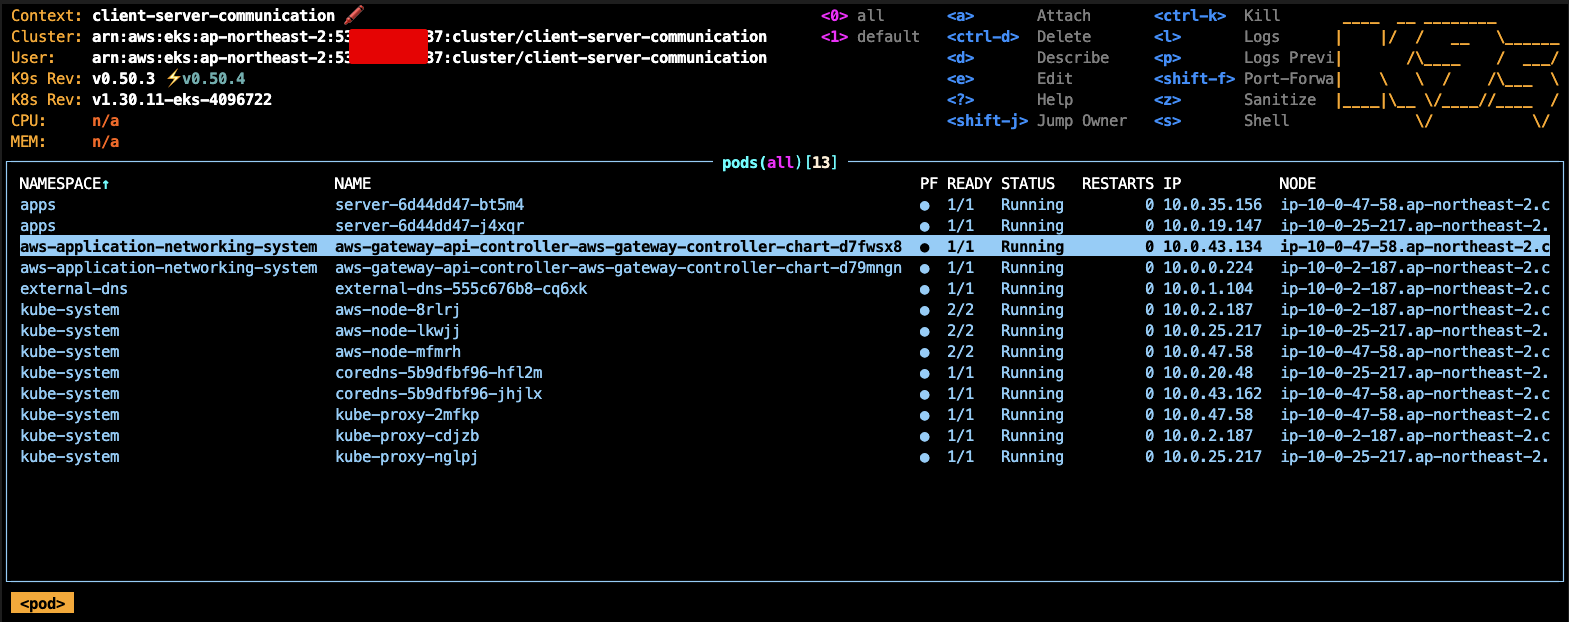
VPC Lattice를 통한 Client to Server 통신 테스트
- 간단한 테스트를 통해 client 워크로드에서 cluster의 워크로드로 통신이 가능한지 한번 테스트 해보겠습니다.
client 서버에 ssh 접속
-
아래 그림과 같이 client라는 이름의 EC2 인스턴스를 선택하고, 상단의 Connect 버튼을 클릭합니다.
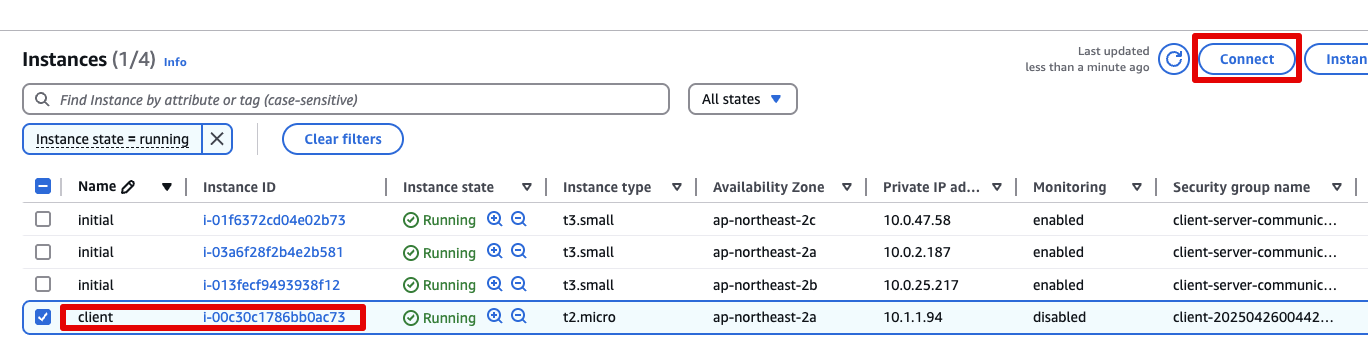
-
그 다음, Session Manager 탭을 클릭하고, 하단의 Conenct 버튼을 클릭합니다.
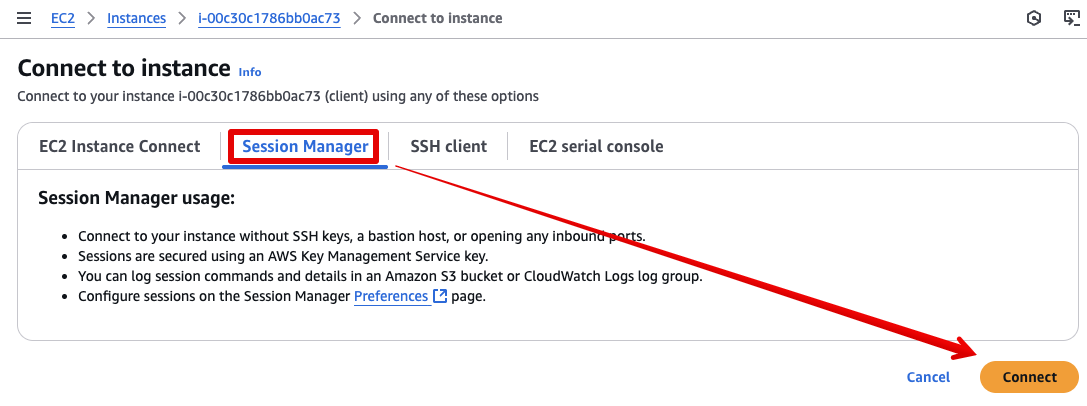
-
아래와 같이 터미널 화면으로 접속되면 성공입니다.
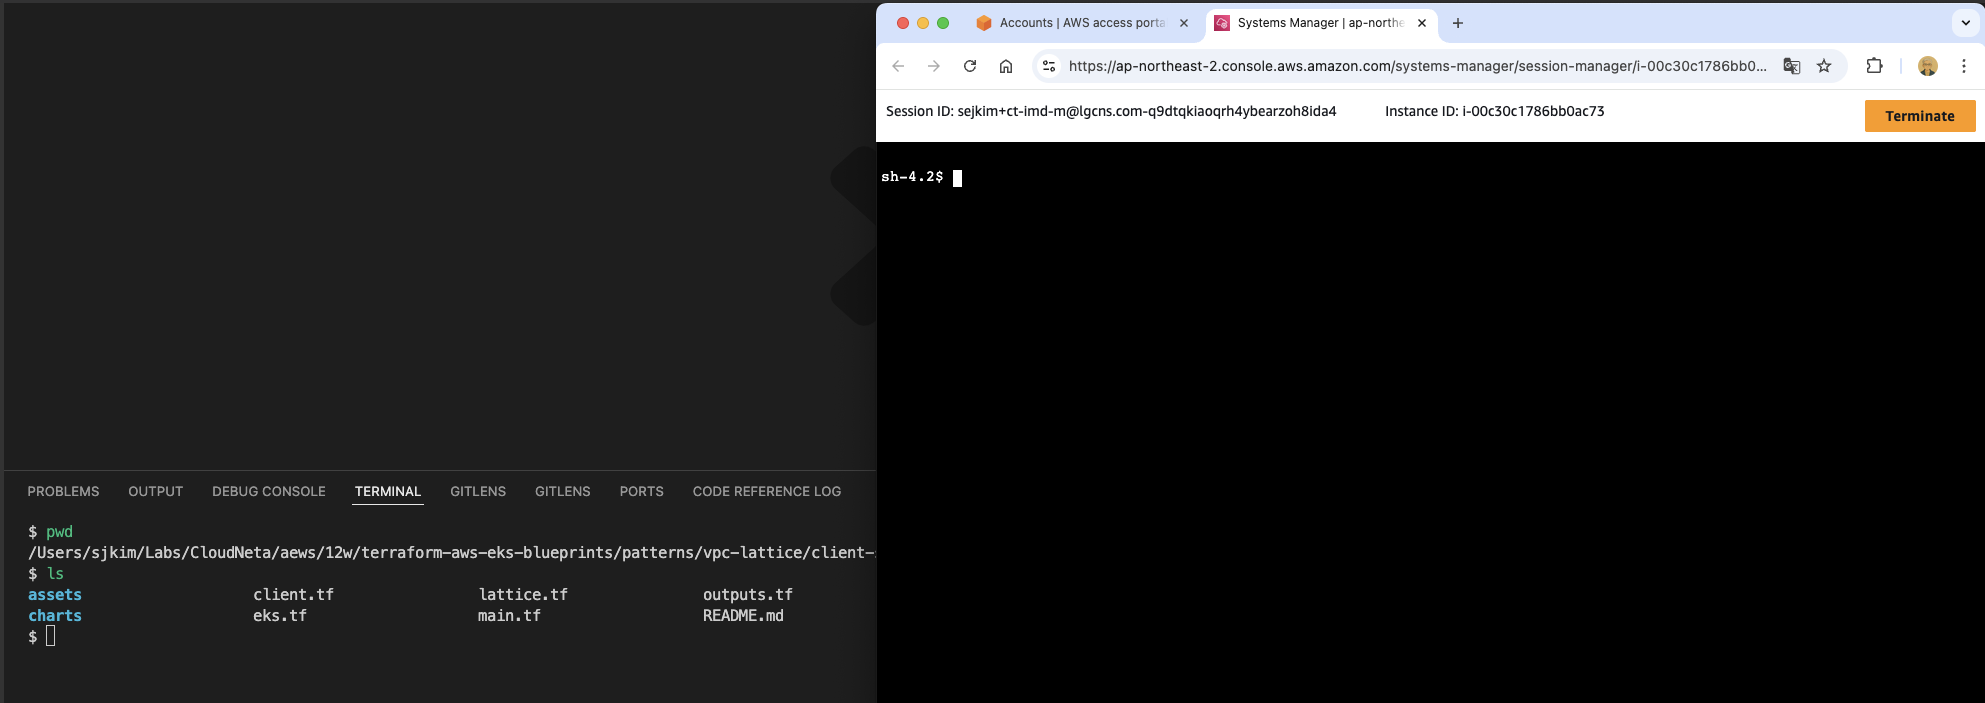
💡 Tips
AWS에서는 Systems Manager Session Manager 라는 기능을 통해 인바운드 포트를 열고 배스천 호스트를 유지 관리하거나 SSH 키를 관리할 필요 없이 IAM 기반으로 EC2 인스턴스에 안전하게 쉘에 접속할 수 있습니다.
참고 : AWS Systems Manager Session Manager를 사용하여 안전하게 인스턴스 액세스 제어하기
client 애플리케이션에서 cluster 애플리케이션으로 http 요청 전송
-
client에서 cluster의 server pod로 요청이 잘 수행되는지 명령을 수행해보겠습니다. 이 과정에서 VPC Lattice로 구성된 서비스 네트워크를 사용해보겠습니다.
-
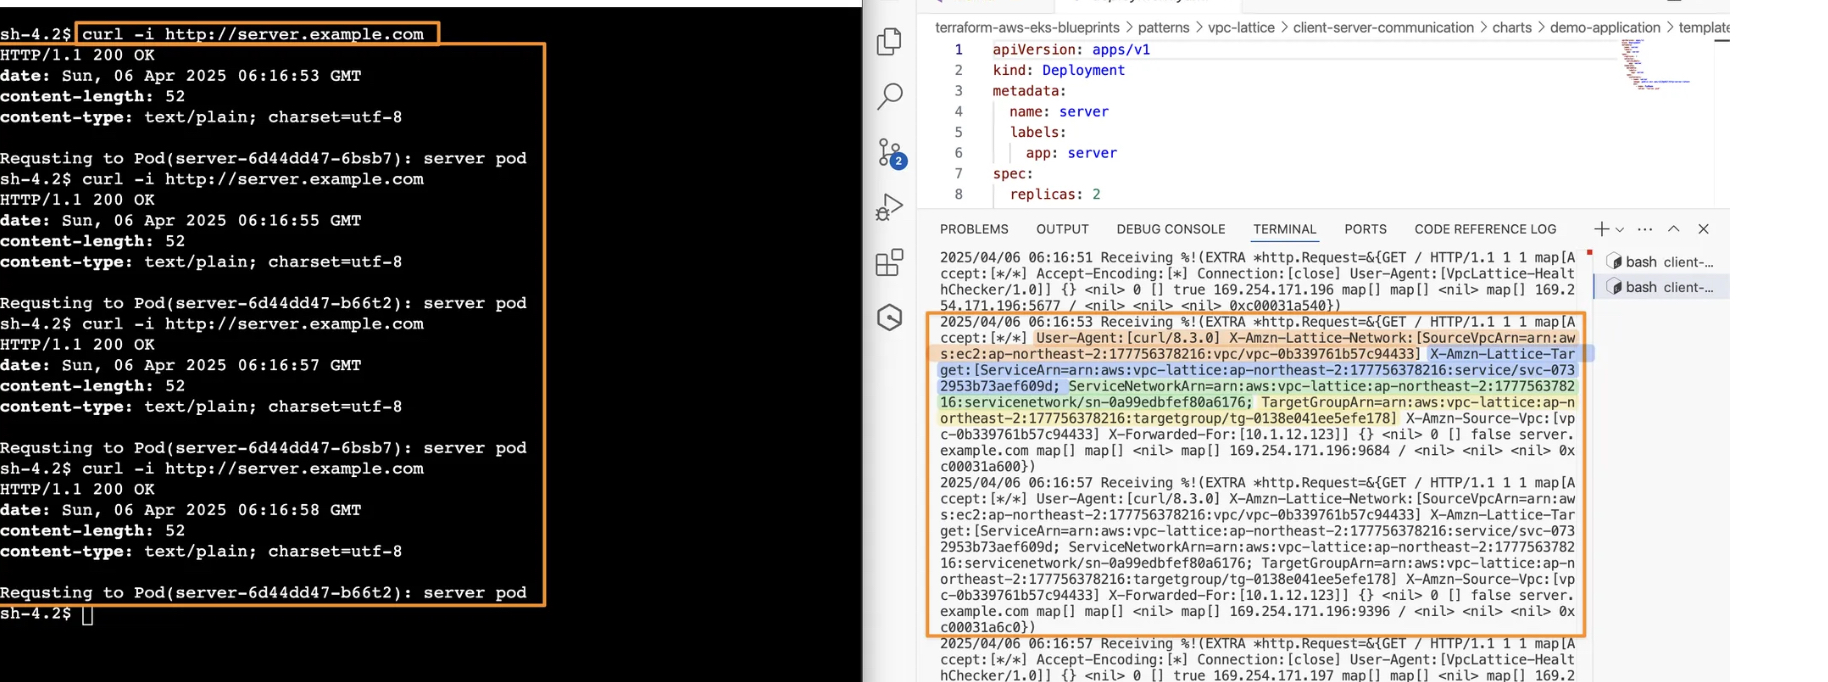
아래 그림처럼 한 쪽에는 client의 터미널을, 다른 한 쪽에는 kubectl 명령을 수행할 터미널을 준비해주세요.
-
아래 kubectl 명령을 통해 server pod의 애플리케이션 로그를 실시간으로 모니터링 하겠습니다.
kubectl logs -f deployment/server -n apps --all-containers=true --since=1mclient의 터미널에서는 아래 명령을 수행하여 네트워크 통신 테스트를 수행합니다.
curl -i http://server.example.com결과는 아래와 같습니다.
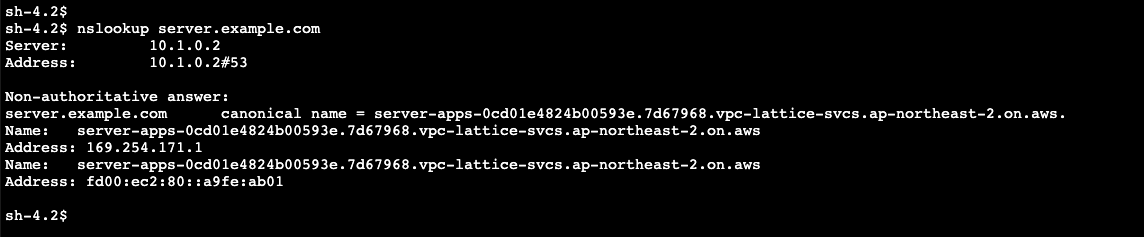
- 어떻게 이런 동작이 가능한걸까요? client의 터미널에서 아래와 같이 nslookup 명령을 수행해보겠습니다.
nslookup server.example.com그럼 아래와 같이 Amazon VPC Lattice로 구성된 엔드포인트가 조회됩니다.

- 즉, Amazon VPC Lattice의 네트워크 구성을 통해서 이런 환경이 구성된 건데요, 한번 VPC Lattice의 구성된 내용을 자세히 살펴보겠습니다.
Amazon VPC Lattice 확인
-
VPC 콘솔 로 다시 접근합니다.
-
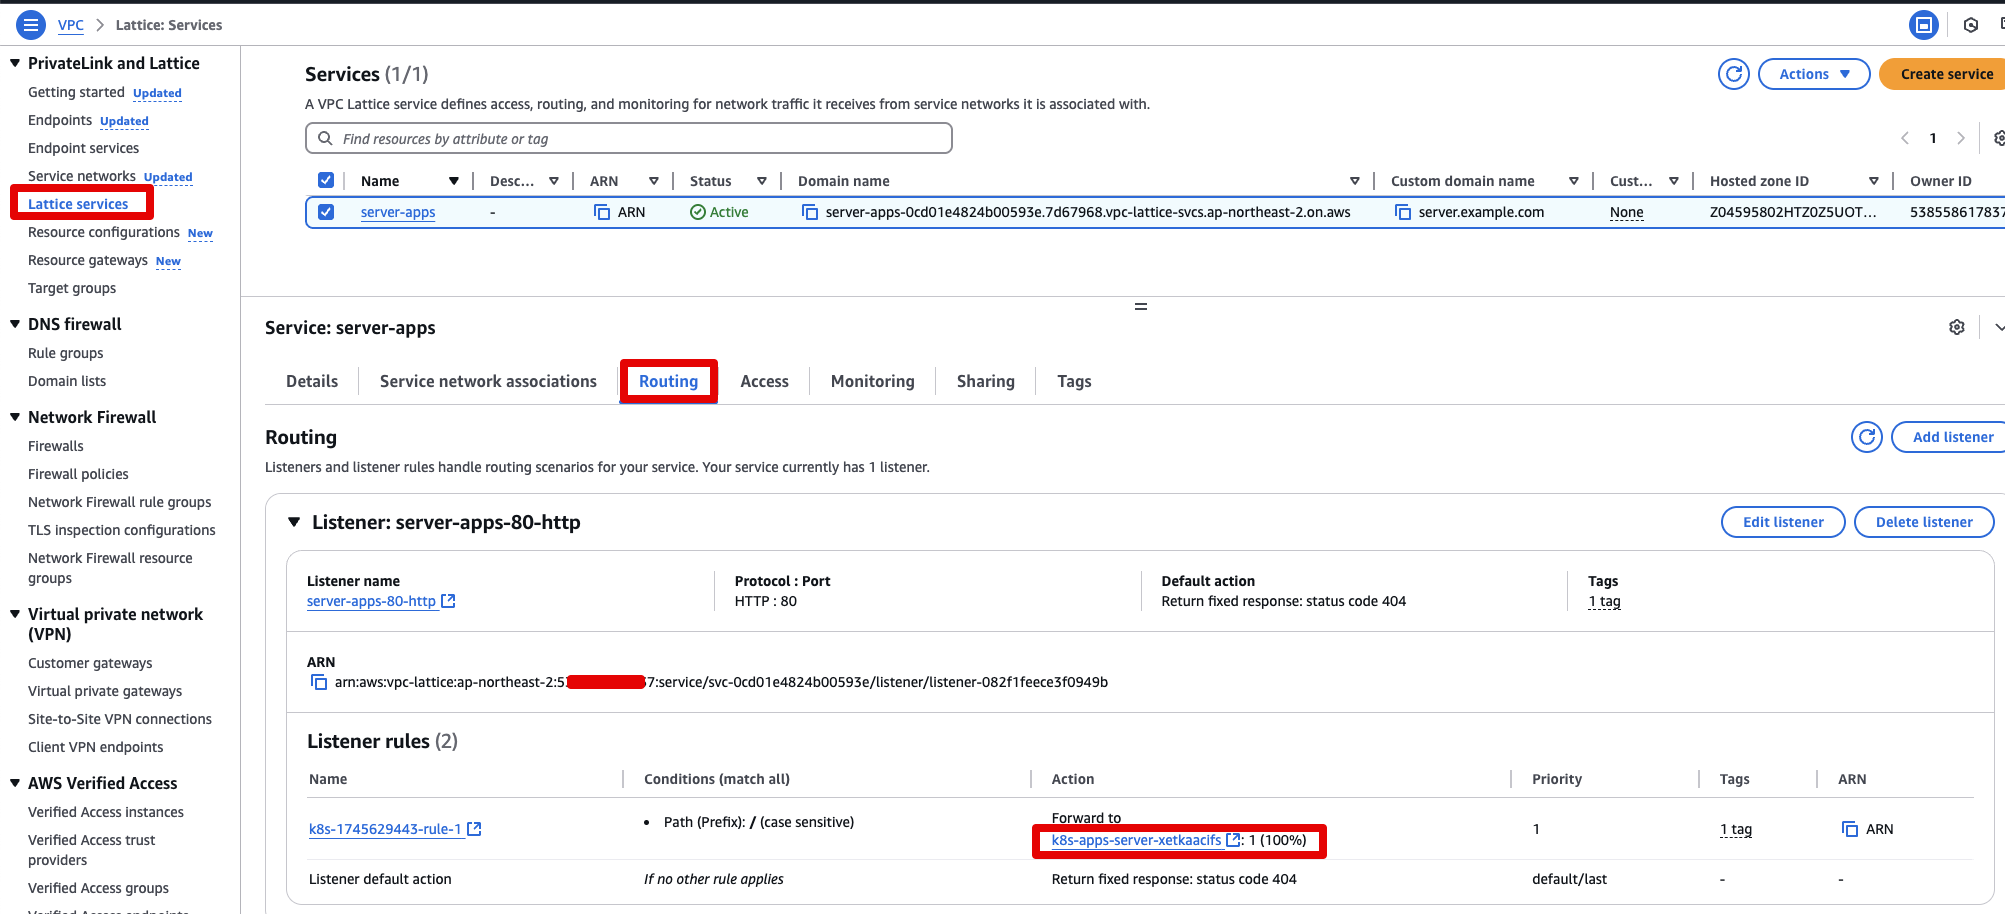
그 다음, 왼쪽 메뉴바에서 PrivateLink and Lattice > Lattice services 를 찾아 클릭합니다.
-
그럼 아래와 같이 VPC Lattice Service를 조회할 수 있습니다.
Amazon VPC Lattice Target Group 확인
-
VPC Lattice Service의 세부 항목 중, Routing 섹션을 클릭하면 아래와 같은 Listener 규칙과 함께 대상 그룹을 확인할 수 있습니다. 대상 그룹의 세부 내용을 보기 위해서 아래 그림과 같이 Listener rules > Action > Forward to 순서로 찾아 대상 그룹을 클릭합니다.
-
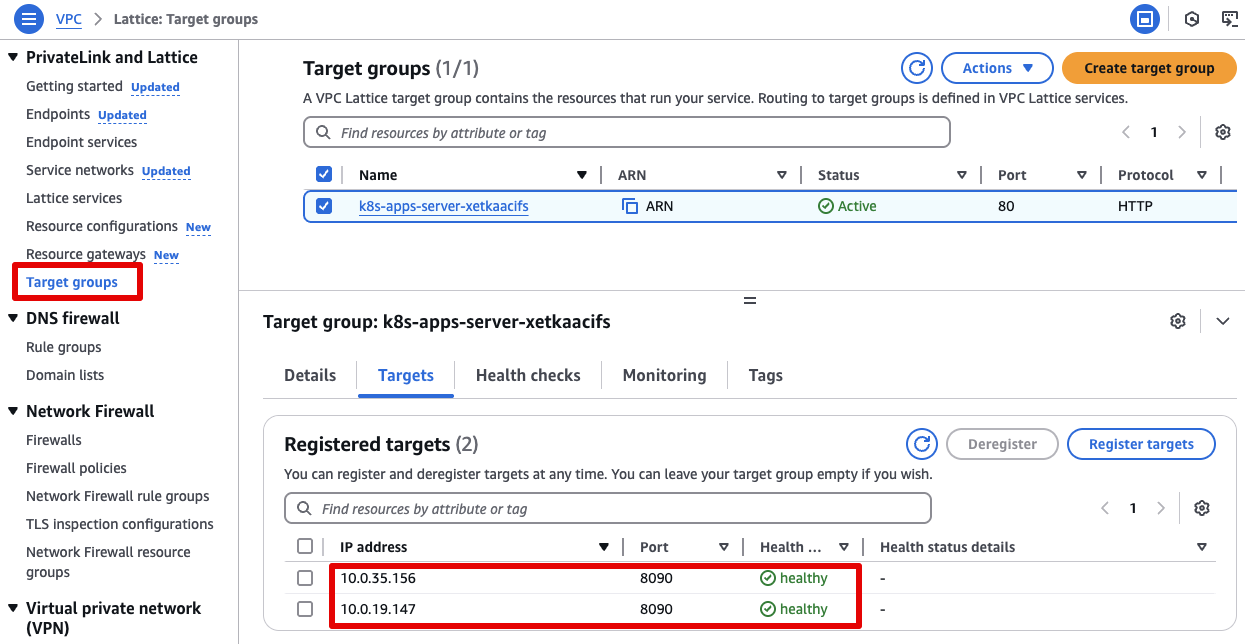
아래는 대상 그룹 상세 페이지 입니다. 여기의 Registered targets 섹션을 보면 IP address와 Port 번호를 통해 VPC Lattice Service로의 라우팅 대상을 안내하고 있습니다.
-
아래 kubectl 명령을 수행하면, 해당 IP address와 일치하는 server pod의 IP 목록을 조회할 수 있습니다.
kubectl get po -n apps -o wide
NAME                    READY   STATUS    RESTARTS   AGE    IP            NODE                                             NOMINATED NODE   READINESS GATES
server-6d44dd47-bt5m4   1/1     Running   0          3h5m   10.0.35.156   ip-10-0-47-58.ap-northeast-2.compute.internal    <none>           <none>
server-6d44dd47-j4xqr 1/1 Running 0 3h5m 10.0.19.147 ip-10-0-25-217.ap-northeast-2.compute.internal <none> <none>- 이어서 아래 명령을 수행하면, server pod에서 사용하는 service의 정보 및 Port 번호를 조회할 수 있습니다.
kubectl get svc -n apps
NAME     TYPE        CLUSTER-IP      EXTERNAL-IP   PORT(S)    AGE
server ClusterIP 172.20.99.159 <none> 8090/TCP 3h6- 이를 통해 VPC Lattice로 구성된 DNS 엔드포인트는 EKS 클러스터 내의 server pod로 라우팅 된다는 것을 알 수 있습니다.
AWS Gateway API Controller의 동작 체크
-
이렇게 VPC Lattice를 통해 EKS 클러스터 내의 server pod로 라우팅 할 수 있는 환경을 구성하기 위해서는 EKS 클러스터 내에 GatewayClass, Gateway, Route 리소스를 생성해야 합니다.
-
AWS Gateway API Controller는 생성된 GatewayClass, Gateway, Route 리소스를 참조하여 필요한 VPC Lattice 네트워크 환경을 구성하게 됩니다.
-
아래 kubectl 명령을 수행하여, AWS Gateway API Controller의 로그를 lattice.log라는 파일로 저장합니다.
kubectl logs deployment/aws-gateway-api-controller-aws-gateway-controller-chart -n aws-application-networking-system --all-containers=true > lattice.log- 그리고 아래의 vi 명령을 통해 로그를 조회하면, AWS Gateway API Controller의 동작을 확인 해볼 수 있습니다.
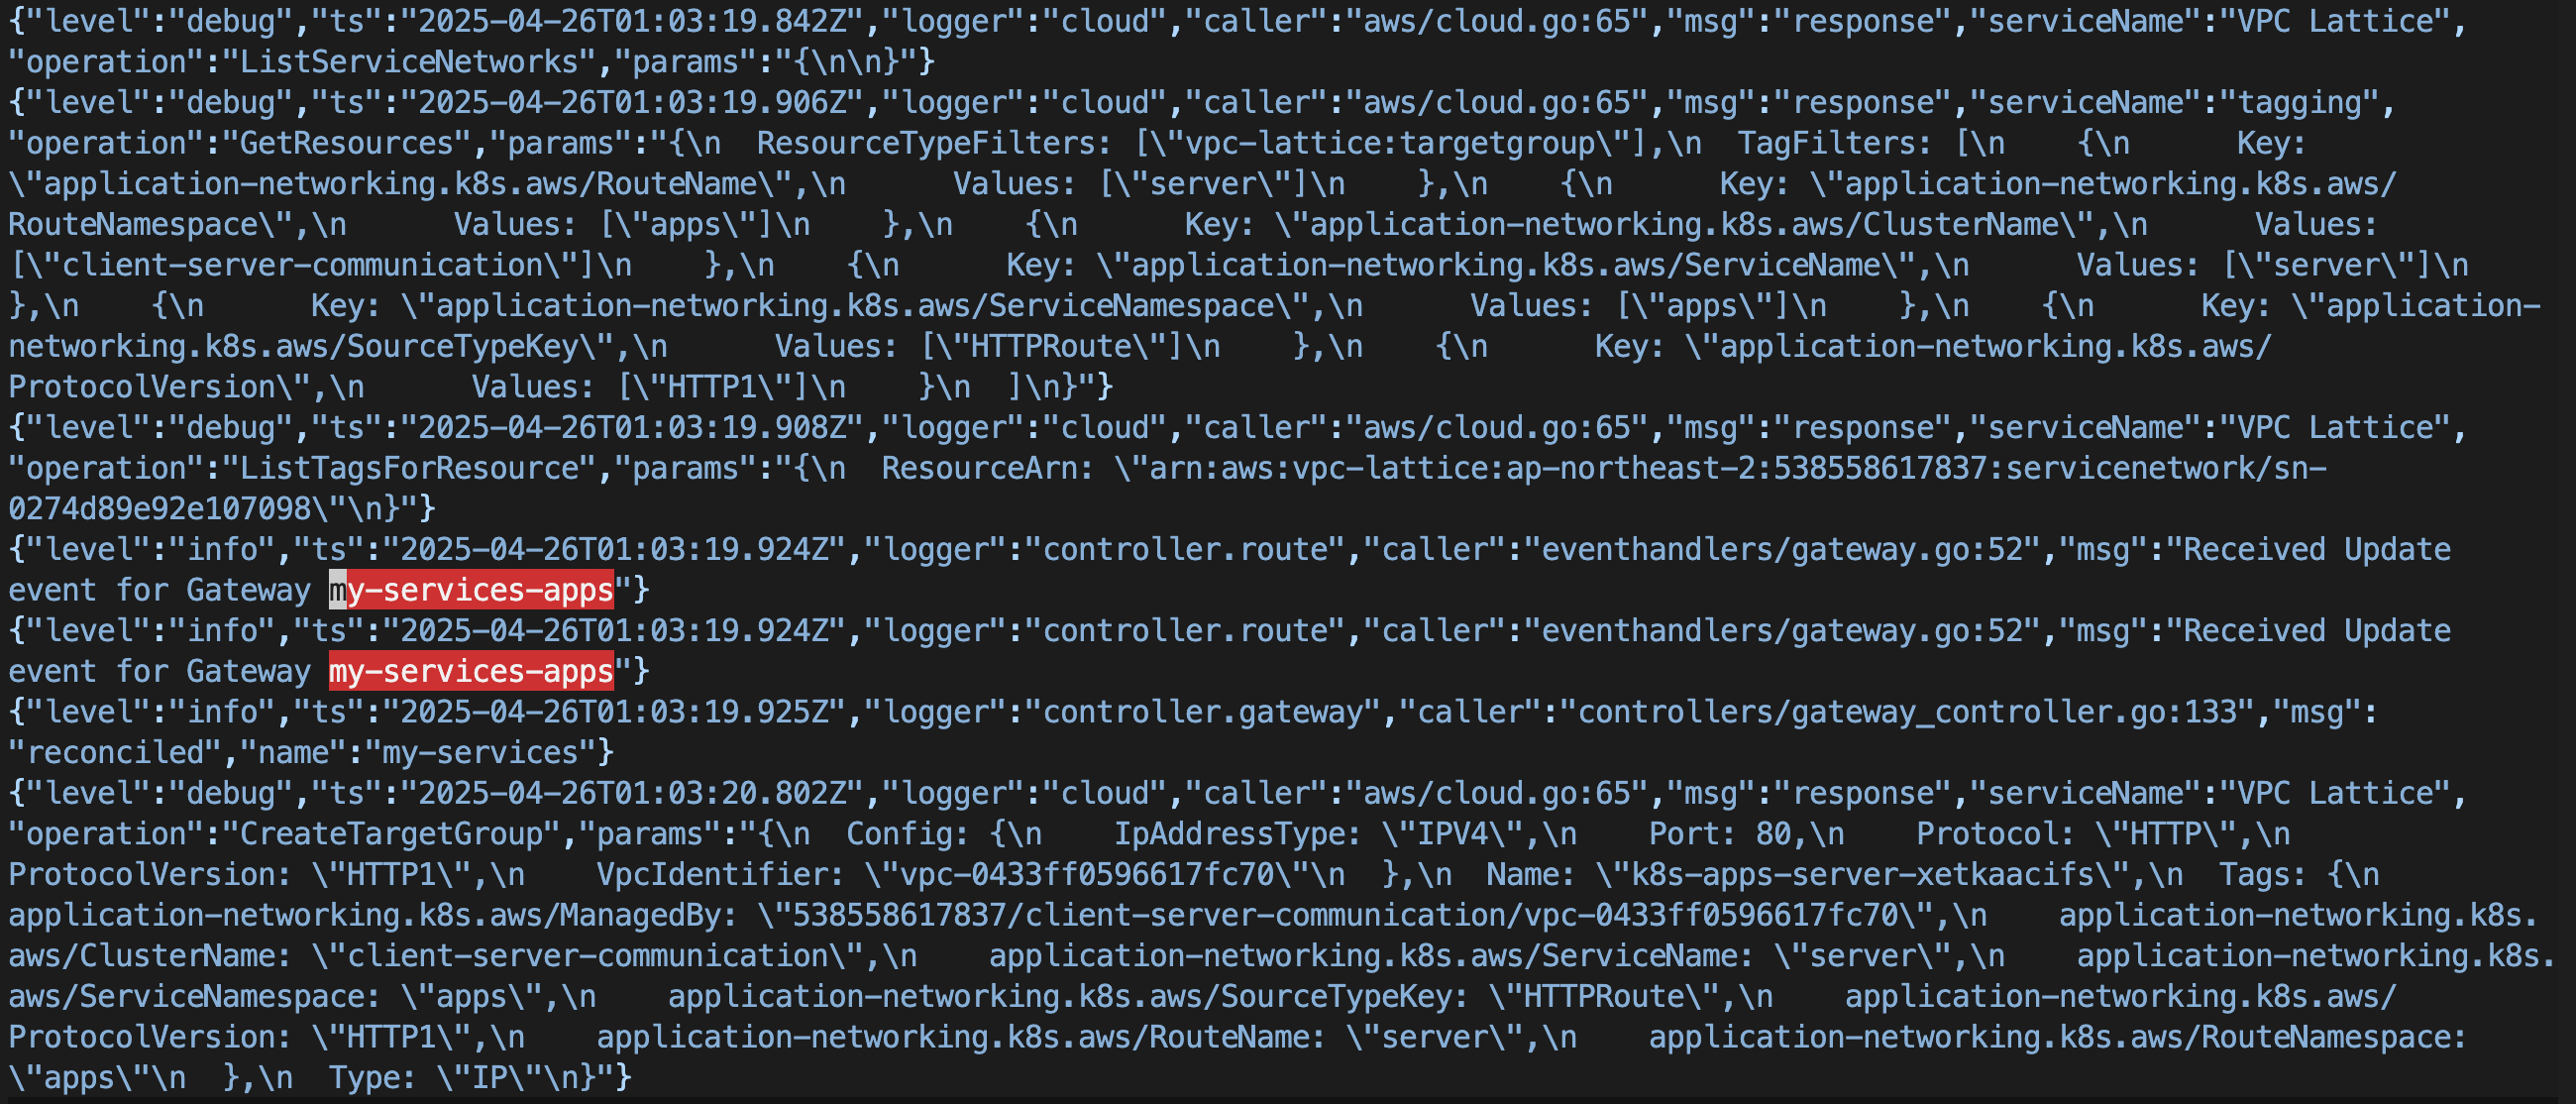
vi lattice.log- 아래 로그의 내용처럼 EKS 클러스터 내에 GatewayClass, Gateway, Route에 대한 오브젝트가 추가되면 AWS Gateway API Controller에서 이를 감지하여 조정(reconcile)합니다.
설명은 아래와 같습니다.
- 로그를 보면,
server라는 이름의 service와my-services라는 이름의 gateway의 생성을 감지하여, reconcile 작업을 수행하는 것을 확인할 수 있습니다. - 이어서
server-apps라는 이름(HTTPRoute의 metadata.name 및 metadata.namespace를 사용)으로 구성된 Route 대상에 라우팅 하기 위해server.example.com이라는 사용자 지정 도메인 이름을 세팅하고, VPC Lattice Service를 구성합니다. - 그리고 VPC Lattice Service에 대해 Listener rule을 생성하고 HTTPRoute 매니페스트 내용에 맞춰 PathPrefix를 구성하고, backendRefs에 대한 대상 그룹을 생성합니다.
- 대상 그룹에는 Service를 참조하여 라우팅 대상 Pod의 IP 주소 및 Port 번호를 세팅합니다.
💡 이번 실습에서 적용된 GatewayClass, Gateway, Route 명세서는 ‘Terraform 코드 살펴보기 > eks.tf 살펴보기’를 참고해주세요.
- AWS Gateway API Controller가 GatewayClass, Gateway, Route 리소스를 참조하여 VPC Lattice 네트워크 환경을 구성하여 정상적으로 통신이 가능한 환경을 구성했다는 것을 확인할 수 있습니다.
실습 리소스 정리
terraform destroy -target="module.client_vpc" -auto-approve
terraform destroy -target="module.cluster_vpc" -auto-approve
terraform destroy -target=aws_route53_zone.primary -auto-approve

terraform destroy -target="module.client_sg" -auto-approve
terraform destroy -target="module.endpoint_sg" -auto-approve

terraform destroy -target="module.client" -auto-approve
terraform destroy -target="module.vpc_endpoints" -auto-approve

terraform destroy -target="module.eks" -auto-approve
terraform destroy -target="module.addons" -auto-approve

terraform destroy -auto-approve
💎💎💎 Amazon VPC Lattice for EKS 주제로 열강을 해주신 방신철님께 감사드립니다 💎💎💎
🎉🎉🎉 CloudNet AEWS Study 총 12주차 학습 정리를 마무리 합니다. 긴 여정으로 명품 강의를 해주신 가시다님과 수고해주신 조력자 분들께 깊은 감사드립니다 🎉🎉🎉