이곳의 내용과 같으며 개인적으로 보려고 적어놓음 🤓
Introduction Sequence
Git Commits
A commit in a git repository records a snapshot of all the files in your directory. It's like a giant copy and paste, but even better!
Git wants to keep commits as lightweight as possible though, so it doesn't just blindly copy the entire directory every time you commit. It can (when possible) compress a commit as a set of changes, or a "delta", from one version of the repository to the next.
Git also maintains a history of which commits were made when. That's why most commits have ancestor commits above them -- we designate this with arrows in our visualization. Maintaining history is great for everyone working on the project!
It's a lot to take in, but for now you can think of commits as snapshots of the project. Commits are very lightweight and switching between them is wicked fast!
Let's see what this looks like in practice. On the right we have a visualization of a (small) git repository. There are two commits right now -- the first initial commit, C0, and one commit after that C1 that might have some meaningful changes.
Hit the button below to make a new commit.

$ git commit
There we go! Awesome. We just made changes to the repository and saved them as a commit. The commit we just made has a parent, C1, which references which commit it was based off of.
Git Branches
Branches in Git are incredibly lightweight as well. They are simply pointers to a specific commit -- nothing more. This is why many Git enthusiasts chant the mantra:
branch early, and branch often
Because there is no storage / memory overhead with making many branches, it's easier to logically divide up your work than have big beefy branches.
When we start mixing branches and commits, we will see how these two features combine. For now though, just remember that a branch essentially says "I want to include the work of this commit and all parent commits."
Let's see what branches look like in practice.
Here we will create a new branch named newImage.

git branch newImage
There, that's all there is to branching! The branch newImage now refers to commit C1.
Let's try to put some work on this new branch. Hit the button below.
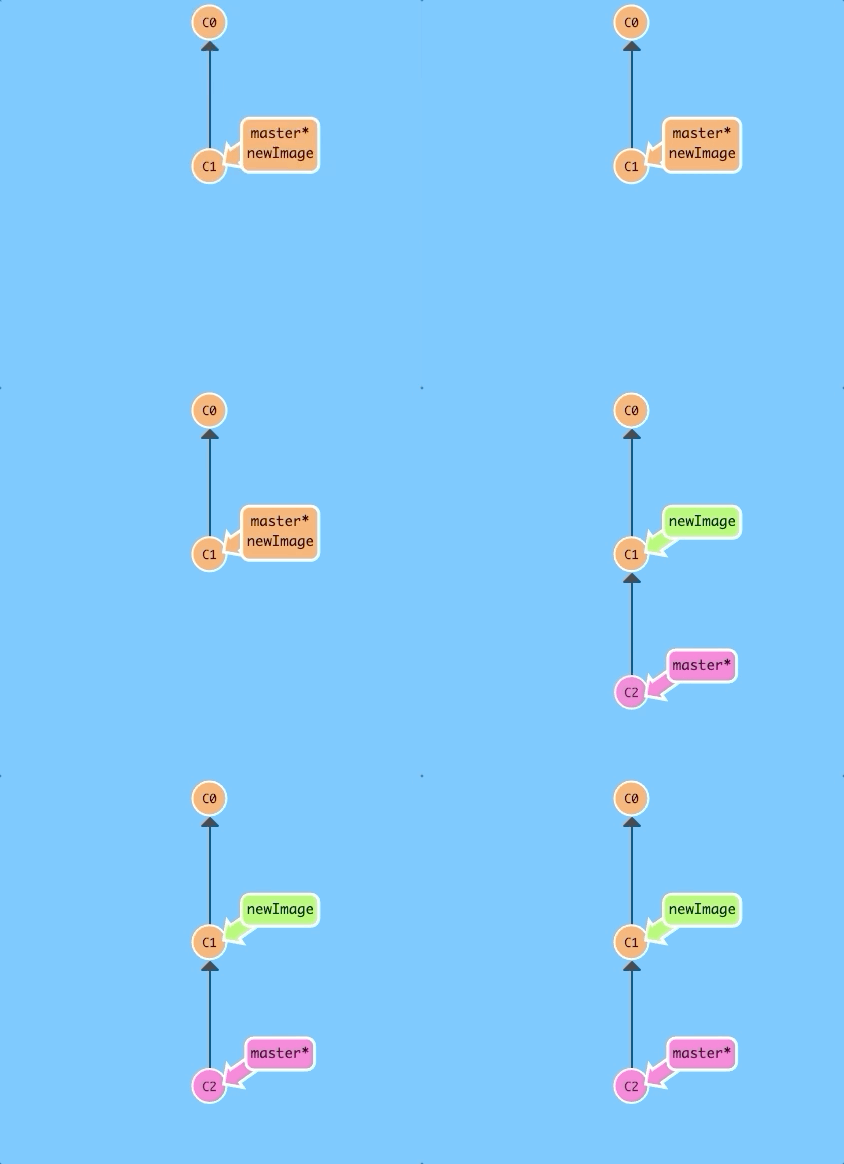
$ git commit
Oh no! The master branch moved but the newImage branch didn't! That's because we weren't "on" the new branch, which is why the asterisk (*) was on master.
Let's tell git we want to checkout the branch with
git checkout <name>
This will put us on the new branch before committing our changes.
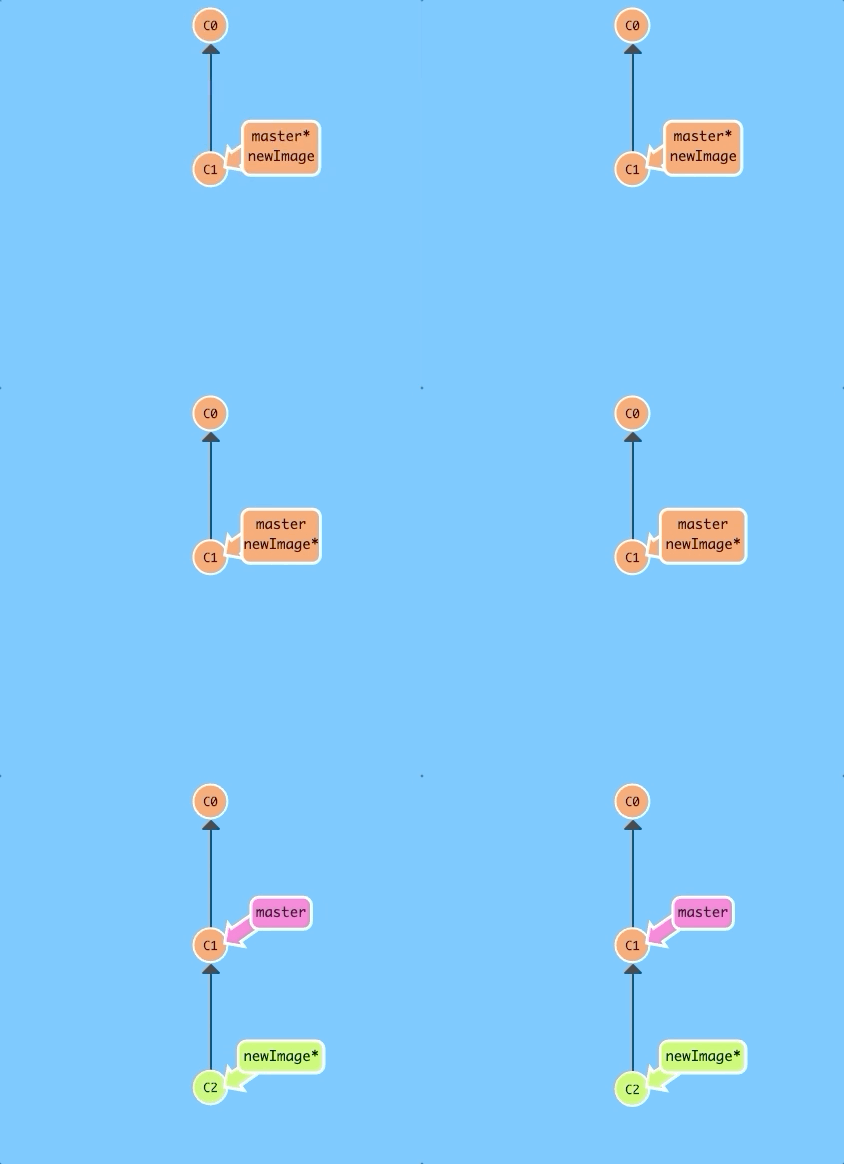
$ git checkout newImage; git commit
There we go! Our changes were recorded on the new branch.
By the way, here's a shortcut: if you want to create a new branch AND check it out at the same time, you can simply type git checkout -b [yourbranchname].
Branches and Merging
Great! We now know how to commit and branch. Now we need to learn some kind of way of combining the work from two different branches together. This will allow us to branch off, develop a new feature, and then combine it back in.
The first method to combine work that we will examine is git merge. Merging in Git creates a special commit that has two unique parents. A commit with two parents essentially means "I want to include all the work from this parent over here and this one over here, and the set of all their parents."
It's easier with visuals, let's check it out in the next view.
Here we have two branches; each has one commit that's unique. This means that neither branch includes the entire set of "work" in the repository that we have done. Let's fix that with merge.
We will merge the branch bugFix into master.
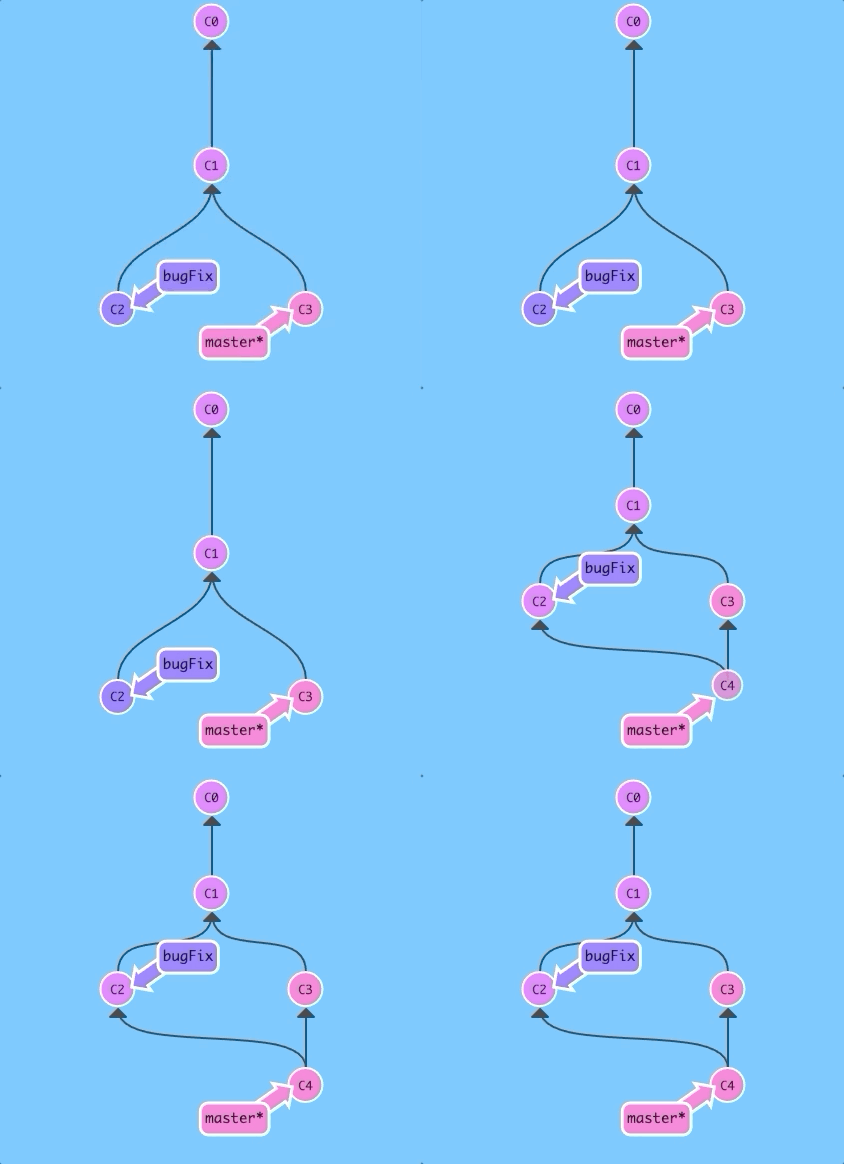
$git merge bugFix
Woah! See that? First of all, master now points to a commit that has two parents. If you follow the arrows up the commit tree from master, you will hit every commit along the way to the root. This means that master contains all the work in the repository now.
Also, see how the colors of the commits changed? To help with learning, I have included some color coordination. Each branch has a unique color. Each commit turns a color that is the blended combination of all the branches that contain that commit.
So here we see that the master branch color is blended into all the commits, but the bugFix color is not. Let's fix that...
Let's merge master into bugFix:
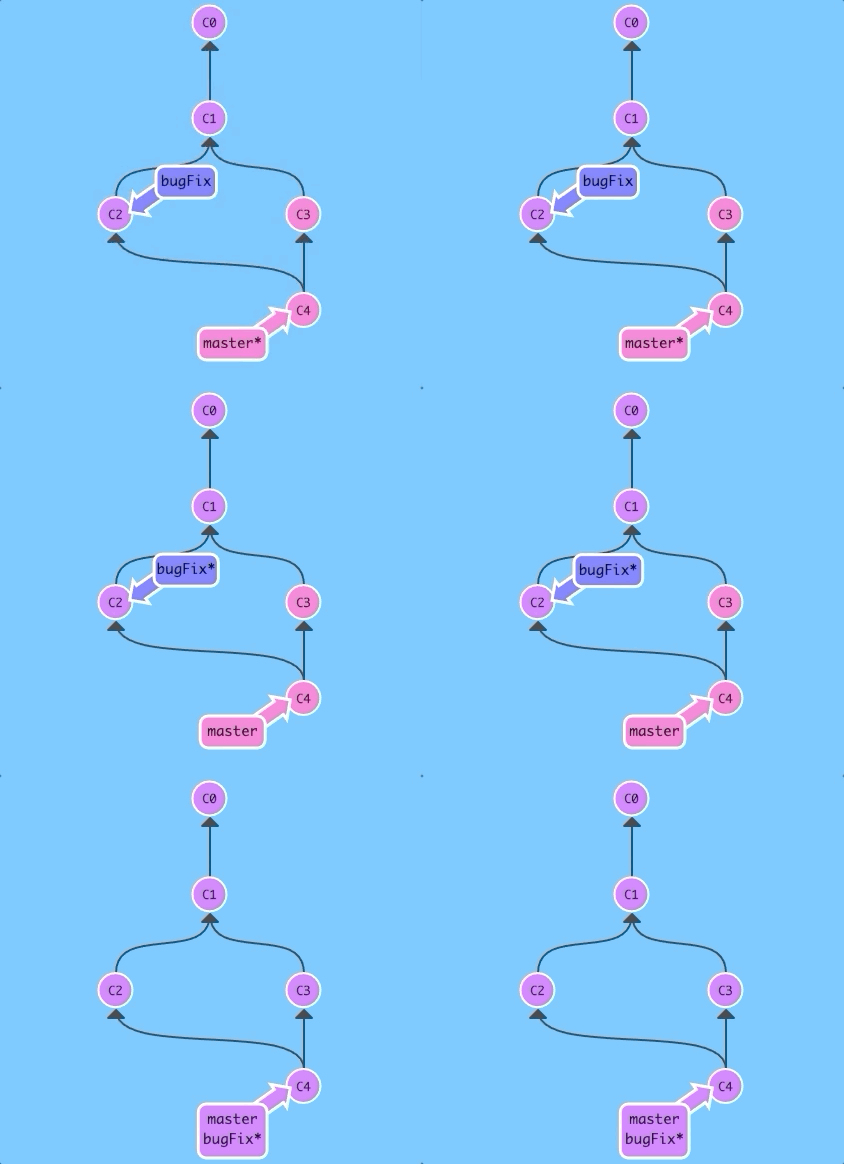
$ git checkout bugFix; git merge master
Since bugFix was an ancestor of master, git didn't have to do any work; it simply just moved bugFix to the same commit master was attached to.
Now all the commits are the same color, which means each branch contains all the work in the repository! Woohoo!
Git Rebase
The second way of combining work between branches is rebasing. Rebasing essentially takes a set of commits, "copies" them, and plops them down somewhere else.
While this sounds confusing, the advantage of rebasing is that it can be used to make a nice linear sequence of commits. The commit log / history of the repository will be a lot cleaner if only rebasing is allowed.
Let's see it in action...
Here we have two branches yet again; note that the bugFix branch is currently selected (note the asterisk)
We would like to move our work from bugFix directly onto the work from master. That way it would look like these two features were developed sequentially, when in reality they were developed in parallel.
Let's do that with the git rebase command.
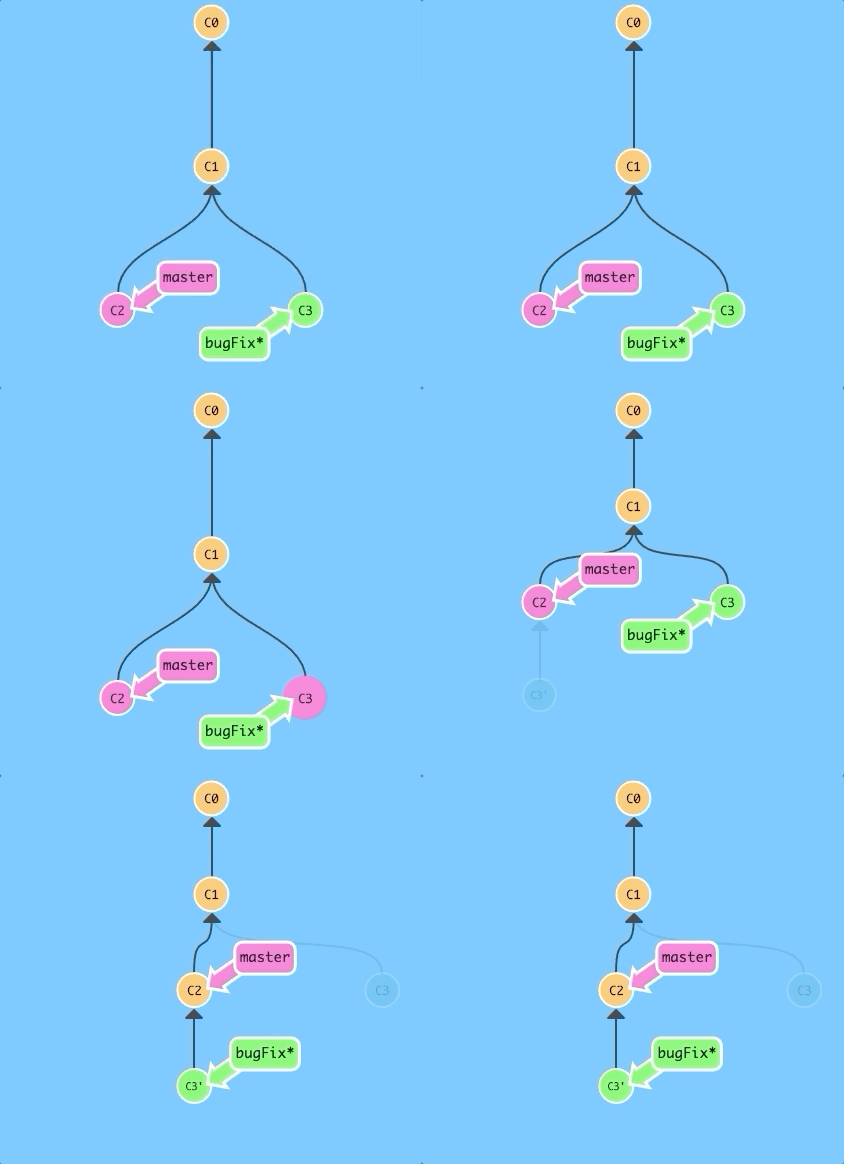
$ git rebase master
Awesome! Now the work from our bugFix branch is right on top of master and we have a nice linear sequence of commits.
Note that the commit C3 still exists somewhere (it has a faded appearance in the tree), and C3' is the "copy" that we rebased onto master.
The only problem is that master hasn't been updated either, let's do that now...
Now we are checked out on the master branch. Let's go ahead and rebase onto bugFix...
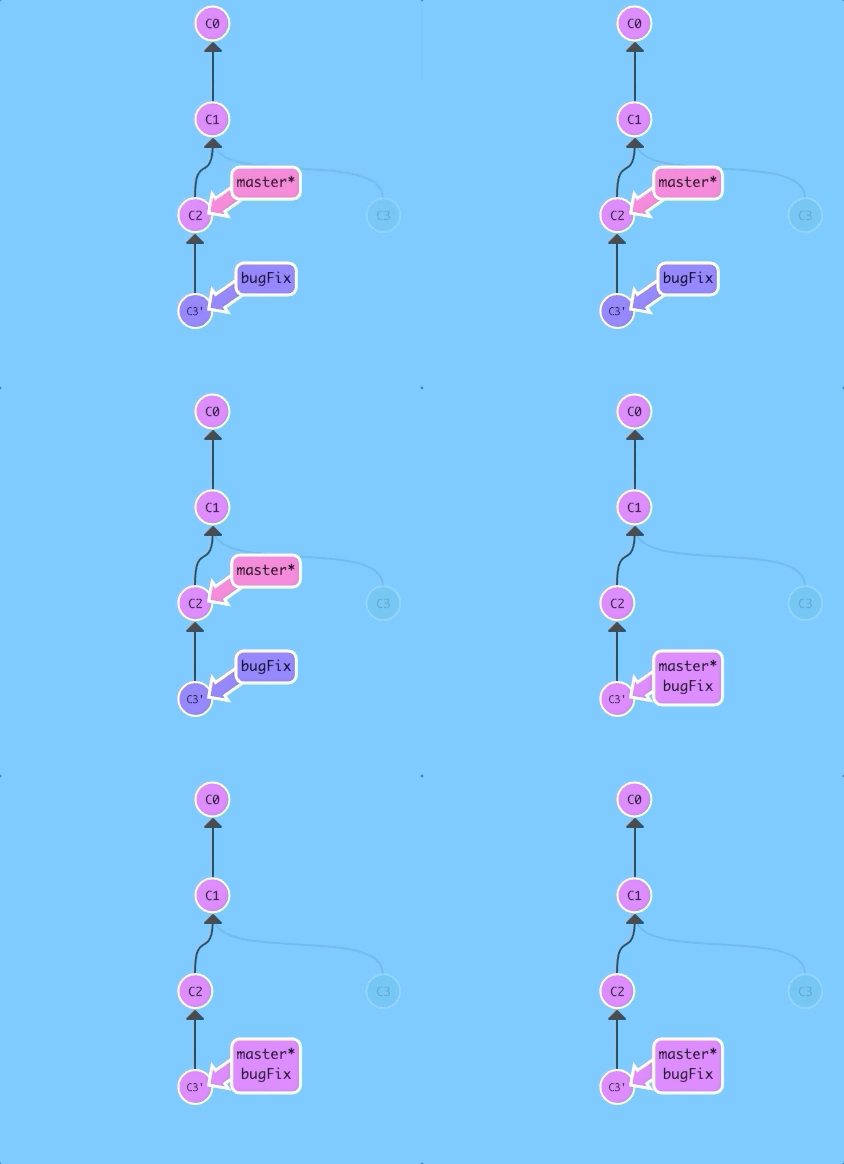
$ git rebase bugFix
There! Since master was an ancestor of bugFix, git simply moved the master branch reference forward in history.
Ramping Up
Moving around in Git
Before we get to some of the more advanced features of Git, it's important to understand different ways to move through the commit tree that represents your project.
Once you're comfortable moving around, your powers with other git commands will be amplified!
HEAD
First we have to talk about "HEAD". HEAD is the symbolic name for the currently checked out commit -- it's essentially what commit you're working on top of.
HEAD always points to the most recent commit which is reflected in the working tree. Most git commands which make changes to the working tree will start by changing HEAD.
Normally HEAD points to a branch name (like bugFix). When you commit, the status of bugFix is altered and this change is visible through HEAD.
Let's see this in action. Here we will reveal HEAD before and after a commit.

$ git checkout C1; git checkout master; git commit; git checkout C2
See! HEAD was hiding underneath our master branch all along.
Detaching HEAD
Detaching HEAD just means attaching it to a commit instead of a branch. This is what it looks like beforehand:
HEAD -> master -> C1

$ git checkout C1
And now it's
HEAD -> C1
Relative Refs
Moving around in Git by specifying commit hashes can get a bit tedious. In the real world you won't have a nice commit tree visualization next to your terminal, so you'll have to use git log to see hashes.
Furthermore, hashes are usually a lot longer in the real Git world as well. For instance, the hash of the commit that introduced the previous level is fed2da64c0efc5293610bdd892f82a58e8cbc5d8. Doesn't exactly roll off the tongue...
The upside is that Git is smart about hashes. It only requires you to specify enough characters of the hash until it uniquely identifies the commit. So I can type fed2 instead of the long string above.
Like I said, specifying commits by their hash isn't the most convenient thing ever, which is why Git has relative refs. They are awesome!
With relative refs, you can start somewhere memorable (like the branch bugFix or HEAD) and work from there.
Relative commits are powerful, but we will introduce two simple ones here:
- Moving upwards one commit at a time with
^ - Moving upwards a number of times with
~<num>
Let's look at the Caret (^) operator first. Each time you append that to a ref name, you are telling Git to find the parent of the specified commit.
So saying master^ is equivalent to "the first parent of master".
master^^ is the grandparent (second-generation ancestor) of master
Let's check out the commit above master here.

$ git checkout master^
Boom! Done. Way easier than typing the commit hash.
You can also reference HEAD as a relative ref. Let's use that a couple of times to move upwards in the commit tree.
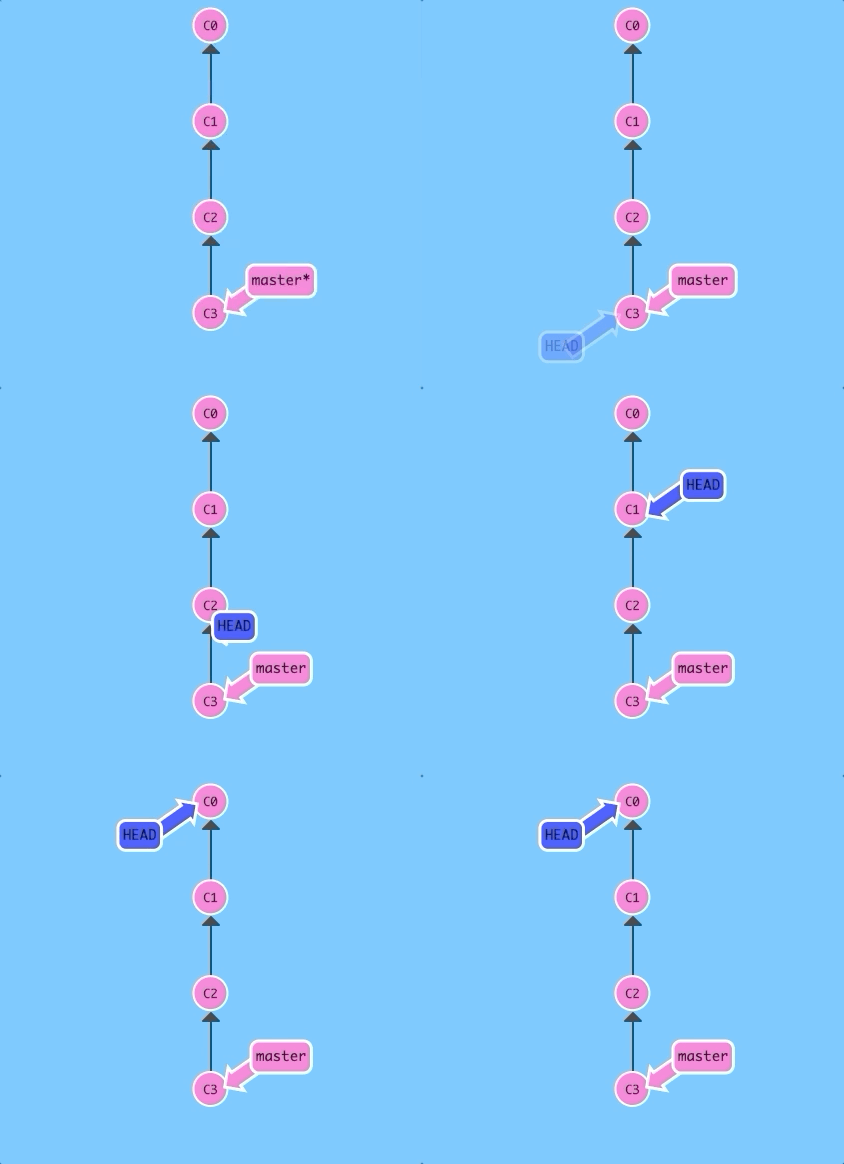
$ git checkout C3; git checkout HEAD^; git checkout HEAD^; git checkout HEAD^;
Easy! We can travel backwards in time with HEAD^
The "~" operator
Say you want to move a lot of levels up in the commit tree. It might be tedious to type ^ several times, so Git also has the tilde (~) operator.
The tilde operator (optionally) takes in a trailing number that specifies the number of parents you would like to ascend. Let's see it in action.
Let's specify a number of commits back with ~.
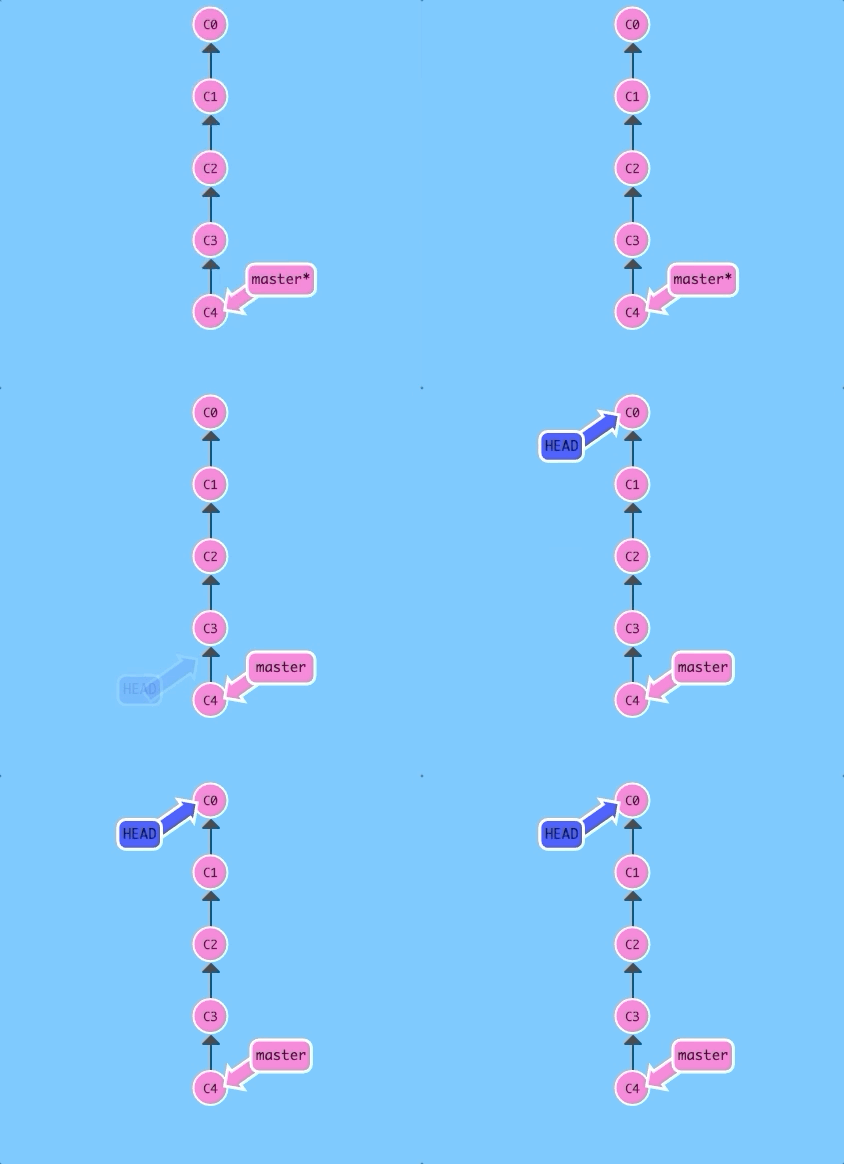
$ git checkout HEAD~4
Boom! So concise -- relative refs are great.
Branch forcing
You're an expert on relative refs now, so let's actually use them for something.
One of the most common ways I use relative refs is to move branches around. You can directly reassign a branch to a commit with the -f option. So something like:
git branch -f master HEAD~3
moves (by force) the master branch to three parents behind HEAD.
Let's see that previous command in action.
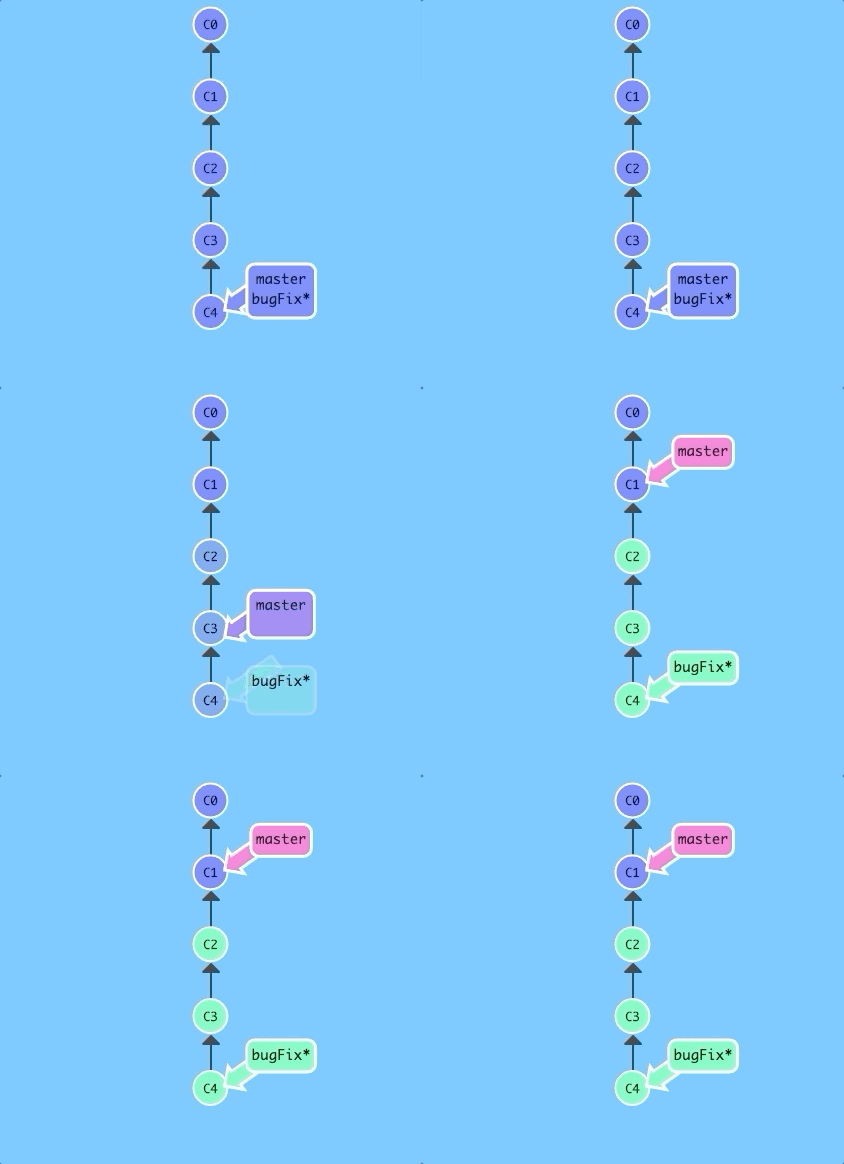
$ git branch -f master HEAD~3
There we go! Relative refs gave us a concise way to refer to C1 and branch forcing (-f) gave us a way to quickly move a branch to that location.
Reversing Changes in Git
There are many ways to reverse changes in Git. And just like committing, reversing changes in Git has both a low-level component (staging individual files or chunks) and a high-level component (how the changes are actually reversed). Our application will focus on the latter.
There are two primary ways to undo changes in Git -- one is using git reset and the other is using git revert. We will look at each of these in the next dialog
Git Reset
git reset reverts changes by moving a branch reference backwards in time to an older commit. In this sense you can think of it as "rewriting history;" git reset will move a branch backwards as if the commit had never been made in the first place.
Let's see what that looks like:
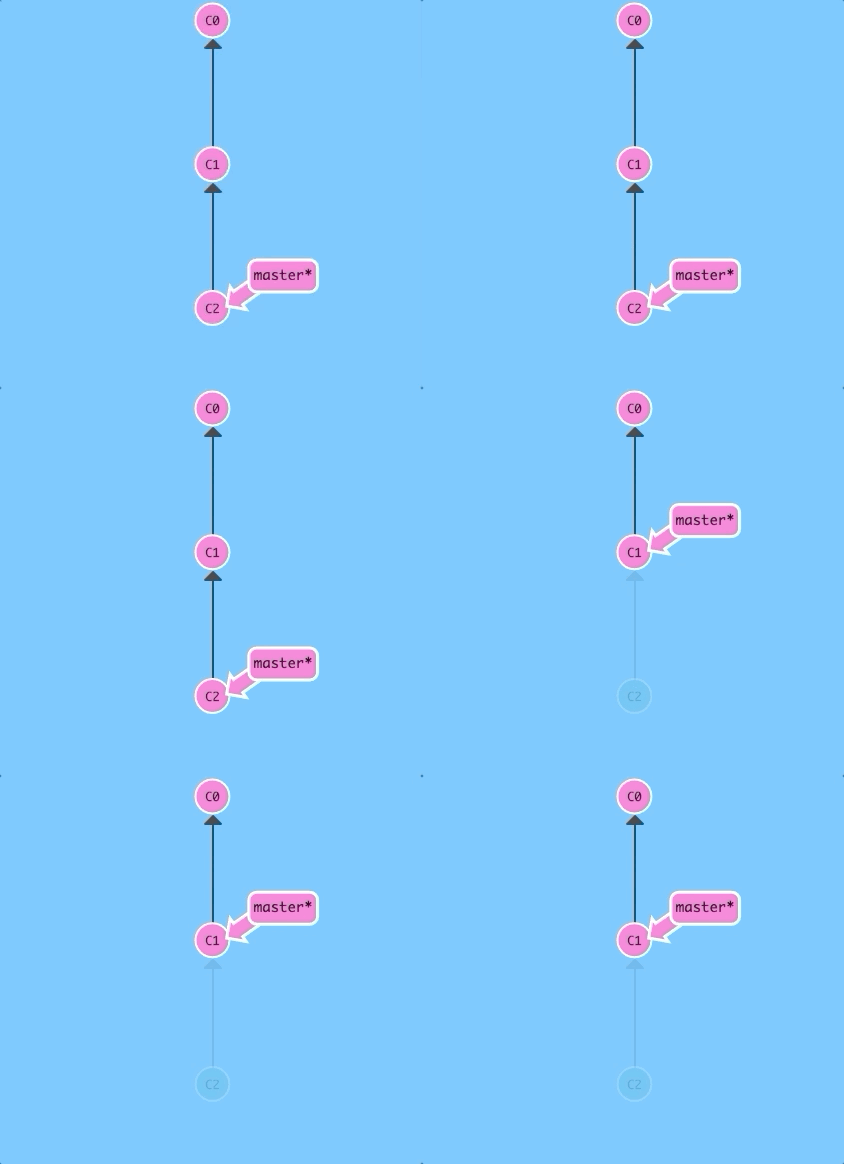
$ git reset HEAD~1
Nice! Git moved the master branch reference back to C1; now our local repository is in a state as if C2 had never happened.
Git Revert
While resetting works great for local branches on your own machine, its method of "rewriting history" doesn't work for remote branches that others are using.
In order to reverse changes and share those reversed changes with others, we need to use git revert. Let's see it in action.
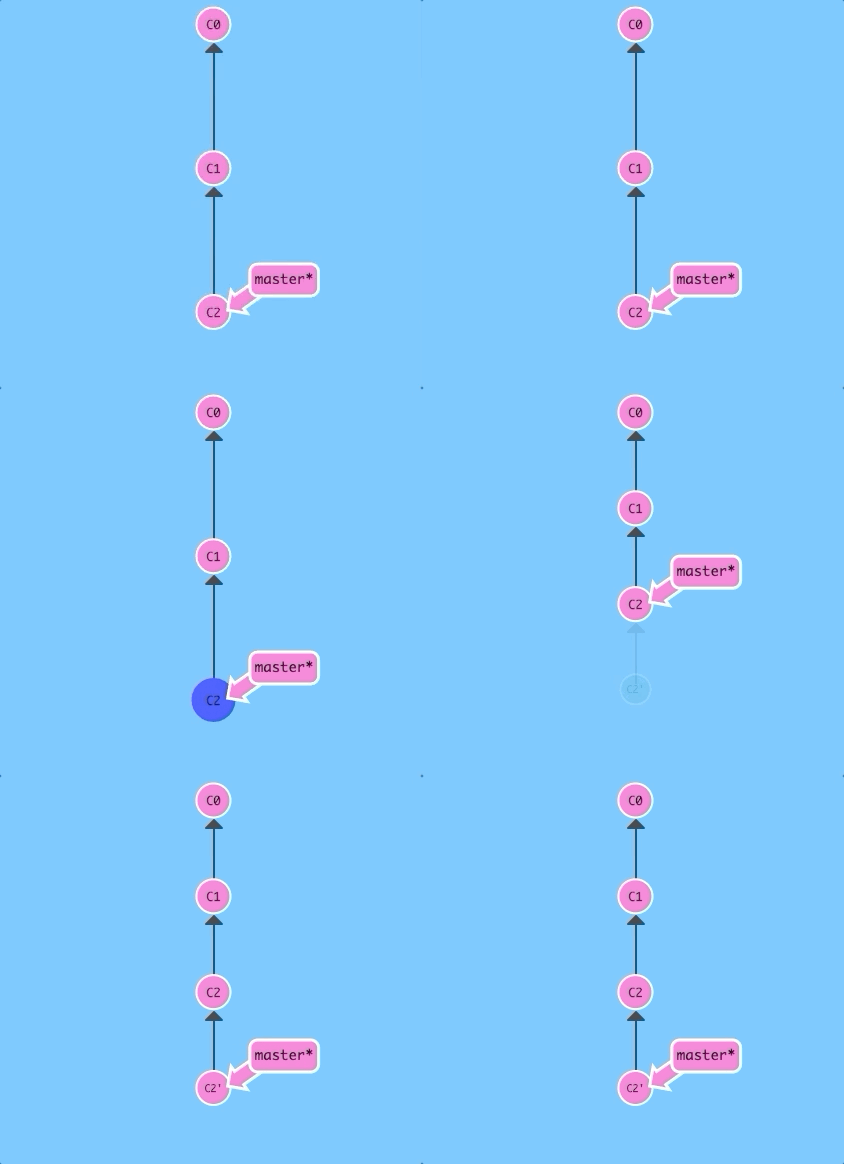
git revert HEAD
Weird, a new commit plopped down below the commit we wanted to reverse. That's because this new commit C2' introduces changes -- it just happens to introduce changes that exactly reverses the commit of C2.
With reverting, you can push out your changes to share with others.
Moving Work Around
So far we've covered the basics of git -- committing, branching, and moving around in the source tree. Just these concepts are enough to leverage 90% of the power of git repositories and cover the main needs of developers.
That remaining 10%, however, can be quite useful during complex workflows (or when you've gotten yourself into a bind). The next concept we're going to cover is "moving work around" -- in other words, it's a way for developers to say "I want this work here and that work there" in precise, eloquent, flexible ways.
This may seem like a lot, but it's a simple concept.
Git Cherry-pick
The first command in this series is called git cherry-pick. It takes on the following form:
git cherry-pick <Commit1> <Commit2> <...>
It's a very straightforward way of saying that you would like to copy a series of commits below your current location (HEAD). I personally love cherry-pick because there is very little magic involved and it's easy to understand.
Let's see a demo!
Here's a repository where we have some work in branch side that we want to copy to master. This could be accomplished through a rebase (which we have already learned), but let's see how cherry-pick performs.
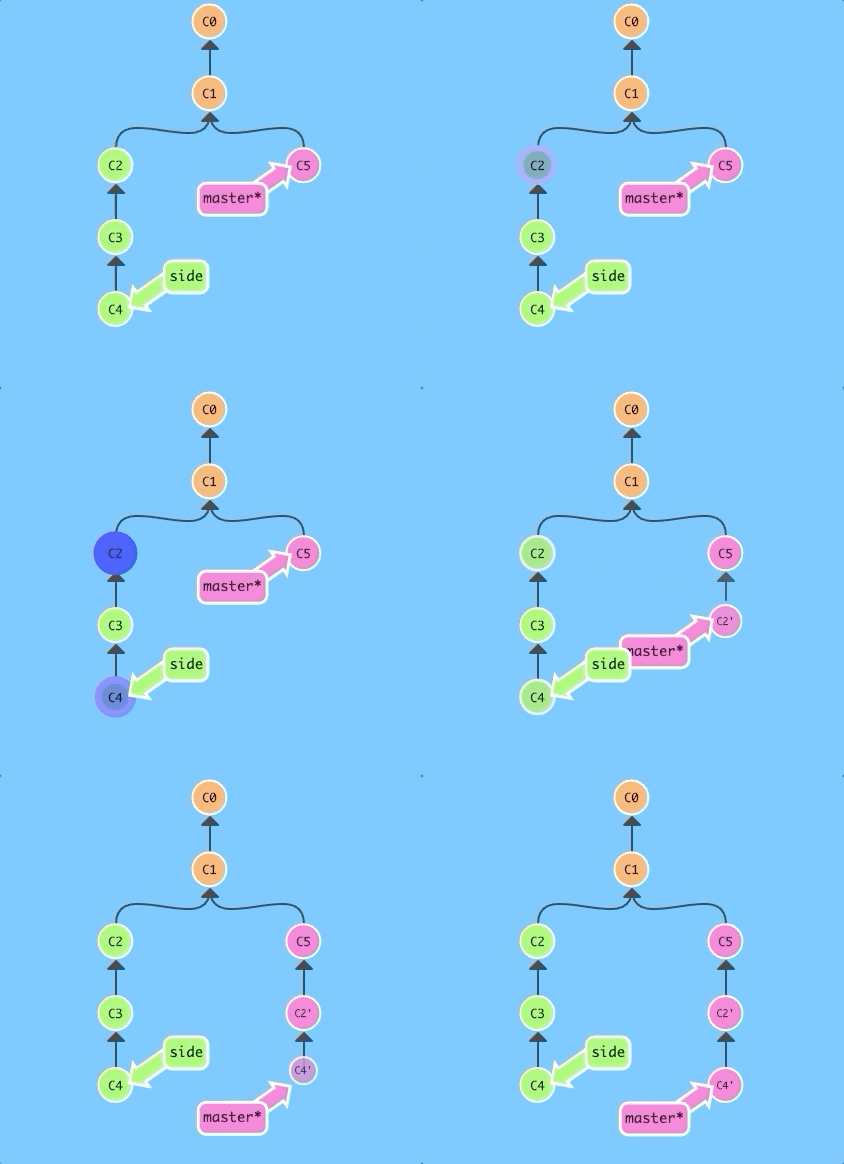
$ git cherry-pick C2 C4
That's it! We wanted commits C2 and C4 and git plopped them down right below us. Simple as that!
Git Interactive Rebase
Git cherry-pick is great when you know which commits you want (and you know their corresponding hashes) -- it's hard to beat the simplicity it provides.
But what about the situation where you don't know what commits you want? Thankfully git has you covered there as well! We can use interactive rebasing for this -- it's the best way to review a series of commits you're about to rebase.
Let's dive into the details...
All interactive rebase means is using the rebase command with the -i option.
If you include this option, git will open up a UI to show you which commits are about to be copied below the target of the rebase. It also shows their commit hashes and messages, which is great for getting a bearing on what's what.
For "real" git, the UI window means opening up a file in a text editor like vim. For our purposes, I've built a small dialog window that behaves the same way.
When the interactive rebase dialog opens, you have the ability to do two things in our educational application:
- You can reorder commits simply by changing their order in the UI (in our window this means dragging and dropping with the mouse).
- You can choose to completely omit some commits. This is designated by
pick-- togglingpickoff means you want to drop the commit.
It is worth mentioning that in the real git interactive rebase you can do many more things like squashing (combining) commits, amending commit messages, and even editing the commits themselves. For our purposes though we will focus on these two operations above.
Great! Let's see an example.
When you hit the button, an interactive rebase window will appear. Reorder some commits around (or feel free to unpick some) and see the result!
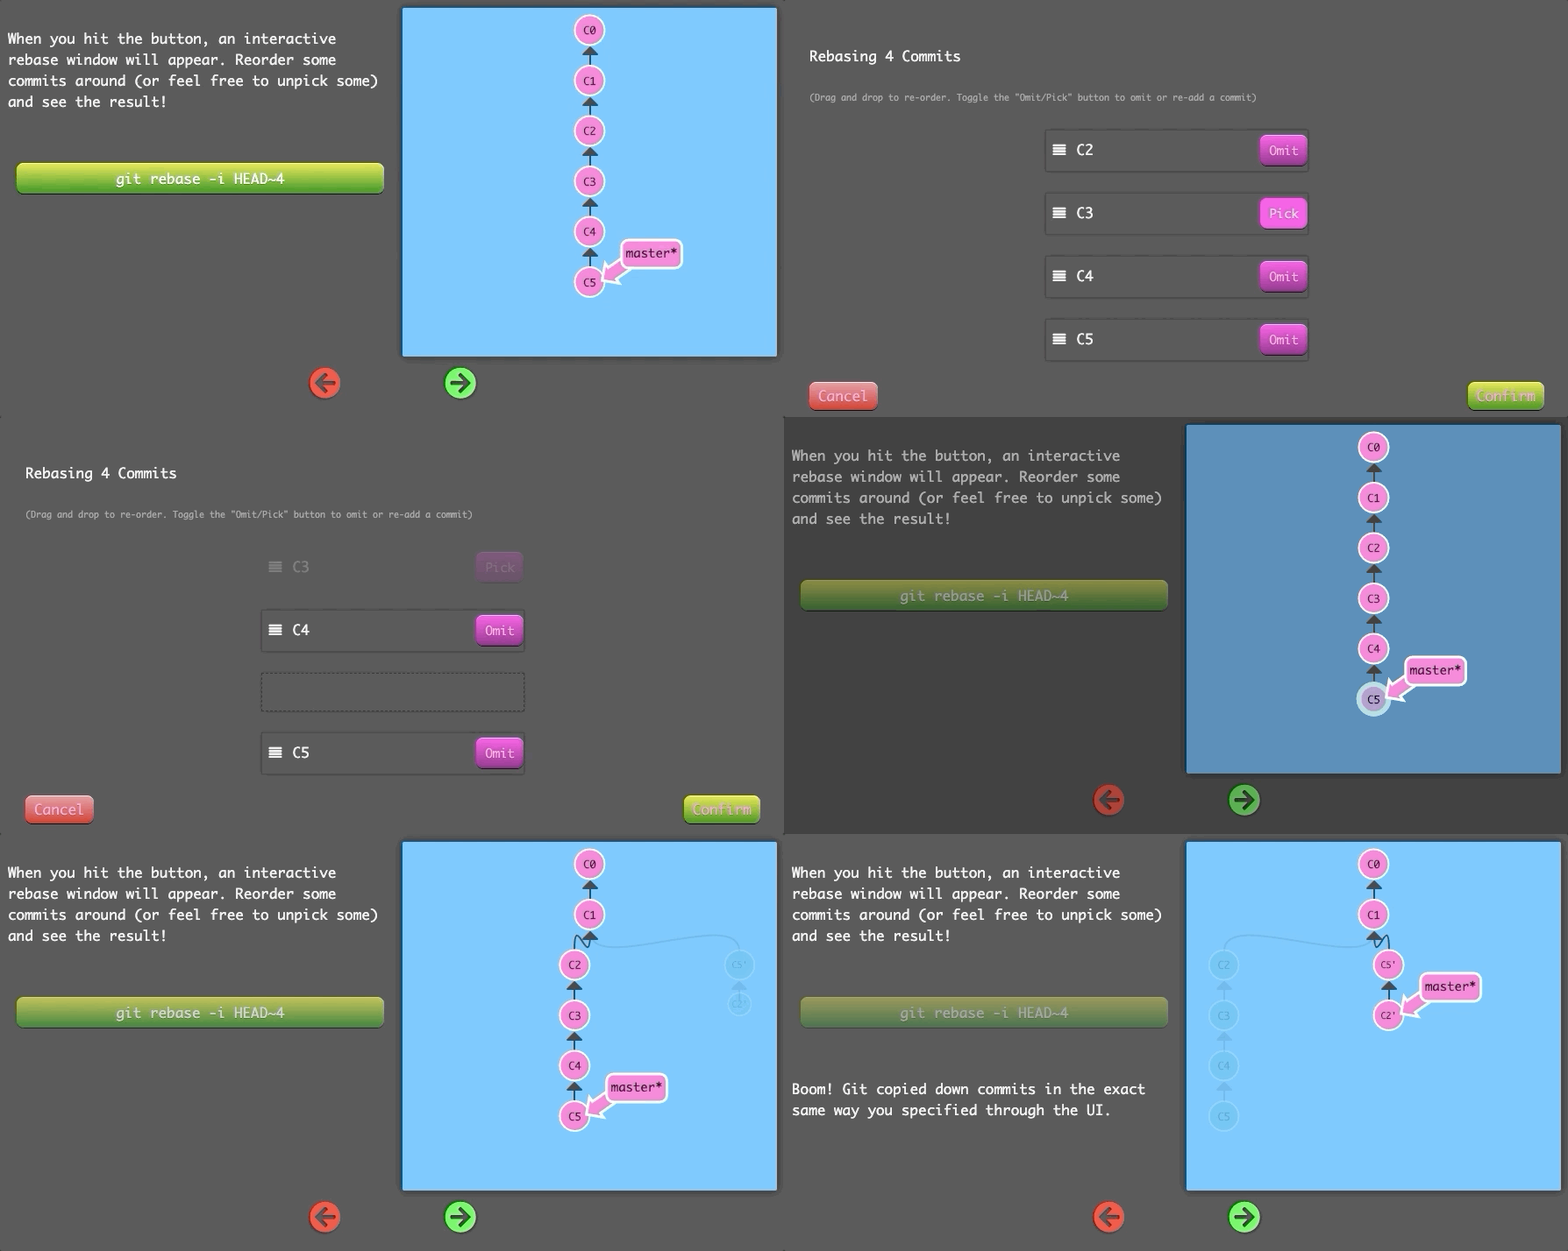
$ git rebase -i HEAD~4
Boom! Git copied down commits in the exact same way you specified through the UI.
11개의 댓글
i never know the use of adobe shadow until i saw this post. thank you for this! this is very helpful.slot online
i never know the use of adobe shadow until i saw this post. thank you for this! this is very helpful.slot gacor
i never know the use of adobe shadow until i saw this post. thank you for this! this is very helpful.dax69 login
All your hard work is much appreciated. Nobody can stop to admire you. Lots of appreciation.区块链平台
You have a real talent for writing unique content. I like how you think and the way you express your views in this article. I am impressed by your writing style a lot. Thanks for making my experience more beautiful.https://hargatoto.hu.net/
You have a real talent for writing unique content. I like how you think and the way you express your views in this article. I am impressed by your writing style a lot. Thanks for making my experience more beautiful.hargatoto
Positive site, where did u come up with the information on this posting?I have read a few of the articles on your website now, and I really like your style. Thanks a million and please keep up the effective work.read more
Thank you for helping people get the information they need. Great stuff as usual. Keep up the great work!!!agenolx resmi
Thank you for helping people get the information they need. Great stuff as usual. Keep up the great work!!! bandar togel
When you use a genuine service, you will be able to provide instructions, share materials and choose the formatting style.수원호빠


Hello, this weekend is good for me, since this time i am reading this enormous informative article here at my home.paito harian sydney lotto