>WeCode 사전 스터디 3주 차 목표는 파이썬에 익숙해지기였다.
우리 팀은 파이썬으로 간단한 크롤러를 만들면서 함수, 문자열, 반복문, 조건문 등 여러 기능을 사용해 보기로 했다.
GitHub👈🏻
Selenium vs BeautifulSoup
크롤러를 만들기에 앞서 유튜브나 구글링을 통해 다른 사람들이 만들어 놓은 예제를 살펴봤다.
Selenium은 JS, CSS, DOM 등 형식에서 좀 더 자유롭고, 프로그래밍에 익숙하지 않아도 만드는 데 큰 어려움은 없어 보였다. 크롬을 띄워 진행 상황을 눈으로 확인할 수도 있고 인풋 창에 키보드로 입력을 하거나, 버튼을 클릭하여 로그인하거나 탭 간 이동 등 사람이 실제로 동작하는 행위와 조금 더 비슷하다. 하지만 속도가 느리고 (물론 사람보다는 빠르지만), 속도가 빠르지 않으며, 빠른 속도가 아니다. 💩
내가 하려는 작업은 로그인을 할 필요도 없었고 (bs4도 로그인 가능) 마우스 클릭이나 키보드 입력 등의 기능은 필요 없고 단순히 데이터만 긁어오면 되었기 때문에 BeautifulSoup을 사용하기로 결정했다.
urllib vs requests
다른 사람들이 이미 만들어놓은 크롤링 예제를 보면 urllib과 requests를 사용하는 것을 볼 수 있었는데 서로 어떻게 다른지 차이점이 궁금해졌다.
구글에 urllib vs requests 를 검색해 봤더니 제일 상단에 Stack Overflow에 이런 답변이 있었다.
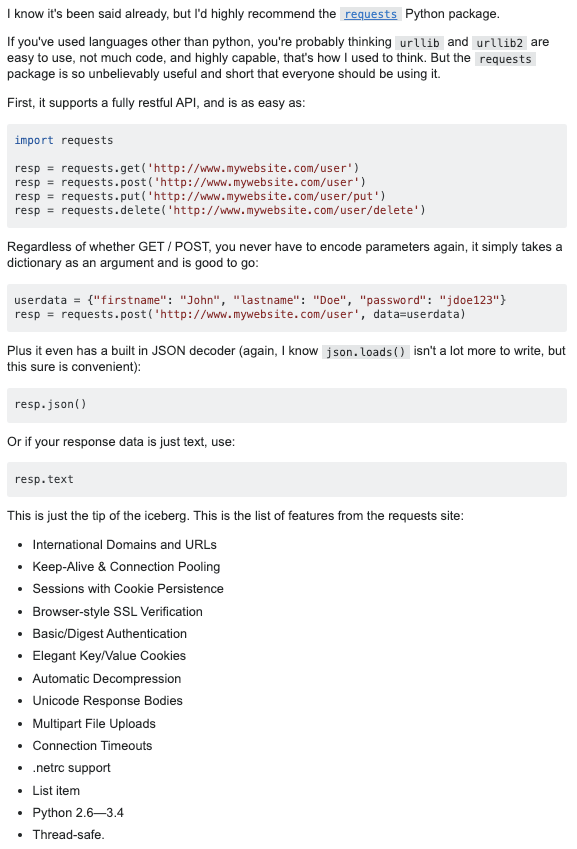
질문에 달린 코멘트들..
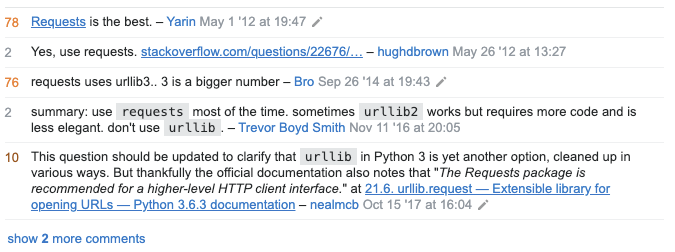
(네, 그렇다고 합니다.. requests짱짱맨!🙌🏻)
그리고 한 블로그의 글을 참조하면 이렇다.

그리고 나는 처음에 urllib을 썼다가 requests로 바꾸게 되었는데, 내가 직접 느낀 차이점으로는 urllib에서 url주소에 한글이 들어가면 따로 변환하는 작업이 필요했는데 requests에는 그럴 필요가 없었다.
(네, 그렇다고 합니다.. requests짱짱맨!🙌🏻)
What to scrape?
크롤링 예제를 보면 네이버 블로그, 뉴스 제목과 링크 불러오기, 멜론 실시간 차트 긁어오기 등이 있었다.
제대로 기억이 나지는 않지만, 예전에 날씨 API를 이용해서 날씨 정보를 받아오려고 한 적이 있었는데 지역명과 좌표가 연결되어 있지 않아서 직접 좌표에 대응해서 날씨를 받아와야 했던 거로 기억한다.
이런 번거로운 과정 없이 네이버에 날씨 검색을 해서 데이터를 긁어오면 이런 문제도 해결이 되고 무엇보다도 네이버는 검색어에 오타가 있으면 어느 정도 자동으로 보정도 해준다..! 거기에 자외선, 미세먼지, 시간당 강수량, 바람 등 추가적인 정보는 보너스 🙈
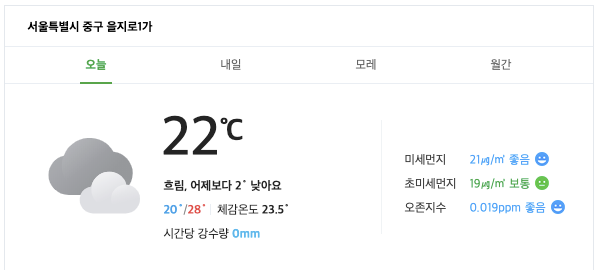
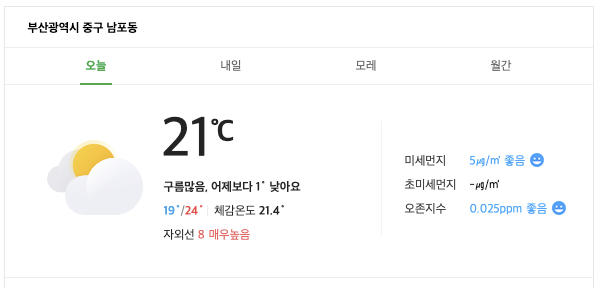
지역별로 비가 내릴 가능성이 있는 곳은 시간당 강수량을 보여주고 아닌 곳은 자외선지수를 보여준다.
Goals
- 지역별, 국가별, 보이는 정보의 차이에 대응 가능할 것
- 오늘, 내일, 모레 날씨를 사용자의 선택에 의해 보여줄 것
- 저장 여부를 묻고, 사용자에게 보인 내용만 csv파일로 저장이 가능할 것
- 사용자가 멈추기 전까지 무한 반복할 것
간략히 정리하면 위의 4가지 기능을 넣고자 했고, 조건문, 반복문, 문자열 파싱 등 여러 가지를 한 번에 사용해볼 수 있게 되어 만족스러운 경험이었다.
Code Review
처음으로, 크롤러가 동작을 시작하는 while문부터 살펴보자.
while
while True:
    where = input('어디 날씨를 알아볼까요? ex) 국가/도시/구/동/면/읍/동 : ')
    html = requests.get(
        'https://search.naver.com/search.naver?sm=top_hty&fbm=0&ie=utf8&query='+where+' 날씨')
    soup = bs(html.text, 'html.parser')
    tmr_morning = soup.select('.morning_box > .info_temperature > .todaytemp ')
    tmr_info = soup.find_all('p', 'cast_txt')
    tmr_indicator = soup.select('.detail_box > .indicator > span')
    if today_weather():
        continue
    answer = input('내일 날씨도 불러올까요? (y/n) : ')
    if answer == 'y' and isAbroad == True:
        abroad_tmr_weather()
        ask_save()
        if ask_keep_going():
            break
    elif answer == 'y' and isAbroad == False:
        tmr_weather()
        ask_the_day_after_tmr = input('모레 날씨도 불러올까요? (y/n) : ')
        if ask_the_day_after_tmr == 'y':
            the_day_after_tmr()
            ask_save()
            if ask_keep_going():
                break
        else:
            ask_save()
            if ask_keep_going():
                break
    else:
        ask_save()
        if ask_keep_going():
break- 인풋으로 받은 값을
where변수로 저장하여https://search.naver.com/search.naver?sm=top_hty&fbm=0&ie=utf8&query='+where+' 날씨의 주소를get요청하여 html을 받아오는 것으로 시작한다. - 네이버의 경우 커스텀헤더를 지정해 주지 않아도 접근할 수 있었기 때문에 더욱 간편했다.
soup = bs(html.text, 'html.parser')받아온 html을 텍스트 형태로 변환하고,html.parser를 넣어서beautifulsoup이 처리할 수 있는 데이터로 변환해준다.이때,
print(html)👉🏻<Response [200]>
print(type(html))👉🏻<class 'requests.models.Response'>
print(type(html.text))👉🏻<class 'str'>requests에서get은 보통 조회의 목적,post는 추가, 수정, 삭제 요청 시 사용된다.
today_weather()
변수 선언 부분은 넘어가고 조건문이 시작하는 부분에 today_weather() 함수의 처음 부분을 보면 다음과 같다.
def today_weather():
    weather_dic = {}
    search_fail = False
    print(datetime.now().strftime('%m월 %d일 %H시 %M분 %S초'))
    weather_dic['시간'] = datetime.now().strftime('%m월 %d일 %H시 %M분 %S초')
    try:
        location_name = soup.find('span', 'btn_select').text
        print(location_name+'의 날씨는 다음과 같습니다.')
        weather_dic['지역명'] = location_name
        global isAbroad
        isAbroad = False
    except:
        try:
            location_name = soup.select('.btn_select > em')[0].text
            isAbroad = True
            print(location_name+'의 날씨는 다음과 같습니다.')
            weather_dic['지역명'] = location_name
        except:    # 모든 예외의 에러 메시지를 출력할 때는 Exception을 사용
            print('해당 지역을 찾을 수 없습니다.')
            search_fail = True
            return True  # for the if statement in the while statement
weather_dic = {}: 딕셔너리에 값을 저장하여 나중에 csv파일로 저장하기 위해 빈 딕셔너리를 만들어줬다.search_fail = False: 올바르지 않은 지역명일 경우, 추가적인 데이터를 긁어오지 않기 위해 추가해주었다.weather_dic['시간'] = datetime.now().strftime('%m월 %d일 %H시 %M분 %S초'): 저장할 경우 해당 데이터가 언제 저장이 되었는지 알기 위해 추가한 부분location_name에서try/except를 사용한 이유는 해외의 경우 지역명이 표시되는 부분이 달랐기 때문에 오류가 발생했기 때문이다. 이때, 함수 안에서isAborad라는 전역 변수를 수정해야 했기 때문에global을 이용했다.


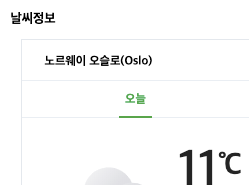
외국 날씨도 다 같은 곳에 이름이 표시되지 않는다. 🤷🏻♂️ 이건 국가 간 도시 이름이 중복되어서 그런 것 같다. 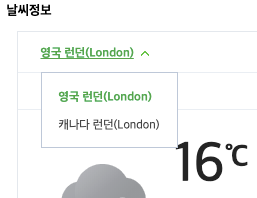
다음으로 같은 함수 안에 최저, 최고 기온을 가져오는 부분은 다음과 같다.
    try:
        min_temp = soup.find('span', {'class': 'min'}).text
        max_temp = soup.find('span', {'class': 'max'}).text
        min_max_temp = '최저/최고 기온 : '+min_temp+'/'+max_temp
        # print(min_max_temp)
    except:
        isAbroad = True
        # print('no min/max temps exist')
- 외국의 경우 최저/최고 기온을 메인에 띄워주지 않기 때문에 지역명 다음으로 체크가 되어야 하는 부분이었다.
다음은 해외의 경우 긁어오는 정보이다.
    if search_fail == False and isAbroad == True:
        current_temp = soup.find('span', {'class': 'todaytemp'}).text
        print('현재 온도 : '+current_temp+'℃')
        weather_dic['현재 온도'] = current_temp+'℃'
        cast_text = soup.find('p', 'cast_txt').text
        print(cast_text)
        weather_dic['비고'] = cast_text
        wind_info = soup.find_all('span', 'sensible')
        print('바람 : ' + wind_info[0].text[3:])
        weather_dic['바람'] = wind_info[0].text[3:]
        print('습도 : ' + wind_info[1].text[3:])
        weather_dic['습도'] = wind_info[1].text[3:]
        abroad_uv = soup.select(
            '.info_data > .info_list:nth-child(2) > li:nth-child(3)')[0].text[5:]
        print('자외선 : ' + abroad_uv)
        weather_dic['자외선'] = abroad_uv
- 국내와 해외 모두 자외선 정보를 표시해줬지만, html상에서는 위치가 달랐기 때문에 변수를 따로 지정해 줘야 했다.
- 체감온도의 경우도 위치가 달랐기 때문에 따로 지정해주었다.
- 해외 날씨 정보는 국내와 다르게 바람, 습도를 표시해주었는데 태그와 클래스 이름이 같았기 때문에
find_all로 같은 태그와 클래스를 모두 찾아내어 리스트 상태의 값을 위와 같이 뽑아(?)내었다.
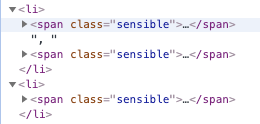
- 자외선의 경우 3번째에 있는
sensible클래스에 들어있었는데select와,:nth-child()를 이용해서 데이터에 접근해 보고 싶었기 때문에 시도해보았다. - 위의 정보들은
weather_dic에 차곡차곡 쌓여간다.
해외가 아니라 국내 날씨일 경우
    elif search_fail == False and isAbroad == False:
        current_temp = soup.find('span', {'class': 'todaytemp'}).text
        cast_text = soup.find('p', 'cast_txt').text
        feel_like_temp = soup.select('.sensible > em > .num')[0].text
        print('현재 온도 : '+current_temp+'℃')
        weather_dic['현재 온도'] = current_temp+'℃'
        print(cast_text)
        weather_dic['비고'] = cast_text
        print('체감온도 : ' + feel_like_temp + '℃')
        weather_dic['체감온도'] = feel_like_temp + '℃'
        print(min_max_temp)
        weather_dic['최저기온'] = min_temp
        weather_dic['최고기온'] = max_temp
- 한방에 찾기 쉬운 것들은
find로 접근했고, 클래스 이름이 같은 게 많거나 하위 클래스로 타고 접근할 때는select가 더 간편한 것 같아서select를 사용했으며,soup.find('span').find('a')처럼find를 여러 개 붙여서 할 수도 있다. soup.find('span', {'class': 'todaytemp'})=soup.find('span', 'todaytemp')find의 괄호 안에 적는 방법은 여러 가지 방법이 있는데 나는 좀 더 직관적인 형태를 사용해 보았다. Beautiful Soup Documentation
국내 지역별 날씨의 변화에 따라 메인에 표시되는 정보가 다른 경우
        try:
            uv_index = soup.select('.indicator > span > .num')
            uv_index_info = soup.find(
                'span', 'indicator').find('span').text[1:]
            print('자외선 : ' + uv_index[0].text + ' ' + uv_index_info)
            weather_dic['자외선'] = uv_index[0].text + ' ' + uv_index_info
        except:
            rainfall = soup.select('.rainfall > em')[0].text[0:1]
            print('시간당 강수량 : ' + rainfall + ' mm')
            weather_dic['시간당 강수량'] = rainfall + ' mm'
- 비가 오거나 비가 올 지역은 자외선 대신 시간당 강수량을 보여주었기 때문에 오류가 나지 않도록
try/except를 사용하였다.
국내 미세먼지 정보
        try:
            data = soup.find('div', 'detail_box')
            fine_dust = data.find_all('dd')[0].text
            ultra_fine_dust = data.find_all('dd')[1].text
            ozone = data.find_all('dd')[2].text
            dust_info = '미세먼지 : '+str(fine_dust)+'\n' + '초미세먼지 : ' + \
                str(ultra_fine_dust)+'\n' + '오존지수 : ' + str(ozone)
            print(dust_info)
            weather_dic['미세먼지'] = str(fine_dust)
            weather_dic['초미세먼지'] = str(ultra_fine_dust)
            weather_dic['오존지수'] = str(ozone)
        except:
            print('no fine dust info exist')
    global weather_dic_combined
    weather_dic_combined.update(weather_dic)
- 사실 이 부분은 해외는 미세먼지 정보가 나오지 않기 때문에 국내, 해외 조건문을 넣기 전에 오류에 대응하기 위해 넣은
try/except라서 없어도 될 것 같다. - 미세먼지와 오존 지수가
int타입이었기 때문에str타입으로 바꾸어 주었다. - 마지막으로, 나중에 사용자가 선택적으로 받아온 정보를 모아둘 빈 딕셔너리에 업데이트해 주었다.
위의 과정이 모두 진행이 되고 나서 다시 while문의 다음 조건문으로 넘어간다.
if statement in while loop
    answer = input('내일 날씨도 불러올까요? (y/n) : ')
    if answer == 'y' and isAbroad == True:
        abroad_tmr_weather()
        ask_save()
        if ask_keep_going():
            break
    elif answer == 'y' and isAbroad == False:
        tmr_weather()
        ask_the_day_after_tmr = input('모레 날씨도 불러올까요? (y/n) : ')
        if ask_the_day_after_tmr == 'y':
            the_day_after_tmr()
            ask_save()
            if ask_keep_going():
                break
        else:
            ask_save()
            if ask_keep_going():
                break
    else:
        ask_save()
        if ask_keep_going():
            break
- 현재(오늘) 날씨를 출력/딕셔너리에 저장 후, 내일 날씨를 불러올지 물어보는 부분이다.
- 이 경우에도 해외인 경우와 국내의 경우가 둘로 나누어지는데 해외는 모레 날씨를 제공하지 않기 때문이다.
- 내일 날씨를 불러오지 않을 경우 앞의 데이터를 저장할지 여부를 결정하고 계속해서 날씨 검색을 할지 여부도 물어보게 된다.
tmr_weather()
def tmr_weather():
    print('내일 오전 :' + str(tmr_morning[0].text) + '℃' + ' ' +
          str(tmr_info[1].text) + '\n' + '미세먼지 : ' + tmr_indicator[0].text)
    print('내일 오후 :' + str(tmr_morning[1].text) + '℃' + ' ' +
          str(tmr_info[2].text) + '\n' + '미세먼지 : ' + tmr_indicator[1].text)
    weather_dic = {}
    weather_dic['내일 오전'] = str(tmr_morning[0].text) + \
        '℃' + ' ' + str(tmr_info[1].text)
    weather_dic['내일 오전 미세먼지'] = tmr_indicator[0].text
    weather_dic['내일 오후'] = str(tmr_morning[1].text) + \
        '℃' + ' ' + str(tmr_info[2].text)
    weather_dic['내일 오후 미세먼지'] = tmr_indicator[1].text
    global weather_dic_combined
    weather_dic_combined.update(weather_dic)
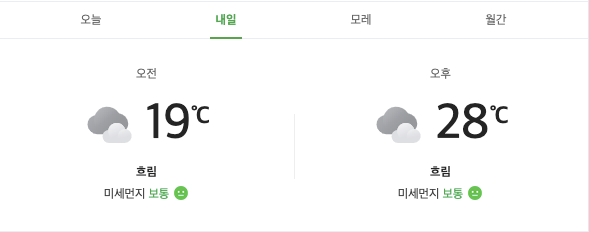
내일탭의 경우오늘탭 보다 보여지는 정보가 적다.- 특이한 점은
내일,모레,오전,오후클래스명과 태그가 같았다. - 이 부분의 변수는
while문 안에서 선언했다.
    tmr_morning = soup.select('.morning_box > .info_temperature > .todaytemp ')
    tmr_info = soup.find_all('p', 'cast_txt')
    tmr_indicator = soup.select('.detail_box > .indicator > span')
tmr_weatehr(),abroad_tmr_weatehr(),the_day_after_tmr()이 3가지 함수가 같은 변수를 사용해서 함수 속에 지역변수로 하지 않고 전역변수로 남겨두었다.
abroad_tmr_weatehr()
def abroad_tmr_weather():
    print('내일 오전 :' + str(tmr_morning[0].text) + '℃' + ' ' +
          str(tmr_info[1].text) + '\n' + '강수확률 : ' + tmr_indicator[1].text + '\n' + '바람 : ' + tmr_indicator[3].text)
    print('내일 오후 :' + str(tmr_morning[1].text) + '℃' + ' ' +
          str(tmr_info[2].text) + '\n' + '강수확률 : ' + tmr_indicator[5].text + '\n' + '바람 : ' + tmr_indicator[7].text)

    weather_dic = {}
    weather_dic['내일 오전'] = str(tmr_morning[0].text) + \
        '℃' + ' ' + str(tmr_info[1].text)
    weather_dic['내일 오전 강수확률'] = tmr_indicator[1].text
    weather_dic['내일 오전 바람'] = tmr_indicator[3].text
    weather_dic['내일 오후'] = str(tmr_morning[1].text) + \
        '℃' + ' ' + str(tmr_info[2].text)
    weather_dic['내일 오후 강수확률'] = tmr_indicator[5].text
    weather_dic['내일 오후 바람'] = tmr_indicator[7].text

    global weather_dic_combined
    weather_dic_combined.update(weather_dic)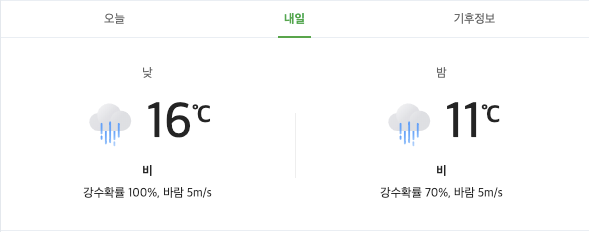
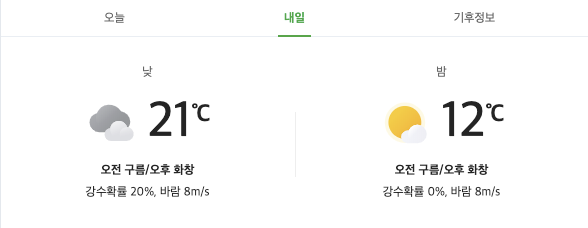
해외의 경우 날씨가 좋아도, 나빠도 강수확률과 바람을 보여준다.
the_day_after_tmr()
def the_day_after_tmr():
    print('모레 오전 :' + str(tmr_morning[2].text) + '℃' + ' ' +
          str(tmr_info[3].text) + '\n' + '미세먼지 : ' + tmr_indicator[2].text)
    print('모레 오후 :' + str(tmr_morning[3].text) + '℃' + ' ' +
          str(tmr_info[4].text) + '\n' + '미세먼지 : ' + tmr_indicator[3].text)

    weather_dic = {}
    weather_dic['모레 오전'] = str(tmr_morning[2].text) + \
        '℃' + ' ' + str(tmr_info[3].text)
    weather_dic['모레 오전 미세먼지'] = tmr_indicator[2].text
    weather_dic['모레 오후'] = str(tmr_morning[3].text) + \
        '℃' + ' ' + str(tmr_info[4].text)
    weather_dic['모레 오후 미세먼지'] = tmr_indicator[3].text

    global weather_dic_combined
    weather_dic_combined.update(weather_dic)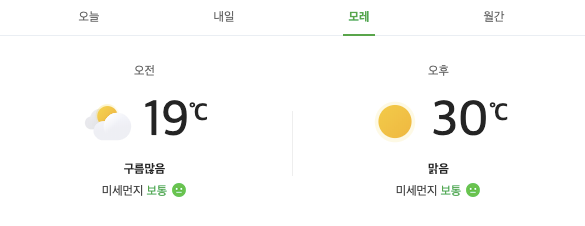
모레 날씨는 국내 날씨에서만 가능하며 내일 날씨와 동일하다.
ask_save()
def ask_save():
    global weather_dic_combined
    wanna_save = input('위의 데이터를 저장하시겠습니까? y/n : ')
    if wanna_save == 'y':
        with open('weather.csv', 'a') as f:
            w = csv.writer(f)
            w.writerow(weather_dic_combined.keys())
            w.writerow(weather_dic_combined.values())
            # for k, v in weather_dic_combined.items():
            # w.writerow([k, v])
        print('saved')

    weather_dic_combined.clear()
with open('weather.csv', 'a') as f:: 저장을 할 경우 읽기/쓰기 타입을a로 지정해주어, 이미 파일이 존재한다면 그 csv파일에 이어서 데이터가 입력되고 저장이 되도록 하였다.- 주석 처리한 부분은 딕셔너리의 키와 값을 세로로 나열이 되는 것 이고 주석을 하지 않은 부분(현재 상태)은 키와 값이 가로로 나열이 된다.
- 마지막 줄에
딕셔너리.clear()를 해주어 비워주는 작업도 해줘야 한다. 이 과정이 없으면, 해외에서만 보여주는 바람, 강수확률 등이 딕셔너리에 남게 되어 국내 날씨의 저장 데이터에 해외 데이터가 들어가 있게 된다. dic = {}👈🏻 딕셔너리를 새로 선언하면 초기화되는 것이 아니라 기존 딕셔너리에 빈 값이 추가되는 것(아무 일도 일어나지 않음)과 같은 효과이다.dic.clear()👈🏻 해당 딕셔너리의keys,values모두 비워준다.

사용자의 선택에 따라 저장되는 정보의 양이 다르다.
ask_keep_going()
def ask_keep_going():
    keep_going = input('계속하시겠습니까? y/n : ')
    if keep_going == 'n':
        return True
    else:
        return False
저장 여부를 결정하고 바로 호출되는 함수이다.
    else:
        ask_save()
        if ask_keep_going():
            break
조건문으로 해당 함수를 호출하고 참일 경우 break하여 while loop를 정지시킨다.
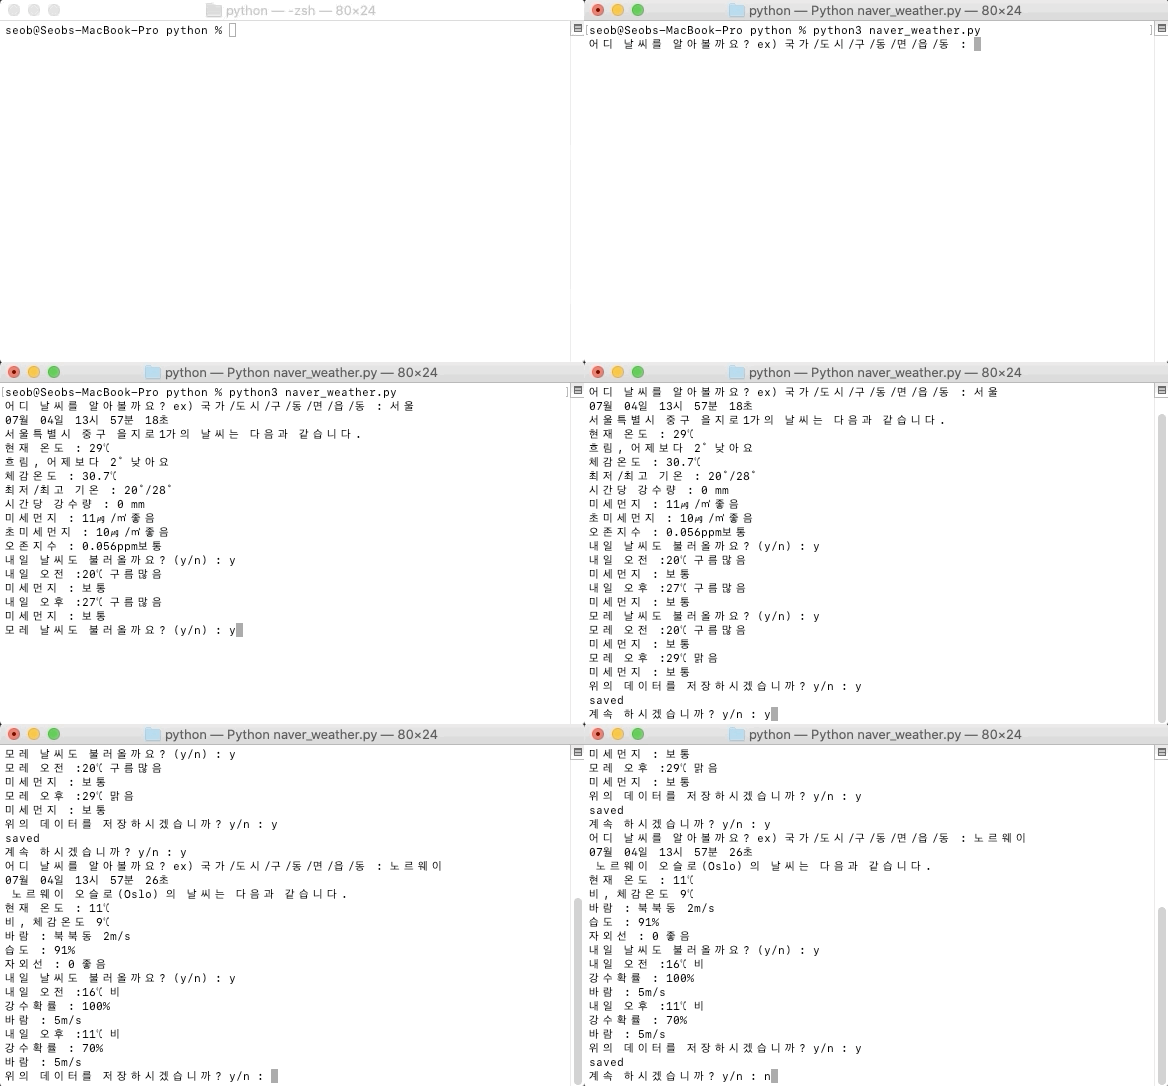
마지막으로 터미널에서 작동하는 모습이다.
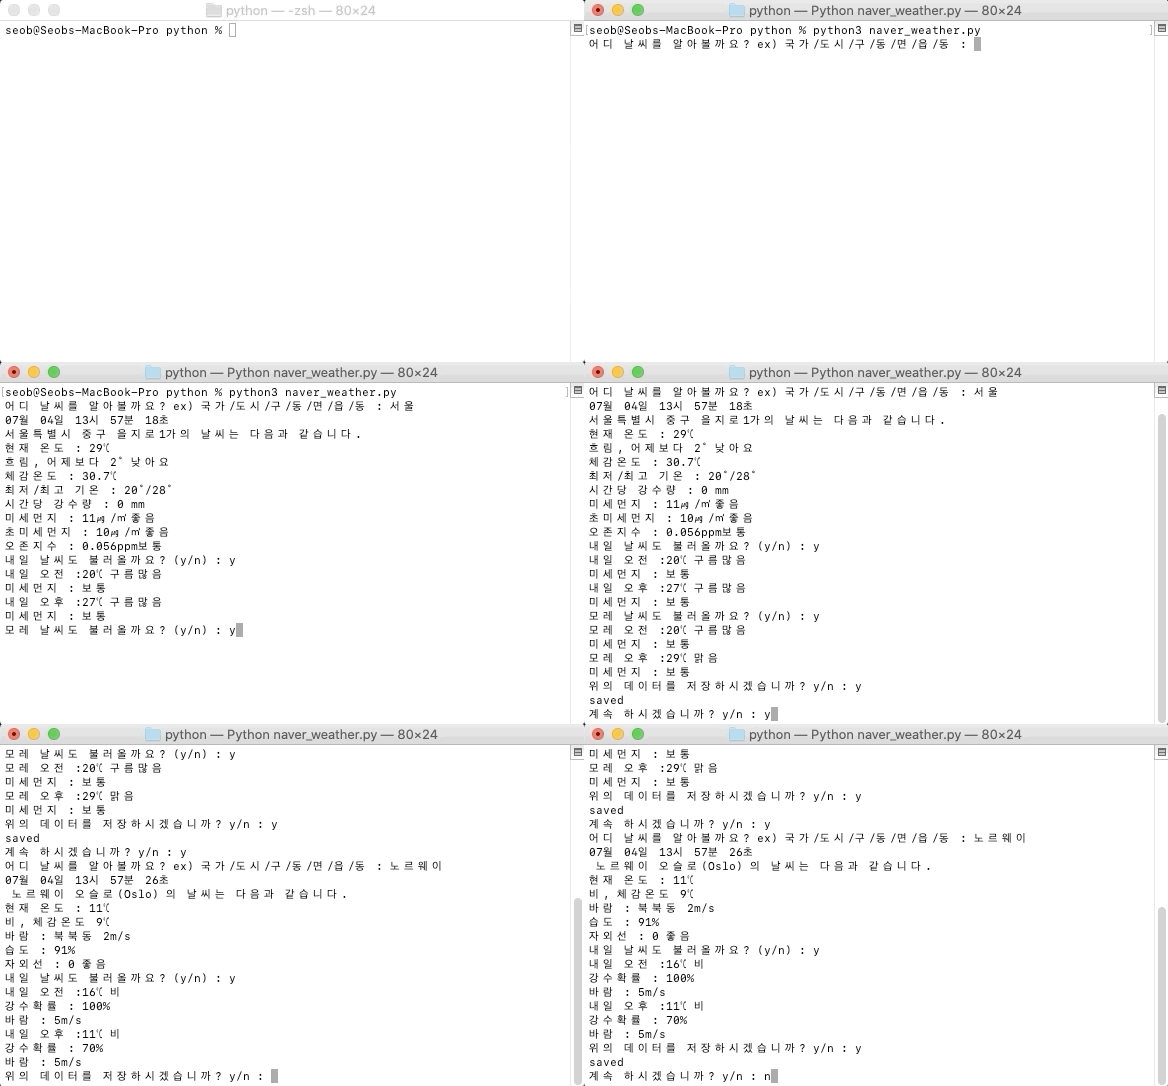

터미널에서 출력된 데이터가 저장된 모습
