미루다 미루다 드디어 적는 크롤링 배포.. 정말 이 녀석 때문에 애를 많이 먹었다..
상품명은 정적, 이미지 URL은 동적으로 로드돼 JSoup만으로는 수집이 불가능했고, Playwright 대신 Selenium을 최종 선택해 배포 환경까지 연동한 과정을 정리하겠다.
1. 초기 시도
-
JSoup
→ 상품명·이미지 전혀 수집 불가 -
Playwright
→ Dockerfile 설정이 복잡해 중단 -
Selenium
→ ✅ 로컬 환경에서 바로 성공
2. 로컬 환경에서 Selenium 크롤러
@Service
public class CoupangScraperService {
    public Map<String, String> getProductInfo(String url) {
        WebDriverManager.chromedriver().setup();
        WebDriver driver = new ChromeDriver();
        Map<String, String> productData = new HashMap<>();

        try {
            driver.get(url);
            WebDriverWait wait = new WebDriverWait(driver, Duration.ofSeconds(10));

            // 1) 상품 제목 가져오기
            WebElement titleEl = wait.until(
                ExpectedConditions.visibilityOfElementLocated(
                    By.cssSelector("h1.prod-buy-header__title")
                )
            );
            productData.put("title", titleEl.getText());

            // 2) 상품 이미지 가져오기
            WebElement imgEl = wait.until(
                ExpectedConditions.visibilityOfElementLocated(
                    By.cssSelector("img.prod-image__detail")
                )
            );
            String imageUrl = imgEl.getAttribute("src");
            String highRes = imgEl.getAttribute("data-zoom-image-url");
            if (highRes != null && !highRes.isEmpty()) {
                imageUrl = highRes;
            }
            if (imageUrl.startsWith("//")) {
                imageUrl = "https:" + imageUrl;
            }
            productData.put("image", imageUrl);

        } catch (Exception e) {
            productData.put("error", e.getMessage());
        } finally {
            driver.quit();
        }
        return productData;
    }
}
결과: 로컬에서 정상 작동!
3. 배포 후 문제
Cloudtype에 배포 후, request만 날려보면 실패
→ 로컬 환경에서만 크롤링이 동작
4. Dockerfile로 환경 구성 시도
# ─── Build Stage ─────────────────────────────────────
FROM eclipse-temurin:17-jdk AS build
WORKDIR /app
COPY . .
RUN chmod +x ./gradlew
RUN ./gradlew bootJar --no-daemon

# ─── Runtime Stage ───────────────────────────────────
FROM ubuntu:22.04
WORKDIR /app

# Chrome + Chromedriver 설치
RUN apt-get update && apt-get install -y \
      wget curl unzip gnupg2 ca-certificates \
      fonts-liberation libappindicator3-1 libasound2 \
      libatk-bridge2.0-0 libatk1.0-0 libgbm1 \
      libnspr4 libnss3 libx11-xcb1 libxcomposite1 \
      libxdamage1 libxrandr2 libxss1 libxtst6 \
      lsb-release xdg-utils chromium-browser chromium-driver && \
    apt-get clean

# 실행 권한 부여
RUN chmod +x /usr/bin/chromium-browser && \
    chmod +x /usr/bin/chromedriver

ENV CHROME_BIN=/usr/bin/chromium-browser
ENV CHROMEDRIVER_PATH=/usr/bin/chromedriver
ENV PATH="${CHROMEDRIVER_PATH}:${PATH}"

COPY --from=build /app/build/libs/*.jar ./app.jar
EXPOSE 8080

ENTRYPOINT ["java", "-jar", "app.jar"]
하지만
- GUI 없는 headless 서버에서
- --no-sandbox, --disable-dev-shm-usage 등 옵션을 줘도 여전히 권한 제한 오류 발생
5. EC2 크롤링 서버 분리
-
필요한 패키지·옵션 자유 설치 가능
-
Cloudtype에는 “크롤링 요청만” 보내도록 구조 변경
5.1 EC2 SSH 접속
cd ~/Downloads
ssh -i "<키이름>.pem" ubuntu@<퍼블릭_IP>
5.2 크롬·크롬드라이버 설치
# 1) 패키지 업데이트
sudo apt update && sudo apt upgrade -y
sudo apt install -y wget curl unzip gnup lsb-release

# 2) Chromium 설치
# Ubuntu 20.04 이하
sudo apt install -y chromium-browser
# 최신 Ubuntu
sudo snap install chromium
chromium --version

# 3) Chromedriver 다운로드 & 설치
wget https://chromedriver.storage.googleapis.com/122.0.6261.111/chromedriver_linux64.zip
sudo apt install unzip -y
unzip chromedriver_linux64.zip
chmod +x chromedriver
sudo mv chromedriver /usr/local/bin/
chromedriver --version
6. EC2 전용 Spring Boot 크롤링 서버
build.gradle
dependencies {
    implementation 'org.springframework.boot:spring-boot-starter-data-jpa'
    implementation 'org.springframework.boot:spring-boot-starter-web'
    compileOnly 'org.projectlombok:lombok'
    runtimeOnly 'com.mysql:mysql-connector-j'
    annotationProcessor 'org.projectlombok:lombok'
    testImplementation 'org.springframework.boot:spring-boot-starter-test'
    testRuntimeOnly 'org.junit.platform:junit-platform-launcher'

    // Selenium
    implementation 'org.seleniumhq.selenium:selenium-java:4.15.0'
    // WebDriver Manager
    implementation 'io.github.bonigarcia:webdrivermanager:5.6.3'
}
CrawingController.java
@RestController
@RequiredArgsConstructor
public class CrawlingController {
    private final CrawlingService crawlingService;

    @PostMapping("/crawl")
    public ResponseEntity<Map<String, String>> crawl(
        @RequestBody Map<String, String> request
    ) {
        String url = request.get("url");
        Map<String, String> result = crawlingService.fetchWishData(url);
        return ResponseEntity.ok(result);
    }
}
CrawlingService.java
@Service
public class CrawlingService {
    public Map<String, String> fetchWishData(String url) {
        Map<String, String> productData = new HashMap<>();
        ChromeOptions options = new ChromeOptions();
        options.setBinary("/snap/bin/chromium");

        // EC2 환경 대응 옵션
        options.addArguments("--headless=new");
        options.addArguments("--no-sandbox");
        options.addArguments("--disable-dev-shm-usage");
        options.addArguments("--disable-gpu");
        options.addArguments("--remote-debugging-port=9222");
        options.addArguments("--disable-software-rasterizer");
        options.addArguments("user-agent=Mozilla/5.0 (Windows NT 10.0; Win64; x64)");

        WebDriver driver = null;
        try {
            driver = new ChromeDriver(options);
            driver.get(url);

            WebElement titleEl = driver.findElement(
                By.cssSelector("h1.prod-buy-header__title")
            );
            WebElement imgEl = driver.findElement(
                By.cssSelector("img.prod-image__detail")
            );

            String title = titleEl.getText();
            String imageUrl = imgEl.getAttribute("src");
            String highRes = imgEl.getAttribute("data-zoom-image-url");
            if (highRes != null && !highRes.isEmpty()) {
                imageUrl = highRes;
            }
            if (imageUrl.startsWith("//")) {
                imageUrl = "https:" + imageUrl;
            }

            productData.put("title", title);
            productData.put("image", imageUrl);

        } catch (Exception e) {
            productData.put("title", null);
            productData.put("image", null);
            productData.put("error", e.getMessage());
        } finally {
            if (driver != null) {
                driver.quit();
            }
        }
        return productData;
    }
}
application.properties
spring.application.name=crawling-server
server.port=8080
# DB 없이 실행하기 위해 datasource 자동 설정 제외
spring.autoconfigure.exclude=\
org.springframework.boot.autoconfigure.jdbc.DataSourceAutoConfiguration
7. EC2 서버 실행 방법
# 1) Java 설치
sudo apt update
sudo apt install openjdk-17-jre-headless -y

# 2) .jar 업로드 (로컬 → EC2)
scp -i "<키경로>/<키이름>.pem" \
    "./build/libs/<프로젝트명>.jar" \
    ubuntu@<퍼블릭_IP>:~

# 3) SSH 접속 및 실행
ssh -i "<키경로>/<키이름>.pem" ubuntu@<퍼블릭_IP>
java -jar <프로젝트명>.jar

# (필요 시 GUI 라이브러리 추가 설치)
sudo apt update
sudo apt install -y \
    fonts-liberation libappindicator3-1 \
    libatk-bridge2.0-0 libnss3 libxss1
8. 메인 서버 코드 연동
@Value("${crawling.server.url}")
private String crawlingServerUrl;

@Override
public Map<String, String> fetchWishData(String url) {
    Map<String, String> requestBody = new HashMap<>();
    requestBody.put("url", url);

    HttpHeaders headers = new HttpHeaders();
    headers.setContentType(MediaType.APPLICATION_JSON);
    HttpEntity<Map<String, String>> entity = new HttpEntity<>(requestBody, headers);

    try {
        ResponseEntity<Map> response = restTemplate.postForEntity(
            crawlingServerUrl + "/crawl",
            entity,
            Map.class
        );
        Map<String, String> result = response.getBody();
        if (result == null
            || result.get("title") == null
            || result.get("image") == null
        ) {
            throw new EventHandler(ErrorStatus._CRAWLING_ERROR);
        }
        return result;
    } catch (Exception e) {
        throw new EventHandler(ErrorStatus._CRAWLING_ERROR);
    }
}
# application-local.yml 예시
crawling:
server:
url: http://<EC2_PUBLIC_IP>:8080💡 ec2 서버용 크롤링 코드를 수정할 경우, bootJar를 다시 실행해서 아래와 같게 실행하면 원격 접속 성공
#ec2에 .jar 파일 업로드
scp -i "/pem키 경로/<pem키이름>.pem" "/크롤링 서버용 프로젝트 jar 경로/build/libs/jar이름.jar" ubuntu@<여기에_퍼블릭_IP_주소>:~

#ec2에서 실행
ssh -i "/pem키 경로/<pem키이름>.pem" ubuntu@<여기에_퍼블릭_IP_주소>

#스프링부트 앱 실행
java -jar jar이름.jar
9. 최종 성공 화면
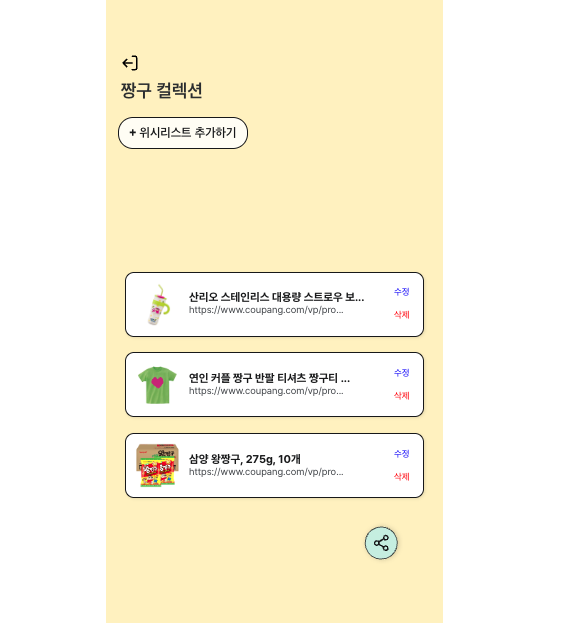
운영 서버에서 EC2 크롤링 API를 호출해 정상적으로 상품명 및 이미지를 받아와 위시리스트에 표시할 수 있었다!
🔥 한계 및 개선 방향
-
IP 차단: 2–4회 요청 후 EC2에서 IP 차단 발생
-
해결 방안:
-
User-Agent 랜덤화
-
요청 간 딜레이 삽입
-
프록시 서버 도입
-
AWS 인스턴스 재시작 통한 IP 풀 변경
-
로컬 단계까지는 완벽했지만, 운영 단계에서도 안정적인 크롤링을 위해 추가 보완이 필요하다..
참고 자료
https://velog.io/@yeessonng/%EC%BF%A0%ED%8C%A1-%ED%81%AC%EB%A1%A4%EB%A7%81-%EB%B0%B0%ED%8F%AC