🗂️ Day28 프로젝트 : pomodoro GUI 애플리케이션
Tkinter 모듈로 포모도로 기법을 구현한 프로그램
순서
🖋️ 완수할 과제 정하기
1. 25분 작업 수행
2. 5분 짧은 휴식
3. 25분 작업 수행
4. 5분 짧은 휴식
5. 25분 작업 수행
6. 5분 짧은 휴식
7. 25분 작업 수행
8. 15-30분 긴 휴식
1. 캔버스 위젯, Tkinter에 이미지 추가
🔍 유의 사항
- colorhunt : 일관된 디자인을 위한 컬러 팔레트
- 모든 위젯에서 표준으로 적용되는 속성 존재 (width, height, bg 등)
- 캔버스(Canvas) 위젯
- 다른 것들 위에 층층이 쌓을 수 있음 (토마토 이미지 위에 타이머 배치하기)
- canvas_ 로 시작하는 모든 메소드들은 같은 캔버스 안에서 겹치기 가능
- canvas_image()
x, y: 위치image: 이미지 파일 주소가 아닌 PhotoImage 클래스 객체- canvas_text()
x, y: 위치fill: 텍스트 색상font: 폰트(튜플)- 여러 속성값을 조정하다보면 토마토 이미지가 자주 움직이기 때문에 계속 수정해야 한다
🖼️ tomato.png

⌨️ main.py
from tkinter import *
# ---------------------------- CONSTANTS ------------------------------- #
YELLOW = "#f7f5dd"
FONT_NAME = "Courier"
# ---------------------------- UI SETUP ------------------------------- #
window = Tk()
window.title("Pomodoro")
window.config(padx=100, pady=50, bg=YELLOW)
canvas = Canvas(width=200, height=224, bg=YELLOW, highlightthickness=0)
tomato_img = PhotoImage(file="tomato.png")
canvas.create_image(100, 112, image=tomato_img)
canvas.create_text(100, 130, text="00:00", fill="white", font=(FONT_NAME, 35, "bold"))
canvas.pack()
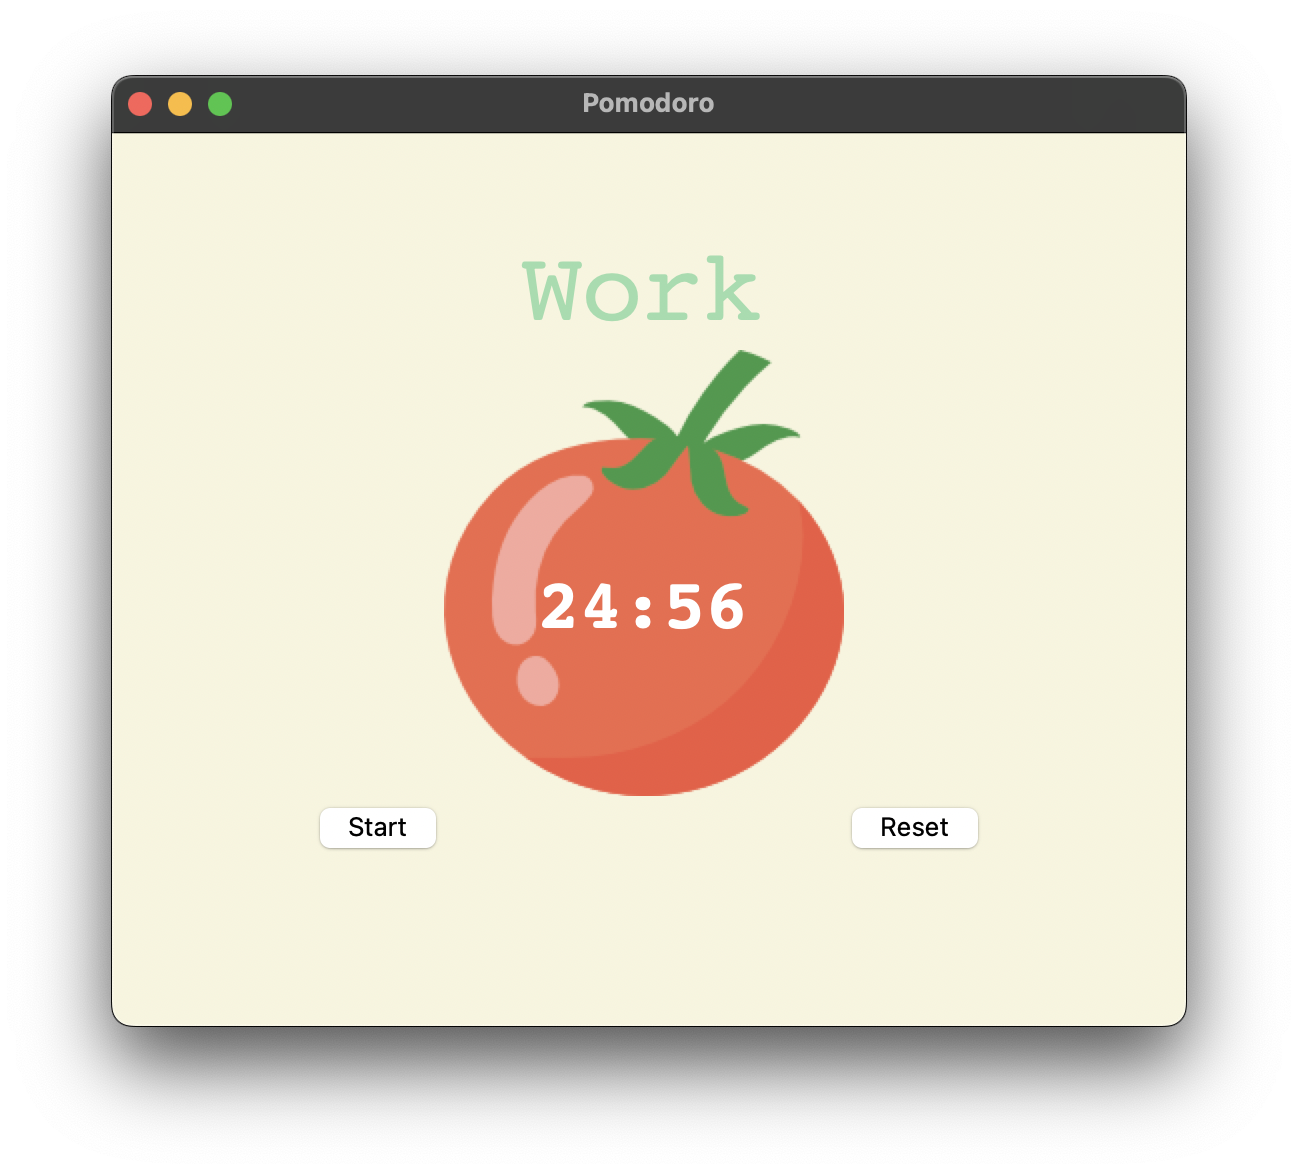
window.mainloop()2. UI 완성
🔍 유의 사항
- 힌트
- 레이블의 글자 색을 바꾸기 위해 fg(foreground) 사용
(bg는 background의 줄임말)- 체크 모양의 특수문자를 복사해서 텍스트로 넣기
- pack() 대신 grid() 사용
- 버튼 주변에 기본 배경색이 약간 남아있는 현상 해결하기
- 강의에서는 캔버스 객체를 초기화할 때처럼 highlightthickness=0 를 사용했으나,
똑같이 따라해도 해결되지 않음- borderwidth=0를 추가했을 때, 테두리가 약간 얇아졌으나 완벽히 없어지지 않음
- highlightbackground=원하는 배경색으로 해결
⌨️ main.py
from tkinter import *

# ---------------------------- CONSTANTS ------------------------------- #
GREEN = "#9bdeac"
YELLOW = "#f7f5dd"
FONT_NAME = "Courier"

# ---------------------------- UI SETUP ------------------------------- #
window = Tk()
window.title("Pomodoro")
window.config(padx=100, pady=50, bg=YELLOW)

title_label = Label(text="Timer", bg=YELLOW, fg=GREEN, font=(FONT_NAME, 50))
title_label.grid(column=1, row=0)

canvas = Canvas(width=200, height=224, bg=YELLOW, highlightthickness=0)
…
canvas.grid(column=1, row=1)

start_button = Button(text="Start", highlightbackground=YELLOW)
start_button.grid(column=0, row=2)
reset_button = Button(text="Reset", highlightbackground=YELLOW)
reset_button.grid(column=2, row=2)

checkmark_label = Label(text='✔', bg=YELLOW, fg=GREEN, font=(FONT_NAME, 30))
checkmark_label.grid(column=1, row=3)

window.mainloop()
3. 카운트다운 메커니즘 추가
🔍 유의 사항
- 5, 4, 3, 2, 1 처럼 한 번에 하나씩 카운트다운하는 기능 구현하기
- 1분 = 60초
- GUI는 이벤트 구동형(event driven)
- ms(밀리초)마다 어떤 이벤트가 일어나는지 주시하다가, 이벤트가 발생하면 반응하는 방식
mainloop()메소드를 통해 while문처럼 루프를 반복
(while문을 따로 사용할 수 없음)- after( ms, func, *args ) : 윈도우에 사용 가능한 메소드로, 일정 시간 대기 후 특정 함수 실행
ms: 대기해야 할 시간의 양 (1000ms = 1s)func: 대기 후, 해당 함수 호출*args: 함수에 넣을 인자- 설정값 변경하기
- 레이블 : label.config( text=new_text )
- 캔버스 : canvas.itemconfig( old_text, text=new_text )
⌨️ main.py
from tkinter import *
import math

# ---------------------------- CONSTANTS ------------------------------- #
…

# ---------------------------- TIMER MECHANISM ------------------------------- #
def start_timer():
    count_down(5 * 60)

# ---------------------------- COUNTDOWN MECHANISM ------------------------------- #
def count_down(count):
    count_min = math.floor(count / 60)
    count_sec = count % 60

    canvas.itemconfig(timer_text, text=f"{count_min}:{count_sec}")
    if count > 0:
        # 1초 대기 후 count에서 1 감소
        window.after(1000, count_down, count - 1)

# ---------------------------- UI SETUP ------------------------------- #
…

canvas = Canvas(width=200, height=224, bg=YELLOW, highlightthickness=0)
tomato_img = PhotoImage(file="tomato.png")
canvas.create_image(100, 112, image=tomato_img)
# 캔버스의 타이머 텍스트를 변수로 지정
timer_text = canvas.create_text(100, 130, text="00:00", fill="white",
                                font=(FONT_NAME, 35, "bold"))
canvas.grid(column=1, row=1)
# Start 버튼에 함수 연결
start_button = Button(text="Start", highlightbackground=YELLOW, command=start_timer)
start_button.grid(column=0, row=2)
…

window.mainloop()
4. 동적 타이핑(dynamic typing)
🔍 유의 사항
- 5분을 카운트다운 시 5:0 가 아닌 5:00로 표시되어야 한다
- 동적 타이핑(dynamic typing)
(C, Java, Swift 등의 언어에서는 불가능한 기능)
- 타입 에러가 발생하는 경우
예)a = 3, b ="4"
a + b: int + str은 불가능b ** 2: str을 제곱할 수 없음- 동적 타이핑이 적용되는 경우
변수 안의 콘텐츠를 변경하는 것으로 변수의 데이터형을 자동으로 변경 가능
a = 3: a의 타입은 int
a = "hello": a의 타입이 str으로 동적 변경됨
⌨️ main.py
from tkinter import *
import math

# ---------------------------- CONSTANTS ------------------------------- #
…

# ---------------------------- TIMER MECHANISM ------------------------------- #
def start_timer():
    count_down(5 * 60)

# ---------------------------- COUNTDOWN MECHANISM ------------------------------- #
def count_down(count):
    count_min = math.floor(count / 60)
    count_sec = count % 60

    # 동적 타이핑으로 한 자리 숫자의 초를 0n으로 표시되도록 변경
    if count_sec < 10:
        count_sec = f"0{count_sec}"

    canvas.itemconfig(timer_text, text=f"{count_min}:{count_sec}")
    if count > 0:
        window.after(1000, count_down, count - 1)

# ---------------------------- UI SETUP ------------------------------- #
…

start_button = Button(text="Start", highlightbackground=YELLOW, command=start_timer)
start_button.grid(column=0, row=2)
…
5. 타이머 세션 및 값 설정
🔍 유의 사항
- 카운트다운 반복 횟수를 전역변수로 설정 후, 함수 내에서 global 키워드로 접근
- 카운트다운 반복 횟수가 1, 3, 5, 7 = 25분 작업 카운트다운
- 카운트다운 반복 횟수가 2, 4, 6 = 5분 짧은 휴식 카운트다운
- 카운트다운 반복 횟수가 8 = 20분 긴 휴식 카운트다운
- 카운트가 0이 되면, 다음 카운트다운이 자동으로 진행되어야 한다
- 사용자 경험 개선하기
- 제목을 단순 'Timer'에서 현재 어떤 것을 해야하는지 표시하도록 변경
- 제목 색깔을 현재 해야하는 것에 따라 다르게 변경하기
⌨️ main.py
from tkinter import *
import math

# ---------------------------- CONSTANTS ------------------------------- #
PINK = "#e2979c"
RED = "#e7305b"
GREEN = "#9bdeac"
YELLOW = "#f7f5dd"
FONT_NAME = "Courier"
WORK_MIN = 25
SHORT_BREAK_MIN = 5
LONG_BREAK_MIN = 20
reps = 0

# ---------------------------- TIMER MECHANISM ------------------------------- #
def start_timer():
    global reps
    reps += 1

    work_sec = WORK_MIN * 60
    short_break_sec = SHORT_BREAK_MIN * 60
    long_break_sec = LONG_BREAK_MIN * 60

    if reps % 8 == 0:
        count_down(long_break_sec)
        title_label.config(text="Break",fg=RED)
    elif reps % 2 == 0:
        count_down(short_break_sec)
        title_label.config(text="Break",fg=PINK)
    else:
        count_down(work_sec)
        title_label.config(text='Work',fg=GREEN)

# ---------------------------- COUNTDOWN MECHANISM ------------------------------- #
def count_down(count):
    count_min = math.floor(count / 60)
    count_sec = count % 60

    if count_sec < 10:
        count_sec = f"0{count_sec}"

    canvas.itemconfig(timer_text, text=f"{count_min}:{count_sec}")
    if count > 0:
        window.after(1000, count_down, count - 1)
    else:
        # 카운트가 0이 되었을 때, 다음 카운트다운 시작하기
        start_timer()

# ---------------------------- UI SETUP ------------------------------- #
…
6. 체크 표시 추가, 애플리케이션 리셋
🔍 유의 사항
- 체크 표시는 사용자가 작업 카운트다운을 완료했을 때만 하나씩 증가
= reps가 2회가 될 때마다 작업 세션을 1번 완료하는 셈- Reset 버튼을 누르면 진행되던 reps를 리셋하는 기능 넣기
- after_cancel() : 설정했던 after를 취소하는 메소드
- after 메소드를 설정했던 윈도우 객체를 변수 안에 넣어야 사용 가능
- 함수 안에서 after 메소드를 사용했기 때문에, 해당 변수는 전역변수로 선언해야 함
- 처음에 해당 변수를 전역변수로 선언할 때는 우선 None값 부여
- reps 값도 0으로 초기화하는 것 잊지말기
- 또한 Reset 버튼을 누르면 타이틀, 타이머, 체크박스를 모두 처음 상태로 초기화해야 한다
⌨️ main.py
from tkinter import *
import math

# ---------------------------- CONSTANTS ------------------------------- #
PINK = "#e2979c"
RED = "#e7305b"
GREEN = "#9bdeac"
YELLOW = "#f7f5dd"
FONT_NAME = "Courier"
WORK_MIN = 25
SHORT_BREAK_MIN = 5
LONG_BREAK_MIN = 20
reps = 0
timer = None

# ---------------------------- TIMER RESET ------------------------------- #
def reset_timer():
    window.after_cancel(timer)
    canvas.itemconfig(timer_text, text="00:00")
    title_label.config(text="Timer", fg=GREEN)
    checkmark_label.config(text="")
    global reps
    reps = 0

# ---------------------------- TIMER MECHANISM ------------------------------- #
def start_timer():
    global reps
    reps += 1

    work_sec = WORK_MIN * 60
    short_break_sec = SHORT_BREAK_MIN * 60
    long_break_sec = LONG_BREAK_MIN * 60

    if reps % 8 == 0:
        count_down(long_break_sec)
        title_label.config(text="Break",fg=RED)
    elif reps % 2 == 0:
        count_down(short_break_sec)
        title_label.config(text="Break",fg=PINK)
    else:
        count_down(work_sec)
        title_label.config(text='Work',fg=GREEN)

# ---------------------------- COUNTDOWN MECHANISM ------------------------------- #
def count_down(count):
    count_min = math.floor(count / 60)
    count_sec = count % 60
    if count_sec < 10:
        count_sec = f"0{count_sec}"

    canvas.itemconfig(timer_text, text=f"{count_min}:{count_sec}")
    if count > 0:
        global timer
        timer = window.after(1000, count_down, count - 1)
    else:
        start_timer()
        # 작업 세션이 끝날 때마다 체크표시하기
        marks = ""
        work_sessions = math.floor(reps / 2)
        for _ in range(work_sessions):
            marks += '✔'
        checkmark_label.config(text=marks)

# ---------------------------- UI SETUP ------------------------------- #
window = Tk()
window.title("Pomodoro")
window.config(padx=100, pady=50, bg=YELLOW)

title_label = Label(text="Timer", bg=YELLOW, fg=GREEN, font=(FONT_NAME, 50))
title_label.grid(column=1, row=0)

canvas = Canvas(width=200, height=224, bg=YELLOW, highlightthickness=0)
tomato_img = PhotoImage(file="tomato.png")
canvas.create_image(100, 112, image=tomato_img)
timer_text = canvas.create_text(100, 130, text="00:00", fill="white",
                                font=(FONT_NAME, 35, "bold"))
canvas.grid(column=1, row=1)

start_button = Button(text="Start", highlightbackground=YELLOW, command=start_timer)
start_button.grid(column=0, row=2)
reset_button = Button(text="Reset", highlightbackground=YELLOW, command=reset_timer)
reset_button.grid(column=2, row=2)

# 체크마크 레이블(처음에는 체크마크 없이 비어있는 상태로 시작)
checkmark_label = Label(bg=YELLOW, fg=GREEN, font=(FONT_NAME, 30))
checkmark_label.grid(column=1, row=3)


window.mainloop()