🗂️ Day63 프로젝트: 가상 책장
읽은 책을 기록하고 평점을 매긴 후 데이터베이스에 저장하여 보여주는 웹사이트
1. 웹사이트 작동시키기
🔍 유의 사항
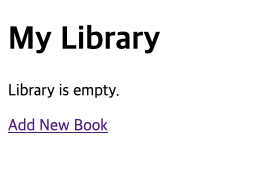
- 홈페이지에 'My Library'로 표시된 제목과 'Add New Book' 링크 추가
- "/add" 경로에 책 이름, 작가, 별점을 입력하고 전송하는 폼 만들기
- 'Add Book' 버튼을 클릭하면 main.py의
all_books에 책 세부정보가 추가되도록 변경- 홈페이지에
all_books의 모든 책을 리스트로 표시
(책이 아직 없는 경우에는 책장이 비었다는 문구 표시)- 홈페이지의 'Add New Book' 링크를 누르면 "/add" 페이지로 이동하도록 수정


❗️문제점: 서버를 갱신하면 all_books 리스트가 초기화되어 모든 데이터가 손실됨
❖ 데이터베이스 기술
◇ SQLite 데이터베이스
- 전 세계에서 가장 많이 사용되는 데이터베이스
- 모든 파이썬 설치에 기본적으로 포함되어 있기 때문에 이미 파이썬 프로젝트에 설치되어 있음
- 데이터베이스를 보기 위한 소프트웨어 DB 브라우저 다운로드 필요
⌨️ main.py
# 1. sqlite3 모듈 임포트
import sqlite3

# 2. 새 데이터베이스에 대한 연결을 생성(데이터베이스가 존재하지 않는 경우 생성됨)
db = sqlite3.connect("books-collection.db")

# 3. main.py를 실행하면 books-collection.db 파일이 파이참에 표시됨

# 4. 데이터베이스를 제어하는 커서 생성
cursor = db.cursor()

# 5. 데이터베이스에 표 생성(한 번 생성한 후에는 주석 처리해야 오류 발생 안 함)
cursor.execute("CREATE TABLE books (id INTEGER PRIMARY KEY, title varchar(250) NOT NULL UNIQUE, author varchar(250) NOT NULL, rating FLOAT NOT NULL)")
'''
<코드 설명>
cursor          : 모든 작업을 수행하는 마우스 포인터
.execute()      : 커서가 작업을 실행하도록 명령
CREATE TABLE    : 데이터베이스에 새 표를 생성하는 키워드
books           : 생성 중인 새 표에 부여한 이름
()              : 표의 필드(엑셀 시트의 '열 제목'에 해당)
id INTEGER PRIMARY KEY              : id 필드(1번째 필드, INTEGER 형, 이 표의 기본키)
title varchar(250) NOT NULL UNIQUE  : title 필드
author varchar(250) NOT NULL        : author 필드
rating FLOAT NOT NULL               : rating 필드
'''

# 6. DB 브라우저 프로그램에서 Open Database → 프로젝트 위치 → books-collection.db 열기

# 7. 데이터를 표에 추가하기 (처음으로 추가하기 때문에 id 필드 값은 1)
cursor.execute("INSERT INTO books VALUES(1, 'Harry Potter', 'J. K. Rowling', 9.3)")

# 8. 변경사항 커밋
db.commit()

# 9. DB 브라우저에서 `Close Database`를 누르거나 파이썬 코드에서 `db.close()`로 db닫기
db.close() 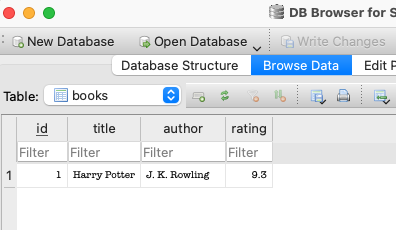
💡 구조화 질의어 (SQL, Structured Query Language)
- 키워드가 모두 대문자로 쓰인 영어 문장과 비슷
- SQ 라이트 데이터베이스의 모든 작업은 SQL이라는 명령어로 표현
- SQL 쿼리는 오타에 민감하기 때문에 오류가 발생하기 쉬움
◇ SQLAlchemy
- 컴파일러가 코드상의 오타와 오류를 찾아낼 수 있도록 도와주는 도구
- 객체 관계형 매핑(ORM, Object Relational Mapping) 라이브러리
- 데이터베이스의 관계를 객체에 매핑할 수 있다는 의미
- 필드는 객체 속성이 되고, 표는 별도의 클래스, 데이터의 각 행은 새 개체로 정의됨
- SQLAlchemy Quick Start
⌨️ main.py
# 1. 필요한 패키지 임포트
from flask import Flask
from flask_sqlalchemy import SQLAlchemy
from sqlalchemy.orm import DeclarativeBase
from sqlalchemy.orm import Mapped, mapped_column
from sqlalchemy import String

class Base(DeclarativeBase):
  pass

# 2. SQLAlchemy로 db 객체 생성
db = SQLAlchemy(model_class=Base)

# 3. 앱 생성
app = Flask(__name__)

# 4. SQLite 데이터베이스 구성
app.config["SQLALCHEMY_DATABASE_URI"] = "sqlite:///new-books-collection.db"

# 5. 확장 프로그램으로 앱 초기화
db.init_app(app)

# 6. 테이블 이름 및 구조 정의
class Book(db.Model):
    id: Mapped[int] = mapped_column(primary_key=True)
    title: Mapped[str] = mapped_column(String(250), unique=True, nullable=False)
    author: Mapped[str] = mapped_column(String(250), nullable=False)
    rating: Mapped[float] = mapped_column(nullable=False)

with app.app_context():
    # 7. 테이블 생성
    db.create_all()

    # 8. 새 레코드 만들기
    new_book = Book(id=1, title="Harry Potter", author="J. K. Rowling", rating=9.3)

    # 9. 데이터 추가
    db.session.add(new_book)

    # 10. 변경사항 커밋
    db.session.commit()
📁 instance 폴더 안에 .db 파일 생성 (내용은 SQLite로 생성했을 때와 같은 결과)
◇ SQLAlchemy를 사용한 CRUD 작업
🆕 Create(생성)
# 새 레코드 만들기
new_book = Book(id=1, title="Harry Potter", author="J. K. Rowling", rating=9.3)
db.session.add(new_book)
db.session.commit()
id(기본키) 필드는 선택사항(제외 시 자동 생성되며, 이미 존재하는 기본키로 생성할 경우 에러 발생)
📖 Read(읽기)
# 모든 레코드 읽기
all_books = db.session.query(Book).all()
# 쿼리별 특정 레코드 읽기
book = Book.query.filter_by(title="Harry Potter").first()🆙 Update(갱신)
# 쿼리별 레코드 업데이트하기
book_to_update = Book.query.filter_by(title="Harry Potter").first()
book_to_update.title = "Harry Potter and the Chamber of Secrets"
db.session.commit()
# 기본키로 레코드 업데이트하기
book_id = 1
book_to_update = Book.query.get(book_id)
book_to_update.title = "Harry Potter and the Goblet of Fire"
db.session.commit()🗑️ Delete(삭제)
# 기본키로 특정 레코드 삭제하기
book_id = 1

# 3가지 방법 중 택 1
book_to_delete = Book.query.get(book_id)      # 해당하는 레코드를 단순 조회
book_to_delete = db.get_or_404(Book, book_id) # 레코드를 찾지 못하면 자동으로 404 에러 발생시킴
book_to_delete = db.session.execute(db.select(Book).where(Book.id == book_id)).scalar()
'''
select(Book) 를 통해 Book 테이블을 대상으로 쿼리 생성
.where(Book.id == book_id) 를 통해 id가 book_id와 일치하는 레코드를 필터링
db.session.execute()를 통해 해당 SQL 쿼리를 실행
scalar() 는 결과에서 첫 번째 레코드를 반환
'''

db.session.delete(book_to_delete)
db.session.commit()
제목 또는 다른 속성별 특정 값을 조회하여 삭제 가능
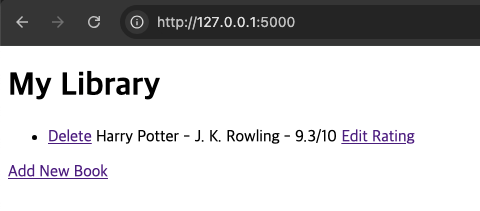
2. 플라스크 웹 사이트에 SQLite 데이터베이스 구축
🔍 유의 사항
- /add 경로를 통해 새 책을 추가
- 책이 데이터베이스에 성공적으로 추가되면 홈페이지로 리디렉션
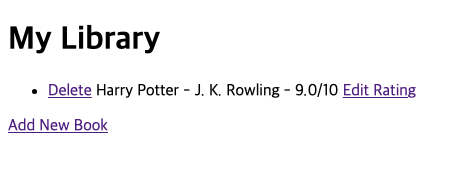
- 홈페이지에 데이터베이스의 모든 책 표시
- 각 도서 목록
<li>에
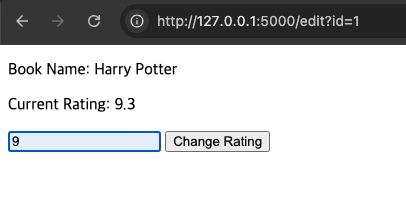
- 평점 수정(Edit Rating) 앵커 태그를 추가
- 클릭 시 평점 수정 페이지로 이동
- '평점 변경'을 클릭하면 홈페이지로 돌아가고 책 옆에 새로운 평점이 표시
- 삭제(Delete) 앵커 태그를 추가
- 클릭 시 데이터베이스에서 책을 삭제하고 홈페이지로 다시 리디렉션
⌨️ main.py
from flask import Flask, render_template, request, redirect, url_for
from flask_sqlalchemy import SQLAlchemy
from sqlalchemy.orm import DeclarativeBase
from sqlalchemy.orm import Mapped, mapped_column
from sqlalchemy import String

class Base(DeclarativeBase):
  pass

db = SQLAlchemy(model_class=Base)
app = Flask(__name__)
app.config["SQLALCHEMY_DATABASE_URI"] = "sqlite:///books.db"
# 객체 상태 변화를 추적하는 데 필요한 메모리를 절약하기 위해 기본값 끄기
app.config['SQLALCHEMY_TRACK_MODIFICATIONS'] = False
db.init_app(app)

class Book(db.Model):
    id: Mapped[int] = mapped_column(primary_key=True)
    title: Mapped[str] = mapped_column(String(250), unique=True, nullable=False)
    author: Mapped[str] = mapped_column(String(250), nullable=False)
    rating: Mapped[float] = mapped_column(nullable=False)

with app.app_context():
    db.create_all()

@app.route('/')
def home():
    all_books = db.session.query(Book).all()
    return render_template("index.html", books=all_books)


@app.route("/add", methods=["GET", "POST"])
def add():
    if request.method == "POST":
        new_book = Book(title=request.form["title"],
                        author=request.form["author"],
                        rating=request.form["rating"])
        db.session.add(new_book)
        db.session.commit()
        # 새 책 정보를 추가 후 redirect 메소드로 다시 홈페이지로 돌아가기
        return redirect(url_for('home'))
    return render_template("add.html")

@app.route("/edit", methods=["GET", "POST"])
def edit():
    if request.method == "POST":
        book_id = request.form["id"]
        book_to_update = Book.query.get(book_id)
        book_to_update.rating = request.form["rating"]
        db.session.commit()
        return redirect(url_for('home'))
    # 쿼리 파라미터(URL에서 ? 뒷부분) 중 id라는 키에 해당하는 값 가져오기
    book_id = request.args.get("id")
    book_selected = Book.query.get(book_id)
    return render_template("edit_rating.html", book=book_selected)

@app.route("/delete")
def delete():
    book_id = request.args.get("id")
    book_to_delete = db.get_or_404(Book, book_id)
    db.session.delete(book_to_delete)
    db.session.commit()
    return redirect(url_for('home'))


if __name__ == "__main__":
    app.run(debug=True)
🏗️ index.html
<!DOCTYPE html>
<html lang="en">
<head>
<meta charset="UTF-8" />
<title>Library</title>
</head>
<body>
<h1>My Library</h1>
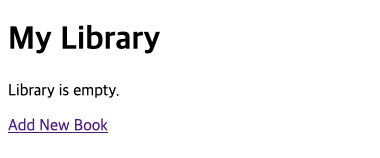
{% if books|length == 0 %}
<p>Library is empty.</p>
{% else %}
<ul>
{% for book in books %}
<li>
<!-- id=book.id 를 URL 쿼리 파라미터로 포함시킴 -->
<a href="{{ url_for('delete', id=book.id) }}">Delete</a>
{{ book.title }} - {{ book.author }} - {{ book.rating }}/10
<a href="{{ url_for('edit', id=book.id) }}">Edit Rating</a>
</li>
{% endfor %}
</ul>
{% endif %}
<a href="{{ url_for('add') }}">Add New Book</a>
</body>
</html>🏗️ add.html
<!DOCTYPE html>
<html lang="en">
  <head>
    <meta charset="UTF-8" />
    <title>Add Book</title>
  </head>
  <body>
    <form action="{{ url_for('add') }}" method="POST">
      <label>Book Name</label>
      <input type="text" name="title"/>
      <label>Book Author</label>
      <input type="text" name="author"/>
      <label>Rating</label>
      <input type="text" name="rating"/>
      <button type="submit">Add Book</button>
    </form>
  </body>
</html>
🏗️ edit_rating.html
<!DOCTYPE html>
<html lang="en">
<head>
  <meta charset="UTF-8">
  <title>Edit Rating</title>
</head>
<body>
  <form action="{{ url_for('edit') }}" method="POST">
    <p>Book Name: {{ book.title }}</p>
    <p>Current Rating: {{ book.rating }}</p>
      <!-- book.id 값을 사용자에게 보이지 않게 서버로 전송 -->
      <input hidden="hidden" name="id" value="{{ book.id }}">
    <input name="rating" type="text" placeholder="New Rating">
    <button type="submit">Change Rating</button>
  </form>
</body>
</html>