[Project] 네이버 Map API 경로 표시
- 프로젝트에서 사용자에게 경로를 보여줄 때, 각 경로를 이어서 보여주려 했다.
또한, 해당 프로젝트에서는 활성화가 된 마커와 비활성화 마커의 이미지가 다르게 적용되었는데 진행한 방법을 기록해 보고자 한다.
먼저, 구현 완료된 화면은 다음과 같다.
| 마커 비활성화 + 첫 화면 | 마커 활성화 + 지도 확대 |
|---|---|
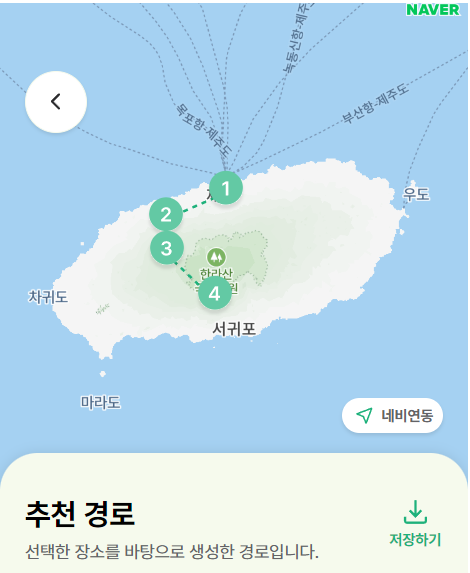 | 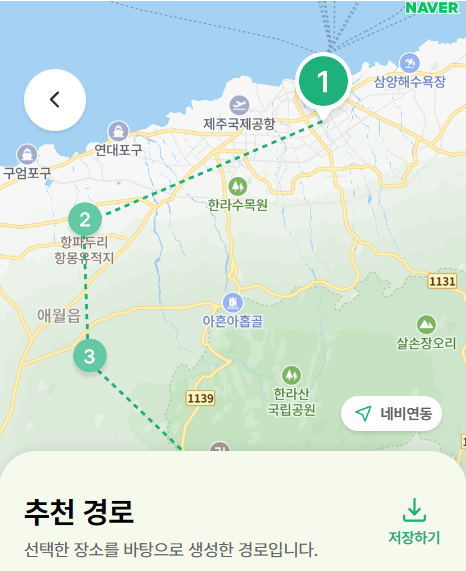 |
1. 네이버 Map API로 지도 띄우기
const TripRoutePage = () => {
  const [routeData, setRouteData] = useState([]);

  const mapRef = useRef(null);
  const markersRef = useRef([]);
  const { naver } = window;

  useEffect(() => {
    if (mapRef.current && naver) {
      const location = new naver.maps.LatLng(33.4008, 126.5601);
      mapRef.current = new naver.maps.Map("map", {
        center: location,
        zoom: 9,
        mapDataControl: false,
        scaleControl: false,
        logoControlOptions: { position: 3 },
      });
    }

    // data 요청 (temp data)
    setRouteData([
      { title: "제주 국제 공항", subtitle: "제주 시내", lat: 33.4995, lng: 126.5388 },
      { title: "제주 국제 공항", subtitle: "제주 시내", lat: 33.4521, lng: 126.4076 },
      { title: "제주 국제 공항", subtitle: "제주 시내", lat: 33.3893, lng: 126.4104 },
      { title: "제주 국제 공항", subtitle: "제주 시내", lat: 33.3058, lng: 126.5161 },
    ]);
  }, []);

  return (
    <TripRouteMapContainer ref={mapRef} id="map"></TripRouteMapContainer>
  );
};
-
가독성을 위해 Map API 관련 코드를 제외하고 삭제했다.
여기에서TripRouteMapContainer는, styled-components를 사용해 스타일링을 했다. 사용한 태그는<div>태그! -
naver.maps.Map객체를 참조하기 위해mapRef를 작성했다.
지도 객체는 다시 렌더링 할 필요가 없었기 때문에,useRef를 사용해 렌더링에 영향을 미치지 않으면서도 참조할 수 있도록 했다.
const location = new naver.maps.LatLng(33.4008, 126.5601);
mapRef.current = new naver.maps.Map("map", {
  center: location,
  zoom: 9,
  mapDataControl: false,
  scaleControl: false,
  logoControlOptions: { position: 3 },
});- 첫 화면에서 제주도 전체가 화면에 들어오도록 하기 위해, 경도와 위도를 설정한 후 해당 좌표를 center에 넣어줬다.
mapDataControl클래스는 지도 데이터 저작권 컨트롤을 정의한다.
mapDataControl 참고 문서scaleControl클래스는 지도 축척 컨트롤을 정의한다.
scaleControl 참고 문서LogoControl클래스는 NAVER 로고 컨트롤을 정의한다.
LogoControl 참고 문서
| 아무런 설정 X (기본) | mapDataControl = false |
|---|---|
 | 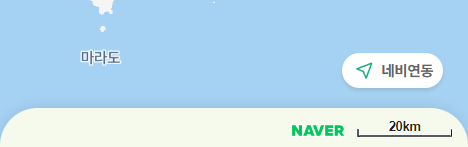 |
scaleControl: false | logoControlOptions: { position: 3 } |
|---|---|
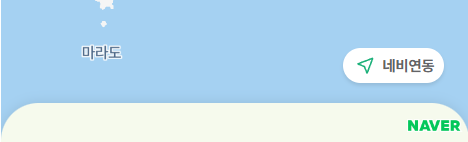 |  |
-
디자인과 기능에서 필요하지 않은 부분은
false처리를 해줬다. -
디자인 구현을 위해 네이버 로고를 하단 시트
z-index로 가리려고 했었다.
이전에는, LogoControl을false처리해 네이버 로고를 안 보이도록 변경 가능했으나 검색한 결과 다음과 같은 내용을 찾을 수 있었다.
LogoControl 질문 답변 페이지
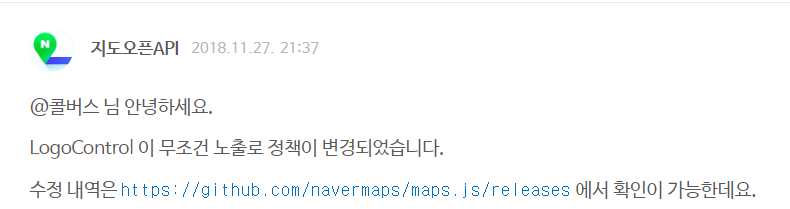
로고의 위치 조정 질문 답변 페이지

-
이 내용을 보고,
z-index로 UI를 올려 로고를 가리면 안 되겠다!!! 생각해서 LogoControl로 상단에 위치하도록 변경했다. -
setRouteData: 아직 백엔드와 연결 작업을 진행하지 않았기 때문에, 임시 데이터를 설정했다.
해당 부분은 백엔드에 API 요청을 받아 데이터를 넣어줄 예정이다.
2. 네이버 Map API로 마커 띄우고 연결하기
const TripRoutePage = () => {
  const [activeRoute, setActiveRoute] = useState(null);
  const [routeData, setRouteData] = useState([]);

  const mapRef = useRef(null);
  const markersRef = useRef([]);
  const { naver } = window;

  useEffect(() => {
    if (mapRef.current) {
      markersRef.current.forEach((marker) => marker.setMap(null));
      markersRef.current = [];

      if (routeData.length > 0) {
        routeData.forEach((route, index) => {
          const marker = new naver.maps.Marker({
            position: new naver.maps.LatLng(route.lat, route.lng),
            map: mapRef.current,
            icon: {
              url: `/images/Map/Markers/marker${index + 1}_${activeRoute === index ? "on" : "off"}.svg`,
              anchor: activeRoute === index ? new naver.maps.Point(26, 55) : new naver.maps.Point(15, 20),
            },
          });

          naver.maps.Event.addListener(marker, "click", () => {
            getClickMarker(index);
          });
          markersRef.current.push(marker);
        });

        // polyline
        const path = routeData.map((route) => new naver.maps.LatLng(route.lat, route.lng));
        const polyline = new naver.maps.Polyline({
          map: mapRef.current,
          path: path,
          strokeColor: theme.color.primary,
          strokeStyle: "shortdash",
          strokeWeight: 2,
        });
      }
    }
  }, [routeData, activeRoute]);
  const getClickMarker = (index) => {
    setActiveRoute(index);
  };

  return (
    <TripRouteMapContainer ref={mapRef} id="map"></TripRouteMapContainer>
  );
};
- 두 번째
useEffect에서 경로를 표시해주는 Marker와 이를 이어주는 PolyLine을 설정했다.
Marker
markersRef는 지도에 표시되는 마커 관리를 위해 사용했다.
각 마커는 지도에 표시되거나 제거되고, 마커들의 상태는 렌더링과 직접적인 관련이 없기 때문에 useRef로 관리했다.
routeData.forEach((route, index) => {
  const marker = new naver.maps.Marker({
    position: new naver.maps.LatLng(route.lat, route.lng),
    map: mapRef.current,
    icon: {
      url: `/images/Map/Markers/marker${index + 1}_${activeRoute === index ? "on" : "off"}.svg`,
      anchor: activeRoute === index ? new naver.maps.Point(26, 55) : new naver.maps.Point(15, 20),
    },
  });

  naver.maps.Event.addListener(marker, "click", () => {
    getClickMarker(index);
  });
  markersRef.current.push(marker);
});- icon은, 활성화 / 비활성화에 따라 이미지가 변경되도록 설정했다.
anchor에 Point 클래스로 2차원 평면의 좌표를 정의했다.
Marker 참고 문서 / Point 참고 문서
이미지에 그림자도 포함되어 있어 해당 내용을 수정하면서 마커 끝이 PolyLine에 닿는 값으로 설정했다.
PolyLine
// polyline
const path = routeData.map((route) => new naver.maps.LatLng(route.lat, route.lng));
const polyline = new naver.maps.Polyline({
  map: mapRef.current,
  path: path,
  strokeColor: theme.color.primary,
  strokeStyle: "shortdash",
  strokeWeight: 2,
});strokeColor는 theme 파일에서 관리하는 color로 설정했다.strokeStyle는 다양한 스타일 중, 디자인과 가장 유사한 shortdash로 설정했다.
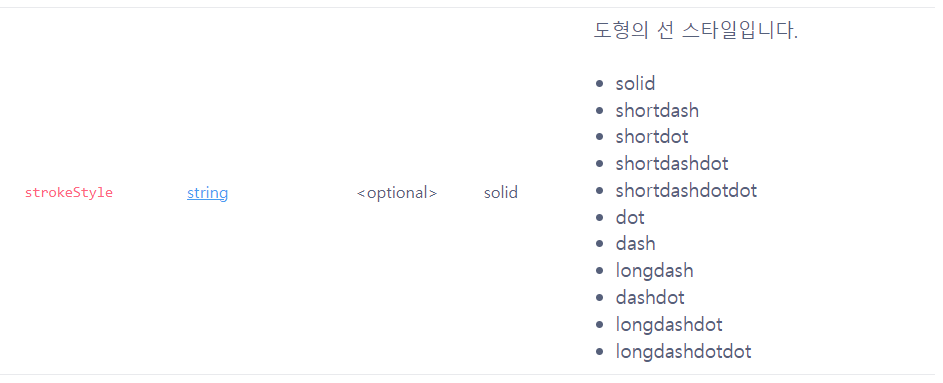
네이버 Map API 도형 문서에서 다양한 옵션 확인 가능!
사용한 옵션 외에도 다양한 옵션이 있다!!! Polyline 옵션 예제 문서