Dynamic Library (dll) - dllexport / dllimport (MSVC)
__declspec(dllexport)와 __declspec(dllimport)는 MSVC(Microsoft Visual C++) 컴파일러에서 사용하는 키워드이다. 동적 라이브러리(dynamic library)에서 클래스나 메서드, 변수를 내보내거나 가져올 때 사용된다.
gcc나clang에서는 `attribute((visibility("default"))) 사용
#pragma onece

#if defined(_WIN32) || defined(_WIN64)
  #ifdef MYLIB_EXPORTS
    #define MYLIB_API __declspec(dllexport)
  #else
    #define MYLIB_API __declspec(dllimport)
#elif defined(__linux__) || defined(__APPLE__)
  #ifdef MYLIB_EXPORTS
    #define MYLIB_API __attribute__((visibility("default")))
  #else
    #define MYLIB_API
  #endif
#else
  #define MYLIB_API
#endif
간단하게 말하면, 라이브러리에서 dll을 빌드할 때는 __declspec(dllexport) 키워드를 클래스 이름이나 메서드 원본 앞, 멤버 변수 앞 등에 붙여서 해당 내용을 외부에서 사용하도록 내보내겠다 라는 의미이다.
반대로, __declspec(dllimport)는 라이브러리의 내용을 해당 프로젝트에서 사용할 것이라는 의미로 사용한다.
#pragma once

#define MYDLL_EXPORT

#ifdef MYDLL_EXPORT
  #define MYDLL_API __declspec(dllexport)
#else
  #define MYDLL_API __declspec(dllimport)
#endif

class MYDLL_API Math
{
public:
	static int Add(const int a, const int b)
	{
		return a + b;
	}

	static int Sub(const int a, const int b)
	{
		return a - b;
	}
};
동적 라이브러리 프로젝트에서는 MYDLL_EXPORT를 선언해주어, __declspec(dllexport)로 사용하면 되고, 동적 라이브러리를 사용하는 프로젝트에서는 이 헤더 파일을 __declspec(dllimport)로 사용하면 된다.
참고로,
dll은 실행파일에 포함되지 않으므로 프로그램을 실행할 때 반드시 필요하다.동적 라이브러리는런타임때동적으로로드된다는 것을 기억하자.
dll 파일경로를 잡아주지 않는 한, 기본적으로실행 파일과dll 파일은 서로 같은 경로에 있어야 한다.
__declspec(dllexport)
DLL (동적 라이브러리)에 구현한 함수를 외부에 노출 시키려면 __declspec(dllexport) 키워드를 사용해야 한다.
__declspec(dllexport) 키워드가 붙지 않은 함수는 외부에서 호출할 수 없다.
다음의 예제를 보자.
#include "pch.h"
#include <iostream>
using namespace std;
extern "C"
{
void InternalFoo()
{
cout << "[InternalFoo] Hello World!" << endl;
}
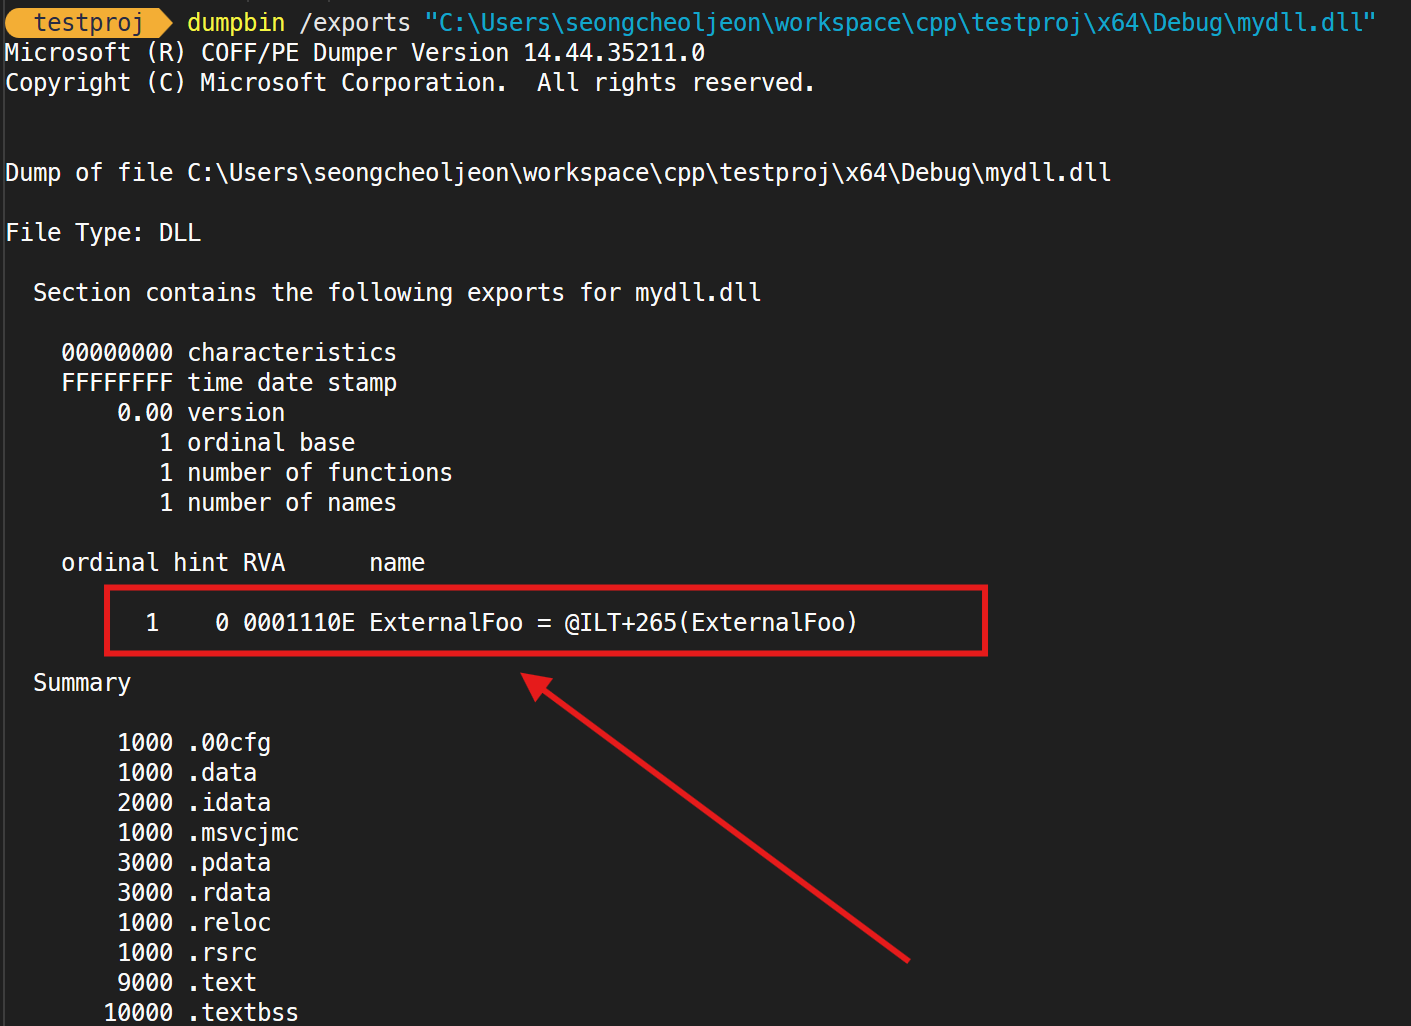
void __declspec(dllexport) ExternalFoo()
{
cout << "[ExternalFoo] Hello World!" << endl;
}
}라이브러리 프로젝트를 빌드 후, dumpbin을 이용하여 dll 파일을 확인해보자 아래와 같이 __declspec(dllexport) 키워드 선언이 된 함수만 외부에 노출 된 것을 볼 수 있다.
해당 라이브러리를 불러와서 실행하는 프로그램을 간단히 만들어 확인해보자.
#include <iostream>
#include <Windows.h>

using namespace std;

using InternalFoo = void(*)();
using ExternalFoo = void(*)();

int main()
{
    HINSTANCE hInst;
    InternalFoo internalFooPtr;
    ExternalFoo externalFooPtr;

    // library load
    hInst = LoadLibrary(L"C:\\Users\\seongcheoljeon\\workspace\\cpp\\testproj\\x64\\Debug\\mydll.dll");

    if (hInst == nullptr)
    {
        return 0;
    }

    // function load
    internalFooPtr = (InternalFoo)GetProcAddress(hInst, "InternalFoo");
    externalFooPtr = (ExternalFoo)GetProcAddress(hInst, "ExternalFoo");

    if (internalFooPtr == nullptr)
    {
        cout << "[InternalFoo] function not found!" << endl;
    }
    else
    {
        internalFooPtr();
    }

    if (externalFooPtr == nullptr)
    {
        cout<< "[ExternalFoo] function not found!" << endl;
    }
    else
    {
        externalFooPtr();
    }

    // library unload
    FreeLibrary(hInst);

    return 0;
}

/* 결과
[InternalFoo] function not found!
[ExternalFoo] Hello World!
*/
결과를 확인해보면, __declspec(dllexport) 키워드가 선언된 함수만 사용 가능 한 것을 볼 수 있다.
__declspec(dllimport)
라이브러리를 개발한다면, 라이브러리 함수를 외부로 배출(export)해야 하므로, 아래의 헤더처럼 __declspec(dllexport)로 함수를 선언하고 소스에서 정의할 수 있다.
// [library_header.h]
static bool __declspec(dllexport) Function();
// [library_source.cpp]
#include "library_header.h"
bool Function() { }하지만 위의 헤더를 라이브러리 개발 프로젝트가 아닌 외부 프로젝트에서 활용할 때는, 외부 프로젝트 입장에서 라이브러리 함수를 import 해야 하므로 dllimport 개념이 적용되어야 한다.
의도에 따라 import 또는 export로 변경할 수 있어야 한다. 즉,
DLL_EXPORTS가 존재하는 경우는 DLL_API를 __declspec(dllexport)로 정의하고,
DLL_EXPORTS가 존재하지 않는 경우는 DLL_API를 declspec(dllimport)로 정의한다.
마지막으로 함수 선언에 __declspec(dllimport/dllexport) 대신 DLL_API를 작성한다.
// [library_header.h]

#ifdef DLL_EXPORTS
#define DLL_API __declspec(dllexport)
#else
#define DLL_API __declspec(dllimport)
#endif

static bool DLL_API Function();
소스파일에서는 #define DLL_EXPORTS로 DLL_EXPORTS를 true로 설정하여 __declspec(dllexport)가 작동하게 한다.
// [library_source.cpp]

#define DLL_EXPORTS
#include "library_header.h"

bool DLL_API Function() { }
외부 프로젝트에서 라이브러리를 사용할 때 헤더를 가져오게 되면, 해당 소스에서는 DLL_EXPORTS가 정의되어 있지 않아 DLL_EXPORTS가 false인 상태이므로, __declspec(dllimport)가 작동하게 된다.
// [project.cpp]
#include "project.h"
#include "library_header.h"

void main()
{
  Function();
}
declspec(dllimport), declspec(dllexport) 예제
간단한 예제를 통해 더 자세히 알아보자.
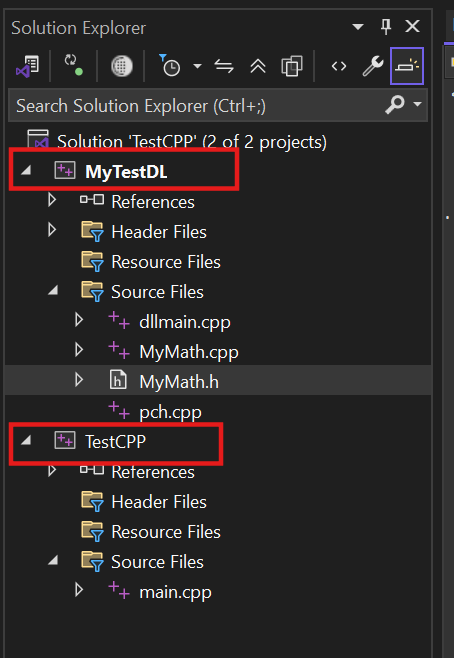
- MyTestDL : 동적 라이브러리(dll) 프로젝트
- TestCPP : main 함수가 존재하는 exe 실행 파일 프로젝트
동적 라이브러리 프로젝트 설정
.dll파일이 생성되어지는 디렉토리 설정

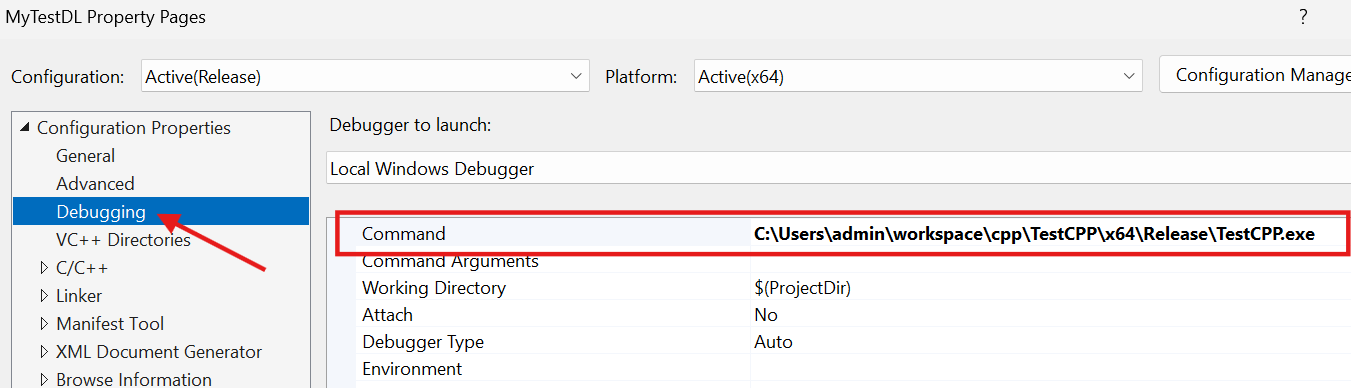
- 만약
디버깅을 할 예정이면, 아래 그림처럼 실행파일을 설정한다.
다음은 라이브러리의 코드 내용이다.
// [MyMath.h]
#pragma once

#include <iostream>

#ifdef MYDLL_EXPORTS
#define MYDLL_API __declspec(dllexport)
#else
#define MYDLL_API __declspec(dllimport)
#endif


class Math
{
public:
	MYDLL_API static int Add(const int a, const int b);
	MYDLL_API static int Sub(const int a, const int b);
};


class MYDLL_API MyClass
{
public:
	explicit MyClass();
	~MyClass() = default;
	void Print() const;

private:
	int val;
};[MyMapth.cpp]
#include "pch.h"
#define MYDLL_EXPORTS // 중요!! 여기서 dllexport 혹은 dllimport 결정.
#include "MyMath.h"
MYDLL_API int Math::Add(const int a, const int b)
{
return a + b;
}
MYDLL_API int Math::Sub(const int a, const int b)
{
return a - b;
}
MyClass::MyClass()
: val(rand() & 1000)
{
}
void MyClass::Print() const
{
std::cout << "Value: " << val << std::endl;
}빌드하여 .dll 파일 생성을 한다.
실행 파일 프로젝트 설정
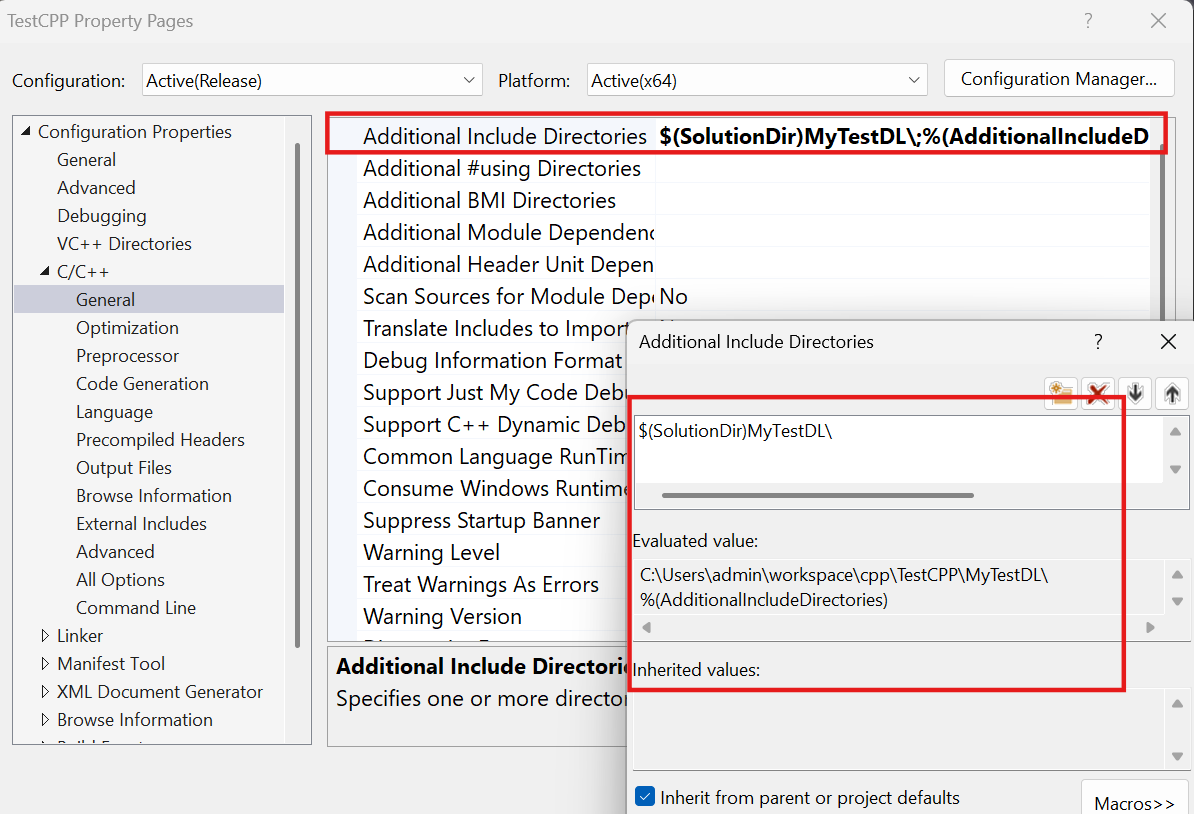
.dll파일의header파일 경로 설정
.dll파일이 존재하는 디렉토리 경로 설정
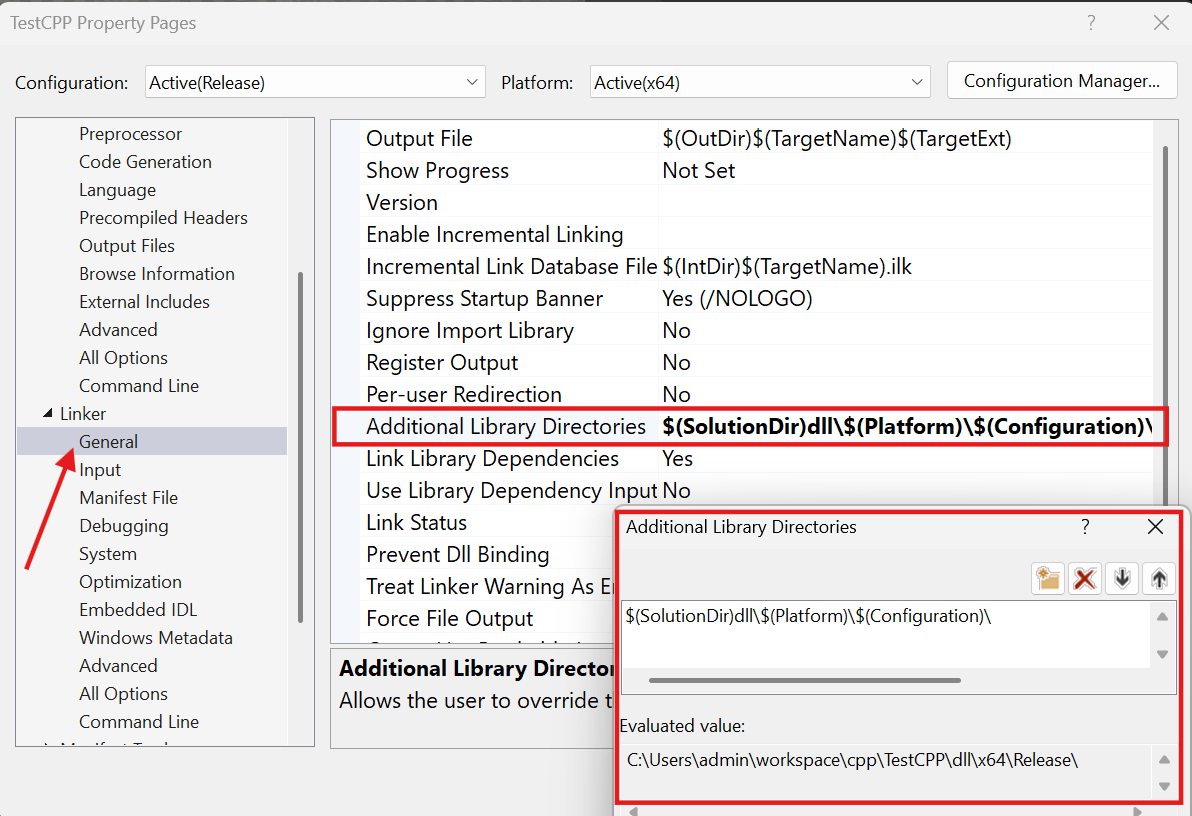
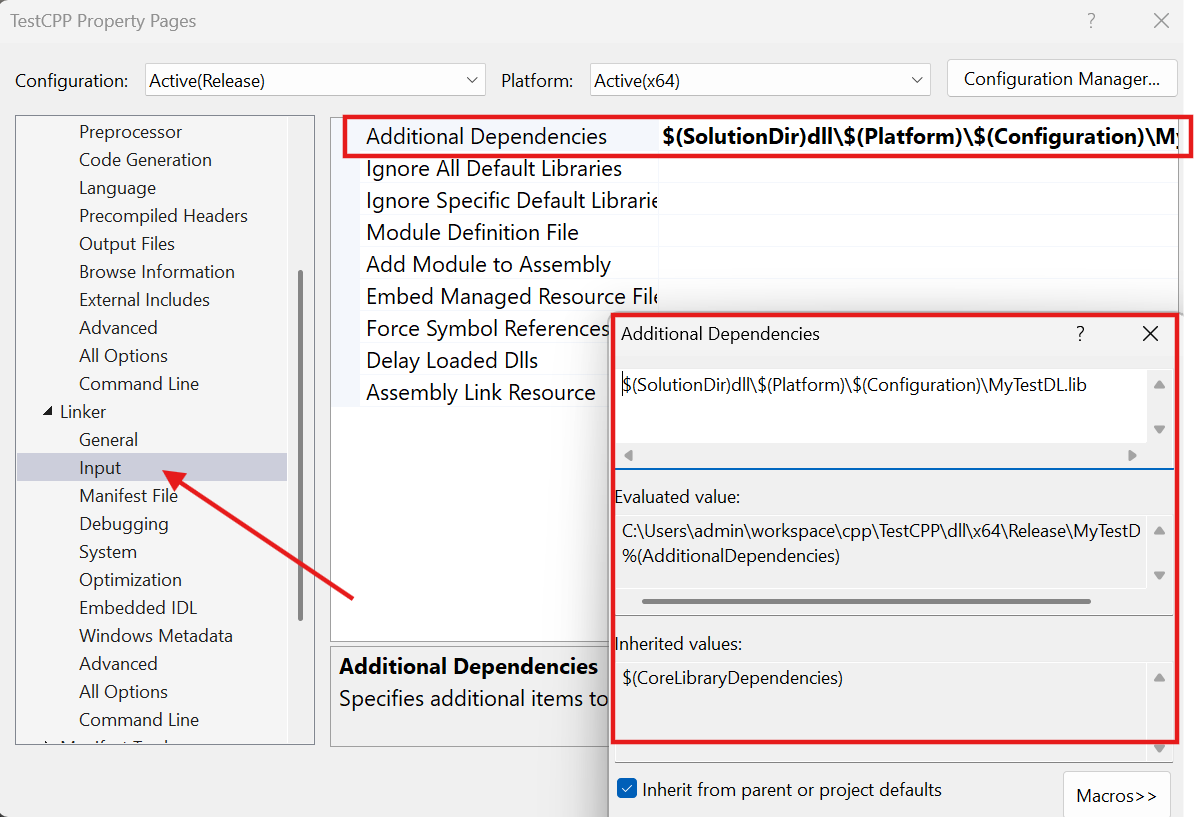
링킹을 위한.lib파일 설정
다음은 실행 파일 프로젝트의 코드이다.
#include <iostream>
#include <Windows.h>
#include "MyMath.h"
using namespace std;
int main()
{
auto add = Math::Add(1, 2);
cout << "Math::Add(1, 2) = " << add << endl;
auto sub = Math::Sub(15, 5);
cout << "Math::Sub(15, 5) = " << sub << endl;
MyClass obj;
obj.Print();
return 0;
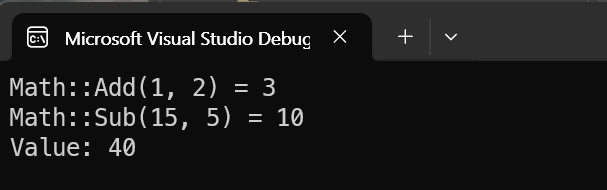
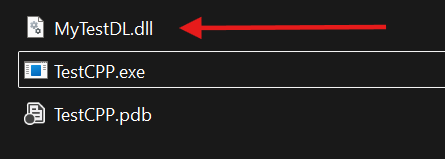
}빌드 후, dll 파일을 찾을 수 없다고 나온다면 실행 파일이 존재하는 디렉토리에 빌드한 dll파일을 복사 후 실행하면 잘 될 것이다.
이제 실행을 해보면, 다음과 같이 라이브러리를 호출한 것을 볼 수 있다.