![]()
NestJS 7.6.13 버전 기준 설명입니다
기본적인 CRUD를 작성해 보겠다.
원래라면 DB연동을 해야하지만 DB연동은 다음 포스팅에서 진행하고
이번 글에서는 내부 데이터를 사용해 만들어 보겠다.
Service
먼저 비즈니스 로직부터 작성해보겠다.
$ nest g service todonest cli를 통해 service를 생성하고 해당 이름을 todo로 정했다.
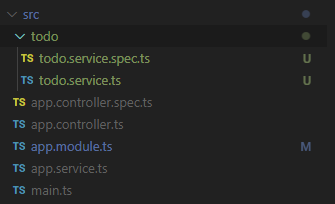
그럼 위미지와 같이 service 파일과 test 파일이 생성된다.
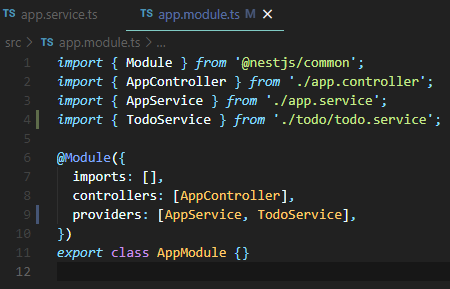
또한 app.module.ts 파일을 확인하면 자동으로 방금 생성한 Service를 module에 등록 시켜준 것을 확인할 수 있다.
Read - findAll
이제 모든 todo list 데이터를 가져오는 간단한 함수를 만들어보자.
// todo.service.ts
import { Injectable } from '@nestjs/common';

let todos = [
  {
    id: 0,
    user_id: 'seongkyun',
    content: '운영체제 공부',
    done: false,
  },
  {
    id: 1,
    user_id: 'seongkyun',
    content: '네트워크 공부',
    done: false,
  },
  {
    id: 2,
    user_id: 'seongkyun',
    content: '알고리즘 공부',
    done: false,
  },
];

@Injectable()
export class TodoService {
  async findAll() {
    return todos;
  }
}
DB를 연결하지 않았기 때문에 todo 배열을 생성하여 사용했다.
findAll()은 전체 todo 데이터를 가져오는 함수기 때문에 todo를 그대로 반환했다.
여기서 return한 값은 HTTP Response의 body를 통해 전달된다.
로직이 잘 작동하기 위해서는 Controller를 만들고 Module에 등록해야 한다.
Controller
nest cli를 통해 controller를 만들 수 있다.
nest g controller todo그 후 다음과 같이 Controller 코드를 작성하자.
// todo.controller.ts
import { Controller, Get } from '@nestjs/common';
import { TodoService } from './todo.service';

@Controller('todo')
export class TodoController {
  constructor(private readonly todoService: TodoService) {}

  @Get()
  findAll() {
    return this.todoService.findAll();
  }
}@Controller에 적은 todo 설정 덕분에 localhost:3000/todo로 전송되는 요청을 이 Controller에서 처리할 수 있다.
(nest cli를 통해 프로젝트를 생성하면 main.ts에서 3000번 포트로 실행되도록 기본 설정돼 있다)
@Get을 통해 HTTP Method를 설정하고 이 데코레이터가 설정된 함수가 해당 요청을 처리한다.
여기서는 미리 작성한 TodoService의 findAll()을 호출하도록 설정했다.
TodoService는 직접 import해서 사용하는 것이 아니라 모듈이 주입해 주도록 설정하기 때문에 Contructor에서 설정할 수 있다.
Module이 inject할 수 있는 것은 @injectable()데코레이터가 작성된 Provider라는 사실을 기억하자.
Service는 Provider의 일종이다.
Module
이제 Controller와 Service를 합쳐줄 Module을 작성하자.
$ nest g module todonest cli를 통해 Module을 작성하고 다음과 같이 작성하자.
// todo.module.ts
import { Module } from '@nestjs/common';
import { TodoController } from './todo.controller';
import { TodoService } from './todo.service';

@Module({
  controllers: [TodoController],
  providers: [TodoService],
})
export class TodoModule {}
Providers에 적힌 TodoService를 controller에 Inject 해준다.
이제 이 Module을 메인 Module인 app.module에 작성해야 한다.
app.Module.ts에 가보면 nest cli가 이미 Controller, Service, Module을 모두 import 시켜놓은 것을 확인할 수 있다.
우리는 TodoModule을 통해 이미 Provider와 Service를 하나의 단위로 묶어두었기 때문에 app.module.ts에서는 TodoModule만 import 처리 되어있으면 된다.
따라서 다음과 같이 코드를 작성하면 된다.
// app.module.ts
import { Module } from '@nestjs/common';
import { AppController } from './app.controller';
import { AppService } from './app.service';
import { TodoModule } from './todo/todo.module';

@Module({
  imports: [TodoModule],
  controllers: [AppController],
  providers: [AppService],
})
export class AppModule {}
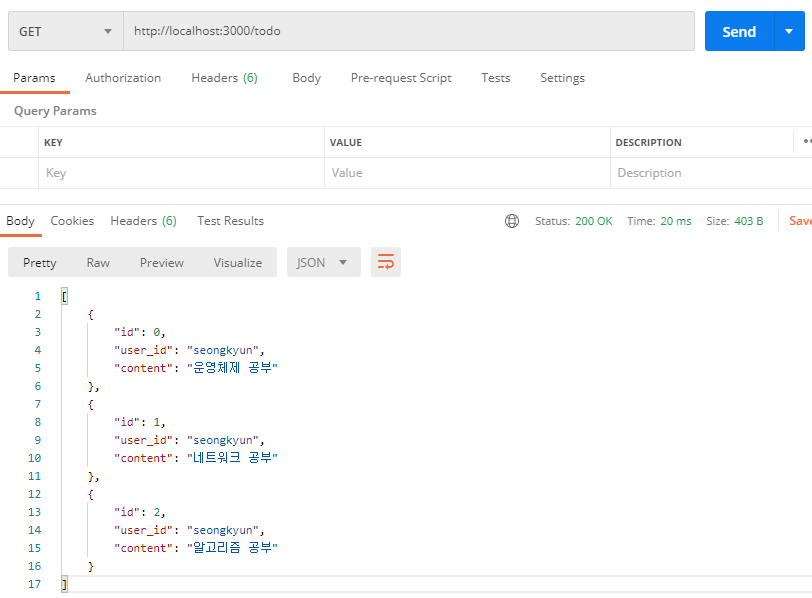
이제 터미널에서 npm run start를 하면 서버가 실행된다.
Postman을 통해 확인하면 다음과 같이 데이터가 잘 전송 되는 것을 확인할 수 있다.
CRUD
본격적으로 CURD를 작성하겠다.
Read - findOne()
todo list 중 하나의 데이터를 가져오는 로직을 짜보겠다.
// todo.service.ts
import { Injectable, NotFoundException } from '@nestjs/common';

let todos = [
  {
    id: 0,
    user_id: 'seongkyun',
    content: '운영체제 공부',
    done: false,
  },
  {
    id: 1,
    user_id: 'seongkyun',
    content: '네트워크 공부',
    done: false,
  },
  {
    id: 2,
    user_id: 'seongkyun',
    content: '알고리즘 공부',
    done: false,
  },
];

@Injectable()
export class TodoService {
  async findAll() {
    return todos;
  }

  async findOne(id: number) {
    const todo = todos.filter((todo) => todo.id === id);

    if (!todo) throw new NotFoundException(); // 예외처리

    return todo;
  }
}
id를 전달 받아서 해당 아이디의 todo만을 필터링 하여 전송한다.
// todo.controller.ts
import { Controller, Get, Param } from '@nestjs/common';
import { TodoService } from './todo.service';

@Controller('todo')
export class TodoController {
  constructor(private readonly todoService: TodoService) {}

  @Get(':id')
  findOne(@Param('id') id: number) {
    return this.todoService.findOne(id);
  }

  @Get()
  findAll() {
    return this.todoService.findAll();
  }
}@Get(':id')처럼 작성하면 클라이언트가 URI를 통해 전송한 Param을 가져올 수 있다.
주의할 점은 아무런 조건이 없는 @Get()보다 항상 위에 작성해야 한다.
상위에 작성한 함수부터 차례대로 처리하기 때문에 Param이 있는 Get(':id')를 아래에 작성하면 @Get() 조건으로 처리된다.
express를 사용해본 경험이 있다면 이와 같은 작성 방법에 익숙할 것이다.
이렇게 작성한 후 서버를 작동시켜 Postman으로 확인하면 데이터가 정상적으로 절달되지 않는다.
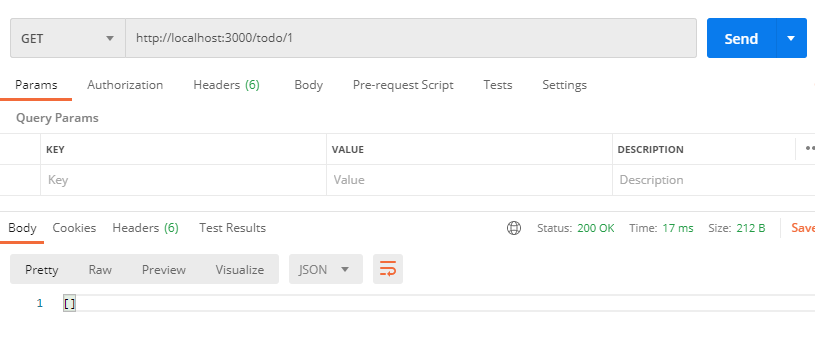
이유는 id의 타입이 string으로 서버에 전달되기 때문이다.
string과 number 타입이 달라서 검색되지 않는 문제다.
이러한 문제를 해결하려면 string을 number로 변경해야 하는데
다음과 같은 방법이 있다.
- 직접 controller나 service에서 하나하나 변경하기
- Pipe와 DTO를 이용하여 자동으로 변경 및 데이터 검증하기
1과 같은 방법은 id와 같이 단 하나의 조건이 전달되는 경우에는 힘들지 않겠지만 다양한 데이터의 타입을 맞추려면 손이 많이간다.
따라서 NestJS는 보다 세련된 방식인 Pipe와 DTO를 이용하여 타입변환과 데이터 검증을 처리한다.
Pipe
Pipe의 역할은 두 가지이다.
- 데이터 타입 변형 (문자열 -> 숫자)
- 데이터 검증
지금은 Pipe를 이용하여 데이터 타입을 변경하는 방법만 알아보겠다.
DTO는 Create 함수를 만들 때 작성하겠다.
NestJS에서 기본적으로 제공하는 파이프는 다음과 같다.
ValidationPipe
ParseIntPipe
ParseBoolPipe
ParseArrayPipe
ParseUUIDPipe
DefaultValuePipe
이름만 봐도 내용을 짐작할 수 있기 때문에 자세한 설명은 적지 않겠다.
만약 제공하는 Pipe 이외에 더 필요한 것이 있다면 Custom Pipe도 만들 수 있다.
todo.controller.ts 파일을 열고 다음과 같이 작성한다.
// todo.controller.ts
import { Controller, Get, Param, ParseIntPipe } from '@nestjs/common';
import { TodoService } from './todo.service';

@Controller('todo')
export class TodoController {
  constructor(private readonly todoService: TodoService) {}

  @Get(':id')
  findOne(@Param('id', ParseIntPipe) id: number) {
    return this.todoService.findOne(id);
  }

  @Get()
  findAll() {
    return this.todoService.findAll();
  }
}ParseIntPipe를 작성하여 string타입으로 전달받은 id를 number로 변경했다.
작성후 NestJS를 다시 실행시키면 정상적으로 데이터를 받는 것을 확인할 수 있다.

Create - create()
create를 할 때는 클라이언트에서 데이터를 받아 DB에 저장한다.
이 때 서버에서 데이터를 가공하여 DB에 저장하기 전에 처리해야할 일은
- 전달 받을 데이터의 타입
- 전달 받은 데이터의 유효성 체크
이다.
NestJS는 이를 DTO로 처리한다.
DTO
먼저 class-validator, class-transformer를 설치한다.
$ npm install class-validator
$ npm install class-transformer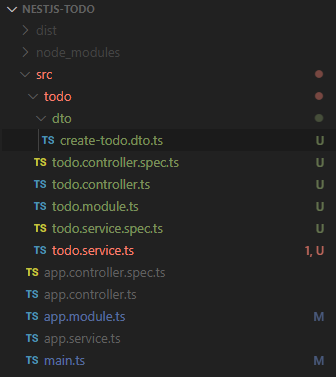
todo 아래에 dto 폴더를 생성하고 create-todo.dto.ts 파일을 생성한다.
// create-todo.dto.ts
import { IsBoolean, IsString } from 'class-validator';

export class CreateTodoDto {
  @IsString()
  user_id: string;

  @IsString()
  content: string;

  @IsBoolean()
  done: boolean;
}
나중에 DB를 연결하고 로그인 기능을 넣는다면 user 테이블을 따로 생성할 테고, 그때는 user_id 대신 userId(foreign key)를 받는다.
지금은 DB를 연결하지 않았기 때문에 user_id를 직접 받는 것으로 진행하겠다.
Class-validator를 이용해 타입을 체크하는 DTO를 만들었다.
Global Pipe
이제 DTO의 내용을 검사할 전역 Pipe 설정을 하겠다.
main.ts 파일을 아래와 같이 작성한다.
// main.ts
import { ValidationPipe } from '@nestjs/common';
import { NestFactory } from '@nestjs/core';
import { AppModule } from './app.module';

async function bootstrap() {
  const app = await NestFactory.create(AppModule);
  app.useGlobalPipes(
    new ValidationPipe({
      whitelist: true,
      forbidNonWhitelisted: true,
      transform: true,
    }),
  );

  await app.listen(3000);
}
bootstrap();useGlobalPipes를 이용하여 전역 pipe를 적용할 수 있다.
검증 설정은 세 가지가 있는데 그 의미는 다음과 같다.
whitelist:DTO에 작성한 검증값 이외에는 서버가 받지 않도록 설정forbidNonWhitelisted:DTO에 작성한 검증값 이외의 값이 들어오면 에러 발생(400 error)transform: 요청으로 넘어온 데이터 타입 변환
Global Pipe의 tranform을 true로 설정하면 id에 사용한 ParseIntPipe를 사용하지 않아도 타입 변환을 시켜준다.
이제 create Service와 Controller 설정을 마무리 하겠다.
todo.service.ts 파일을 다음과 같이 작성한다.
import { Injectable, NotFoundException } from '@nestjs/common';
import { CreateTodoDto } from './dto/create-todo.dto';

let todos = [
  {
    id: 0,
    user_id: 'seongkyun',
    content: '운영체제 공부',
    done: false,
  },
  {
    id: 1,
    user_id: 'seongkyun',
    content: '네트워크 공부',
    done: false,
  },
  {
    id: 2,
    user_id: 'seongkyun',
    content: '알고리즘 공부',
    done: false,
  },
];

@Injectable()
export class TodoService {
  async findAll() {
    return todos;
  }

  async findOne(id: number) {
    const todo = todos.filter((todo) => todo.id === id);

    if (!todo) throw new NotFoundException(); // 예외처리

    return todo;
  }

  async create(createTodoDto: CreateTodoDto) {
    todos = [
      ...todos,
      {
        id: todos[todos.length - 1].id + 1,
        user_id: createTodoDto.user_id,
        content: createTodoDto.content,
        done: createTodoDto.done,
      },
    ];

    return todos;
  }
}
id가 primary하지 않을 수 있다는 문제가 있지만 지금은 이렇게 진행하겠다.
마지막으로 Controller 파일을 아래와 같이 작성한다.
// todo.controller.ts
import {
  Body,
  Controller,
  Get,
  Param,
  ParseIntPipe,
  Post,
} from '@nestjs/common';
import { CreateTodoDto } from './dto/create-todo.dto';
import { TodoService } from './todo.service';

@Controller('todo')
export class TodoController {
  constructor(private readonly todoService: TodoService) {}

  @Get(':id')
  findOne(@Param('id') id: number) {
    return this.todoService.findOne(id);
  }

  @Get()
  findAll() {
    return this.todoService.findAll();
  }

  @Post()
  create(@Body() createTodoDto: CreateTodoDto) {
    return this.todoService.create(createTodoDto);
  }
}
Post Method를 사용할 것이기 때문에 @Post() 데코레이터를 사용했다.
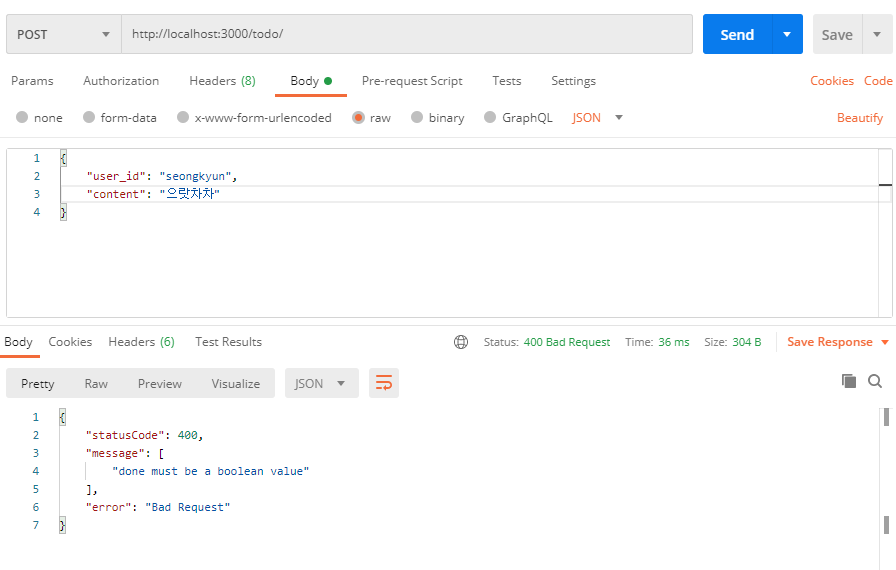
NestJS를 다시 실행시키고 Postman으로 데이터를 전송하면 제대로 생성되는 것을 확인할 수 있다.

만약 필요로하는 데이터 요소를 전송하지 않으면 아래와 같이 에러를 발생시킨다.
Update - update()
update 로직도 DTO와 Service, Controller를 만들어야 한다.
update-todo.dto.ts 파일을 만들고 아래와 같이 작성한다.
// update-todo.dto.ts
import { PartialType } from '@nestjs/mapped-types';
import { IsBoolean, IsNumber, IsString } from 'class-validator';
import { CreateTodoDto } from './create-todo.dto';

export class UpdateTodoDto extends PartialType(CreateTodoDto) {
  @IsNumber()
  id: number;

  @IsBoolean()
  done?: boolean;

  @IsNumber()
  userId?: number;
}
update에 필요한 데이터는 일부만 필요할 수 있기 때문에 타입스크립트를 작성할 때 처럼 ?를 적어야 한다.
? 작업을 도와주는 PartialType을 사용하여 한번에 해결할 수 있다.
update-todo.dto.ts를 다음과 같이 수정한다.
// update-todo.dto.ts
import { PartialType } from '@nestjs/mapped-types';
import { CreateTodoDto } from './create-todo.dto';

export class UpdateTodoDto extends PartialType(CreateTodoDto) {}PartialType은 CreateTodoDto의 요소들에 ?설정을 붙여준다.
이 후 Service, Controller를 아래와 같이 작성한다.
// todo.service.ts
import { Injectable, NotFoundException } from '@nestjs/common';
import { CreateTodoDto } from './dto/create-todo.dto';
import { UpdateTodoDto } from './dto/update-todo.dto';

let todos = [
  {
    id: 0,
    user_id: 'seongkyun',
    content: '운영체제 공부',
    done: false,
  },
  {
    id: 1,
    user_id: 'seongkyun',
    content: '네트워크 공부',
    done: false,
  },
  {
    id: 2,
    user_id: 'seongkyun',
    content: '알고리즘 공부',
    done: false,
  },
];

@Injectable()
export class TodoService {
  async findAll() {
    return todos;
  }

  async findOne(id: number) {
    const todo = todos.filter((todo) => todo.id === id);

    if (!todo) throw new NotFoundException(); // 예외처리

    return todo;
  }

  async create(createTodoDto: CreateTodoDto) {
    todos = [
      ...todos,
      {
        id: todos[todos.length - 1].id + 1,
        user_id: createTodoDto.user_id,
        content: createTodoDto.content,
        done: createTodoDto.done,
      },
    ];

    return todos;
  }

  async update(id: number, updateTodoDto: UpdateTodoDto) {
    await this.findOne(id);

    const oldTodos = todos.filter((todo) => todo.id !== id);
    const oldTodo = todos.find((todo) => todo.id == id);

    const newTodo = {
      ...oldTodo,
      ...updateTodoDto,
    };

    todos = [...oldTodos, newTodo].sort((a, b) => a.id - b.id);

    return todos;
  }
}
// todo.controller.ts
import {
  Body,
  Controller,
  Get,
  Param,
  ParseIntPipe,
  Patch,
  Post,
} from '@nestjs/common';
import { CreateTodoDto } from './dto/create-todo.dto';
import { UpdateTodoDto } from './dto/update-todo.dto';
import { TodoService } from './todo.service';

@Controller('todo')
export class TodoController {
  constructor(private readonly todoService: TodoService) {}

  @Get(':id')
  findOne(@Param('id') id: number) {
    return this.todoService.findOne(id);
  }

  @Get()
  findAll() {
    return this.todoService.findAll();
  }

  @Post()
  create(@Body() createTodoDto: CreateTodoDto) {
    return this.todoService.create(createTodoDto);
  }

  @Patch(':id')
  update(@Param('id') id: number, @Body() updateTodoDto: UpdateTodoDto) {
    return this.todoService.update(id, updateTodoDto);
  }
}
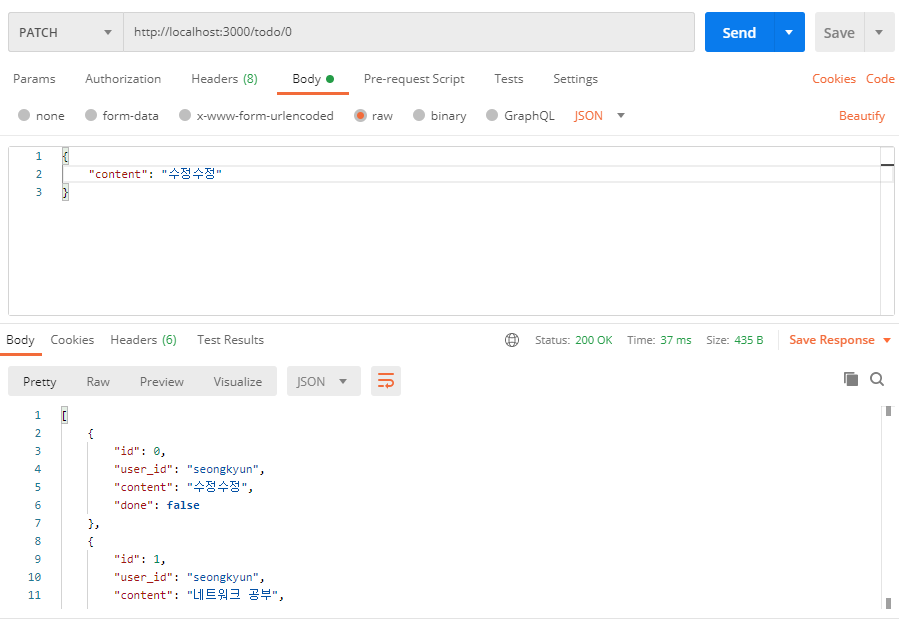
이 후 NestJS를 재시작한 후 Postman을 통해 수정을 요청하면 정상적으로 수정되는 것을 확인할 수 있다.
Delete - deleteOne()
Delete의 경우도 이전과 다를게 없다.
아래와 같이 Service와 Controller를 작성한다.
// todo.service.ts
import { Injectable, NotFoundException } from '@nestjs/common';
import { CreateTodoDto } from './dto/create-todo.dto';
import { UpdateTodoDto } from './dto/update-todo.dto';

let todos = [
  {
    id: 0,
    user_id: 'seongkyun',
    content: '운영체제 공부',
    done: false,
  },
  {
    id: 1,
    user_id: 'seongkyun',
    content: '네트워크 공부',
    done: false,
  },
  {
    id: 2,
    user_id: 'seongkyun',
    content: '알고리즘 공부',
    done: false,
  },
];

@Injectable()
export class TodoService {
  async findAll() {
    return todos;
  }

  async findOne(id: number) {
    const todo = todos.filter((todo) => todo.id === id);

    if (!todo) throw new NotFoundException(); // 예외처리

    return todo;
  }

  async create(createTodoDto: CreateTodoDto) {
    todos = [
      ...todos,
      {
        id: todos[todos.length - 1].id + 1,
        user_id: createTodoDto.user_id,
        content: createTodoDto.content,
        done: createTodoDto.done,
      },
    ];

    return todos;
  }

  async update(id: number, updateTodoDto: UpdateTodoDto) {
    await this.findOne(id);

    const oldTodos = todos.filter((todo) => todo.id !== id);
    const oldTodo = todos.find((todo) => todo.id == id);

    const newTodo = {
      ...oldTodo,
      ...updateTodoDto,
    };

    todos = [...oldTodos, newTodo].sort((a, b) => a.id - b.id);

    return todos;
  }

  async deleteOne(id: number) {
    await this.findOne(id);

    const newTodos = todos.filter((todo) => todo.id !== id);

    todos = newTodos;

    return todos;
  }
}
// todo.controller.ts
import {
Body,
Controller,
Delete,
Get,
Param,
ParseIntPipe,
Patch,
Post,
} from '@nestjs/common';
import { CreateTodoDto } from './dto/create-todo.dto';
import { UpdateTodoDto } from './dto/update-todo.dto';
import { TodoService } from './todo.service';
@Controller('todo')
export class TodoController {
constructor(private readonly todoService: TodoService) {}
@Get(':id')
findOne(@Param('id') id: number) {
return this.todoService.findOne(id);
}
@Get()
findAll() {
return this.todoService.findAll();
}
@Post()
create(@Body() createTodoDto: CreateTodoDto) {
return this.todoService.create(createTodoDto);
}
@Patch(':id')
update(@Param('id') id: number, @Body() updateTodoDto: UpdateTodoDto) {
return this.todoService.update(id, updateTodoDto);
}
@Delete(':id')
delete(@Param('id') id: number) {
return this.todoService.deleteOne(id);
}
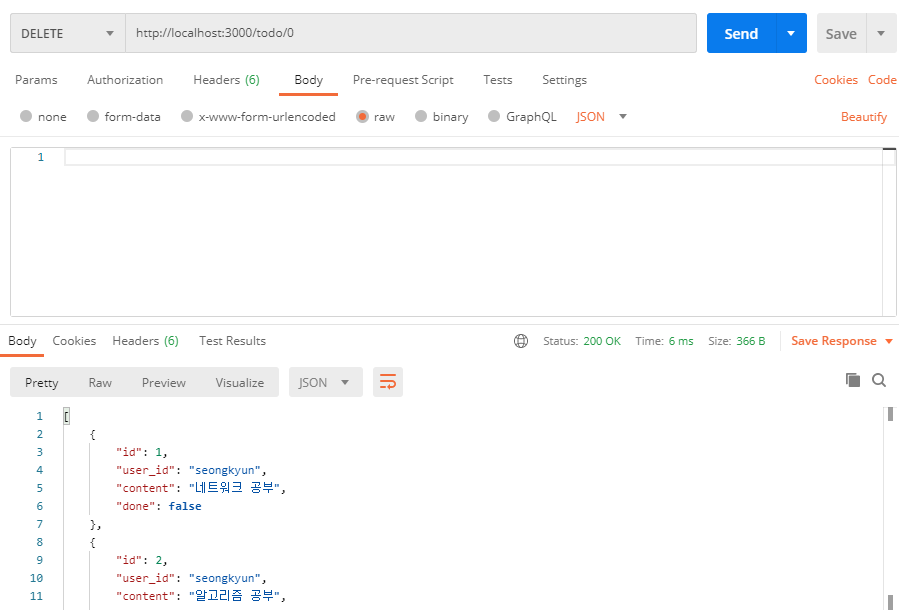
}Postman을 통해 Delete를 시도하면 정상적으로 삭제가 되는 것을 확인할 수 있다.