- 브릿지
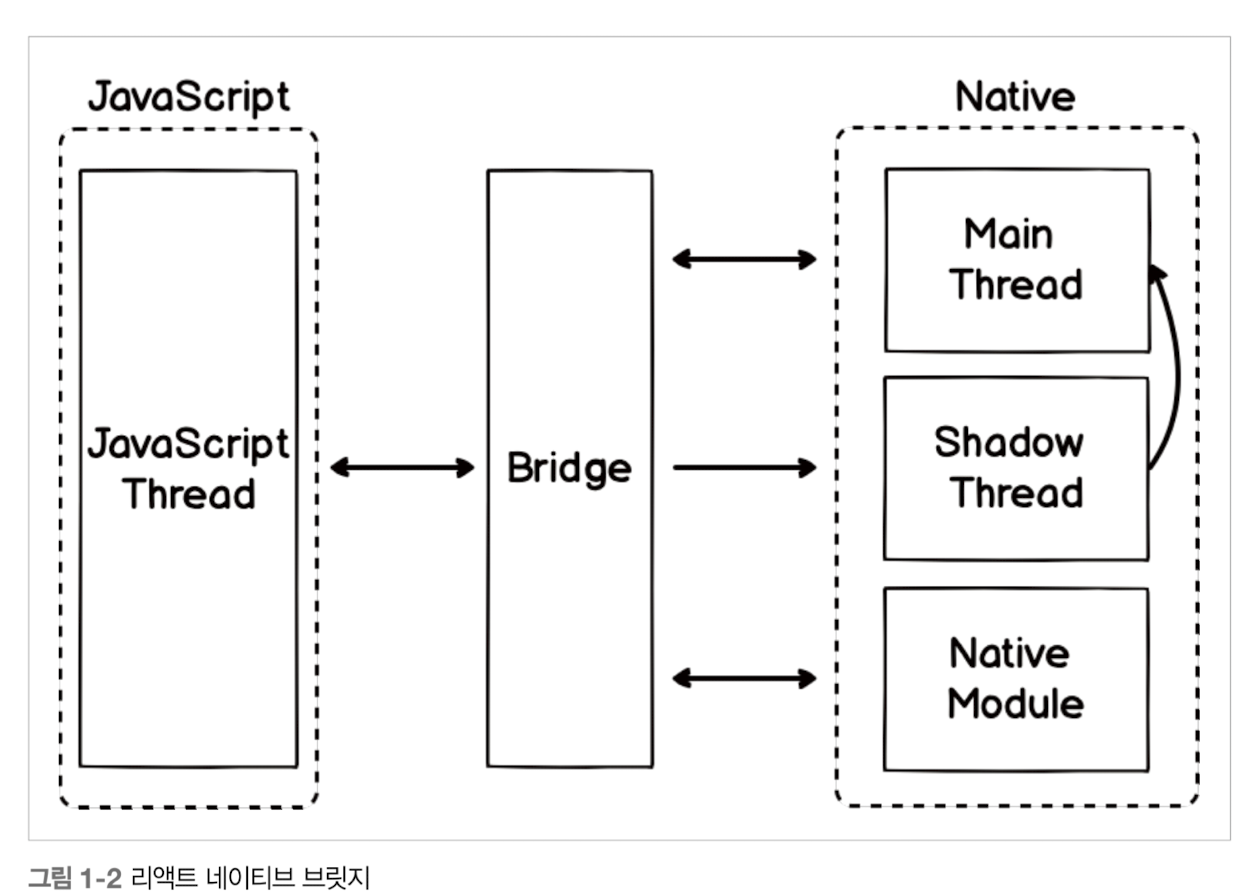
main thread : UI담당
shadow thread : 레이아웃 계산
native module : 각 모듈에 자체 스레드가 있다.
안드로이드 = 스레드 폴을 공유
- JSX
xml과 매우 유사하다. UI작업을 할 때 가독성을 준다.
바벨을 사용하여 자바스크립트로 변환한다.
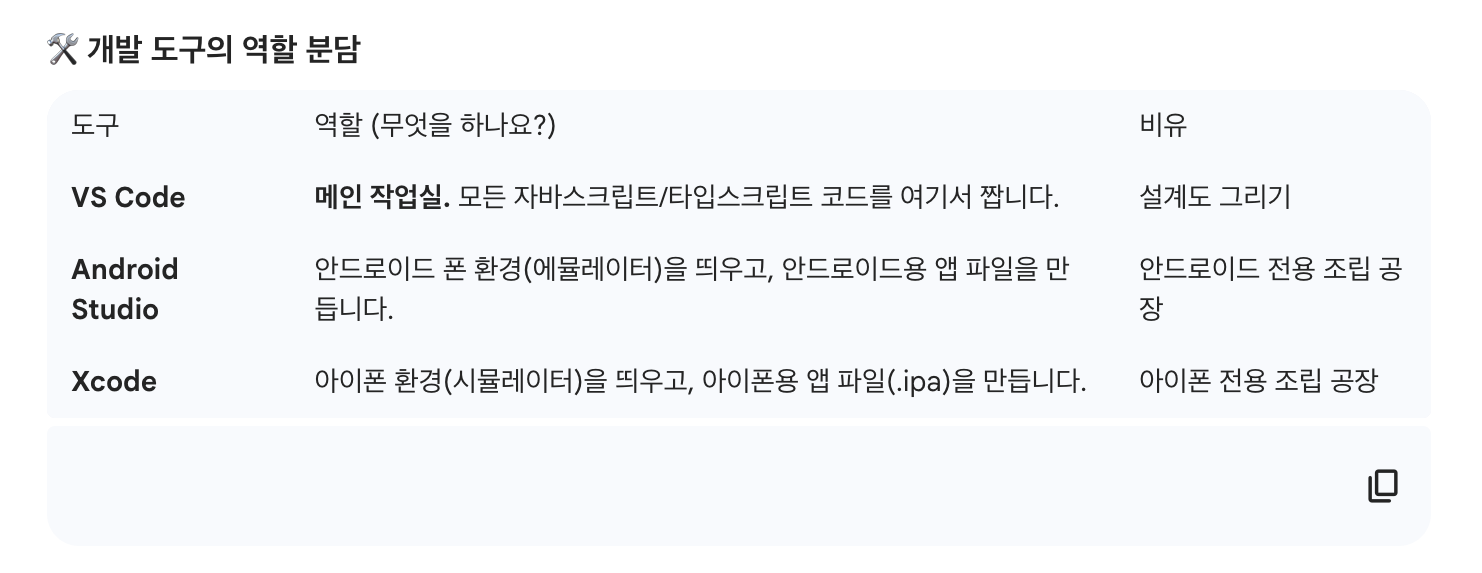
2장 React Native
맥, 윈도우, 리눅스 환경에서 개발 가능
맥 - ios, 안드로이드 개발 가능
윈도우, 리눅스 - 안드로이드 개발 가능
Node.js, JDK, 안드로이드 스튜디오, 왓치맨, Xcode 추가 설치필요
왓치맨 : 파일 시스템 변경 감지 도구
iOS 시뮬레이터를 실행
Xcode 메뉴의 Open Developer Tool 메뉴에서 Simulator를 실행하는 방법
맥의 Spotlight 검색 기능에서 Simulator.app
File -> Open Device -> 기기 선택 가능하다.
-
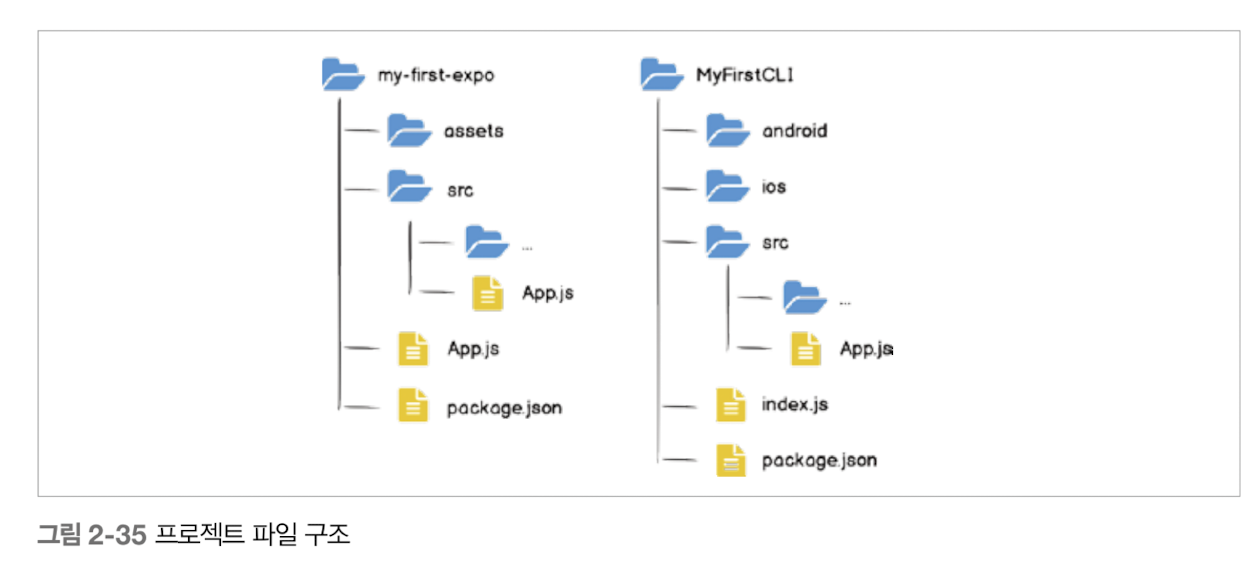
project 설치
npx @react-native-community/cli init MyFirstApp(폴더명) -
react native 프로젝트 생성하는 방법
1) Expo
npx expo login
2) Expo 프로젝트 생성
expo init my-first-expo
항상 첫번째 blank 선택
3) cd my-first-expo
npm start
4) app.json 에서 package 추가하기
"android": {
"adaptiveIcon": {
"backgroundColor": "#E6F4FE",
"foregroundImage": "./assets/android-icon-foreground.png",
"backgroundImage": "./assets/android-icon-background.png",
"monochromeImage": "./assets/android-icon-monochrome.png"
}}, "package": "com.stella03.my-first-expo", "web": { "favicon": "./assets/favicon.png" }}
}
5) terminal에서 a를 누르면 실행된다.
cmd+control+z 와 cmd+m를 이용해서 메뉴를 열 수 있다.
6) 로그 확인하기
vscode 에서 그냥 npx expo start 해서
a누르고, 로그 확인 가능
- 리액트 네이티브 CLI
expo의 단점을 극복한다. expo와 반대로 네이티브 CLI에서 필요한 기능이 있을 경우 모듈을 직접 만들어 사용할 수 있다. 배포가 불편하고, 어렵다.
npx react-native init 폴더이름
npm run ios
npm run android 실행할 수 있다.
명령 프롬프트 창 하나가 추가로 열리고 Metro가 실행되는 것을 볼 수 있다.
네이티브를 위한 자바스크립트 번들러이다. 실행될 때마다 단일 파일로 컴파일하는 역할을 한다.
= 90% 이상이 expo를 이용하여 진행한다.
3장 Component
View : ui를 구성하는 가장 기본적인 요소, = div와 같은 역할이다.
Fragment : 여러 개의 컴포넌트를 반환하고 싶은 경우 = <> 빈 태그로 사용해도 된다.
jsx의 경우 Null은 가능하지만 undefined는 오류가 발생한다.
{/ 주석 /}
- 스타일링
<View style={{ flex: 1, backgroundColor: '#fff', alignItems: 'center', justifyContent: 'center', }}>
</View>
카멜케이스로 작성해야한다.
- 내장 컴포넌트
리액트 네이티브 컴포넌트
https://reactnative.dev/docs/components-and-apis
커스텀 컴포넌트
react와 동일하게 components/MyButton.js 생성한다.
TouchableOpacity 컴포넌트 = 버튼 만들 때 사용한다.
import { TouchableOpacity } from "react-native"


export default MyButton = () => {
    return (
        <TouchableOpacity>
            <Text style={{ fontSize: 24}}>My Button</Text>
        </TouchableOpacity>
    )
}
props와 state
1) props : 부모 컴포넌트로부터 전달된 속성값 혹은 상속받은 속성값을 말한다.
<Button title="Button"/> 여기서 속성을 지정한다. 부모에서자식 컴포넌트인 MyButton.js에서
const MyButton = props => {
	console.log(props);
    return (...);
}; 이렇게 사용 가능하다.
3) propTypes OR TypeScript 사용한다.
잘못된 타입을 전달, 필수로 전달해야 하는 값을 전달하지 않아서 문제, 잘못된 props가 전달되었다는 것을 경고 메시지를 통해 알리는 방법
npm install prop-types
설치 하고

d@Dui-MacBookAir react-native-component % npx react-native start

⚠️ react-native depends on @react-native-community/cli for cli commands. To fix update your package.json to include:


  "devDependencies": {
    "@react-native-community/cli": "latest",
  }
npx react-native start 하면 런타임 경고를 확인할 수 있다.
PropTypes.string.isRequired, 필수 여부를 지정하는 방법이다.
MyButton.propTypes = {
  title: PropTypes.string.isRequired,
  name: PropTypes.string.isRequired,
};

MyButton.propTypes = {
  title: PropTypes.string.isRequired,
  onPress: PropTypes.func.isRequired,
};
onPress가 필수로 설정되었기 때문에 MyButton 컴포넌트를 사용할 때 onPress를 전달하도록 수정
4) press 이벤트
특정 DOM을 클릭했을 때 호출되는 onClick 이벤트
onPressIn : 터치가 시작될 때 항상 호출
onPressOut : 터치가 해제될 때
onPress : 터치 해제될 때 onPressOut 이후 호출
onLongPress : 터치가 일정 시간 이상 지속되면 호출
delayLongPress=[3000] 호출되는 시간 조절 가능
5) change 이벤트
const EventInput = () => {
    const [text, setText] = useState('');
    const _onChange = event => setText(event.nativeEvent.text);

    return (
        <View>
            <Text style={{ margin: 10, fontSize:30 }}>text: {text}</Text>
            <TextInput
                style={{ borderWidth: 1, padding: 10, fontSize: 20 }}
                placeholder="Enter a text..."
                onChange={_onChange}
            />
        </View>
    )
}
onChange를 통해 변화된 텍스트를 전달할 수 있다.
onChangeText는 컴포넌트 텍스트가 변경되었을 때 변경된 텍스트만 인수로 전달하여 호출
6) Pressable 컴포넌트
TouchableOpacity 컴포넌트를 대체한다. 기존보다 다양한 기능을 제공한다.
HitRect, PressRect이다. (정확하게 클릭해야 하기 때문에)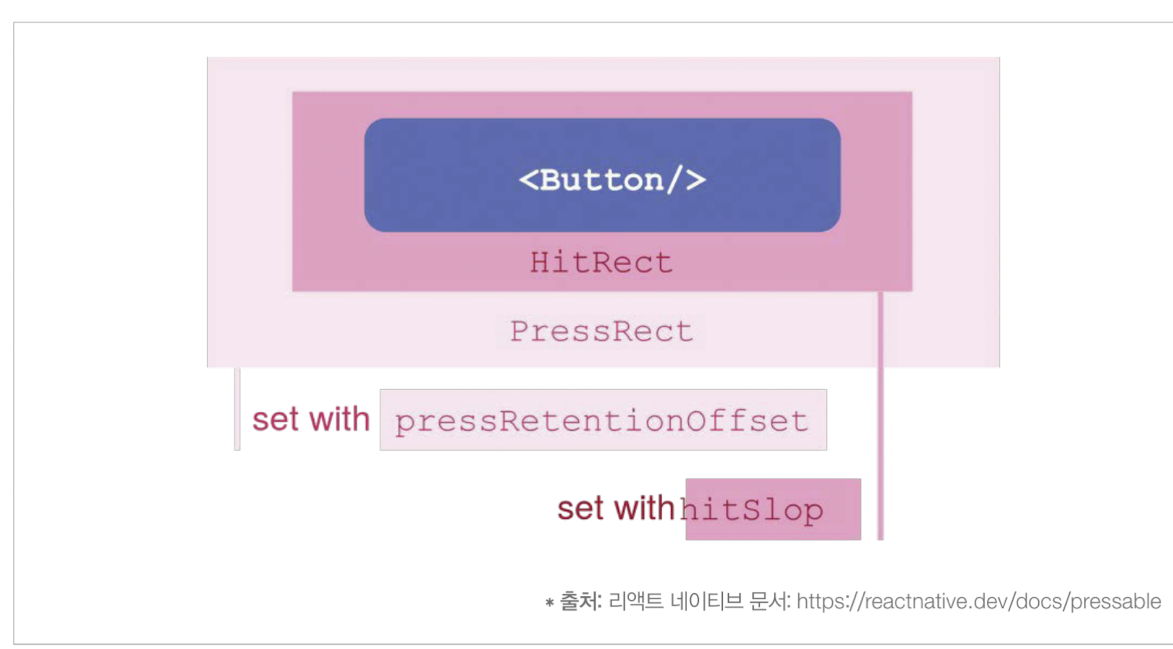
누른 상태에서 벗어나도록 pressRect을 조절한다.
const Button = (props) => {
	return (
    	<Pressable
        	pressRetnetionOffset={{ bottom: 50, left: 50, right: 50, top: 50}}
            hitSlop={50}
        </Pressable>
    )
};
PressRect 범위는 HitRect의 범위끝에서 시작되기 때문에 hitSlop의 값에 따라 PressRect의 범위가 달라진다.