0531-AWS
- 보안그룹 삭제 시 아웃바운드/인바운드에 다른 보안그룹과 연결되어 있으면 삭제가 안됨
Route53
- 53 : DNS port
- Load Balancing 기능 존재
- 여러개의 GSLB(Global Server Load Balancing)
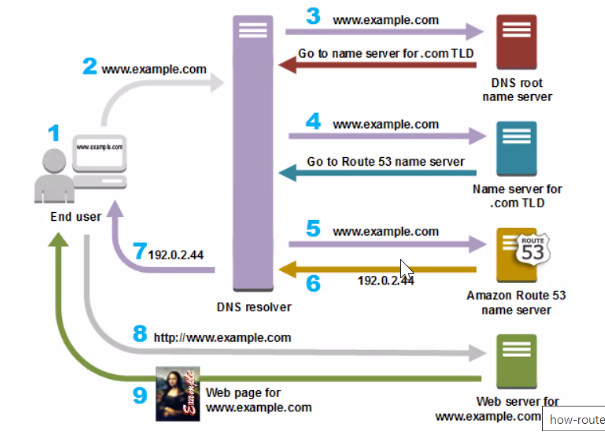
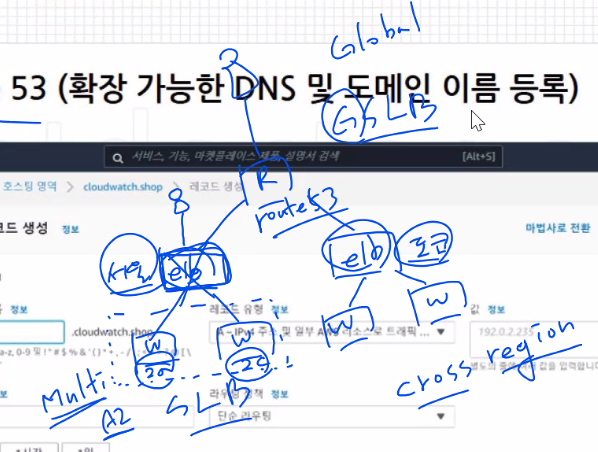
가용성 모니터링/ 트래픽 관리
- GSLB를 구현
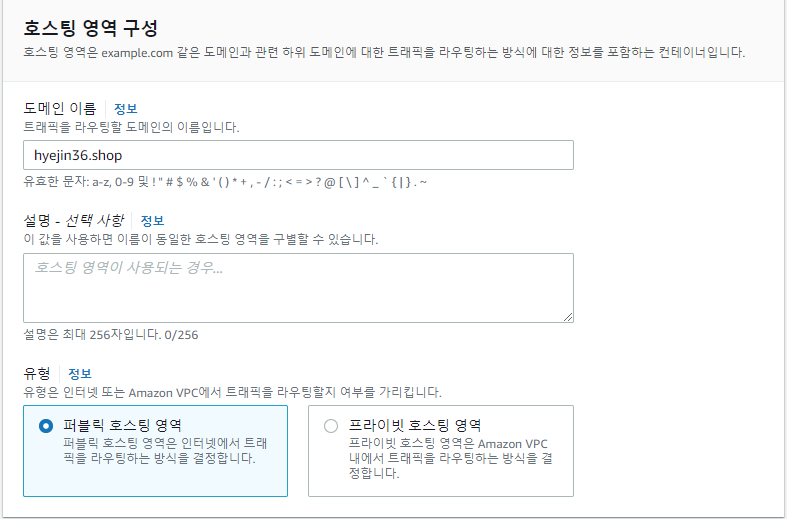
호스팅 영역 생성
가비아 설정
가비아 접속-> MY 가비아-> 도메인 통합 관리툴
- 도메인
ns-167.awsdns-20.com
ns-1111.awsdns-10.org
ns-1998.awsdns-57.co.uk
ns-765.awsdns-31.net
가비아 접속-> MY 가비아-> 도메인 통합 관리툴-> 네임서버 설정
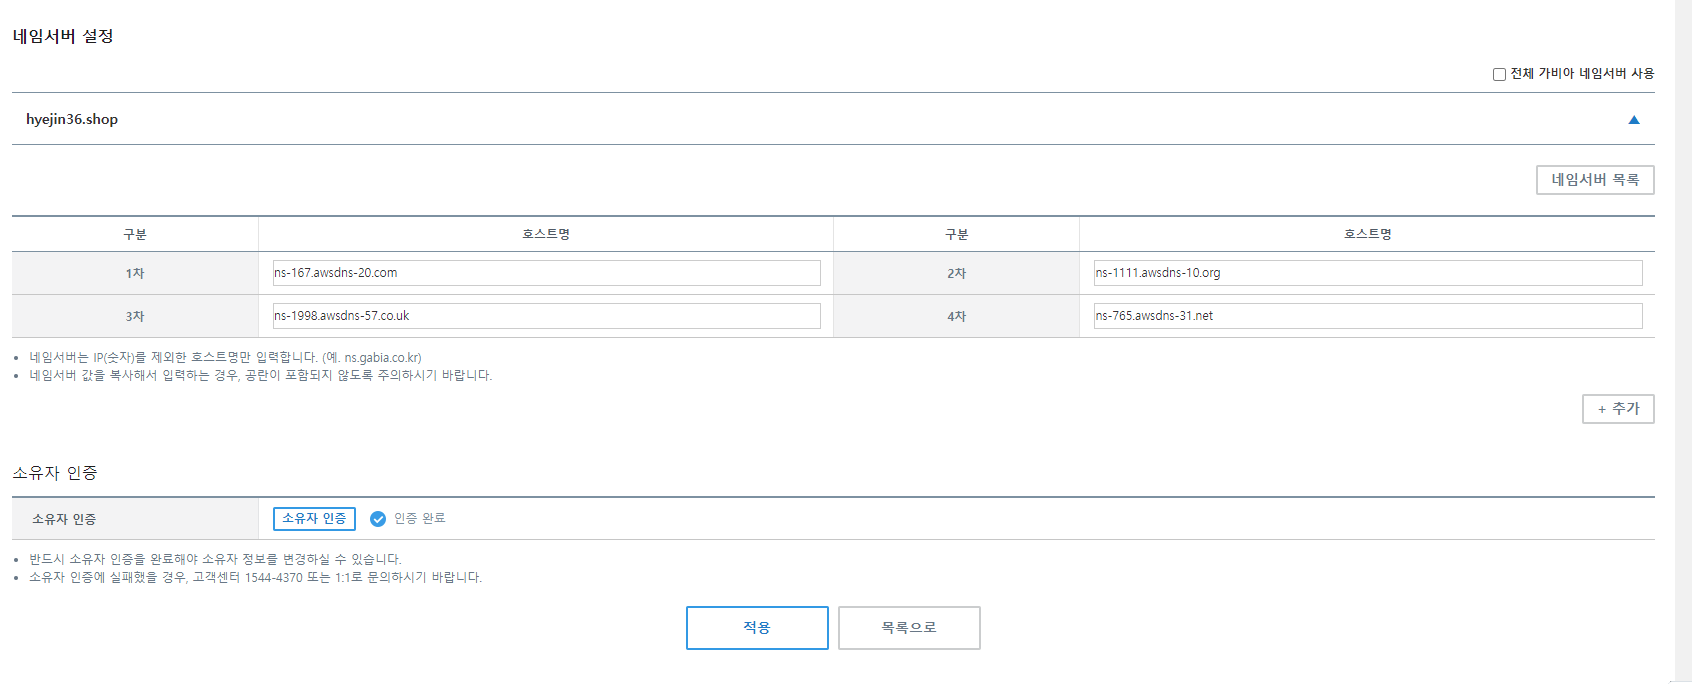
소유자 인증도 필수

AWS 설정
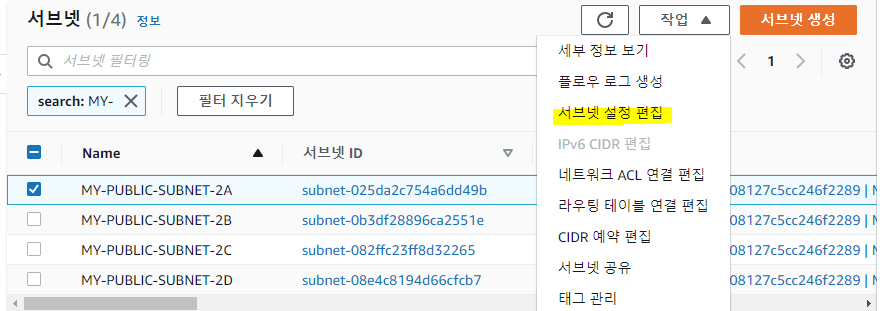
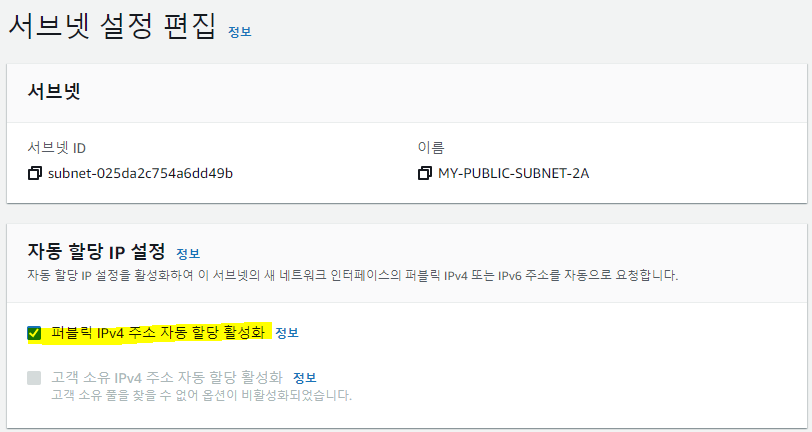
※퍼블릭 IP 자동 할당 설정
VPC > 서브넷 > MY- 필터 > 작업 > 서브넷 설정 편집 > 자동 할당 IP 설정 체크
인스턴스 생성
- 이름 : WEBSERVER
- 이미지 : AWS LINUX
- 유형 : t2.micro
- 키 페어 : aws-key
- VPC : MY-VPC
- 서브넷 : 2a
- ★퍼블릭 IP 자동 할당 : 활성화
- 보안 그룹
- 이름: SG-WEB
- 보안 그룹 규칙1: SSH / 위치무관
- 보안 그룹 규칙2: HTTP / 위치무관
- 보안 그룹 규칙3: 모든 ICMP-IPv4 / 위치무관
- 스토리지 구성 : 8GiB gp2
- 고급 세부 정보 - 사용자 데이터
#!/bin/bash
yum install -y httpd
systemctl enable --now httpd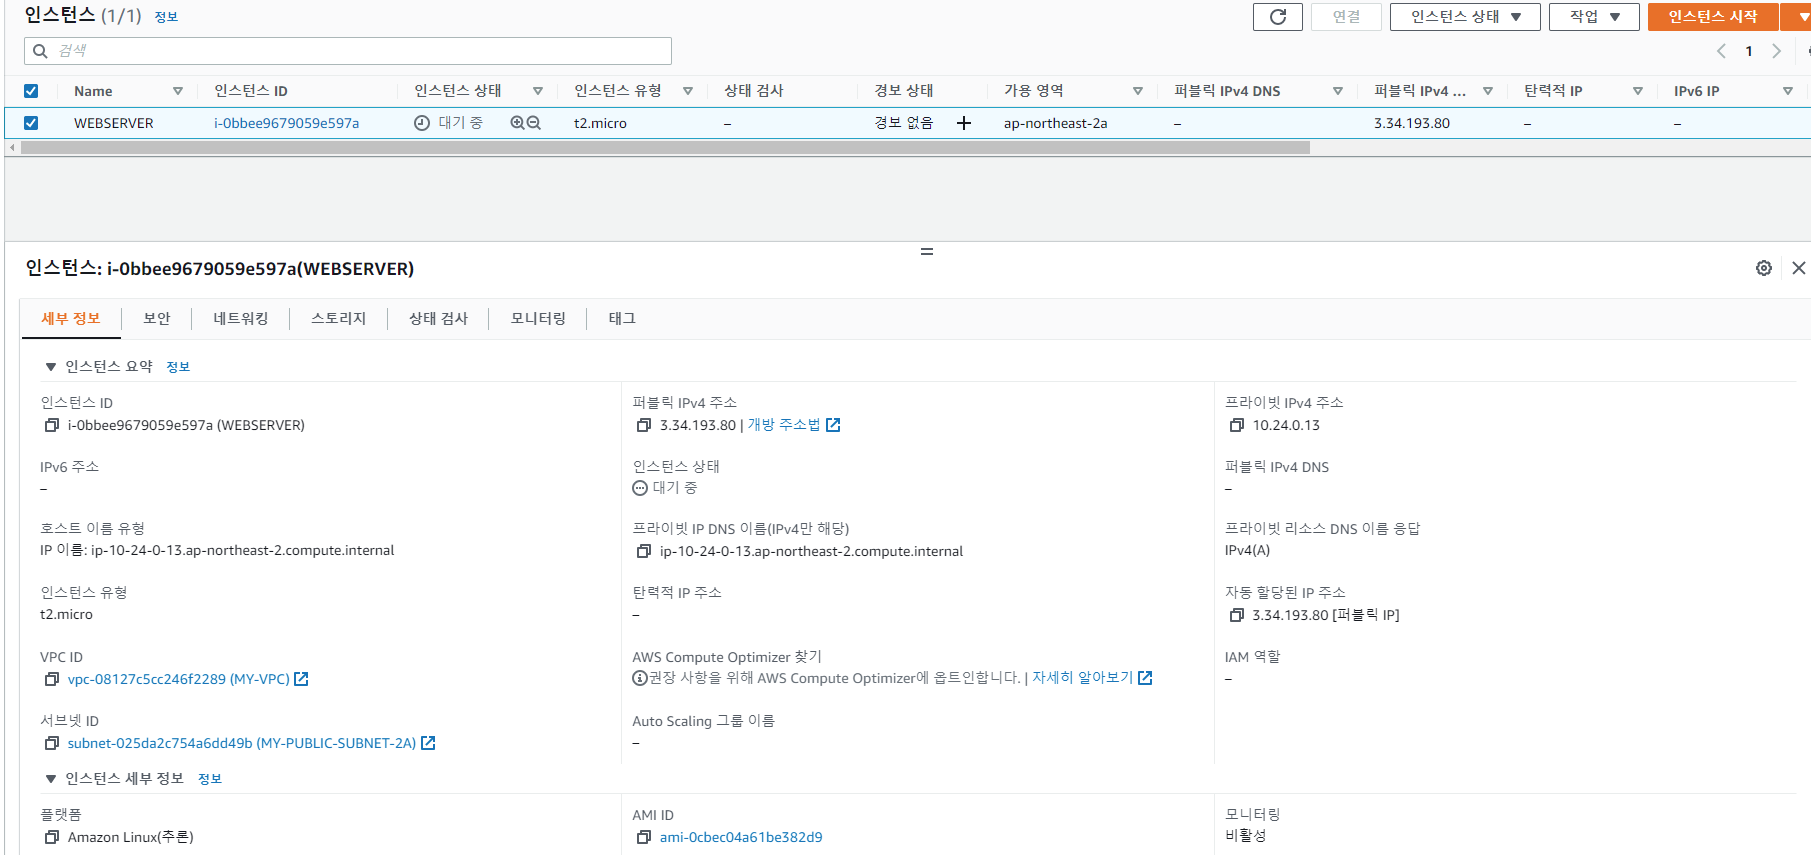
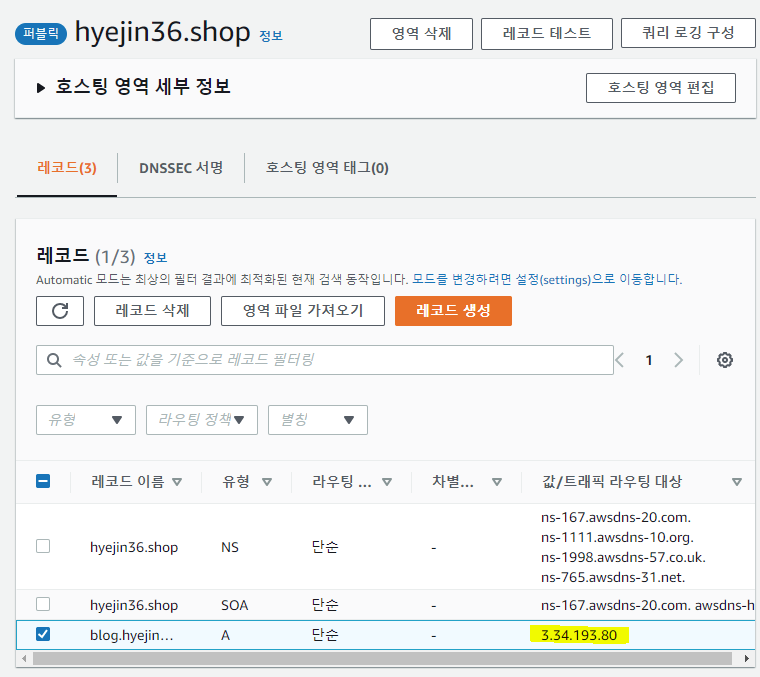
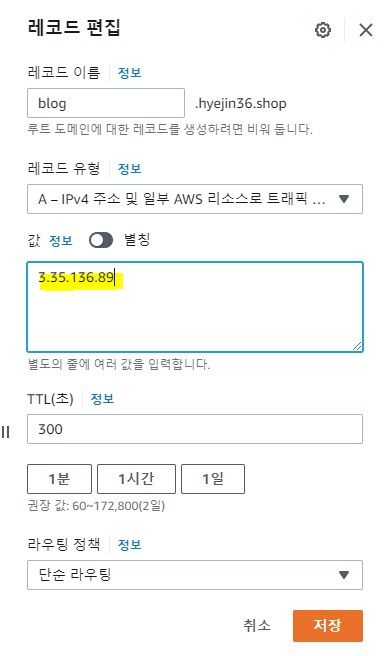
레코드 생성

-> 생성한 퍼블릭 IP
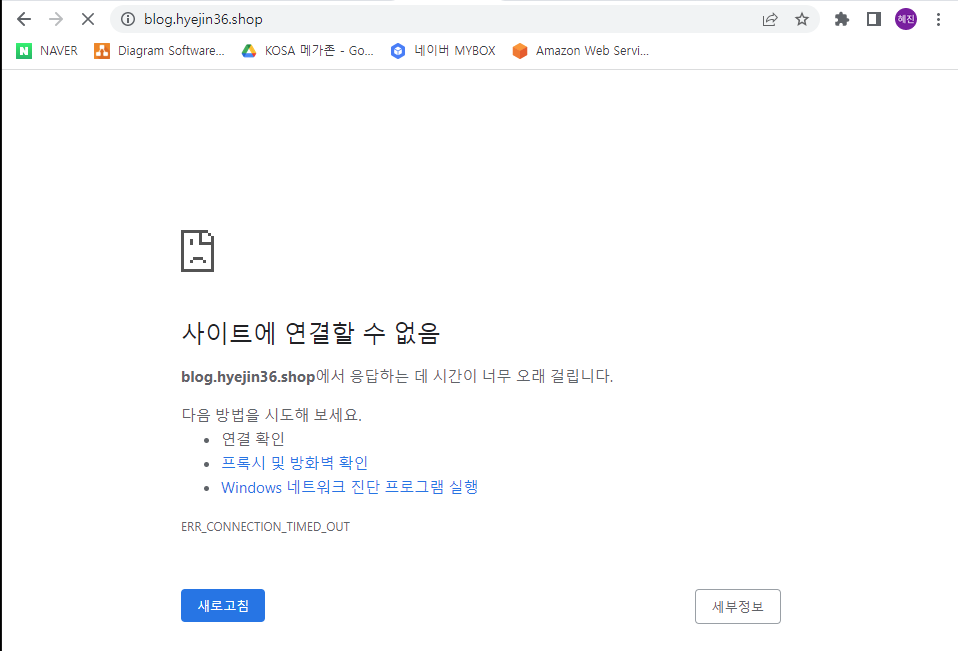
-> blog.hyejin36.shop
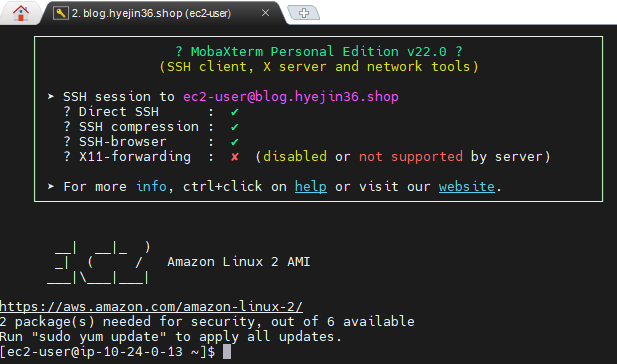
mobaxterm에 접속
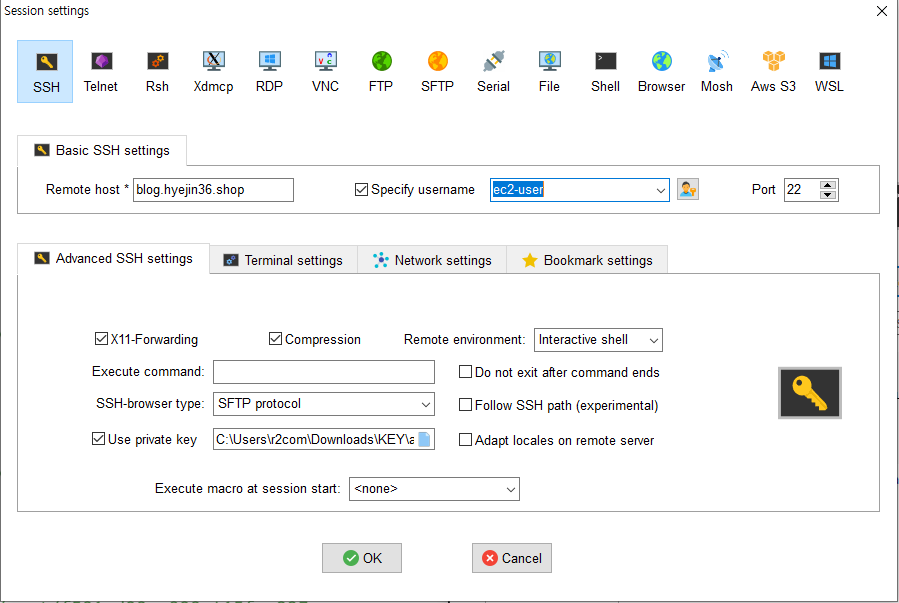
- host : blog.hyejin36.shop
- name : ec2-user
- key : aws-key
프라이빗 서브넷 생성
-
VPC ID : MY-VPC
-
서브넷 1
- 서브넷 이름 : MY-PRIVATE-SUBNET-2A
- 가용 영역 : ap-northeast-2a
- IPv4 CIDR 블록 : 10.24.64.0/20
- 서브넷 2
- 서브넷 이름 : MY-PRIVATE-SUBNET-2B
- 가용 영역 : ap-northeast-2b
- IPv4 CIDR 블록 : 10.24.80.0/20

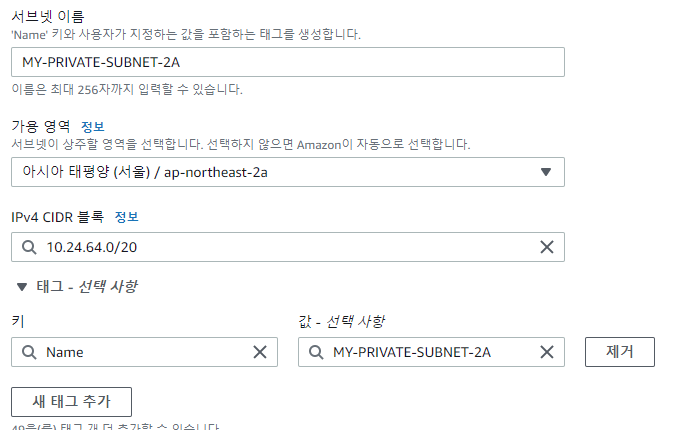
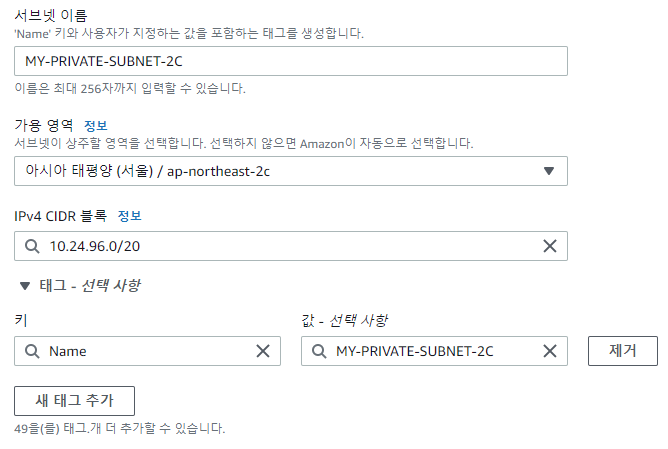
- 서브넷 3
- 서브넷 이름 : MY-PRIVATE-SUBNET-2C
- 가용 영역 : ap-northeast-2c
- IPv4 CIDR 블록 : 10.24.96.0/20
- 서브넷 4
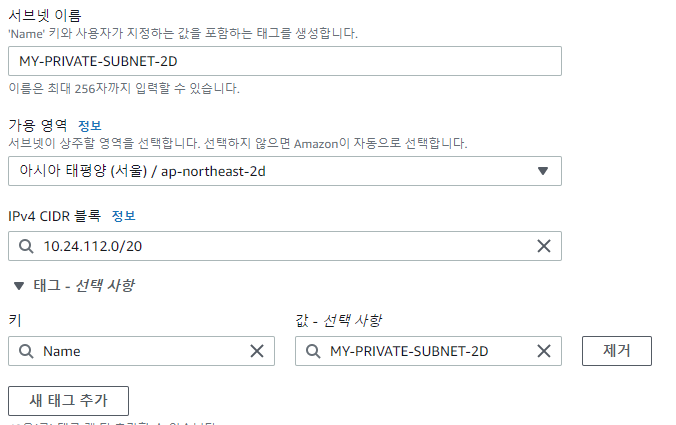
- 서브넷 이름 : MY-PRIVATE-SUBNET-2D
- 가용 영역 : ap-northeast-2d
- IPv4 CIDR 블록 : 10.24.112.0/20

- 서브넷은 나중에 수정 불가능이라 다시 생성해야 함
라우팅 테이블 생성
- 이름 : MY-PRIVATE-SUBNET-RTB
- VPC : MY-VPC
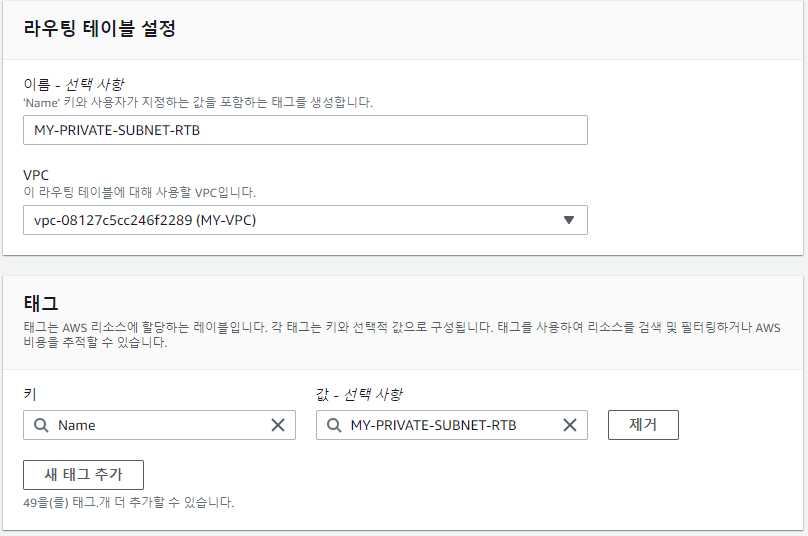
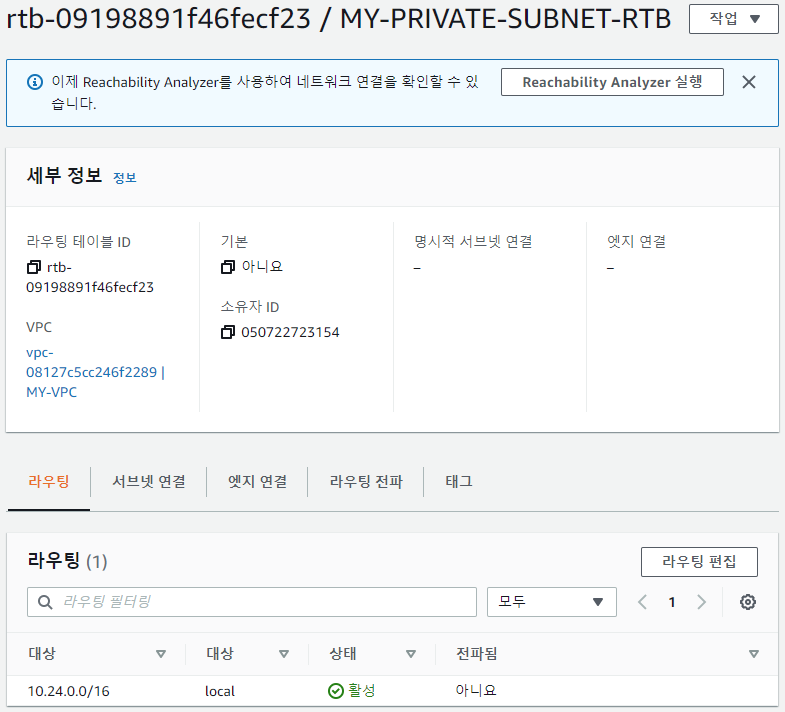
-> 라우팅 정보 자동 저장
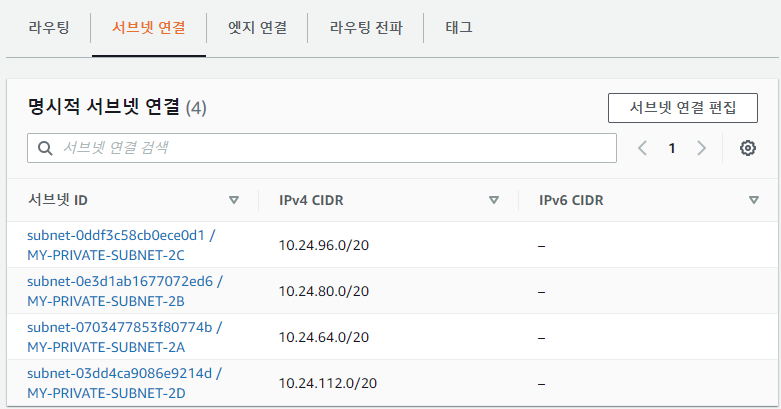
- 서브넷 연결 > 명시적 서브넷 연결 > 서브넷 연결 편집
인스턴스 생성
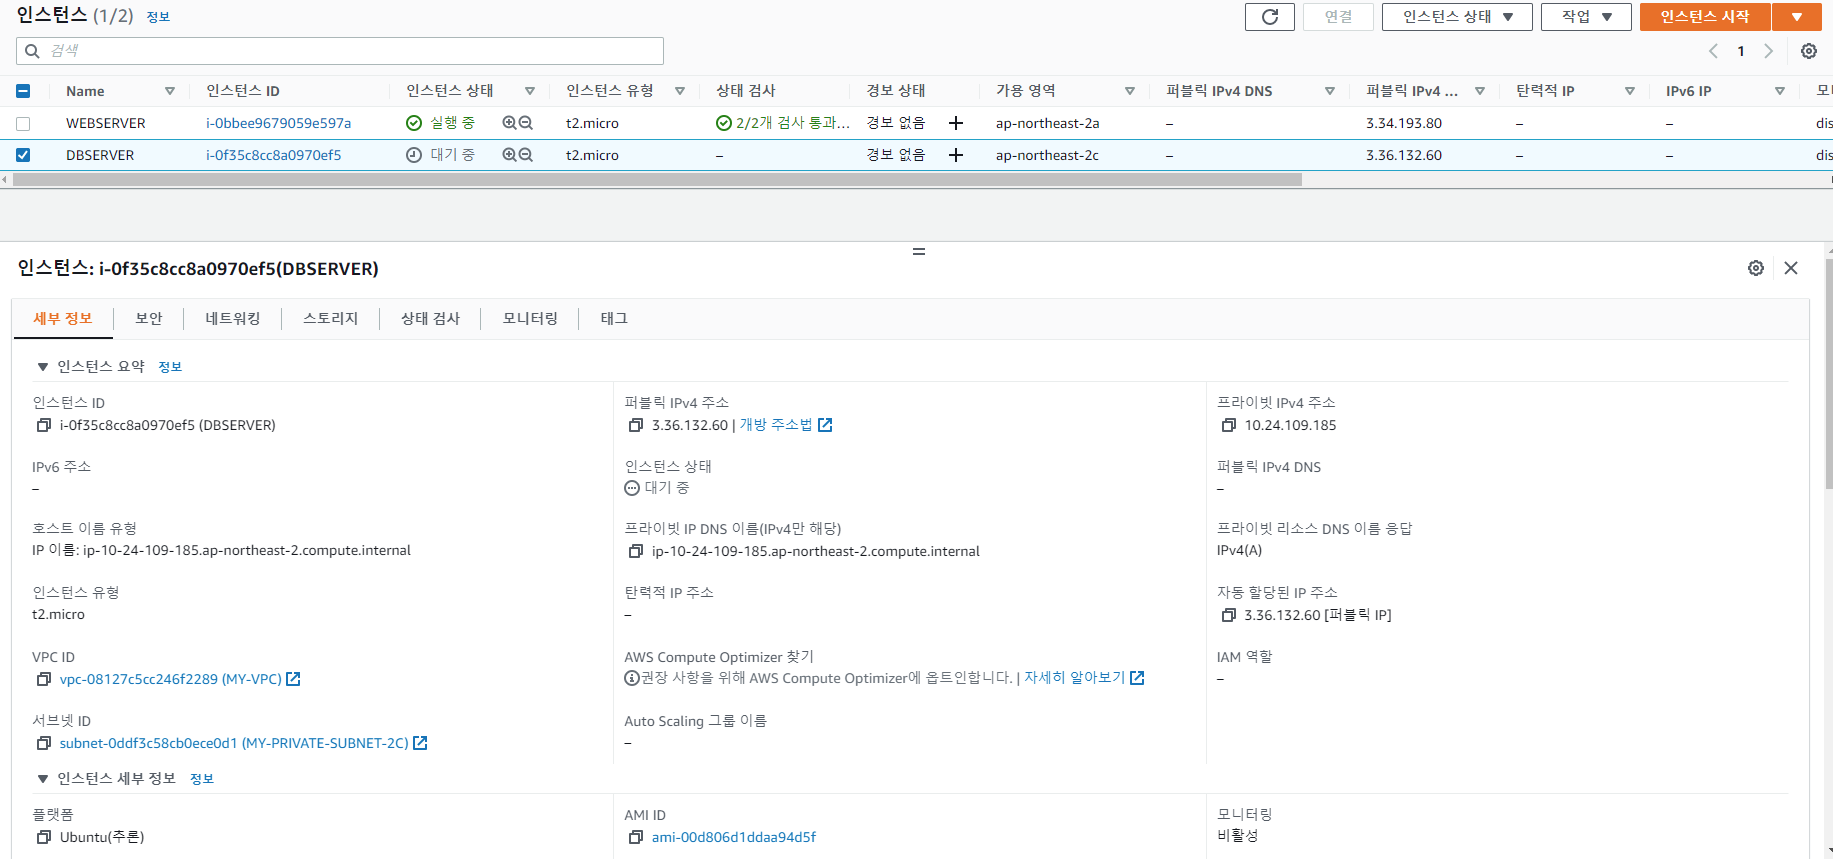
- 이름 : DBSERVER
- 이미지 : Ubuntu 18.04
- 유형 : t2.micro
- 키 페어 : aws-key
- VPC : MY-VPC
- 서브넷 : MY-PRIVATE-SUBNET-2C
- ★퍼블릭 IP 자동 할당 : 활성화(private 이라서 ip를 받아도 통신이 안됨)
- 보안 그룹
- 이름: SG-DB
- 보안 그룹 규칙1: SSH / 위치무관
- 보안 그룹 규칙2: 모든 ICMP-IPv4 / 위치무관
- 보안 그룹 규칙3: MYSQL/Aurora / 위치무관
- 스토리지 구성 : 8GiB gp2
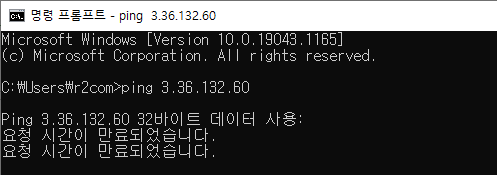
-> cmd에서 ping public IP로 했을 때 안나감.
mobaxterm에 접속
- ubuntu로 접속
- aws-key.pem 업로드
$ sudo chmod 400 aws-key.pem
$ ssh -i aws-key.pem ubuntu@10.24.109.185
The authenticity of host '10.24.109.185 (10.24.109.185)' can't be established.
ECDSA key fingerprint is SHA256:8m3cRJMtfyKIdQuAQ2wvS0Jc8Tp42LpTa+CNLpd+f1Q.
ECDSA key fingerprint is MD5:3c:7a:08:6a:ab:0a:09:c7:7e:09:17:50:3c:84:c5:57.
Are you sure you want to continue connecting (yes/no)? yes
Warning: Permanently added '10.24.109.185' (ECDSA) to the list of known hosts.
Welcome to Ubuntu 18.04.6 LTS (GNU/Linux 5.4.0-1071-aws x86_64)
* Documentation: https://help.ubuntu.com
* Management: https://landscape.canonical.com
* Support: https://ubuntu.com/advantage
System information as of Tue May 31 02:46:02 UTC 2022
System load: 0.08 Processes: 93
Usage of /: 15.5% of 7.69GB Users logged in: 0
Memory usage: 18% IP address for eth0: 10.24.109.185
Swap usage: 0%
0 updates can be applied immediately.
The programs included with the Ubuntu system are free software;
the exact distribution terms for each program are described in the
individual files in /usr/share/doc/*/copyright.
Ubuntu comes with ABSOLUTELY NO WARRANTY, to the extent permitted by
applicable law.
To run a command as administrator (user "root"), use "sudo <command>".
See "man sudo_root" for details.
ubuntu@ip-10-24-109-185:~$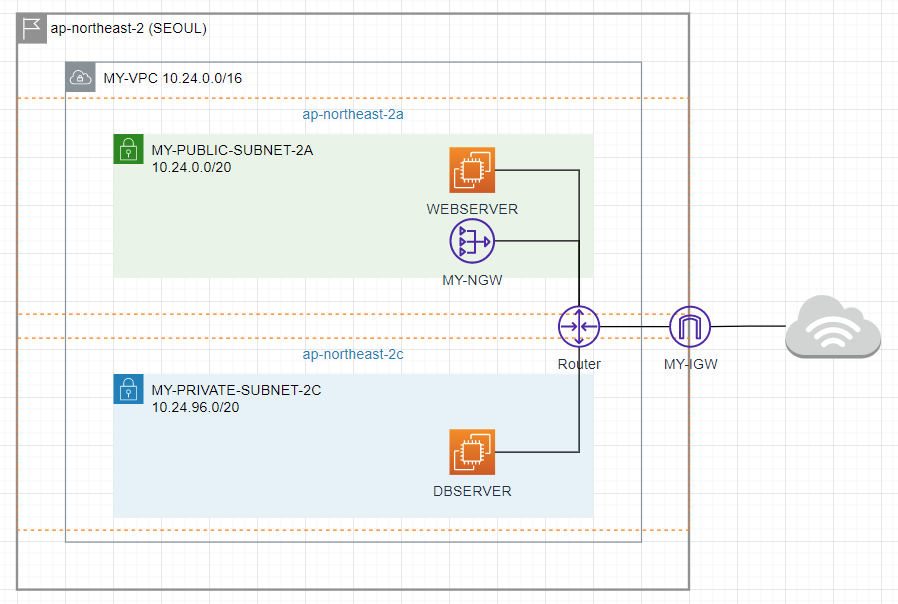
-> NAT gateway는 public에다가 해야함
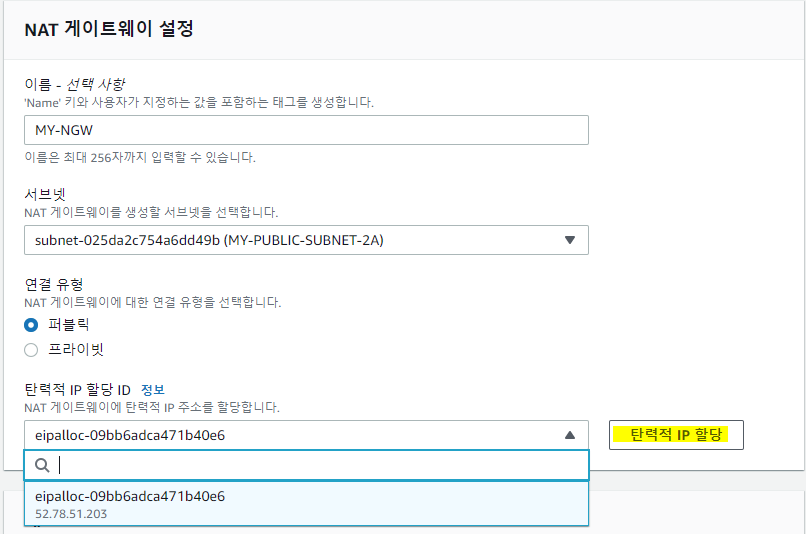
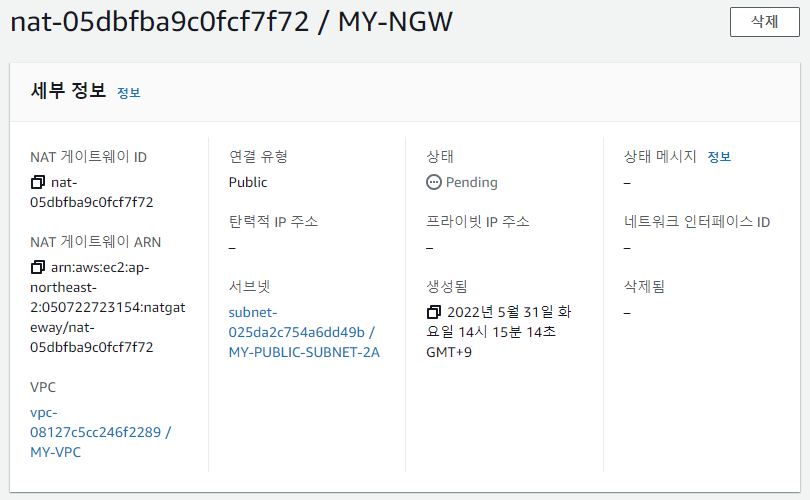
NAT 게이트웨이 생성
- 이름 : MY-NGW
- 서브넷 : MY-PUBLIC-SUBNET-2A
- 탄력적 IP 할당 클릭 (사용하면 과금x, 사용하지 않고 보유만 하면 과금)
-> 라우팅 정보가 없어서 인터넷이 안되는 것!
-> NAT를 추가해줘야 함 (통신전용 게이트웨이)
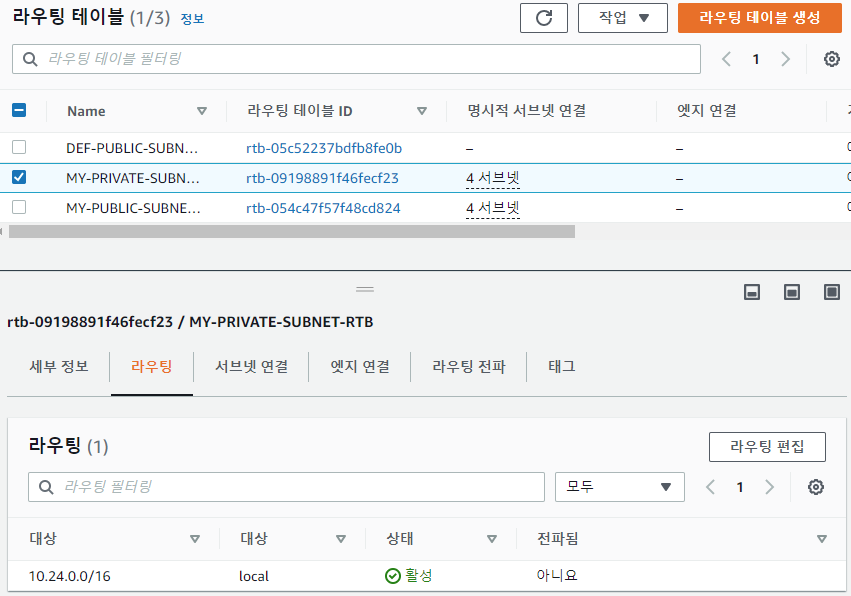
라우팅 테이블 > MY-PRIVATE-SUBNET-RTB > 라우팅 > 라우팅 편집
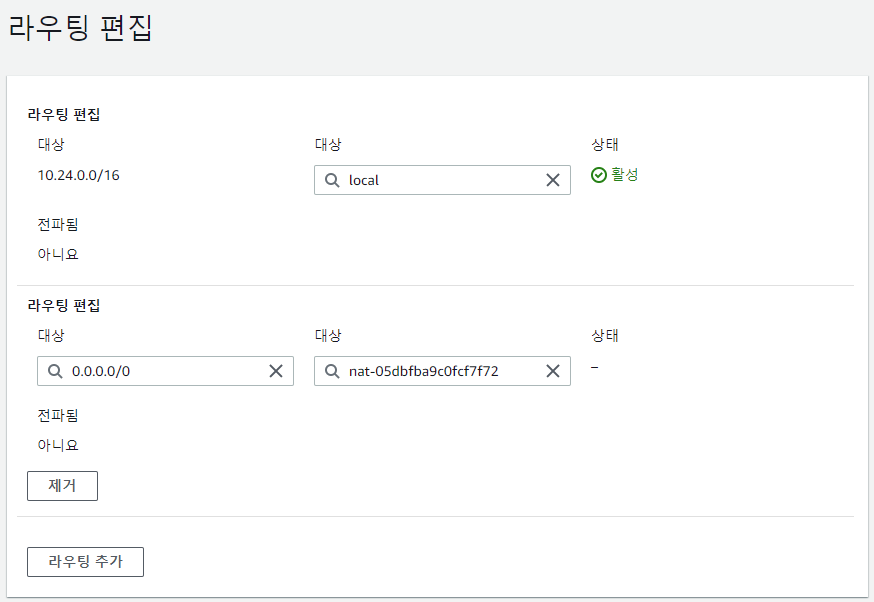
-> NAT 게이트웨이 추가

-> ping 성공
- NAT 게이트웨이는 한시간 이후면 과금 발생이기 때문에 한시간 되기전에 삭제해야함
- NAT 게이트웨이 지우고 탄력적 IP도 삭제해야 함
mobaxterm에 접속
Ubuntu(DBSERVER)
$ sudo apt-get update -y
$ sudo apt-get install -y mariadb-server unzip nfs-common
ubuntu@ip-10-24-109-185:~$ sudo mysql_secure_installation
NOTE: RUNNING ALL PARTS OF THIS SCRIPT IS RECOMMENDED FOR ALL MariaDB
SERVERS IN PRODUCTION USE! PLEASE READ EACH STEP CAREFULLY!
In order to log into MariaDB to secure it, we'll need the current
password for the root user. If you've just installed MariaDB, and
you haven't set the root password yet, the password will be blank,
so you should just press enter here.
Enter current password for root (enter for none):
OK, successfully used password, moving on...
Setting the root password ensures that nobody can log into the MariaDB
root user without the proper authorisation.
Set root password? [Y/n] y
New password:
Re-enter new password:
Password updated successfully!
Reloading privilege tables..
... Success!
By default, a MariaDB installation has an anonymous user, allowing anyone
to log into MariaDB without having to have a user account created for
them. This is intended only for testing, and to make the installation
go a bit smoother. You should remove them before moving into a
production environment.
Remove anonymous users? [Y/n] y
... Success!
Normally, root should only be allowed to connect from 'localhost'. This
ensures that someone cannot guess at the root password from the network.
Disallow root login remotely? [Y/n] y
... Success!
By default, MariaDB comes with a database named 'test' that anyone can
access. This is also intended only for testing, and should be removed
before moving into a production environment.
Remove test database and access to it? [Y/n] y
- Dropping test database...
... Success!
- Removing privileges on test database...
... Success!
Reloading the privilege tables will ensure that all changes made so far
will take effect immediately.
Reload privilege tables now? [Y/n] y
... Success!
Cleaning up...
All done! If you've completed all of the above steps, your MariaDB
installation should now be secure.
Thanks for using MariaDB!비밀번호 : test1234
$ sudo vi /etc/mysql/mariadb.conf.d/50-server.cnf
#bind-address            = 127.0.0.1
$ sudo systemctl restart mysql
$ sudo mysql -u root -p
CREATE USER 'wpuser'@'%' IDENTIFIED BY 'wppass';
CREATE DATABASE IF NOT EXISTS wordpress;
GRANT ALL PRIVILEGES ON wordpress.* TO 'wpuser'@'%';
ubuntu@ip-10-24-109-185:~$ sudo mysql -u root -p
Enter password:
Welcome to the MariaDB monitor. Commands end with ; or \g.
Your MariaDB connection id is 31
Server version: 10.1.48-MariaDB-0ubuntu0.18.04.1 Ubuntu 18.04
Copyright (c) 2000, 2018, Oracle, MariaDB Corporation Ab and others.
Type 'help;' or '\h' for help. Type '\c' to clear the current input statement.
MariaDB [(none)]> CREATE USER 'wpuser'@'%' IDENTIFIED BY 'wppass';
Query OK, 0 rows affected (0.00 sec)
MariaDB [(none)]> CREATE DATABASE IF NOT EXISTS wordpress;
Query OK, 1 row affected (0.00 sec)
MariaDB [(none)]> GRANT ALL PRIVILEGES ON wordpress.* TO 'wpuser'@'%';
Query OK, 0 rows affected (0.00 sec)
MariaDB [(none)]> quit
Byeec2(WEBSERVER)
# wget https://ko.wordpress.org/wordpress-4.8.2-ko_KR.zip
# sudo yum install -y httpd php php-mysql php-gd php-mbstring wget unzip
# cd /var/www/html
# sudo unzip /home/ec2-user/wordpress-4.8.2-ko_KR.zip
sudo mv ./wordpress/* .
# sudo chown -R apache:apache /var/www/*
# sudo systemctl restart httpd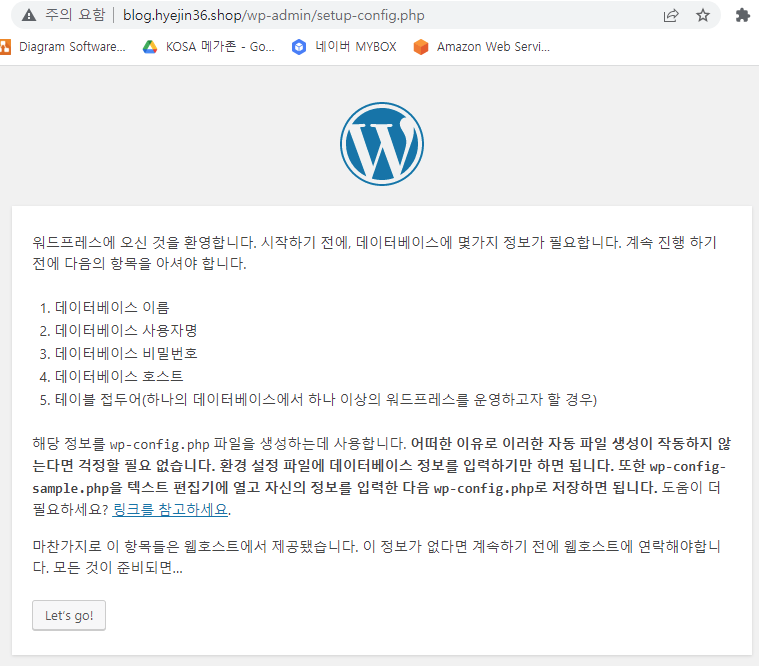
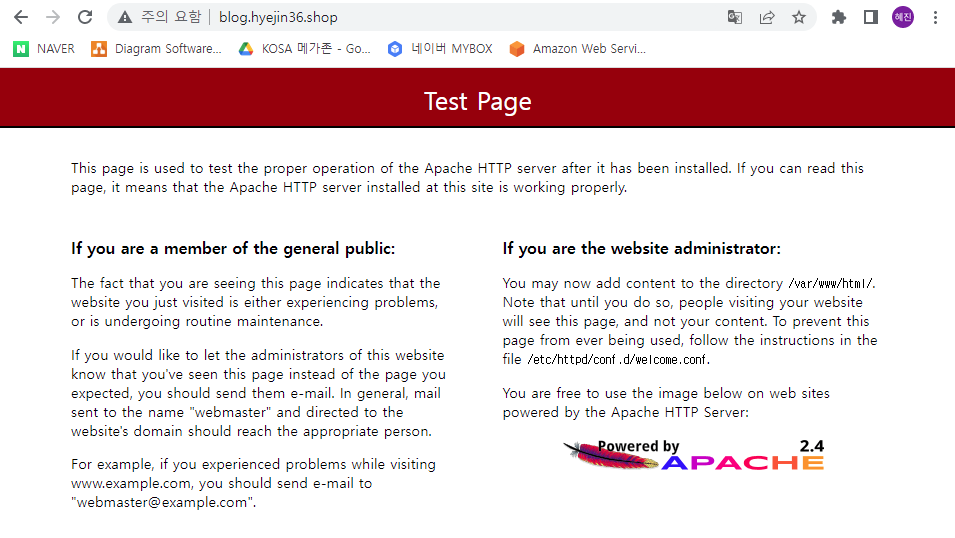
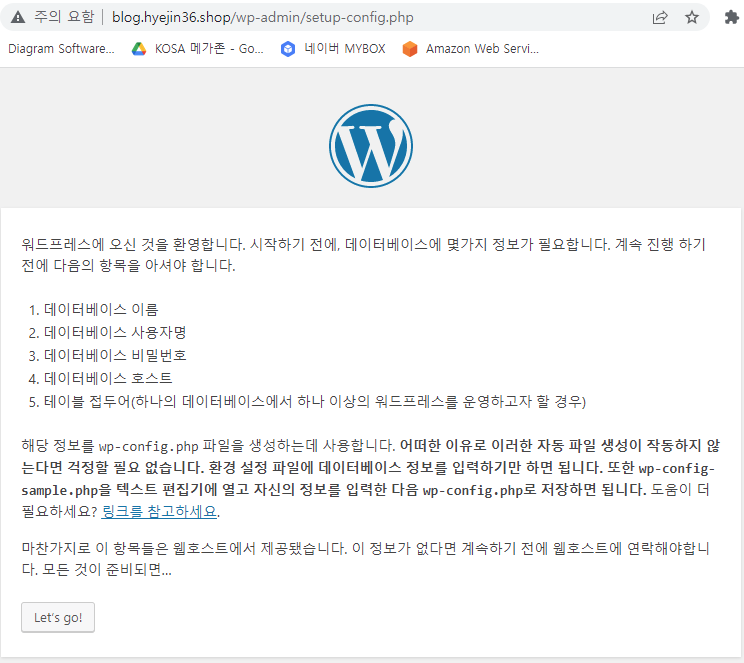
-> blog.hyejin36.shop으로 접속하면 워드프레스 보임
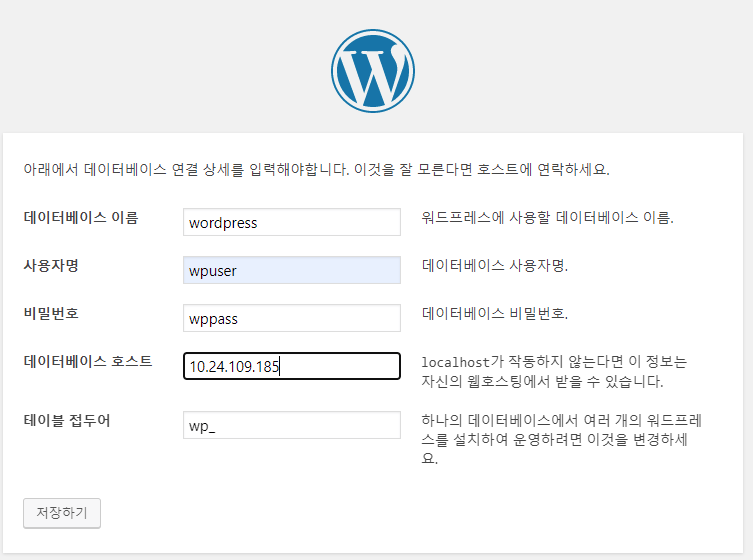
- 데이터베이스 이름 : wordpress
- 사용자명 : wpuser
- 비밀번호 : wppass
- 데이터베이스 호스트 : DBSERVER IP; 10.24.109.185
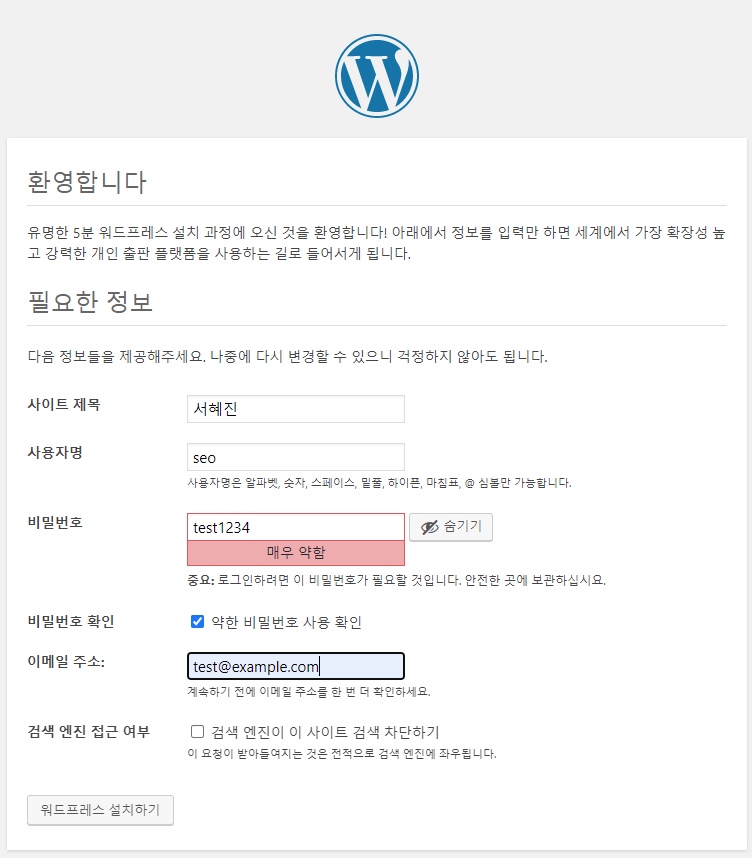
- 사이트 제목 : 서혜진
- 사용자명 : seo
- 비밀번호 : test1234
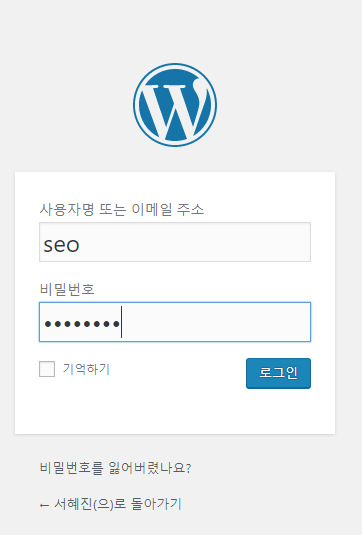
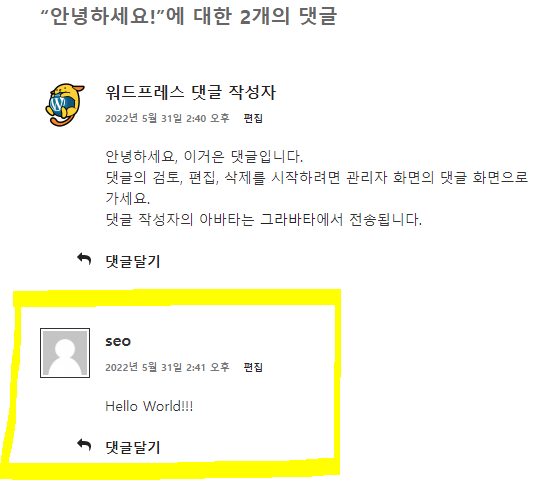
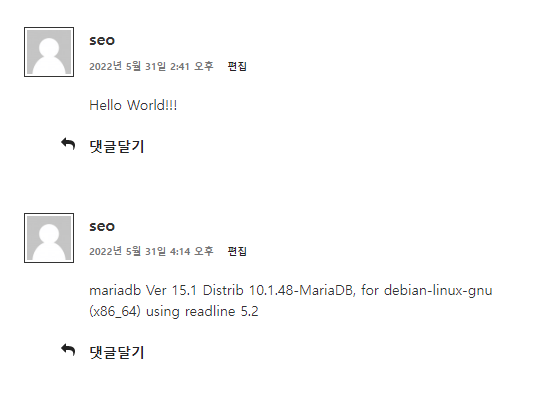
-> seo/ test1234으로 로그인
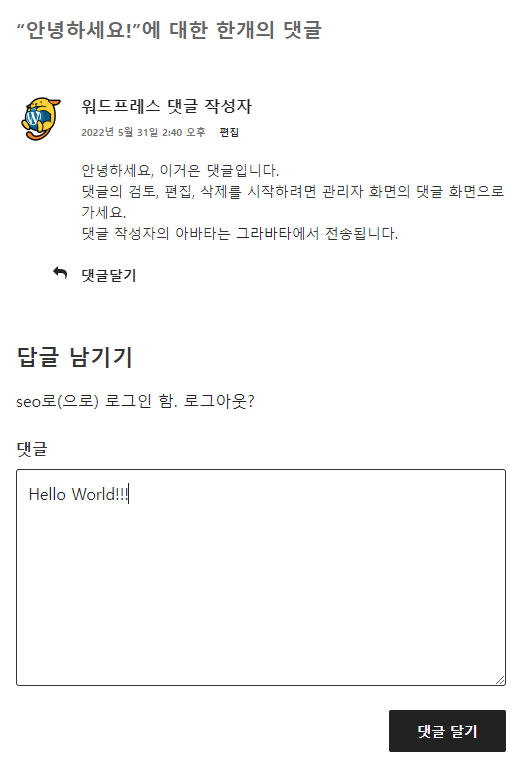
- 게시글로 접속해서 댓글 달기
- NAT 게이트웨이 없을 때 설치하려면?
VPC > 라우팅 테이블 > MY-PRIVATE-SUBNET-RTB > 라우팅 > 라우팅 편집
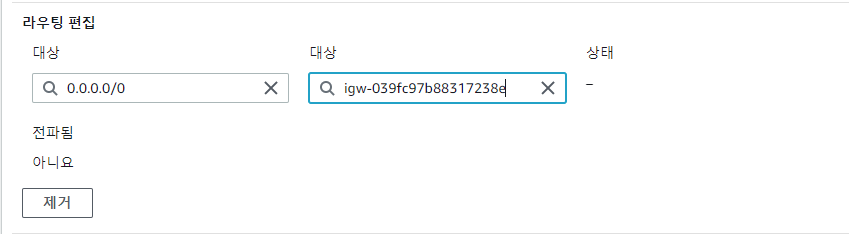
-> 인터넷 게이트웨이 설정
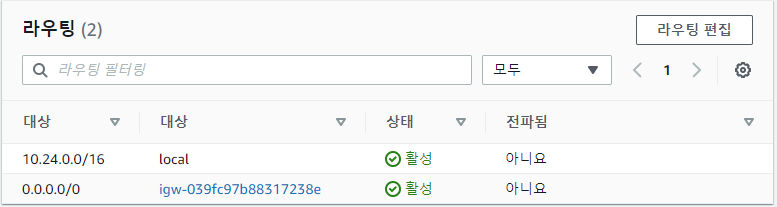
※조건: 인터넷 게이트웨이를 설정해도 우분투의 퍼블릭 IP가 없으면 통신이 안됨.
인스턴스 중지(power off)
- 중지하면 퍼블릭 ip 사라짐
- 다시 시작하면 퍼블릭 ip가 변경됨-> 도메인이 틀어진다는 의미
-> 예전 ip로 연결되어 있음
-> route 53에서 바뀐 ip로 다시 바꿔줘야함
- 탄력적 IP는 중지했다가 시작해도 IP가 바뀌지 않음
- WEBSERVER에는 탄력적 IP를 연결하는 게 좋음
네트워크 및 보안
보안 그룹
보안그룹 > SG-DB >인바운드 규칙 편집 > MYSQL 삭제
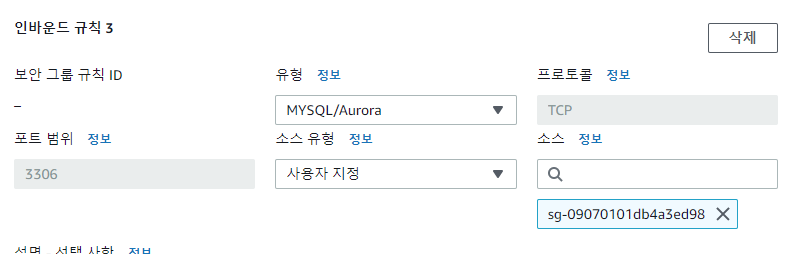
-> SG-WEB에서만 출발하는 트래픽만 DB에 접속 가능
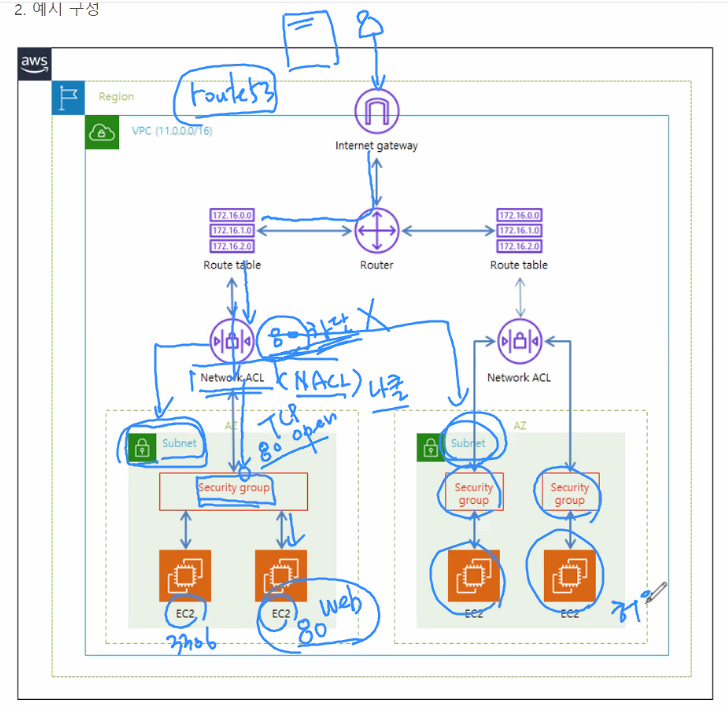
NACL(나클)
- 서브넷 바깥에 위치
- 서브넷 상위에서 관리
- 특정그룹 차단 가능, 허용도 가능(보안그룹이 허용 가능이므로 차단 기능만 사용)
보안그룹
- 서브넷을 벗어날 수 없음
- 특정 그룹 허용 가능
- 차단 불가능
예시) pc로는 접근 못하고, 핸드폰으로만 접근 가능하게 만들어보자! (blog.hyejin36.shop)
-> pc는 차단, 모바일은 허용
VPC > 네트워크 ACL > MY-NACL > 인바운드 규칙 편집 > 규칙 추가
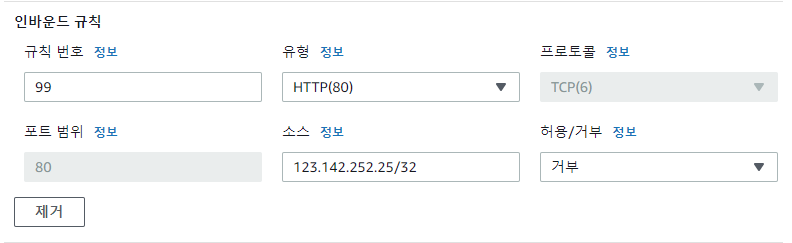
- 주의사항
-전체 허용 다음이 거부 정책이기 때문에 규칙 번호 100을 절대 제거하면 안됨
-새 규칙의 규칙번호를 100보다 앞 숫자로 설정하면 됨
-> pc로는 접근 불가

-> 핸드폰으로는 접근 가능
AWS 데이터베이스 서비스
NoSQL(KVS; Key Value Store) :
SQL : MySQL, MariaDB, Oracle, MS-SQL, Aurora(MySQL, Postgre SQL)
RDS
- 관리되는 관계형 데이터베이스 서비스
데이터베이스(DBNMS) 생성
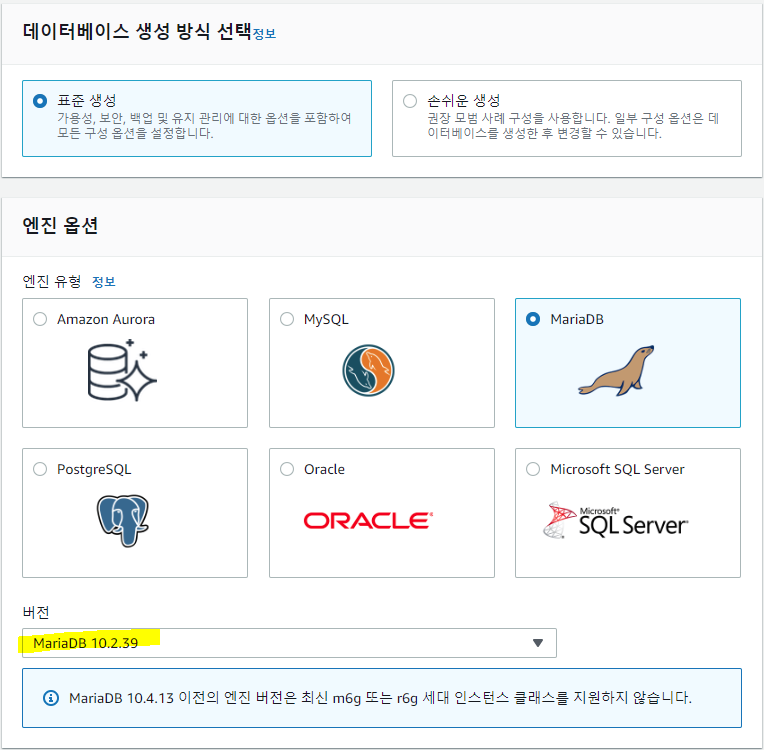
- 생성 방식 : 표준 생성
- 엔진 유형 : MariaDB
- 템플릿 : 프리 티어
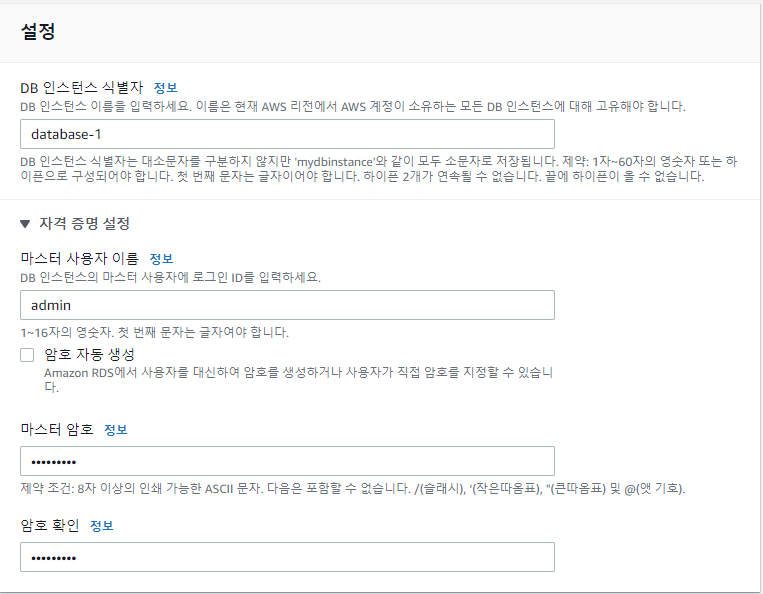
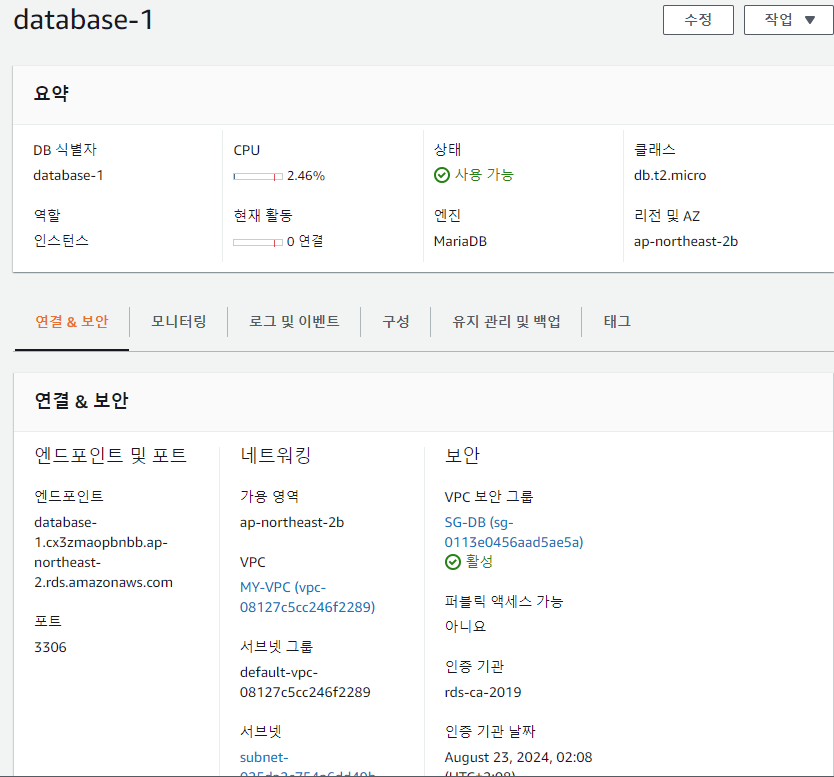
- DB 인스턴스 식별자 : database-1
- 마스터 사용자 이름 : admin
- 마스터 암호 : Test1234!
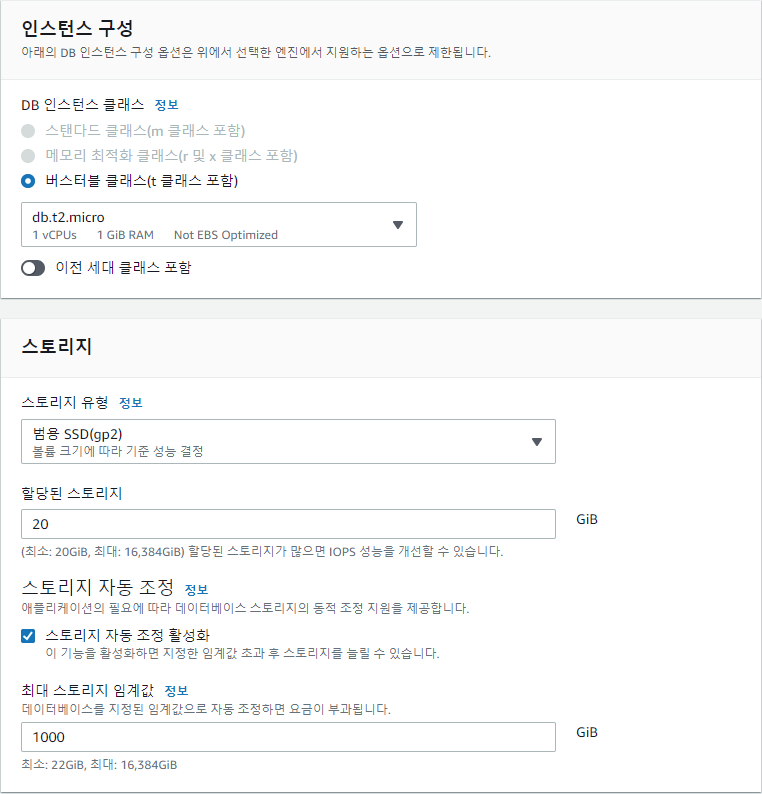
- 인스턴스 구성 :
- 버스터블 클래스(t 클래스 포함) - 프리티어라 다른 것 선택 불가
- db.t2.micro
- 스토리지 : 범용 SSD(gp2) / 20 / 1000
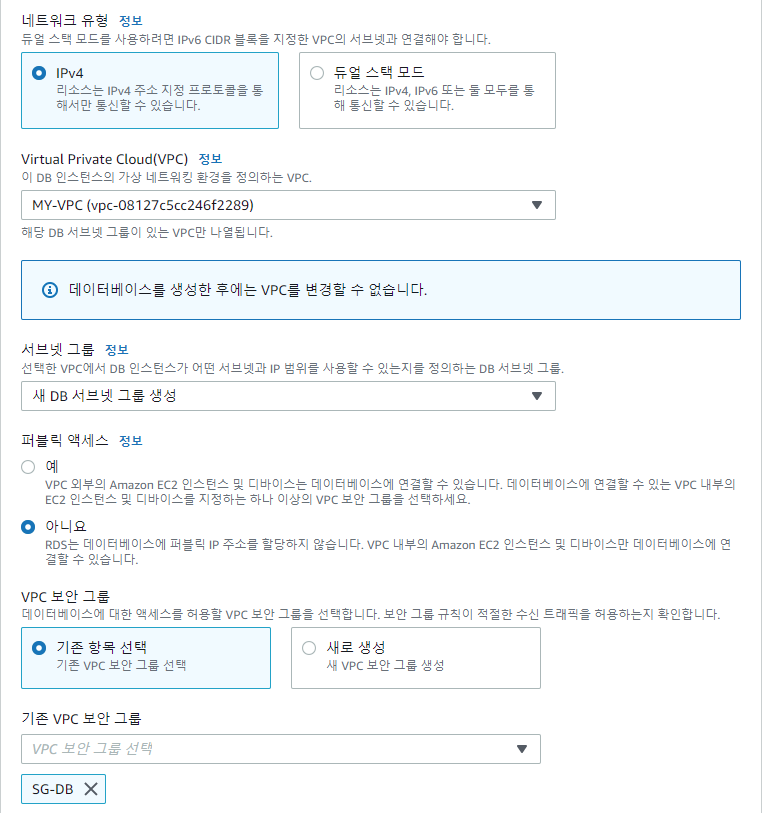
- 네트워크 유형 : IPv4
- VPC : MY-VPC
- 서브넷 그룹 : 새 DB 서브넷 그룹 생성
- 퍼블릭 액세스 : 아니요
*예 : mysql 명령어로 직접 들어가기 가능- VPC 보안 그룹 : SG-DB
- 가용 영역 : ap-notrheast-2b (b를 선택해서 가용성 높임)

mobaxterm - ubuntu(DBSERVER)
ubuntu@ip-10-24-109-185:~$ mysql -h database-1.cx3zmaopbnbb.ap-northeast-2.rds.amazonaws.com -u admin -p
Enter password:
Welcome to the MariaDB monitor.  Commands end with ; or \g.
Your MariaDB connection id is 30
Server version: 10.2.39-MariaDB-log Source distribution

Copyright (c) 2000, 2018, Oracle, MariaDB Corporation Ab and others.

Type 'help;' or '\h' for help. Type '\c' to clear the current input statement.

MariaDB [(none)]> CREATE USER 'wpuser'@'%' IDENTIFIED BY 'wppass';
Query OK, 0 rows affected (0.01 sec)

MariaDB [(none)]> CREATE DATABASE IF NOT EXISTS wordpress;
Query OK, 1 row affected (0.00 sec)

MariaDB [(none)]> GRANT ALL PRIVILEGES ON wordpress.* TO 'wpuser'@'%';
Query OK, 0 rows affected (0.01 sec)

MariaDB [(none)]> quit
Bye
$ sudo mysqldump -uwpuser -pwppass wordpress > wordpress.sql
$ sudo mysql -h database-1.cx3zmaopbnbb.ap-northeast-2.rds.amazonaws.com -uwpuser -pwppass wordpress < wordpress.sqlmobaxterm - ec2(WEBSERVER)
$ cd /var/www/html
$ sudo mv wp-config.php wp-config.php.bak
blog.hyejin36.shop으로 접속
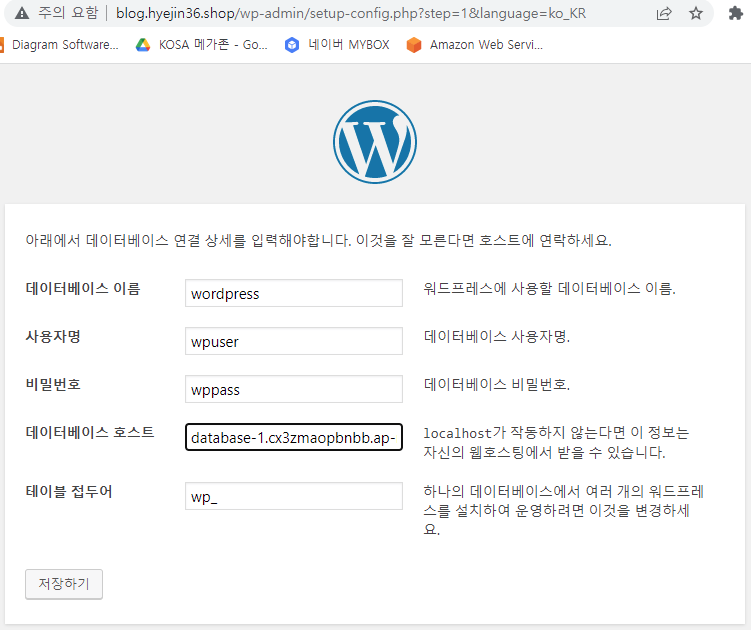
- 사용자명 : wpuser
- 비밀번호 : wppass
- 데이터베이스 호스트 : 데이터베이스 엔드포인트 (database-1.cx3zmaopbnbb.ap-northeast-2.rds.amazonaws.com)
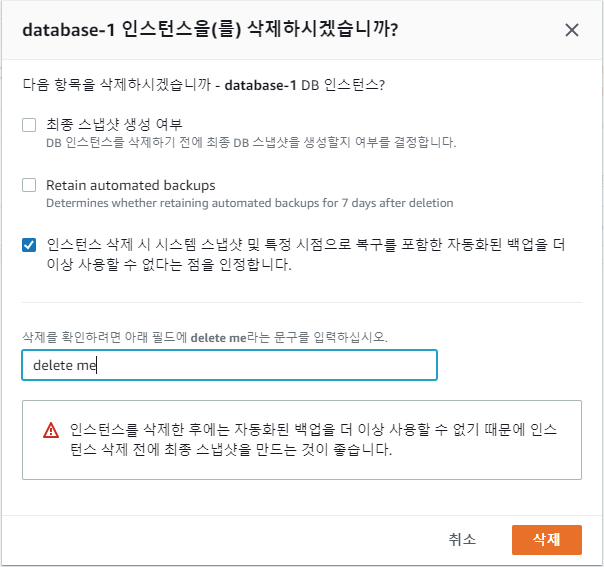
RDS 삭제
데이터베이스 누르고 작업 > 삭제
- 최종 스냅샷 생성 여부 체크 하면 안됨 -> 과금 발생
Route53 삭제(12시간 전에 삭제해야 함)
- A 레코드 먼저 삭제
- 이후에 영역 삭제
