step 3과 이어집니다.
이번 step에서는 Pre-rendering and Data Fetching 에 대한 step 입니다.
Pre-rendering?
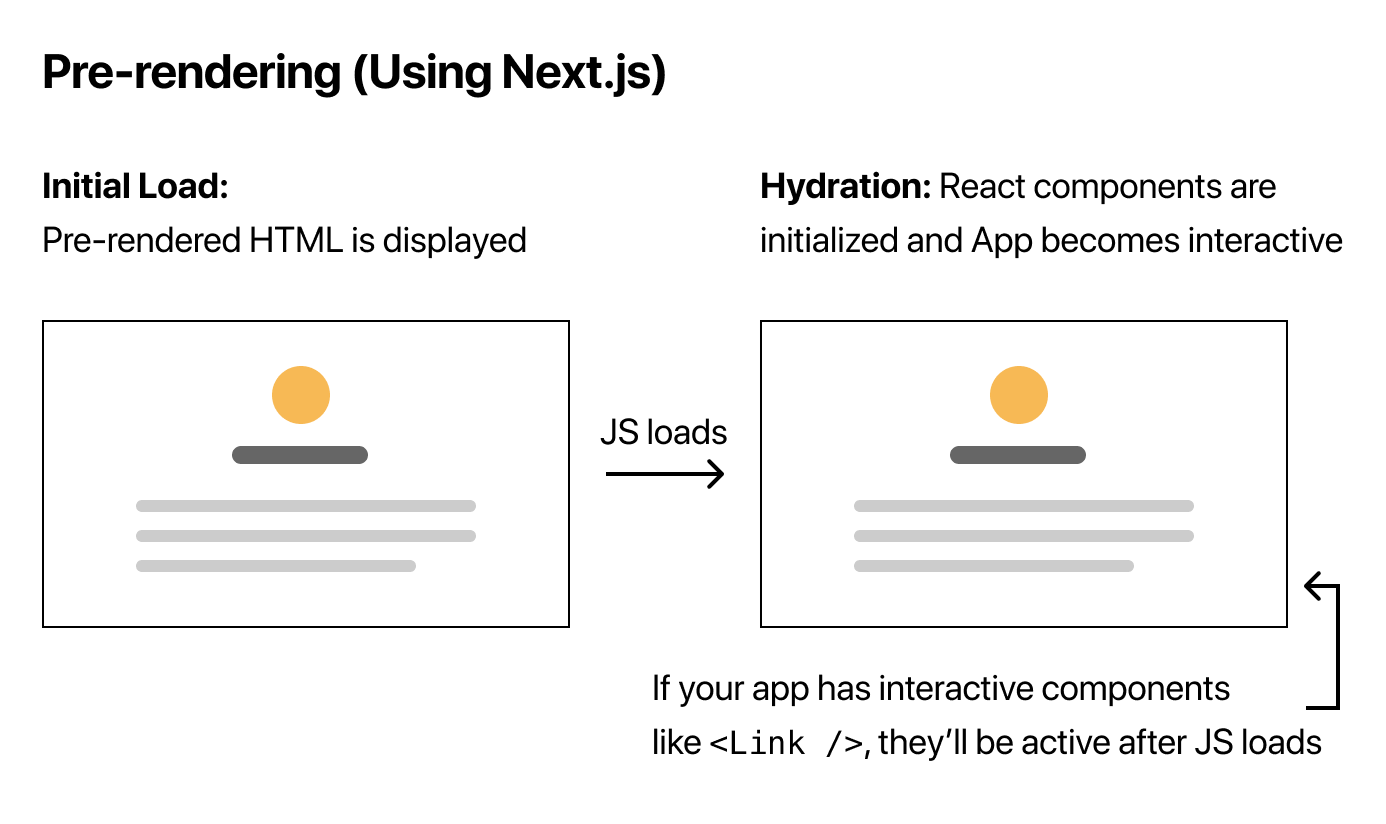
기본적으로 Next.js 는 페이지를 Pre-rendering 합니다.
그 의미는 클라이언트 사이드 측의 모든 javascript를 수행하는 대신 Next.js가 미리 각 페이지에 대해 HTML을 생성한다는 것을 의미한다.
pre-rendering 은 SEO에 좋은 영향을 줄 수 있습니다.
간단히 pre-rendering을 확인 해 볼 수 있습니다. 브라우저 설정에서 javascript 사용 안하기를 한 후에 만든 페이지를 들어가보면 앱이 JavaScript 없이 렌더링되는 것을 볼 수 있습니다. 넥스트.js가 앱을 정적 HTML로 미리 렌더링해 자바스크립트를 실행하지 않고도 앱 UI를 볼 수 있기 때문입니다.
Note: 로컬 호스트에서도 위의 단계를 시도할 수 있지만 JavaScript를 사용 불가능으로 설정하면 CSS가 로드되지 않습니다.
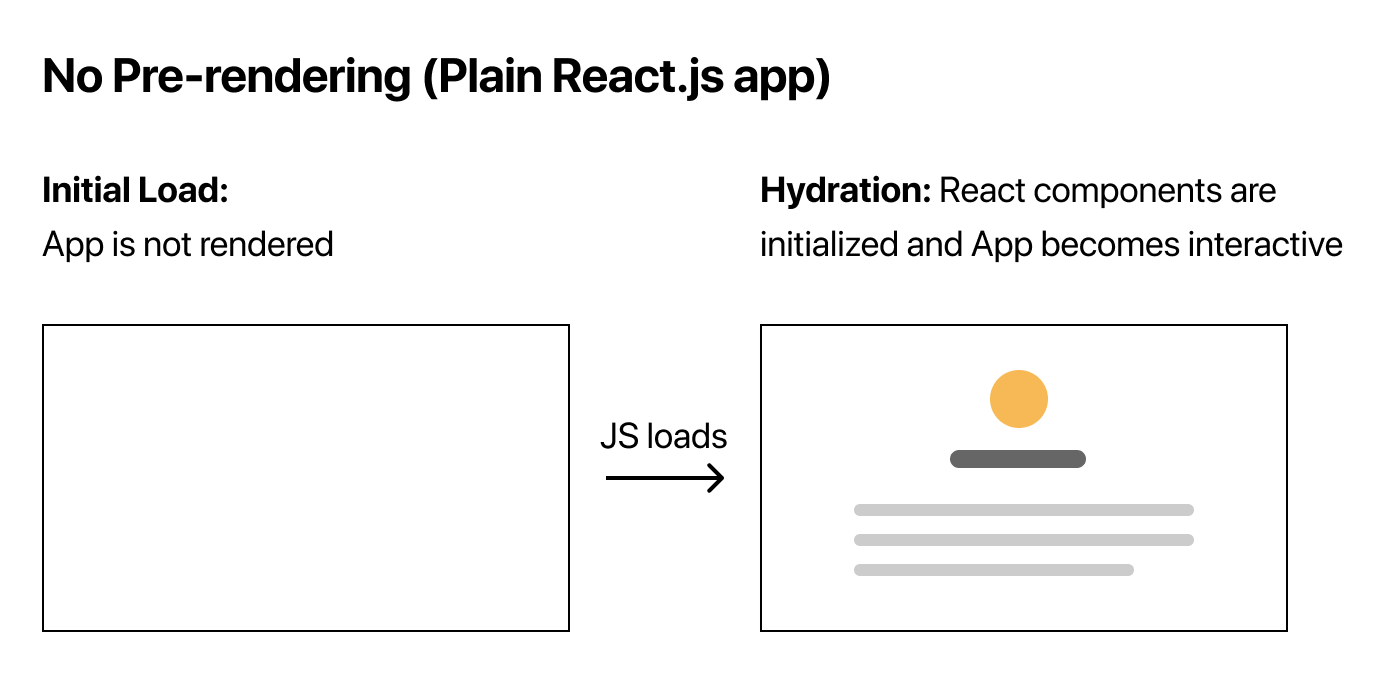
일반 React.js 를 사용하면 javascript없이 UI를 확인해 볼 수 없습니다.
이 그림을 통해 pre-rendering의 장점을 확실히 확인 할 수 있습니다.
Two Forms of Pre-rendering
Next.js에는 두 가지 형태의 Static Generation과 Server-side Rendering이 있습니다. 차이점은 페이지에 대한 HTML을 생성할 때입니다.
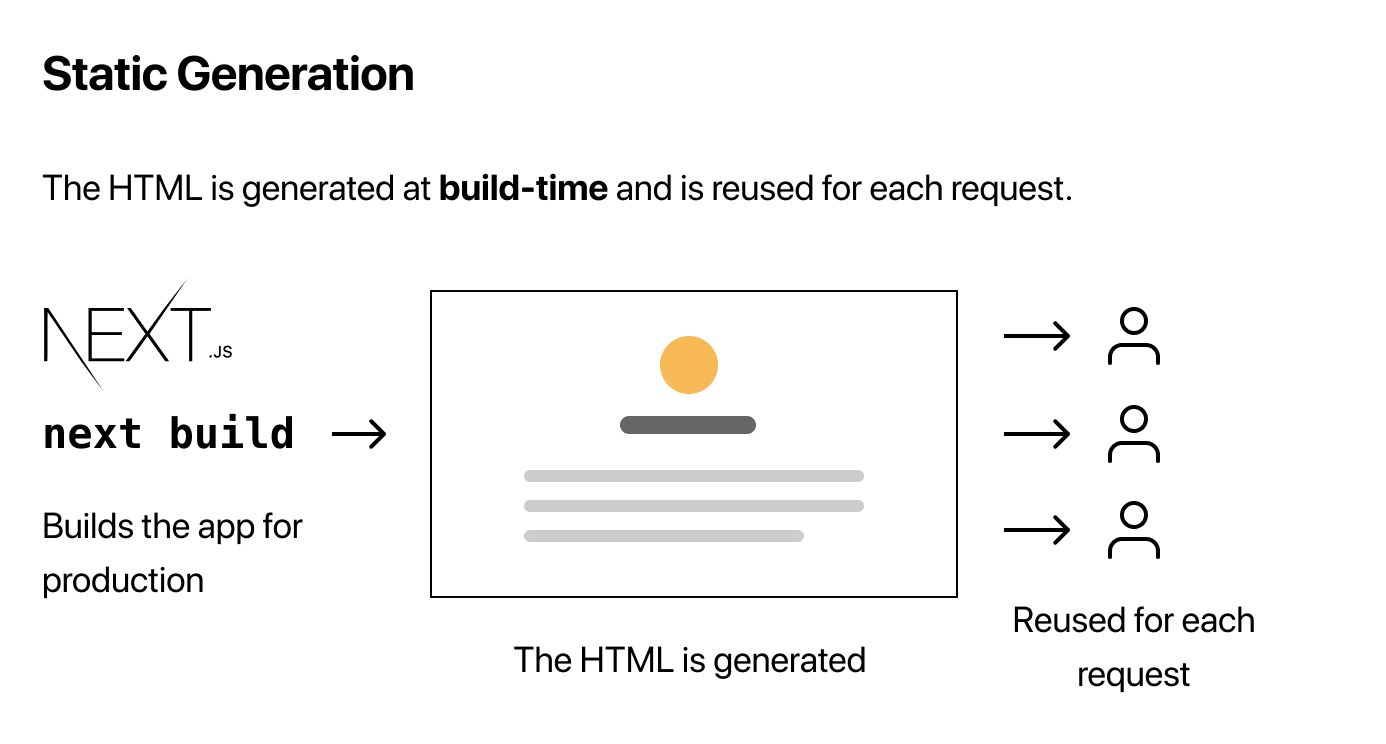
- Static Generation 은 build time에 HTML을 생성하는 Pre-rendering 방법입니다. 미리 렌더링된 HTML은 각 요청에 대해 재사용됩니다.
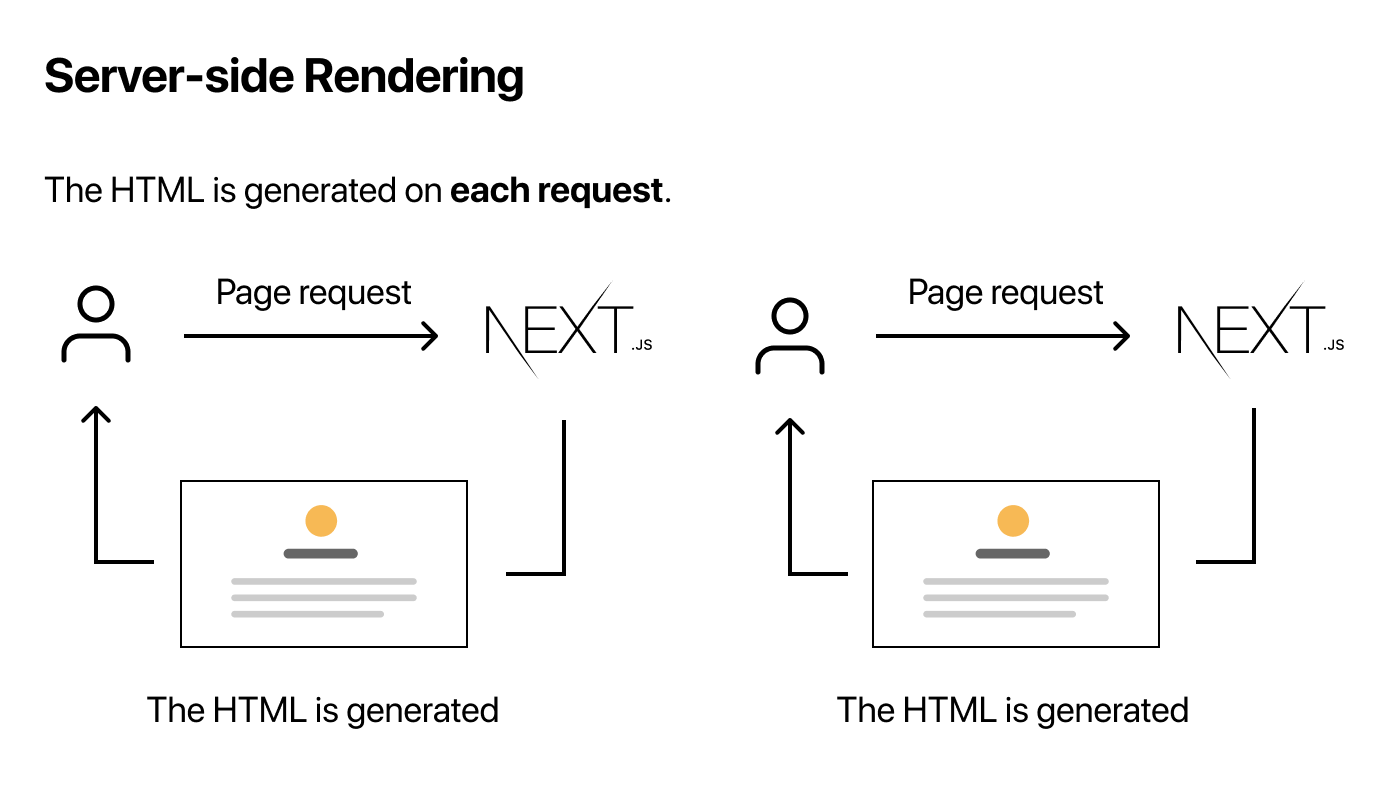
- Server-side Rendering은 각 요청에서 HTML을 생성하는 Pre-rendering 방법입니다.
개발 모드(npm run dev 또는 yarn dev를 실행할 때)에서는 Static Generation을 사용하는 페이지의 경우에도 각 요청에 대해 모든 페이지가 Server-side Rendering됩니다.
Next.js 는 Pre-rendering 방법을 여러가지 섞어서 하이브리드로 만들 수 있습니다.
언제 각 Pre-rendering을 사용해야 할까요 Static Generation vs Server-side Rendering
Next.js 는 Static Generation 을 추천합니다. 페이지를 한 번 빌드하고 CDN에서 제공 할 수 있기 때문에 서버가 모든 요청에 페이지를 렌더링하는 것보다 훨씬 빠릅니다.
이런 유형에서 static Generation 을 사용 할 수 있습니다.
- Marketing pages
- Blog posts
- E-commerce 상품 목록
- Help and documentation
사용자의 요청보다 먼저 페이지를 렌더 할 수 있으면 됩니다.
사용자의 요청보다 먼저 페이지를 렌더링할 수 없는 경우 Static Generation은 알맞지 않습니다. 페이지에 자주 업데이트되는 데이터가 표시되고 요청마다 페이지 내용이 변경될 수 있습니다. 그 경우에는 Server-side Rendering를 사용합시다.
Static Generation과 데이터
Static Generation는 데이터가 있어도 없어도 가능합니다.
지금까지 만든 모든 페이지는 외부 데이터를 가져올 필요가 없습니다. 이 페이지들은 앱이 제작될 때 정적으로 자동으로 생성됩니다.
하지만 데이터베이스에서 쿼리를 통해 데이터를 받아오거나 외부 API를 받아와 구성하는 경우에는 HTML을 렌더링 못할 수도 있습니다.
Next.js는 이러한 경우(Static Generation with data)를 지원합니다.
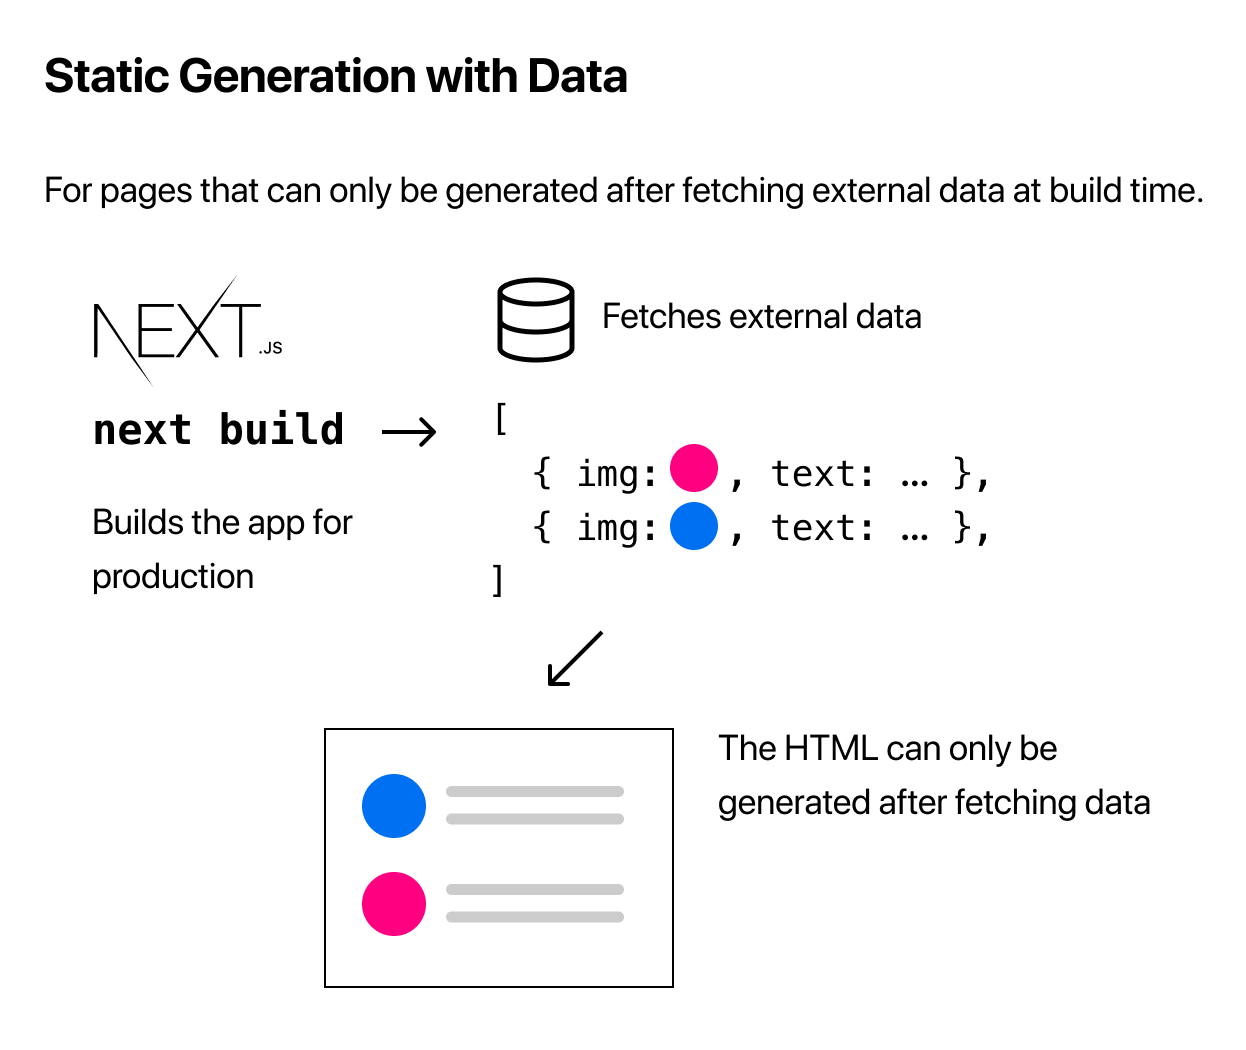
Static Generation with Data using getStaticProps
페이지 컴포넌트를 export 할 때 getStaticProps라는 비동기 함수(acync)를 내보낼 수도 있습니다.
- 프로덕트 빌드 타임 과정에서 동작합니다.
- function 내에서 외부 데이터를 가져와 페이지에 prop으로 보낼 수 있습니다.
export default function Home(props) { ... }

export async function getStaticProps() {
  // Get external data from the file system, API, DB, etc.
  const data = ...

  // The value of the `props` key will be
  //  passed to the `Home` component
  return {
    props: ...
  }
}
다음과 같이 사용 할 수 있습니다.
한번 Blog Data를 예제로 사용해 봅시다.
이제 파일 시스템을 사용하여 블로그 데이터를 앱에 추가합니다. 각 블로그 게시물은 .md file이 될 것입니다.
-
루트파일에
posts디렉토리를 만들고pre-rendering.md와ssg-ssr.md를 다음과 같이 작성해 보세요. -
pre-rendering.md
---
title: 'Two Forms of Pre-rendering'
date: '2020-01-01'
---

Next.js has two forms of pre-rendering: **Static Generation** and **Server-side Rendering**. The difference is in **when** it generates the HTML for a page.

- **Static Generation** is the pre-rendering method that generates the HTML at **build time**. The pre-rendered HTML is then _reused_ on each request.
- **Server-side Rendering** is the pre-rendering method that generates the HTML on **each request**.

Importantly, Next.js lets you **choose** which pre-rendering form to use for each page. You can create a "hybrid" Next.js app by using Static Generation for most pages and using Server-side Rendering for others.- ssg-ssr.md
---
title: 'When to Use Static Generation v.s. Server-side Rendering'
date: '2020-01-02'
---

We recommend using **Static Generation** (with and without data) whenever possible because your page can be built once and served by CDN, which makes it much faster than having a server render the page on every request.

You can use Static Generation for many types of pages, including:

- Marketing pages
- Blog posts
- E-commerce product listings
- Help and documentation

You should ask yourself: "Can I pre-render this page **ahead** of a user's request?" If the answer is yes, then you should choose Static Generation.

On the other hand, Static Generation is **not** a good idea if you cannot pre-render a page ahead of a user's request. Maybe your page shows frequently updated data, and the page content changes on every request.

In that case, you can use **Server-Side Rendering**. It will be slower, but the pre-rendered page will always be up-to-date. Or you can skip pre-rendering and use client-side JavaScript to populate data.
각 마크 다운 파일의 맨 위에 제목과 날짜가 포함 된 메타 데이터 섹션이 있음을 알았을 것입니다. 이를 YAML Front Matter라고 하는데, 이는 gray-matter라는 라이브러리를 사용하여 구문 분석할 수 있습니다.
Parsing the Blog Data on getStaticProps
우리가 작성한 데이터를 통해서 index.js 파일을 업데이트 해봅시다.
각 마크다운 파일을 구문 분석하여 title, date 및 file name을 가져옵니다(이 이름은 게시물 URL의 id로 사용됩니다).
이 데이터를 통한 pre-render를 하기위해 getStaticProps를 사용해 봅시다.
일단 md파일에서 데이터를 가져올 수 있는 패키지를 다음 명령어를 통해 설치해봅시다
npm install gray-matter그리고 파일시스템에서 간단하게 데이터를 가져올 수 있는 라이브러리를 만들어 봅시다.
- 루트 파일에서
lib디렉토리를 만든후posts.js를 만들어 보세요
import fs from 'fs'
import path from 'path'
import matter from 'gray-matter'

const postsDirectory = path.join(process.cwd(), 'posts')

export function getSortedPostsData() {
  // Get file names under /posts
  const fileNames = fs.readdirSync(postsDirectory)
  const allPostsData = fileNames.map(fileName => {
    // Remove ".md" from file name to get id
    const id = fileName.replace(/\.md$/, '')

    // Read markdown file as string
    const fullPath = path.join(postsDirectory, fileName)
    const fileContents = fs.readFileSync(fullPath, 'utf8')

    // Use gray-matter to parse the post metadata section
    const matterResult = matter(fileContents)

    // Combine the data with the id
    return {
      id,
      ...matterResult.data
    }
  })
  // Sort posts by date
  return allPostsData.sort(({ date: a }, { date: b }) => {
    if (a < b) {
      return 1
    } else if (a > b) {
      return -1
    } else {
      return 0
    }
  })
}
이제 getSortedPostsData를 import 해오고 page/index.js 에서 getStaticProps 내부에 호출해야 합니다.
index.js 코드에 다음 코드를 추가해 보세요
import { getSortedPostsData } from '../lib/posts'

export async function getStaticProps() {
  const allPostsData = getSortedPostsData()
  return {
    props: {
      allPostsData
    }
  }
}
getStaticProps의 props 객체 내부에 있는 allPostsData를 반환하면 블로그 게시물이 Home 구성 요소로 전달됩니다.
export default function Home ({ allPostsData }) { ... }다음과 같이 블로그 게시물에 대한 값들을 사용 할 수 있게 됩니다.
index.js 의 내용을 블로그 게시물을 볼 수 있도록 내용을 추가 해 봅시다
export default function Home({ allPostsData }) {
  return (
    <Layout home>
      {/* 기존 코드는 유지하세요 */}

      <section className={`${utilStyles.headingMd} ${utilStyles.padding1px}`}>
        <h2 className={utilStyles.headingLg}>Blog</h2>
        <ul className={utilStyles.list}>
          {allPostsData.map(({ id, date, title }) => (
            <li className={utilStyles.listItem} key={id}>
              {title}
              <br />
              {id}
              <br />
              {date}
            </li>
          ))}
        </ul>
      </section>
    </Layout>
  )
}
페이지를 확인해 보면
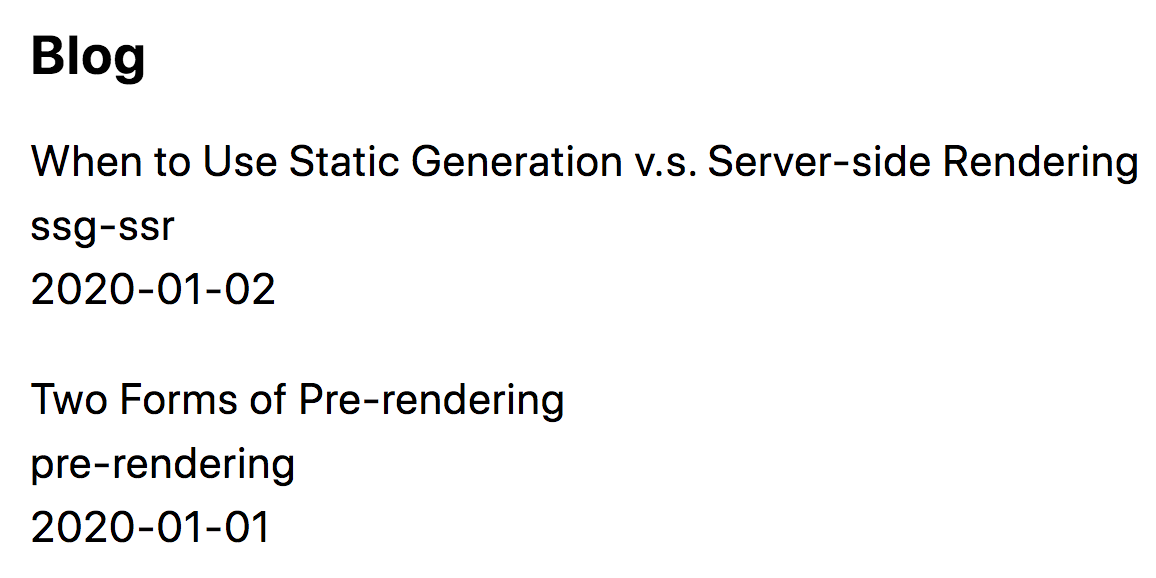
다음과 같이 우리가 작성한 게시물이 표시되어 있는 것을 확인 할 수 있습니다.
getStaticProps Details
getStaticProps를 사용할 때 꼭 알아야 할 정보들이 있습니다.
Fetch External API or Query Database
lib/posts.js에서는 파일 시스템에서 데이터를 가져오는 getSortedPostsData를 구현했습니다. 그러나 외부 API 같은 다른 소스에서 데이터를 가져올 수 있으며, 이 작업은 정상적으로 작동합니다.
export async function getSortedPostsData() {
  // Instead of the file system,
  // fetch post data from an external API endpoint
  const res = await fetch('..')
  return res.json()
}
또한 데이터베이스를 직접 쿼리할 수도 있습니다
import someDatabaseSDK from 'someDatabaseSDK'

const databaseClient = someDatabaseSDK.createClient(...)

export async function getSortedPostsData() {
  // Instead of the file system,
  // fetch post data from a database
  return databaseClient.query('SELECT posts...')
}
Only Allowed in a Page
page 디렉토리에서만 export 가능합니다.
